tailgate MERCEDES-BENZ R-Class 2012 W251 User Guide
[x] Cancel search | Manufacturer: MERCEDES-BENZ, Model Year: 2012, Model line: R-Class, Model: MERCEDES-BENZ R-Class 2012 W251Pages: 368, PDF Size: 15.19 MB
Page 86 of 368
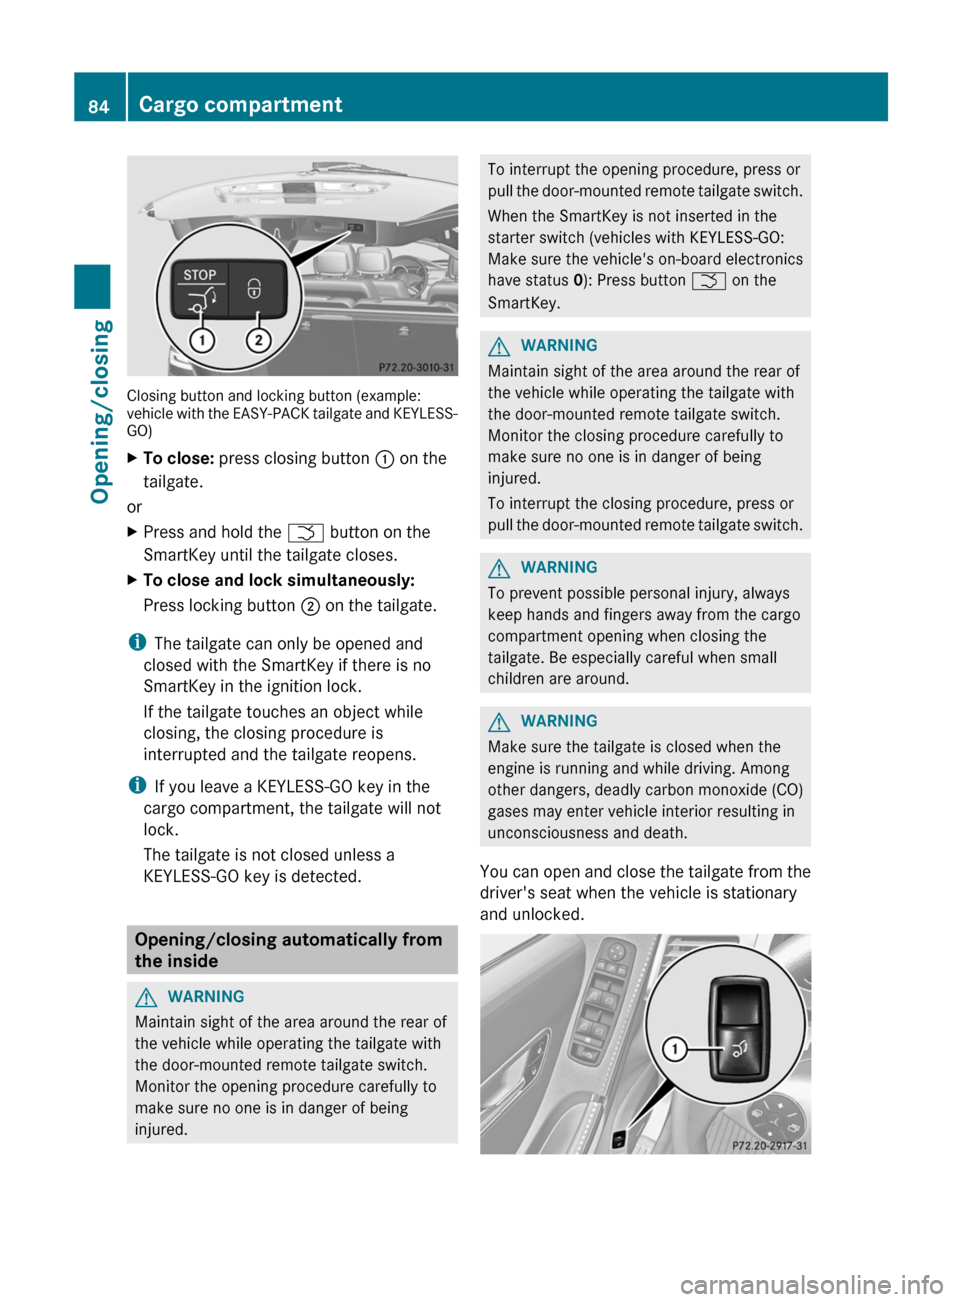
Closing button and locking button (example:
vehicle with the EASY-PACK tailgate and KEYLESS-
GO)
XTo close: press closing button : on the
tailgate.
or
XPress and hold the F button on the
SmartKey until the tailgate closes.XTo close and lock simultaneously:
Press locking button ; on the tailgate.
i
The tailgate can only be opened and
closed with the SmartKey if there is no
SmartKey in the ignition lock.
If the tailgate touches an object while
closing, the closing procedure is
interrupted and the tailgate reopens.
i If you leave a KEYLESS-GO key in the
cargo compartment, the tailgate will not
lock.
The tailgate is not closed unless a
KEYLESS-GO key is detected.
Opening/closing automatically from
the inside
GWARNING
Maintain sight of the area around the rear of
the vehicle while operating the tailgate with
the door-mounted remote tailgate switch.
Monitor the opening procedure carefully to
make sure no one is in danger of being
injured.
To interrupt the opening procedure, press or
pull the door-mounted remote tailgate switch.
When the SmartKey is not inserted in the
starter switch (vehicles with KEYLESS-GO:
Make sure the vehicle's on-board electronics
have status 0): Press button F on the
SmartKey.GWARNING
Maintain sight of the area around the rear of
the vehicle while operating the tailgate with
the door-mounted remote tailgate switch.
Monitor the closing procedure carefully to
make sure no one is in danger of being
injured.
To interrupt the closing procedure, press or
pull the door-mounted remote tailgate switch.
GWARNING
To prevent possible personal injury, always
keep hands and fingers away from the cargo
compartment opening when closing the
tailgate. Be especially careful when small
children are around.
GWARNING
Make sure the tailgate is closed when the
engine is running and while driving. Among
other dangers, deadly carbon monoxide (CO)
gases may enter vehicle interior resulting in
unconsciousness and death.
You can open and close the tailgate from the
driver's seat when the vehicle is stationary
and unlocked.
84Cargo compartmentOpening/closing
Page 87 of 368

XTo open: pull remote operating switch :
for the tailgate until the tailgate opens.XTo close: turn the SmartKey to position 1
or 2 in the ignition lock.XPress remote operating switch for
tailgate : until the tailgate is closed.
If the tailgate comes into contact with an
object, the closing procedure is interrupted
and the tailgate reopens.
XTo interrupt the closing procedure: push
or pull remote operating switch for the
tailgate :.
Opening the tailgate from inside the
vehicle
GWARNING
Do not leave children unattended in the
vehicle. Children could open the tailgate from
the inside, which could result in an accident
and/or serious personal injury.
! Always make sure there is sufficient
space when opening.
You can unlock and open the tailgate from
inside the vehicle.
The handle is on the lower part of the tailgate
window on the right-hand side when viewed
in the direction of travel.
XPress handle : in the direction of
arrow ; as far as it will go and hold it there.XFrom this position, pull handle : in the
direction of arrow = as far as it will go and
hold it there.XSwing the tailgate upwards.
i Vehicles with the EASY-PACK tailgate:
If you do not open the tailgate after
unlocking, it will lock again automatically
after a few seconds.
Limiting the opening angle of the
tailgate
Important safety notes
You can limit the opening angle of the tailgate
in the top half of its opening range. This could
be useful, for example, if there is insufficient
space above the tailgate.
! Make sure there is sufficient clearance to
open the tailgate fully when setting the
opening angle. The tailgate could otherwise
be damaged. Ideally, set the opening angle
outside.
Activating
XTo open the tailgate: pull the handle on
the tailgate.XTo stop the opening procedure at the
desired position: press the closing button
( Y page 83) in the tailgate or pull the handle
on the outside of the tailgate again.XTo store the position: press and hold the
closing button in the tailgate until you hear
a short tone.
The opening angle limiter is activated. The
tailgate will now stop in the stored position
when opening.Cargo compartment85Opening/closingZ
Page 88 of 368
DeactivatingXPress and hold the closing button
( Y page 83) in the tailgate until you hear
two short tones.
Side windows
Important safety notes
GWARNING
When opening or closing the windows, make
sure there is no danger of anyone being
harmed by the opening/closing procedure.
The door windows are equipped with the
express operation and automatic reversal
function. If in express operation mode a door
window encounters an obstruction that
blocks its path, the automatic reversal
function will stop the door window and open
it slightly.
The door windows operate differently when
the switch is pulled and held. See the "Closing
when a door window is blocked" section in
this chapter for details.
The closing of a door window can be
immediately halted by releasing the switch or,
if the switch was pulled past the resistance
point and released, by either pressing or
pulling the respective switch.
The closing of the hinged quarter windows can
be immediately halted by pressing or pulling
the switch.
If a window encounters an obstruction that
blocks its path in a circumstance where you
are closing the windows by pressing and
holding button & on the SmartKey or by
pressing and holding the lock button (vehicles
with KEYLESS-GO) on an outside door handle,
the automatic reversal function will not
operate.
Activate the override switch when children
are riding in the back seats of the vehicle. The
children may otherwise injure themselves,
e.g. by becoming trapped in the window
opening.
GWARNING
Do not keep any part of your body up against
the window pane when opening a window. The
downward motion of the pane may pull that
part of your body down between the window
pane and the door frame and trap it there. If
there is a risk of entrapment, release the
switch and pull it to close the window.
Opening and closing the side
windows
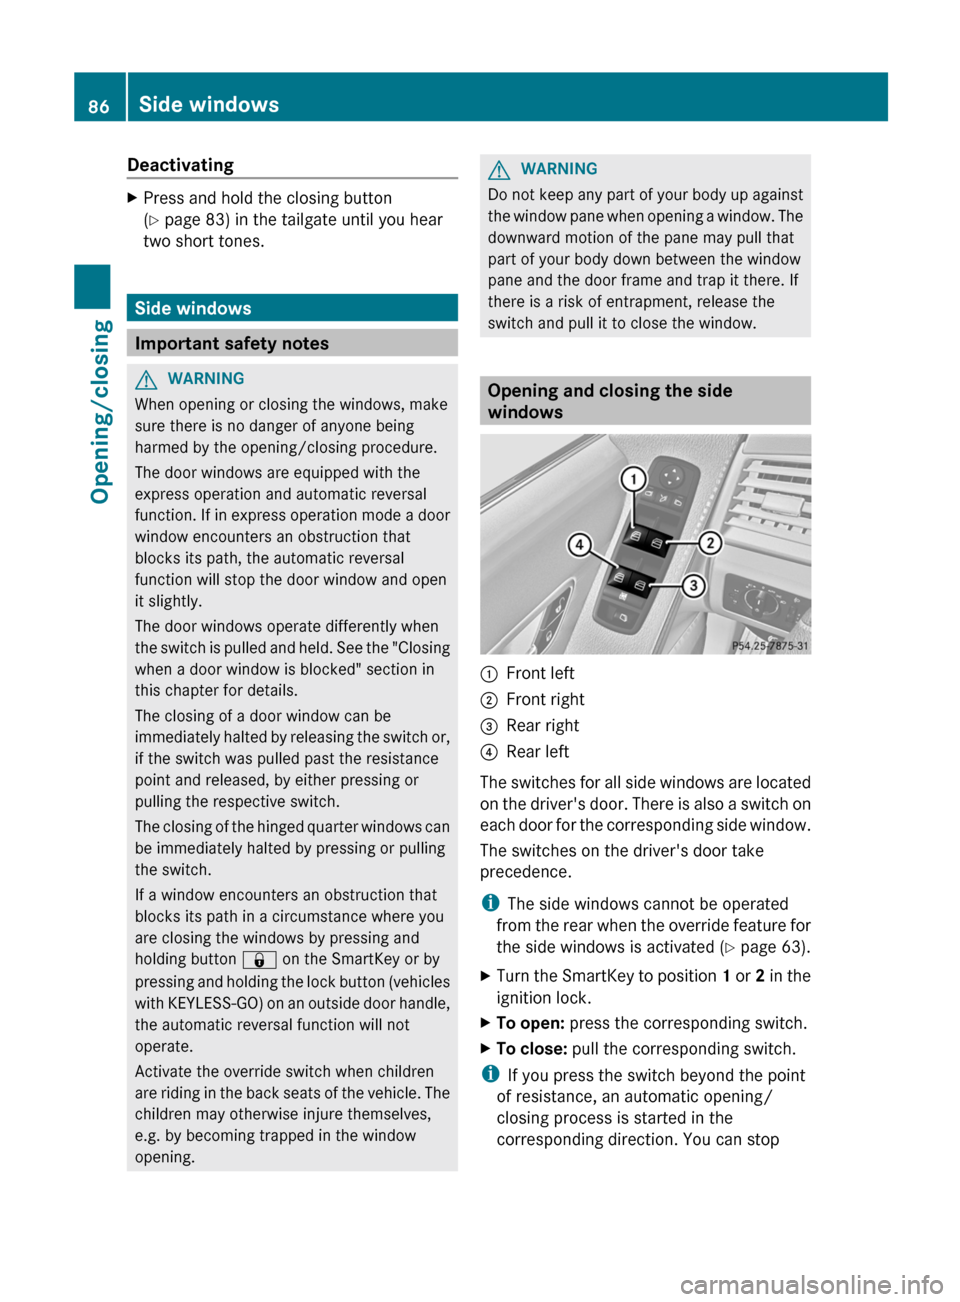
:Front left;Front right=Rear right?Rear left
The switches for all side windows are located
on the driver's door. There is also a switch on
each door for the corresponding side window.
The switches on the driver's door take
precedence.
i The side windows cannot be operated
from the rear when the override feature for
the side windows is activated ( Y page 63).
XTurn the SmartKey to position 1 or 2 in the
ignition lock.XTo open: press the corresponding switch.XTo close: pull the corresponding switch.
i
If you press the switch beyond the point
of resistance, an automatic opening/
closing process is started in the
corresponding direction. You can stop
86Side windowsOpening/closing
Page 126 of 368
:Backup lampXTurn the bulb holder counter-clockwise and
remove it.XRemove the bulb from the bulb holder.XInsert the new bulb into the bulb holder.XInsert the bulb holder and turn it clockwise.XClose the side trim panel ( Y page 123).
License plate lamps
XSwitch off the lights.XOpen the tailgate.XRemove screws :.XRemove the license plate lamp.XReplace the bulb.XInsert the license plate lamp.XReplace and tighten screws :.Windshield wipers
Switching the windshield wipers on/
off
GWARNING
Wiper blades are components that are subject
to wear and tear. Replace the wiper blades
twice a year, preferably in the spring and fall.
Otherwise the windows will not be wiped
properly. As a result, you may not be able to
observe surrounding traffic conditions and
could cause an accident.
! Do not operate the windshield wipers
when the windshield is dry, as this could
damage the wiper blades. Moreover, dust
that has collected on the windshield can
scratch the glass if wiping takes place when
the windshield is dry.
! If the windshield wipers leave smears on
the windshield after the vehicle has been
washed in an automatic car wash, wax or
other residues may be the reason for this.
Clean the windshield using washer fluid
after washing the vehicle in an automatic
car wash.
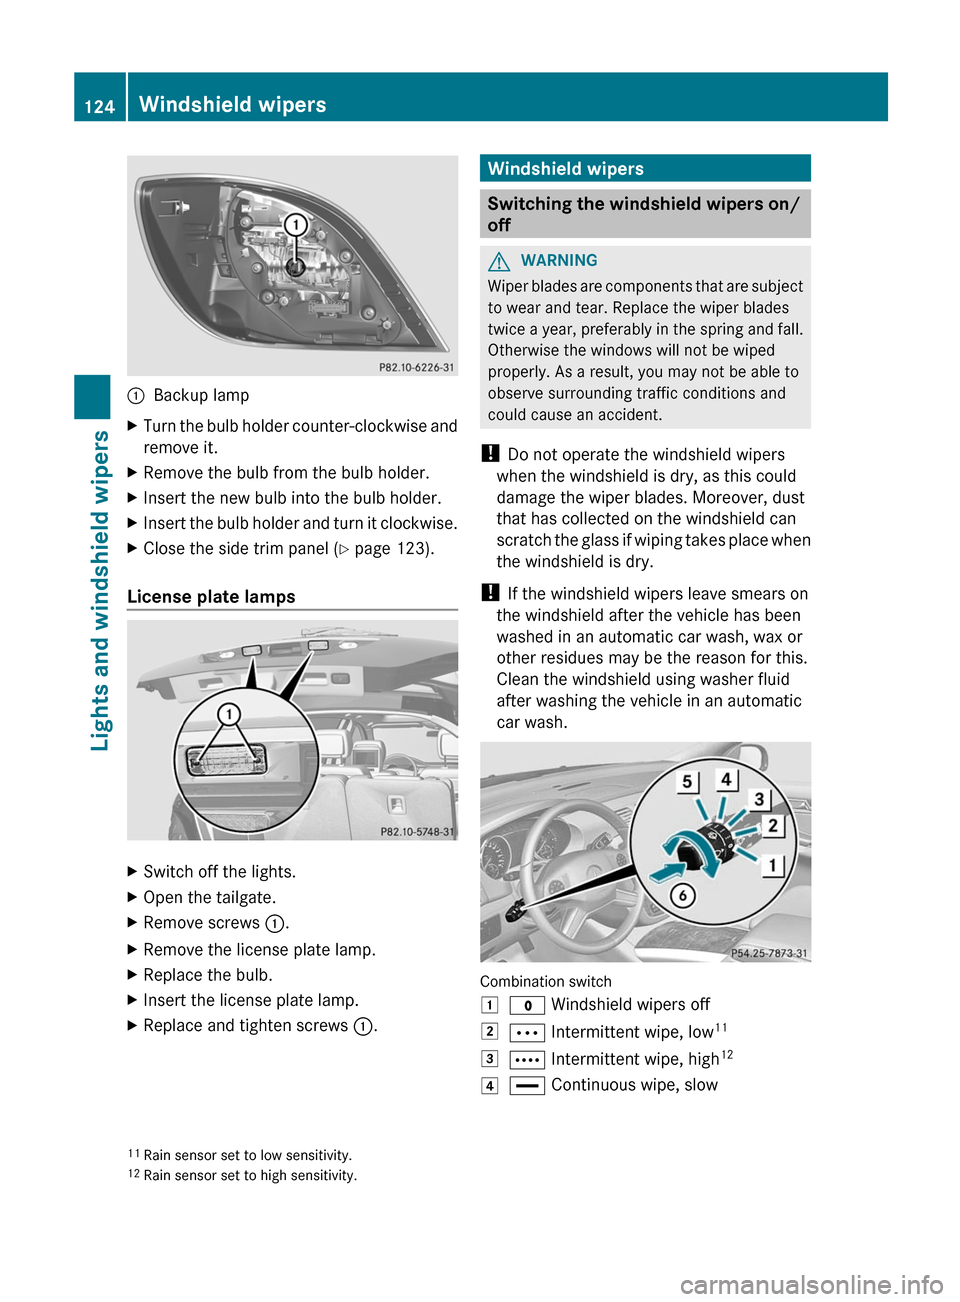
Combination switch
1$ Windshield wipers off2Ä Intermittent wipe, low 113Å
Intermittent wipe, high 124°
Continuous wipe, slow11
Rain sensor set to low sensitivity.
12 Rain sensor set to high sensitivity.124Windshield wipersLights and windshield wipers
Page 161 of 368
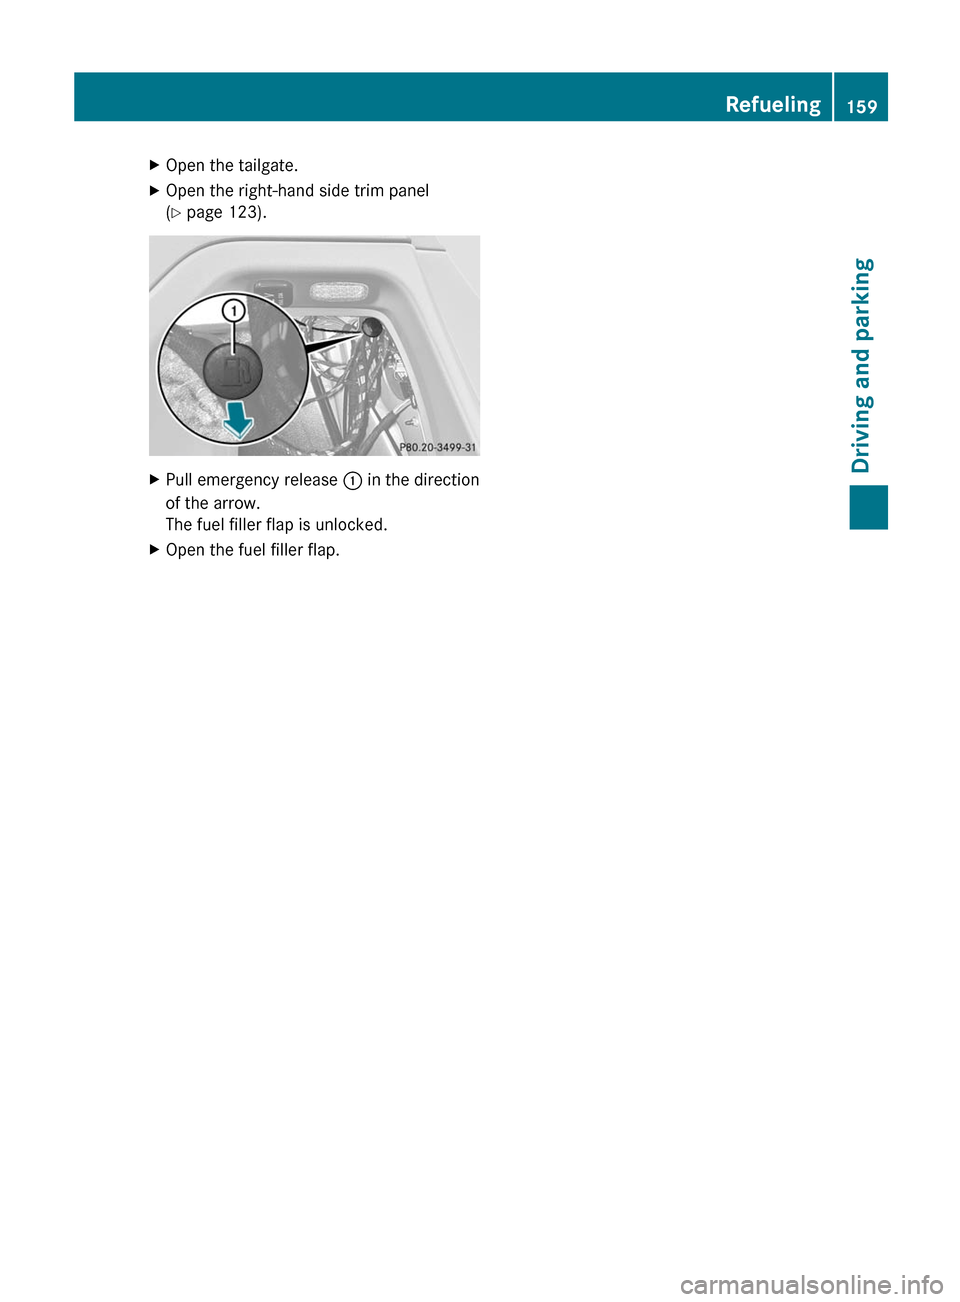
XOpen the tailgate.XOpen the right-hand side trim panel
( Y page 123).XPull emergency release : in the direction
of the arrow.
The fuel filler flap is unlocked.XOpen the fuel filler flap.Refueling159Driving and parkingZ
Page 162 of 368
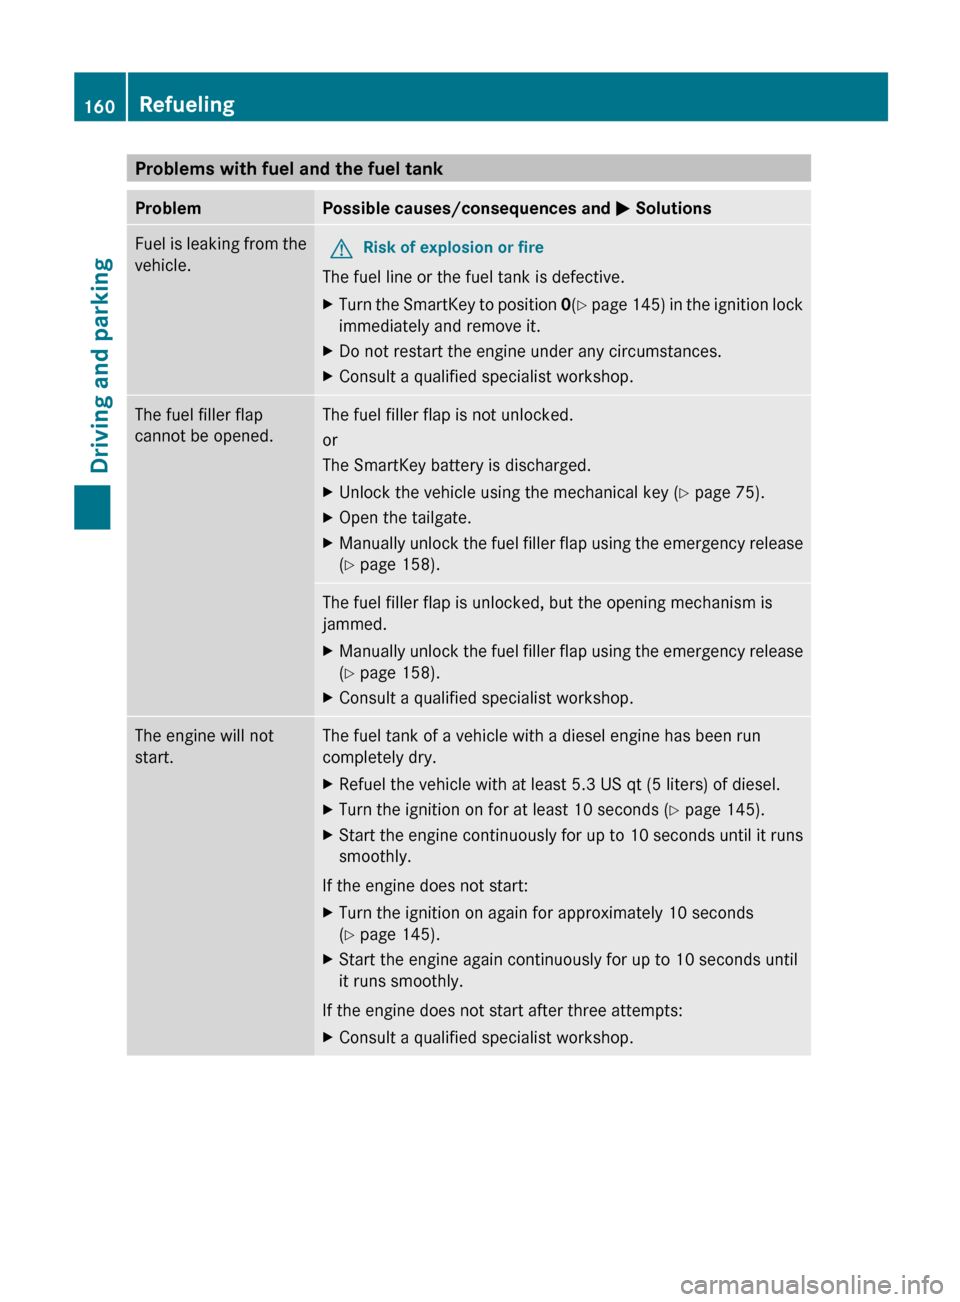
Problems with fuel and the fuel tankProblemPossible causes/consequences and M SolutionsFuel is leaking from the
vehicle.GRisk of explosion or fire
The fuel line or the fuel tank is defective.
XTurn the SmartKey to position 0(Y page 145) in the ignition lock
immediately and remove it.XDo not restart the engine under any circumstances.XConsult a qualified specialist workshop.The fuel filler flap
cannot be opened.The fuel filler flap is not unlocked.
or
The SmartKey battery is discharged.XUnlock the vehicle using the mechanical key ( Y page 75).XOpen the tailgate.XManually unlock the fuel filler flap using the emergency release
( Y page 158).The fuel filler flap is unlocked, but the opening mechanism is
jammed.XManually unlock the fuel filler flap using the emergency release
( Y page 158).XConsult a qualified specialist workshop.The engine will not
start.The fuel tank of a vehicle with a diesel engine has been run
completely dry.XRefuel the vehicle with at least 5.3 US qt (5 liters) of diesel.XTurn the ignition on for at least 10 seconds ( Y page 145).XStart the engine continuously for up to 10 seconds until it runs
smoothly.
If the engine does not start:
XTurn the ignition on again for approximately 10 seconds
( Y page 145).XStart the engine again continuously for up to 10 seconds until
it runs smoothly.
If the engine does not start after three attempts:
XConsult a qualified specialist workshop.160RefuelingDriving and parking
Page 164 of 368
use a sponge and cold water to clean it. DEF
residues crystallize after time and
contaminate the affected surfaces.
! DEF is not a fuel additive and must not be
added to the fuel tank. If DEF is added to
the fuel tank, this can lead to engine
damage.
i If you are adding between maintenance
intervals, add approximately 1 gallon (3.8 l)
of DEF to the DEF tank. One gallon (3.8 l)
of DEF is approximately 2 DEF refill bottles.
For further information on DEF, see:
( Y page 357).
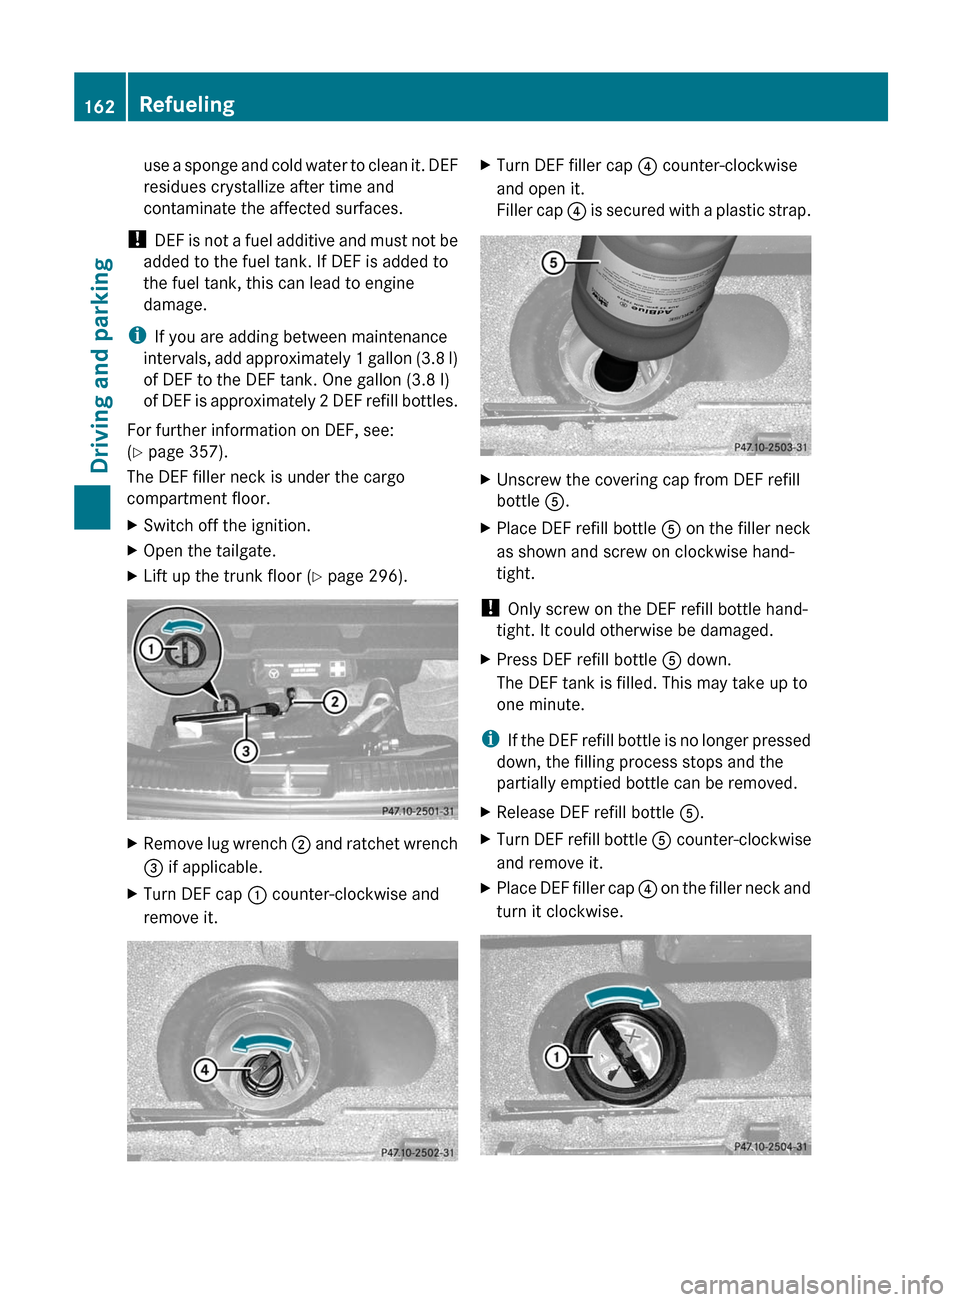
The DEF filler neck is under the cargo
compartment floor.XSwitch off the ignition.XOpen the tailgate.XLift up the trunk floor ( Y page 296).XRemove lug wrench ; and ratchet wrench
= if applicable.XTurn DEF cap : counter-clockwise and
remove it.XTurn DEF filler cap ? counter-clockwise
and open it.
Filler cap ? is secured with a plastic strap.XUnscrew the covering cap from DEF refill
bottle A.XPlace DEF refill bottle A on the filler neck
as shown and screw on clockwise hand-
tight.
! Only screw on the DEF refill bottle hand-
tight. It could otherwise be damaged.
XPress DEF refill bottle A down.
The DEF tank is filled. This may take up to
one minute.
i If the DEF refill bottle is no longer pressed
down, the filling process stops and the
partially emptied bottle can be removed.
XRelease DEF refill bottle A.XTurn DEF refill bottle A counter-clockwise
and remove it.XPlace DEF filler cap ? on the filler neck and
turn it clockwise.162RefuelingDriving and parking
Page 165 of 368
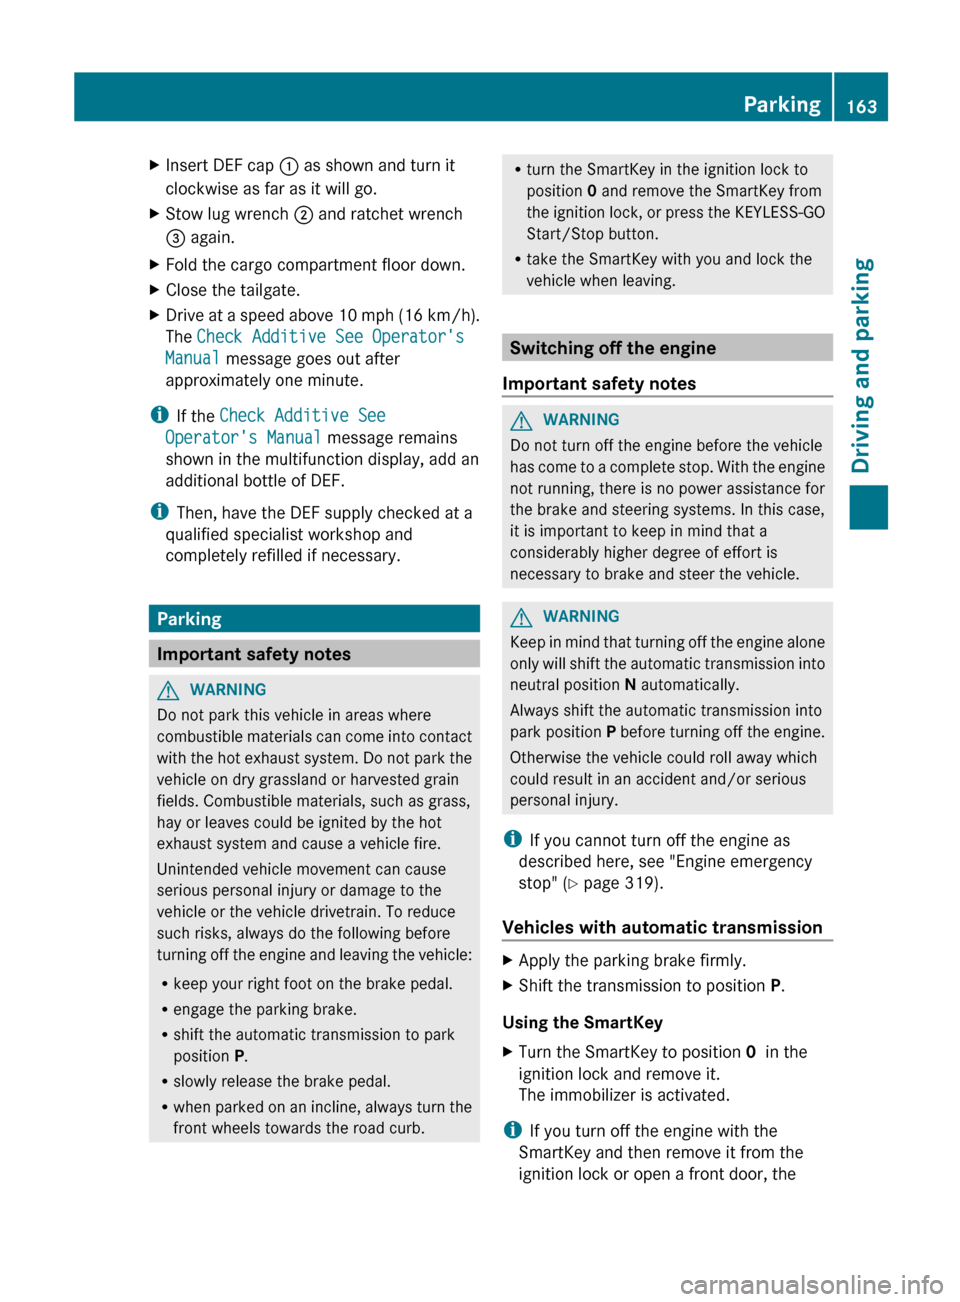
XInsert DEF cap : as shown and turn it
clockwise as far as it will go.XStow lug wrench ; and ratchet wrench
= again.XFold the cargo compartment floor down.XClose the tailgate.XDrive at a speed above 10 mph (16 km/h).
The Check Additive See Operator's
Manual message goes out after
approximately one minute.
i If the Check Additive See
Operator's Manual message remains
shown in the multifunction display, add an
additional bottle of DEF.
i Then, have the DEF supply checked at a
qualified specialist workshop and
completely refilled if necessary.
Parking
Important safety notes
GWARNING
Do not park this vehicle in areas where
combustible materials can come into contact
with the hot exhaust system. Do not park the
vehicle on dry grassland or harvested grain
fields. Combustible materials, such as grass,
hay or leaves could be ignited by the hot
exhaust system and cause a vehicle fire.
Unintended vehicle movement can cause
serious personal injury or damage to the
vehicle or the vehicle drivetrain. To reduce
such risks, always do the following before
turning off the engine and leaving the vehicle:
R keep your right foot on the brake pedal.
R engage the parking brake.
R shift the automatic transmission to park
position P.
R slowly release the brake pedal.
R when parked on an incline, always turn the
front wheels towards the road curb.
R turn the SmartKey in the ignition lock to
position 0 and remove the SmartKey from
the ignition lock, or press the KEYLESS-GO
Start/Stop button.
R take the SmartKey with you and lock the
vehicle when leaving.
Switching off the engine
Important safety notes
GWARNING
Do not turn off the engine before the vehicle
has come to a complete stop. With the engine
not running, there is no power assistance for
the brake and steering systems. In this case,
it is important to keep in mind that a
considerably higher degree of effort is
necessary to brake and steer the vehicle.
GWARNING
Keep in mind that turning off the engine alone
only will shift the automatic transmission into
neutral position N automatically.
Always shift the automatic transmission into
park position P before turning off the engine.
Otherwise the vehicle could roll away which
could result in an accident and/or serious
personal injury.
i If you cannot turn off the engine as
described here, see "Engine emergency
stop" ( Y page 319).
Vehicles with automatic transmission
XApply the parking brake firmly.XShift the transmission to position P.
Using the SmartKey
XTurn the SmartKey to position 0 in the
ignition lock and remove it.
The immobilizer is activated.
i If you turn off the engine with the
SmartKey and then remove it from the
ignition lock or open a front door, the
Parking163Driving and parkingZ
Page 183 of 368
ADS (Adaptive Damping System)
ADS is continuously electronically-controlled.
It adapts the damping characteristics to suit
the current operating conditions. The
damping is controlled for each wheel
individually. This improves driving safety and
tire comfort.
This depends on:
R your driving style
R the road surface conditions
R the ADS setting
R the vehicle level setting
Your selection remains stored even if you
remove the SmartKey from the ignition lock.
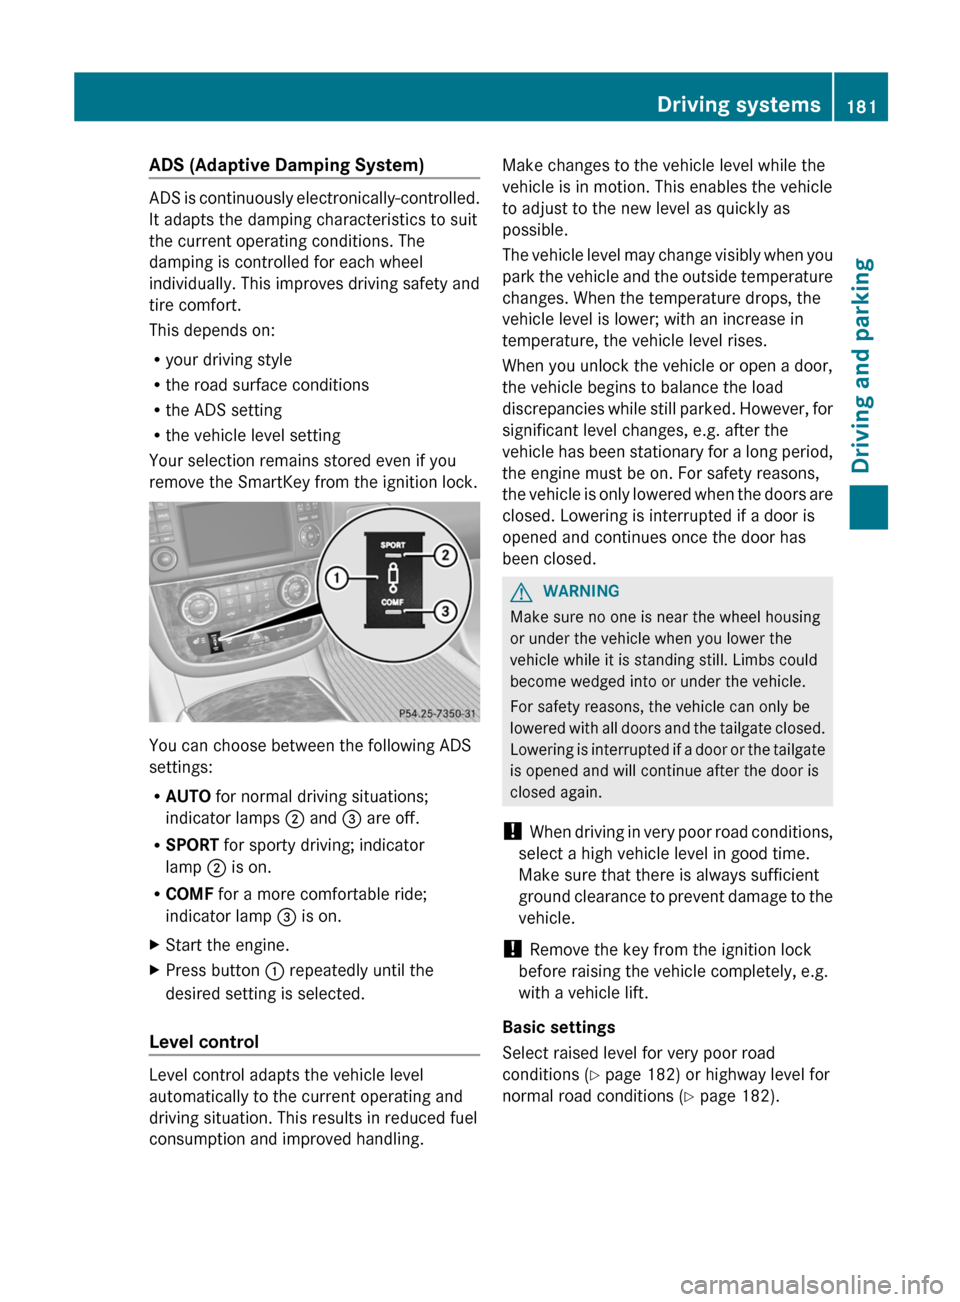
You can choose between the following ADS
settings:
R AUTO for normal driving situations;
indicator lamps ; and = are off.
R SPORT for sporty driving; indicator
lamp ; is on.
R COMF for a more comfortable ride;
indicator lamp = is on.
XStart the engine.XPress button : repeatedly until the
desired setting is selected.
Level control
Level control adapts the vehicle level
automatically to the current operating and
driving situation. This results in reduced fuel
consumption and improved handling.
Make changes to the vehicle level while the
vehicle is in motion. This enables the vehicle
to adjust to the new level as quickly as
possible.
The vehicle level may change visibly when you
park the vehicle and the outside temperature
changes. When the temperature drops, the
vehicle level is lower; with an increase in
temperature, the vehicle level rises.
When you unlock the vehicle or open a door,
the vehicle begins to balance the load
discrepancies while still parked. However, for
significant level changes, e.g. after the
vehicle has been stationary for a long period,
the engine must be on. For safety reasons,
the vehicle is only lowered when the doors are
closed. Lowering is interrupted if a door is
opened and continues once the door has
been closed.GWARNING
Make sure no one is near the wheel housing
or under the vehicle when you lower the
vehicle while it is standing still. Limbs could
become wedged into or under the vehicle.
For safety reasons, the vehicle can only be
lowered with all doors and the tailgate closed.
Lowering is interrupted if a door or the tailgate
is opened and will continue after the door is
closed again.
! When driving in very poor road conditions,
select a high vehicle level in good time.
Make sure that there is always sufficient
ground clearance to prevent damage to the
vehicle.
! Remove the key from the ignition lock
before raising the vehicle completely, e.g.
with a vehicle lift.
Basic settings
Select raised level for very poor road
conditions ( Y page 182) or highway level for
normal road conditions ( Y page 182).
Driving systems181Driving and parkingZ
Page 189 of 368
Problems with PARKTRONICProblemPossible causes/consequences and M SolutionsOnly the red segments
in the PARKTRONIC
warning displays are lit.
You also hear a warning
tone for approximately
two seconds.
PARKTRONIC is
deactivated after
approximately
20 seconds, and the
indicator lamp in the
PARKTRONIC button
lights up.PARKTRONIC has malfunctioned and has switched off.XIf problems persist, have PARKTRONIC checked at a qualified
specialist workshop.Only the red segments
in the PARKTRONIC
warning displays are lit.
PARKTRONIC is
deactivated after
approximately 20
seconds.The PARKTRONIC sensors are dirty or there is interference.XClean the PARKTRONIC sensors ( Y page 291).XSwitch the ignition back on.The problem may be caused by an external source of radio or
ultrasound waves.XSee if PARKTRONIC functions in a different location.Rear view camera
Important safety notes
The rear view camera is an optical parking aid.
It shows the area behind your vehicle in the
COMAND display.
GWARNING
Make sure that no persons or animals are in
the maneuvering range. Otherwise, they
could be injured.
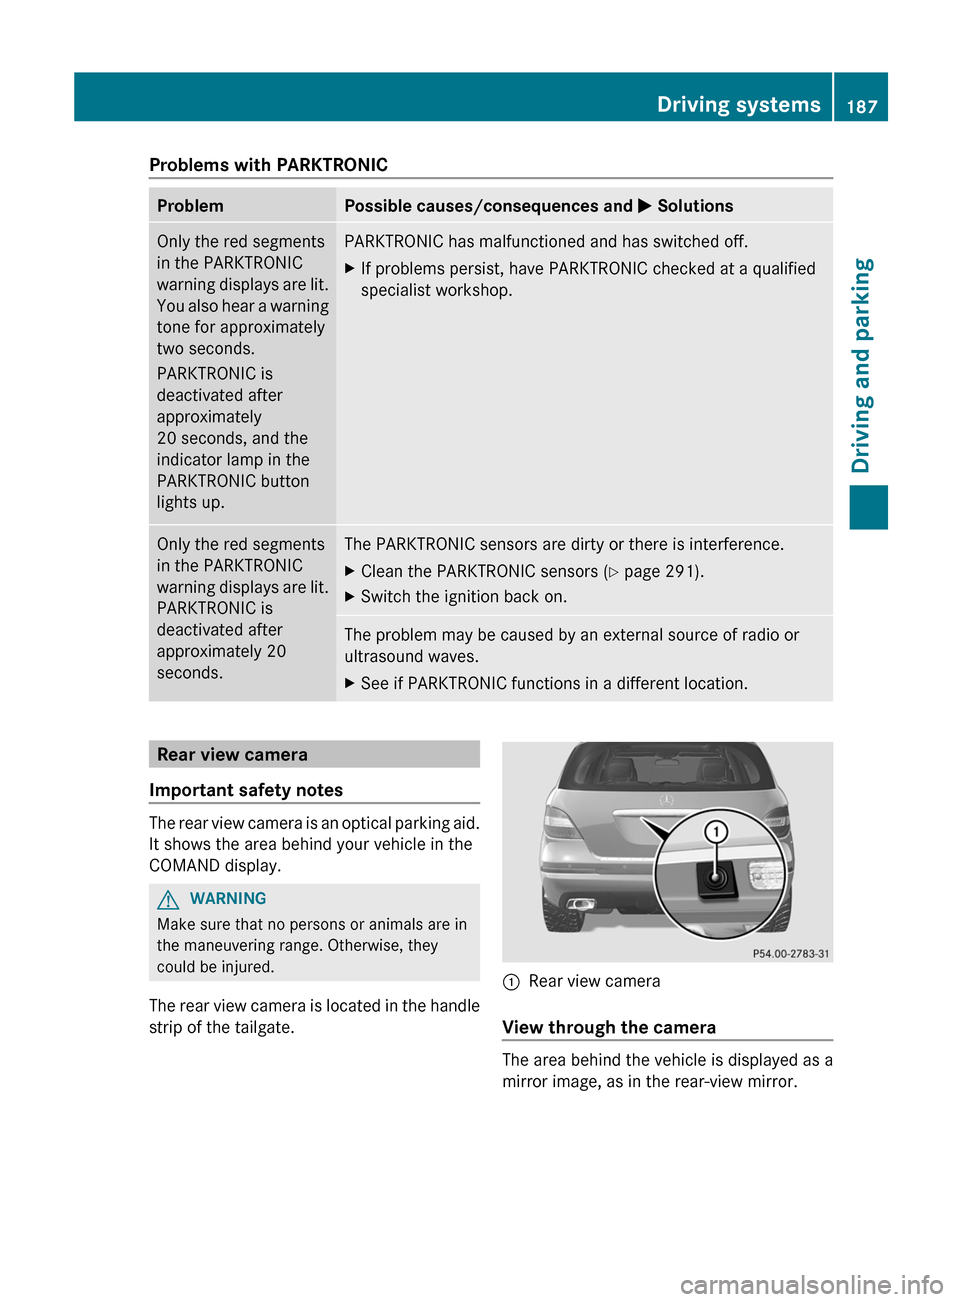
The rear view camera is located in the handle
strip of the tailgate.
:Rear view camera
View through the camera
The area behind the vehicle is displayed as a
mirror image, as in the rear-view mirror.
Driving systems187Driving and parkingZ