Airmatic MERCEDES-BENZ R-Class 2012 W251 Owner's Manual
[x] Cancel search | Manufacturer: MERCEDES-BENZ, Model Year: 2012, Model line: R-Class, Model: MERCEDES-BENZ R-Class 2012 W251Pages: 368, PDF Size: 15.19 MB
Page 6 of 368
1, 2, 3 ...
115 V socket ...................................... 268
12 V socket see Sockets
4ETS (Electronic Traction System) .... 66
A
ABS (Anti-lock Braking System) Display message ............................ 214
Function/notes ................................ 65
Important safety notes ....................65
Warning lamp ................................. 240
Activating/deactivating cooling
with air dehumidification ................. 135
Active service system PLUS see ASSYST PLUS service interval
display
Adaptive Damping System (ADS) ..... 181
Additives (engine oil) ........................ 358
Adjusting the armrest (2nd row of
seats) .................................................. 102
ADS (Adaptive Damping System) ..... 181
Air bags Display message ............................ 220
Front air bag (driver, front
passenger) ....................................... 42
Important safety notes ....................40
Safety guidelines ............................. 39
Side impact air bag ..........................42
Window curtain air bag ....................43
Air-conditioning system
see Climate control
Air filter (display message) .............. 228
AIRMATIC (display message) ............ 229
AIRMATIC package ............................ 180
Air pressure see Tire pressure
Air vents
Important safety notes ..................141
Rear ............................................... 142
Setting ........................................... 141
Setting the center air vents ...........141
Setting the side air vents ...............141
Alarm system
see ATA (Anti-Theft Alarm system)
Anti-lock Braking System
see ABS (Anti-lock Braking System)
Anti-Theft Alarm system
see ATA (Anti-Theft Alarm system)
Anti-theft system
ATA (Anti-Theft Alarm system) .........69
Ashtray ............................................... 265
ASSYST PLUS see ASSYST PLUS service interval
display
ATA (Anti-Theft Alarm system)
Activating/deactivating ...................69
Function ........................................... 69
Switching off the alarm ....................69
Audio menu (on-board computer) .... 203
Audio system see separate operating instructions
Authorized Mercedes-Benz Center
see Qualified specialist workshop
AUTO lights
Display message ............................ 225
see Lights
Automatic headlamp mode .............. 115
Automatic transmission Automatic drive program ...............154
Changing gear ............................... 152
DIRECT SELECT lever .....................150
Display message ............................ 234
Driving tips .................................... 153
Emergency running mode ..............156
Kickdown ....................................... 153
Problem (malfunction) ...................156
Program selector button ................153
Pulling away ................................... 147
Shift ranges ................................... 154
Starting the engine ........................146
Steering wheel paddle shifters ......153
Trailer towing ................................. 153
Transmission position display ........151
Transmission positions ..................152
Automatic transmission
emergency mode ............................... 1564Index
Page 14 of 368
Setting for driving abroad
(symmetrical) ................................. 114
Switching on/off ........................... 115
Luggage net ....................................... 251
Lumbar support Adjusting the 4-way lumbar
support .......................................... 105
Luxury head restraints ....................... 99
M
M+S tires ................................... 169, 324
Maintenance see ASSYST PLUS service interval
display
Malfunction message
see Display messages
Malfunctions relevant to safety
Reporting ......................................... 24
Matte finish (cleaning
instructions) ...................................... 290
mbrace Call priority .................................... 273
Display message ............................ 218
Downloading destinations
(COMAND) ..................................... 273
Emergency call .............................. 270
Important safety notes ..................269
Locating a stolen vehicle ...............275
MB info call button ........................272
Roadside Assistance button ..........272
Search & Send ............................... 274
Self-test ......................................... 270
System .......................................... 270
Vehicle remote unlocking ..............274
Mechanical key
Function/notes ................................ 75
Unlocking the driver's door ..............81
Memory card (audio) ......................... 203
Memory function ............................... 112
Messages see Display messages
Mirrors
see Exterior mirrors
see Rear-view mirror
see Vanity mirror
Mobile phone
Menu (on-board computer) ............211
Modifying the programming
(SmartKey) ........................................... 75
MOExtended run-flat system ........... 309
MP3 Operating ....................................... 203
see separate operating instructions
Multicontour seat .............................. 105
Multifunction display ........................ 200
Multifunction steering wheel Operating the on-board computer . 199
Overview .......................................... 31
N
Navigation Menu (on-board computer) ............204
On-board computer .......................204
see separate operating instructions
NECK-PRO head restraints
Operation ......................................... 49
Resetting after being triggered ........50
NECK-PRO luxury head restraints
Operation ......................................... 49
Resetting after being triggered ........50
Notes on breaking-in a new
vehicle ................................................ 144
O
Occupant Classification System
(OCS) Faults ............................................... 48
Operation ......................................... 44
System self-test ............................... 47
Occupant safety
Children in the vehicle .....................56
System overview .............................. 38
Octane number (fuel) ........................ 356
Odometer ........................................... 202
see Trip odometer
Off-road system
4MATIC .......................................... 183
Oil
see Engine oil
On-board computer
Additional functions menu .............210
AIRMATIC/compass menu ............204
Audio menu ................................... 203
12Index
Page 170 of 368
at high speeds. This improves the grip of the
brake pads.GWARNING
Make sure that you do not endanger other
road users when you apply the brakes.
You can find a description of Brake Assist
(BAS) on ( Y page 65).
Parking brake
If you drive on wet roads or dirt-covered
surfaces, road salt and/or dirt could get into
the parking brake.
In order to prevent corrosion and a reduction
in the braking power of the parking brake,
observe the following:
R Gently depress the parking brake from time
to time before beginning the journey.
R Drive a distance of approximately 110 yds
(100 m) with a maximum speed of 12 mph
(20 km/h).
GWARNING
While performing this procedure please
assure that the vehicle is stopped before
applying the parking brake. Otherwise the
rear wheels could lock up. You could lose
control of the vehicle and cause an accident.
In addition, the vehicle's brake lights do not
light up when the parking brake is engaged.
Make sure not to endanger any other road
users when you engage the parking brake.
Driving on wet roads
Hydroplaning
If water has accumulated to a certain depth
on the road surface, there is a danger of
hydroplaning occurring, even if:
R you drive at low speeds.
R the tires have adequate tread depth.
For this reason, in the event of heavy rain or
in conditions in which hydroplaning can occur
you must drive in the following manner:
R reduce your speed
R avoid ruts
R brake carefully
Driving on flooded roads
! Do not drive through flooded areas.
Check the depth of any water before driving
through it. Drive slowly through standing
water. Otherwise, water may enter the
vehicle interior or the engine compartment.
This can damage the electronic
components in the engine or the automatic
transmission. Water can also be drawn in
by the engine's air suction nozzles and this
can cause engine damage.
Do not allow water to enter the passenger
compartment or the engine compartment. If
you have to drive through a stretch of
standing water, please be aware the
following:
R the depth of the water must not exceed
10 inches (25 cm) for calm water
R you should drive no faster than at walking
pace.
i For vehicles with AIRMATIC package:
if you have set the raised level before
driving through a stretch of standing water,
the maximum water depth is 12 inches
(30 cm).
Winter driving
Important safety notes
GWARNING
If the vehicle becomes trapped in snow,
ensure that snow is kept away from the
exhaust pipe and from around the vehicle as
long as the engine is running. Otherwise,
poisonous carbon monoxide (CO) may enter
168Driving tipsDriving and parking
Page 182 of 368
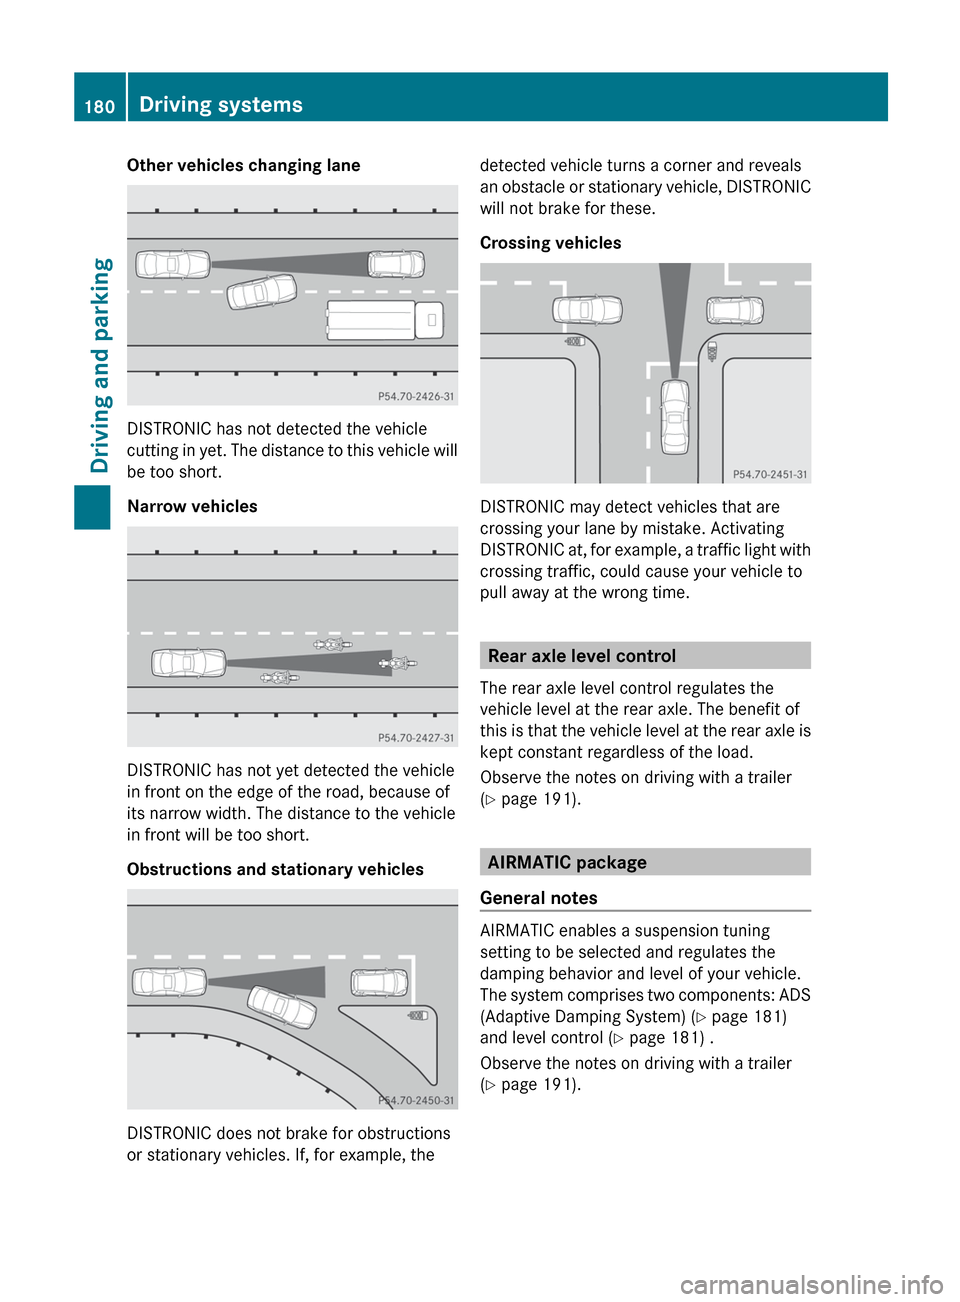
Other vehicles changing lane
DISTRONIC has not detected the vehicle
cutting in yet. The distance to this vehicle will
be too short.
Narrow vehicles
DISTRONIC has not yet detected the vehicle
in front on the edge of the road, because of
its narrow width. The distance to the vehicle
in front will be too short.
Obstructions and stationary vehicles
DISTRONIC does not brake for obstructions
or stationary vehicles. If, for example, the
detected vehicle turns a corner and reveals
an obstacle or stationary vehicle, DISTRONIC
will not brake for these.
Crossing vehicles
DISTRONIC may detect vehicles that are
crossing your lane by mistake. Activating
DISTRONIC at, for example, a traffic light with
crossing traffic, could cause your vehicle to
pull away at the wrong time.
Rear axle level control
The rear axle level control regulates the
vehicle level at the rear axle. The benefit of
this is that the vehicle level at the rear axle is
kept constant regardless of the load.
Observe the notes on driving with a trailer
( Y page 191).
AIRMATIC package
General notes
AIRMATIC enables a suspension tuning
setting to be selected and regulates the
damping behavior and level of your vehicle.
The system comprises two components: ADS
(Adaptive Damping System) ( Y page 181)
and level control ( Y page 181) .
Observe the notes on driving with a trailer
( Y page 191).
180Driving systemsDriving and parking
Page 194 of 368
RDo not install hired trailer couplings or
other detachable trailer couplings on the
bumpers of your vehicle.
R To reduce the risk of damage to the ball
coupling, remove it from the ball coupling
recess when not in use.
Coupling up a trailer
GWARNING
Vehicles with AIRMATIC: While you are
coupling or decoupling a trailer, make sure
nobody locks or unlocks the vehicle and/or
opens or closes doors or the tailgate.
The vehicle's level could change and you
could endanger yourself and/or others as a
result.
Make sure that you do not operate the ADS
switch or the vehicle level control system
when coupling/decoupling the trailer.
Observe the maximum permissible trailer
dimensions (width and length).
Most federal states and all Canadian
provinces require by law:
R safety chains between the towing vehicle
and the trailer. The chains should be cross-
wound under the trailer drawbar. They must
be fastened to the vehicle's trailer
coupling, not to the bumper or the axle.
Allow for enough play in the chains to
facilitate turning tight corners.
R a separate brake system for certain types
of trailer.
R a safety switch for braked trailers. Check
the specific legal requirements applicable
to your federal state.
If the trailer detaches from the towing
vehicle, the safety switch applies the
trailer's brakes.
! Do not connect the trailer's brake system
(if featured) to the hydraulic brake system
of the towing vehicle, as the latter is
equipped with an anti-lock brake system.
Doing so will result in a loss of function of
the brake systems of both the vehicle and
the trailer.
i The vehicle's wiring harness features a
line to the brake indicator lamp.XMake sure that the automatic transmission
is set to position P.XApply the vehicle's parking brake.XStart the engine.XVehicles with the AIRMATIC package:
select highway level and set ADS to
AUTO or COMF .XSwitch off the engine.XClose all doors and the tailgate.XCouple up the trailer.XEstablish all electrical connections.
i
Vehicles with the AIRMATIC package:
with a trailer attached, the vehicle will
always remain at highway level. When
coupling up a trailer, please observe the
following:
R if highway level has not been set
manually, the vehicle will automatically
sink to highway level as soon as it
reaches a speed of 5 mph (8 km/h).
R high-speed level is not available.
These restrictions apply to all accessories
powered through a connection to the trailer
power socket of your vehicle, e.g. a bicycle
carrier.
Towing a trailer
There are numerous legal requirements
concerning the towing of a trailer, e.g. speed
restrictions. Make sure that your vehicle/
trailer combination complies with the local
requirements not only in your area of
residence but also at any location to which
you are traveling. The police and local
authorities can provide reliable information.
192Trailer towingDriving and parking
Page 195 of 368
Please observe the following when towing a
trailer:
R To acquaint yourself with driving with a
trailer and with the resulting changes to
handling, you should practice cornering,
stopping and reversing in a traffic-free
location.
R Before driving, check:
- the trailer tow hitch
- the safety switch for braked trailers
- the safety chains
- the electrical connections
- the lights
- the wheels
R Adjust the exterior mirrors to provide an
unobstructed view of the rear section of the
trailer.
R If the trailer features electronically
controlled brakes, pull away the vehicle/
trailer combination carefully, manually
brake using the brake controller, and check
the brakes for correct function.
R Secure any objects on the trailer to prevent
the cargo from slipping when the vehicle is
in motion.
R If you couple up a trailer, regularly check
the cargo for secure fastening and make
sure that the trailer lamps and (if
applicable) the trailer brakes are
functioning correctly.
R Bear in mind that the handling will be less
stable when towing a trailer than when
driving without one. Avoid sudden steering
movements.
R The vehicle/trailer combination is heavier,
accelerates more slowly, has a decreased
gradient climbing capability and a longer
braking distance.
It is more susceptible to side winds and
requires more careful steering.
R If possible, avoid abrupt braking. Depress
the brake pedal moderately at first, so that
the trailer can activate its own brakes. Then
increase the pressure on the brake pedal.R If the automatic transmission continues to
shift back and forth between two gears
when driving up or downhill, restrict the
shift range. Select shift range 4, 3, 2, or 1.
A lower gear and lower speed reduce the
risk of engine failure.
R When driving downhill, shift to a lower gear
to utilize the engine's braking effect.
Avoid continuous brake application as this
may overheat the vehicle brakes and, if
installed, the trailer brakes.
R If the coolant temperature increases
dramatically while the air-conditioning
system is switched on, switch off the air-
conditioning system.
Coolant heat can additionally be dissipated
by opening the windows and by setting the
blower fan and the interior temperature to
maximum.
R When overtaking, pay particular attention
to the extended length of your vehicle/
trailer combination.
Due to the length of your vehicle/trailer
combination, you will have to travel an
additional distance beyond the vehicle you
are overtaking before returning to the
previous lane.
Decoupling a trailer
GWARNING
Vehicles with AIRMATIC: While you are
coupling or decoupling a trailer, make sure
nobody locks or unlocks the vehicle and/or
opens or closes doors or the tailgate.
The vehicle's level could change and you
could endanger yourself and/or others as a
result.
Make sure that you do not operate the ADS
switch or the vehicle level control system
when coupling/decoupling the trailer.
XMake sure that the automatic transmission
is set to position P.XApply the vehicle's parking brake.Trailer towing193Driving and parkingZ
Page 196 of 368
XStart the engine.XClose all doors and the tailgate.XApply the trailer's parking brake.GWARNING
Vehicles with AIRMATIC: As soon as you
disconnect the electrical connection between
the trailer and the vehicle, the vehicle will
lower. To help avoid personal injury, make
sure no one is near the wheel housing or
underneath the vehicle before the electrical
connection is disconnected.
When you decouple the trailer, the vehicle is
temporarily raised because the springs are
relieved of load. Be especially careful during
this process, as you could otherwise injure
yourself and/or others. Make sure that any
persons remaining in the vehicle do not press
the switches for vehicle level control or the
ADS.
XRemove the trailer cable and decouple the
trailer.XSwitch off the engine.
Permissible trailer loads and drawbar
noseweights
Weight specifications
The Gross Trailer Weight (GTW) is the
combined weight of the trailer together with
the cargo and equipment loaded on the
trailer. Permissible gross weight: 3500 lb
(1588 kg).
The permissible Trailer drawbar Weight
Rating (TWR) is the maximum weight
permitted on the trailer drawbar: 350 lb
(158 kg) limit for Mercedes-Benz-approved
trailer couplings.
Loading a trailer
R When loading a trailer, please note that
neither the permissible gross trailer weight
nor the permissible Gross Vehicle Weight
Rating (GVWR) may be exceeded. The
permissible Gross Vehicle Weight Rating
(GVWR) is specified on the type plate
located on the B-pillar on the driver's side
of your vehicle.
You can find the maximum permissible
values on the type plates of your vehicle
and the trailer. Always observe the lowest
respective value when determining the
maximum weight with which you can load
the vehicle and the trailer.
R The drawbar noseweight acting on the ball
coupling has to be added to the rear axle
weight in order to prevent the permissible
Gross Axle Weight Rating (GAWR) from
being exceeded. The permissible Gross
Vehicle Weight Rating (GVWR) is specified
on the type plate located on the B-pillar on
the driver's side of your vehicle.
i Mercedes-Benz recommends loading the
trailer so that the drawbar noseweight
remains between 8% and 10% of the
permissible gross trailer weight.
i The weight of additional accessories,
passengers, and cargo reduces the
permissible trailer load and drawbar
noseweight for your vehicle.
Checking the vehicle and trailer weight
R To check that the weights of the towing
vehicle and the trailer comply with the
maximum permissible values, have the
vehicle/trailer combination (including the
driver, passengers, and cargo with a fully
laden trailer) weighed on a calibrated
weighbridge.
R Check the gross axle weight rating of the
front and rear axle, the Gross Trailer Weight
(GTW), and the drawbar noseweight.
Trailer power supply
The trailer power socket of your vehicle is
designed for connecting the 7-pin connector
supplied as part of the Mercedes-Benz-
approved trailer coupling.
194Trailer towingDriving and parking
Page 203 of 368
Menus and submenus
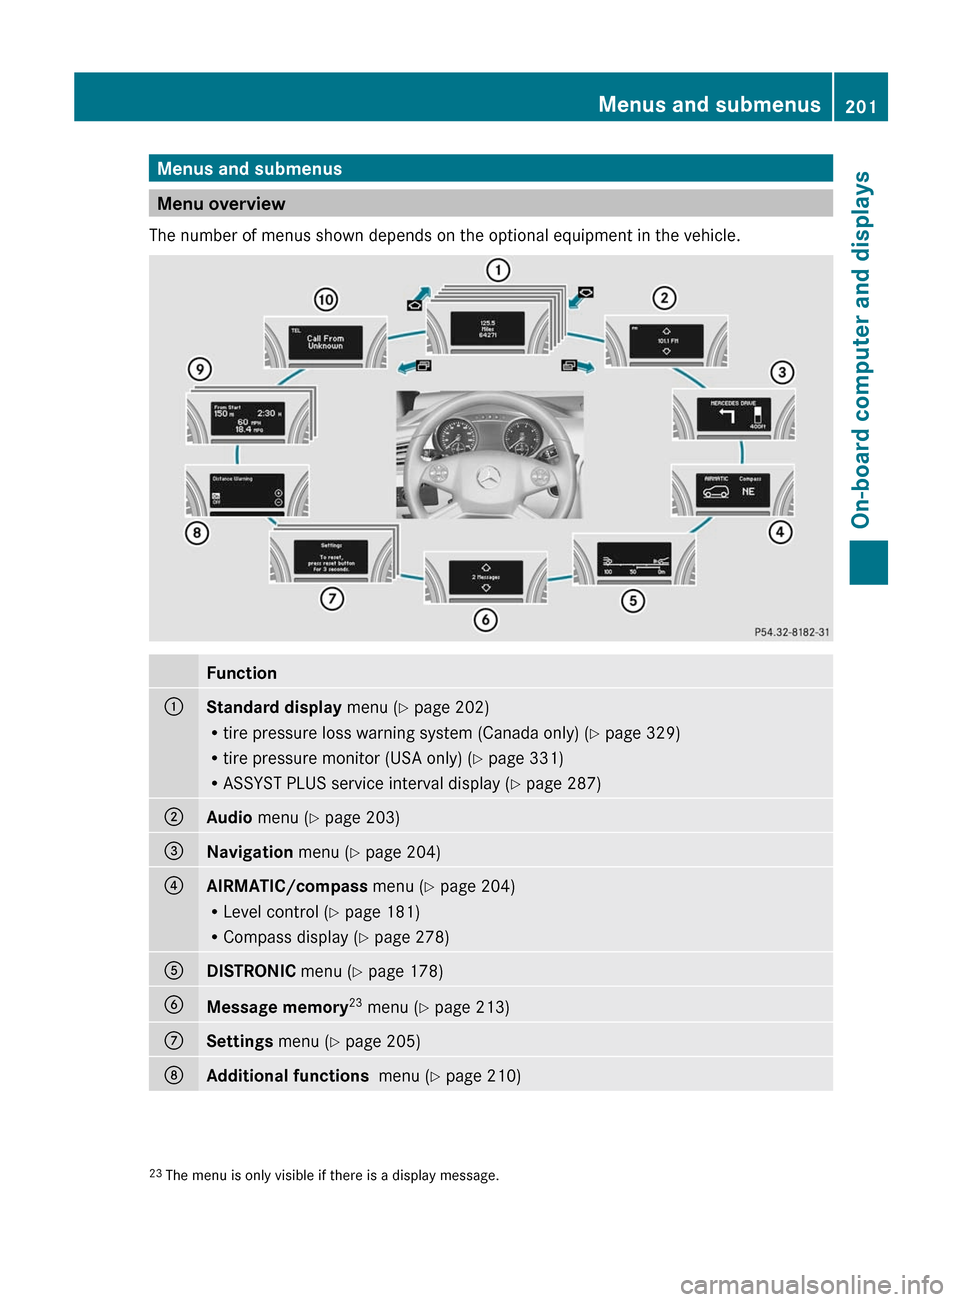
Menu overview
The number of menus shown depends on the optional equipment in the vehicle.
Function:Standard display menu (Y page 202)
R tire pressure loss warning system (Canada only) ( Y page 329)
R tire pressure monitor (USA only) ( Y page 331)
R ASSYST PLUS service interval display ( Y page 287);Audio menu ( Y page 203)=Navigation menu (Y page 204)?AIRMATIC/compass menu (Y page 204)
R Level control ( Y page 181)
R Compass display ( Y page 278)ADISTRONIC menu (Y page 178)BMessage memory 23
menu ( Y page 213)CSettings menu (Y page 205)DAdditional functions menu (Y page 210)23
The menu is only visible if there is a display message.Menus and submenus201On-board computer and displaysZ
Page 206 of 368
XTo select the next/previous track:
briefly press the & or * button.XTo select a track from the track list
(rapid scrolling): press and briefly hold the
& or * button.
The current track will not be displayed in
audio AUX mode ( Auxiliary audio mode:
external audio source connected).
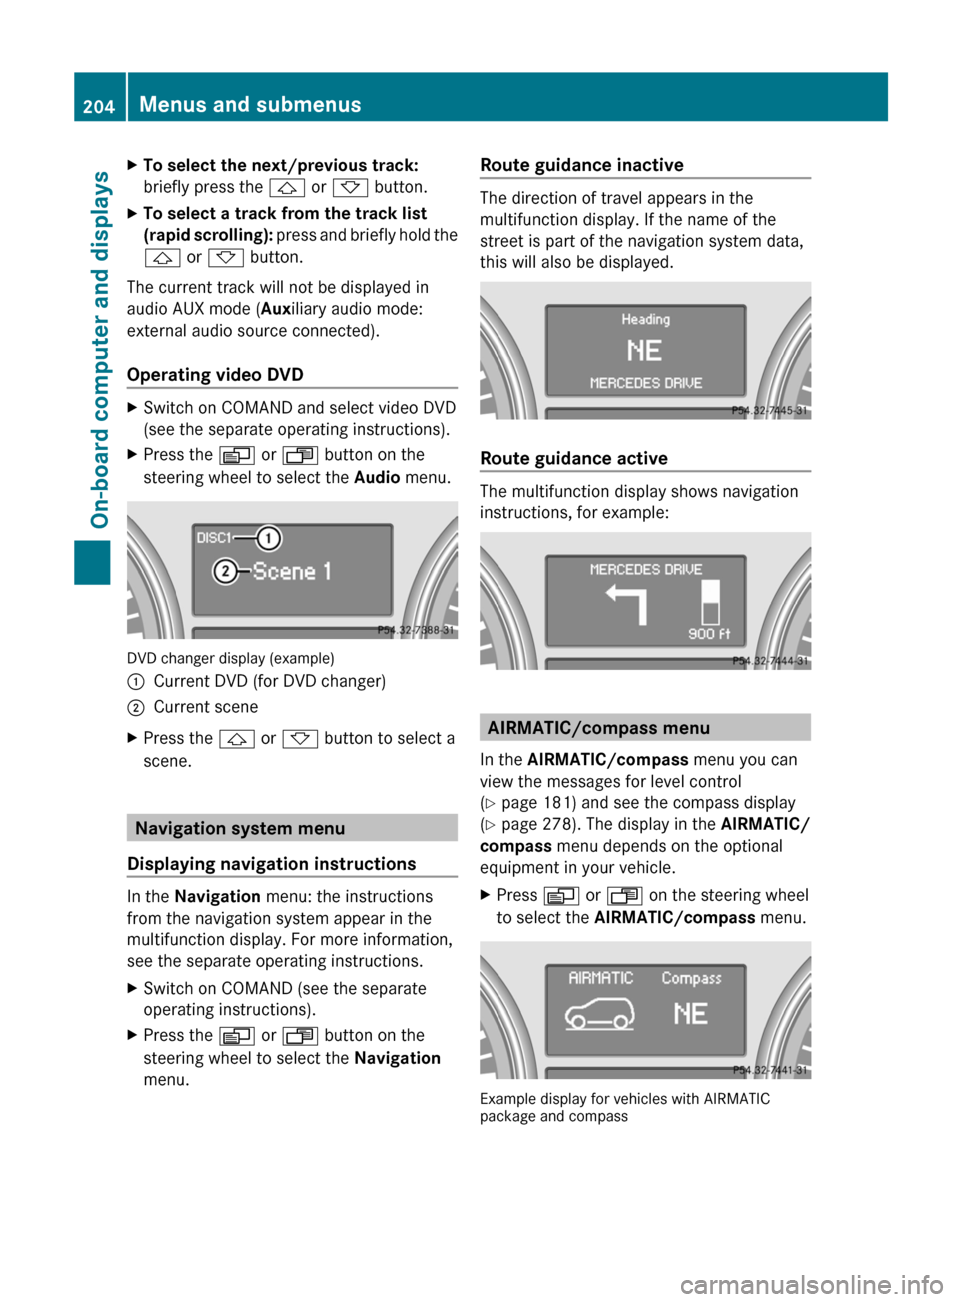
Operating video DVD
XSwitch on COMAND and select video DVD
(see the separate operating instructions).XPress the V or U button on the
steering wheel to select the Audio menu.
DVD changer display (example)
:Current DVD (for DVD changer);Current sceneXPress the & or * button to select a
scene.
Navigation system menu
Displaying navigation instructions
In the Navigation menu: the instructions
from the navigation system appear in the
multifunction display. For more information,
see the separate operating instructions.
XSwitch on COMAND (see the separate
operating instructions).XPress the V or U button on the
steering wheel to select the Navigation
menu.Route guidance inactive
The direction of travel appears in the
multifunction display. If the name of the
street is part of the navigation system data,
this will also be displayed.
Route guidance active
The multifunction display shows navigation
instructions, for example:
AIRMATIC/compass menu
In the AIRMATIC/compass menu you can
view the messages for level control
( Y page 181) and see the compass display
( Y page 278). The display in the AIRMATIC/
compass menu depends on the optional
equipment in your vehicle.
XPress V or U on the steering wheel
to select the AIRMATIC/compass menu.
Example display for vehicles with AIRMATIC
package and compass
204Menus and submenusOn-board computer and displays
Page 231 of 368
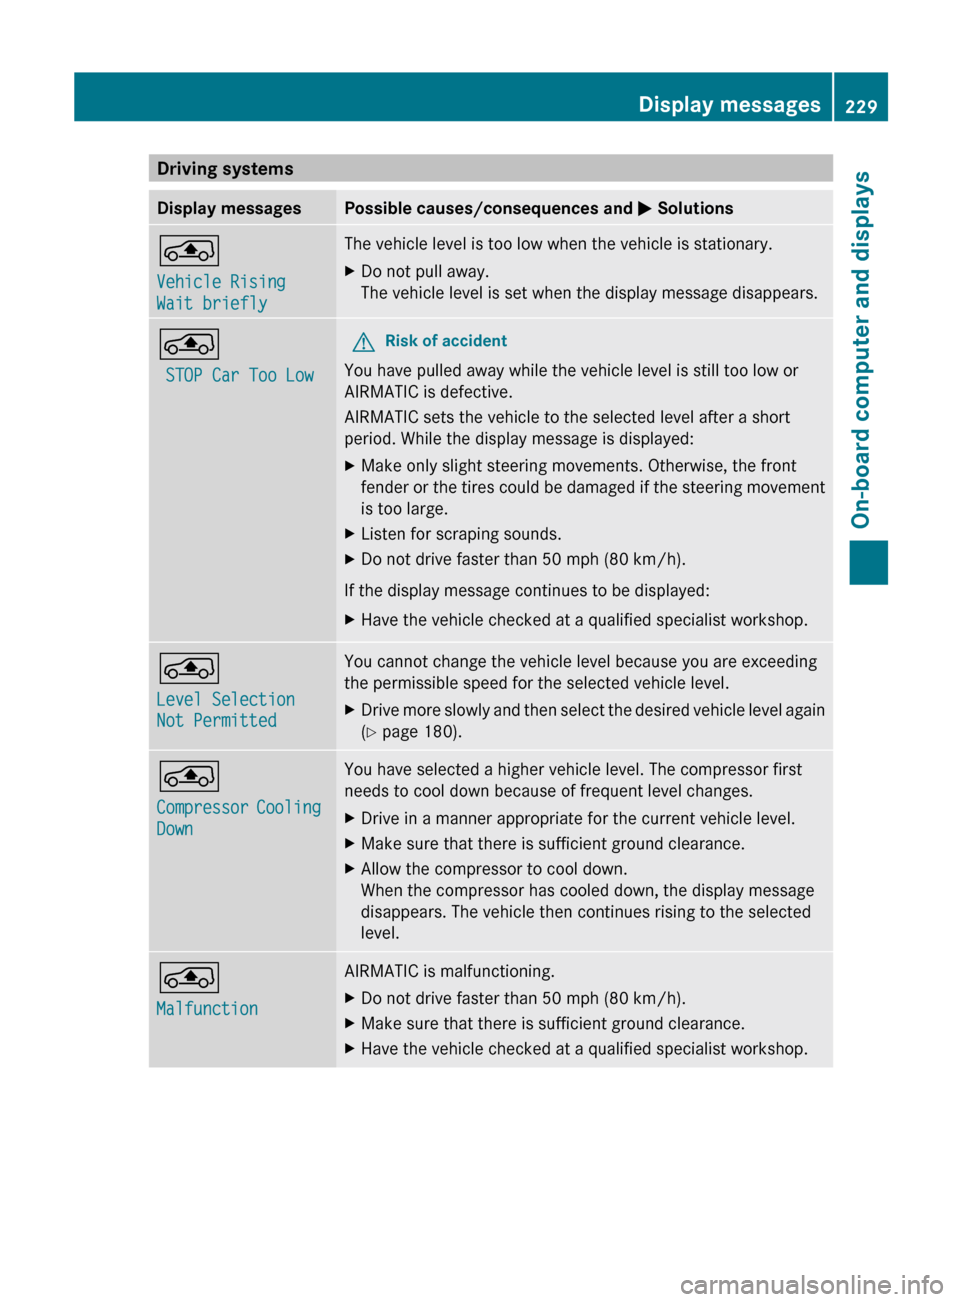
Driving systemsDisplay messagesPossible causes/consequences and M Solutions°
Vehicle Rising
Wait brieflyThe vehicle level is too low when the vehicle is stationary.XDo not pull away.
The vehicle level is set when the display message disappears.°
STOP Car Too LowGRisk of accident
You have pulled away while the vehicle level is still too low or
AIRMATIC is defective.
AIRMATIC sets the vehicle to the selected level after a short
period. While the display message is displayed:
XMake only slight steering movements. Otherwise, the front
fender or the tires could be damaged if the steering movement
is too large.XListen for scraping sounds.XDo not drive faster than 50 mph (80 km/h).
If the display message continues to be displayed:
XHave the vehicle checked at a qualified specialist workshop.°
Level Selection
Not PermittedYou cannot change the vehicle level because you are exceeding
the permissible speed for the selected vehicle level.XDrive more slowly and then select the desired vehicle level again
( Y page 180).°
Compressor Cooling
DownYou have selected a higher vehicle level. The compressor first
needs to cool down because of frequent level changes.XDrive in a manner appropriate for the current vehicle level.XMake sure that there is sufficient ground clearance.XAllow the compressor to cool down.
When the compressor has cooled down, the display message
disappears. The vehicle then continues rising to the selected
level.°
MalfunctionAIRMATIC is malfunctioning.XDo not drive faster than 50 mph (80 km/h).XMake sure that there is sufficient ground clearance.XHave the vehicle checked at a qualified specialist workshop.Display messages229On-board computer and displaysZ