ignition MERCEDES-BENZ R-CLASS FAMILY TOURER 2013 Manual Online
[x] Cancel search | Manufacturer: MERCEDES-BENZ, Model Year: 2013, Model line: R-CLASS FAMILY TOURER, Model: MERCEDES-BENZ R-CLASS FAMILY TOURER 2013Pages: 364, PDF Size: 28.68 MB
Page 217 of 364
Display messages
Introduction
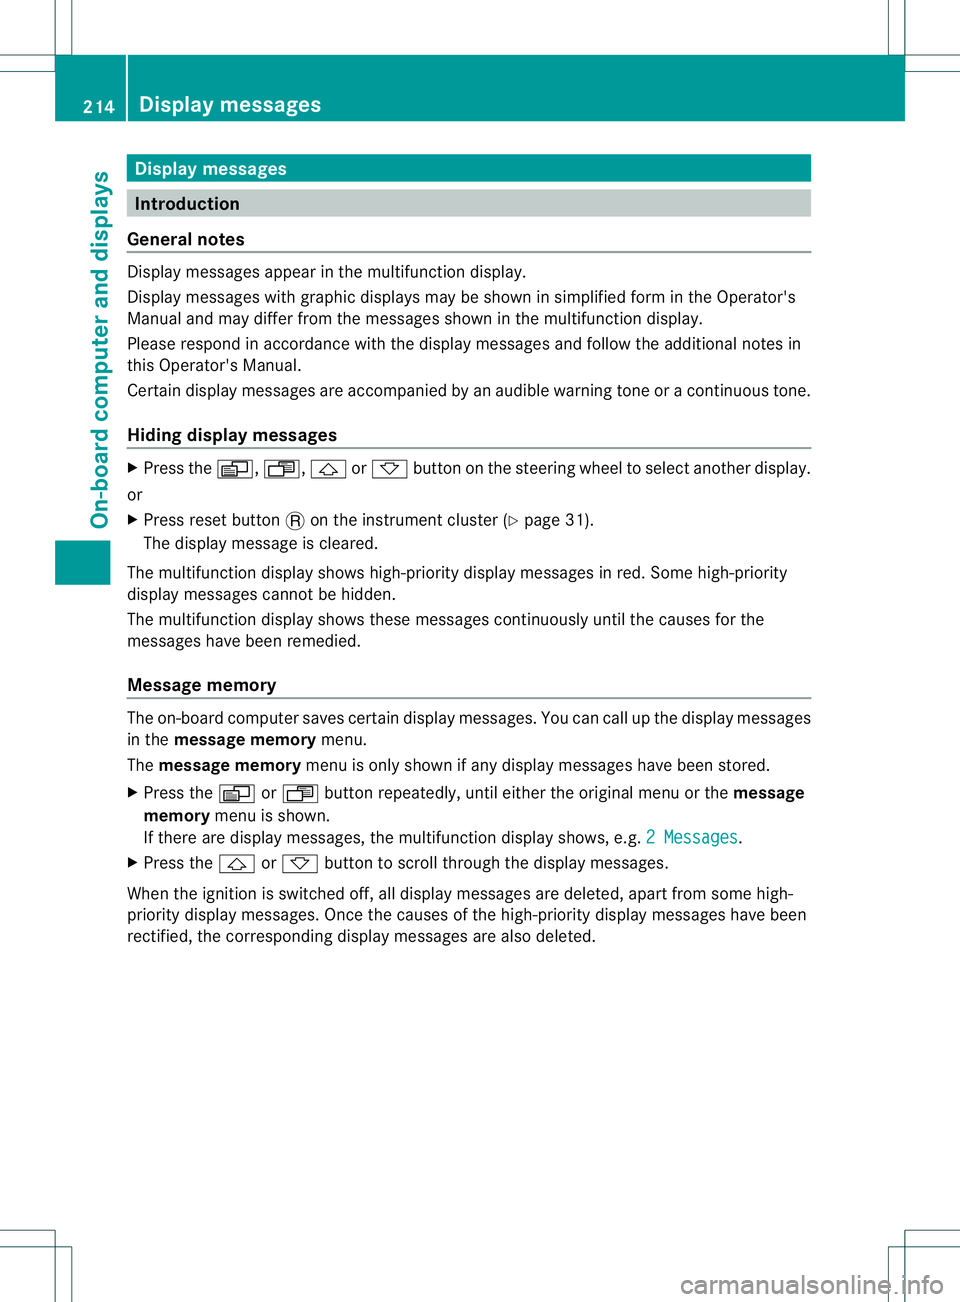
General notes Display messages appear in them
ultifunction display.
Display messages with graphic displays may be shown in simplified for minthe Operator's
Manual and may differ from the messages shown in the multifunction display.
Please respond in accordance with the display messages and follow the additional notes in
this Operator's Manual.
Certain display messages are accompanied by an audible warning tone or a continuous tone.
Hiding display messages X
Press the V,U,&or* button on the steering wheel to select another display.
or
X Press reset button .on the instrument cluster (Y page 31).
The display message is cleared.
The multifunction display shows high-priority display messages in red. Some high-priority
display messages cannot be hidden.
The multifunction display shows these messages continuously until the causes for the
messages have been remedied.
Message memory The on-board computer saves certain display messages. You can call up the display messages
in the
message memory menu.
The message memory menu is only shown if any display messages have been stored.
X Press the VorU button repeatedly, until either the original menu or the message
memory menu is shown.
If there are display messages, the multifunction displays hows, e.g.2 Messages .
X Press the &or* button to scroll through the display messages.
When the ignition is switched off, all display messages are deleted, apart from some high-
priority display messages. Once the causes of the high-priority display messages have been
rectified, the corresponding display messages are also deleted. 214
Display messagesOn-board computer and displays
Page 222 of 364
Display messages Possible causes/consequences and
M Solutions
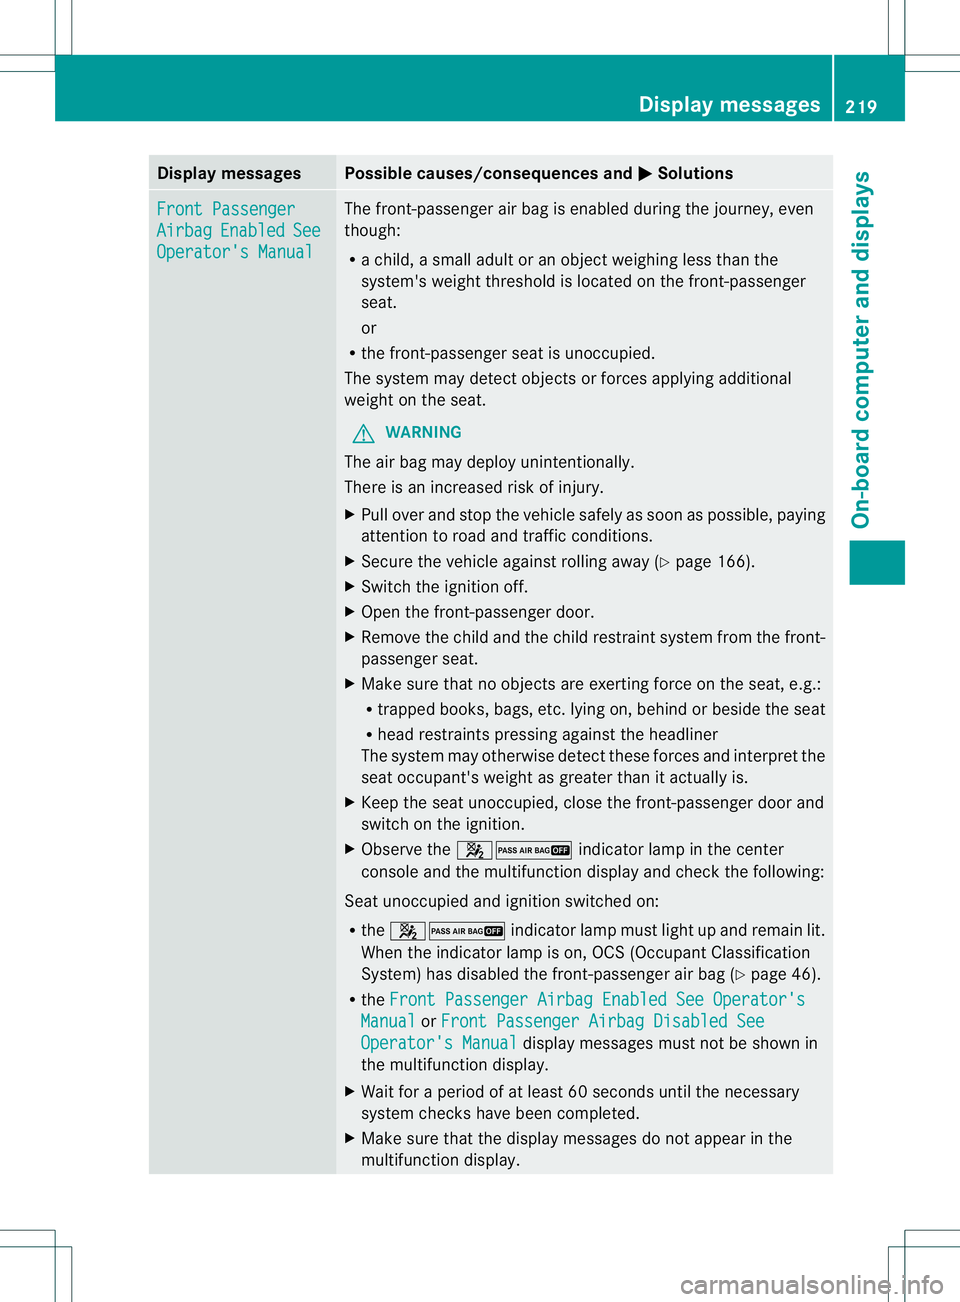
Front Passenger
Airbag Enabled See
Operator's Manual The front-passenger air bag is enabled during the journey, even
though:
R
a child, a small adult or an objec tweighing less than the
system's weight threshold is located on the front-passenger
seat.
or
R the front-passenger seat is unoccupied.
The system may detec tobjects or forces applying additional
weight on the seat.
G WARNING
The air bag may deploy unintentionally.
There is an increased risk of injury.
X Pull over and stop the vehicle safely as soon as possible, paying
attention to road and traffic conditions.
X Secure the vehicle against rolling away (Y page 166).
X Switch the ignition off.
X Open the front-passenger door.
X Remove the child and the child restraint system from the front-
passenger seat.
X Make sure that no objects are exerting force on the seat, e.g.:
R
trapped books, bags, etc .lying on, behind or beside the seat
R head restraints pressing against the headliner
The system may otherwise detec tthese forces and interpret the
seat occupant's weight as greater than it actually is.
X Keep the seat unoccupied, close the front-passenger door and
switch on the ignition.
X Observe the 42 indicator lamp in the center
console and the multifunction display and check the following:
Seat unoccupied and ignition switched on:
R the 42 indicator lamp must light up and remain lit.
When the indicator lamp is on, OCS (Occupant Classification
System) has disabled the front-passenger air bag (Y page 46).
R the Front Passenger Airbag Enabled See Operator's Manual or
Front Passenger Airbag Disabled See Operator's Manual display messages must not be shown in
the multifunction display.
X Wait for a period of at least 60 seconds until the necessary
system checks have been completed.
X Make sure that the display messages do not appearint he
multifunction display. Display messages
219On-board computer and displays Z
Page 223 of 364
Display messages Possible causes/consequences and
M Solutions
If these conditions are fulfilled, the front-passenger seat can be
occupied again
.Whether the 42 indicator lamp
remains lit or goes out depends on how OCS classifies the
occupant.
If the conditions are not fulfilled, the system is not operating
correctly.
X Visit a qualified specialist workshop immediately. Front Passenger
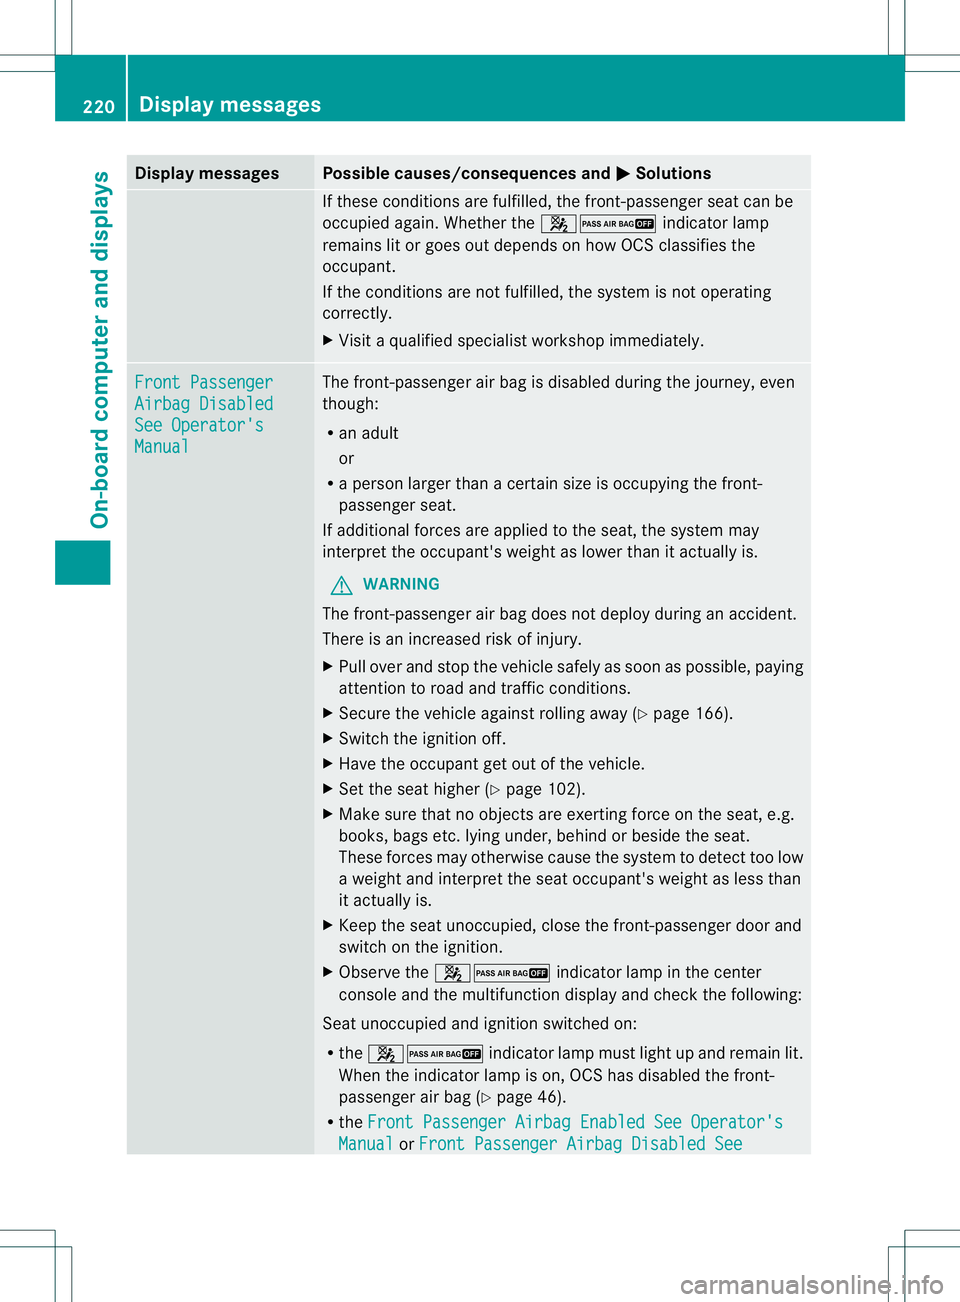
Airbag Disabled
See Operator's
Manual The front-passenger air bag is disabled during the journey, even
though:
R
an adult
or
R a person larger than a certain size is occupying the front-
passenger seat.
If additional forces are applied to the seat, the system may
interpret the occupant's weight as lower than it actually is.
G WARNING
The front-passenger air bag does not deploy during an accident.
There is an increased risk of injury.
X Pull over and stop the vehicle safely as soon as possible, paying
attention to road and traffic conditions.
X Secure the vehicle against rolling away (Y page 166).
X Switch the ignition off.
X Have the occupant get out of the vehicle.
X Set the seat higher (Y page 102).
X Make sure that no objects are exerting force on the seat, e.g.
books, bags etc. lying under, behind or beside the seat.
These forces may otherwise cause the system to detect too low
a weight and interpret the seat occupant's weight as less than
it actually is.
X Keep the seat unoccupied, close the front-passenger door and
switch on the ignition.
X Observe the 42 indicator lamp in the center
console and the multifunction display and check the following:
Seat unoccupied and ignition switched on:
R the 42 indicator lamp must light up and remain lit.
When the indicator lamp is on, OCS has disabled the front-
passenger air bag (Y page 46).
R the Front Passenger Airbag Enabled See Operator's Manual or
Front Passenger Airbag Disabled See 220
Display messagesOn-board computer and displays
Page 239 of 364
Display messages Possible causes/consequences and
M Solutions
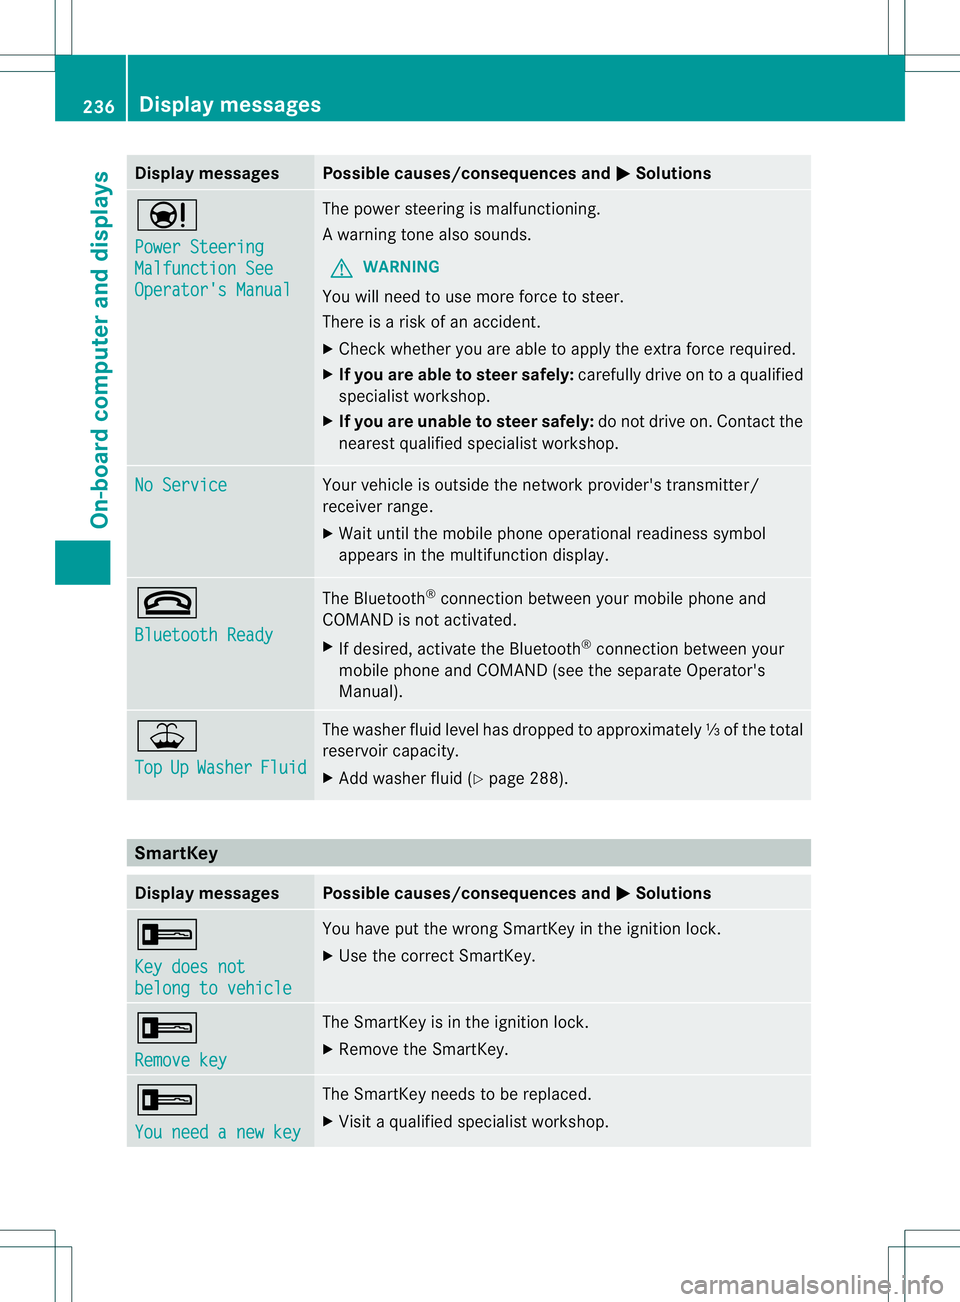
Ð
Power Steering
Malfunction See
Operator's Manual The powe
rsteering is malfunctioning.
Aw arning tone also sounds.
G WARNING
You will need to use more force to steer.
There is a ris kofanaccident.
X Check whethe ryou are able to apply the extra force required.
X If you are able to steer safely: carefully drive on to a qualified
specialist workshop.
X If you are unable to steer safely: do not drive on. Contact the
nearest qualified specialist workshop. No Service Your vehicle is outside the network provider's transmitter/
receiver range.
X
Wait until the mobile phone operational readiness symbol
appears in the multifunction display. ~
Bluetooth Ready The Bluetooth
®
connection between your mobile phone and
COMAND is not activated.
X If desired, activate the Bluetooth ®
connection between your
mobile phone and COMAND (see the separate Operator's
Manual). ¥
Top
Up Washer Fluid The washer fluid level has dropped to approximately
⅓ofthe total
reservoir capacity.
X Add washer fluid (Y page 288).SmartKey
Display messages Possible causes/consequences and
M Solutions
+
Key does not
belong to vehicle You have put the wrong SmartKey in the ignition lock.
X
Use the correct SmartKey. +
Remove key The SmartKey is in the ignition lock.
X
Remove the SmartKey. +
You need a new key The SmartKey needs to be replaced.
X
Visit a qualified specialist workshop. 236
Display messagesOn-board computer and displays
Page 240 of 364
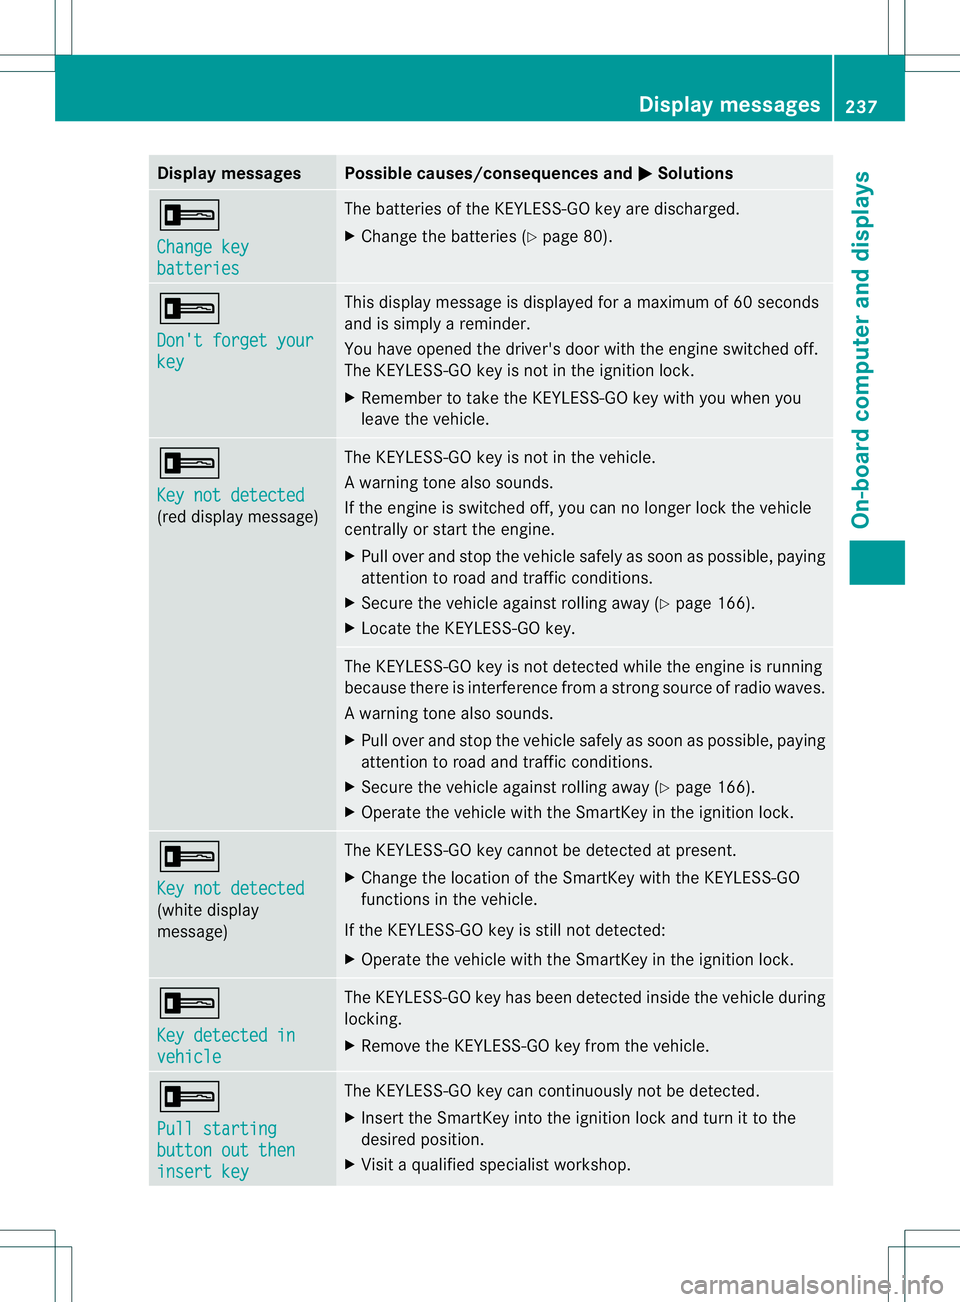
Display messages Possible causes/consequences and
M Solutions
+
Change key
batteries The batteries of the KEYLESS-GO key are discharged.
X
Change the batteries ( Ypage 80). +
Don't forget your
key This display message is displayed fo
ramaximum of 60 seconds
and is simply a reminder.
You have opened the driver's door with the engine switched off.
The KEYLESS-GO key is not in the ignition lock.
X Remember to take the KEYLESS-GO key with you when you
leave the vehicle. +
Key not detected
(red display message) The KEYLESS-GO key is not in the vehicle.
Aw
arning tone also sounds.
If the engine is switched off, you can no longer loc kthe vehicle
centrally or start the engine.
X Pull over and stop the vehicle safely as soon as possible, paying
attention to road and traffic conditions.
X Secure the vehicle against rolling away (Y page 166).
X Locate the KEYLESS-GO key. The KEYLESS-GO key is not detected while the engine is running
because there is interference from a strong source of radio waves.
Aw
arning tone also sounds.
X Pull ove rand stop the vehicle safely as soo nas possible, paying
attention to road and traffic conditions.
X Secure the vehicle against rolling away (Y page 166).
X Operate the vehicle with the SmartKey in the ignition lock. +
Key not detected
(white display
message) The KEYLESS-GO key cannot be detected at present.
X
Change the location of the SmartKey with the KEYLESS-GO
functions in the vehicle.
If the KEYLESS-GO key is still not detected:
X Operate the vehicle with the SmartKey in the ignition lock. +
Key detected in
vehicle The KEYLESS-GO key has been detected inside the vehicle during
locking.
X
Remove the KEYLESS-GO key from the vehicle. +
Pull starting
button out then
insert key The KEYLESS-GO key can continuously not be detected.
X
Insert the SmartKey into the ignition lock and turn it to the
desired position.
X Visit a qualified specialist workshop. Display messages
237On-board computer and displays Z
Page 248 of 364
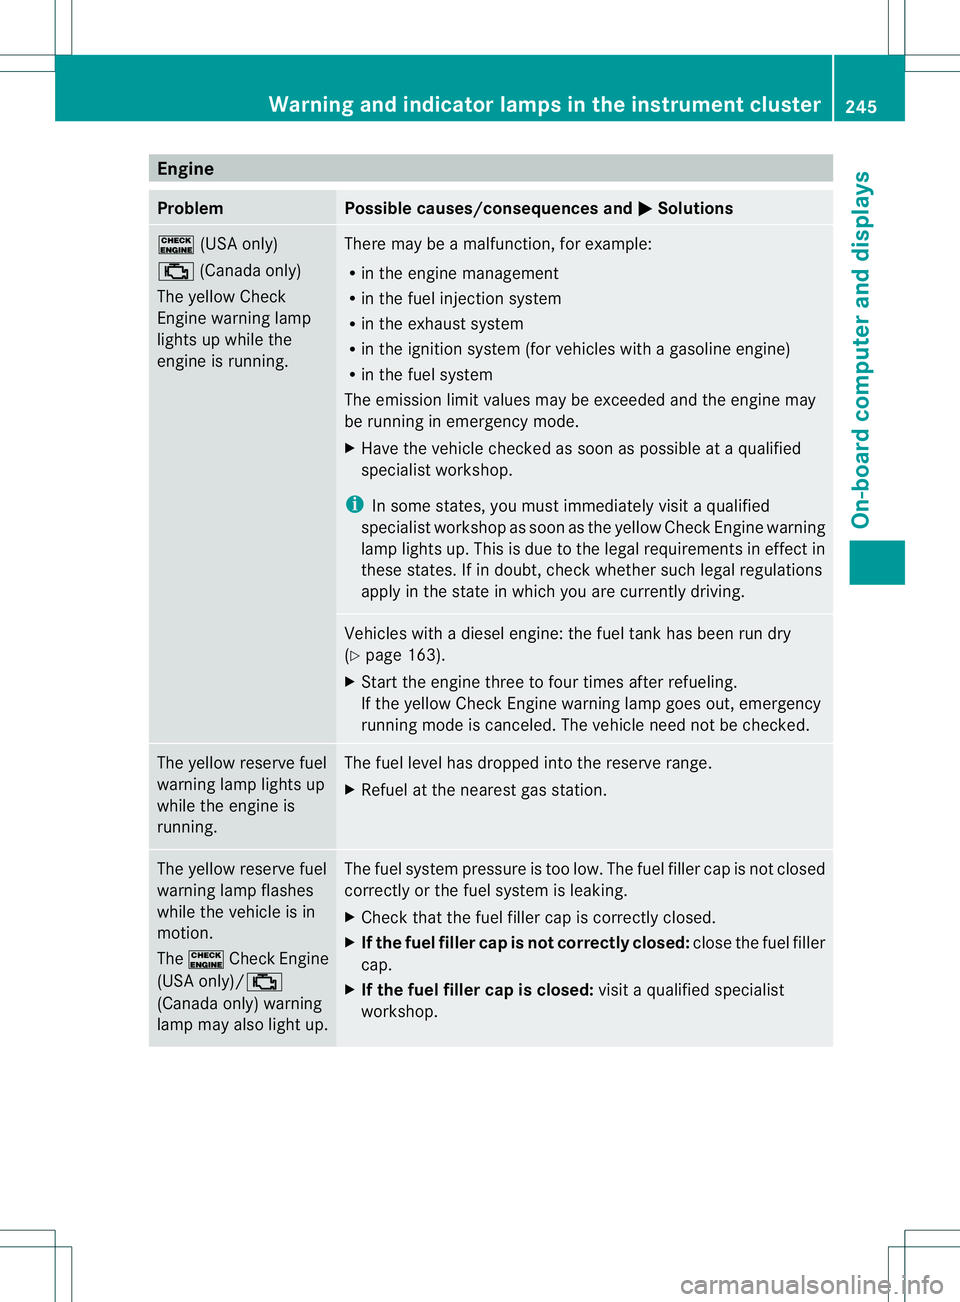
Engine
Problem Possible causes/consequences and
M Solutions
!
(USA only)
; (Canada only)
The yellow Check
Engine warning lamp
lights up while the
engine is running. There may be a malfunction, for example:
R
in the engine management
R in the fuel injection system
R in the exhaust system
R in the ignition system (for vehicles with a gasoline engine)
R in the fuel system
The emission limit values may be exceeded and the engin emay
be running in emergency mode.
X Have the vehicle checked as soon as possible at a qualified
specialist workshop.
i In some states, you must immediately visit a qualified
specialist workshop as soon as the yellow Chec kEngine warning
lamp lights up.T his is due to the legal requirements in effect in
these states. If in doubt, check whether such legal regulations
apply in the state in which you are currently driving. Vehicles with a diesel engine: the fuel tank has been run dry
(Y
page 163).
X Start the engine three to four times after refueling.
If the yellow Check Engine warning lamp goes out, emergency
running mode is canceled. The vehicle need not be checked. The yellow reserve fuel
warning lamp lights up
while the engine is
running. The fuel level has dropped into the reserve range.
X
Refuel at the nearest gas station. The yellow reserve fuel
warning lamp flashes
while the vehicle is in
motion.
The
! Check Engine
(USA only)/;
(Canada only) warning
lamp may also light up. The fuel system pressure is too low. The fuel filler cap is not closed
correctly or the fuel system is leaking.
X
Check that the fuel filler cap is correctly closed.
X If the fuel filler cap is not correctly closed: close the fuel filler
cap.
X If the fuel filler cap is closed: visit a qualified specialist
workshop. Warning and indicator lamps in the instrument cluster
245On-board computer and displays Z
Page 272 of 364
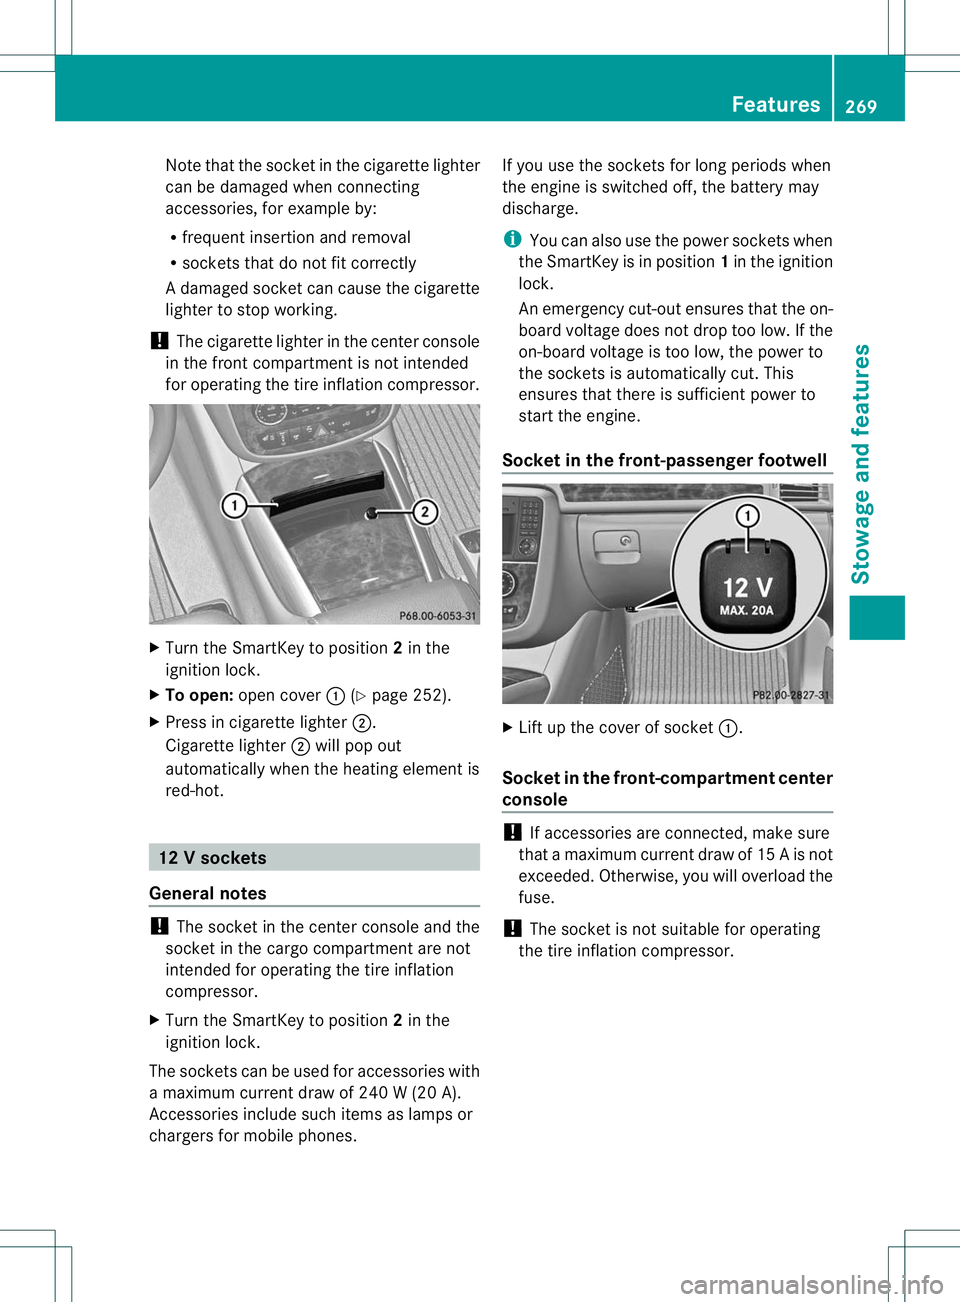
Note that the socket in the cigarette lighter
can be damaged when connecting
accessories, for example by:
R
frequent insertion and removal
R sockets that do not fit correctly
Ad amaged socke tcan cause the cigarette
lighter to stop working.
! The cigarette lighter in the cente rconsole
in the front compartment is not intended
for operating the tire inflation compressor. X
Turn the SmartKey to position 2in the
ignition lock.
X To open: open cover :(Ypage 252).
X Press in cigarette lighter ;.
Cigarette lighter ;will pop out
automatically when the heating element is
red-hot. 12
Vsockets
General notes !
The socket in the center console and the
socket in the cargo compartment are not
intended for operating the tire inflation
compressor.
X Turn the SmartKey to position 2in the
ignitio nlock.
The sockets can be used for accessories with
a maximum current draw of 240 W (20 A).
Accessories include such items as lamps or
chargers for mobile phones. If you use the sockets for long periods when
the engine is switched off, the battery may
discharge.
i
You can also use the power sockets when
the SmartKey is in position 1in the ignition
lock.
An emergency cut-out ensures that the on-
board voltage does not drop too low. If the
on-board voltage is too low, the power to
the sockets is automatically cut. This
ensures that there is sufficient power to
start the engine.
Socket in the front-passenger footwell X
Lift up the cover of socket :.
Socket in the front-compartment center
console !
If accessories are connected, make sure
that amaximum curren tdraw of 15 A is not
exceeded. Otherwise, you willo verload the
fuse.
! The socket is not suitable for operating
the tire inflation compressor. Features
269Stowage and features Z
Page 275 of 364
i
Determining the location of the vehicle on
a map is only possible if:
R GP Sreception is available
R the vehicle position can be forwarded to
the Customer Assistance Center
The mbrace system To adjust the volume during an mbrace call,
proceed as follows:
X
Press the WorX button on the
multifunction steering wheel.
or
X Use the volume controller of the audio
system/COMAND.
The mbrace system provides various
services, e.g.:
R automatic and manual emergency call
R Roadside Assistance call
R MB Info call
USA only: you can find information and a
description of all available features under
"Owners Online" at http://www.mbusa.com.
System self-test After you have switched on the ignition, the
system carries out a self-diagnosis.
Am
alfunction in the system has been
detected if one of the following conditions
occurs:
R the indicator lamp in theS OS button does
not come on during the system self-test.
R the indicator lamp in the ºRoadside
Assistance button does not light up during
self-diagnosis of the system.
R the indicator lamp in the EMB-Info call
button does not light up during self-
diagnosis of the system. R
the indicator lamp in one or more of the
following buttons continues to light up red
after the system self-diagnosis:
-SOS button
- Roadside Assistance call button º
- MB Info call button E
R the Tele Aid Inoperative or
Tele Aid
Not Activated message appears in the
multifunction display after the system self-
diagnosis.
If a malfunction is indicated as outlined
above, the system may not operate as
expected. In the event of an emergency,
assistance must be summoned by other
means.
Have the system checked at the nearest
authorized Mercedes-Benz Center or contact
the following service hotlines:
R USA: Mercedes-Benz Customer Assistance
center at
1-800-FOR-MERCedes (1-800-367-6372)
or 1-888-990-9007
R Canada: Customer Service at
1-888-923-8367
Emergency call Important safety notes
G
WARNING
If the indicator lamp in the SOS button is
flashing continuously and there was no voice
connection to the Response Center
established, then the mbrace system could
not initiate an emergency call (e.g. the
relevant cellular phone network is not
available).
The message Call Failed appears in the
multifunction display for approximately
10 seconds.
Should this occur, assistance must be
summoned by other means.
! Alicense agreement must exis tinorder
to activate the mbrace service .Ensure that
your system is activated and ready for use, 272
FeaturesSto
wage an d features
Page 279 of 364
i
The Destination Download function is
available if the corresponding mobile
phone network is available and data
transfer is possible.
i You can only use the Destination
Download function if the vehicle is
equipped with a navigation system.
Route Assistance
This service is part of the mbrace PLUS
Package and cannot be purchased
separately.
i You can also use the Route Assistance
function if your vehicle is not equipped with
a navigation system.
Within the framework of this service, you
receive a professional and reliable form of
navigation support without having to leave
your vehicle.
The customer service representative finds a
suitable route depending on your vehicle's
curren tposition and the desired destination.
You will then be guided live through the
current route section.
Search &Send "Search & Send" is a destination entry
service. You can find further information on
"Search
&Send" in the separate COMAND
operating instructions.
Vehicle remote opening You can use the vehicle remote opening if you
have unintentionally locked your vehicle and
a replacemen
tSmartKey is not available.T he
vehicle can be opened by the Mercedes-Benz
Customer Assistance center.
The vehicle can be opened remotely up to four
days after the ignition was last switched off.
X Contact the following service hotlines:
R
USA: Mercedes-BenzC ustomer
Assistance center at
1-800-FOR-MERCedes (1-800-367-6372
)or 1-888-990-9007
R Canada: Customer Service at
1-888-923-8367
You will be asked for your password.
X Return to your vehicle at the time agreed
upon with the Mercedes-Benz Customer
Assistance Center.
X Pull on the tailgate handle for at least
20 seconds until the indicator lamp in the
SOS button (Y page 272) flashes.
The Connecting Call message appears
on the multifunction display.
USA only: alternatively, the vehicle can be
opened via:
R the Internet, under the "Owners Online"
section
R the telephone application (e.g. iPhone ®
,
Blackberry)
To do this, you will need your identification
number and password.
i Vehicle remote opening is only possible if
the corresponding mobile phone network
is accessible.
The SOS button flashes and the Call Connected message appears in the
multifunction display to confirm that the
command for vehicle remote opening has
been received.
If the tailgate handle is pulled for longer
than 20 seconds before authorization has
been received, you must wait for
15 minutes. Only then can you pull the
tailgate handle once again. 276
FeaturesStowage and features
Page 281 of 364
i
Canada only:
This device complies with the RSS-210
Rules of Industry Canada. Operation is
subject to the following two conditions:
1. This device may no tcause harmful
interference, and
2. this device must accept any interference
received, including interference that may
cause undesired operatio nofthe device.
Any unauthorized modification to this
device could void the user's authority to
operate the equipment.
IC: 279B-HMIHL4
Programming Programming buttons
G
WARNING
Only press the button on the integrated
garage door opener if there are no persons or
objects present within the sweep of the
garage door. Persons could otherwise be
injured as the door moves. Integrated garage door opener on the rear-view
mirror
Garage door remote control
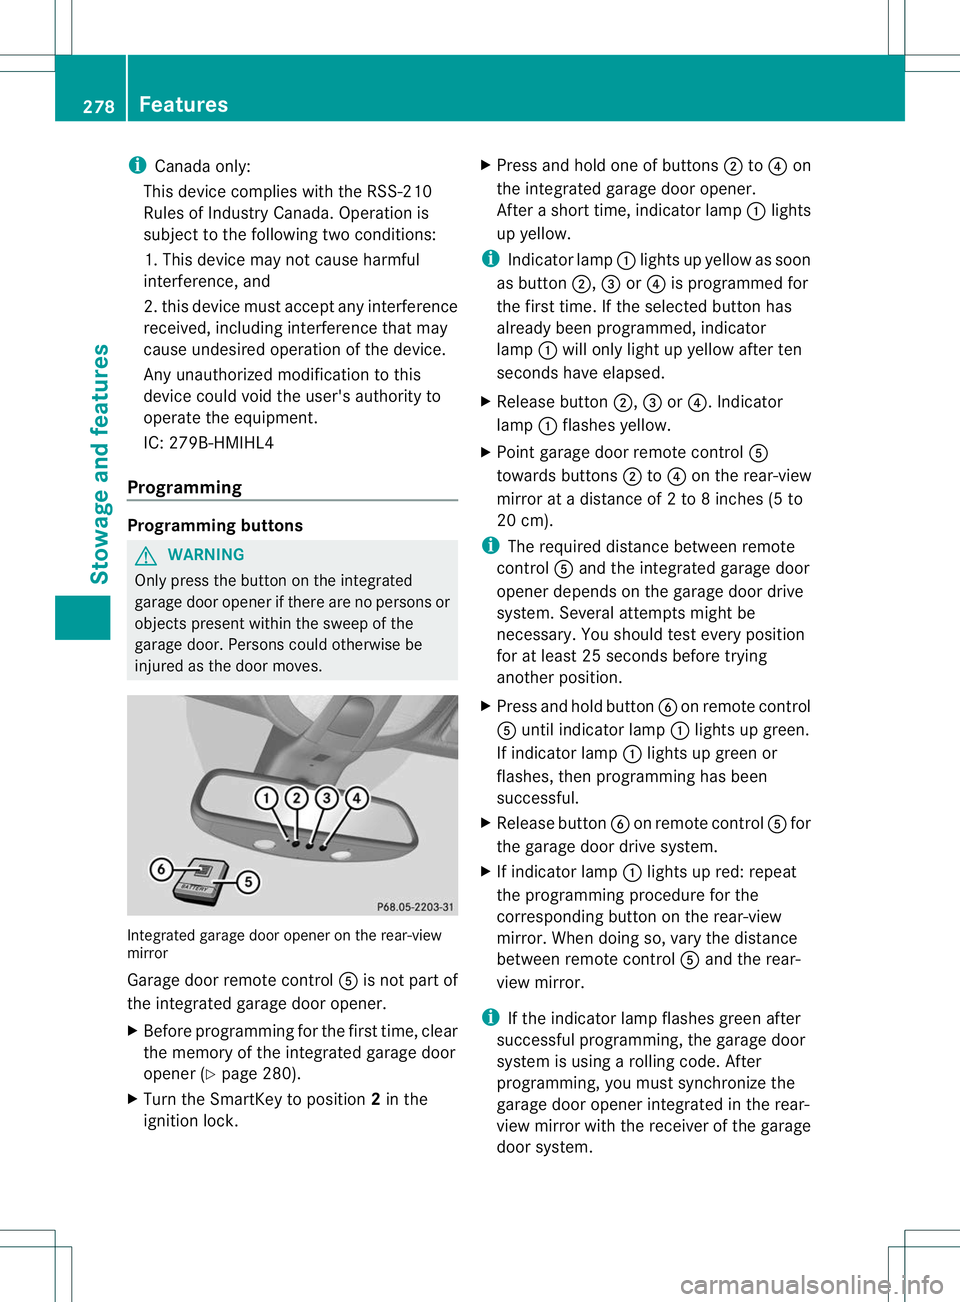
Ais not part of
the integrated garage door opener.
X Before programming for the first time, clear
the memory of the integrated garage door
opener (Y page 280).
X Turn the SmartKey to position 2in the
ignition lock. X
Press and hold one of buttons ;to? on
the integrated garage door opener.
After a short time, indicator lamp :lights
up yellow.
i Indicator lamp :lights up yellow as soon
as button ;,=or? is programmed for
the first time. If the selected button has
already been programmed, indicator
lamp :will only light up yellow after ten
seconds have elapsed.
X Release button ;,=or?. Indicator
lamp :flashes yellow.
X Point garage door remote control A
towards buttons ;to? on the rear-view
mirror at a distance of 2 to 8 inches (5 to
20 cm).
i The required distance between remote
control Aand the integrated garage door
opener depends on the garage door drive
system. Several attemptsm ight be
necessary. You should tes tevery position
for at least 25 seconds before trying
another position.
X Press and hold button Bon remote control
A until indicator lamp :lights up green.
If indicator lamp :lights up green or
flashes, then programming has been
successful.
X Release button Bon remote control Afor
the garage door drive system.
X If indicator lamp :lights up red: repeat
the programming procedure for the
corresponding button on the rear-view
mirror. When doing so, vary the distance
between remote control Aand the rear-
view mirror.
i If the indicator lamp flashes green after
successful programming, the garage door
system is using a rolling code. After
programming, you must synchronize the
garage door opener integrated in the rear-
view mirror with the receive rofthe garage
door system. 278
FeaturesStowage and features