driver seat adjustment MERCEDES-BENZ R-CLASS FAMILY TOURER 2013 Owners Manual
[x] Cancel search | Manufacturer: MERCEDES-BENZ, Model Year: 2013, Model line: R-CLASS FAMILY TOURER, Model: MERCEDES-BENZ R-CLASS FAMILY TOURER 2013Pages: 364, PDF Size: 28.68 MB
Page 17 of 364
R
Radar sensor system Activating/deactivating .................209
Radiator cover ................................... 285
Radio Selecting astation ......................... 204
see separate operating instructions
Radio-controlled devices
(installing) .......................................... 281
Reading lamp ..................................... 124
Rear bench seat Folding forwards/back ..................254
Rear compartment
Activating/deactivating climate
control ........................................... 137
Exit/entry position (3rd row of
seats) ............................................ .107
Setting the airv ents...................... 144
Setting the temperature ................140
Rear fog lamp
Display message ............................ 223
Switching on/off ........................... 122
Rear lamps
see Lights
Rear seat
Adjusting ....................................... 106
Rear seats
see Rears eat
Rear view camera
Function/notes ............................. 189
Rear-view mirror
Anti-glare (manual). .......................114
Dipping (automatic) .......................115
Rear window defroster
Problem (malfunction) ...................143
Switching on/off ........................... 142
Rear window wiper
Replacing the wiper blade .............. 132
Switching on/off ........................... 131
Refueling
Fuel gauge ....................................... 31
Important safety notes ..................160
Refueling process. .........................161
see Fuel
Remote control
Programming (garage door
opener) .......................................... 278Reporting safety defects
....................25
Reserve (fuel tank) see Fuel
Reserve fuel
Display message ............................ 227
Warning lamp ................................. 245
see Fuel
Reset button ........................................ 31
Residual heat (climate control) ........143
Restraint system see SRS (Supplemental Restraint
System)
Roadside Assistance (breakdown) ....22
Roller sunblind Panorama roof with power tilt/
sliding panel ..................................... 95
Rea rside windows ......................... 267
Roof carrier ........................................ 264
Roof lining and carpets (cleaning
guidelines) ......................................... 296
Roof load (maximum) ........................357
Route (navigation) see Route guidance (navigation)
Route guidance (navigation) ............205 S
Safety Childrenint he vehicle..................... 60
Child restraint systems ....................60
Occupant Classification System
(OCS) ............................................... 46
Safety system
see Driving safety systems
Seat belts
Adjusting the driver's and front-
passenger seatb elt......................... 57
Adjusting the height ......................... 57
Belt force limiters ............................ 59
Cleaning ......................................... 295
Correct usage .................................. 55
Emergency Tensioning Devices ....... .59
Fastening ......................................... 56
Important safety guidelines .............54
Releasing ......................................... 58
Safety guidelines ............................. 42
Switching belt adjustment on/off
(on-board computer) ......................21014
Index
Page 56 of 364
R
if the vehicle skids, the side windows are
closed so that only a small gap remains.
R on vehicles with a sliding sunroof: if the
vehicle skids, the sliding sunroof closes so
that only a small gap remains.
If the hazardous situation passes without
resulting in an accident, PRE-SAFE ®
slackens
the belt pretensioning. All settings made by
PRE-SAFE ®
can then be reversed.
If the seat belts are not released:
X Move the backrest or seat back slightly, but
only when the vehicle is stationary.
The belt pretensioning is reduced and the
locking mechanis mis released.
More information abouts eat-belt
adjustment, a convenience function
integrated into PRE-SAFE ®
, can be found in
the "Seat-belt adjustment" section
(Y page 57). NECK-PRO head restraints/NECK-
PRO luxury head restraints
Important safety notes G
WARNING
Do not attach any objects (e.g. a coat hanger)
to the NECK-PRO head restraints/NECK-PRO
luxury head restraints. Otherwise, the NECK-
PRO head restraints/NECK-PRO luxury head
restraints may not function properly and in
the event of a rear-end collision may not offer
the protection they are designed to provide. G
WARNING
Seat or head restraint covers can cause a
malfunction when the NECK-PRO head
restraints/NECK PRO luxury head restraints
are activated or when the side impact air bags
are deployed, or they can preven tthis
completely. The NECK-PRO head restraints/
NECK PRO luxury head restraints or side
impact air bags can therefore not provide the
intended protection. Do not use any seat or
head restraint covers. G
WARNING
For your protection, drive only with properly
positioned head restraints.
Adjust the head restraint so that it is as close
to the head as possible and the center of the
head restraint supports the back of the head
at eye level. This will reduce the potential for
injury to the head and neck in the event of an
accident or similar situation. G
WARNING
For reasons of safety, have the NECK-PRO
head restraints/NECK-PRO luxury head
restraints checked at an authorized
Mercedes-Benz Center after a rear-end
collision.
NECK-PRO head restraints/NECK-PRO luxury
head restraints increase protection of the
driver's and front-passenger's head and
neck. In the event of a rear collision of a
certain severity, the NECK-PRO head
restraints/NECK-PRO luxury head restraints
on the driver's and front-passenger seats are
moved forwards and upwards. This provides
better head support.
If the NECK-PRO head restraints/NECK-PRO
luxury head restraints have been triggered in
an accident, reset the NECK-PRO head
restraints/NECK-PRO luxury head restraints
on the driver's and front-passenger seats
(Y page 54). Otherwise, the additional
protection will not be available in the event of
another rear-end collision. NECK-PRO head
restraints/NECK-PRO luxury head restraints
that have been triggered are moved forwards
and can no longer be adjusted.
Resetting triggered NECK-PRO head
restraints/NECK-PRO luxury head
restraints NECK-PRO head restraints
G
WARNING
When pushing back the NECK-PRO head
restraint cushion, make sure your fingers do Occupant safety
53Safety
Z
Page 60 of 364
X
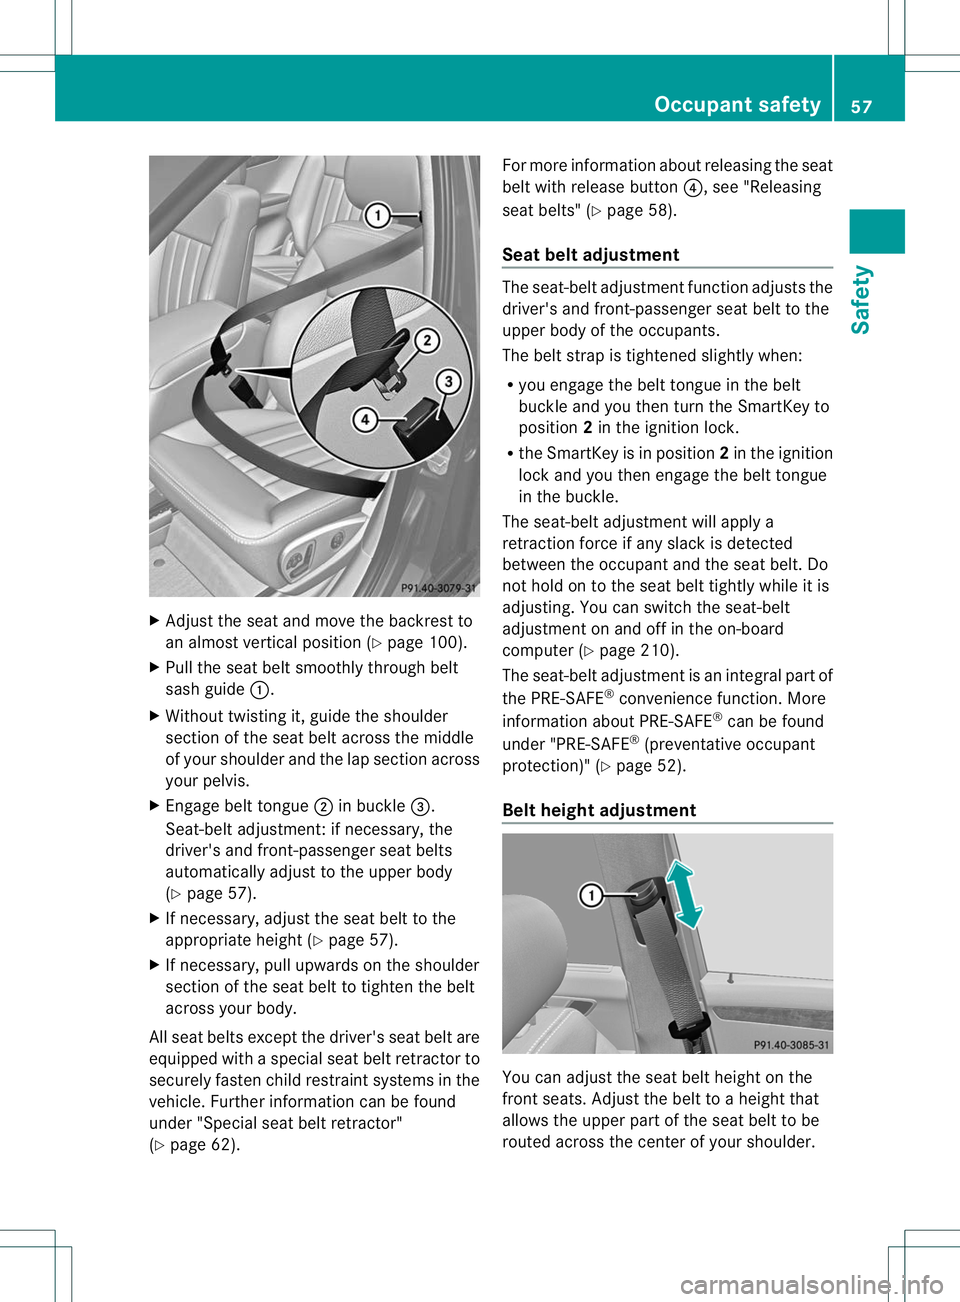
Adjust the seat and move the backrest to
an almos tvertical position (Y page 100).
X Pull the seat belt smoothly through belt
sash guide :.
X Without twisting it, guide the shoulder
section of the seat belt across the middle
of your shoulder and the lap section across
your pelvis.
X Engage belt tongue ;in buckle =.
Seat-belt adjustment:ifn ecessary, the
driver's and front-passenger seat belts
automatically adjust to the upper body
(Y page 57).
X If necessary, adjust the seat belt to the
appropriate height (Y page 57).
X If necessary, pull upwards on the shoulder
section of the seat belt to tighten the belt
across your body.
All seat belts except the driver's seat belt are
equipped with a special seat belt retractor to
securely fasten child restraint systems in the
vehicle. Further information can be found
under "Special seat belt retractor"
(Y page 62). For more information about releasing the seat
belt with release button
?, see "Releasing
seat belts" (Y page 58).
Seat belt adjustment The seat-belt adjustment function adjusts the
driver's and front-passenger seat belt to the
upper body of the occupants.
The belt strap is tightened slightly when:
R
you engage the belt tongue in the belt
buckle and you then turn the SmartKey to
position 2in the ignition lock.
R the SmartKey is in position 2in the ignition
lock and you then engage the belt tongue
in the buckle.
The seat-belt adjustment will apply a
retraction force if any slack is detected
between the occupant and the seat belt. Do
not hold on to the seat belt tightly while it is
adjusting. You can switch the seat-belt
adjustment on and off in the on-board
computer (Y page 210).
The seat-belt adjustment is an integral part of
the PRE-SAFE ®
convenience function. More
information about PRE-SAFE ®
can be found
under "PRE-SAFE ®
(preventative occupant
protection)" (Y page 52).
Belt height adjustment You can adjust the seat belt height on the
fron
tseats. Adjust the belt to a height that
allows the upper part of the seat belt to be
routed across the center of your shoulder. Occupant safety
57Safety Z
Page 70 of 364
ignition lock or removed from the vehicle,
such as seat adjustment, steering wheel
adjustment, or the memory function
If children open a door, they could injure other
persons or get out of the vehicle and injure
themselves or be injured by following traffic.
Do not expose the child restraint system to
direc tsunlight .The child restraint system's
metal parts, for example, could become very
hot, and the child could be burned on these
parts.
Child-proof locks for the rear doors G
WARNING
Children could open a rear door from inside
the vehicle. This could result in serious
injuries or an accident. Therefore, when
children ride in the rear always secure the rear
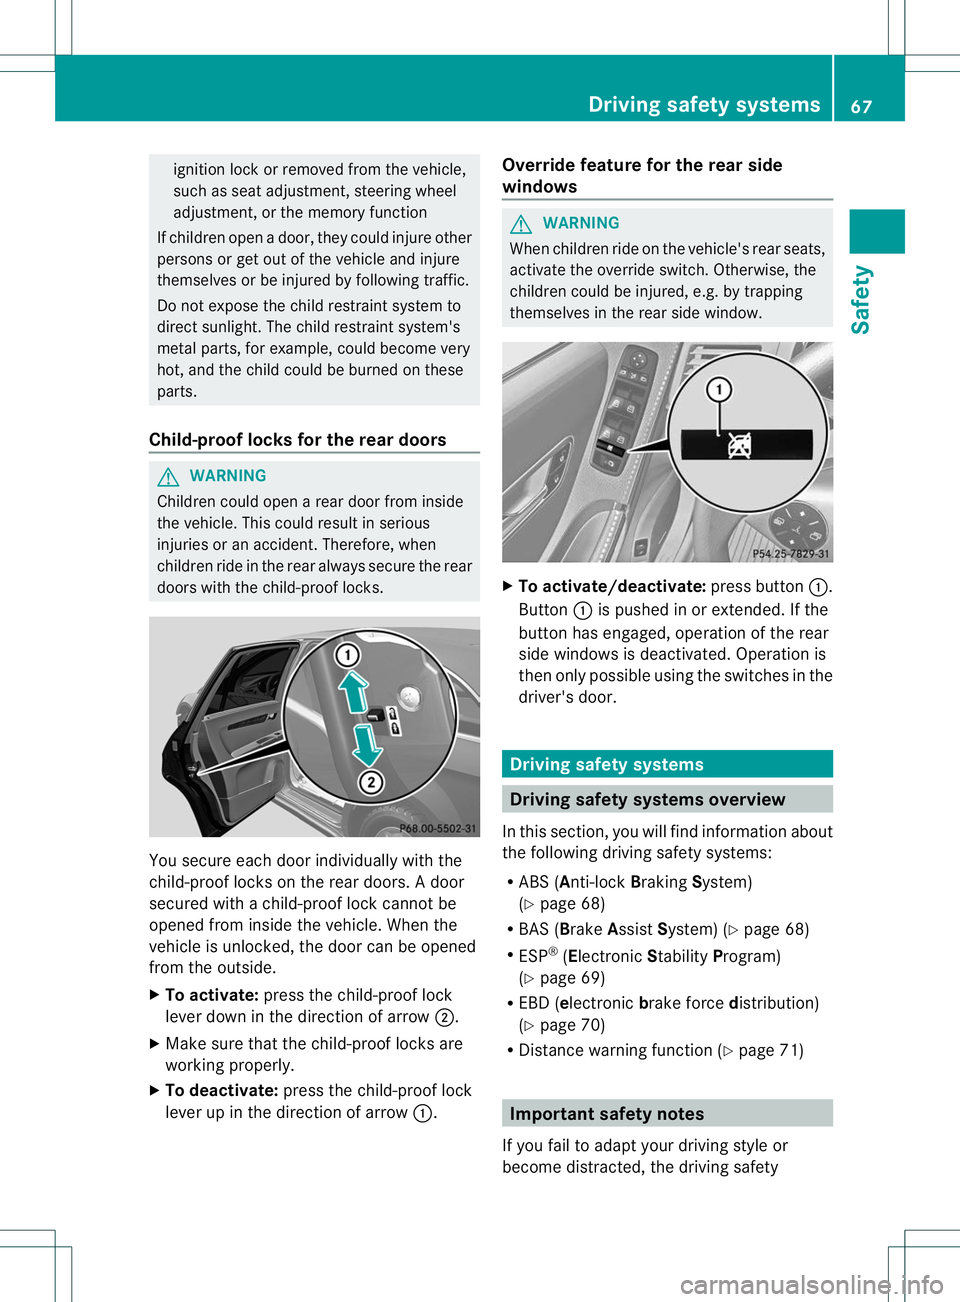
doors with the child-proof locks. You secure each door individually with the
child-proof locks on the rear doors.
Adoor
secured with a child-proof lock cannot be
opened from inside the vehicle. When the
vehicle is unlocked, the door can be opened
from the outside.
X To activate: press the child-proof lock
lever down in the direction of arrow ;.
X Make sure that the child-proof locks are
working properly.
X To deactivate: press the child-proof lock
lever up in the direction of arrow :.Override feature for the rear side
windows G
WARNING
When children ride on the vehicle's rear seats,
activate the override switch. Otherwise, the
children could be injured, e.g. by trapping
themselves in the rear side window. X
To activate/deactivate: press button:.
Button :is pushed in or extended. If the
button has engaged, operation of the rear
side windows is deactivated. Operation is
then only possible using the switches in the
driver's door. Driving safety systems
Driving safety systems overview
In this section, you will find information about
the following driving safety systems:
R ABS (Anti-lock BrakingSystem)
(Y page 68)
R BAS (Brake AssistSystem) (Y page 68)
R ESP ®
(Electronic StabilityProgram)
(Y page 69)
R EBD ( electronic brake force distribution)
(Y page 70)
R Distance warning function (Y page 71) Important safety notes
If you fail to adapt your driving style or
become distracted, the driving safety Driving safety systems
67Safety Z
Page 103 of 364
Useful information
i This Operator's Manual describes all
models and all standard and optional
equipment of your vehicle available at the
time of publication of the Operator's
Manual. Country-specific differences are
possible. Please note that your vehicle may
not be equipped with all features
described. This also applies to safety-
related systems and functions.
i Read the information on qualified
specialist workshops: (Y page 24).Correcting the driver's seat position
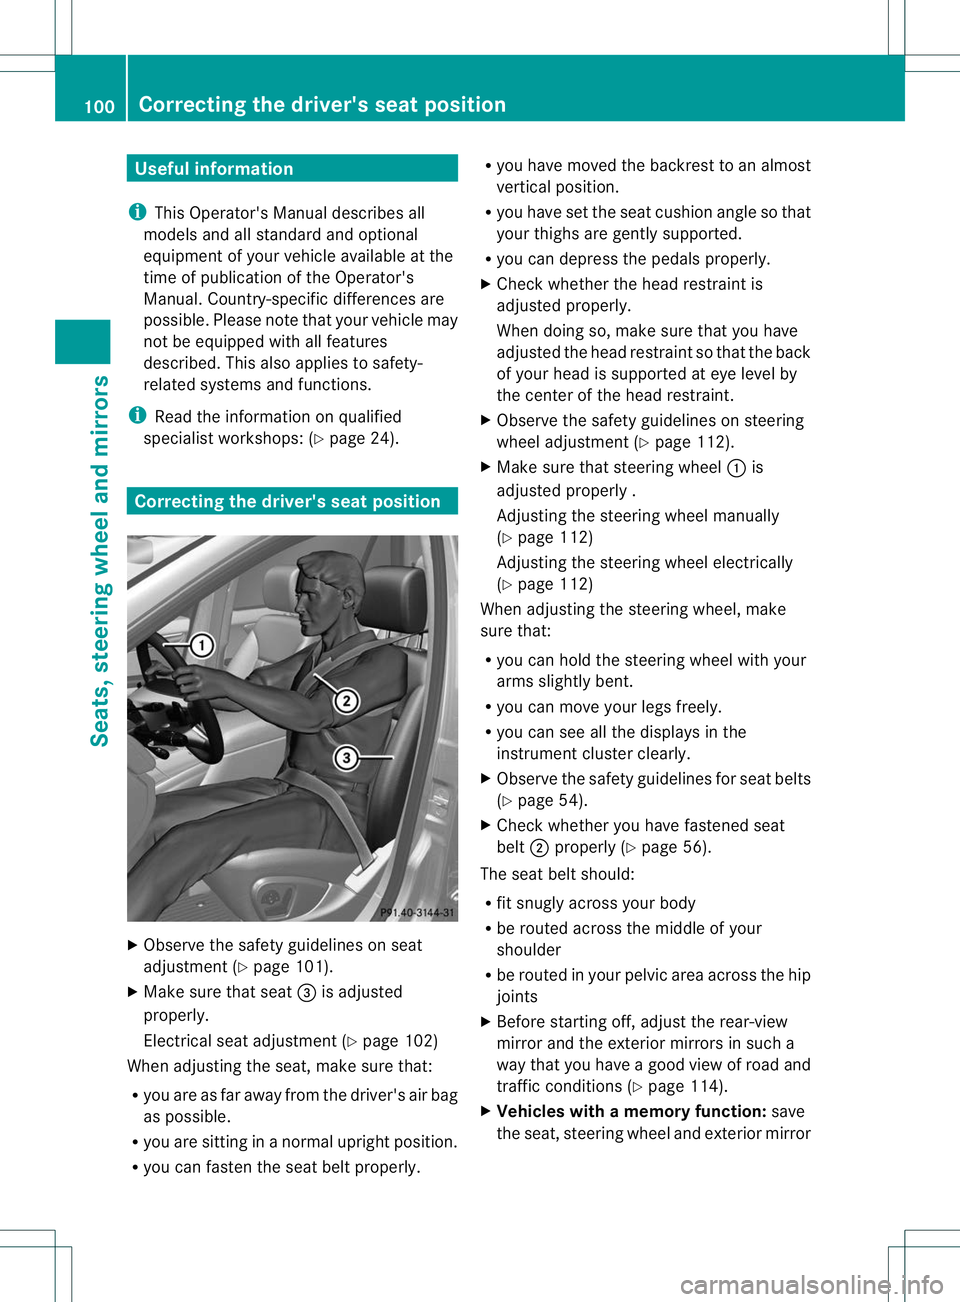
X
Observe the safety guidelines on seat
adjustment (Y page 101).
X Make sure that seat =is adjusted
properly.
Electrical seat adjustment (Y page 102)
When adjusting the seat, make sure that:
R you are as far away from the driver's air bag
as possible.
R you are sitting in a normal upright position.
R you can fastent he seat belt properly. R
you have moved the backrest to an almost
vertical position.
R you have set the seat cushion angle so that
your thighs are gently supported.
R you can depress the pedals properly.
X Check whether the head restraint is
adjusted properly.
When doing so, make sure that you have
adjusted the head restraint so that the back
of your head is supported at eye level by
the center of the head restraint.
X Observe the safety guidelines on steering
wheel adjustment (Y page 112).
X Make sure that steering wheel :is
adjusted properly .
Adjusting the steering wheel manually
(Y page 112)
Adjusting the steering wheel electrically
(Y page 112)
When adjusting the steering wheel, make
sure that:
R you can hold the steering wheel with your
arms slightly bent.
R you can move your legs freely.
R you can see all the displays in the
instrumentc luster clearly.
X Observe the safety guidelines for seat belts
(Y page 54).
X Check whether you have fastened seat
belt ;properly (Y page 56).
The seat belt should:
R fit snugly across your body
R be routed across the middle of your
shoulder
R be routed in your pelvic area across the hip
joints
X Before starting off, adjust the rear-view
mirror and the exterior mirrors in such a
way that you have a good view of road and
traffic conditions (Y page 114).
X Vehicles with a memory function: save
the seat, steering wheel and exterior mirror 100
Correcting the driver's seat positionSeats, steering wheel and mirrors
Page 104 of 364
settings using the memory function
(Y
page 116). Seats
Important safety notes
G
WARNING
The seats can still be adjusted when there is
no key in the ignition lock. For this reason,
children should never be left unsupervised in
the vehicle. They could otherwise become
trapped when adjusting the seat. G
WARNING
Make sure that the back of your head is
supported at eye level by the central area of
the head restraint. If your head is not
supported correctly by the head restraint, you
could suffer a severe neck injury in the event
of an accident. Never drive if the head
restraints are not engaged and set correctly. G
WARNING
In order to avoid possible loss of vehicle
control, all seat, head restraint, steering
wheel and rear view mirror adjustments, as
well as fastening of seat belts, must be done
before setting the vehicle in motion. G
WARNING
Do not adjust the driver's seat while driving.
Adjusting the seat while driving could cause
the driver to lose control of the vehicle.
Never travel in a moving vehicle with the seat
backrest in an excessively reclined position as
this can be dangerous. You could slide under
the seat belt in a collision. If you slide under
it, the seat belt would apply force at the
abdomen or neck. This could cause serious or
fatal injuries. The seat backrest and seat belts
provide the best restraint when the wearer is
in a position that is as upright as possible and
seat belts are properly positioned on the
body. G
WARNING
Your seat belt must be adjusted so that you
can correctly fasten your seat belt.
Observe the following points:
R adjust the seat backrest until your arms are
slightly angled when holding the steering
wheel.
R adjust the seat to a comfortable seating
position that still allows you to reach the
accelerator/brake pedal safely.T he
position should be as far back as possible
with the driver still able to operate the
controls properly.
R adjust the head restraint so that it is as
close to the head as possible and the center
of the head restraint supports the back of
the head at eye level.
R never place hands under the seat or near
any moving parts while a seat is being
adjusted.
Failure to do so could result in an accident
and/or serious personal injury. G
WARNING
According to accident statistics, children are
safer when properly restrained on the rear
seats than on the front-passenger seat. Thus,
we strongly recommend that children be
placed in the rear seat whenever possible.
Regardless of seating position, children 12
years old and under must be seated and
properly secured in an appropriately sized
child restraint system or booster seat
recommended for the size and weight of the
child. For additional information, see the
"Children in the vehicle" section.
Ac hild's risk of serious or fatal injuries is
significantly increased if the child restraints
are not properly secured in the vehicle and/
or the child is not properly secured in the child
restraint. G
WARNING
For your protection, drive only with properly
positioned head restraints. Seats
101Seats, steering wheel and mirrors
Z
Page 115 of 364
Steering wheel
Important safety notes
G
WARNING
Do not adjust the steering wheel while driving.
Adjusting the steering wheel while driving, or
driving without the steering wheel adjustment
feature locked could cause the driver to lose
control of the vehicle.
The electrical steering wheel adjustment
feature can be operated at any time.
Therefore, do not leave children unattended
in the vehicle, or with access to an unlocked
vehicle. Achild's unsupervised access to a
vehicle could result in an accident and/or
serious personal injury. Adjusting the steering wheel
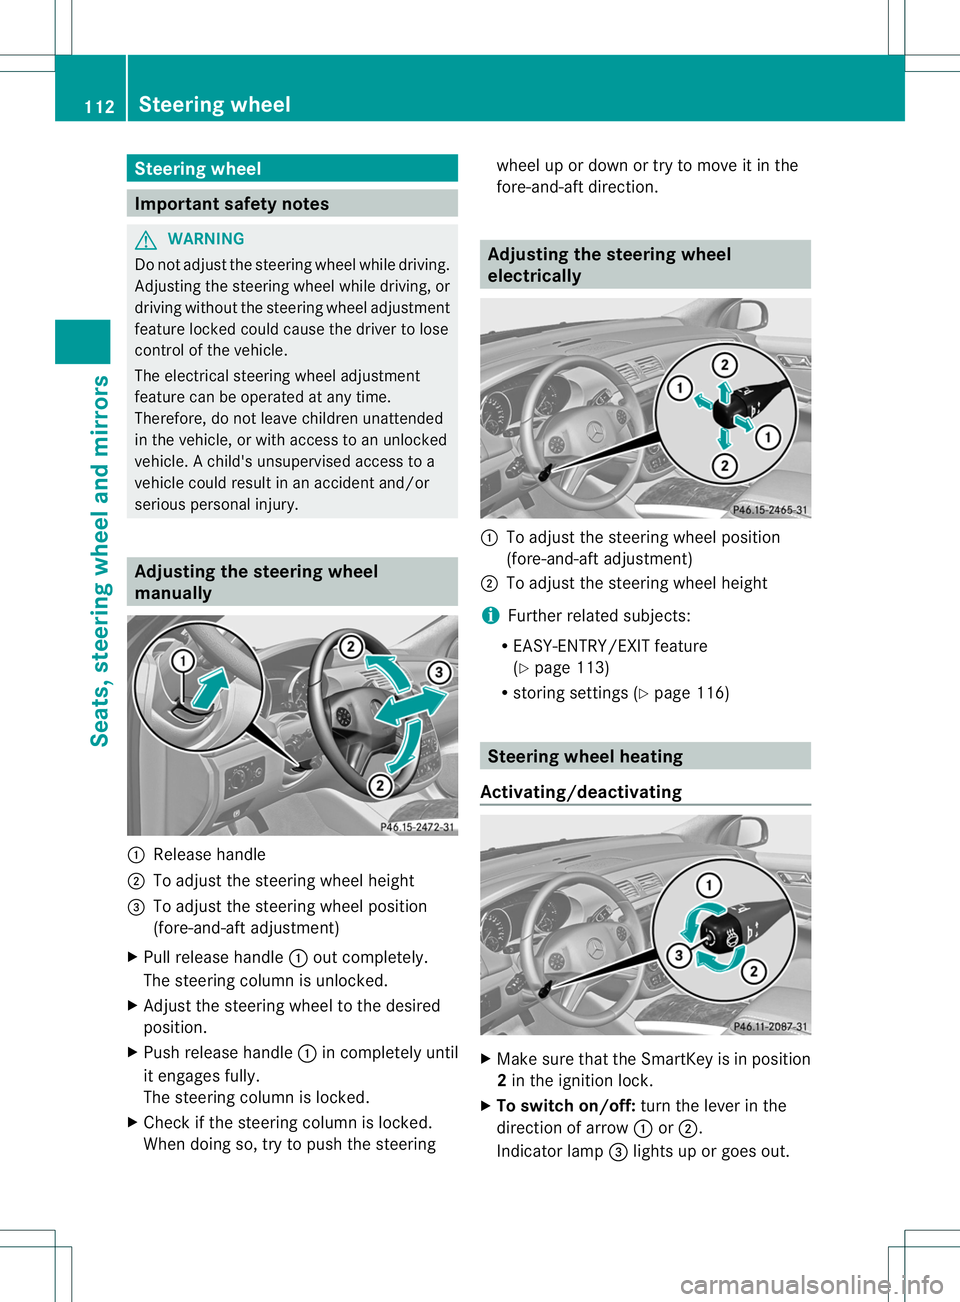
manually
:
Release handle
; To adjust the steering wheel height
= To adjust the steering wheel position
(fore-and-aft adjustment)
X Pull release handle :out completely.
The steering column is unlocked.
X Adjust the steering wheel to the desired
position.
X Push release handle :in completely until
it engages fully.
The steering column is locked.
X Check if the steering column is locked.
When doing so, try to push the steering wheel up or down or try to move it in the
fore-and-aft direction. Adjusting the steering wheel
electrically
:
To adjust the steering wheel position
(fore-and-aft adjustment)
; To adjust the steering wheel height
i Further related subjects:
R EASY-ENTRY/EXIT feature
(Y page 113)
R storing settings (Y page 116) Steering wheel heating
Activating/deactivating X
Make sure that the SmartKey is in position
2in the ignition lock.
X To switch on/off: turn the lever in the
direction of arrow :or;.
Indicator lamp =lights up or goes out. 112
Steering wheelSeats, steering wheel and mirrors
Page 116 of 364
Vehicles without KEYLESS-GO: when you
remove the SmartKey from the ignition lock,
the steering wheel heating is deactivated.
Vehicles with KEYLESS-GO: when you switch
off the ignition and open the driver's door, the
steering wheel heating is deactivated.
Problems with the steering wheel
heating
The steering wheel heating has switched off
prematurely or cannot be switched on. The
vehicle's electrical system voltage is too low
because too many electrical consumers are
switched on.
X
Switch off electrical consumers that you do
not need, such as the rear window
defroster or interior lighting. EASY-ENTRY/EXIT feature
Important safety notes G
WARNING
Make sure that nobody can become trapped
when you activate the EASY-ENTRY/EXIT
feature.
If there is a risk of someone becoming
trapped, stop the adjustment procedure. To
halt the procedure:
R press the steering column adjustment
button.
R press one of the memory function position
buttons.
The steering column stops moving
immediately.
Do not keep the memory function position
button pressed as this will start the memory
function and set the steering wheel and seat
in motion.
Do not leave children unattended in the
vehicle. They could open the driver's door and
thereby unintentionally activate the EASY-
ENTRY/EXIT feature and become trapped. G
WARNING
Let the system complete the adjustment
procedure before setting the vehicle in
motion. All steering wheel adjustment must
be completed before setting the vehicle in
motion. Driving off with the steering wheel
still adjusting could cause the driver to lose
control of the vehicle.
The EASY-ENTRY/EXIT feature makes getting
in and out of yourv ehicle easier.
You can activate and deactivate the EASY-
ENTRY/EXIT feature in the on-board
computer (Y page 210).
Position of the steering wheel when the
EASY-ENTRY/EXIT feature is active The steering wheel swings upwards when
you:
R
remove the SmartKey from the ignition lock
R open the driver's door and KEYLESS-GO is
in position 1
R open the driver's door and the SmartKey is
in position 0or 1in the ignition lock
i The steering wheel only moves upwards if
it has not already reached the upper end
stop.
Position of the steering wheel for
driving The steering wheel is moved to the last
selected position when:
R
the driver's door is closed.
R you insert the SmartKey into the ignition
lock.
or
R you press the Start/Stop button once on
vehicles with KEYLESS-GO.
When you close the driver's door with the
ignition switched on, the steering wheel is
also automatically moved to the previously
set position.
The last position of the steering wheel is
stored when you switch off the ignition or Steering wheel
113Seats, steering wheel and mirrors Z
Page 117 of 364
when you store the settin
gwith the memory
function (Y page 116).
Crash-responsive EASY-EXIT feature If the crash-responsive EASY-EXIT feature is
triggered in an accident, the steering column
will move upwards when the driver's door is
opened. This occurs irrespective of the
position of the SmartKey in the ignition lock.
This makes it easier to exit the vehicle and
rescue the occupants.
The crash-responsive EASY-EXIT feature is
only operational if the EASY-EXIT/ENTRY
feature is activated in the on-board computer
(Y
page 210). Mirrors
Rear-view mirror
X
Anti-glare mode: flick anti-glare lever :
forwards or back. Exterior mirrors
Adjusting the exterior mirrors G
WARNING
The exterior mirrors reduce the size of the
image. Objects are actually closer than they
appear. You could misjudge the distance from
vehicles driving behind and cause an
accident, e.g. when changing lane. For this
reason, make sure of the actual distance from the vehicle driving behind by glancing over
your shoulder.
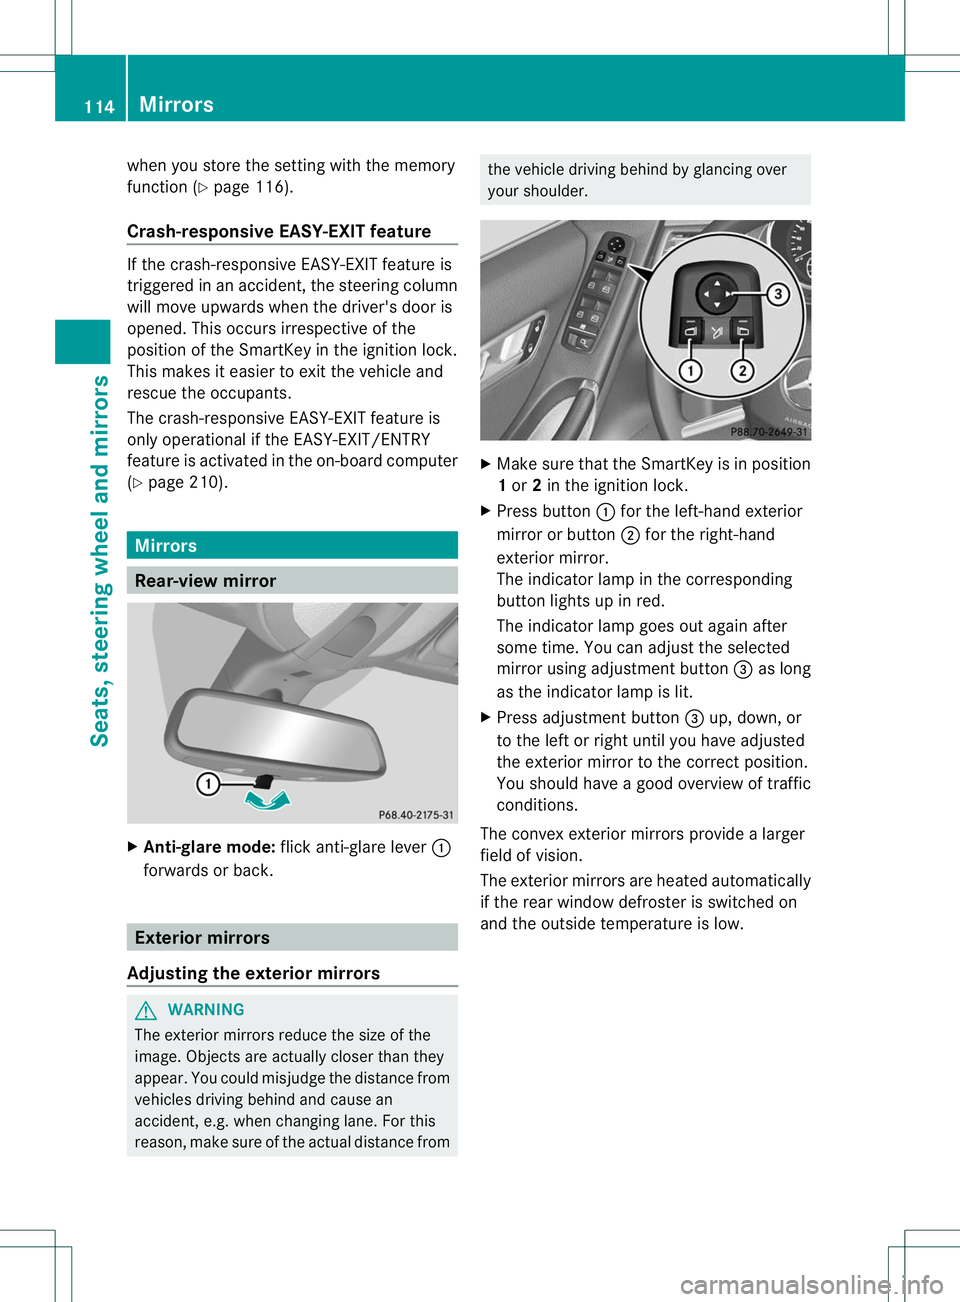
X
Make sure that the SmartKey is in position
1or 2in the ignition lock.
X Press button :for the left-hand exterior
mirror or button ;for the right-hand
exterior mirror.
The indicator lamp in the corresponding
button lights up in red.
The indicator lamp goes out again after
some time. You can adjust the selected
mirror using adjustment button =as long
as the indicator lamp is lit.
X Press adjustmen tbutton =up, down, or
to the left or right until you have adjusted
the exterior mirror to the correct position.
You should have a good overview of traffic
conditions.
The convex exterio rmirrors provide a larger
field of vision.
The exterior mirrors are heated automatically
if the rear window defroster is switched on
and the outside temperature is low. 114
MirrorsSeats, steering wheel and mirrors
Page 119 of 364
Parking position for the exterior
mirror on the front-passenger side
Setting and storing the parking position Using reverse gear
You can position the front-passenger side
exterior mirror in such a way that you can see
the rear wheel on that side as soon as you
engage reverse gear. You can store this
position.
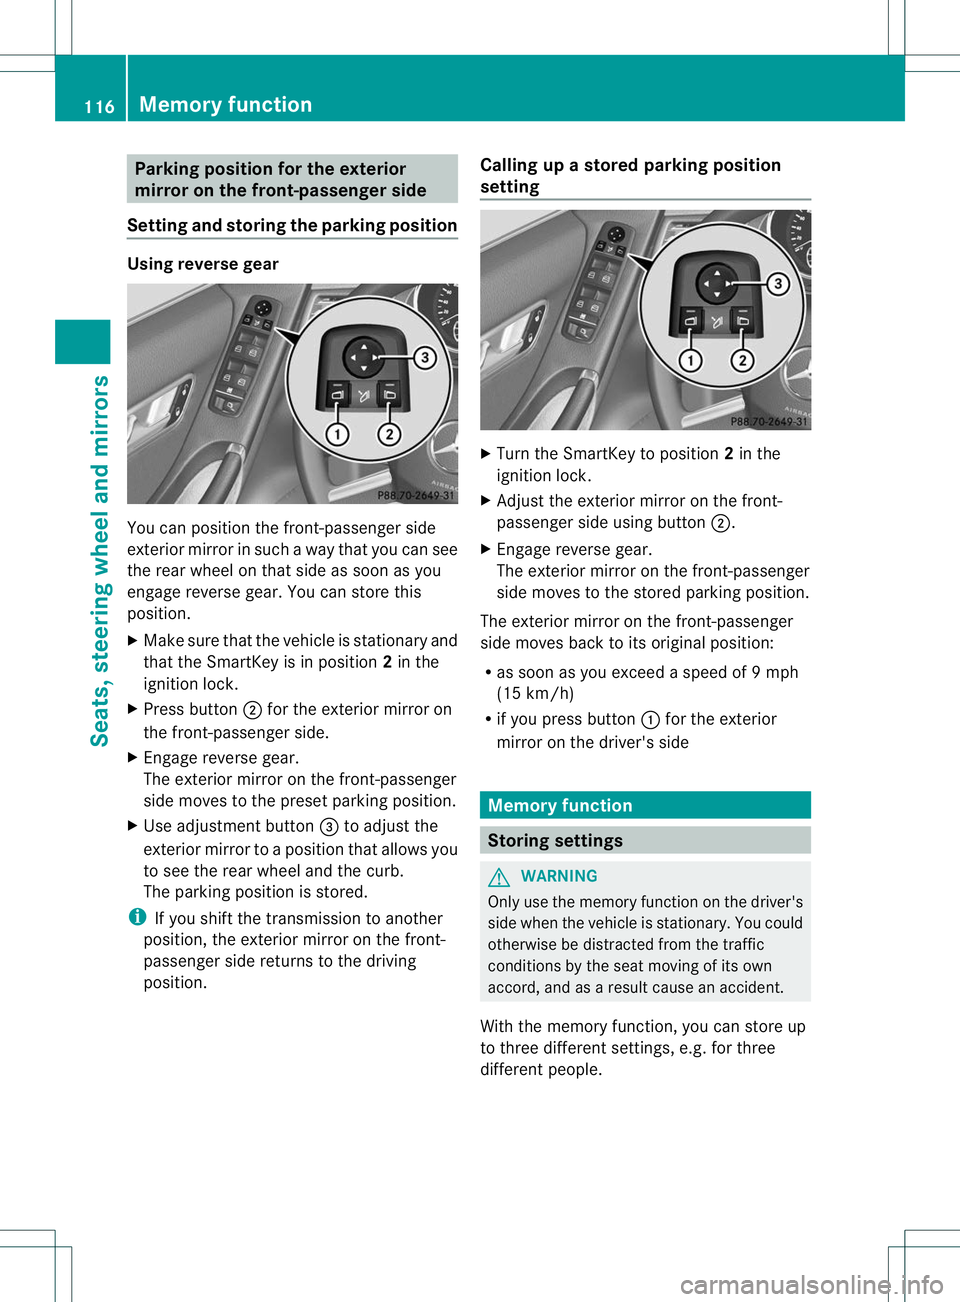
X
Make sure that the vehicle is stationary and
that the SmartKey is in position 2in the
ignition lock.
X Press button ;for the exterior mirror on
the front-passenger side.
X Engage reverse gear.
The exterior mirror on the front-passenger
side moves to the preset parking position.
X Use adjustment button =to adjust the
exterior mirror to a position that allows you
to see the rear wheel and the curb.
The parking position is stored.
i If you shift the transmission to another
position, the exterior mirror on the front-
passenger side returns to the driving
position. Calling up a stored parking position
setting X
Turn the SmartKey to position 2in the
ignition lock.
X Adjust the exterior mirror on the front-
passenger side using button ;.
X Engage reverse gear.
The exterior mirror on the front-passenger
side moves to the stored parking position.
The exterior mirror on the front-passenger
side moves back to its original position:
R as soon as you exceed a speed of 9mph
(15 km/h)
R if you press button :for the exterior
mirror on the driver's side Memory function
Storing settings
G
WARNING
Only use the memory function on the driver's
side when the vehicle is stationary. You could
otherwise be distracted from the traffic
conditions by the seat moving of its own
accord, and as a result cause an accident.
With the memory function, you can store up
to three different settings, e.g. for three
differen tpeople. 116
Memory functionSeats, steering wheel and mirrors