isofix MERCEDES-BENZ R-CLASS FAMILY TOURER 2013 Owners Manual
[x] Cancel search | Manufacturer: MERCEDES-BENZ, Model Year: 2013, Model line: R-CLASS FAMILY TOURER, Model: MERCEDES-BENZ R-CLASS FAMILY TOURER 2013Pages: 364, PDF Size: 28.68 MB
Page 9 of 364
Cargo compartment enlargement
Full ................................................ .255
Important safety notes ..................254
Partial ............................................ 255
Cargo compartment floor .................298
Cargo net Attaching ....................................... 263
Important safety information .........262
Cargo tie down rings .........................259
Car keys see SmartKey
Car wash (care) ................................. 290
CD player/CD changer (on-board
computer) .......................................... 204
Center console 2nd row of seats ............................ 253
Lowe rsection .................................. 35
Uppe rsection .................................. 34
Central locking
Automatic locking (on-board
computer) ...................................... 209
Locking/unlocking (SmartKey) ........77
Changing bulbs
High-beam headlamps ...................128
Important safety notes ..................125
License plate lighting .....................130
Low-beam headlamps ....................127
Overview of bul btypes .................. 126
Parking lamps ................................ 128
Removing/replacing the cover
(front wheel arch) .......................... 127
Reversing lamps ............................ 129
Side marker lamps .........................128
Standing lamps (front) ...................128
Turn signals (front) ......................... 128
Child-proof locks
Important safety notes ....................66
Rea rdoors ....................................... 67
Children
In the vehicle ................................... 60
Restraint systems ............................ 60
Specia lseat belt retractor ...............62
Child seat
LATCH-type (ISOFIX) child seat
anchors ............................................ 63
Top Tether ....................................... 64
Cigarette lighter ................................ 268Cleaning
Mirro rturn signal ........................... 293
Trailer tow hitch ............................. 294
Climate control
Automatic climate control (3-
zone) .............................................. 136
Controlling automatically ...............139
Cooling with aird ehumidification..138
Defrosting the windows .................142
Defrosting the windshield ..............142
Dual-zone automatic climate
control ........................................... 135
Important safety notes ..................134
Indicator lamp ................................ 139
Information on using 3-zone
automatic climate control ..............137
Notes on using automatic climate
control ........................................... 135
Overview of systems ......................134
Problems with cooling with air
dehumidification ............................ 139
Problem with the rear window
defroster ........................................ 143
Rea rcontrol panel ......................... 136
Setting the aird istribution.............141
Setting the airflow .........................141
Setting the airv ents...................... 144
Setting the temperature ................140
Switching air-recirculation mode
on/off ............................................ 143
Switching on/off ........................... 137
Switching residual hea ton/off ......143
Switching the MONO function on/
off .................................................. 141
Switching the rear window
defroster on/off ............................ 142
Clock (on-board computer) ...............207
Cockpit Overview .......................................... 30
see Instrument cluster
Collapsible spare wheel
Inflating ......................................... 343
see Emergency spare wheel
COMAND
see separate operating instructions
COMAND display
Cleaning ......................................... 294
Combination switch ..........................1236
Index
Page 14 of 364
Instrumen
tcluster
Overview .......................................... 31
Selecting the language (on-board
computer) ...................................... 207
Settings ......................................... 206
Warning and indicator lamps ...........32
Instrument cluster lighting ..............200
Interior lighting ................................. 124
Automatic control ..........................125
Delayed switch-off (on-board
computer) ...................................... 209
Emergency lighting ........................125
Manual control ............................... 125
Overview ........................................ 124
Reading lamp ................................. 124J
Jack Storage location ............................ 298
Using ............................................. 336
Jump-start (engine)
see Jump starting (engine)
Jump starting (engine) ......................304 K
KEYLESS-GO Convenience closing feature ............91
Display message ............................ 237
Locking ............................................ 77
Start/Stop button .......................... 149
Starting the engine ........................151
Unlocking ......................................... 77
Keyp ositions
KEYLESS-GO .................................. 149
SmartKey ....................................... 149
Kickdown
Driving tips .................................... 157L
Lamps see Warning and indicator lamps
Language (on-board computer) ........207
LATCH-type (ISOFIX) child seat
anchors ................................................ 63
Level control (display message) ......228 Level control (vehicle with
AIRMATIC package)
Basi csettings ................................ 184
Function/notes ............................. 183
Important safety notes ..................183
License plate lamp
Changing bulbs .............................. 130
Display message ............................ 223
Lights
Activating/deactivating the
exterio rlighting delayed switch-
off .................................................. 208
Activating/deactivating the
interio rlighting delayed switch-off .209
Automatic headlamp mode ............121
Driving abroad ............................... 120
Fog lamps ...................................... 122
Hazard warning lamps ...................124
High beam flasher .......................... 123
High-beam headlamps ...................123
Ligh tswitc h................................... 120
Low-beam headlamps ....................121
Parking lamps ................................ 121
Rea rfog lamp ................................ 122
Standing lamps .............................. 121
Switching the daytime running
lamps on/off (on-board
computer) ...................................... 207
Switching the daytime running
lamps on/off (switch) ....................121
Switching the surround lighting
on/off (on-board computer) ..........208
Turn signals ................................... 123
see Changing bulbs
see Interior lighting
Light sensor (display message) .......224
Loading guidelines ............................250
Locking see Centra llocking
Locking (doors)
Automatic ........................................ 83
Emergency locking ........................... 84
From inside (central locking
button) ............................................. 83
Locking centrally
see Centra llocking
Locking verification signal (on-
board computer) ............................... 209 Index
11
Page 44 of 364
tamper with electronic components or their
software.
In this section, you will lear nthe most
important facts about the restraint system
components of the vehicle.
The restraint system consists of:
R seat belts
R child restraint systems
R LATCH-type (ISOFIX) child seat anchors
Additional protection is provided by:
R SRS (Supplemental Restraint System)
R NECK-PRO head restraints/NECK-PRO
luxury head restraints
R PRE-SAFE ®
R air bag system components with:
-PASSENGER AIR BAG OFF indicator lamp
- front-passenger seat with Occupant
Classification System (OCS)
The different air bag systems work
independently of each other. The protective
functions of the system work in conjunction
with each other. Not all air bags are always
deployed in an accident.
i See "Children in the vehicle" for
information on infants and children
traveling with you in the vehicle restraint
systems for infants and children
(Y page 60). SRS (Supplemental Restraint System)
Introduction SRS consists of:
R
+ SRS warning lamp
R Air bags
R The air bag control unit with crash sensors
R Emergency Tensioning Devices
R Belt force limiters
SRS reduces the risk of occupants coming
into contact with the vehicle's interior in the
event of an accident. It can also reduce the effect of the forces to which occupants are
subjected during an accident.
SRS warning lamp G
WARNING
The SRS self-check has detected a
malfunction if the +SRS warning lamp:
R does not come on at all
R fails to go out approximately 4seconds
after the engine was started
R comes on after the engine was started or
while driving
For your safety, Mercedes-Benz strongly
recommends that you have the system
checked as soon as possible at an authorized
Mercedes-Benz Center .Otherwise the SRS
may not be activated when it is needed in an
accident, which could resul tinserious or fatal
injury. The SRS might also deploy
unexpectedly and unnecessarily which could
also result in injury.
In addition, improper work on the SRS creates
a risk of rendering the SRS inoperative or
causing unintended air bag deployment. Work
on the SRS must therefore only be performed
by qualified technicians. Contac tan
authorized Mercedes-Ben zCenter.
If it is necessary to modify an air bag system
to accommodate a person with disabilities,
contact an authorized Mercedes-Benz Center
for details. USA only: Call our Customer
Assistance Center at 1-800-FOR-MERCedes
(1-800-367-6372) for details.
SRS functions are checked regularly when
you switch on the ignition and when the
engine is running. Therefore, malfunctions
can be detected in good time.
The + SRS warning lamp in the instrument
cluster lights up when the ignition is switched
on. It goes out no later than a few seconds
after the engine is started.
The SRS components are in operational
readiness when the +SRS warning lamp
goes out while the engine is running. Occupant safety
41Safety Z
Page 66 of 364
LATCH-type (ISOFIX) child seat anchors
in the rear
G
WARNING
Children that are too large for a child restraint
must travel in seats usingn ormal seat belts.
Position shoulder belt across the chest and
shoulder, not face or neck.
Ab ooster seat may be necessary to achieve
proper seat belt positioning for children over
41 lb (18 kg) until they reach a height where
a lap/shoulder belt fits properly without a
booster.
Install the child restraint system in
accordance with the manufacturer's
instructions.
Attach the child restraint system to both
securing rings.
An incorrectly installed child restraint system
could come loose during an accident and
seriously or even fatally injure the child.
Child restraint systems or child seat securing
rings that are malfunctioning or damaged as
the result of a collision must be replaced. Outer seat in the second row
:
Securing rings
; Installation instructions for the securing
ring Securing ring
:for two LATCH-type (ISOFIX)
child restraint systems can be found on the
left and right:
R on the seat cushions of the outer seats in
the second row
R on the backrests of the seats in the third
row of seats
X Move the rear seat backrests in the second
row to an upright position (Y page 106).
X Slide the upholstered lining over retaining
loop :to one side.
X Install the LATCH-type (ISOFIX) child seat
securing system. Comply with the
manufacturer's instructions when
installing. Seat in the third row
The securing rings on the seats in the third
row are covered by protective caps.
X
Remove protective caps =in the third row
of seats. ?
Securing rings for the third row of seats
X Install the LATCH-type (ISOFIX) child seat
securing system. Comply with the Children in the vehicle
63Safety Z
Page 67 of 364
manufacturer's instructions when
installing.
Secure child restraint systems withou ta
LATCH-type (ISOFIX) child seat securing
system using the seat belts in the vehicle.
When installing child restraint systems, you
must observe the manufacturer's installation
instructions.
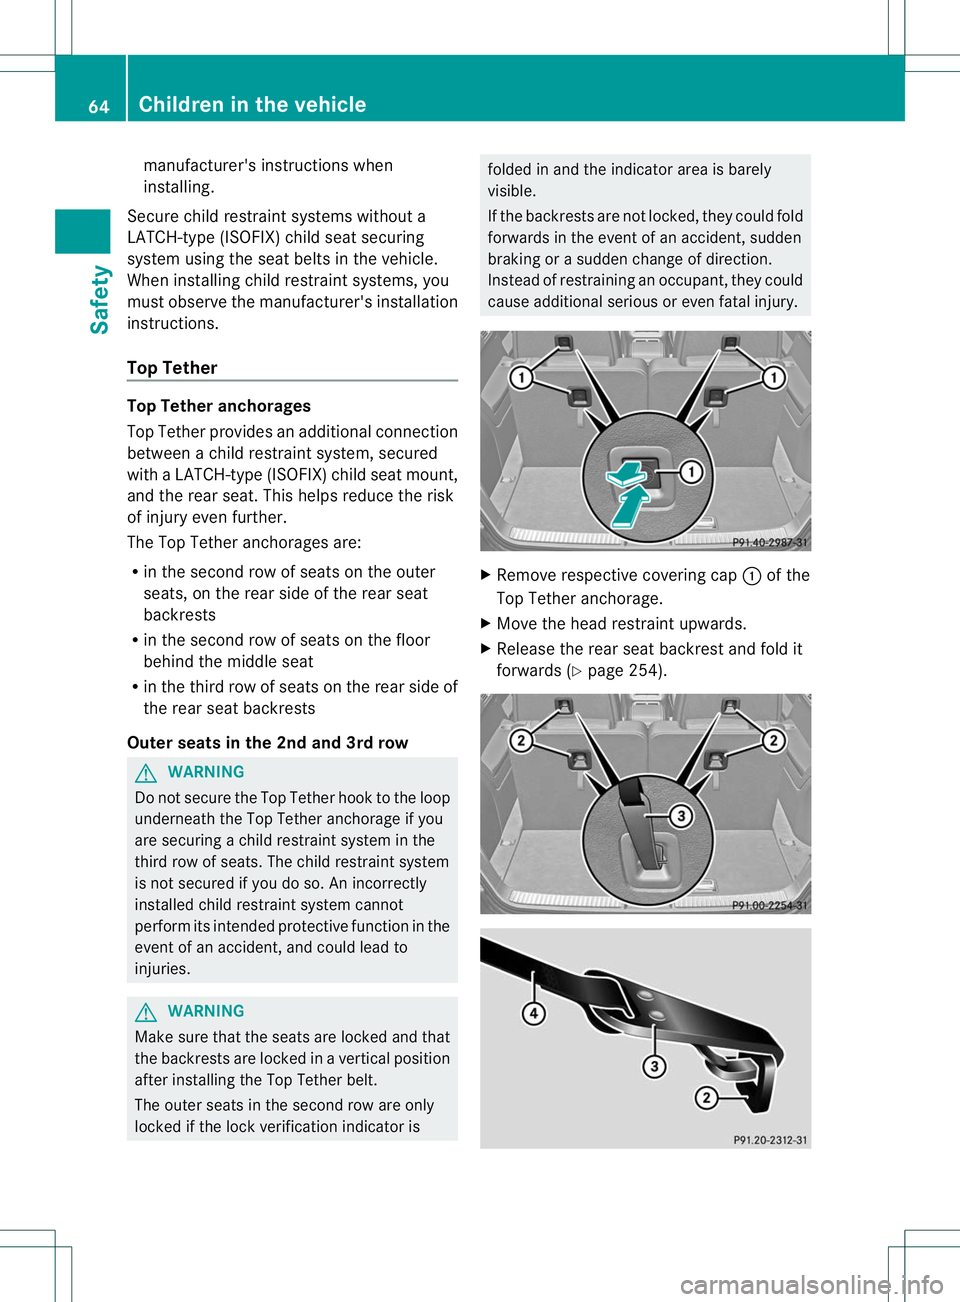
Top Tether Top Tether anchorages
Top Tether provides an additional connection
betwee
nachild restraint system, secured
with a LATCH-type (ISOFIX) child sea tmount,
and the rear seat. This helps reduce the risk
of injury even further.
The Top Tether anchorages are:
R in the second row of seats on the outer
seats, on the rear side of the rear seat
backrests
R in the second row of seats on the floor
behind the middle seat
R in the third row of seats on the rear side of
the rear seat backrests
Outer seats in the 2nd and 3rd row G
WARNING
Do not secure the Top Tether hook to the loop
underneath the Top Tether anchorage if you
are securing a child restraint system in the
third row of seats. The child restraint system
is not secured if you do so. An incorrectly
installed child restraint system cannot
perform its intended protective function in the
event of an accident, and could lead to
injuries. G
WARNING
Make sure that the seats are locked and that
the backrests are locked in a vertical position
after installing the Top Tether belt.
The outer seats in the second row are only
locked if the lock verification indicator is folded in and the indicator area is barely
visible.
If the backrests are not locked, they could fold
forwards in the event of an accident, sudden
braking or a sudden change of direction.
Instead of restraining an occupant, they could
cause additional serious or even fatal injury.
X
Remove respective covering cap :of the
Top Tether anchorage.
X Move the head restraint upwards.
X Release the rear seat backrest and fold it
forwards (Y page 254).64
Children in the vehicleSafety
Page 68 of 364
X
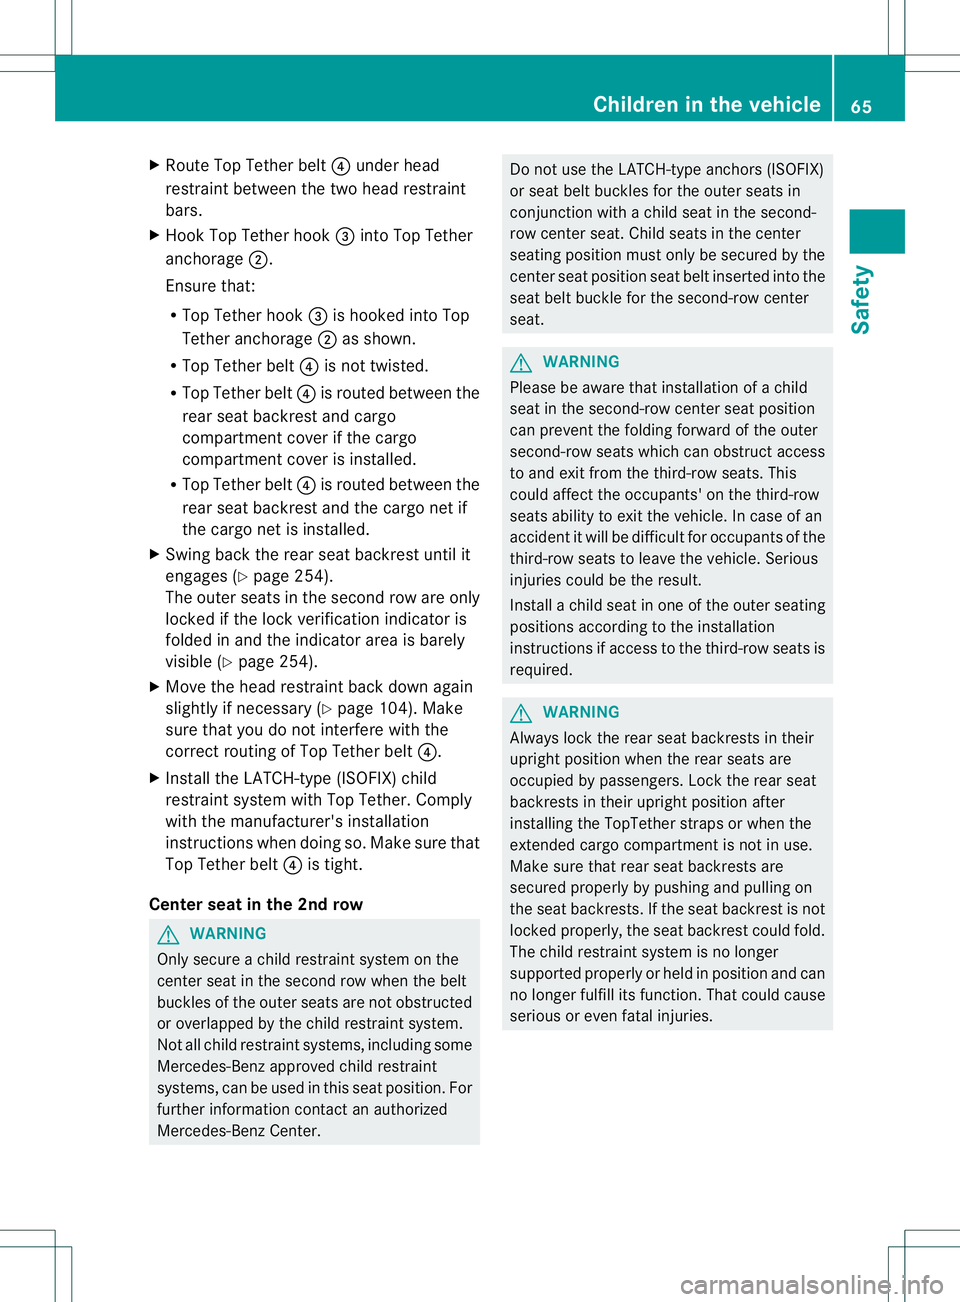
Route Top Tether belt ?under head
restrain tbetween the two head restraint
bars.
X Hook Top Tether hook =into Top Tether
anchorage ;.
Ensure that:
R Top Tether hook =is hooked into Top
Tether anchorage ;as shown.
R Top Tether belt ?is not twisted.
R Top Tether belt ?is routed between the
rear seat backrest and cargo
compartment cover if the cargo
compartment cover is installed.
R Top Tether belt ?is routed between the
rear seat backrest and the cargo net if
the cargo net is installed.
X Swing back the rear seat backrest until it
engages (Y page 254).
The outer seats in the second row are only
locked if the lock verification indicator is
folded in and the indicator area is barely
visible (Y page 254).
X Move the head restraint back down again
slightly if necessary (Y page 104). Make
sure that you do not interfere with the
correct routing of Top Tether belt ?.
X Install the LATCH-type (ISOFIX) child
restraint system with Top Tether.C omply
with the manufacturer's installation
instructions when doing so. Make sure that
Top Tether belt ?is tight.
Center seat in the 2nd row G
WARNING
Only secure a child restraint system on the
center seat in the second row when the belt
buckles of the outer seats are not obstructed
or overlapped by the child restraint system.
Not all child restraint systems, including some
Mercedes-Benz approved child restraint
systems, can be used in this seat position. For
further information contact an authorized
Mercedes-Benz Center. Do not use the LATCH-type anchors (ISOFIX)
or seat belt buckles for the outer seats in
conjunction with a child seat in the second-
row center seat. Child seats in the center
seating position must only be secured by the
center seat position seat belt inserted into the
seat belt buckle for the second-row center
seat.
G
WARNING
Please be aware that installation of a child
seat in the second-row center seat position
can prevent the folding forward of the outer
second-row seats which can obstruct access
to and exit from the third-row seats. This
could affect the occupants' on the third-row
seats ability to exit the vehicle. In case of an
accident it will be difficult for occupants of the
third-row seats to leave the vehicle. Serious
injuries could be the result.
Install a child seat in one of the outer seating
positions according to the installation
instructions if access to the third-row seats is
required. G
WARNING
Always lock the rear seat backrests in their
upright position when the rear seats are
occupied by passengers. Lock the rear seat
backrests in their upright position after
installing the TopTether straps or when the
extended cargo compartment is not in use.
Make sure that rear seat backrests are
secured properly by pushing and pulling on
the seat backrests. If the seat backrest is not
locked properly, the seat backrest could fold.
The child restraint system is no longer
supported properly or held in position and can
no longer fulfill its function. That could cause
serious or even fatal injuries. Children in the vehicle
65Safety Z
Page 69 of 364
X
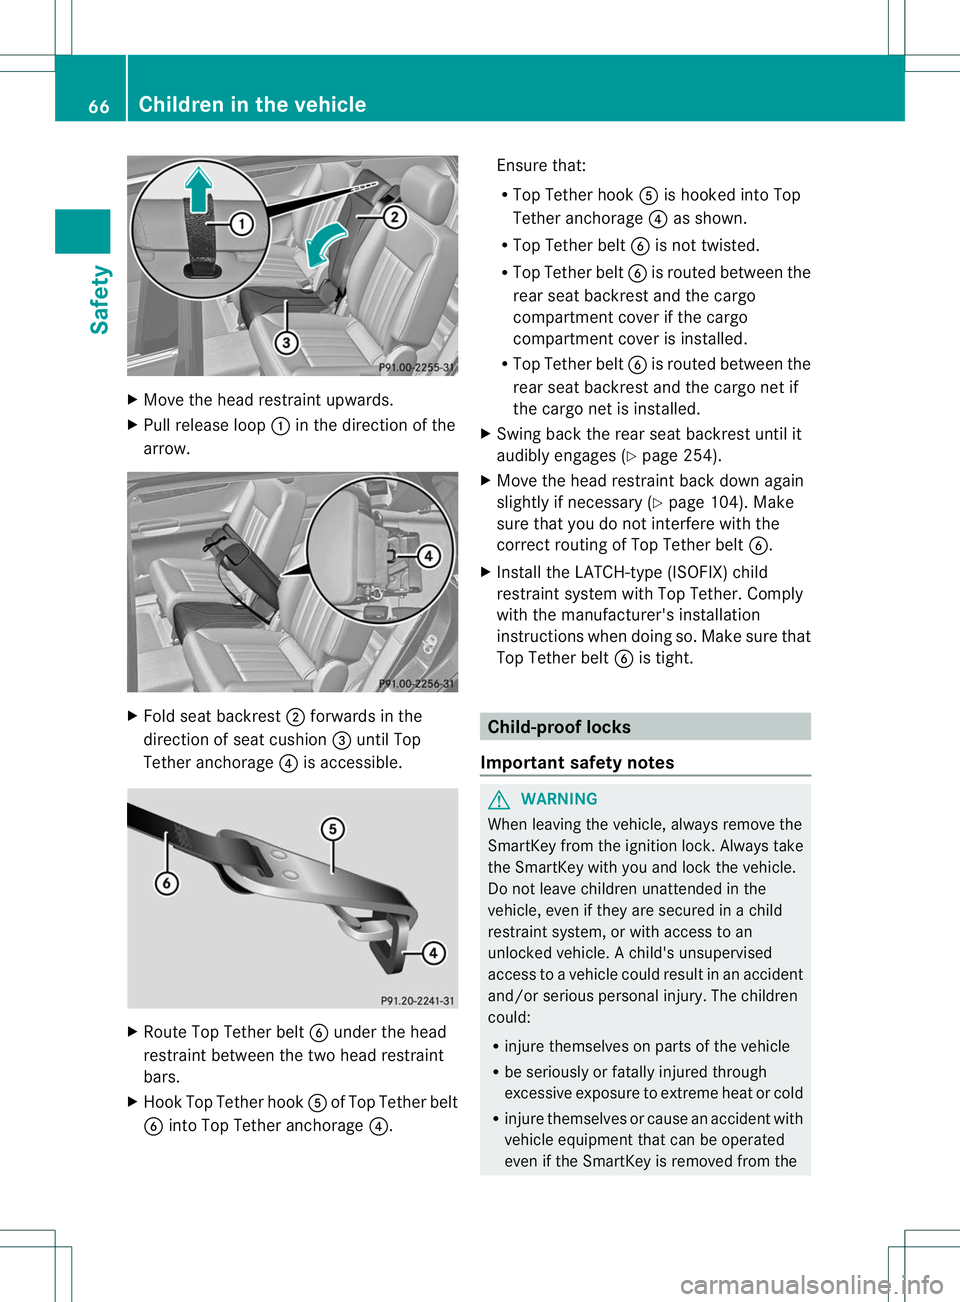
Move the head restraint upwards.
X Pull release loop :in the direction of the
arrow. X
Fold seat backrest ;forwards in the
direction of seat cushion =until Top
Tether anchorage ?is accessible. X
Route Top Tether belt Bunder the head
restraint between the two head restraint
bars.
X Hook Top Tether hook Aof Top Tether belt
B into Top Tether anchorage ?.Ensure that:
R
Top Tether hook Ais hooked into Top
Tether anchorage ?as shown.
R Top Tether belt Bis not twisted.
R Top Tether belt Bis routed between the
rear seat backrest and the cargo
compartment cover if the cargo
compartmen tcover is installed.
R Top Tether belt Bis routed between the
rear seat backrest and the cargo net if
the cargo net is installed.
X Swing back the rear seat backrest until it
audibly engages (Y page 254).
X Move the head restraint back down again
slightly if necessary (Y page 104). Make
sure that you do not interfere with the
correc trouting of Top Tether belt B.
X Install the LATCH-type (ISOFIX) child
restraint system with Top Tether. Comply
with the manufacturer's installation
instructions when doing so. Make sure that
Top Tether belt Bis tight. Child-proof locks
Important safety notes G
WARNING
When leaving the vehicle, always remove the
SmartKey from the ignition lock. Always take
the SmartKey with you and lock the vehicle.
Do not leave children unattended in the
vehicle, even if they are secured in a child
restraint system, or with access to an
unlocked vehicle. Achild's unsupervised
access to a vehicle could result in an accident
and/or serious personal injury. The children
could:
R injure themselves on parts of the vehicle
R be seriously or fatally injured through
excessive exposure to extreme heat or cold
R injure themselves or cause an accident with
vehicle equipment that can be operated
even if the SmartKey is removed from the 66
Children in the vehicleSafety