window MERCEDES-BENZ R-CLASS MPV 2008 Owner's Guide
[x] Cancel search | Manufacturer: MERCEDES-BENZ, Model Year: 2008, Model line: R-CLASS MPV, Model: MERCEDES-BENZ R-CLASS MPV 2008Pages: 373, PDF Size: 6.75 MB
Page 169 of 373

Air conditioning
166
Rear-compartment air conditioning*
1
Q Increases the airflow
2 Sets the temperature
3 U Controls the air conditioning auto-
matically
4 Z Directs the airflow through the rear
air vents
5 Y Directs the airflow through the foot-
well vents
6 ´ Activates/deactivates the rear-
compartment air conditioning
7 · Reduces the airflow Switching the air conditioning on/off
i When the air conditioning is switched off,
the air supply and air circulation are also
switched off. Only select this setting briefly,
otherwise the windows may mist up.
i Activate the air conditioning primarily
using the Ubutton.
Activating/deactivating the front-com-
partment air conditioning via 2-zone
Thermatic/multi-zone Thermotronic* X
Turn the key to position 2in the ignition
lock.
X To activate: press the´button.
The indicator lamp in the ´button goes
out. The previously selected settings come
into effect again.
or
X Press the Ubutton.
The indicator lamp in the Ubutton
comes on. Airflow and air distribution are
set to automatic mode.
X To deactivate: press the´button.
The indicator lamp in the ´button
comes on. Activating and deactivating the rear-
compartment air conditioning via 2-
zone Thermatic X
Turn the key to position 2in the ignition
lock.
X To activate/deactivate: press the<
button (Y page 161).
The indicator lamp in the
Activating and deactivating the rear-
compartment air conditioning via multi-
zone Thermotronic* X
Turn the key to position 2in the ignition
lock.
X To switch on: press the™button
(Y page 163).
ON and MODE are shown in the multi-zone
Thermotronic* display behind the )
symbol. The MODEdisplay goes out after
three seconds. The display switches back
to the standard display. Cont
rols
* optional
251_AKB; 5; 7, en-GB
wobuchh
,V ersion: 2.10.6
2008-05-11T14:51:51+02:00 - Seite 166 Dateiname: 6515_1825_02_buchblock.pdf; preflight
Page 170 of 373

Air conditioning
167
X
To deactivate: press the™button
(Y page 163).
MODE is shown in the display behind
the ) symbol.
X Press the ´button (Y page 163).
OFF is shown in the display behind
the ) symbol.
Activating and deactivating the rear-
compartment air conditioning via the
rear-compartment air-conditioning sys-
tem* X
Turn the key to position 2in the ignition
lock.
X Activate multi-zone Thermotronic*.
X To activate: press theUbutton.
The indicator lamp in the Ubutton
comes on.
X To deactivate: press the´button.
The indicator lamp in the ´button
comes on. Switching cooling with air-dehumidi-
fication on/off
The "cooling with dehumidification" function
is only available when the engine is running.
The air inside the vehicle is cooled and dehu-
midified according to the temperature selec-
ted. This prevents the windows from misting
up. G
Risk of accident
If the "cooling with air dehumidification"
function is deactivated, the air inside the
vehicle will not be cooled (during warm
weather) or dehumidified. The windows
could mist up more quickly. This may pre-
vent you from observing the traffic condi-
tions, thereby causing an accident. H
Environmental note
The cooling system uses the refrigerant
R134A. This refrigerant does not damage
the earth's ozone layer.
Condensation may drip from the underside of
the vehicle when Thermatic is in cooling
mode. X
To activate: press the9button.
The indicator lamp in the 9button lights
up.
X To deactivate: press the9button.
The indicator lamp in the 9button goes
out. The cooling with air dehumidification
function has a delayed switch-off feature. Controlling the air conditioning auto-
matically
In automatic mode, the set temperature is
maintained automatically at a constant level.
The system automatically regulates the tem-
perature of the dispensed air, the airflow and
the air distribution.
The automatic air conditioning will achieve
optimal operation if "cooling with air dehu-
midification" is also activated. If necessary,
cooling with air dehumidification can be deac-
tivated. Cont
rols
* optional
251_AKB; 5; 7, en-GB
wobuchh
,V ersion: 2.10.6
2008-05-11T14:51:51+02:00 - Seite 167 ZDateiname: 6515_1825_02_buchblock.pdf; preflight
Page 173 of 373

Air conditioning
170
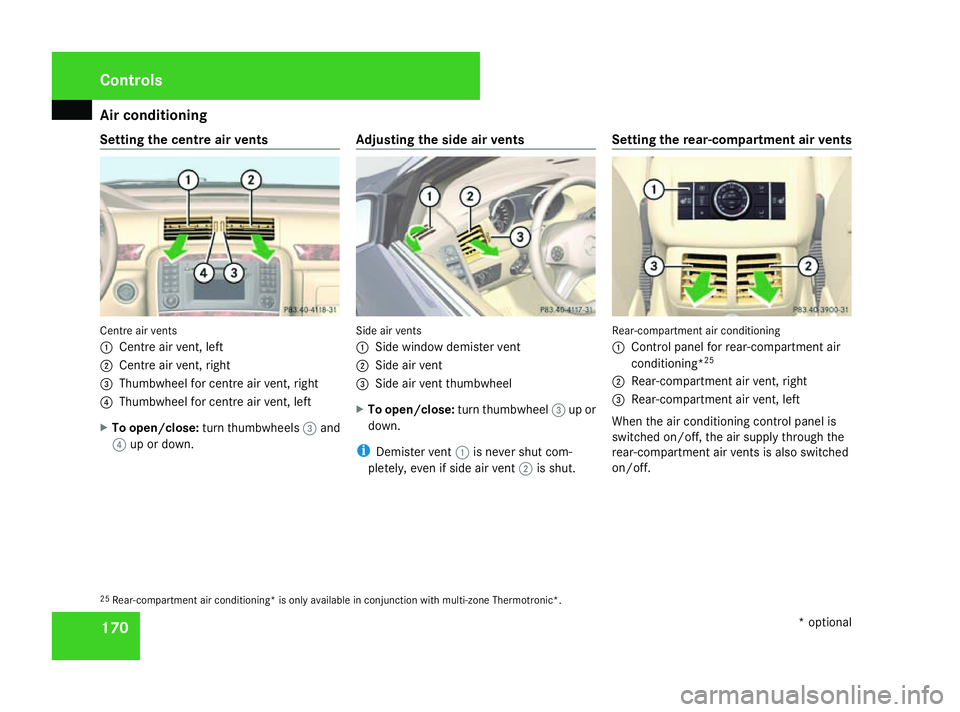
Setting the centre air vents
Centre air vents
1
Centre air vent, left
2 Centre air vent, right
3 Thumbwheel for centre air vent, right
4 Thumbwheel for centre air vent, left
X To open/close: turn thumbwheels 3and
4 up or down. Adjusting the side air vents Side air vents
1
Side window demister vent
2 Side air vent
3 Side air vent thumbwheel
X To open/close: turn thumbwheel 3up or
down.
i Demister vent 1is never shut com-
pletely, even if side air vent 2is shut. Setting the rear-compartment air vents Rear-compartment air conditioning
1
Control panel for rear-compartment air
conditioning* 25
2 Rear-compartment air vent, right
3 Rear-compartment air vent, left
When the air conditioning control panel is
switched on/off, the air supply through the
rear-compartment air vents is also switched
on/off.
25 Rear-compartment air conditioning* is only available in conjunction with multi-zone Thermotronic*. Cont
rols
* optional
251_AKB; 5; 7, en-GB
wobuchh
,V ersion: 2.10.6
2008-05-11T14:51:51+02:00 - Seite 170 Dateiname: 6515_1825_02_buchblock.pdf; preflight
Page 175 of 373

Air conditioning
172
X
Turn the key to position 2in the ignition
lock.
X Press the 6/Z/{/8/
Y/ 7ora button. Setting the airflow
X Turn the key to position 2in the ignition
lock.
X To increase/reduce: press theQor
· button. Switching the Mono function on/off
Multi-zone Thermotronic*: you can use the
MONO function to adopt the temperature, air
distribution and airflow settings on the driv-
er's side for the front-passenger side.
X Press the zbutton.
The indicator lamp in the zswitch lights
up or goes out. Demisting the windscreen
i You should only select the "demisting"
function until the windscreen is clear again.
X Turn the key to position 2in the ignition
lock.
X To activate: press the|button.
The indicator lamp in the |button
comes on.
The system automatically switches to the
following functions:
R cooling with air dehumidification on
R high airflow 26
R high temperature 26
R air distribution to the windscreen and
front side windows
R air-recirculation mode off
X To switch off: press the|button.
The indicator lamp in the |button goes
out. The previously selected settings come
into effect again. The cooling with air dehu-
midification function remains on. Air-recir-
culation mode remains deactivated.
or
X Press the ´button. or
X
Press the Ubutton.
or
X Turn the thumbwheels for the temperature
clockwise or anti-clockwise.
or
X Press the Qor· button. Demisting the windows
Windows misted up on the inside X
Activate the "cooling function with air-
dehumidification" function.
X Activate the automatic mode.
X If the windows continue to mist up, activate
the "demisting" function.
Windows misted up on the outside X
Activate the windscreen wipers.
X Press the a/7orY/ 8air
distribution button.
i You should only select this setting until
the windscreen is clear again.
26 Depending on the outside temperature. Cont
rols
* optional
251_AKB; 5; 7, en-GB
wobuchh
,V ersion: 2.10.6
2008-05-11T14:51:51+02:00 - Seite 172 Dateiname: 6515_1825_02_buchblock.pdf; preflight
Page 176 of 373

Air conditioning
173Switching the rear window heating
on/off
G
Risk of accident
Clear all windows of ice or snow before set-
ting off. Impaired visibility could otherwise
endanger you and others.
i At very low temperatures, the rear win-
dow heating is only switched on once the
vehicle interior has warmed up.
i The rear window heating has a high cur-
rent draw. You should therefore switch it
off as soon as the window is clear, as it only
switches off automatically after several
minutes.
i If the battery voltage is too low, the rear
window heating may switch off.
X Turn the key to position 2in the ignition
lock.
X Press the 1button.
The indicator lamp in the 1button lights
up or goes out. Activating/deactivating air-recircula-
tion mode
You can deactivate the flow of fresh air if
unpleasant odours are entering the vehicle
from outside. The air already inside the vehi-
cle will then be recirculated. G
Risk of accident
Only switch over to air-recirculation mode
briefly at low outside temperatures. Other-
wise, the windows could mist up, thus
impairing visibility and endangering your-
self and others. This may prevent you from
observing the traffic conditions, thereby
causing an accident.
X Turn the key to position 2in the ignition
lock.
X To activate: press the:button.
The indicator lamp in the :button
comes on.
i Air-recirculation mode is activated auto-
matically at high outside temperatures.
When air-recirculation mode is activated
automatically, the indicator lamp in
the : button is not lit.
Outside air is added after about 30
minutes. X
To deactivate: press the:button.
The indicator lamp in the :button goes
out.
i Air-recirculation mode switches off auto-
matically:
R after approximately five minutes at out-
side temperatures below approximately
5 †
R after approximately five minutes if cool-
ing with air dehumidification is deactiva-
ted
R after approximately 30 minutes at out-
side temperatures above approximately
5 †
Air-recirculation mode with the conve-
nience opening/closing feature G
Risk of injury
Make sure that nobody can become trap-
ped between the side window and the door
frame as the side windows are opened and
closed. Do not place objects or lean against
the side window when it is being opened or
closed. You or the objects could be drawn
in or become trapped between the side
window and the door frame as the window Cont
rols
251_AKB; 5; 7, en-GB
wobuchh
,V ersion: 2.10.6
2008-05-11T14:51:51+02:00 - Seite 173 ZDateiname: 6515_1825_02_buchblock.pdf; preflight
Page 177 of 373

Air conditioning
174 moves. If there is a risk of entrapment,
press the :button again. Press the but-
ton for stopping, opening or closing the side
window in the opposite direction as appro-
priate.
Make sure that nobody can become trap-
ped when you open or close the sliding/
tilting sunroof*/panorama sliding sun-
roof*. If there is a risk of entrapment, press
the : button again. Press the button for
stopping, opening or closing the sliding/
tilting sunroof*/panorama sliding sun-
roof *in the opposite direction as appropri-
ate.
X Convenience closing: press and hold
the : button until the side windows and
the sliding/tilting sunroof*/panorama
sliding sunroof* have closed.
The indicator lamp in the :button
comes on. Air-recirculation mode is activa-
ted.
X Convenience opening: press and hold
the : button until the side windows and
the sliding/tilting sunroof*/panorama sliding sunroof* have reached their original
position.
The indicator lamp in the
:button goes
out. Air-recirculation mode is deactivated.
i If you open the side windows or the slid-
ing/tilting sunroof* or panorama sliding
sunroof* manually after closing using the
convenience closing feature, it will remain
in this position when opened using the con-
venience opening feature. Switching the residual heat on/off
It is possible to make use of the residual heat
of the engine to continue heating the station-
ary vehicle for up to 30 minutes after the
engine has been switched off. The heating
time depends on the set interior temperature.
i The blower will run at a low speed regard-
less of the airflow setting.
i If you activate the "residual heat" function
at high temperatures, only the ventilation
will be activated. The blower runs at
medium speed. X
Turn the key to position 0in the ignition
lock or remove it.
X To switch on: press the9button.
The indicator lamp in the 9button lights
up.
X To deactivate: press the9button.
The indicator lamp in the 9button goes
out.
i The residual heat automatically switches
off after around 30 minutes or if:
R the ignition is switched on
R the battery voltage drops Auxiliary heating/ventilation*
G
Risk of poisoning
Exhaust fumes are produced when the aux-
iliary heating is in operation. Inhaling these
exhaust fumes can be poisonous. You
should therefore switch off the auxiliary
heating in confined spaces without an
extraction system, e.g. a garage. G
Risk of fire
When operating the auxiliary heating, parts
of the vehicle may become very hot, and Controls
* optional
251_AKB; 5; 7, en-GB
wobuchh
,V ersion: 2.10.6
2008-05-11T14:51:51+02:00 - Seite 174 Dateiname: 6515_1825_02_buchblock.pdf; preflight
Page 181 of 373

Sliding sunroof
178
Heater booster function on vehicles
with a diesel engine The heater booster function helps the engine
to reach its operating temperature faster dur-
ing its warm-up phase, as well as helping to
heat the vehicle interior faster. The heater
booster function switches on if outside tem-
peratures are low and the coolant tempera-
ture is less than 70 †. Sliding sunroof
Sliding/tilting sunroof*
G
Risk of injury
Children could injure themselves if they
operate the sliding/tilting sunroof.
Never leave children unsupervised in the
vehicle. Always take the KEYLESS–GO
key* with you when leaving the vehicle,
even if you are only leaving it for a short
time. G
Risk of injury
Make sure that nobody can become trap-
ped when you are opening and closing the
sliding/tilting sunroof. If there is a risk of
entrapment, release the switch and push it
briefly in any direction to stop the sliding/
tilting sunroof. G
Risk of injury
The glass in the sliding/tilting sunroof
could break in an accident. If you are not
wearing a seat belt, there is a risk that you
could be thrown through the opening in the
event of the vehicle overturning. Therefore,
always wear a seat belt to reduce the risk
of injuries. !
Only open the sliding/tilting sunroof if it
is free of snow and ice. Otherwise, mal-
functions may occur.
Do not allow anything to protrude from the
sliding/tilting sunroof. The seals could oth-
erwise be damaged.
i Resonance noises can occur in addition
to the usual airflow noises when the slid-
ing/tilting sunroof is open. They are caused
by minor pressure fluctuations in the vehi-
cle interior.
Change the position of the sliding/tilting
sunroof or open a side window slightly to
reduce or eliminate these noises.
i It is also possible to open and close the
sliding/tilting sunroof from the outside
using the "Summer opening" (Y page 108)
and "Convenience closing" (Y page 108)
features respectively.
When PRE-SAFE ®
* has been activated, the
sliding/tilting sunroof closes automatically in
the event of danger, leaving a small gap open. Controls
* optional
251_AKB; 5; 7, en-GB
wobuchh,
Version: 2.10.6 2008-05-11T14:51:51+02:00 - Seite 178Dateiname: 6515_1825_02_buchblock.pdf; preflight
Page 184 of 373

Sliding sunroof
181Panorama sliding sunroof* with roller
sunblinds
Panorama sliding sunroof G
Risk of injury
Make sure that nobody can become trap-
ped when closing the panorama sliding sun-
roof. If there is a risk of entrapment, release
the switch and push it briefly in any direc-
tion to stop the panorama sliding sunroof. G
Risk of injury
Children could injure themselves if they
operate the panorama sliding sunroof.
Never leave children unsupervised in the
vehicle. Always take the KEYLESS GO
key* with you when leaving the vehicle,
even if you are only leaving it for a short
time. G
Risk of injury
The glass in the panorama sliding sunroof
could break in an accident. If you are not
wearing a seat belt, there is a risk that you
could be thrown through the opening in the
event of the vehicle overturning. Therefore,
always wear a seat belt to reduce the risk
of injuries. !
Only open the panorama sliding sunroof
if it is free of snow and ice. Otherwise, mal-
functions may occur.
Do not allow anything to protrude from the
panorama sliding sunroof. The seals could
otherwise be damaged.
i When the panorama sliding sunroof is
open, resonance noises may occur as well
as the usual airflow noises. They are caused
by minor pressure fluctuations in the vehi-
cle interior. Change the position of the pan-
orama sliding sunroof or open a side
window slightly to reduce or eliminate
these noises.
i It is also possible to open and close the
panorama sliding sunroof from the outside
using the "Summer opening" (Y page 108)
and "Convenience closing" (Y page 108)
features respectively.
In a dangerous situation, PRE-SAFE ®
closes
the panorama sliding sunroof automatically,
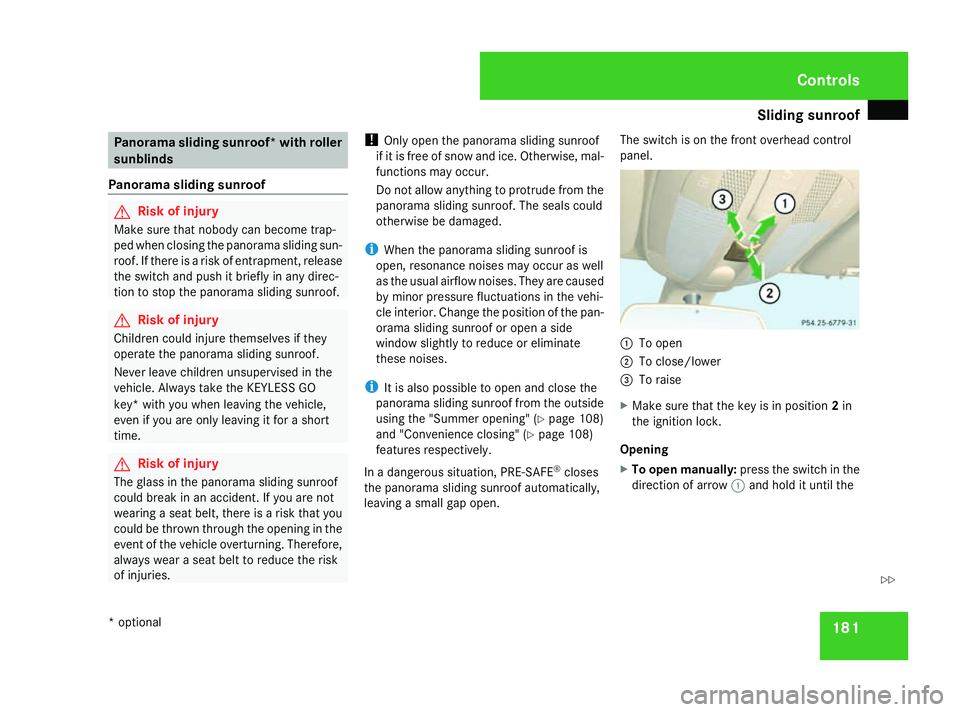
leaving a small gap open. The switch is on the front overhead control
panel. 1
To open
2 To close/lower
3 To raise
X Make sure that the key is in position 2in
the ignition lock.
Opening
X To open manually: press the switch in the
direction of arrow 1and hold it until the Controls
* optional
251_AKB; 5; 7, en-GB
wobuchh,
Version: 2.10.6 2008-05-11T14:51:51+02:00 - Seite 181 ZDateiname: 6515_1825_02_buchblock.pdf; preflight
Page 200 of 373

Loading and stowing
1973
Supporting base
6 Centre console
X Position centre console 6above support-
ing base 3.
X Anchor the retainers of centre console 6
to anchoring points 4or5 on supporting
base 3.
X Guide the front part of centre console 6
downwards in the direction of the arrow to
supporting base 3.
Centre console 6must rest on supporting
base 3.
X Push the front part of centre console 6
downwards until you hear centre console
6 engage in securing rings 1or2. Luggage compartment cover* and
safety net*
Luggage compartment cover* G
Risk of accident and injury
The luggage compartment cover is not a
restraint system. Secure the load under the
luggage compartment cover by suitable
means. Make sure that the luggage com-
partment cover is engaged securely. If lug-
gage is not sufficiently secured, it can be
thrown over the backrest into the
passenger compartment during, for
instance, heavy braking, sudden changes of
direction or in the event of an accident. You
could cause an accident or cause injury to
yourself and others.
The luggage compartment cover can be
attached behind the 2nd row of seats and 3rd
row of seats.
! When loading the vehicle, make sure that
you do not stack the load in the luggage
compartment higher than the lower edge of
the side windows. Do not place heavy
objects on top of the luggage compartment
cover. Extending and retracting the luggage
compartment cover
Luggage compartment cover fitted behind the 3rd
row of seats
1
Handle
2 Guide
i Short wheelbase vehicles:
If the luggage compartment cover is instal-
led behind the 3rd row of seats, it covers
the whole of the luggage compartment. It
cannot be extended and hooked in.
X To extend: pull the luggage compartment
cover towards you by handle 1.
X Hook the luggage compartment cover into
guides 2on the left and right. Controls
* optional
251_AKB; 5; 7, en-GB
wobuchh, Version: 2.10.6 2008-05-11T14:51:51+02:00 - Seite 197 ZDateiname: 6515_1825_02_buchblock.pdf; preflight
Page 208 of 373

Features
205
X
Swing sun visor 1to the side.
X Vehicles with sliding/tilting sunroof*:
fold down additional sun visor* 2to the
windscreen. Roller sunblinds* for the rear side
windows 1
Retainer
2 Tab
X To extend: pull the roller sunblind out by
tab 2and hook it onto retainers 1at the
top of the window.
! Always guide the roller sunblind by hand.
Do not let it snap back suddenly, as this
would damage the automatic roller mech-
anism. !
If you drive with the roller sunblind exten-
ded and the window open, the roller sun-
blind may pop out of the retainer and
suddenly spring back if you drive at high
speeds, e.g. on the motorway. This could
damage the inertia reel. Therefore, either
close the window or retract the roller sun-
blind before driving at high speeds. Ashtray*
Ashtray in the cockpit 1
Cover
2 Insert
X To open: open cover 1(Ypage 202).
X To remove the insert: reach into the
recess on the rear of insert 2.X
Pull insert 2upwards and remove it.
X Inserting the insert: place insert2into
the opening from above and press it down
until it engages.
Ashtray in the 2nd row of seats Vehicles with a centre console in the 2nd row
of seats and short wheelbase do not have an
ashtray below the centre console.
1
Cover
2 Insert
X To open: open cover 1(Ypage 203).
X Fold cover 1down in the direction of the
arrow as far as it will go. Controls
* optional
251_AKB; 5; 7, en-GB
wobuchh,
Version: 2.10.6 2008-05-11T14:51:51+02:00 - Seite 205 ZDateiname: 6515_1825_02_buchblock.pdf; preflight