check engine MERCEDES-BENZ R320 2010 W251 Owner's Manual
[x] Cancel search | Manufacturer: MERCEDES-BENZ, Model Year: 2010, Model line: R320, Model: MERCEDES-BENZ R320 2010 W251Pages: 364, PDF Size: 7.5 MB
Page 7 of 364
Armrest, rear
Storage compartment .................... 199
Ashtrays ............................................. 204
Aspect ratio (tires) ............................ 249
Audio/DVD menu .............................. 128
Auto-dimming rear view mirrors ........ 94
Automatic central locking ..........74, 137
Automatic headlamp mode ................98
Automatic interior lighting control ..102
Automatic locking when driving ......137
Automatic shift program ..................120
Automatic transmission ................... 115
Automatic shift program ................120
Emergency operation (limp-home
mode) ............................................ 121
Gear range indicator ......................120
Gear ranges ................................... 119
Gear selector lever ........................116
Hill-start assist system .................. 153
Kickdown ....................................... 119
One-touch gearshifting ..................120
Program mode indicator ................120
Program mode selector switch
(automatic shift program) ..............120
Shifting procedure ......................... 118
Steering wheel gearshift control .... 121
Towing a trailer .............................. 119
Transmission position indicator ..... 118
Transmission positions .................. 118
AUX socket ........................................ 198
Axle oils .............................................. 351B
BabySmart™
Air bag deactivation system ............. 45
Self-test
........................................... 47
Backrest
see Seats
Backup lamps
Messages in the multifunction
display ........................................... 295
Bar (air pressure unit) ....................... 249
BAS (Brake Assist System) ................. 64
Batteries, SmartKey
Checking condition ..........................73
Replacing ....................................... 310Battery, Vehicle
................................. 333
Charging ........................................ 335
Jump starting ................................. 336
Messages in the multifunction
display
................................... 282, 292
Bead (tire) .......................................... 249
Beverage holders see Cup holders
Bleeding the fuel system (diesel
engine) ............................................... 331
BlueTEC
AdBlue ®
tank ................................. 331
AdBlue ®
tank capacity ................... 351
Brake fluid
Checking level ............................... 227
Messages in the multifunction
display ........................................... 286
Brake lamps
Cleaning lenses ............................. 265
Brake pads
Messages in the multifunction
display ........................................... 285
Brakes ................................................ 253
Parking brake ........................ 114, 255
Warning lamp ................................. 301
Break-in period .................................. 220
Bug cover (Radiator) ......................... 224
Bulbs see Replacing bulbs C
CAC (Customer Assistance Center) ...23
California retail buyers and
lessees, important notice for .............21
Calls (phone) ...................................... 140
Can holders see Cup holders
Capacities and recommended
fuel/lubricants .................................. 350
Cargo compartment
Cargo net ....................................... 196
Cargo volume, expanding ..............189
Cover blind .................................... 194
Fuse box ........................................ 342
Hooks ............................................ 189
Tie-down rings ............................... 188
Cargo compartment cover blind ...... 194 Index
5 251_AKB; 4; 52, en-US
d2ureepe,
Version: 2.11.8.1 2009-03-23T09:22:52+01:00 - Seite 5
Page 10 of 364
Driving off
.................................. 112, 255
Driving safety systems ....................... 63
4-ETS
............................................... 65
ABS .................................................. 63
BAS .................................................. 64
EBP .................................................. 64
ESP ®
................................................ 65
Driving systems
AIRMATIC ...................................... 153
All-wheel drive (4MATIC) ................ 156
Cruise control ................................ 142
Distronic ........................................ 145
Hill-start assist system .................. 153
Parktronic system ..........................156
Rear view camera .......................... 159
Driving tips, automatic
transmission ...................................... 119E
Easy-entry/exit feature .............. 92, 137
EBP (Electronic Brake
Proportioning) ......................................
64
Electrical system
Improper work on or
modifications ................................... 22
Power outlets ................................. 206
Electrical system (Technical data)
see Vehicle specification
Electronic Stability Program
see ESP ®
Electronic Traction System
see 4-ETS
Emergency, in case of
First aid kit ..................................... 270
Flat tire .......................................... 319
Hazard warning flasher ..................101
Roadside Assistance ................ 21, 210
Towing the vehicle .........................338
Emergency calls
Tele Aid .......................................... 209
Emergency engine shutdown ...........342
Emergency operations
Limp-home mode ........................... 121
Remote door unlock ...................... 212
Emergency Tensioning Device
see ETD Emission control
............................... 260
Information label ............................
345
System warranties ........................... 20
Engine
Break-in recommendations ............220
Cleaning ......................................... 264
Compartment ................................ 222
Malfunction indicator
lamp ........................................ 29, 305
Messages in the multifunction
display ........................................... 290
Number .......................................... 345
Starting .......................................... 110
Turning off ..................................... 114
Engine (Technical data)
see Vehicle specification
Engine compartment
Radiator ......................................... 224
Engine coolant
see Coolant
Engine oil
Adding ........................................... 225
Additives ........................................ 352
Checking level ............................... 224
Consumption ................................. 224
Messages in the multifunction
display ........................................... 293
Oil dipstick ..................................... 224
Recommended engine oils and oil
filter ............................................... 352
ESP ®
(Electronic Stability
Program) .............................................. 65
4-ETS ............................................... 65
Messages in the multifunction
display ................................... 275, 286
Trailer stabilization ........................... 66
Warning lamp ................................. 303
ETD (Emergency Tensioning
Device) ................................................. 52
Safety guidelines ............................. 39
Express operation
Panorama roof ............................... 184
Power windows .............................. 106
Tilt/sliding sunroof ........................181
Exterior lamp switch ........................... 97
Exterior rear view mirrors ..................94
Fold-in function .............................. 1388
Index 251_AKB; 4; 52, en-US
d2ureepe,
Version: 2.11.8.1 2009-03-23T09:22:52+01:00 - Seite 8
Page 13 of 364
J
Jack ..................................................... 272
Jump starting ..................................... 336K
Key, Mechanical
Loss of ............................................. 73
Unlocking/locking manually .......... 308
Key, SmartKey
Battery check lamp .......................... 73
Checking batteries ........................... 73
Factory setting
........................... 71, 72
Global locking (KEYLESS-
GO) .................................................. 73
Global locking (SmartKey) ................ 71
Global unlocking (KEYLESS-
GO) ............................................ 72, 73
Global unlocking
(SmartKey) ....................................... 71
Important notes on KEYLESS-GO .....72
Locking/unlocking ........................... 70
Loss of ............................................. 73
Messages in the multifunction
display ........................................... 289
Opening and closing the power
tilt/sliding sunroof or the
panorama roof ............................... 108
Opening and closing the windows . 108
Remote control ................................ 70
Replacing batteries ........................ 310
Restoring to factory setting ....... 71, 73
Selective setting ........................ 71, 73
Starter switch positions ................... 79
KEYLESS-GO
Starter switch positions ................... 80
Kickdown ........................................... 119
Kilopascal (air pressure unit) ...........249 L
Labels
Certification ................................... 344
Emission control information
......... 345 Tire and Loading Information
placard
........................................... 236
Tire inflation pressure ....................230
Lamps, exterior
Exterior lamp switch ........................ 97
Front .............................................. 313
Messages in the multifunction
display ........................................... 295
Rear ............................................... 313
Switching on/off .............................. 97
Lamps, indicator and warning
ABS .......................................... 28, 300
Brakes ..................................... 28, 301
Distance warning
lamp ........................ 28, 147, 152, 304
Engine malfunction .................. 29, 305
ESP ®
........................................ 28, 303
Fog lamps ........................................ 99
Front passenger front air bag off
(Canada only) .......................... 45, 307
Front passenger front air bag off
(USA only) ................................ 42, 307
Fuel tank reserve ..................... 29, 305
High-beam headlamps .............29, 100
Instrument cluster ...................28, 299
Low-beam headlamps ................ 29, 98
Low tire pressure/TPMS
malfunction telltale .................. 28, 306
Seat belt telltale ................29, 51, 302
SRS .................................... 29, 36, 303
Turn signals ..................................... 28
Language, selecting ..........................133
LATCH-type child seat anchors see Children in the vehicle
License plate lamps
Messages in the multifunction
display ........................................... 296
Replacing bulbs ............................. 314
Light alloy wheels, cleaning .............267
Lighter see Cigarette lighter
Lighting ................................................ 97
Daytime running lamp mode ............99
Exterior ............................................ 97
Interior ........................................... 102
Limp-home mode .............................. 121
Load index (tires) ......................245, 249 Index
11 251_AKB; 4; 52, en-US
d2ureepe,
Version: 2.11.8.1 2009-03-23T09:22:52+01:00 - Seite 11
Page 39 of 364
G
Warning!
The SRS self-check has detected a
malfunction when the SRS indicator lamp
+:
R does not come on at all
R does not go out after 4 seconds after the
engine was started
R comes on while driving
For
your safety, we strongly recommend that
you contact an authorized Mercedes-Benz
Center immediately to have the system
checked. Otherwise the SRS may not be
activated when needed in an accident, which
could result in serious or fatal injury. The SRS
might also deploy unexpectedly and
unnecessarily which could also result in injury
as well.
In addition, improper work on the SRS creates
a risk of rendering the SRS inoperative or
causing unintended air bag deployment. Work
on the SRS must therefore only be performed
by qualified technicians. Contact an
authorized Mercedes-Benz Center.
If it is necessary to modify an air bag system
to accommodate a person with disabilities,
contact an authorized Mercedes-Benz Center.
USA only: Call our Customer Assistance
Center at 1-800-FOR-MERCedes
(1-800-367-6372) for details. Air bags
G
Warning!
Air bags are designed to reduce the potential
of injury and fatality in certain
R frontal impacts (front air bags)
R side impacts (side impact air bags and
window curtain air bags)
R rollovers (window curtain air bags)
However, no system available today can
completely eliminate injuries and fatalities. Deployment of the air bags temporarily
releases a small amount of dust from the air
bags. This dust, however, is neither harmful
to
your health, nor does it indicate a fire in the
vehicle. The dust might cause some
temporary breathing difficulty for people with
asthma or other breathing trouble. To avoid
this, you may wish to get out of the vehicle as
soon as it is safe to do so. If you have any
breathing difficulty but cannot get out of the
vehicle after the air bag inflates, then get fresh
air by opening a window or door. G
Warning!
To reduce the risk of injury when the front air
bags
inflate, it is very important for the driver
and front passenger to always be in a properly
seated position and to wear their respective
seat belt.
For maximum protection in the event of a
collision always be in normal seated position
with your back against the seat backrest.
Fasten your seat belt and make sure it is
properly positioned on your body.
Since the air bag inflates with considerable
speed and force, a proper seating position
and correct positioning of the hands on the
steering wheel will help to keep you at a safe
distance from the air bag. Occupants who are
not wearing their seat belt, are not seated
properly or are too close to the air bag can be
seriously injured or killed by an air bag as it
inflates with great force instantaneously:
R Sit with the seat belt properly fastened in a
position that is as upright as possible with
your back against the seat backrest.
R Move the driver’s seat as far back as
possible, still permitting proper operation
of vehicle controls. The distance from the
center of the driver’s chest to the center of
the air bag cover on the steering wheel
must be at least 10 inches (25 cm) or more.
You should be able to accomplish this by
adjusting the seat and steering wheel. If Occupant safety
37Safety and security
251_AKB; 4; 52, en-US
d2ureepe, Version: 2.11.8.1 2009-03-23T09:22:52+01:00 - Seite 37 Z
Page 44 of 364
R
regardless of whether the seat belt on the
impacted side of the vehicle is in use
R in certain vehicle rollovers, if the system
determines that air bag deployment can
offer
additional protection to that provided
by the seat belt
Window curtain air bags : are not deployed
in impacts which do not exceed the system’s
deployment threshold.
Window curtain air bags : deploy in the area
indicated by the arrows. Occupant Classification System
The
Occupant Classification System (OCS) is
standard equipment in USA.
The OCS activates or deactivates the front
passenger front air bag automatically. The
respective status is based on the classified
occupant weight category determined by
weight sensor readings from the front
passenger seat.
The system does not deactivate
R the front passenger side impact air bag
R the window curtain air bag
R the Emergency Tensioning Devices (ETDs)
To be classified correctly, the front passenger
must sit
R with the seat belt properly fastened
R in a position that is as upright as possible
with the back against the seat backrest
R with the feet on the floor
If the occupant’s weight is transferred to
another object in the vehicle (e.g. by leaning
on armrests), the OCS may not be able to
properly approximate the occupant’s weight
category.
Furthermore, the occupant weight may
appear to increase or decrease due to the
following: objects hanging on the seat, lodged
underneath the seat, stuffed between the
seat and middle console or the seat and door,
other passengers pushing on the seat, or objects applying pressure to the back of the
seat. Always make sure the seat has
clearance in all directions at all times.
If your seat, including the trim cover and
cushion,
needs to be serviced in any way, take
the vehicle to an authorized Mercedes-Benz
Center.
Only seat accessories approved by
Mercedes-Benz may be used.
Both the driver and the front passenger
should always use the 42
indicator lamp as an indication of whether or
not the front passenger is properly
positioned. G
Warning!
If the 42 indicator lamp
illuminates when an adult or someone larger
than a small individual is in the front
passenger seat, have the front passenger
reposition himself or herself in the seat until
the 42 indicator lamp goes out,
or
check whether objects are caught under or
around the seat.
In the event of a collision, the air bag control
unit will not allow front passenger front air bag
deployment when the OCS has classified the
front passenger seat occupant as weighting
as much as or less than a typical 12-month-
old child in a standard child restraint or if the
front passenger seat is classified as being
empty.
When the OCS senses that the front
passenger seat occupant is classified as
being up to or less than the weight of a typical
12-month-old child in a standard child
restraint, the 42 indicator lamp
will illuminate when the engine is started and
remain illuminated, indicating that the front
passenger front air bag is deactivated.
When the OCS senses that the front
passenger seat is classified as being empty,
the 42 indicator lamp will
illuminate when the engine is started and
remain illuminated, indicating that the front
passenger front air bag is deactivated. 42
Occupant safety
Safety and security
251_AKB; 4; 52, en-US
d2ureepe,
Version: 2.11.8.1 2009-03-23T09:22:52+01:00 - Seite 42
Page 81 of 364
the door-mounted remote tailgate switch.
Monitor the closing procedure carefully to
make sure no one is in danger of being
injured.
To interrupt the closing procedure, press or
pull the door-mounted remote tailgate switch.
If the tailgate comes into contact with an
object while closing, the closing procedure is
stopped and the tailgate reopens. This may
happen if luggage has been piled too high, for
example.
X Turn the SmartKey in the starter switch to
position 1 or 2.
X Press remote tailgate opening/closing
switch : until the tailgate begins to close.
While the tailgate is closing an acoustic
warning sounds.
X Interrupting the closing procedure:
Press or pull remote tailgate opening/
closing switch :.
Limiting opening height of tailgate You can limit the opening height of the
tailgate in the upper opening range. This can
be useful, for example, when the space above
the tailgate is not sufficient.
Activating
X
Open the tailgate: Pull on handle
(Y page 75) or press and hold button
F on the SmartKey until the tailgate
opens.
X Stop opening procedure: When the
tailgate is in the desired position, press
tailgate closing switch ( Y page 77) or pull
on handle once more.
X You can also press or pull the remote
tailgate opening/closing switch
(Y page 78) to stop the opening procedure. X
Press and hold the tailgate closing switch
in the tailgate ( Y page 77) until you hear a
short acoustic signal.
The opening height of the tailgate is limited.
The tailgate will now stop at the stored
position when opened.
Deactivating
X Press and hold the tailgate closing switch
in the tailgate ( Y page 77) until you hear
two short, consecutive acoustic signals. Starter switch positions
SmartKey
G
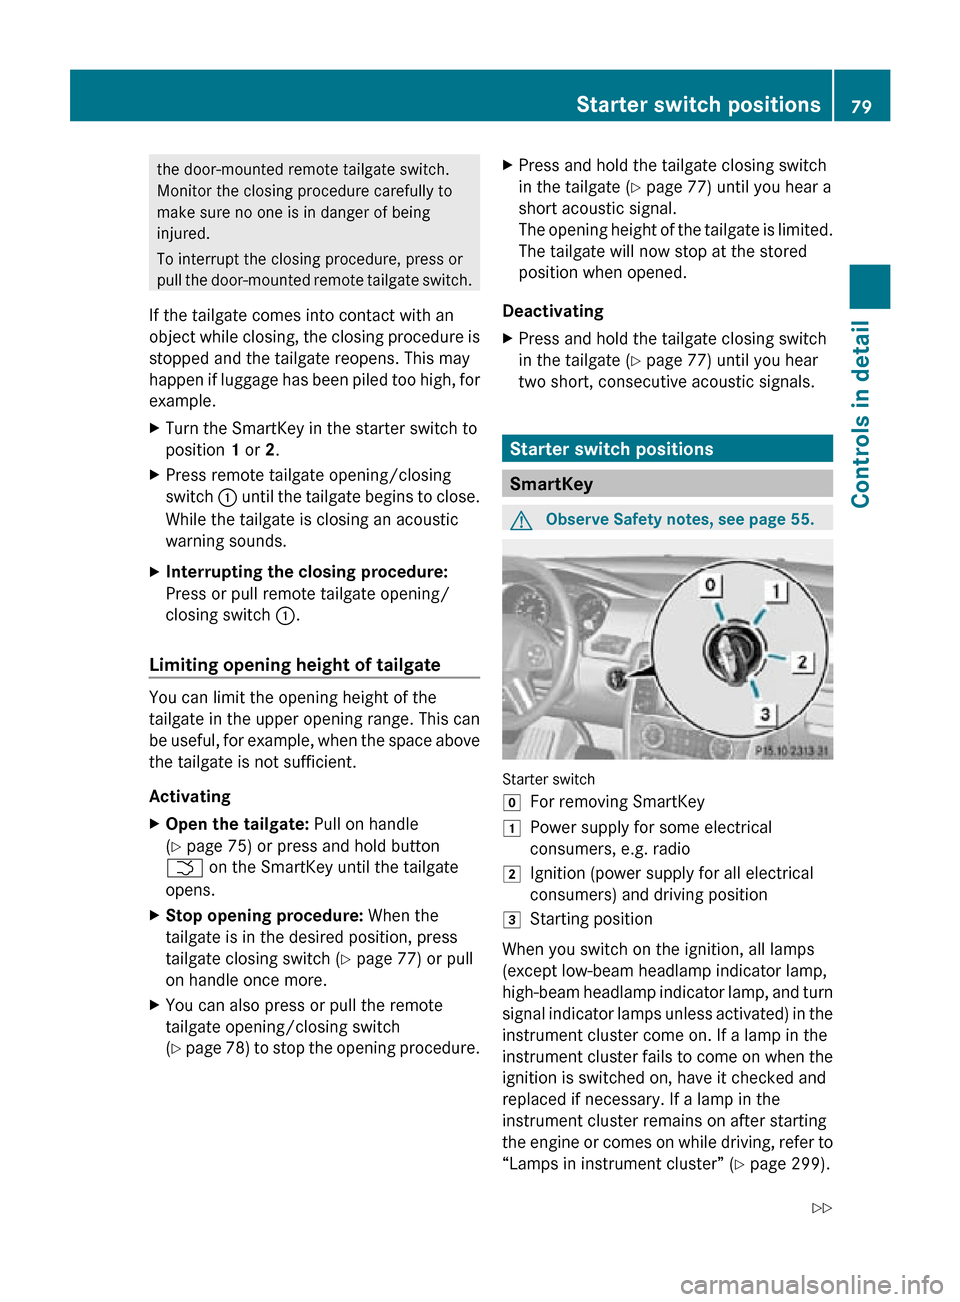
Observe Safety notes, see page 55. Starter switch
g
For removing SmartKey
1 Power supply for some electrical
consumers, e.g. radio
2 Ignition (power supply for all electrical
consumers) and driving position
3 Starting position
When you switch on the ignition, all lamps
(except low-beam headlamp indicator lamp,
high-beam headlamp indicator lamp, and turn
signal indicator lamps unless activated) in the
instrument cluster come on. If a lamp in the
instrument cluster fails to come on when the
ignition is switched on, have it checked and
replaced if necessary. If a lamp in the
instrument cluster remains on after starting
the engine or comes on while driving, refer to
“Lamps in instrument cluster” (Y page 299). Starter switch positions
79Controls in detail
251_AKB; 4; 52, en-US
d2ureepe, Version: 2.11.8.1 2009-03-23T09:22:52+01:00 - Seite 79 Z
Page 82 of 364
X
Always remove the SmartKey from the
starter switch when the engine is not in
operation.
This will help to prevent accelerated vehicle
battery discharge or a completely
discharged vehicle battery.
If the SmartKey cannot be turned in the
starter switch, the vehicle battery may not be
sufficiently charged.
X Check the vehicle battery and charge it if
necessary.
or
X Get a jump start.
i If the SmartKey does not belong to the
vehicle, the SmartKey can be turned in the
starter switch. However, the ignition does
not switch on and the engine does not start. KEYLESS-GO
G
Observe Safety notes, see page 55.
Vehicles equipped with the KEYLESS-GO
feature are supplied with a SmartKey with
integrated KEYLESS-GO function and a
removable KEYLESS-GO start/stop button.
The KEYLESS-GO start/stop button must be
inserted in the starter switch and the
SmartKey present in the vehicle.
Pressing the KEYLESS-GO start/stop button
without depressing the brake pedal
corresponds to the various starter switch
positions (Y page 79).
Pressing the KEYLESS-GO start/stop button
with the brake pedal firmly depressed will
start the engine (Y page 110).
The KEYLESS-GO start/stop button can be
pulled out of the starter switch easily. You can
then insert the SmartKey into the starter
switch.
i The KEYLESS-GO start/stop button does
not need to be removed from the starter
switch when you leave the vehicle.
However, always take the SmartKey with
you when you leave the vehicle. As long as the SmartKey is in the vehicle, the vehicle’s
electrical systems can be switched on or
the engine can be started using the
KEYLESS-GO start/stop button.
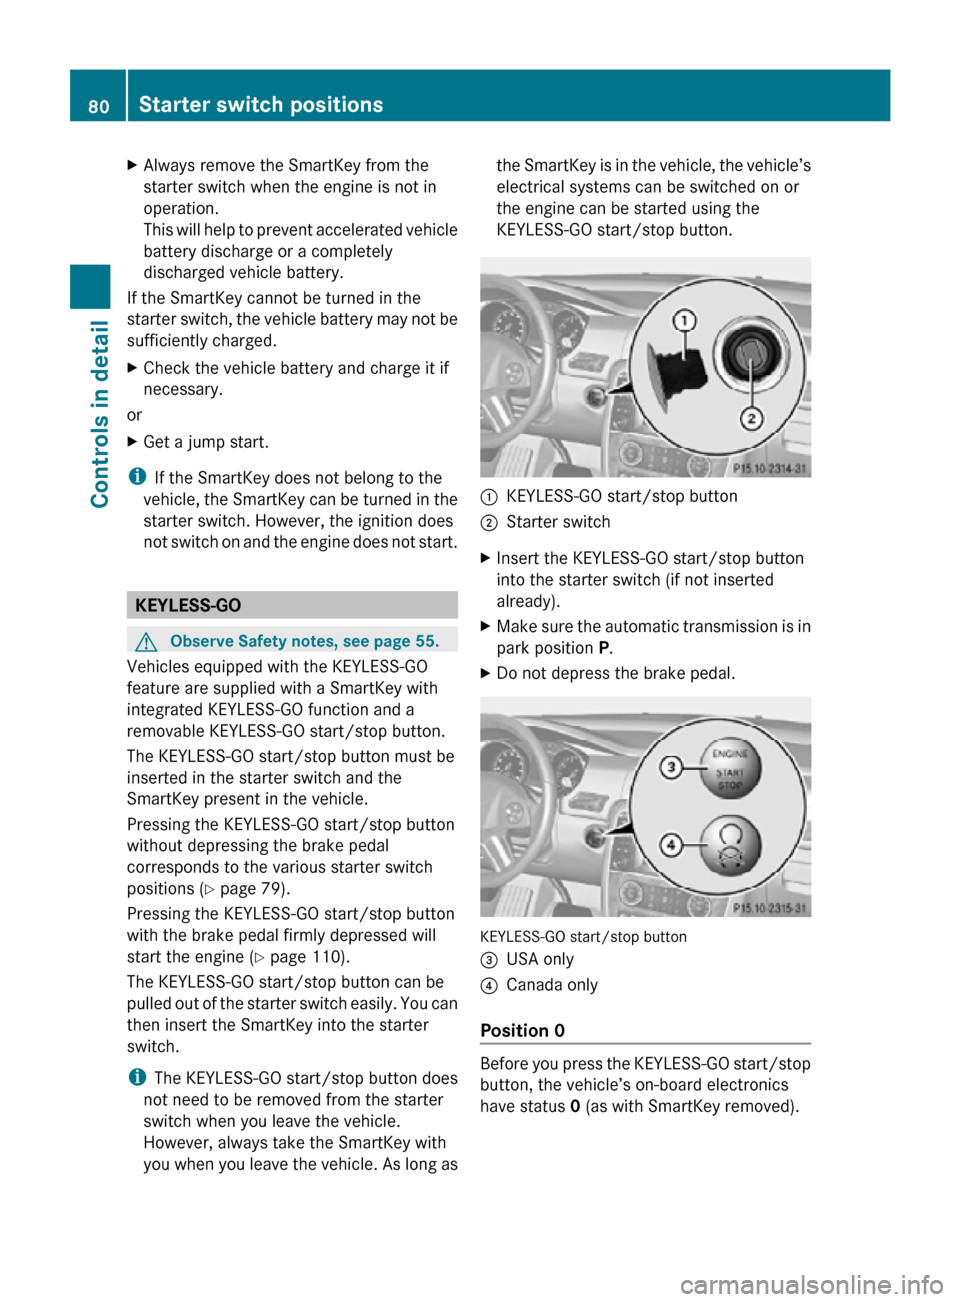
:
KEYLESS-GO start/stop button
; Starter switch
X Insert the KEYLESS-GO start/stop button
into the starter switch (if not inserted
already).
X Make sure the automatic transmission is in
park position P.
X Do not depress the brake pedal. KEYLESS-GO start/stop button
=
USA only
? Canada only
Position 0 Before you press the KEYLESS-GO start/stop
button, the vehicle’s on-board electronics
have status 0 (as with SmartKey removed).80
Starter switch positionsControls in detail
251_AKB; 4; 52, en-US
d2ureepe,
Version: 2.11.8.1 2009-03-23T09:22:52+01:00 - Seite 80
Page 83 of 364
Position 1
X
Press the KEYLESS-GO start/stop button
once.
This supplies power for some electrical
consumers, such as radio functions.
i If you now press the KEYLESS-GO start/
stop button
R once more, the ignition (position 2) is
switched on
R twice more the power supply is again
switched off
Ignition (or position 2) X
Press the KEYLESS-GO start/stop button
twice.
This supplies power for all electrical
consumers.
All lamps (except low-beam headlamp
indicator lamp, high-beam headlamp
indicator lamp, and turn signal indicator
lamps unless activated) in the instrument
cluster
come on. If a lamp in the instrument
cluster fails to come on when the ignition
is switched on, have it checked and
replaced if necessary. If a lamp in the
instrument cluster remains on after
starting the engine or comes on while
driving, refer to “Lamps in instrument
cluster” ( Y page 299).
i If you now press the KEYLESS-GO start/
stop
button once, the power supply is again
switched off. Seats
Safety notes
G
Warning!
In order to avoid possible loss of vehicle
control
the following must be done before the
vehicle is put into motion:
R seat adjustment
R head restraint adjustment
R steering wheel adjustment
R rear view mirror adjustment
R fastening of seat belts G
Warning!
Do not adjust the driver’s seat while driving.
Adjusting the seat while driving could cause
the driver to lose control of the vehicle.
Never ride in a moving vehicle with the seat
backrest
in an excessively reclined position as
this can be dangerous. You could slide under
the seat belt in a collision. If you slide under
it, the seat belt would apply force at the
abdomen or neck. That could cause serious
or fatal injuries. The seat backrest and seat
belts provide the best restraint when the
wearer is in a position that is as upright as
possible and seat belts are properly
positioned on the body. G
Warning!
Your seat must be adjusted so that you can
correctly fasten your seat belt.
Observe the following points:
R Adjust
the seat backrest until your arms are
slightly angled when holding the steering
wheel.
R Adjust the seat to a comfortable seating
position that still allows you to reach the
accelerator/brake pedal safely. The
position should be as far back as possible
with the driver still able to operate the
controls properly. Seats
81
Controls in detail
251_AKB; 4; 52, en-US
d2ureepe, Version: 2.11.8.1 2009-03-23T09:22:52+01:00 - Seite 81 Z
Page 115 of 364
idle speed. If your foot is not firmly on the
brake pedal, the vehicle could accelerate
quickly forward or in reverse. You could lose
control of the vehicle and hit someone or
something. Only shift into gear when the
engine is idling normally and when your right
foot is firmly on the brake pedal.
! Only
shift the automatic transmission into
reverse gear R or park position P when the
vehicle is stopped. Otherwise the
automatic transmission could be damaged.
X Depress the brake pedal.
The gear selector lever can now be used.
X Shift the automatic transmission into drive
position D or reverse gear R.
i Shifting
the automatic transmission out of
park position P is only possible with the
brake pedal depressed.
Without the brake pedal depressed, the
gear selector lever can be moved up or
down. However, the parking pawl remains
engaged, not allowing shifting to occur.
X Wait for the gear selection process to
complete before setting the vehicle in
motion.
X If engaged, release the parking brake.
X Release the brake pedal.
X Carefully depress the accelerator pedal.
After a cold start, the automatic transmission
shifts at a higher engine speed. This allows
the catalytic converter (gasoline engine) or
the
oxidation catalyst (diesel engine) to reach
its operating temperature earlier.
For more information on driving, see “Driving
instructions” ( Y page 253). Problems while driving
The
engine runs erratically and misfires R
Gasoline engine: An ignition cable may be
damaged.
R The engine electronics may not be
operating properly.
R Gasoline engine: Unburned gasoline may
have entered the catalytic converter and
damaged it.
X Give very little gas.
X Have the problem checked at an authorized
Mercedes-Benz
Center as soon as possible.
The coolant temperature is above
248‡
(120†) The coolant is too hot and is no longer cooling
the engine.
X
Stop the vehicle in a safe location as soon
as possible.
X Turn off the engine immediately.
X Allow the engine and coolant to cool off.
X Check the coolant level and add coolant if
necessary ( Y page 225).
In case of accident If the vehicle is leaking fuel:
X
Do not start the engine under any
circumstances.
X Exit the vehicle at a safe distance from the
roadway.
X Notify local fire and/or police authorities.
If the extent of the damage cannot be
determined:
X Contact an authorized Mercedes-Benz
Center or call Roadside Assistance.
If no damage on major assemblies, fuel
system, and engine mount can be
determined:
X Start the engine in the usual manner. Driving and parking
113Controls in detail
251_AKB; 4; 52, en-US
d2ureepe, Version: 2.11.8.1 2009-03-23T09:22:52+01:00 - Seite 113 Z
Page 123 of 364
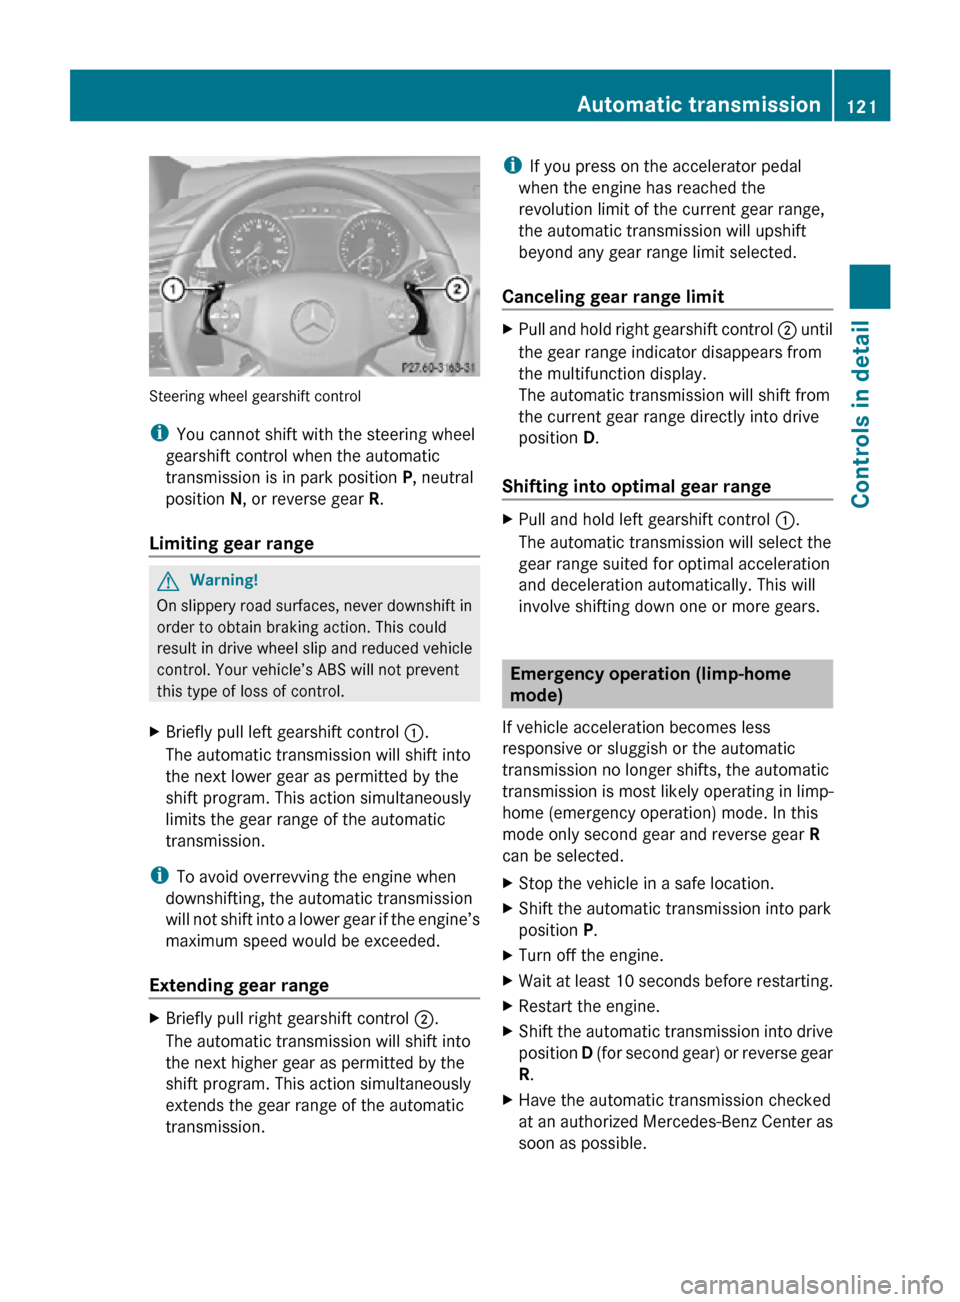
Steering wheel gearshift control
i
You cannot shift with the steering wheel
gearshift control when the automatic
transmission is in park position P, neutral
position N, or reverse gear R.
Limiting gear range G
Warning!
On slippery road surfaces, never downshift in
order to obtain braking action. This could
result in drive wheel slip and reduced vehicle
control. Your vehicle’s ABS will not prevent
this type of loss of control.
X Briefly pull left gearshift control :.
The automatic transmission will shift into
the next lower gear as permitted by the
shift program. This action simultaneously
limits the gear range of the automatic
transmission.
i To avoid overrevving the engine when
downshifting, the automatic transmission
will not shift into a lower gear if the engine’s
maximum speed would be exceeded.
Extending gear range X
Briefly pull right gearshift control ;.
The automatic transmission will shift into
the next higher gear as permitted by the
shift program. This action simultaneously
extends the gear range of the automatic
transmission. i
If you press on the accelerator pedal
when the engine has reached the
revolution limit of the current gear range,
the automatic transmission will upshift
beyond any gear range limit selected.
Canceling gear range limit X
Pull and hold right gearshift control ; until
the gear range indicator disappears from
the multifunction display.
The automatic transmission will shift from
the current gear range directly into drive
position D.
Shifting into optimal gear range X
Pull and hold left gearshift control :.
The automatic transmission will select the
gear range suited for optimal acceleration
and deceleration automatically. This will
involve shifting down one or more gears. Emergency operation (limp-home
mode)
If vehicle acceleration becomes less
responsive or sluggish or the automatic
transmission no longer shifts, the automatic
transmission is most likely operating in limp-
home (emergency operation) mode. In this
mode only second gear and reverse gear R
can be selected.
X Stop the vehicle in a safe location.
X Shift the automatic transmission into park
position P.
X Turn off the engine.
X Wait at least 10 seconds before restarting.
X Restart the engine.
X Shift the automatic transmission into drive
position D (for second gear) or reverse gear
R.
X Have the automatic transmission checked
at an authorized Mercedes-Benz Center as
soon as possible. Automatic transmission
121Controls in detail
251_AKB; 4; 52, en-US
d2ureepe, Version: 2.11.8.1 2009-03-23T09:22:52+01:00 - Seite 121 Z