jump start MERCEDES-BENZ S CLASS 2010 Owners Manual
[x] Cancel search | Manufacturer: MERCEDES-BENZ, Model Year: 2010, Model line: S CLASS, Model: MERCEDES-BENZ S CLASS 2010Pages: 548, PDF Size: 11.45 MB
Page 7 of 548
Armrest, rear
Control panel ........................... 80, 293
Cup holder ..................................... 385
Storage compartment ....................383
Ashtrays ............................................. 387
Aspect ratio (tires) ............................ 430
Assistance menu ............................... 231
ATTENTION ASSIST ........................... 355
Messages in the multifunction
display ........................................... 476
Switching on or off ......................... 232
Audio Aux ........................................... 186
Audio menu ........................................ 226
Auto-dimming rear view mirrors ..... 295
Automatic central locking ................ 278
Automatic headlamp mode .............. 299
Automatic interior lighting control .. 304
Automatic shift program .................. 322
Automatic transmission ................... 317
Automatic shift program ................322
Gear range indicator ......................321
Gear ranges ................................... 321
Gear selector lever ........................317
Hill-start assist system ..................341
Kickdown ....................................... 321
Kickdown (manual shift program) ..325
Manual shift program ..................... 324
One-touch gearshifting ..................323
Program mode indicator ................322
Program mode selector switch
(automatic shift program) ..............322
Program mode selector switch
(manual shift program) ..................324
Shifting procedure .........................319
Steering wheel gearshift control ....323
Transmission position indicator .....320
Transmission positions ..................320
AUX
Audio ............................................. 186
Media interface .............................. 200
Sockets .......................................... 187
Video ............................................. 186
Axle oils .............................................. 538B
Backrest see Seats
Backup lamps
Messages in the multifunction
display ........................................... 485
Bar (air pressure unit) ....................... 430
BAS (Brake Assist System) ................. 64
BAS PLUS (Brake Assist System
PLUS) .................................................... 64
Batteries, replacing
Headphone .................................... 502
Remote control (Rear Seat
Entertainment System) ..................502
Remote control (SPLITVIEW) ..........502
SmartKey ....................................... 502
Batteries, SmartKey
Checking condition ........................277
Battery, Vehicle ................................. 512
Charging ........................................ 514
Jump starting ................................. 514
Messages in the multifunction
display ................................... 463, 482
Bead (tire) .......................................... 430
Beverage holders see Cup holders
Blind Spot Assist ............................... 359
Messages in the multifunction
display ........................................... 460
Switching on or off ......................... 233
Bluetooth ®
interface ......................... 151
Brake Assist System see BAS
Brake Assist System PLUS
see BAS PLUS
Brake fluid
Checking level ............................... 409
Messages in the multifunction
display ........................................... 472
Brake lamps
Cleaning lenses ............................. 443
Brake pads
Messages in the multifunction
display ........................................... 466
Brakes ................................................ 435
High-performance brake system ....437
Warning lamp ................................. 490Index5221_AKB; 6; 20, en-USd2ugruen,Version: 2.11.8.12009-09-24T13:28:17+02:00 - Seite 5
Page 13 of 548
Inside door handle ...................... 38, 278
Instrument cluster ...................... 32, 326
Illumination .................................... 326
Lamps ............................................ 489
Multifunction display .....................222
Instrument lighting
see Instrument cluster, Illumination
Instrument panel
see Instrument cluster
Instruments and controls
see Cockpit
Interior lighting
Emergency lighting ........................304
Front .............................................. 304
Front reading lamps .......................304
Rear ............................................... 304
Rear reading lamps ........................304
Interior rear view mirror ................... 294
Auto-dimming rear view mirrors ....295
Interior storage spaces
see Storage compartments
Intermittent wiping ........................... 306
Rain sensor .................................... 306
iPod ®
(media interface) .................... 200
ISOFIX (Child seat anchors –
LATCH-type) see Children in the vehicle
J
Jack ..................................................... 451
Jump starting ..................................... 514
K
Key, Mechanical
Loss of ........................................... 277
Replacing ....................................... 278
Unlocking/locking manually ..........499
Valet locking .................................. 283
Key, SmartKey
Battery check lamp ........................277
Checking batteries ......................... 277
Factory setting ...................... 275, 277
Global locking (KEYLESS-
GO) ................................................ 277
Global locking (SmartKey) .............275
Global unlocking (KEYLESS-
GO) ................................................ 277
Global unlocking
(SmartKey) ..................................... 275
Important notes on KEYLESS-GO ...276
Locking/unlocking ........................274
Loss of ........................................... 277
Messages in the multifunction
display ........................................... 478
Opening, trunk ............................... 279
Opening and closing the power
tilt/sliding sunroof or the
panorama roof ............................... 309
Opening and closing the windows . 309
Remote control .............................. 274
Replacing ....................................... 278
Replacing batteries ........................502
Restoring to factory setting ...275, 277
Selective setting ....................275, 277
Starter switch positions .................284
KEYLESS-GO
Starter switch positions .................284
Keypad (COMAND) .............................. 79
Kickdown ........................................... 321
Kickdown (manual shift program) ... 325
Kilopascal (air pressure unit) ........... 431
L
Labels
Certification ................................... 524
Emission control information .........525
Tire and Loading Information
placard ........................................... 418
Tire inflation pressure ....................412
Lamps, exterior
Exterior lamp switch ......................298
Front .............................................. 505
Messages in the multifunction
display ........................................... 485
Switching on/off ........................... 298
Lamps, indicator and warning
ABS .......................................... 32, 490
Adaptive Highbeam Assist .............301
Brakes ........................................... 490
Distance warning lamp ..........333, 496
Engine malfunction ........................496
ESC .......................................... 32, 495
Index11221_AKB; 6; 20, en-USd2ugruen,Version: 2.11.8.12009-09-24T13:28:17+02:00 - Seite 11
Page 286 of 548
GWarning!
Only drive with the doors closed. Otherwise,
one or more of the doors could open while the
vehicle is in motion, putting you and/or
others at risk.
GWarning!
Make sure the trunk is closed when the engine
is running and while driving. Among other
dangers, deadly carbon monoxide (CO) gases
may enter vehicle interior resulting in
unconsciousness and death.
XPower closing assist for doors: Press the
doors gently past the initial engage position
into the lock.
XPower closing assist for trunk lid: Press
the trunk lid gently into its lock.
Starter switch positions
SmartKey
GObserve Safety notes, see page 56.
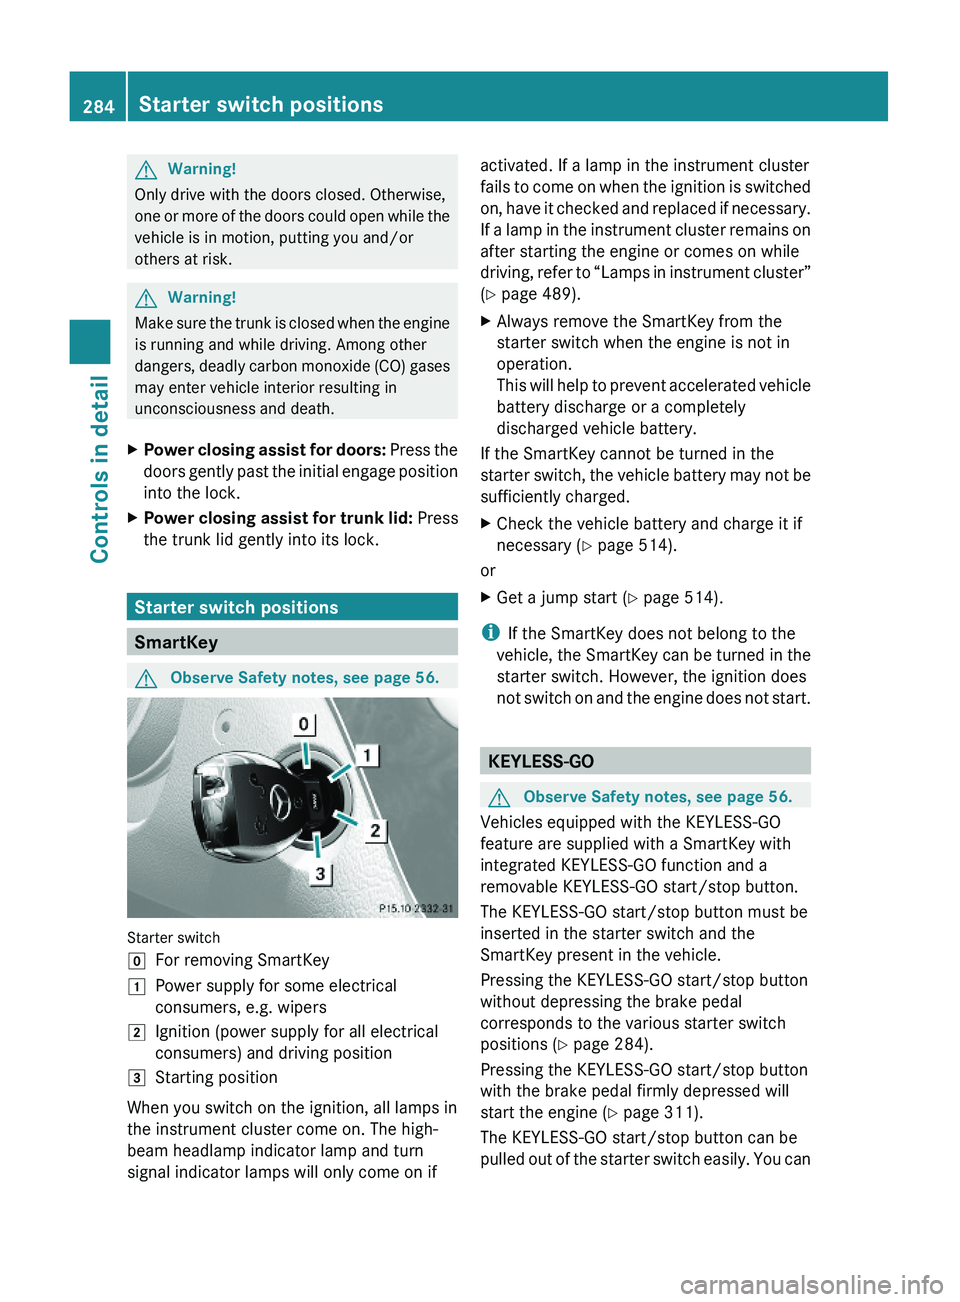
Starter switch
\000]For removing SmartKey\000JPower supply for some electrical
consumers, e.g. wipers
\000KIgnition (power supply for all electrical
consumers) and driving position
\000LStarting position
When you switch on the ignition, all lamps in
the instrument cluster come on. The high-
beam headlamp indicator lamp and turn
signal indicator lamps will only come on if
activated. If a lamp in the instrument cluster
fails to come on when the ignition is switched
on, have it checked and replaced if necessary.
If a lamp in the instrument cluster remains on
after starting the engine or comes on while
driving, refer to “Lamps in instrument cluster”
(Y page 489).
XAlways remove the SmartKey from the
starter switch when the engine is not in
operation.
This will help to prevent accelerated vehicle
battery discharge or a completely
discharged vehicle battery.
If the SmartKey cannot be turned in the
starter switch, the vehicle battery may not be
sufficiently charged.
XCheck the vehicle battery and charge it if
necessary (Y page 514).
or
XGet a jump start (Y page 514).
iIf the SmartKey does not belong to the
vehicle, the SmartKey can be turned in the
starter switch. However, the ignition does
not switch on and the engine does not start.
KEYLESS-GO
GObserve Safety notes, see page 56.
Vehicles equipped with the KEYLESS-GO
feature are supplied with a SmartKey with
integrated KEYLESS-GO function and a
removable KEYLESS-GO start/stop button.
The KEYLESS-GO start/stop button must be
inserted in the starter switch and the
SmartKey present in the vehicle.
Pressing the KEYLESS-GO start/stop button
without depressing the brake pedal
corresponds to the various starter switch
positions (Y page 284).
Pressing the KEYLESS-GO start/stop button
with the brake pedal firmly depressed will
start the engine (Y page 311).
The KEYLESS-GO start/stop button can be
pulled out of the starter switch easily. You can
284Starter switch positionsControls in detail
221_AKB; 6; 20, en-USd2ugruen,Version: 2.11.8.12009-09-24T13:28:17+02:00 - Seite 284
Page 314 of 548
children unattended in the vehicle, as they
could otherwise accidentally start the engine.
When leaving the vehicle, always take the
SmartKey with you and lock the vehicle. Do
not leave children unattended in the vehicle,
or with access to an unlocked vehicle. A
child’s unsupervised access to a vehicle could
result in an accident and/or serious personal
injury.
You can start your vehicle without the
SmartKey in the starter switch using the
KEYLESS-GO start/stop button.
The SmartKey must be located in the vehicle.
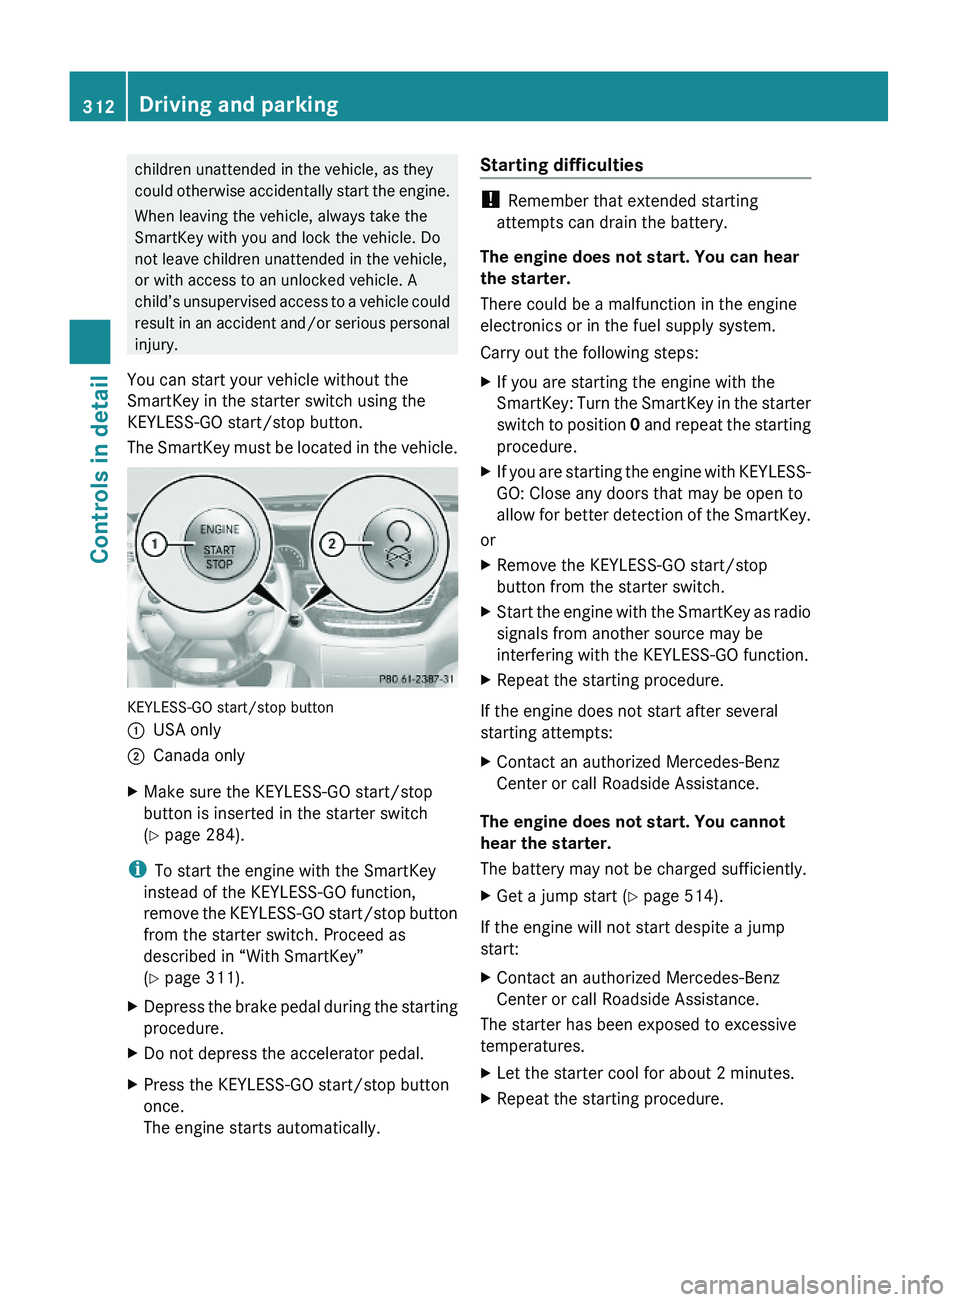
KEYLESS-GO start/stop button
\000FUSA only\000GCanada onlyXMake sure the KEYLESS-GO start/stop
button is inserted in the starter switch
(Y page 284).
iTo start the engine with the SmartKey
instead of the KEYLESS-GO function,
remove the KEYLESS-GO start/stop button
from the starter switch. Proceed as
described in “With SmartKey”
(Y page 311).
XDepress the brake pedal during the starting
procedure.
XDo not depress the accelerator pedal.XPress the KEYLESS-GO start/stop button
once.
The engine starts automatically.
Starting difficulties
! Remember that extended starting
attempts can drain the battery.
The engine does not start. You can hear
the starter.
There could be a malfunction in the engine
electronics or in the fuel supply system.
Carry out the following steps:
XIf you are starting the engine with the
SmartKey: Turn the SmartKey in the starter
switch to position 0 and repeat the starting
procedure.
XIf you are starting the engine with KEYLESS-
GO: Close any doors that may be open to
allow for better detection of the SmartKey.
or
XRemove the KEYLESS-GO start/stop
button from the starter switch.
XStart the engine with the SmartKey as radio
signals from another source may be
interfering with the KEYLESS-GO function.
XRepeat the starting procedure.
If the engine does not start after several
starting attempts:
XContact an authorized Mercedes-Benz
Center or call Roadside Assistance.
The engine does not start. You cannot
hear the starter.
The battery may not be charged sufficiently.
XGet a jump start (Y page 514).
If the engine will not start despite a jump
start:
XContact an authorized Mercedes-Benz
Center or call Roadside Assistance.
The starter has been exposed to excessive
temperatures.
XLet the starter cool for about 2 minutes.XRepeat the starting procedure.312Driving and parkingControls in detail
221_AKB; 6; 20, en-USd2ugruen,Version: 2.11.8.12009-09-24T13:28:17+02:00 - Seite 312
Page 394 of 548
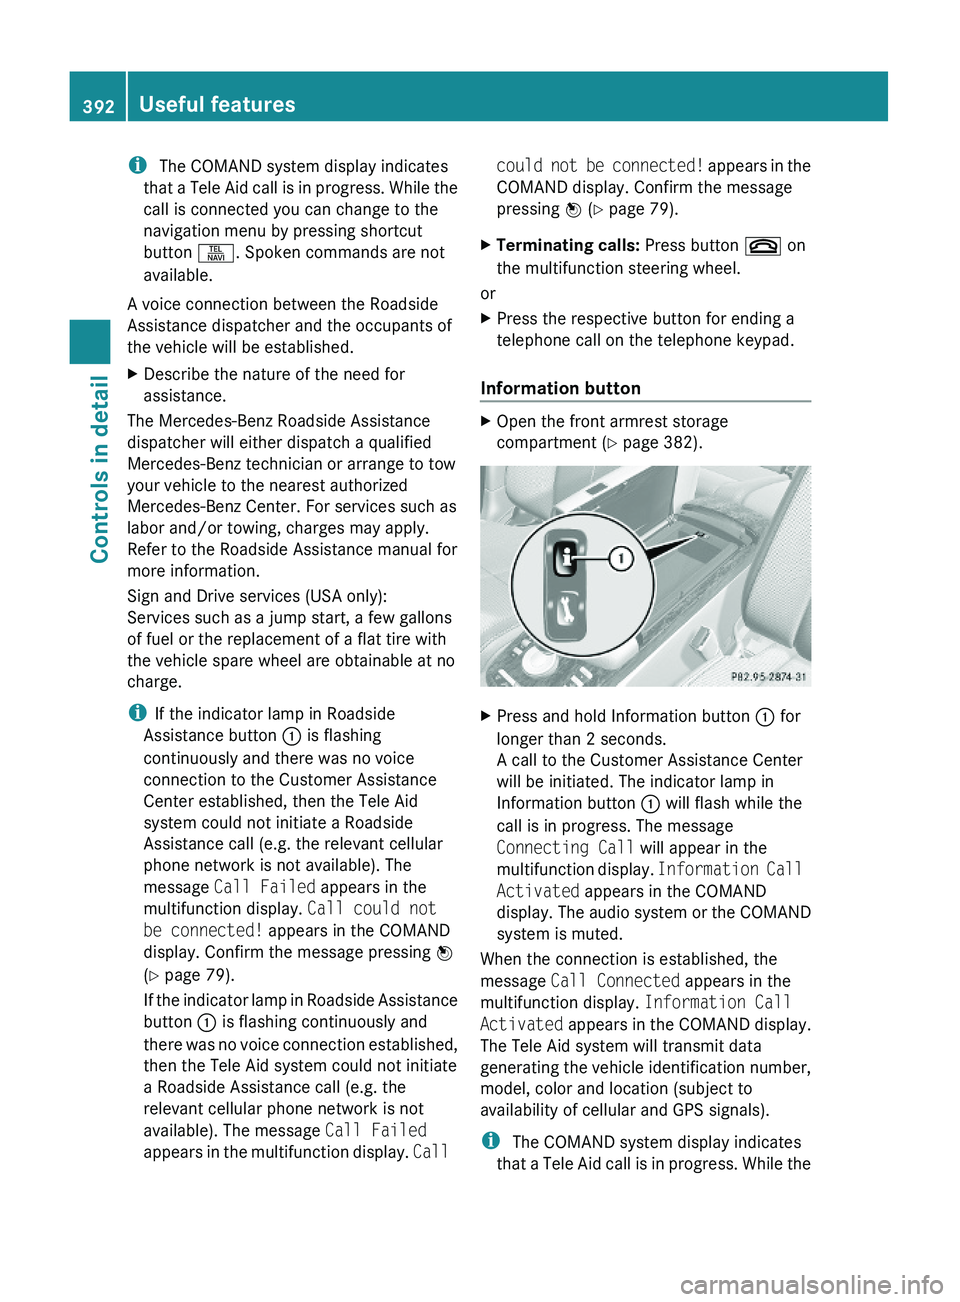
i The COMAND system display indicates
that a Tele Aid call is in progress. While the
call is connected you can change to the
navigation menu by pressing shortcut
button \000X. Spoken commands are not
available.
A voice connection between the Roadside
Assistance dispatcher and the occupants of
the vehicle will be established.
XDescribe the nature of the need for
assistance.
The Mercedes-Benz Roadside Assistance
dispatcher will either dispatch a qualified
Mercedes-Benz technician or arrange to tow
your vehicle to the nearest authorized
Mercedes-Benz Center. For services such as
labor and/or towing, charges may apply.
Refer to the Roadside Assistance manual for
more information.
Sign and Drive services (USA only):
Services such as a jump start, a few gallons
of fuel or the replacement of a flat tire with
the vehicle spare wheel are obtainable at no
charge.
iIf the indicator lamp in Roadside
Assistance button \000F is flashing
continuously and there was no voice
connection to the Customer Assistance
Center established, then the Tele Aid
system could not initiate a Roadside
Assistance call (e.g. the relevant cellular
phone network is not available). The
message Call Failed appears in the
multifunction display. Call could not
be connected! appears in the COMAND
display. Confirm the message pressing \000
Page 451 of 548
Vehicle equipment ............................450
Where will I find ...? ..........................450
Vehicle status messages in the
multifunction display .......................452
What to do if … ..................................489
Unlocking/locking manually ...........499
Resetting activated NECK-PRO
active front head restraints .............501
Replacing batteries (SmartKey,
remote control, headphone) ............502
Replacing bulbs .................................504
Replacing wiper blades ....................507
Flat tire ..............................................508
Battery ...............................................512
Jump starting ....................................514
Towing the vehicle ............................516
Fuses ..................................................519
449Practical hints221_AKB; 6; 20, en-USd2ugruen,Version: 2.11.8.12009-09-24T13:28:17+02:00 - Seite 449
Page 516 of 548
The factory-equipped battery may only be
replaced with a battery that
R has the same security features
R is of identical size
R is of identical voltage
R is of identical capacity
! As any other battery, the battery may
discharge if you do not operate the vehicle
for an extended period of time. Have the
battery disconnected at a qualified
workshop or an authorized Mercedes-Benz
Center in such a case. You may also
connect an accessory battery charge unit
expressly approved by Mercedes-Benz for
your vehicle model to maintain the battery
charge. Contact an authorized Mercedes-
Benz Center for further information.
The battery, the battery ventilation hose
and the lateral plug must always be
securely installed when the vehicle is in
operation.
! Switch off the engine and switch off the
vehicle’s internal electrical functions
before you disconnect or remove the
battery’s terminal clamps. You could
otherwise destroy electronic assemblies
such as the generator.
Remove SmartKey from starter switch
(vehicles with KEYLESS-GO: Make sure the
vehicle’s on-board electronics have status 0)
when you turn off the engine and no longer
require any electrical consumers. The vehicle
then uses very little power and the battery is
spared.
If the battery is discharged, you must use the
mechanical key to unlock the vehicle.
Charging the battery
GWarning!
Never charge a battery while still installed in
the vehicle unless the accessory battery
charge unit approved by Mercedes-Benz is
being used. Gases may escape during
charging and could cause an explosion that
may result in personal injury, paint damage or
corrosion.
An accessory battery charge unit specially
adapted for Mercedes-Benz vehicles and
tested and approved by Mercedes-Benz is
available. It permits the charging of the
battery in its installed position. Contact an
authorized Mercedes-Benz Center for
information and availability.
Charge battery in accordance with the
separate instructions for the accessory
battery charger.
Have the battery charged at an authorized
Mercedes-Benz Center. If you charge the
battery yourself, follow the operating
instructions for your charging device.
Only use a battery charge unit with a
maximum charging voltage of 14.8 V.XCharge battery in accordance with the
instructions of the battery charger
manufacturer.
Jump starting
GWarning!
Failure to follow these directions will cause
damage to the electronic components, and
can lead to a battery explosion and severe
injury or death.
Never lean over batteries while connecting or
jump starting. You might get injured.
Battery fluid contains sulfuric acid. Do not
allow this fluid to come in contact with eyes,
skin or clothing. In case it does, immediately
flush affected area with water, and seek
medical help if necessary.
A battery will also produce hydrogen gas,
which is flammable and explosive. Keep
flames or sparks away from battery, avoid
514Jump startingPractical hints
221_AKB; 6; 20, en-USd2ugruen,Version: 2.11.8.12009-09-24T13:28:17+02:00 - Seite 514
Page 517 of 548
improper connection of jumper cables,
smoking, etc.
Attempting to jump start a frozen battery can
result in it exploding, causing personal injury.
Read all instructions before proceeding.GWarning!
HYBRID vehicles: It is imperative that you read
the HYBRID Supplemental Operating
Instructions included in your vehicle literature
portfolio. You may otherwise not receive all
necessary safety information and warning for
the operation of your vehicle.
! Do not tow-start the vehicle. You could
otherwise seriously damage the automatic
transmission which is not covered by the
Mercedes-Benz Limited Warranty.
! Jump starting should only be performed
using the jump-start terminals located in
the engine compartment.
Avoid repeated and lengthy starting
attempts.
Do not attempt to start the engine using a
battery quick-charge unit.
If the engine does not run after several
unsuccessful starting attempts, have it
checked at the nearest authorized
Mercedes-Benz Center.
Excessive unburned fuel generated by
repeated failed starting attempts may
damage the catalytic converter and may
present a fire risk.
Make sure the jumper cables do not have
loose or missing insulation.
Make sure the cable clamps do not touch
any other metal part while the other end is
still attached to a battery.
If the battery is discharged, the engine can be
started with jumper cables and the fully
charged battery of another vehicle or an
equivalent starter pack. Observe the
following:
R Access to the battery is not possible on all
vehicles. If you cannot access the battery
of the other vehicle, provide jump start
power by an external battery or starter
pack.
R Jump starting should only be performed
when the engine and catalytic converter
are cold.
R Do not jump start the engine or charge the
battery if the battery is frozen. Let the
battery thaw out first.
R Only jump start from batteries with the
same voltage rating (12 V). Jump starting
with a more powerful battery could damage
the vehicle’s electrical system. Such
damage will not be covered by the
Mercedes-Benz Limited Warranty.
R Only use jumper cables with sufficient
cross-section and insulated terminal
clamps.
R Always make sure the jumper cables are
not on or near pulleys, fans or other parts
that move when an engine is started or
running.
R Should the battery be drained completely,
let the donating power source charge the
vehicle for several minutes before
reattempting the starting process.XMake sure the two vehicles do not touch.XSwitch off all electrical consumers.XEngage the electronic parking brake.XMake sure the automatic transmission is in
park position P.XOpen the hood ( Y page 404).Jump starting515Practical hints221_AKB; 6; 20, en-USd2ugruen,Version: 2.11.8.12009-09-24T13:28:17+02:00 - Seite 515Z
Page 519 of 548
necessary safety information and warning for
the operation of your vehicle.
! To prevent damage during transport, do
not tie down vehicle by its chassis or
suspension parts.
If circumstances do not permit the
recommended towing methods, the vehicle
may be towed with all wheels on the ground
or front axle raised (except vehicles with
4MATIC) only so far as necessary to have the
vehicle moved to a safe location where the
recommended towing methods can be
employed.
! Before towing the vehicle observe the
following instructions:
RDo not tow-start the vehicle. You could
otherwise seriously damage the
automatic transmission which is not
covered by the Mercedes-Benz Limited
Warranty.
RDo not tow with sling-type equipment.
Towing with sling-type equipment over
bumpy roads will damage radiator and
supports.
RTowing of the vehicle should only be
done using the properly installed towing
eye bolt. Never attach a tow cable, tow
rope or tow rod to the vehicle chassis,
frame or suspension parts.
GWarning!
With the engine not running, there is no power
assistance for the brake and steering
systems. In this case, it is important to keep
in mind that a considerably higher degree of
effort is necessary to brake and steer the
vehicle. Adapt your driving accordingly.
! Avoid pulling the vehicle abruptly or
diagonally, since it could result in damage
to the chassis alignment.
! Do not use the towing eye bolt for
recovery, as this could damage the vehicle.
If in doubt, recover the vehicle with a crane.
iIf the battery is disconnected or
discharged
Rthe SmartKey will not turn in the starter
switch
Rthe automatic transmission will remain in
park position P
For more information see “Battery”
(Y page 512) or “Jump starting”
(Y page 514).
Installing towing eye bolt
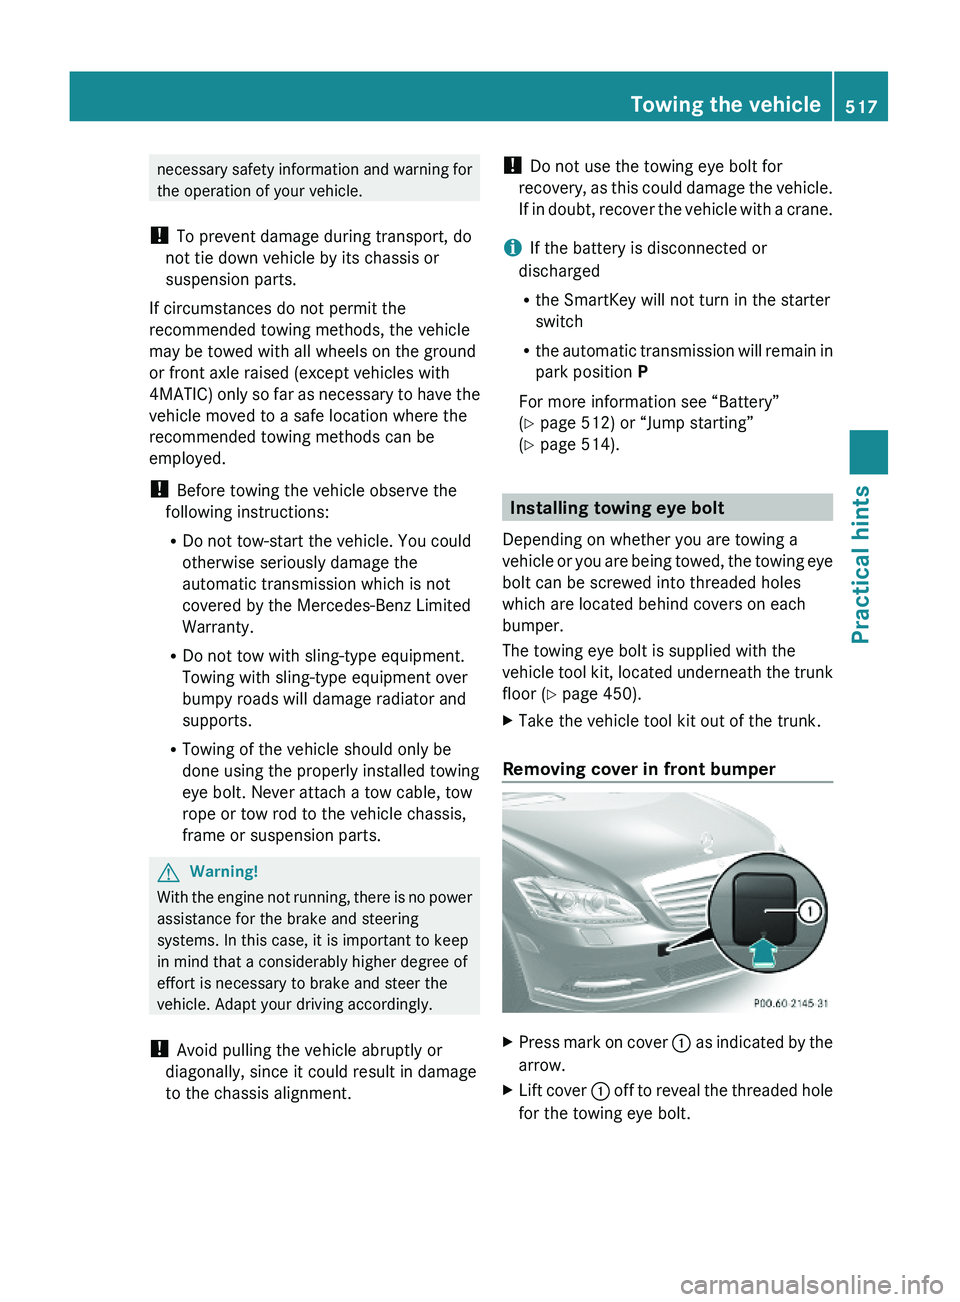
Depending on whether you are towing a
vehicle or you are being towed, the towing eye
bolt can be screwed into threaded holes
which are located behind covers on each
bumper.
The towing eye bolt is supplied with the
vehicle tool kit, located underneath the trunk
floor (Y page 450).
XTake the vehicle tool kit out of the trunk.
Removing cover in front bumper
XPress mark on cover \000F as indicated by the
arrow.
XLift cover \000F off to reveal the threaded hole
for the towing eye bolt.
Towing the vehicle517Practical hints221_AKB; 6; 20, en-USd2ugruen,Version: 2.11.8.12009-09-24T13:28:17+02:00 - Seite 517Z