Top up coo MERCEDES-BENZ S-Class 2011 W221 Owner's Manual
[x] Cancel search | Manufacturer: MERCEDES-BENZ, Model Year: 2011, Model line: S-Class, Model: MERCEDES-BENZ S-Class 2011 W221Pages: 524, PDF Size: 22.53 MB
Page 9 of 524
CD/DVDEjecting (Rear Seat Entertainment
System) ......................................... 248
Inserting (Rear Seat
Entertainment System) ..................247
CD player/CD changer
Operation (COMAND) ....................217
Center console ..................................... 35
Central locking Activating/deactivating
(COMAND) ..................................... 261
SmartKey ......................................... 76
Changing bulbs
Headlamps ..................................... 278
Changing direction
Announcement phase ....................164
Change of direction phase .............165
Preparation phase .........................164
Changing gears .................................. 309
Changing the programming SmartKey ......................................... 79
Channel presets ................................ 209
Character entry ................................. 127
Characters Entering ................................. 128, 130
Child-proof locks
Rear doors ....................................... 65
Children
In the vehicle ................................... 60
Restraint systems ............................ 61
Child seat
LATCH-type (ISOFIX ) child seat
anchors ............................................ 63
Special seat belt retractor ...............62
Top Tether ....................................... 64
Cigarette lighter ................................ 431
City Entering ......................................... 152
Classification system for
occupants (OCS) Faults ............................................... 52
Operation ......................................... 48
System self-test ............................... 51
Climate control
Activating/deactivating .................288
Activating/deactivating air-
recirculation mode .........................293Automatic climate control .............287
COMAND ....................................... 261
Controlling automatically ...............289
Controlling centrally (COMAND) ....264
Cooling with air dehumidification ..289
Cooling with air dehumidification
(COMAND) ..................................... 263
Defrosting the windshield ..............292
Demisting the windows .................. 293
Important safety information .........286
Indicator lamp ................................ 289
Main menu ..................................... 263
Maximum cooling .......................... 292
Problems with "cooling with air
dehumidification" ........................... 289
Problems with the rear window
heating .......................................... 293
Rear compartment (COMAND) ......265
Rear control panel .........................288
Refrigerant ..................................... 514
Setting the air distribution .............291
Setting the airflow .........................292
Setting the airflow (COMAND) .......265
Setting the air vents ......................295
Setting the footwell temperature
(COMAND) ..................................... 264
Setting the temperature ................290
Setting the temperature (rear
compartment) ................................ 291
Switching the rear window
heating on/off ............................... 293
Switching the residual heat
function on/off .............................. 294
Coat hooks ......................................... 424
Cockpit ................................................. 31
COMAND Basic functions .............................. 131
Components .................................. 116
Function buttons ........................... 117
Switching on/off ........................... 131
COMAND controller ........................... 116
COMAND display ............................... 119
Cleaning instructions .....................123
Folding in and swiveling .................122
Setting ........................................... 141
COMAND menu
Automatic climate control .............261Index7
Page 10 of 524
COMAND MenuVehicle ........................................... 257
COMAND operating system .............. 116
Combination switch .......................... 274
Conference connection ..................... 198
Consumption statistics (on-board
computer) .......................................... 368
Convenience closing feature .............. 91
Convenience opening feature ............ 90
Convenience telephone Importing contacts ........................200
Coolant (engine)
Checking the level .........................450
Display message ............................ 397
Notes ............................................. 515
Temperature gauge ........................ 365
Cooling
see Climate control
Copy protection (CD/DVD) ............... 225
Cornering light (display message) ... 394
Crosshair position Saving ............................................ 180
Cruise control
Cruise control lever .......................324
Display message ............................ 407
Function/notes ............................. 323
Cup holder ......................................... 427
Center console .............................. 427
Rear compartment .........................428
Current fuel consumption (on-
board computer) ............................... 368
Customer Assistance Center (CAC) ............................................... 27
Customer Relations Department ....... 27
D
Dashboard see Cockpit
Data carrier
MUSIC REGISTER ........................... 226
Data medium
Audio DVD ..................................... 224
CD/DVD ........................................ 225
MP3 ............................................... 224
Date format
Setting ........................................... 142
Daytime running lamps
Display message ............................ 396
Switching on/off (on-board
computer) ...................................... 377
Delayed switch-off
Exterior lighting (COMAND) ...........259
Interior lighting (COMAND) ............259
Destination
Adopting from the list of previous
destinations ................................... 176
Destination entry
Point of interest ............................. 160
Destination information ................... 169
Destination input .............................. 151
Address ......................................... 151
Destination memory ......................156
Intermediate stop .......................... 158
Last destination ............................. 157
Map ............................................... 157
Destination memory ......................... 175
Deleting an entry ........................... 178
My address .................................... 175
Storing a destination .....................176
Digital speedometer ......................... 368
DIRECT SELECT lever see Automatic transmission
Display (cleaning instructions) ........ 457
Display messages Brakes ........................................... 388
Calling up (on-board computer) .....380
Clearing (on-board computer) ........380
Driving systems ............................. 401
Engine ............................................ 397
KEYLESS-GO .................................. 411
Lamps ............................................ 394
Safety systems .............................. 381
Service interval display ..................451
SmartKey ....................................... 411
Tires ............................................... 407
Vehicle ........................................... 409
Distance
see Route overview
Distance recorder ............................. 368
Distance warning lamp ..................... 419
DISTRONIC PLUS ............................... 325
Deactivating ................................... 333
Display message ............................ 4068Index
Page 15 of 524
Low-beam headlamps ....................273
Rear fog lamp ................................ 274
Switching the Adaptive Highbeam
Assist on/off (on-board
computer) ...................................... 377
Switching the daytime driving
lights on/off (on-board computer) . 377
Light sensor (display message) ....... 397
List as selection list Calling up ....................................... 129
Loading guidelines ............................ 422
Locator lighting Adjusting (COMAND) .....................260
Locking
Automatic ........................................ 83
Emergency locking ........................... 84
From inside the vehicle (central
locking button) ................................. 83
Setting to automatic (COMAND) ....261
Locking verification signal (on-
board computer) ............................... 378
Logic 7 ®
see harman/kardon ®
Logic 7 ®
Surround Sound system
Low-beam headlamp (display
message) ............................................ 394
Luggage net ....................................... 425
Lumbar support ................................. 106
see Lumbar support
Lumbar supports (COMAND) ............ 266
M
Main-beam headlamps (display
message) ............................................ 395
Malfunction message see Display messages
Malfunctions relevant to safety
Reporting ......................................... 27
Manual drive program ...................... 311
Map Arrival time/distance to
destination ..................................... 182
Calling up ....................................... 157
City model ..................................... 183
Map display ................................... 181
Moving ................................... 158, 180
Showing geo-coordinates ..............183
Showing road names .....................183
Topographic map ........................... 183
Map display (also see navigation)
Traffic reports ................................ 172
Map information ................................ 182
Map orientation ................................. 181
Map scale Adjusting ....................................... 179
Massage function (PULSE) ............... 269
Matte finish (cleaning
instructions) ...................................... 455
mbrace Automatic retrieval of vehicle data
(service due date) ..........................438
Call priority .................................... 436
Display message ............................ 383
Downloading destinations
(COMAND) ..................................... 437
Emergency call .............................. 433
Important safety notes ..................432
Locating a stolen vehicle ...............439
MB info call button ........................436
Remote vehicle locking ..................438
Roadside Assistance button ..........435
Self-test ......................................... 433
System .......................................... 433
Vehicle remote unlocking ..............438
Mechanical key
Function/notes ................................ 79
Media Interface
Active partition .............................. 234
Basic menu .................................... 231
Connection options .......................229
iPod ®
............................................. 229
Metadata ....................................... 232
Mode ............................................. 229
MP3 player .................................... 229
Selecting categories ......................232
Selecting folders ............................ 232
Selecting music files ......................231
Selecting playlists ..........................232
Switching to ................................... 230
USB mass storage device ..............229
Media list ........................................... 221
Memory function ............................... 111Index13
Page 160 of 524
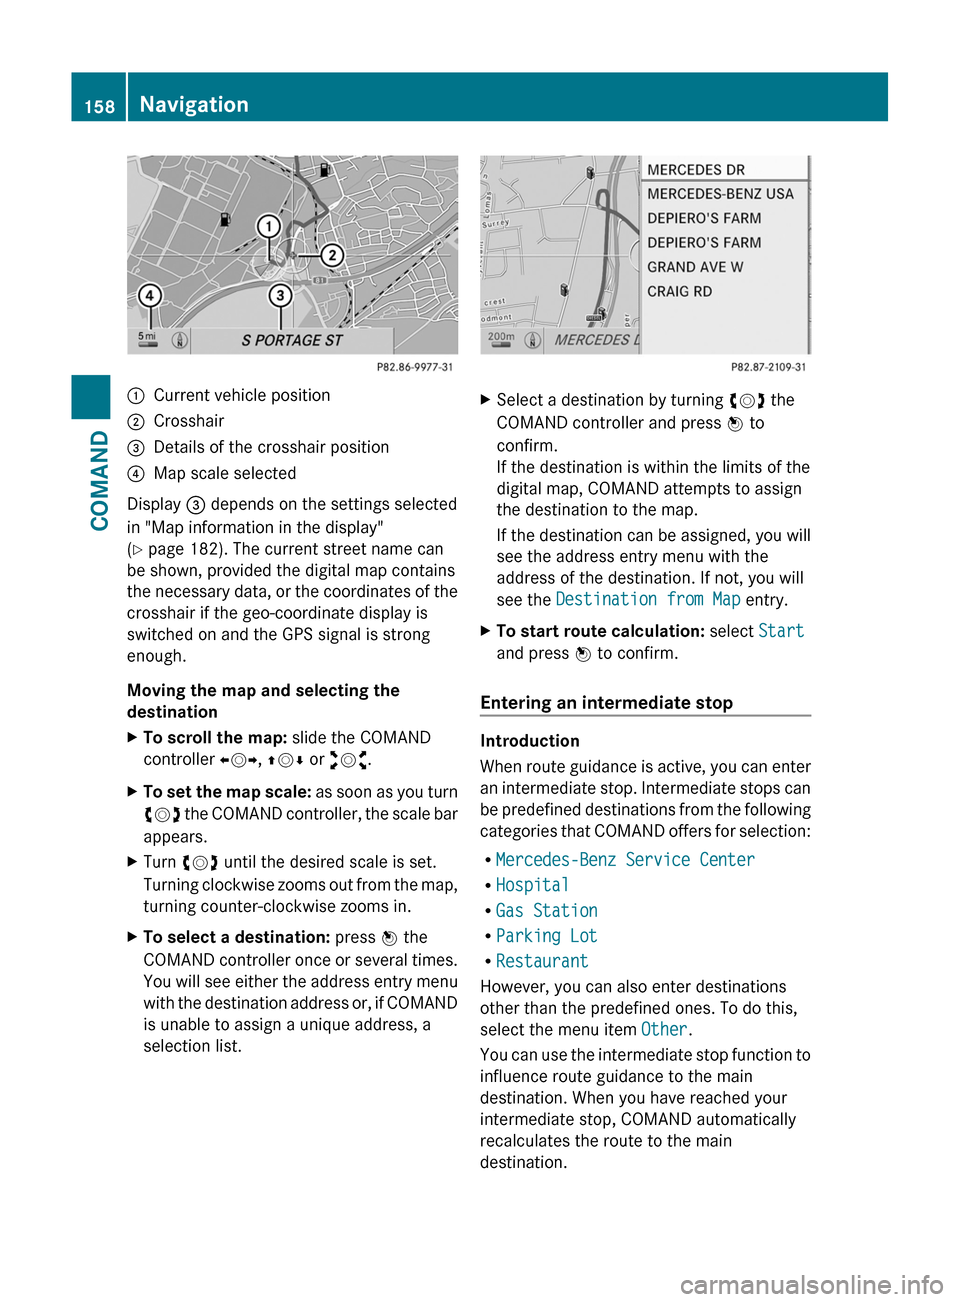
:Current vehicle position;Crosshair=Details of the crosshair position?Map scale selected
Display = depends on the settings selected
in "Map information in the display"
(Y page 182). The current street name can
be shown, provided the digital map contains
the necessary data, or the coordinates of the
crosshair if the geo-coordinate display is
switched on and the GPS signal is strong
enough.
Moving the map and selecting the
destination
XTo scroll the map: slide the COMAND
controller XVY, ZVÆ or aVb.
XTo set the map scale: as soon as you turn
cVd the COMAND controller, the scale bar
appears.
XTurn cVd until the desired scale is set.
Turning clockwise zooms out from the map,
turning counter-clockwise zooms in.
XTo select a destination: press W the
COMAND controller once or several times.
You will see either the address entry menu
with the destination address or, if COMAND
is unable to assign a unique address, a
selection list.
XSelect a destination by turning cVd the
COMAND controller and press W to
confirm.
If the destination is within the limits of the
digital map, COMAND attempts to assign
the destination to the map.
If the destination can be assigned, you will
see the address entry menu with the
address of the destination. If not, you will
see the Destination from Map entry.
XTo start route calculation: select Start
and press W to confirm.
Entering an intermediate stop
Introduction
When route guidance is active, you can enter
an intermediate stop. Intermediate stops can
be predefined destinations from the following
categories that COMAND offers for selection:
RMercedes-Benz Service Center
RHospital
RGas Station
RParking Lot
RRestaurant
However, you can also enter destinations
other than the predefined ones. To do this,
select the menu item Other.
You can use the intermediate stop function to
influence route guidance to the main
destination. When you have reached your
intermediate stop, COMAND automatically
recalculates the route to the main
destination.
158NavigationCOMAND
Page 182 of 524
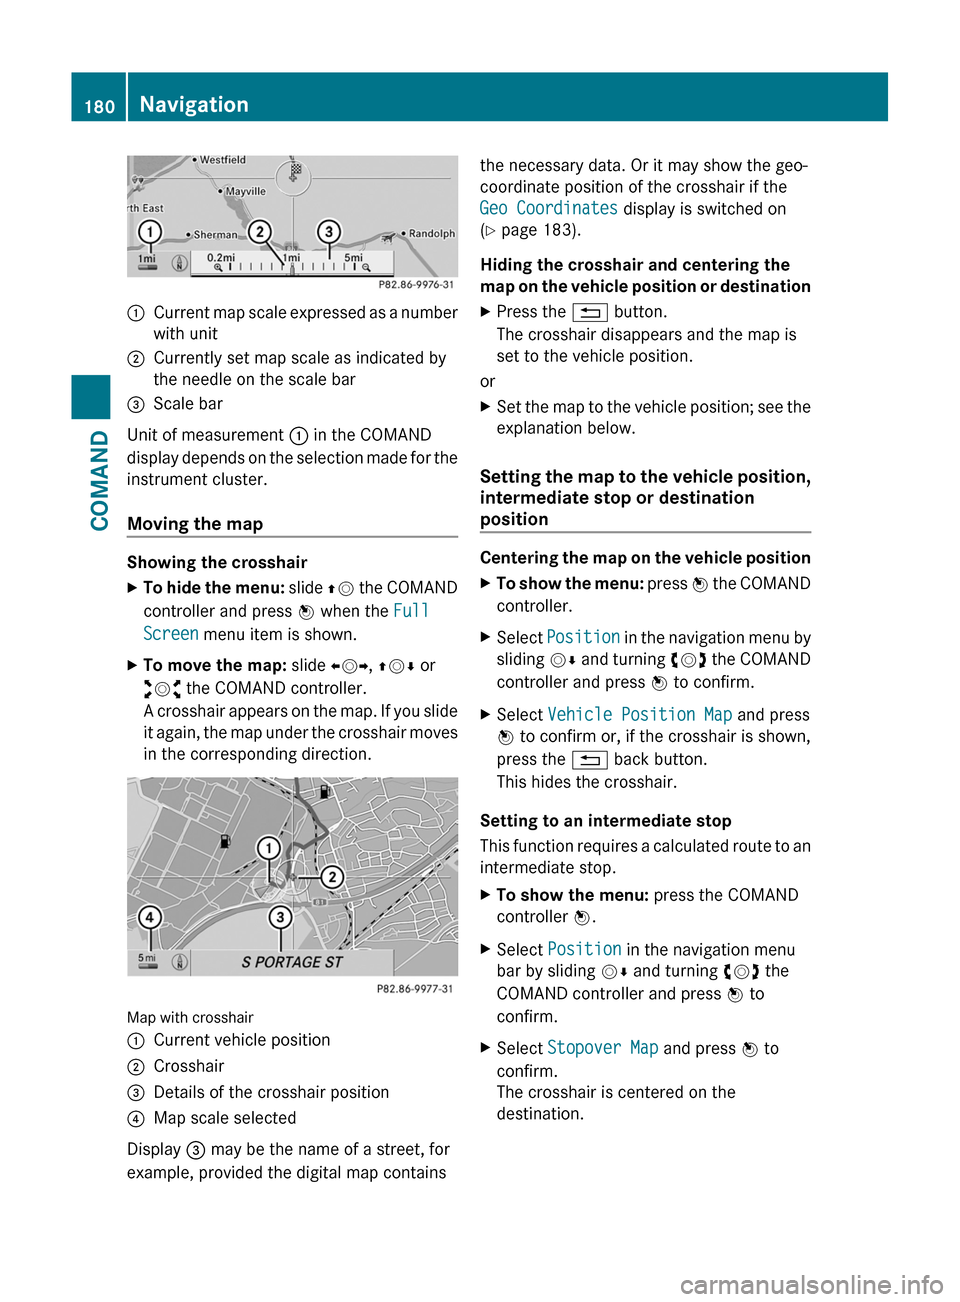
:Current map scale expressed as a number
with unit
;Currently set map scale as indicated by
the needle on the scale bar
=Scale bar
Unit of measurement : in the COMAND
display depends on the selection made for the
instrument cluster.
Moving the map
Showing the crosshair
XTo hide the menu: slide ZV the COMAND
controller and press W when the Full
Screen menu item is shown.
XTo move the map: slide XVY, ZVÆ or
aVb the COMAND controller.
A crosshair appears on the map. If you slide
it again, the map under the crosshair moves
in the corresponding direction.
Map with crosshair
:Current vehicle position;Crosshair=Details of the crosshair position?Map scale selected
Display = may be the name of a street, for
example, provided the digital map contains
the necessary data. Or it may show the geo-
coordinate position of the crosshair if the
Geo Coordinates display is switched on
(Y page 183).
Hiding the crosshair and centering the
map on the vehicle position or destination
XPress the % button.
The crosshair disappears and the map is
set to the vehicle position.
or
XSet the map to the vehicle position; see the
explanation below.
Setting the map to the vehicle position,
intermediate stop or destination
position
Centering the map on the vehicle position
XTo show the menu: press W the COMAND
controller.
XSelect Position in the navigation menu by
sliding VÆ and turning cVd the COMAND
controller and press W to confirm.
XSelect Vehicle Position Map and press
W to confirm or, if the crosshair is shown,
press the % back button.
This hides the crosshair.
Setting to an intermediate stop
This function requires a calculated route to an
intermediate stop.
XTo show the menu: press the COMAND
controller W.
XSelect Position in the navigation menu
bar by sliding VÆ and turning cVd the
COMAND controller and press W to
confirm.
XSelect Stopover Map and press W to
confirm.
The crosshair is centered on the
destination.
180NavigationCOMAND
Page 185 of 524
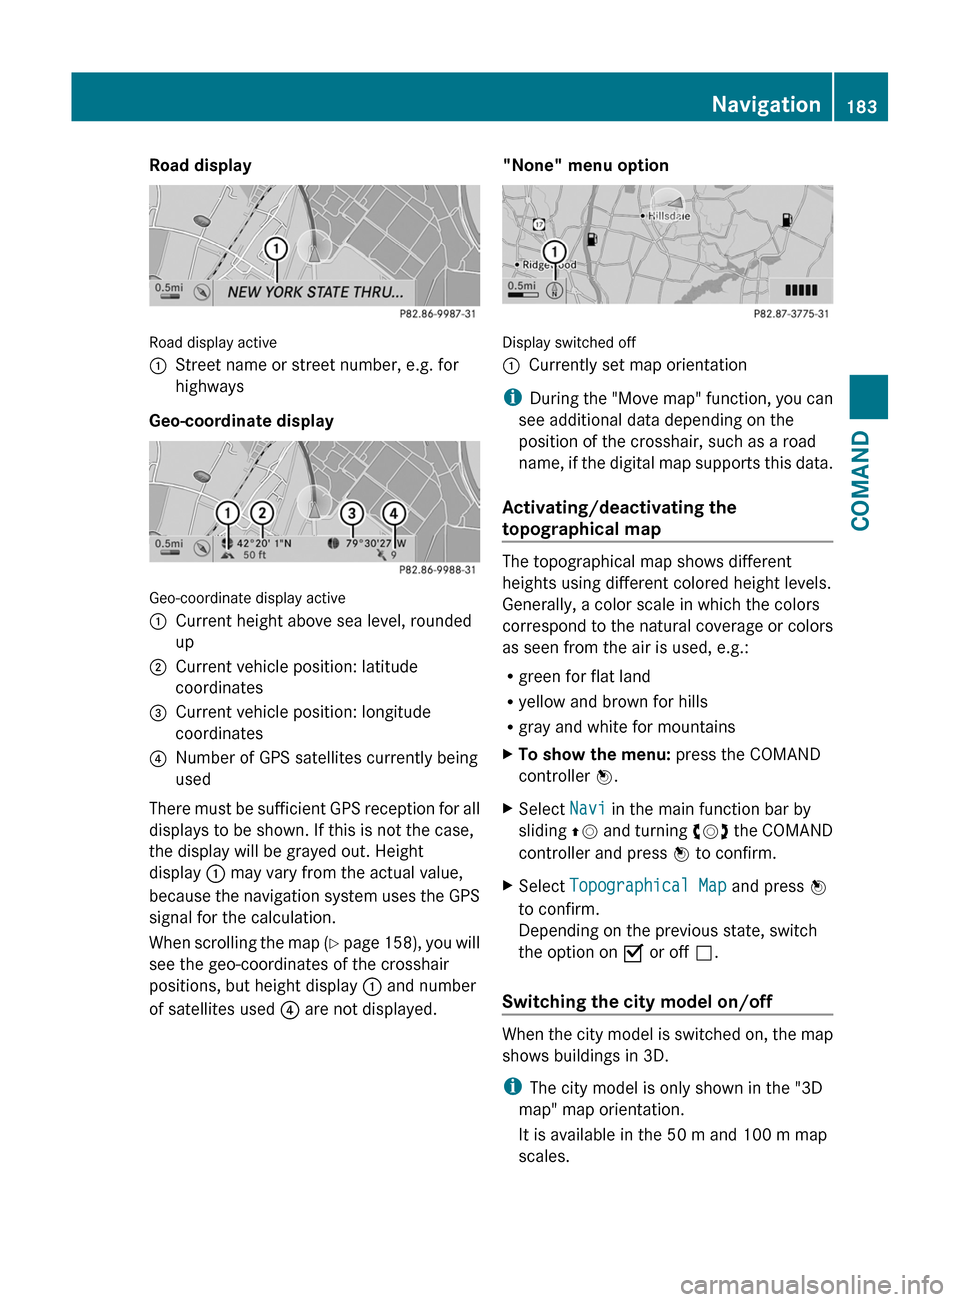
Road display
Road display active
:Street name or street number, e.g. for
highways
Geo-coordinate display
Geo-coordinate display active
:Current height above sea level, rounded
up
;Current vehicle position: latitude
coordinates
=Current vehicle position: longitude
coordinates
?Number of GPS satellites currently being
used
There must be sufficient GPS reception for all
displays to be shown. If this is not the case,
the display will be grayed out. Height
display : may vary from the actual value,
because the navigation system uses the GPS
signal for the calculation.
When scrolling the map (Y page 158), you will
see the geo-coordinates of the crosshair
positions, but height display : and number
of satellites used ? are not displayed.
"None" menu option
Display switched off
:Currently set map orientation
iDuring the "Move map" function, you can
see additional data depending on the
position of the crosshair, such as a road
name, if the digital map supports this data.
Activating/deactivating the
topographical map
The topographical map shows different
heights using different colored height levels.
Generally, a color scale in which the colors
correspond to the natural coverage or colors
as seen from the air is used, e.g.:
Rgreen for flat land
Ryellow and brown for hills
Rgray and white for mountains
XTo show the menu: press the COMAND
controller W.
XSelect Navi in the main function bar by
sliding ZV and turning cVd the COMAND
controller and press W to confirm.
XSelect Topographical Map and press W
to confirm.
Depending on the previous state, switch
the option on O or off ª.
Switching the city model on/off
When the city model is switched on, the map
shows buildings in 3D.
iThe city model is only shown in the "3D
map" map orientation.
It is available in the 50 m and 100 m map
scales.
Navigation183COMANDZ
Page 280 of 524
Switch the reading lamp off=Interior lighting
Interior lighting control
Important notes
In order to prevent the vehicle's battery from
discharging, the interior lighting functions are
automatically deactivated after some time
except for when the key is in position 2 in the
ignition lock.
Automatic interior lighting control
XTo switch on/off: press the | button.
The OFF indicator lamp shows whether the
automatic interior lighting control is
deactivated (indicator lamp on) or
activated (indicator lamp off).
The interior lighting automatically switches
on if you:
R unlock the vehicle
R open a door
R remove the key from the ignition lock
The interior light is activated for a short while
when the key is removed from the ignition
lock. You can activate this delayed switch-off
using COMAND ( Y page 259).
Manual interior lighting control
XTo switch the front interior lighting on/
off: press the c button.XTo switch the rear interior lighting on/
off: press the u button.XTo switch the reading lamps on/off:
press the p button.Changing bulbs
Important safety notes
Xenon bulbs
If your vehicle is equipped with Xenon bulbs,
you can recognize this by the following: the
cone of light from the Xenon bulbs moves
from the top to the bottom and back again
when you start the engine. For this to be
observed, the lights must be switched on
before starting the engine.
GWarning
Xenon bulbs carry a high voltage. You could
get an electric shock and be seriously or even
fatally injured if you touch the electric
contacts on Xenon bulbs. Therefore, never
remove the cover from Xenon bulbs.
Do not change Xenon bulbs yourself, but have
them replaced at a qualified specialist
workshop which has the necessary specialist
knowledge and tools to carry out the work
required.
Mercedes-Benz recommends that you use an
authorized Mercedes-Benz Center for this
purpose. In particular, work relevant to safety
or on safety-related systems must be carried
out at a qualified specialist workshop.
Bulbs and lamps are an important aspect of
vehicle safety. You must therefore make sure
that these function correctly at all times.
Have the headlamp setting checked regularly.
Other bulbs
GWarning!
Bulbs and lamps can be very hot. You should
therefore allow them to cool down before you
change them. Otherwise, you could be burned
if you touch them.
Keep bulbs out of the reach of children.
Otherwise, they could damage the bulbs, for
example, and injure themselves.
278Changing bulbsLights and windshield wipers
Page 307 of 524
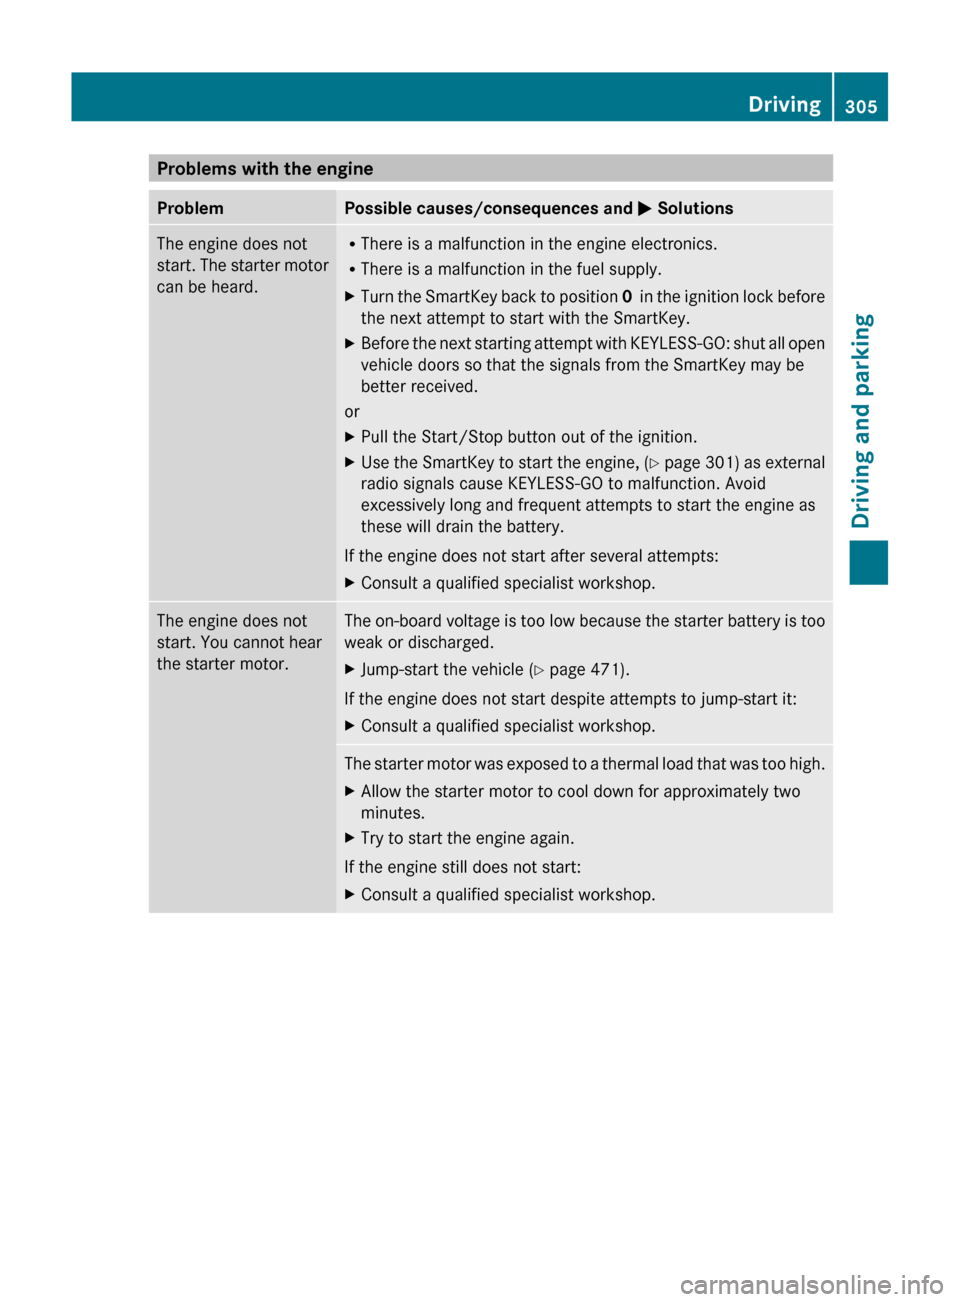
Problems with the engineProblemPossible causes/consequences and M SolutionsThe engine does not
start. The starter motor
can be heard.R There is a malfunction in the engine electronics.
R There is a malfunction in the fuel supply.XTurn the SmartKey back to position 0 in the ignition lock before
the next attempt to start with the SmartKey.XBefore the next starting attempt with KEYLESS-GO: shut all open
vehicle doors so that the signals from the SmartKey may be
better received.
or
XPull the Start/Stop button out of the ignition.XUse the SmartKey to start the engine, (Y page 301) as external
radio signals cause KEYLESS-GO to malfunction. Avoid
excessively long and frequent attempts to start the engine as
these will drain the battery.
If the engine does not start after several attempts:
XConsult a qualified specialist workshop.The engine does not
start. You cannot hear
the starter motor.The on-board voltage is too low because the starter battery is too
weak or discharged.XJump-start the vehicle ( Y page 471).
If the engine does not start despite attempts to jump-start it:
XConsult a qualified specialist workshop.The starter motor was exposed to a thermal load that was too high.XAllow the starter motor to cool down for approximately two
minutes.XTry to start the engine again.
If the engine still does not start:
XConsult a qualified specialist workshop.Driving305Driving and parkingZ
Page 308 of 524
ProblemPossible causes/consequences and M SolutionsThe engine is not
running smoothly and
is misfiring.
There is a malfunction in the engine electronics or a mechanical
component of the engine management system.
XOnly depress the accelerator pedal slightly.XHave the cause rectified immediately at a qualified specialist
workshop.
Otherwise, non-combusted fuel may get into the catalytic
converter and damage it.
The coolant
temperature gauge
shows a value above
248 ‡(120 †).
The coolant level is too low. The coolant is too hot and the engine
is no longer being cooled sufficiently.
XStop as soon as possible and allow the engine and the coolant
to cool down.
XCheck the coolant level (Y page 450). Observe the warning
notes as you do so and add coolant if necessary.Automatic transmission
Important safety notes
GWarning
It is dangerous to shift AUTOTRONIC out of
parking position P or neutral position N if the
engine speed is higher than idle speed. If your
foot is not firmly on the brake pedal, the
vehicle could accelerate quickly forward or in
reverse. You could lose control of the vehicle
and hit someone or something. Only shift into
gear when the engine is idling normally and
when your right foot is firmly on the brake
pedal.
GWarning!
Keep in mind that turning off the engine alone
only will shift AUTOTRONIC into neutral
position N automatically.
Always shift AUTOTRONIC into park position
P before turning off the engine.
Otherwise the vehicle could roll away which
could result in an accident and/or serious
personal injury.
GWarning!
HYBRID vehicles: It is imperative that you read
the HYBRID Supplemental Operating
Instructions included in your vehicle literature
portfolio. You may otherwise not receive all
necessary safety information and warning for
the operation of your vehicle.
DIRECT SELECT lever
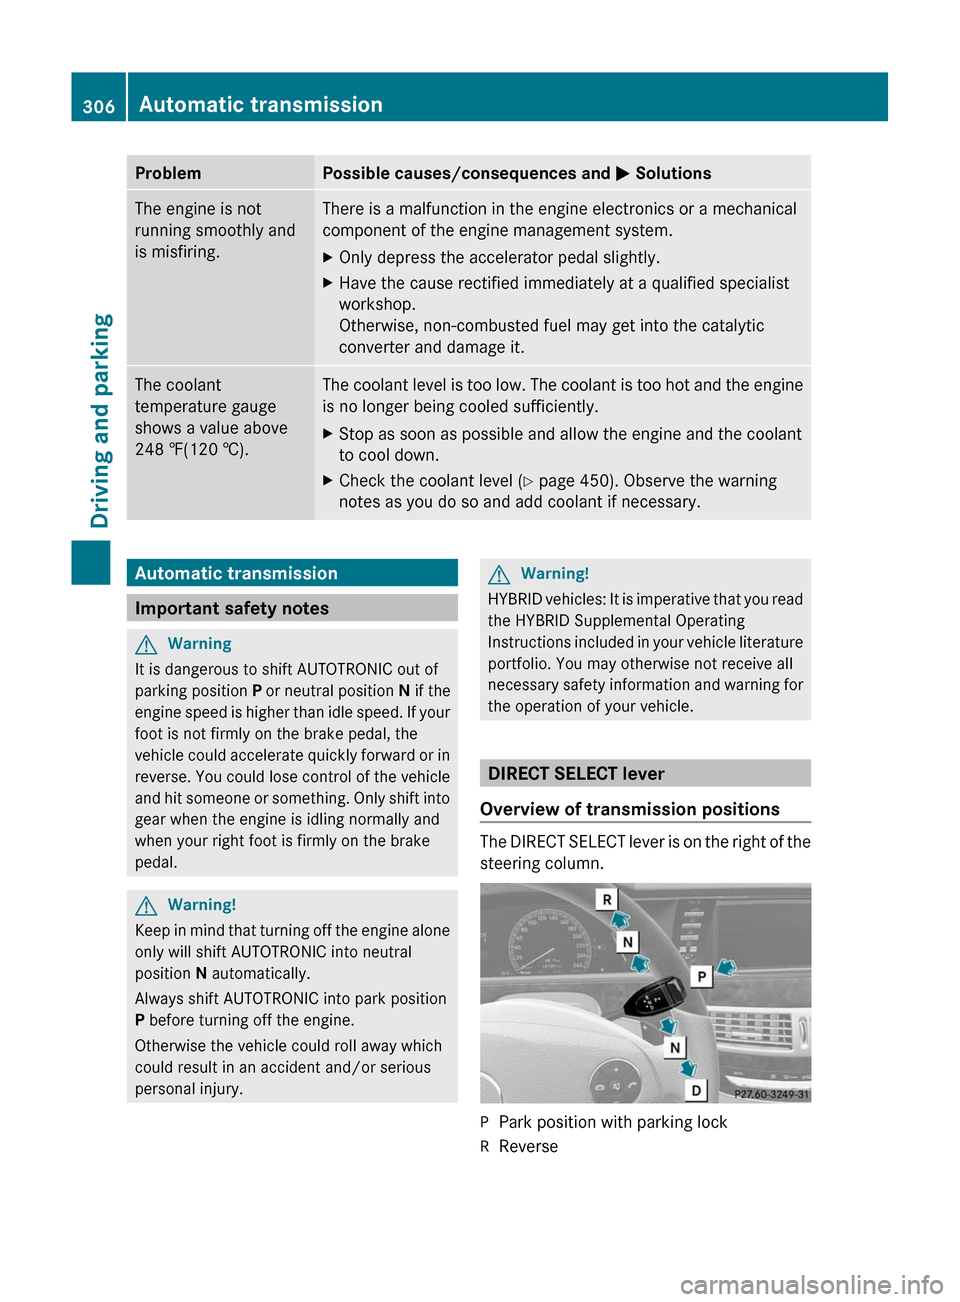
Overview of transmission positions
The DIRECT SELECT lever is on the right of the
steering column.
PPark position with parking lockRReverse306Automatic transmissionDriving and parking
Page 323 of 524
but drive on for a short while. This allows the
airflow to cool the brakes more quickly.
Wet roadsGWarning
After driving in heavy rain for some time
without applying the brakes or through water
deep enough to wet brake components, the
first braking action may be somewhat
reduced. You have to depress the brake pedal
more firmly. Maintain a safe distance from
vehicles in front.
After driving on a wet road or having the
vehicle washed, brake firmly while paying
attention to the traffic conditions. This will
warm up the brake discs, thereby drying them
more quickly and protecting them against
corrosion.
Limited braking performance on salt
treated roads
GWarning
The layer of salt on the brake discs and the
brake pads/linings may cause a delay in the
braking effect, resulting in a significantly
longer braking distance, which could lead to
an accident.
To avoid this danger, you should:
R occasionally brake carefully, without
putting other road users at risk, when you
are driving on salted roads. This helps to
remove any salt that may have started to
build up on the brake discs and the brake
pads/linings.
R maintain a greater distance to the vehicle
ahead and drive with particular care.
R carefully apply the brakes at the end of a
trip and immediately after commencing a
new trip, so that salt residues are removed
from the brake discs.
Servicing the brakes
! If the red brake warning lamp lights up in
the instrument cluster and you hear a
warning tone while the engine is running,
the brake fluid level may be too low.
Observe additional warning messages in
the multifunction display.
The brake fluid level may be too low due to
brake pad wear or leaking brake lines.
Have the brake system checked
immediately. This work should be carried
out at an authorized Mercedes-Benz
Center.
All checks and maintenance work on the
brake system must be carried out at a
qualified specialist workshop. Contact an
authorized Mercedes-Benz Center.
Only install brake pads and use brake fluid
recommended by Mercedes-Benz.
GWarning
If other than recommended brake pads are
installed, or other than recommended brake
fluid is used, the braking properties of the
vehicle can be degraded to an extent that safe
braking is substantially impaired. This could
result in an accident.
! Vehicles with 4MATIC: a function or
performance test may only be carried out
on a two-axle dynamometer. If you are
planning to have the vehicle tested on such
a dynamometer, contact an authorized
Mercedes-Benz Center to obtain further
information first. Otherwise, the drive train
or the brake system may suffer damage.
! Vehicles with 4MATIC: as the ESP®
system operates automatically, the engine
and the ignition must be switched off
(SmartKey in position 0 or 1 in the ignition
lock or Start/Stop button in position 0 or
1 ) when the electric parking brake is being
tested on a brake dynamometer.
Braking maneuvers triggered automatically
by ESP ®
may seriously damage the brake
system.
Driving tips321Driving and parkingZ