fuel consumption MERCEDES-BENZ S-Class 2011 W221 Owner's Manual
[x] Cancel search | Manufacturer: MERCEDES-BENZ, Model Year: 2011, Model line: S-Class, Model: MERCEDES-BENZ S-Class 2011 W221Pages: 524, PDF Size: 22.53 MB
Page 10 of 524
COMAND MenuVehicle ........................................... 257
COMAND operating system .............. 116
Combination switch .......................... 274
Conference connection ..................... 198
Consumption statistics (on-board
computer) .......................................... 368
Convenience closing feature .............. 91
Convenience opening feature ............ 90
Convenience telephone Importing contacts ........................200
Coolant (engine)
Checking the level .........................450
Display message ............................ 397
Notes ............................................. 515
Temperature gauge ........................ 365
Cooling
see Climate control
Copy protection (CD/DVD) ............... 225
Cornering light (display message) ... 394
Crosshair position Saving ............................................ 180
Cruise control
Cruise control lever .......................324
Display message ............................ 407
Function/notes ............................. 323
Cup holder ......................................... 427
Center console .............................. 427
Rear compartment .........................428
Current fuel consumption (on-
board computer) ............................... 368
Customer Assistance Center (CAC) ............................................... 27
Customer Relations Department ....... 27
D
Dashboard see Cockpit
Data carrier
MUSIC REGISTER ........................... 226
Data medium
Audio DVD ..................................... 224
CD/DVD ........................................ 225
MP3 ............................................... 224
Date format
Setting ........................................... 142
Daytime running lamps
Display message ............................ 396
Switching on/off (on-board
computer) ...................................... 377
Delayed switch-off
Exterior lighting (COMAND) ...........259
Interior lighting (COMAND) ............259
Destination
Adopting from the list of previous
destinations ................................... 176
Destination entry
Point of interest ............................. 160
Destination information ................... 169
Destination input .............................. 151
Address ......................................... 151
Destination memory ......................156
Intermediate stop .......................... 158
Last destination ............................. 157
Map ............................................... 157
Destination memory ......................... 175
Deleting an entry ........................... 178
My address .................................... 175
Storing a destination .....................176
Digital speedometer ......................... 368
DIRECT SELECT lever see Automatic transmission
Display (cleaning instructions) ........ 457
Display messages Brakes ........................................... 388
Calling up (on-board computer) .....380
Clearing (on-board computer) ........380
Driving systems ............................. 401
Engine ............................................ 397
KEYLESS-GO .................................. 411
Lamps ............................................ 394
Safety systems .............................. 381
Service interval display ..................451
SmartKey ....................................... 411
Tires ............................................... 407
Vehicle ........................................... 409
Distance
see Route overview
Distance recorder ............................. 368
Distance warning lamp ..................... 419
DISTRONIC PLUS ............................... 325
Deactivating ................................... 333
Display message ............................ 4068Index
Page 13 of 524
F
Favorites (COMAND) ......................... 118
First-aid kit ......................................... 462
First list entry Accepting ...................................... 129
Flat tire
Changing a wheel/mounting the
spare wheel ................................... 463
MOExtended run-flat system .........467
Preparing the vehicle .....................463
Raising the vehicle .........................464
Floormat ............................................. 442
Freeway information ......................... 185
Frequency input Manual ........................................... 209
Front fog lamp (display message) ... 395
Front multicontour seat
(COMAND) .......................................... 266
Front-passenger seat Adjusting from the driver's seat ..... 103
Adjusting from the rear
compartment ................................. 103
Fuel
Additives ........................................ 513
Notes ............................................. 512
Premium-grade unleaded gasoline . 512
Refueling ........................................ 313
Specifications ................................ 512
Tank content/reserve fuel .............511
Troubleshooting ............................. 316
Fuel consumption
Current (on-board computer) .........368
Notes ............................................. 319
Fuel filler cap (display message) ..... 400
Fuel filler flap Opening/closing ....... 314
Fuel level Calling up the range (on-board
computer) ...................................... 368
Fuel tank
Filling capacity ............................... 511
Function buttons (COMAND) ............ 117
Function restrictions Video DVD mode ........................... 237
Fuse allocation chart (vehicle tool
kit) ...................................................... 462Fuses
Dashboard fuse box .......................476
Engine emergency stop .................477
Fuse allocation chart .....................475
Fuse box in the engine
compartment ................................. 476
Fuse box in the rear compartment . 476
Notes ............................................. 475
G
Garage door opener Clearing the memory .....................442
Notes ............................................. 439
Opening/closing the garage door ..441
Programming the remote control ...440
Gear indicator (on-board
computer) .......................................... 371
Gear or selector lever (cleaning
guidelines) ......................................... 458
Genuine Mercedes-Benz parts ......... 508
Genuine wood trim and trim strips
(cleaning instructions) ...................... 458
Glove box ........................................... 422
Gracenote Media Database .............. 222
H
Hands-free microphone Switching on/off ........................... 198
harman/kardon ®
Logic 7 ®
Surround Sound system ................... 134
Hazard warning lamps ...................... 276
HD Radio™ ......................................... 212
Headlamp cleaning system .............. 276
Adding washer fluid .......................450
Notes ............................................. 515
Headlamp mode (daytime driving)
see Daytime running lamps
Headlamps
Cleaning ......................................... 456
Misting up ...................................... 277
Head restraint
NECK-PRO ..................................... 104
NECK-PRO luxury ........................... 104
Index11
Page 304 of 524
XRelease the brake pedal.XCarefully depress the accelerator pedal.
The electric parking brake (Y page 317) is
automatically released.
The red F indicator lamp (USA only) or
the red ! indicator lamp (Canada only)
in the instrument cluster goes out.
iThe vehicle locks centrally once you have
pulled away. The locking knobs in the doors
drop down.
You can open the doors from the inside at
any time.
You can also deactivate the automatic
locking feature .
iUpshifts take place at higher engine
speeds after a cold start. This helps the
catalytic converter to reach its operating
temperature more quickly.
Hill start assist
Hill start assist helps you when pulling away
forwards or in reverse on an uphill gradient.
It holds the vehicle for a short time after you
have removed your foot from the brake pedal.
This gives you enough time to move your foot
from the brake pedal to the accelerator pedal
and depress it before the vehicle begins to
roll.
GWarning
Never leave the vehicle when it is held by hill
start assist. After approximately one second,
hill start assist will no longer brake your
vehicle and it could roll away.
XTake your foot off the brake pedal.
iOnce you have taken your foot off the
brake pedal, the vehicle is held for around
one second.
XPull away.
Hill start assist will not function if:
Ryou are pulling away on a level road or a
downhill gradient.
Rthe transmission is in position N.
Rthe electric parking brake is applied.
RESP® is malfunctioning.
ECO start/stop function
General notes
The ECO start/stop function is only available
for the S 63 AMG.
The ECO start/stop function is only available
in drive program C.
The ECO start/stop function switches the
engine off automatically when the vehicle
stops moving.
The engine starts automatically when you pull
away again. The ECO start/stop function
thereby helps you to reduce the fuel
consumption and emissions of your vehicle.
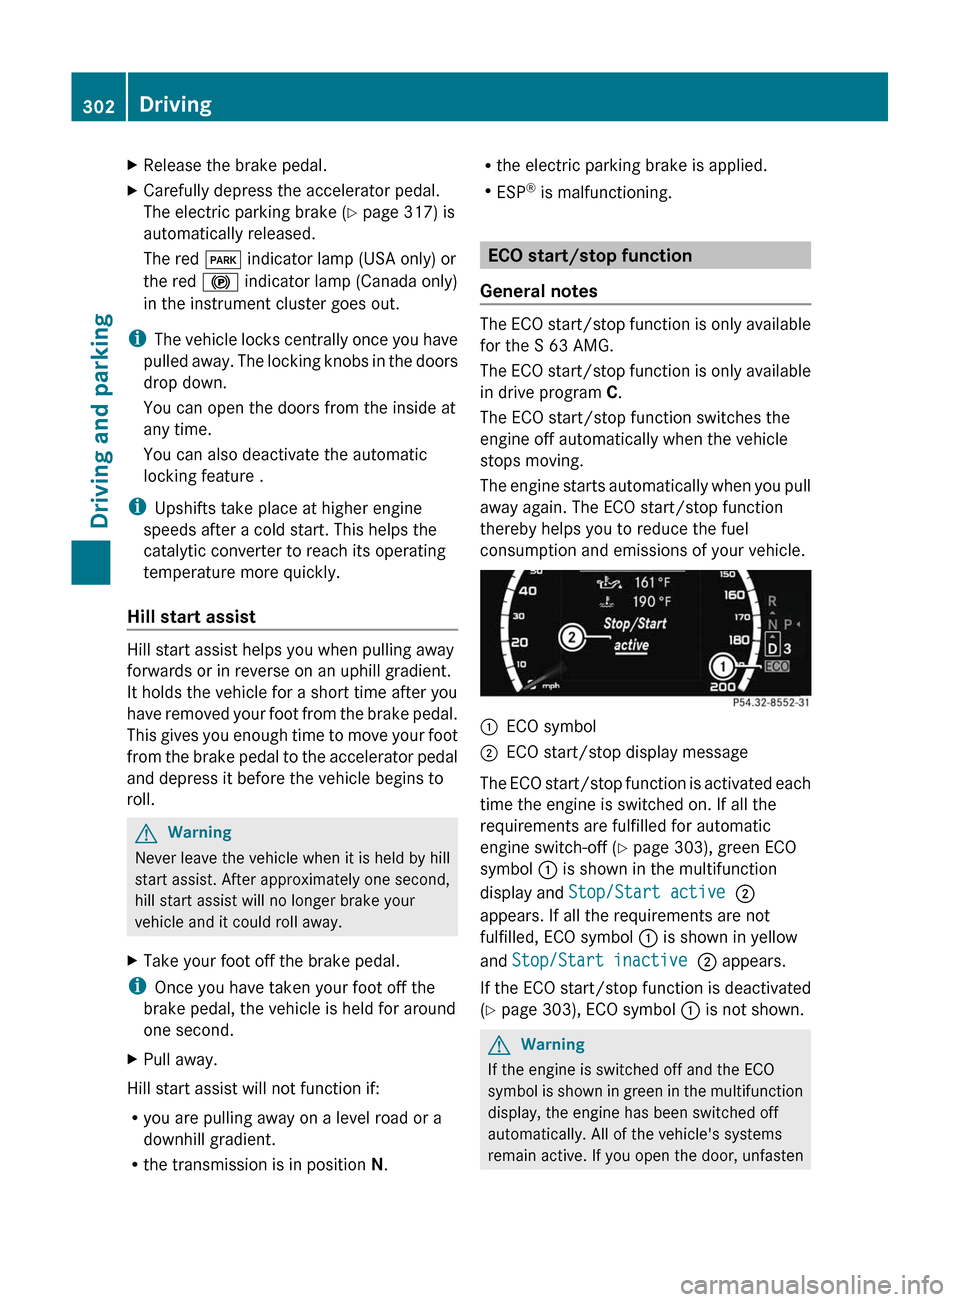
:ECO symbol;ECO start/stop display message
The ECO start/stop function is activated each
time the engine is switched on. If all the
requirements are fulfilled for automatic
engine switch-off (Y page 303), green ECO
symbol : is shown in the multifunction
display and Stop/Start active ;
appears. If all the requirements are not
fulfilled, ECO symbol : is shown in yellow
and Stop/Start inactive ; appears.
If the ECO start/stop function is deactivated
(Y page 303), ECO symbol : is not shown.
GWarning
If the engine is switched off and the ECO
symbol is shown in green in the multifunction
display, the engine has been switched off
automatically. All of the vehicle's systems
remain active. If you open the door, unfasten
302DrivingDriving and parking
Page 321 of 524
workshop, e.g. an authorized Mercedes-
Benz Center.
If you leave the vehicle parked up for longer
than six weeks, the vehicle may suffer
damage as a result of lack of use.XVisit a qualified specialist workshop and
seek advice.
Driving tips
General notes on driving
Important safety notes
GWarning!
Please do not forget that your primary
responsibility is to drive the vehicle. A driver’s
attention to the road must always be his/her
primary focus when driving. For your safety
and the safety of others, we recommend that
you pull over to a safe location and stop
before placing or taking a telephone call.
If you choose to use the telephone 21
while
driving, please use the hands-free device and
only use the telephone when road, weather
and traffic conditions permit. Some
jurisdictions prohibit the driver from using a
mobile telephone while driving a vehicle.
Only operate the COMAND 21
(Cockpit
Management and Data System) if road,
weather and traffic conditions permit.
Otherwise, you may not be able to observe
traffic conditions and could endanger yourself
and others.
Bear in mind that at a speed of just 30 mph
(approximately 50 km/h), your vehicle is
covering a distance of 44 feet (approximately
14 m) every second.
Drive sensibly – save fuel
To save fuel, observe the following notes:
XKeep tires at the recommended inflation
pressures.XRemove unnecessary cargo.XRemove the roof rack when not in use.XMaintain a low engine speed until the
engine is warm.XAvoid frequent acceleration and
deceleration.XHave all maintenance work performed at
the service intervals specified in the
Service Booklet or indicated by the service
interval indicator.
Fuel consumption is also increased by driving
in cold weather, in stop-and-go traffic, on
short trips and in mountainous areas.
Drinking and driving
GWarning
Drinking and driving and/or taking drugs and
driving are very dangerous combinations.
Even a small amount of alcohol or drugs can
affect your reflexes, perceptions and
judgment.
The possibility of a serious or even fatal
accident are greatly increased when you drink
or take drugs and drive.
Do not drink or take drugs and drive or allow
anyone to drive who has been drinking or
taking drugs.
Pedals
GWarning
Make sure absolutely no objects are
obstructing the pedals' range of movement.
Keep the driver's footwell clear of all
obstacles. If there are any floormats or
carpets in the footwell, make sure that the
pedals still have sufficient clearance.
21 Observe all legal requirements.Driving tips319Driving and parkingZ
Page 338 of 524
Deactivating the HOLD function
The HOLD function is deactivated
automatically if:
R you accelerate and the transmission is in
position D or R.
R the transmission is in position P.
R you apply the brakes again with a certain
amount of pressure until HOLD disappears
from the instrument cluster.
R you secure the vehicle using the electric
parking brake.
R you activate DISTRONIC PLUS.
i After a time, the electric parking brake
secures the vehicle and relieves the service
brake.
GWarning
Never get out of the vehicle when the HOLD
function is activated.
The HOLD function must never be operated
or deactivated by a passenger or from outside
the vehicle.
The HOLD function does not replace the
electric parking brake and must not be used
for parking.
The braking effect of the HOLD function is
canceled and the vehicle could roll away if:
R the HOLD function is deactivated by
depressing the accelerator pedal or the
brake pedal.
R there is a malfunction in the system or an
interruption in the power supply, e.g.
battery failure.
R the electrical system in the engine
compartment, the battery or the fuses are
tampered with.
R the battery is disconnected.
AIRMATIC
Vehicle level
Your vehicle regulates its height
automatically. All-round self-leveling ensures
the best possible suspension and constant
ground clearance, even with a laden vehicle.
When you drive fast, the vehicle is lowered
automatically to improve driving safety and to
reduce fuel consumption.
The following vehicle levels are possible on
vehicles without 4MATIC:
R normal.
R raised: the vehicle is raised above the
normal level by 1.00 in (25 mm).
R lowered: the vehicle is lowered beyond the
normal level by 0.60 in (15 mm).
The following vehicle levels are possible on
vehicles with 4MATIC:
R normal: in comfort mode, the vehicle is
raised above Sport mode by 0.40 in
(10 mm).
R raised: in comfort mode, the vehicle is
raised by about 0.60 in (15 mm) and in
Sport mode by about 1.00 in (25 mm) over
the normal level.
R lowered: the vehicle is lowered beyond the
normal level by 0.40 in (10 mm).
The "Normal" and "Raised" vehicle levels can
be set manually.
The "Lowered” vehicle level is set
automatically:
R in vehicles without 4MATIC at speeds
above 60 mph (100 km/h)
R in vehicles with 4MATIC at speeds above
50 mph (80 km/h)
Setting the vehicle level
Select the "Normal" setting for normal road
surfaces and "Raised" for driving with snow
chains or on particularly poor road surfaces.
Your selection remains stored even if you
remove the SmartKey from the ignition lock.
336Driving systemsDriving and parking
Page 340 of 524
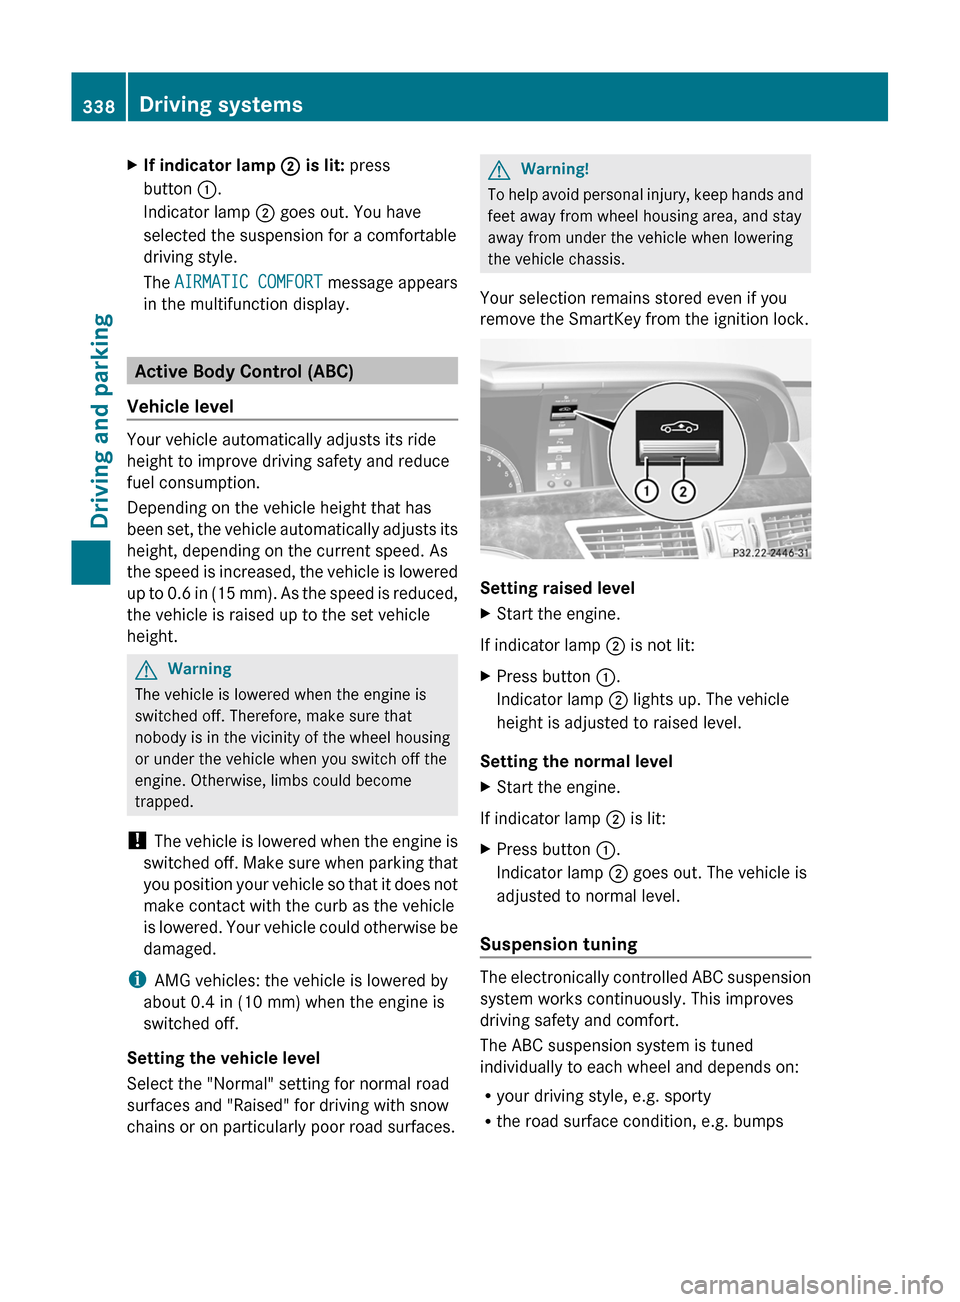
XIf indicator lamp ; is lit: press
button :.
Indicator lamp ; goes out. You have
selected the suspension for a comfortable
driving style.
The AIRMATIC COMFORT message appears
in the multifunction display.
Active Body Control (ABC)
Vehicle level
Your vehicle automatically adjusts its ride
height to improve driving safety and reduce
fuel consumption.
Depending on the vehicle height that has
been set, the vehicle automatically adjusts its
height, depending on the current speed. As
the speed is increased, the vehicle is lowered
up to 0.6 in (15 mm). As the speed is reduced,
the vehicle is raised up to the set vehicle
height.
GWarning
The vehicle is lowered when the engine is
switched off. Therefore, make sure that
nobody is in the vicinity of the wheel housing
or under the vehicle when you switch off the
engine. Otherwise, limbs could become
trapped.
! The vehicle is lowered when the engine is
switched off. Make sure when parking that
you position your vehicle so that it does not
make contact with the curb as the vehicle
is lowered. Your vehicle could otherwise be
damaged.
iAMG vehicles: the vehicle is lowered by
about 0.4 in (10 mm) when the engine is
switched off.
Setting the vehicle level
Select the "Normal" setting for normal road
surfaces and "Raised" for driving with snow
chains or on particularly poor road surfaces.
GWarning!
To help avoid personal injury, keep hands and
feet away from wheel housing area, and stay
away from under the vehicle when lowering
the vehicle chassis.
Your selection remains stored even if you
remove the SmartKey from the ignition lock.
Setting raised level
XStart the engine.
If indicator lamp ; is not lit:
XPress button :.
Indicator lamp ; lights up. The vehicle
height is adjusted to raised level.
Setting the normal level
XStart the engine.
If indicator lamp ; is lit:
XPress button :.
Indicator lamp ; goes out. The vehicle is
adjusted to normal level.
Suspension tuning
The electronically controlled ABC suspension
system works continuously. This improves
driving safety and comfort.
The ABC suspension system is tuned
individually to each wheel and depends on:
Ryour driving style, e.g. sporty
Rthe road surface condition, e.g. bumps
338Driving systemsDriving and parking
Page 370 of 524
Trip menu
Standard display
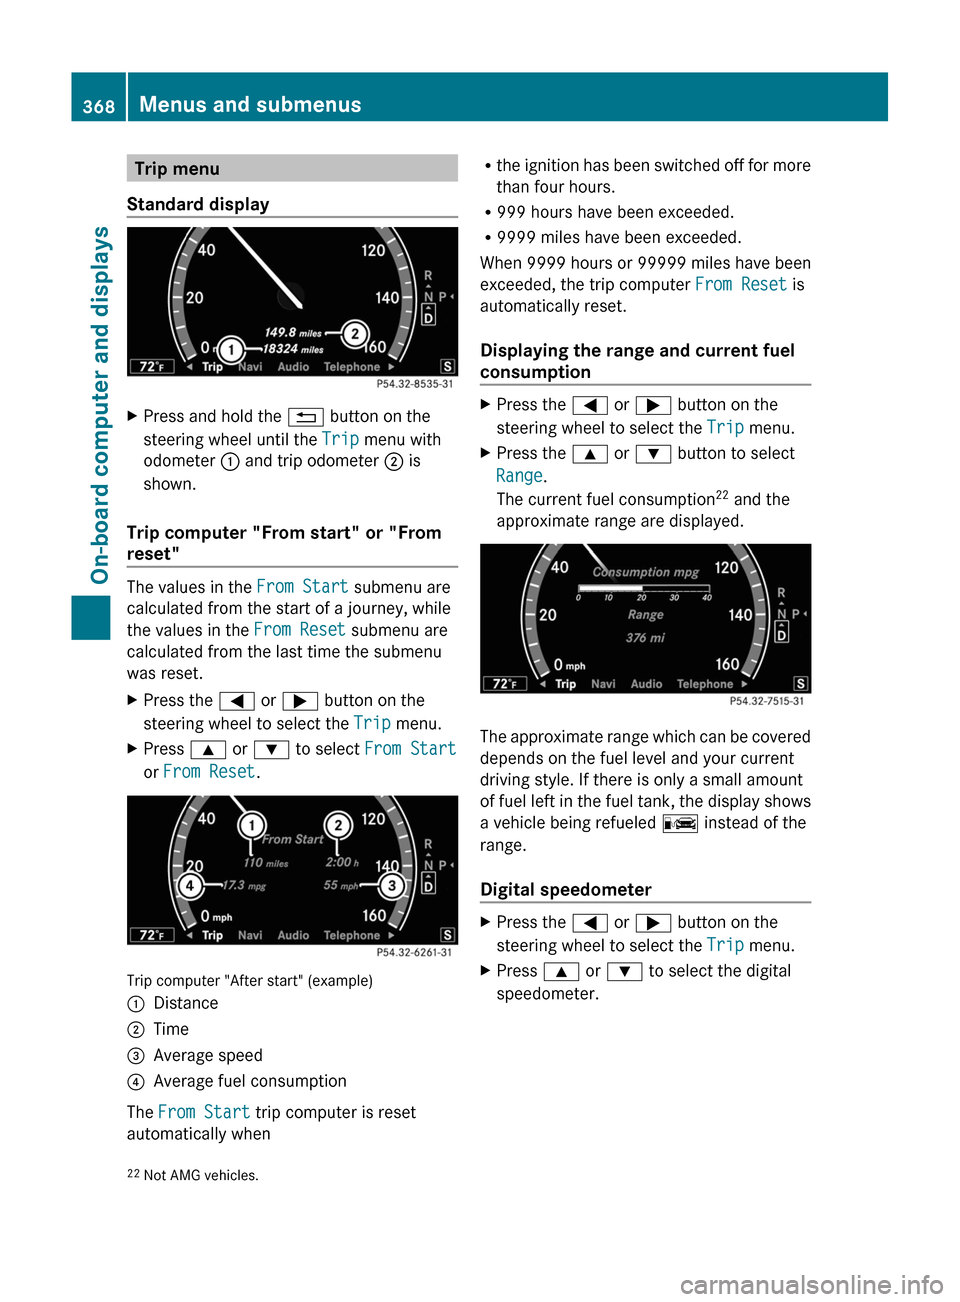
XPress and hold the % button on the
steering wheel until the Trip menu with
odometer : and trip odometer ; is
shown.
Trip computer "From start" or "From
reset"
The values in the From Start submenu are
calculated from the start of a journey, while
the values in the From Reset submenu are
calculated from the last time the submenu
was reset.
XPress the = or ; button on the
steering wheel to select the Trip menu.
XPress 9 or : to select From Start
or From Reset.
Trip computer "After start" (example)
:Distance;Time=Average speed?Average fuel consumption
The From Start trip computer is reset
automatically when
Rthe ignition has been switched off for more
than four hours.
R999 hours have been exceeded.
R9999 miles have been exceeded.
When 9999 hours or 99999 miles have been
exceeded, the trip computer From Reset is
automatically reset.
Displaying the range and current fuel
consumption
XPress the = or ; button on the
steering wheel to select the Trip menu.
XPress the 9 or : button to select
Range.
The current fuel consumption22 and the
approximate range are displayed.
The approximate range which can be covered
depends on the fuel level and your current
driving style. If there is only a small amount
of fuel left in the fuel tank, the display shows
a vehicle being refueled C instead of the
range.
Digital speedometer
XPress the = or ; button on the
steering wheel to select the Trip menu.
XPress 9 or : to select the digital
speedometer.22Not AMG vehicles.368Menus and submenusOn-board computer and displays
Page 422 of 524
inside of the fuel filler flap of your vehicle, if there is one). If your vehicle has tires which are a
different size to those on the tire and load data label or those specified in the tire pressure table,
if there is one, you should determine the correct tire pressure for these tires.
As an added safety feature, your vehicle has been equipped with a tire pressure monitor (TPMS).
An indicator lamp lights up if one or more of your tires are significantly underinflated. Accordingly,
when the low tire pressure indicator lamp lights up, you should stop and check your tires as soon
as possible, and inflate them to the proper pressure. Driving on a significantly underinflated tire
causes the tire to overheat and can lead to tire failure.
An excessively low tire pressure also increases fuel consumption, reduces the service life of the
tires and may impair the driving and braking characteristics of the vehicle. Please note that the
TPMS is not a substitute for proper tire maintenance and it is the driver's responsibility to maintain
correct tire pressure, even if underinflation has not reached the level at which the low tire
pressure indicator lamp of the TPMS lights up.
USA only:
Your vehicle has also been equipped with a TPMS malfunction indicator to indicate when the
system is not operating properly. The TPMS malfunction indicator is combined with the low tire
pressure indicator lamp. When the system detects a malfunction, the indicator lamp will flash
for approximately one minute and then remain illuminated. This sequence will continue upon
subsequent vehicle start-ups as long as the malfunction exists. When the malfunction indicator
is lit, the system may not be able to detect or signal low tire pressure as intended.
TPMS malfunctions may occur for a variety of reasons, including the installation of incompatible
replacement or alternate tires or wheels on the vehicle that prevent the TPMS from functioning
properly. Always check the TPMS malfunction indicator after replacing one or more tires or wheels
on your vehicle to ensure that the replacement or alternate tires and wheels allow the TPMS to
continue to function properly.420Warning and indicator lamps in the instrument clusterOn-board computer and displays
Page 505 of 524
The wear patterns on the front and rear tires
differ, depending on the operating conditions.
Rotate the wheels before a clear wear pattern
has formed on the tires. Front tires typically
wear more on the shoulders and the rear tires
in the center.
If your vehicle's tire configuration allows, you
can rotate the wheels according to the
intervals in the tire manufacturer's warranty
book in your vehicle documents. If no
warranty book is available, the tires should be
rotated every 3000 to 6000 miles
(5000 to 10000 km), or earlier if tire wear
requires. Do not change the direction of
wheel rotation.
Clean the contact surfaces of the wheel and
the brake disc thoroughly every time a wheel
is interchanged. Check the tire pressures.
Information on changing a wheel and fitting
the spare wheel ( Y page 463).
! On vehicles installed with a tire pressure
monitor, electronic components are
located in the wheel.
Tire-mounting tools should not be applied
in the area of the valve, as this could
damage the electronic components.
Always have the tires changed at a qualified
specialist workshop, e.g. an authorized
Mercedes-Benz Center.
Direction of rotation
Tires with a specified direction of rotation
have additional benefits, e.g. if there is a risk
of hydroplaning. You will only gain these
benefits if the correct direction of rotation is
observed.
An arrow on the sidewall of the tire indicates
its correct direction of rotation.
You may install an emergency spare wheel/
spare wheel against the direction of rotation.
Observe the time restriction on use as well as
the speed limitation specified on the
emergency spare wheel/spare wheel.
Storing wheels
Store wheels that are not being used in a cool,
dry and preferably dark place. Protect the
tires from contact with oil, grease and fuel.
Cleaning the wheels
GWarning
Do not use power washers with circular jet
nozzles (concentrated-power jets) to clean
your vehicle, especially for cleaning tires. You
could otherwise damage the tires and cause
an accident.
Wheel/tire combinations
Points to remember
GWarning
Observe the "Important safety notes"
( Y page 480).
! For safety reasons, Mercedes-Benz
recommends that you only use tires,
wheels and accessories which have been
approved by Mercedes-Benz specifically
for your vehicle.
These tires have been specially adapted for
use with the control systems, such as ABS
or ESP ®
, and are marked as follows:
R MO = Mercedes-Benz Original
R MOE = Mercedes-Benz Original Extended
(tires with run-flat characteristics)
R MO1 = Mercedes-Benz Original (only
certain AMG tires)
Mercedes-Benz Original Extended tires
may only be used on wheels that have been
specifically approved by Mercedes-Benz.
Only use tires, wheels or accessories
tested and approved by Mercedes-Benz.
Certain characteristics, e.g. handling,
vehicle noise emissions or fuel
consumption, may otherwise be adversely
affected. In addition, when driving with a
Wheel/tire combinations503Tires and wheelsZ