fog light MERCEDES-BENZ S-Class 2012 W221 Owner's Manual
[x] Cancel search | Manufacturer: MERCEDES-BENZ, Model Year: 2012, Model line: S-Class, Model: MERCEDES-BENZ S-Class 2012 W221Pages: 536, PDF Size: 25.27 MB
Page 14 of 536
Exterior lightingsee Exterior lighting
Exterior mirror parking position
Adjusting (COMAND) .....................262
Exterior mirrors
Adjusting ....................................... 111
Dipping (automatic) .......................112
Folding in/out (automatically) .......112
Folding in/out (electrically) ...........112
Out of position (troubleshooting) ...112
Storing settings (memory
function) ........................................ 113
Storing the parking position ..........113
Eyeglasses compartment ................. 433
F
Factory setting (reset function) ....... 150
Fader, setting .................................... 135
Fast forward Audio mode (CD, DVD, MP3) .........225
Rear Seat Entertainment System ...255
Video DVD ..................................... 242
Fast rewind
Audio mode (CD, DVD, MP3) .........225
Rear Seat Entertainment System ...255
Video DVD ..................................... 242
Favorites (COMAND) ......................... 120
Filler cap see Fuel filler flap
First-aid kit ......................................... 472
Flat tire Changing a wheel/mounting the
spare wheel ................................... 473
MOExtended run-flat system .........477
Preparing the vehicle .....................473
Raising the vehicle .........................474
Floormat ............................................. 453
Freeway information ......................... 187
Front fog lamps ................................. 278
Display message ............................ 402
Switching on/off ........................... 278
Front-passenger seat
Adjusting from the driver's seat ..... 105
Adjusting from the rear
compartment ................................. 105
Front windshield
see Windshield
Fuel
Additives ........................................ 526
Displaying the current
consumption .................................. 376
Displaying the range ......................376
Driving tips .................................... 326
Fuel gauge ....................................... 35
Important safety notes ..................525
Premium-grade unleaded gasoline . 525
Problem (malfunction) ...................320
Refueling ........................................ 317
Specifications ................................ 525
Tank content/reserve fuel .............524
Fuel filler flap, opening/closing ....... 319
Fuel filter (display message) ............ 408
Fuel level Calling up the range (on-board
computer) ...................................... 376
Fuel tank
Capacity ........................................ 524
Problem (malfunction) ...................320
Function buttons (COMAND) ............ 119
Fuses Allocation chart ............................. 486
Before changing ............................. 486
Dashboard fuse box .......................486
Engine emergency stop .................487
Fuse box in the engine
compartment ................................. 487
Fuse box in the rear compartment . 486
Important safety notes ..................485
G
Garage door opener Clearing the memory .....................453
Notes ............................................. 450
Opening/closing the garage door ..453
Programming (button in the rear-
view mirror) ................................... 451
Gasoline ............................................. 318
Gear indicator (on-board
computer) .......................................... 379
Gear or selector lever (cleaning
guidelines) ......................................... 468
Genuine Mercedes-Benz parts ......... 520
Glove box ........................................... 432
GPS reception .................................... 151
12Index
Page 15 of 536
Gracenote Media Database .............. 226
H
Handbrake see Parking brake
Harman/kardon ®
Logic 7 ®
surround sound system see Surround sound (harman/
kardon ®
surround sound system)
Hazard warning lamps ...................... 279
HD Radio™ ......................................... 215
Heading up (navigation) ................... 184
Headlamp cleaning system Notes ............................................. 529
Headlamps
Adding fluid to cleaning system .....461
Cleaning system (function) ............278
Fogging up ..................................... 281
see Automatic headlamp mode
Headphones
Changing batteries ........................247
Function overview ..........................142
Indicator lamp ................................ 143
Selecting a screen .........................142
Switching on/off ........................... 142
Head restraints
Adjusting ....................................... 106
Adjusting (electrically) ...................106
Adjusting (rear) .............................. 107
NECK-PRO ..................................... 106
NECK-PRO luxury ........................... 106
see NECK-PRO head restraints/
NECK-PRO luxury head restraints
Heating
see Climate control
High-beam headlamps
Changing bulbs (vehicles with
halogen daytime running lamps) ....284
Changing bulbs (vehicles with LED
daylight lamps) .............................. 284
Display message ............................ 402
Switching Adaptive Highbeam
Assist on/off ................................. 280
Switching on/off ........................... 279
Hill start assist .................................. 306
HOLD function
Display message ............................ 411
Function/notes ............................. 342
Home
see Home address
Home address
Entering and saving .......................156
Selecting from the destination
memory ......................................... 159
Hood
Closing ........................................... 457
Display message ............................ 418
Opening ......................................... 456
Hydroplaning ..................................... 329
I
Ignition lock see Key positions
Immobilizer .......................................... 75
Incident (traffic report) ..................... 174
Indicator lamps see Warning and indicator lamps
Indicators
see Turn signals
Insect protection on the radiator .... 457
Instrument cluster Overview .......................................... 35
Warning and indicator lamps ...........36
Instrument lighting
see Instrument cluster lighting
Interface (USB, iPod ®
)
see Media Interface
Interior lighting
Ambient light (COMAND) ...............263
Automatic control ..........................282
Interior lighting .............................. 263
Manual control ............................... 282
Overview ........................................ 281
Reading lamp ................................. 281
see Interior lighting
Intermediate stop
Deleting ......................................... 162
Entering ......................................... 161
iPod ®
Alphabetical track selection ..........237
Connecting to the Media
Interface ........................................ 234
Index13
Page 16 of 536
Selecting a category/playlist .........236
Supported variants ........................233
J
Jack Storage location ............................ 472
Using ............................................. 474
Jump starting (engine) ...................... 481
K
Key see SmartKey
KEYLESS-GO
Convenience closing feature ............94
Locking ............................................ 79
Start/Stop button .......................... 303
Starting the engine ........................305
Unlocking ......................................... 79
Key positions
KEYLESS-GO .................................. 303
SmartKey ....................................... 303
Kickdown
Driving tips .................................... 313
Manual drive program ....................316
L
Lamps see Warning and indicator lamps
Lane-change assistant
see Blind Spot Assist
Lane detection (automatic)
see Lane Keeping Assist
Lane Keeping Assist
Activating/deactivating .................385
Display message ............................ 411
Function/information ....................362
Lap time (RACETIMER) ...................... 380
LATCH-type (ISOFIX) child seat
anchors ................................................ 65
Letter bar see Character bar
License plate lamp (display
message) ............................................ 402
Lighting see Lights
Lights
Automatic headlamp mode ............277
Cornering light function .................280
Display message ............................ 401
Driving abroad ............................... 276
Fog lamps ...................................... 278
Hazard warning lamps ...................279
High beam flasher .......................... 279
High-beam headlamps ...................279
Light switch ................................... 276
Low-beam headlamps ....................277
Parking lamps ................................ 276
Rear fog lamp ................................ 278
Switching Adaptive Highbeam
Assist on/off ................................. 386
Switching the daytime running
lamps on/off (on-board
computer) ...................................... 385
Switching the daytime running
lamps on/off (switch) ....................277
Turn signals ................................... 279
see Changing bulbs
see Interior lighting
Light sensor (display message) ....... 403
LIM indicator lamp Cruise control ................................ 331
DISTRONIC PLUS ........................... 335
Loading guidelines ............................ 432
Locator lighting setting (COMAND) . 264
Locking see Central locking
Locking (doors)
Automatic ........................................ 86
Emergency locking ........................... 88
From inside (central locking
button) ............................................. 86
Locking centrally
see Central locking
Locking verification signal (on-
board computer) ............................... 386
Logic 7 ®
(Harman Kardon ®
surround sound system) see 3D sound (Harman Kardon ®
surround sound system) 14Index
Page 266 of 536
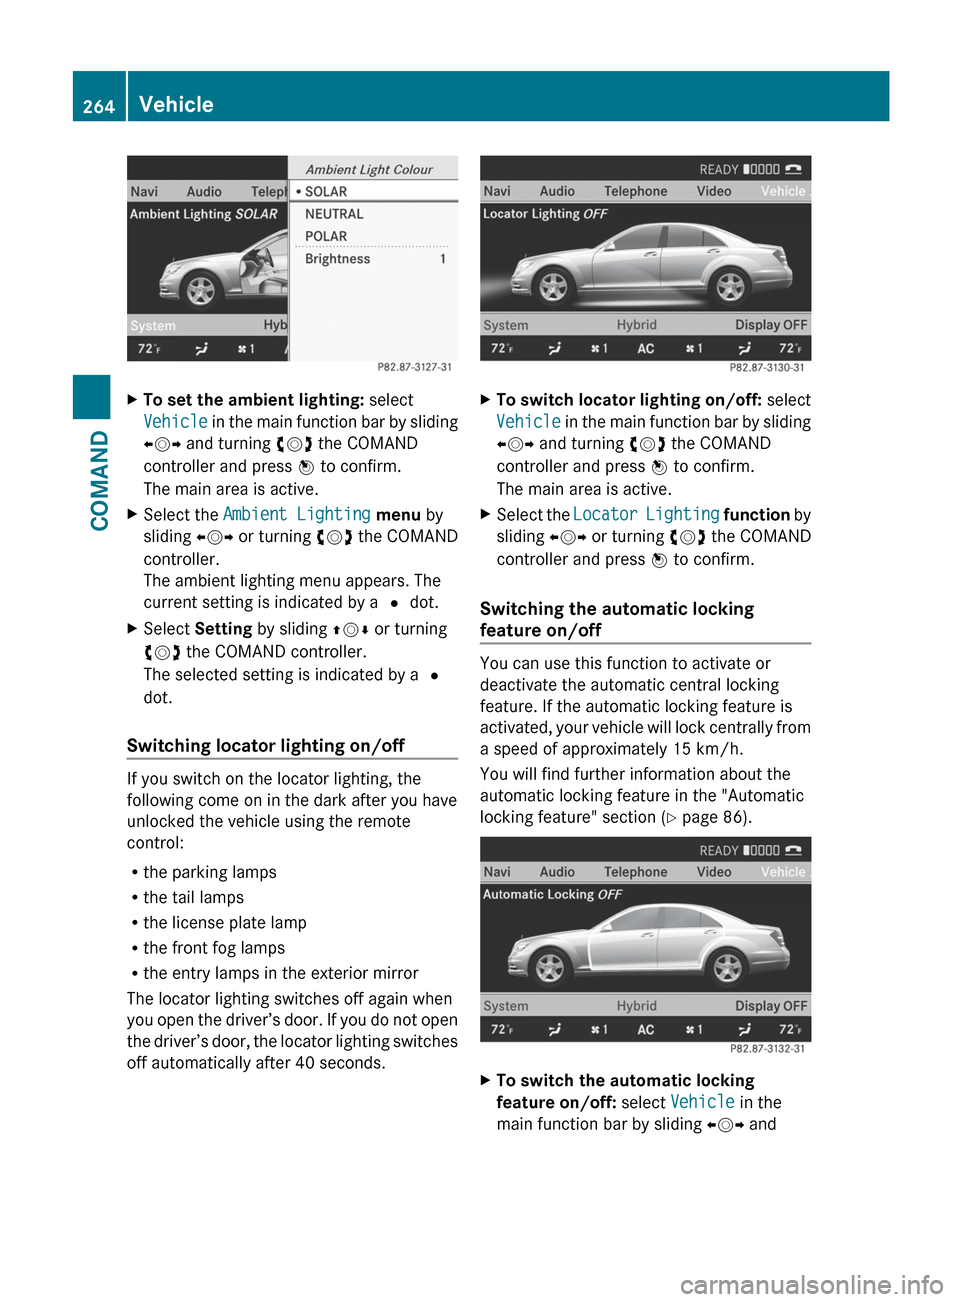
XTo set the ambient lighting: select
Vehicle in the main function bar by sliding
XVY and turning cVd the COMAND
controller and press W to confirm.
The main area is active.XSelect the Ambient Lighting menu by
sliding XVY or turning cVd the COMAND
controller.
The ambient lighting menu appears. The
current setting is indicated by a # dot.XSelect Setting by sliding ZVÆ or turning
cVd the COMAND controller.
The selected setting is indicated by a #
dot.
Switching locator lighting on/off
If you switch on the locator lighting, the
following come on in the dark after you have
unlocked the vehicle using the remote
control:
R the parking lamps
R the tail lamps
R the license plate lamp
R the front fog lamps
R the entry lamps in the exterior mirror
The locator lighting switches off again when
you open the driver’s door. If you do not open
the driver’s door, the locator lighting switches
off automatically after 40 seconds.
XTo switch locator lighting on/off: select
Vehicle in the main function bar by sliding
XVY and turning cVd the COMAND
controller and press W to confirm.
The main area is active.XSelect the Locator Lighting function by
sliding XVY or turning cVd the COMAND
controller and press W to confirm.
Switching the automatic locking
feature on/off
You can use this function to activate or
deactivate the automatic central locking
feature. If the automatic locking feature is
activated, your vehicle will lock centrally from
a speed of approximately 15 km/h.
You will find further information about the
automatic locking feature in the "Automatic
locking feature" section ( Y page 86).
XTo switch the automatic locking
feature on/off: select Vehicle in the
main function bar by sliding XVY and264VehicleCOMAND
Page 278 of 536
Useful information
i This Operator's Manual describes all
models and all standard and optional
equipment of your vehicle available at the
time of publication of the Operator's
Manual. Country-specific differences are
possible. Please note that your vehicle may
not be equipped with all features
described. This also applies to safety-
related systems and functions.
i Please read the information on qualified
specialist workshops ( Y page 31).
Exterior lighting
Important safety notes
For reasons of safety, Mercedes-Benz
recommends that you drive with the lights
switched on even during the daytime. In some
countries, operation of the headlamps varies
due to legal requirements and self-imposed
obligations.
Information about driving abroad
Converting to symmetrical low beam
when driving abroad: switch the headlamps
to symmetrical low beam in countries in
which traffic drives on the opposite side of the
road to the country where the vehicle is
registered. This prevents glare to oncoming
traffic. Symmetrical lights do not illuminate
as large an area of the edge of the road.
Have the headlamps converted at a qualified
specialist workshop, e.g. an authorized
Mercedes-Benz Center, as close to the border
as possible before driving in these countries.
Converting to asymmetrical low beam
after returning: have the headlamps
converted back to asymmetrical low beam at
a qualified specialist workshop, e.g. an
authorized Mercedes-Benz Center, as soon as
possible after crossing the border again.
Light switch
Operation
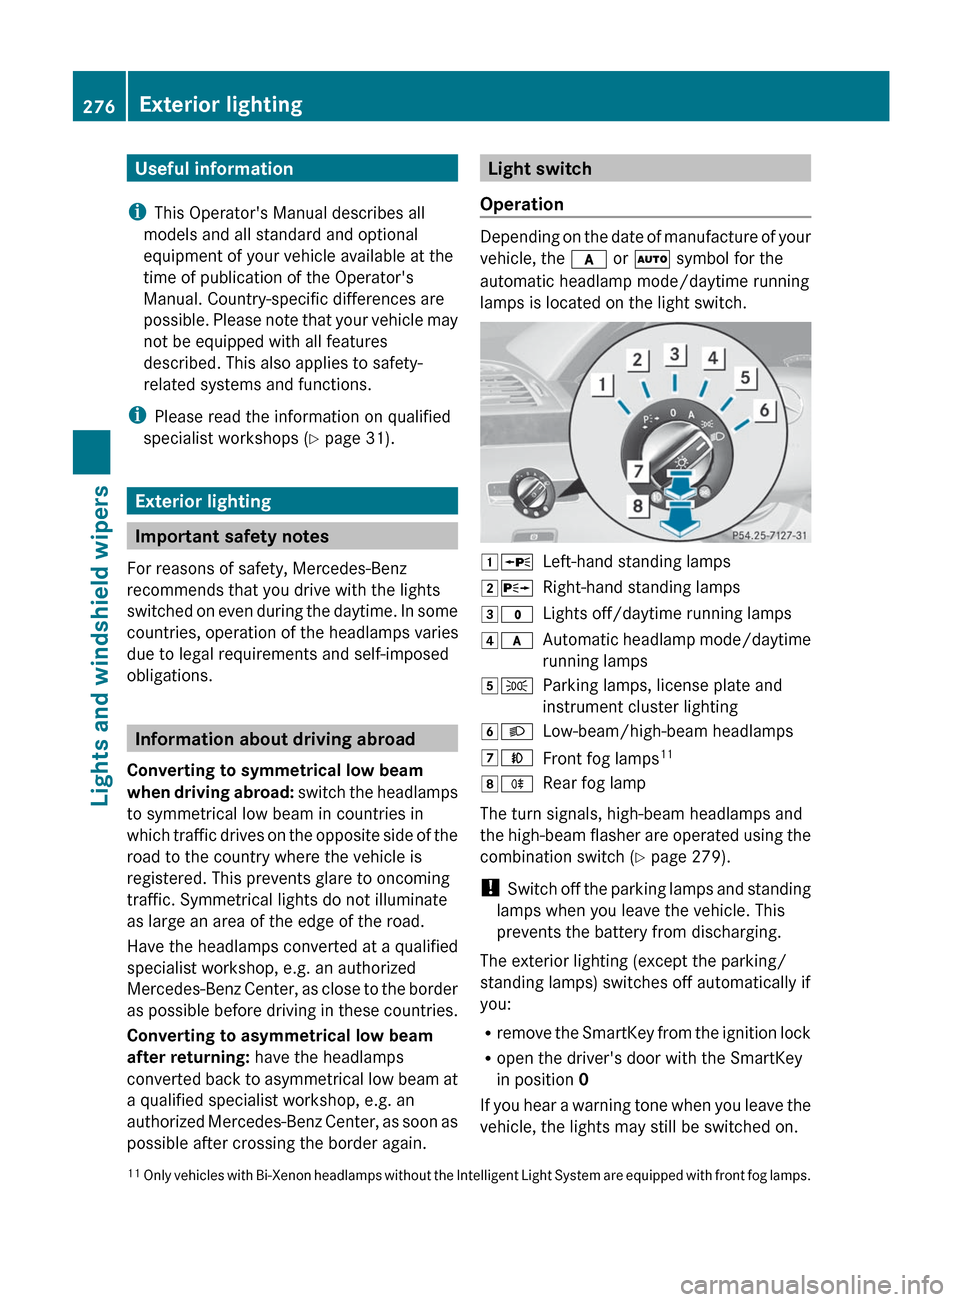
Depending on the date of manufacture of your
vehicle, the c or à symbol for the
automatic headlamp mode/daytime running
lamps is located on the light switch.
1 WLeft-hand standing lamps2XRight-hand standing lamps3$Lights off/daytime running lamps4cAutomatic headlamp mode/daytime
running lamps5 TParking lamps, license plate and
instrument cluster lighting6 LLow-beam/high-beam headlamps7NFront fog lamps 118
RRear fog lamp
The turn signals, high-beam headlamps and
the high-beam flasher are operated using the
combination switch ( Y page 279).
! Switch off the parking lamps and standing
lamps when you leave the vehicle. This
prevents the battery from discharging.
The exterior lighting (except the parking/
standing lamps) switches off automatically if
you:
R remove the SmartKey from the ignition lock
R open the driver's door with the SmartKey
in position 0
If you hear a warning tone when you leave the
vehicle, the lights may still be switched on.
11 Only vehicles with Bi-Xenon headlamps without the Intelligent Light System are equipped with front fog lamps.276Exterior lightingLights and windshield wipers
Page 279 of 536
XTurn the light switch to $ or c .
or
XIf the rear fog lamp is switched on: press
the light switch in to the stop.
Low-beam headlamps
XTo switch on the low-beam headlamps:
turn the SmartKey in the ignition lock to
position 2 or start the engine.XTurn the light switch to L.
The T indicator lamp on the light switch
lights up.XTo switch off the low-beam
headlamps: turn the light switch to $.
Daytime running lamps
Daytime running lamps in Canada
The daytime running lamps function is
required by law in Canada. It cannot therefore
be deactivated.
XTurn the light switch to $ or c .
With the engine running: depending on the
ambient light, the daytime running lamps or
the low-beam headlamps are switched on.
When the low-beam headlamps are
activated, the T indicator lamp on the
light switch lights up.
When the engine is running and the vehicle is
stationary or if the electronic parking brake is
applied: if you move the selector lever from a
drive position to P, the daytime running
lamps/low-beam headlamps go out after
three minutes.
When the engine is running, the vehicle is
stationary and in high ambient light
brightness: if you turn the light switch
to T , the daytime running lamps and the
parking lamps are switched on.
If the engine is running and you turn the light
switch to L, the manual settings take
precedence over the daytime running lamps.
Daytime running lamps in the USA
In the USA, the daytime running lamps are
deactivated upon delivery from the factory.XTo activate the daytime running
lamps: activate the daytime running lamps
function in the on-board computer
( Y page 385).XTurn the light switch to $ or c .
With the engine running: depending on the
ambient light, the daytime running lamps or
the low-beam headlamps are switched on.
When the low-beam headlamps are
activated, the T indicator lamp on the
light switch lights up.
If the engine is running and you turn the light
switch to T or L , the manual settings
take precedence over the daytime running
lamps.
Automatic headlamp mode
XTo switch on automatic headlamp
mode: turn the light switch to c.
SmartKey in position 1 in the ignition lock:
the parking lamps are switched on or off
automatically depending on the brightness
of the ambient light.
With the engine running: depending on the
brightness of the ambient light, the daytime
running lamps 12
or the parking lamps and
low-beam headlamps are switched on or off
automatically.
When the low-beam headlamps are
switched on, the T indicator lamp on
the light switch lights up.GWARNING
If the light switch is set to c, the low-beam
headlamps will not come on automatically if
it is foggy. This could endanger you and
others. Therefore, turn the light switch to
L in fog.
12
Only if daytime running lamps have been activated via the on-board computer.Exterior lighting277Lights and windshield wipersZ
Page 280 of 536
The automatic headlamp feature is only an
aid. The driver is responsible for the vehicle's
lighting at all times.GWARNING
When it is dark or foggy, turn the light switch
quickly from c to L . Otherwise, the
headlamps could switch off temporarily and
you could cause an accident.
Front fog lamps
GWARNING
If you suspect that driving conditions will be
foggy, turn the light switch to L before you
start your journey. Otherwise, your vehicle
may not be visible and you could endanger
yourself and others.
GWARNING
In low ambient lighting or foggy conditions,
only switch from position c to L with
the vehicle at a standstill in a safe location.
Switching from c to L will briefly
switch off the headlamps. Doing so while
driving in low ambient lighting conditions may
result in an accident.
XTo switch on the front fog lamps: turn
the SmartKey in the ignition lock to position
2 or start the engine.XTurn the light switch to L or T . If the
light switch is set to c, you cannot
switch on the fog lamps.XPull the light switch out to the first detent.
The green N indicator lamp on the light
switch lights up.XTo switch off the front fog lamps: press
the light switch in as far as it will go.
The green N indicator lamp on the light
switch goes out.Rear fog lampXTo switch on the rear fog lamp: turn the
SmartKey in the ignition lock to position 2
or start the engine.XTurn the light switch to L or T
(vehicles with front fog lamps), or turn the
light switch to L (vehicles without front
fog lamps). If the light switch is set to
c , you cannot switch on the rear fog
lamp.XTurn the light switch to L. If the light
switch is set to T, you cannot switch on
the rear fog lamp.XPull the light switch out to the second stop
(vehicles with front fog lamps) or pull it out
to the stop (vehicles without front fog
lamps).
The yellow R indicator lamp on the light
switch lights up.XTo switch off the rear fog lamp: press the
light switch in as far as it will go.
The yellow R indicator lamp on the light
switch goes out.
Headlamp cleaning system
The headlamps are cleaned automatically if
the "Wipe with washer fluid" function is
operated ten times while the lights are on and
the engine is running (Y page 285). When you
switch off the ignition, the automatic
headlamp cleaning system is reset and
counting is resumed from 0.
278Exterior lightingLights and windshield wipers
Page 283 of 536
the high-beam headlamps are switched on
automatically. The K indicator lamp in
the instrument cluster also lights up.
When you drive slower than approximately
30 mph (45 km/h) or if other road users
are identified or if the roads are sufficiently
illuminated:
the high-beam headlamps are switched off
automatically. The K indicator lamp in
the instrument cluster goes out. The _
indicator lamp in the instrument cluster
stays on.XTo deactivate: move the combination
switch back to its normal position.
The _ indicator lamp in the instrument
cluster goes out.GWARNING
The Adaptive Highbeam Assist is only an aid
intended to support you while driving. The
driver is and remains responsible for proper
vehicle lighting in accordance with the
prevailing light, sight and traffic conditions.
The system may be impaired or unavailable
when
R visibility is poor, e.g. due to snow, rain, fog,
or heavy spray
R the optical sensor area of the windshield is
dirty, fogged up, or covered by a sticker for
example
The system cannot recognize the following
road users:
R Road users without a lighting system of
their own, e.g. pedestrians
R Road users with dim lighting of their own,
e.g. cyclists
R Road users whose lighting is obstructed,
e.g. road users behind a guardrail
R In some seldom cases, even road users with
a lighting system of their own may be
recognized too late or not at all.
The automatic high-beam headlamps will then
not be deactivated or it will be activated in
spite of preceding or oncoming road users.
This could endanger you and/or others and
cause an accident. Always pay close attention
to the traffic situation and switch off the high
beam manually if necessary.
Headlamps fogged up on the inside
The headlamps may fog up on the inside if
there is high atmospheric humidity.
XDrive with the headlamps switched on.
The level of moisture diminishes,
depending on the length of the journey and
the weather conditions (humidity and
temperature).
If the level of moisture does not diminish:
XHave the headlamps checked at a qualified
specialist workshop.
Interior lighting
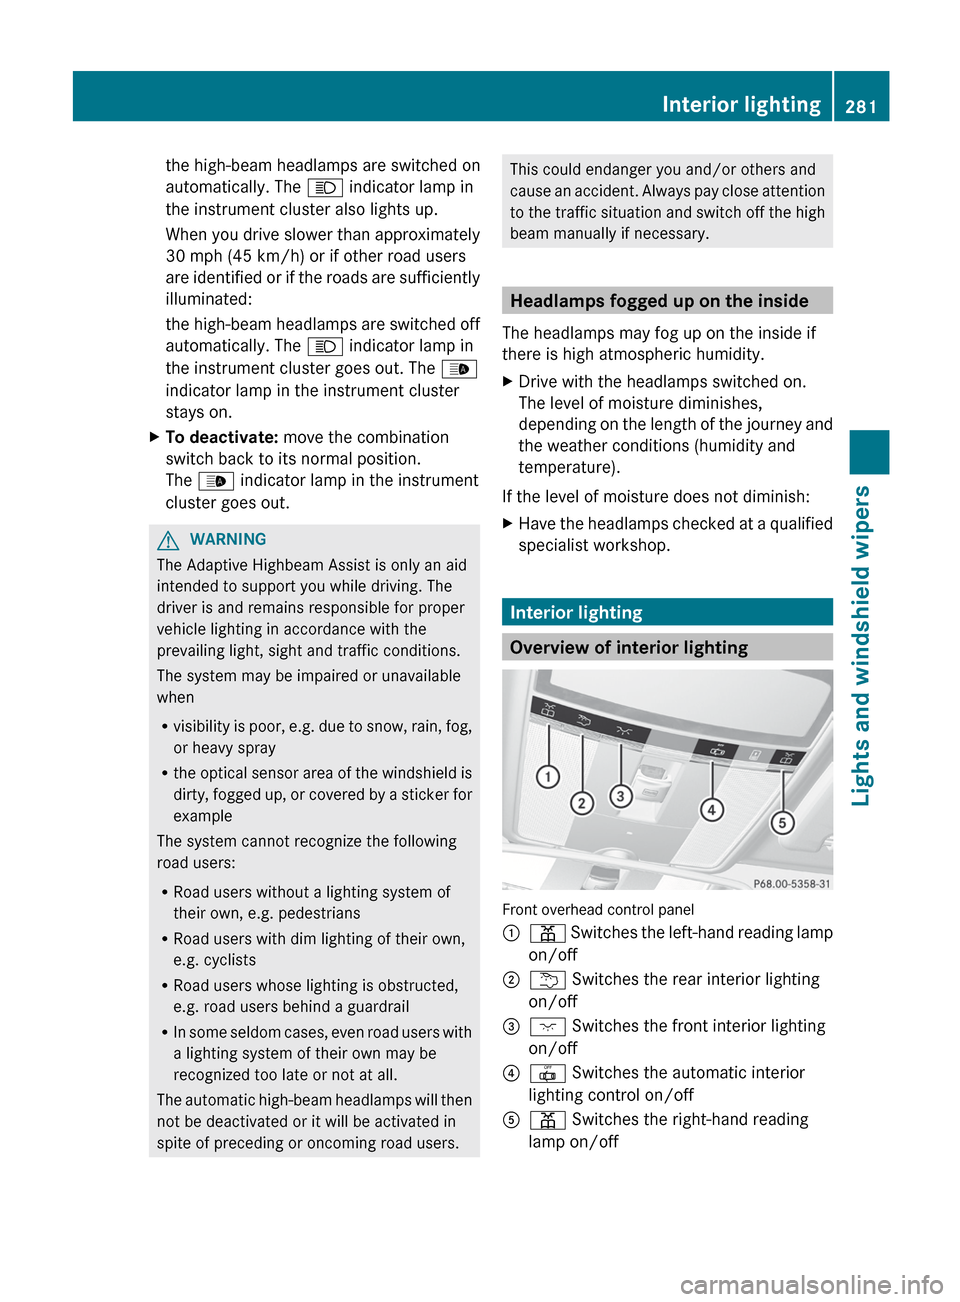
Overview of interior lighting
Front overhead control panel
:p Switches the left-hand reading lamp
on/off;u Switches the rear interior lighting
on/off=c Switches the front interior lighting
on/off?| Switches the automatic interior
lighting control on/offAp Switches the right-hand reading
lamp on/offInterior lighting281Lights and windshield wipersZ
Page 294 of 536
Notes on using climate control
Below, you can find a number of notes and
recommendations to help you use climate
control optimally.
R Activate climate control using the Ã
rocker switch. The indicator lamp in the
à rocker switch lights up.
R Set the temperature to 72 ‡ (22 †).
R Only use the "defrosting" function briefly
until the windshield is clear again.
R Only use "air-recirculation" mode briefly,
e.g. if there are unpleasant outside odors
or when in a tunnel. The windows could
otherwise fog up as, in air-recirculation
mode, no fresh air is drawn into the vehicle.
R Use the residual heat function if you want
to heat or ventilate the vehicle interior
when the ignition is switched off. The
"residual heat" function can only be
activated or deactivated with the ignition
switched off.
Operating the climate control system
Activating/deactivating climate
control
Important information
GWARNING
When the climate control system is
deactivated, the outside air supply and
circulation are also deactivated. Only choose
this setting for a short time. Otherwise the
windows could fog up, impairing visibility and
endangering you and others.
i Switch on climate control primarily using
the à rocker switch ( Y page 293).
Switching the front climate control on/
off using the front control panelXTurn the SmartKey to position 2 in the
ignition lock.XTo activate: press the ^ rocker switch
up or down.
The indicator lamp in the rocker switch
goes out. The previously selected settings
come into effect again.XTo deactivate: press the ^ rocker
switch up or down.
The indicator lamp in the rocker switch
lights up.
Switching the rear-compartment
climate control on/off using the front
control panel
XTurn the SmartKey to position 2 in the
ignition lock.XActivate the Y rear compartment
function via COMAND ( Y page 268).
The rear-compartment climate control can
be controlled via the front control panel
using the Y rear compartment function.XTo activate: press the ^ rocker switch
up or down.
The indicator lamp in the rocker switch
goes out. The previously selected settings
come into effect again.XTo deactivate: press the ^ rocker
switch up or down.
The indicator lamp in the rocker switch
lights up.292Operating the climate control systemClimate control
Page 295 of 536
Switching the rear-compartment
climate control on/off using the rear
control panelXTurn the SmartKey to position 2 in the
ignition lock.XTo switch on: press rocker switch
K (Y page 291) up or down and select
AUTO .
or
XPress rocker switch K(Y page 291) up or
down and select MAN.XTo switch off: press rocker switch
K (Y page 291) up or down and select
OFF .
Activating/deactivating cooling with
the air dehumidification function
Important information
The cooling with air dehumidification function
is only available when the engine is running.
The air inside the vehicle is cooled and
dehumidified according to the temperature
selected.
GWARNING
If you switch off the cooling function, the
vehicle will not be cooled when weather
conditions are warm. The windows can fog up
more quickly. Window fogging may impair
visibility and endanger you and others.
Condensation may drip from the underside of
the vehicle when it is in cooling mode. This is
normal and not a sign that there is a
malfunction.
You can activate or deactivate the cooling
with air dehumidification function via
COMAND ( Y page 267).
i The cooling with air dehumidification
function uses refrigerant R134a. This
coolant does not contain
chlorofluorocarbons, and therefore does
not damage the ozone layer.
Problems with the cooling with air
dehumidification function
If you can no longer switch on the cooling with
air dehumidification function via COMAND,
the cooling with air dehumidification function
is switched off due to a malfunction.
XConsult a qualified specialist workshop.
Setting climate control to automatic
GWARNING
If you switch off the cooling function, the
vehicle will not be cooled when weather
conditions are warm. The windows can fog up
more quickly. Window fogging may impair
visibility and endanger you and others.
In automatic mode, the set temperature is
maintained automatically at a constant level.
The system automatically regulates the
temperature of the dispensed air, the airflow
and the air distribution.
Automatic mode will achieve optimal
operation if cooling with air dehumidification
is also activated. If desired, cooling with air
dehumidification can be deactivated.
Controlling the front climate control
using the front control panel
XTurn the SmartKey to position 2 in the
ignition lock.XSet the desired temperature.X To switch on: press the à rocker
switch up or down.
The indicator lamp in the à rocker
switch lights up.Operating the climate control system293Climate controlZ