interior lights MERCEDES-BENZ S-Class 2012 W221 Owner's Manual
[x] Cancel search | Manufacturer: MERCEDES-BENZ, Model Year: 2012, Model line: S-Class, Model: MERCEDES-BENZ S-Class 2012 W221Pages: 536, PDF Size: 25.27 MB
Page 11 of 536
Cup holderCenter console .............................. 437
Important safety notes ..................437
Rear compartment .........................437
Customer Assistance Center (CAC) ... 31
Customer Relations Department ....... 31
D
Dashboard see Cockpit
Data
see Technical data
Data carrier
MUSIC REGISTER ........................... 230
Data medium
Audio DVD ..................................... 228
CD/DVD ........................................ 229
MP3 ............................................... 228
Date format, setting .......................... 144
Day design, setting ........................... 143
Daytime running lamp mode see Daytime running lamps
Daytime running lamps
Display message ............................ 403
Switching on/off (on-board
computer) ...................................... 385
Switching on/off (switch) ..............277
DEF
Adding ........................................... 321
Display message ............................ 408
Delayed switch-off
Exterior lighting (COMAND) ...........263
Interior lighting (COMAND) ............263
Destination (navigation)
Displaying information ...................172
Entering a destination by address .. 153
Entering a destination using the
map ............................................... 160
Entering an intermediate stop .......161
Entering a point of interest ............162
Saving ............................................ 179
Selecting from the destination
memory ......................................... 159
Selecting from the list of last
destinations ................................... 159
Destination memory (navigation)
Deleting an entry ........................... 181
Entering/saving your home
address .......................................... 156
Previous destinations ....................181
Dialing a number (telephone) ........... 200
Digital speedometer ......................... 376
Digital TV see TV
DIRECT SELECT lever
see Automatic transmission
Display
Selecting the design ......................143
Settings ......................................... 143
Display (cleaning instructions) ........ 467
Displaying the arrival time ............... 172
Displaying the distance to the
destination ......................................... 172
Display messages Calling up (on-board computer) .....388
Driving systems ............................. 408
Engine ............................................ 404
General notes ................................ 388
Hiding (on-board computer) ...........388
Lights ............................................. 401
Safety systems .............................. 389
Service interval display ..................462
SmartKey ....................................... 419
Tires ............................................... 415
Vehicle ........................................... 417
Distance
see Navigation, route overview
Distance display (on-board
computer) .......................................... 383
Distance recorder ............................. 376
see Odometer
see Trip odometer
Distance warning (warning lamp) .... 428
DISTRONIC PLUS Deactivating ................................... 340
Display message ............................ 413
Displays in the multifunction
display ........................................... 339
Driving tips .................................... 340
Function/notes ............................. 332
Important safety notes ..................332Index9
Page 16 of 536
Selecting a category/playlist .........236
Supported variants ........................233
J
Jack Storage location ............................ 472
Using ............................................. 474
Jump starting (engine) ...................... 481
K
Key see SmartKey
KEYLESS-GO
Convenience closing feature ............94
Locking ............................................ 79
Start/Stop button .......................... 303
Starting the engine ........................305
Unlocking ......................................... 79
Key positions
KEYLESS-GO .................................. 303
SmartKey ....................................... 303
Kickdown
Driving tips .................................... 313
Manual drive program ....................316
L
Lamps see Warning and indicator lamps
Lane-change assistant
see Blind Spot Assist
Lane detection (automatic)
see Lane Keeping Assist
Lane Keeping Assist
Activating/deactivating .................385
Display message ............................ 411
Function/information ....................362
Lap time (RACETIMER) ...................... 380
LATCH-type (ISOFIX) child seat
anchors ................................................ 65
Letter bar see Character bar
License plate lamp (display
message) ............................................ 402
Lighting see Lights
Lights
Automatic headlamp mode ............277
Cornering light function .................280
Display message ............................ 401
Driving abroad ............................... 276
Fog lamps ...................................... 278
Hazard warning lamps ...................279
High beam flasher .......................... 279
High-beam headlamps ...................279
Light switch ................................... 276
Low-beam headlamps ....................277
Parking lamps ................................ 276
Rear fog lamp ................................ 278
Switching Adaptive Highbeam
Assist on/off ................................. 386
Switching the daytime running
lamps on/off (on-board
computer) ...................................... 385
Switching the daytime running
lamps on/off (switch) ....................277
Turn signals ................................... 279
see Changing bulbs
see Interior lighting
Light sensor (display message) ....... 403
LIM indicator lamp Cruise control ................................ 331
DISTRONIC PLUS ........................... 335
Loading guidelines ............................ 432
Locator lighting setting (COMAND) . 264
Locking see Central locking
Locking (doors)
Automatic ........................................ 86
Emergency locking ........................... 88
From inside (central locking
button) ............................................. 86
Locking centrally
see Central locking
Locking verification signal (on-
board computer) ............................... 386
Logic 7 ®
(Harman Kardon ®
surround sound system) see 3D sound (Harman Kardon ®
surround sound system) 14Index
Page 46 of 536
Useful information
i This Operator's Manual describes all
models and all standard and optional
equipment of your vehicle available at the
time of publication of the Operator's
Manual. Country-specific differences are
possible. Please note that your vehicle may
not be equipped with all features
described. This also applies to safety-
related systems and functions.
i Please read the information on qualified
specialist workshops ( Y page 31).
Occupant safety
Overview of occupant safety
In this section, you will learn the most
important facts about the restraint system
components of the vehicle.
The restraint system consists of:
R seat belts
R child restraint systems
R LATCH-type (ISOFIX) child seat anchors
Additional protection is provided by:
R SRS (Supplemental Restraint System)
R NECK-PRO head restraints/NECK-PRO
luxury head restraints
R PRE-SAFE ®
R Air bag system components with:
- PASSENGER AIR BAG OFF indicator lamp
- front-passenger seat with Occupant
Classification System (OCS)
The different air bag systems work
independently of each other. The protective
functions of the system work in conjunction
with each other. Not all air bags are deployed
in an accident.
GWARNING
Modifications to or work improperly
conducted on restraint system components
or their wiring, as well as tampering with
interconnected electronic systems, can lead
to the restraint systems no longer functioning
as intended.
Air bags or Emergency Tensioning Devices
(ETDs), for example, could deploy
inadvertently or fail to deploy in accidents
although the deceleration threshold for air
bag deployment is exceeded. Therefore,
never modify the restraint systems. Do not
tamper with electronic components or their
software.
i See "Children in the vehicle"
( Y page 62) for more information on
infants and children traveling with you in
the vehicle and restraints for infants and
children.
SRS (Supplemental Restraint System)
Introduction
SRS consists of:
R the 6 SRS warning lamp
R air bags
R air bag control unit (with crash sensors)
R Emergency Tensioning Devices
R belt force limiters
SRS reduces the risk of occupants coming
into contact with the vehicle's interior in the
event of an accident. It can also reduce the
effect of the forces to which occupants are
subjected during an accident.
SRS warning lamp
SRS functions are checked regularly when
you switch on the ignition and when the
engine is running. Therefore, malfunctions
can be detected in good time.
The 6 SRS warning lamp in the instrument
cluster lights up when the ignition is switched
on. It goes out no later than a few seconds
after the engine is started.
44Occupant safetySafety
Page 64 of 536
direction during the initial stages of the
impact
R if, in the event of a side impact, on the side
opposite the impact the vehicle
decelerates or accelerates rapidly in a
lateral direction
R if, in certain situations where the vehicle
overturns, the system determines that it
can provide additional protection
If the air bags are deployed, you will hear a
bang, and a small amount of powder may also
be released. Only in rare cases will the bang
affect your hearing. The powder that is
released generally does not constitute a
health hazard. The 6 SRS warning lamp
lights up.GWARNING
Pyrotechnic Emergency Tensioning Devices
that have been deployed must be renewed.
For your safety, when disposing of Emergency
Tensioning Devices, always observe the
safety instructions. These are available from
any authorized Mercedes-Benz Center.
The PRE-SAFE ®
system has electrically
operated reversible pre-tensioners that do
not require replacement after activation.
! If the front-passenger seat is not
occupied, do not engage the seat belt
tongue in the buckle on the front-
passenger seat. Otherwise, the Emergency
Tensioning Device could be triggered in the
event of an accident.
Automatic comfort-install feature
The front seat belts have an automatic
comfort-install feature. In vehicles with a rear
bench seat with electrically adjustable outer
seats, the seat belts for the outer seats have
an automatic comfort-install feature. The
automatic comfort-install feature reduces the
retraction force of the seat belts. This results
in increased seat belt comfort.
Children in the vehicle
Child restraint systems
Important safety notes
We recommend that all infants and children
be properly secured in an infant or child
restraint system at all times while the vehicle
is in motion.
The use of seat belts and infant and child
restraint systems is required by law in all 50
states, the District of Columbia, the U.S.
territories and all Canadian provinces.
Infants and children must always be seated in
an appropriate infant or child restraint system
recommended for the size and weight of the
child. The infant or child restraint system
must be properly secured in accordance with
the manufacturer's instructions. All infant or
child restraint systems must meet U.S.
Federal Motor Vehicle Safety Standards 213
and 225 and Canadian Motor Vehicle Safety
Standards 213 and 210.2.
An information label on the child restraint
system indicates whether it meets these
standards. This information is also provided
in the installation instructions supplied with
the child restraint system.
Always read and follow the manufacturer's
instructions when using an infant or child
restraint system or booster seat.
Observe all warning signs in the vehicle
interior and on the infant or child restraint.
GWARNING
According to accident statistics, children are
safer when properly restrained on the rear
seats than on the front-passenger seat. Thus,
we strongly recommend that children be
placed in the rear seats whenever possible.
Regardless of seating position, children 12
years old and under must be seated and
properly secured in an appropriately sized
child restraint system or booster seat
recommended for the size and weight of the
child.
62Children in the vehicleSafety
Page 112 of 536
The electrical steering wheel adjustment
feature can be operated at any time.
Therefore, do not leave children unattended
in the vehicle, or with access to an unlocked
vehicle. A child's unsupervised access to a
vehicle could result in an accident and/or
serious personal injury.
Adjusting the steering wheel
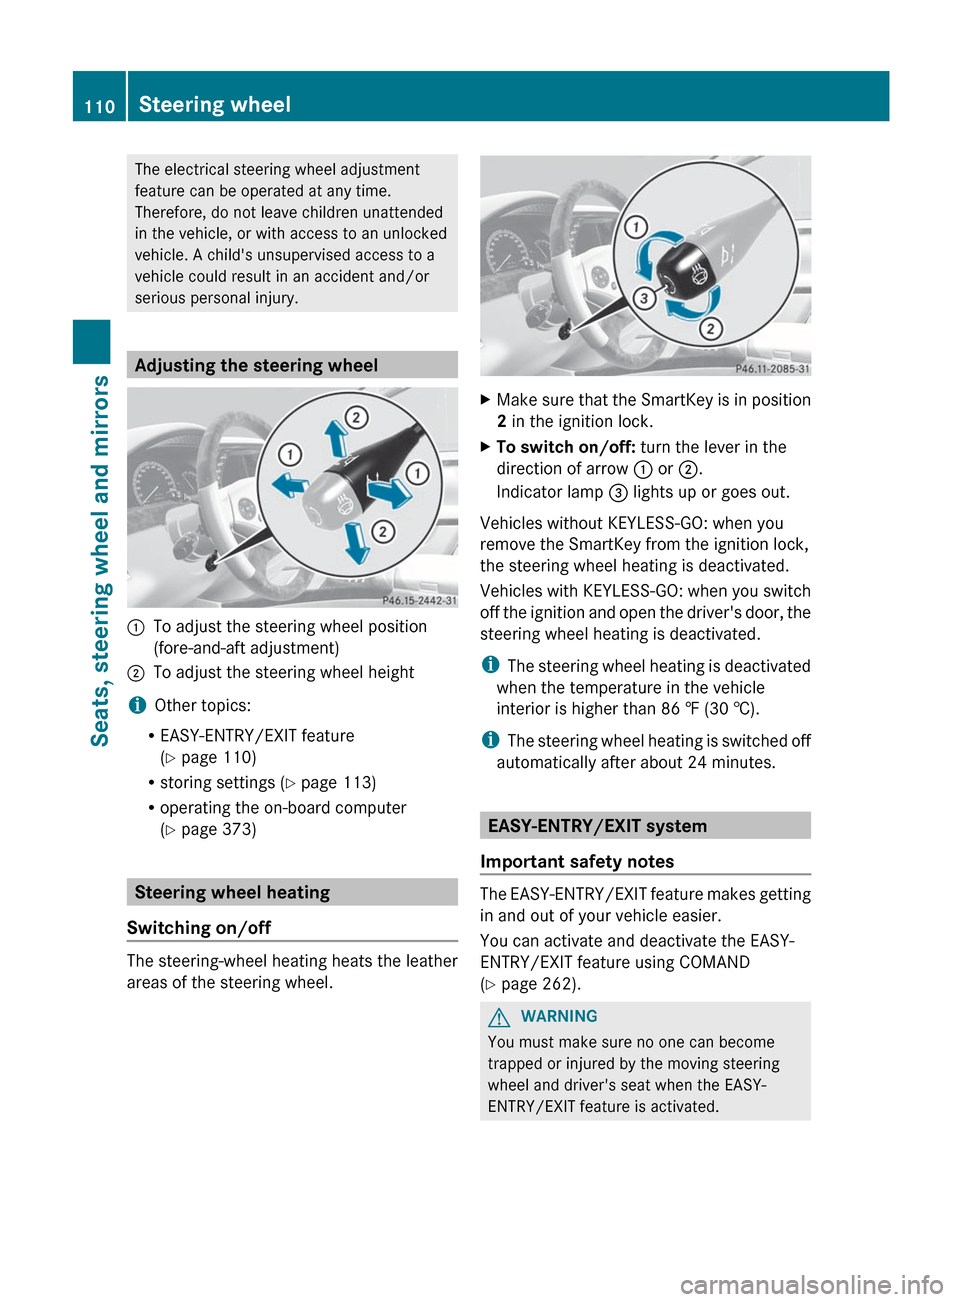
:To adjust the steering wheel position
(fore-and-aft adjustment);To adjust the steering wheel height
i Other topics:
R EASY-ENTRY/EXIT feature
( Y page 110)
R storing settings ( Y page 113)
R operating the on-board computer
( Y page 373)
Steering wheel heating
Switching on/off
The steering-wheel heating heats the leather
areas of the steering wheel.
XMake sure that the SmartKey is in position
2 in the ignition lock.XTo switch on/off: turn the lever in the
direction of arrow : or ;.
Indicator lamp = lights up or goes out.
Vehicles without KEYLESS-GO: when you
remove the SmartKey from the ignition lock,
the steering wheel heating is deactivated.
Vehicles with KEYLESS-GO: when you switch
off the ignition and open the driver's door, the
steering wheel heating is deactivated.
i The steering wheel heating is deactivated
when the temperature in the vehicle
interior is higher than 86 ‡ (30 †).
i The steering wheel heating is switched off
automatically after about 24 minutes.
EASY-ENTRY/EXIT system
Important safety notes
The EASY-ENTRY/EXIT feature makes getting
in and out of your vehicle easier.
You can activate and deactivate the EASY-
ENTRY/EXIT feature using COMAND
( Y page 262).
GWARNING
You must make sure no one can become
trapped or injured by the moving steering
wheel and driver's seat when the EASY-
ENTRY/EXIT feature is activated.
110Steering wheelSeats, steering wheel and mirrors
Page 114 of 536
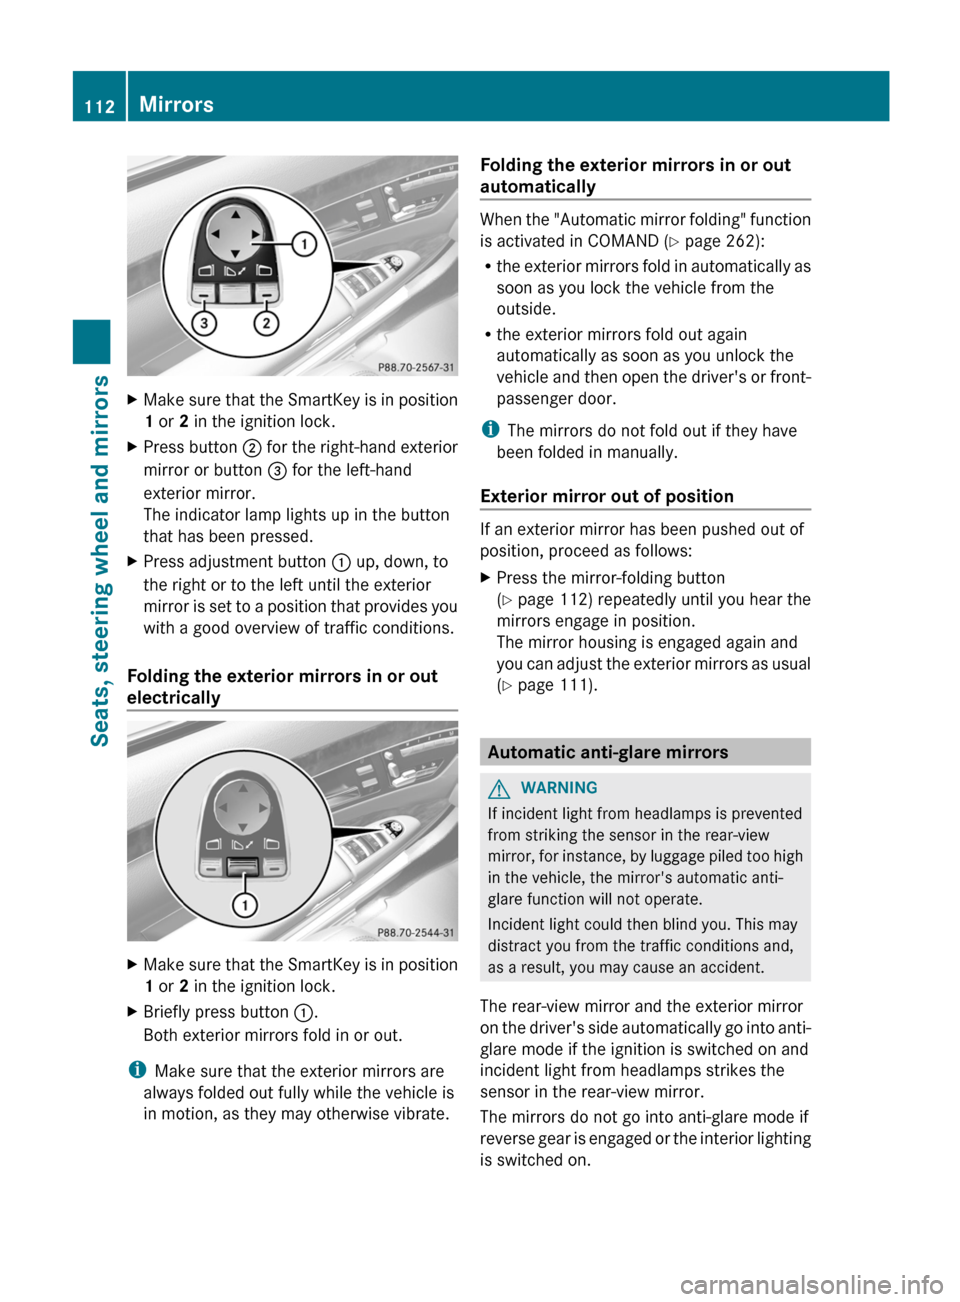
XMake sure that the SmartKey is in position
1 or 2 in the ignition lock.XPress button ; for the right-hand exterior
mirror or button = for the left-hand
exterior mirror.
The indicator lamp lights up in the button
that has been pressed.XPress adjustment button : up, down, to
the right or to the left until the exterior
mirror is set to a position that provides you
with a good overview of traffic conditions.
Folding the exterior mirrors in or out
electrically
XMake sure that the SmartKey is in position
1 or 2 in the ignition lock.XBriefly press button :.
Both exterior mirrors fold in or out.
i Make sure that the exterior mirrors are
always folded out fully while the vehicle is
in motion, as they may otherwise vibrate.
Folding the exterior mirrors in or out
automatically
When the "Automatic mirror folding" function
is activated in COMAND ( Y page 262):
R the exterior mirrors fold in automatically as
soon as you lock the vehicle from the
outside.
R the exterior mirrors fold out again
automatically as soon as you unlock the
vehicle and then open the driver's or front-
passenger door.
i The mirrors do not fold out if they have
been folded in manually.
Exterior mirror out of position
If an exterior mirror has been pushed out of
position, proceed as follows:
XPress the mirror-folding button
( Y page 112) repeatedly until you hear the
mirrors engage in position.
The mirror housing is engaged again and
you can adjust the exterior mirrors as usual
( Y page 111).
Automatic anti-glare mirrors
GWARNING
If incident light from headlamps is prevented
from striking the sensor in the rear-view
mirror, for instance, by luggage piled too high
in the vehicle, the mirror's automatic anti-
glare function will not operate.
Incident light could then blind you. This may
distract you from the traffic conditions and,
as a result, you may cause an accident.
The rear-view mirror and the exterior mirror
on the driver's side automatically go into anti-
glare mode if the ignition is switched on and
incident light from headlamps strikes the
sensor in the rear-view mirror.
The mirrors do not go into anti-glare mode if
reverse gear is engaged or the interior lighting
is switched on.
112MirrorsSeats, steering wheel and mirrors
Page 265 of 536
COMAND controller and press W to
confirm.
The main area is active.XSelect the Easy-Entry/Exit Feature
menu by sliding XVY or turning cVd the
COMAND controller.
The EASY-ENTRY/EXIT feature menu
appears. The current setting is indicated by
a # dot.XSelect Setting by sliding ZVÆ or turning
cVd the COMAND controller.
The selected setting is indicated by a #
dot.
Setting the interior/exterior lighting
delayed switch-off time
Interior lighting: you can set whether and for
how long you wish the interior lighting to
remain on in the dark after you have removed
the SmartKey from the ignition lock.
Exterior light: you can set whether and for
how long you want the exterior lighting to
remain on in the dark after the doors have
been closed. The exterior lighting
automatically switches off after the switch-off
delay has elapsed.
You may select from the following settings:
R 0 seconds: delayed switch-off is
deactivated.
R 15, 30, 45, 60 seconds: delayed switch-off
is activated.
i You can reactivate this function by
opening a door within one minute. If none
of the doors are opened after the SmartKey
is removed from the ignition lock or if a door
is not closed after it has been opened, the
exterior lights switch off after 60 seconds.
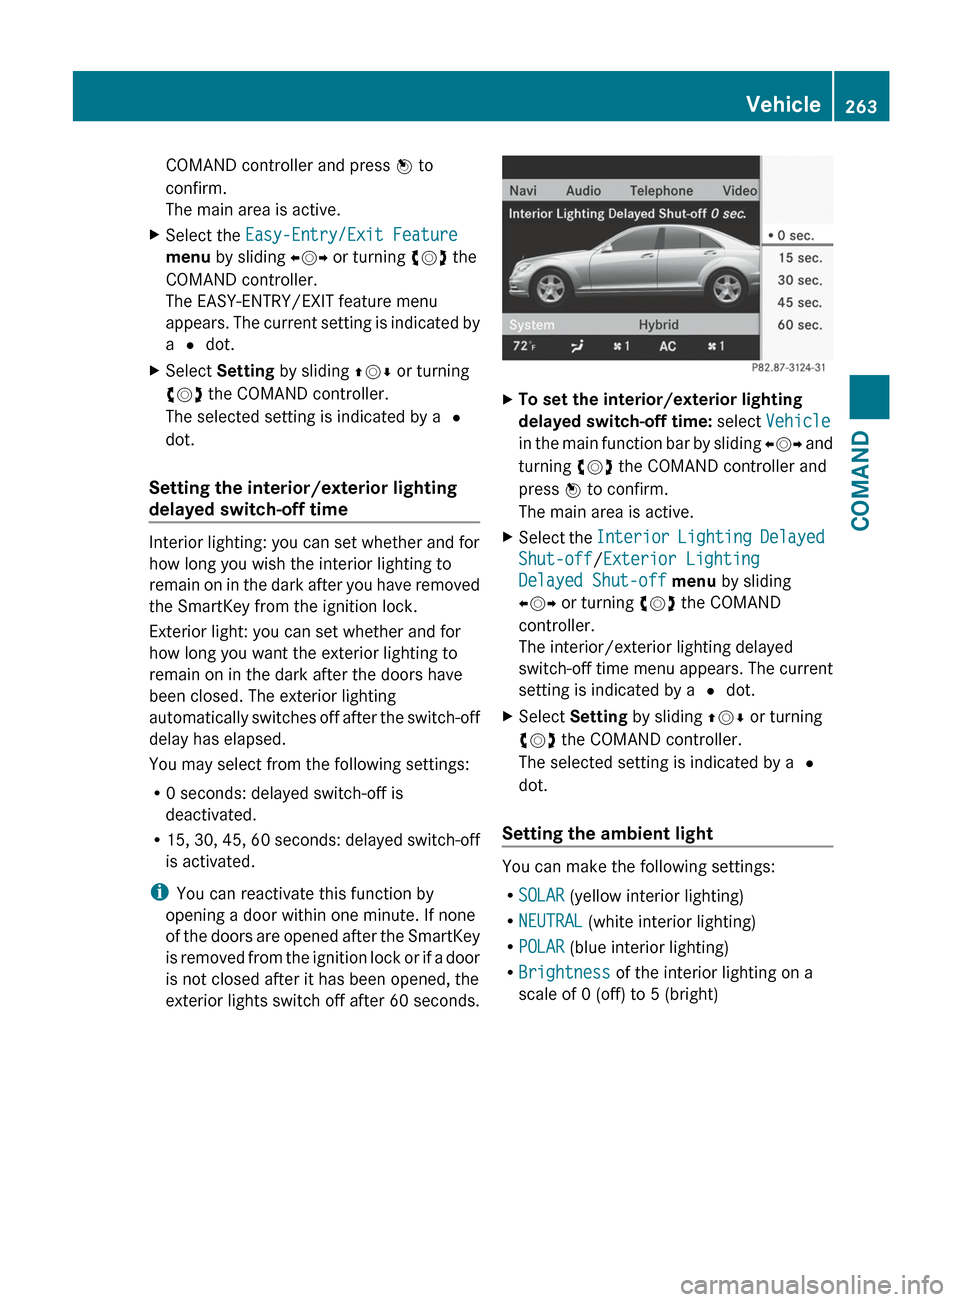
XTo set the interior/exterior lighting
delayed switch-off time: select Vehicle
in the main function bar by sliding XVY and
turning cVd the COMAND controller and
press W to confirm.
The main area is active.XSelect the Interior Lighting Delayed
Shut-off /Exterior Lighting
Delayed Shut-off menu by sliding
XVY or turning cVd the COMAND
controller.
The interior/exterior lighting delayed
switch-off time menu appears. The current
setting is indicated by a # dot.XSelect Setting by sliding ZVÆ or turning
cVd the COMAND controller.
The selected setting is indicated by a #
dot.
Setting the ambient light
You can make the following settings:
R SOLAR (yellow interior lighting)
R NEUTRAL (white interior lighting)
R POLAR (blue interior lighting)
R Brightness of the interior lighting on a
scale of 0 (off) to 5 (bright)
Vehicle263COMANDZ
Page 277 of 536
Useful information ............................276
Exterior lighting ................................ 276
Interior lighting ................................. 281
Replacing bulbs ................................. 282
Windshield wipers ............................285275Lights and windshield wipers
Page 283 of 536
the high-beam headlamps are switched on
automatically. The K indicator lamp in
the instrument cluster also lights up.
When you drive slower than approximately
30 mph (45 km/h) or if other road users
are identified or if the roads are sufficiently
illuminated:
the high-beam headlamps are switched off
automatically. The K indicator lamp in
the instrument cluster goes out. The _
indicator lamp in the instrument cluster
stays on.XTo deactivate: move the combination
switch back to its normal position.
The _ indicator lamp in the instrument
cluster goes out.GWARNING
The Adaptive Highbeam Assist is only an aid
intended to support you while driving. The
driver is and remains responsible for proper
vehicle lighting in accordance with the
prevailing light, sight and traffic conditions.
The system may be impaired or unavailable
when
R visibility is poor, e.g. due to snow, rain, fog,
or heavy spray
R the optical sensor area of the windshield is
dirty, fogged up, or covered by a sticker for
example
The system cannot recognize the following
road users:
R Road users without a lighting system of
their own, e.g. pedestrians
R Road users with dim lighting of their own,
e.g. cyclists
R Road users whose lighting is obstructed,
e.g. road users behind a guardrail
R In some seldom cases, even road users with
a lighting system of their own may be
recognized too late or not at all.
The automatic high-beam headlamps will then
not be deactivated or it will be activated in
spite of preceding or oncoming road users.
This could endanger you and/or others and
cause an accident. Always pay close attention
to the traffic situation and switch off the high
beam manually if necessary.
Headlamps fogged up on the inside
The headlamps may fog up on the inside if
there is high atmospheric humidity.
XDrive with the headlamps switched on.
The level of moisture diminishes,
depending on the length of the journey and
the weather conditions (humidity and
temperature).
If the level of moisture does not diminish:
XHave the headlamps checked at a qualified
specialist workshop.
Interior lighting
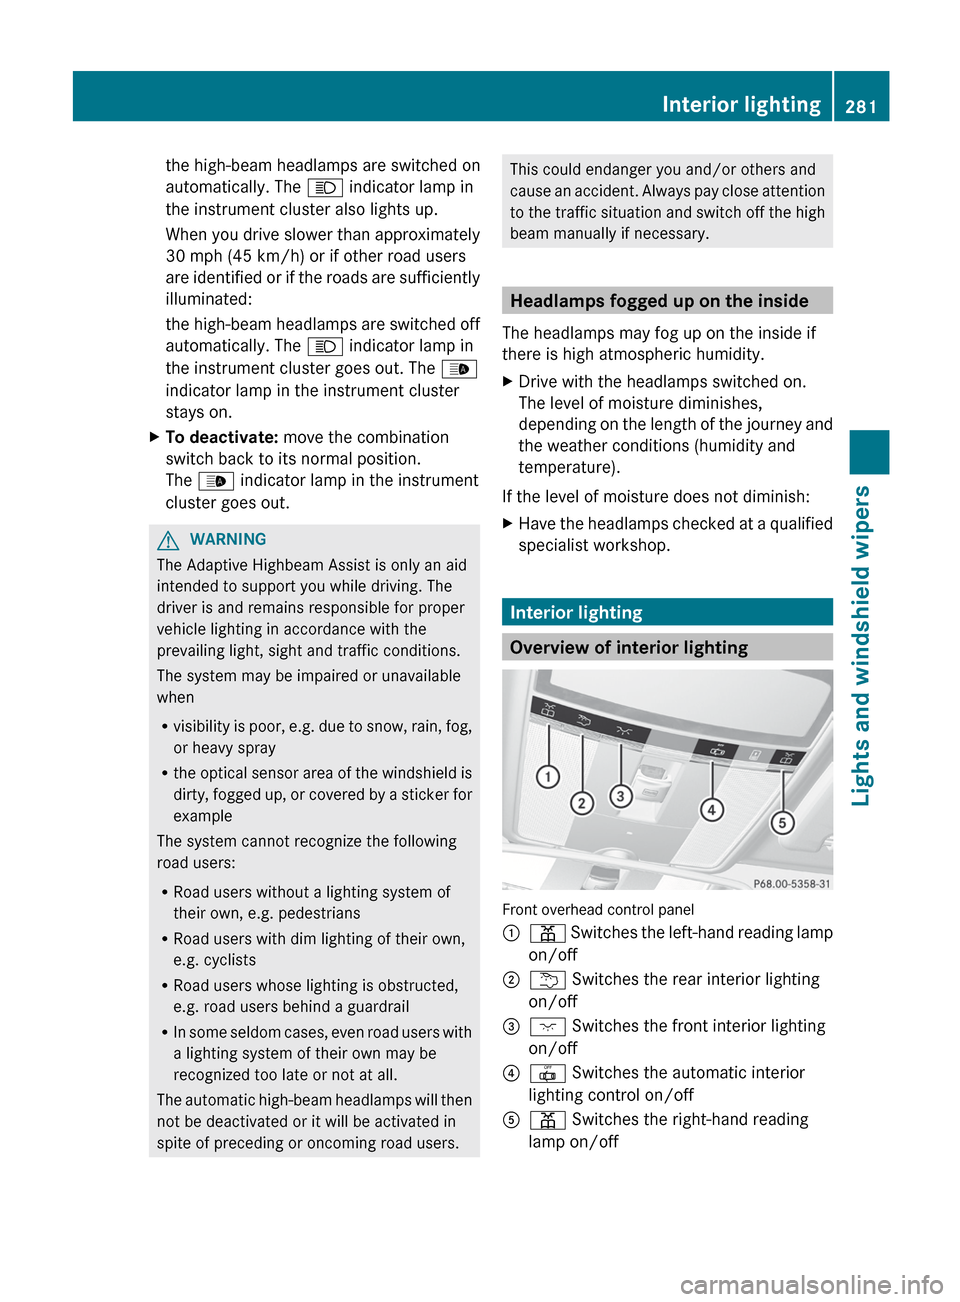
Overview of interior lighting
Front overhead control panel
:p Switches the left-hand reading lamp
on/off;u Switches the rear interior lighting
on/off=c Switches the front interior lighting
on/off?| Switches the automatic interior
lighting control on/offAp Switches the right-hand reading
lamp on/offInterior lighting281Lights and windshield wipersZ
Page 284 of 536
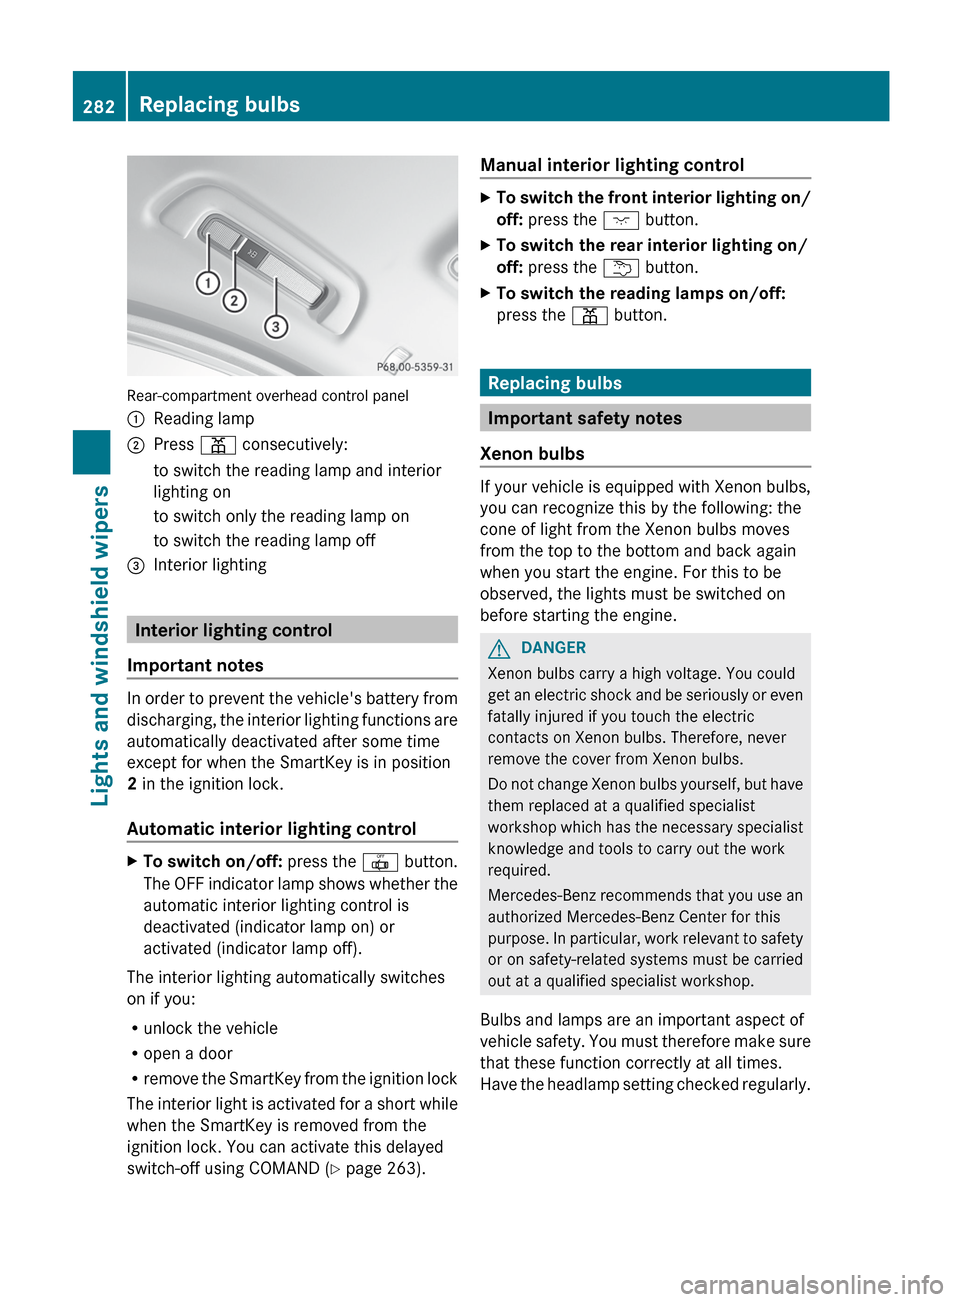
Rear-compartment overhead control panel
:Reading lamp;Press p consecutively:to switch the reading lamp and interior
lighting onto switch only the reading lamp onto switch the reading lamp off=Interior lighting
Interior lighting control
Important notes
In order to prevent the vehicle's battery from
discharging, the interior lighting functions are
automatically deactivated after some time
except for when the SmartKey is in position
2 in the ignition lock.
Automatic interior lighting control
XTo switch on/off: press the | button.
The OFF indicator lamp shows whether the
automatic interior lighting control is
deactivated (indicator lamp on) or
activated (indicator lamp off).
The interior lighting automatically switches
on if you:
R unlock the vehicle
R open a door
R remove the SmartKey from the ignition lock
The interior light is activated for a short while
when the SmartKey is removed from the
ignition lock. You can activate this delayed
switch-off using COMAND ( Y page 263).
Manual interior lighting controlXTo switch the front interior lighting on/
off: press the c button.XTo switch the rear interior lighting on/
off: press the u button.XTo switch the reading lamps on/off:
press the p button.
Replacing bulbs
Important safety notes
Xenon bulbs
If your vehicle is equipped with Xenon bulbs,
you can recognize this by the following: the
cone of light from the Xenon bulbs moves
from the top to the bottom and back again
when you start the engine. For this to be
observed, the lights must be switched on
before starting the engine.
GDANGER
Xenon bulbs carry a high voltage. You could
get an electric shock and be seriously or even
fatally injured if you touch the electric
contacts on Xenon bulbs. Therefore, never
remove the cover from Xenon bulbs.
Do not change Xenon bulbs yourself, but have
them replaced at a qualified specialist
workshop which has the necessary specialist
knowledge and tools to carry out the work
required.
Mercedes-Benz recommends that you use an
authorized Mercedes-Benz Center for this
purpose. In particular, work relevant to safety
or on safety-related systems must be carried
out at a qualified specialist workshop.
Bulbs and lamps are an important aspect of
vehicle safety. You must therefore make sure
that these function correctly at all times.
Have the headlamp setting checked regularly.
282Replacing bulbsLights and windshield wipers