sat nav MERCEDES-BENZ S-Class 2012 W221 Owner's Manual
[x] Cancel search | Manufacturer: MERCEDES-BENZ, Model Year: 2012, Model line: S-Class, Model: MERCEDES-BENZ S-Class 2012 W221Pages: 536, PDF Size: 25.27 MB
Page 9 of 536
Carsee Vehicle
Care
Carpets .......................................... 469
Car wash ........................................ 463
Display ........................................... 467
Exterior lights ................................ 466
Gear or selector lever ....................468
Matte finish ................................... 465
Night View Assist Plus ...................467
Notes ............................................. 463
Paint .............................................. 465
Plastic trim .................................... 468
Power washer ................................ 464
Rear view camera .......................... 467
Roof lining ...................................... 469
Seat belt ........................................ 469
Seat cover ..................................... 469
Sensors ......................................... 467
Steering wheel ............................... 468
Tail pipes ....................................... 467
Trim pieces .................................... 468
Washing by hand ........................... 464
Wheels ........................................... 465
Windows ........................................ 466
Wiper blades .................................. 466
Wooden trim .................................. 468
Cargo tie down rings ......................... 435
Car pool lanes .................................... 169
Car wash (care) ................................. 463
Category Satellite radio ................................ 218
CD
Copy protection ............................. 229
Fast forward/fast rewind ...............225
General information .......................229
Inserting ........................................ 220
Inserting/loading (Rear Seat
Entertainment System) ..................251
Mode, switching to ........................221
Multisession .................................. 228
Notes on discs ............................... 229
Operating the player/changer
(on-board computer) ......................379
Pause function ............................... 223
Playback options ........................... 228
Player/changer operation
(COMAND) ..................................... 220Removing/ejecting (Rear Seat
Entertainment System) ..................251
Safety notes .................................. 220
Selecting a media type ..................224
Selecting a track ............................ 224
Sound settings (balance, bass,
fader, treble) .................................. 135
Cell phone
see Mobile phone
Center console ..................................... 38
Central locking Automatic locking feature
(COMAND) ..................................... 264
Locking/unlocking (SmartKey) ........78
Changing batteries (remote
control, headphones) ........................ 247
Changing bulbs High-beam headlamps (vehicles
with halogen daytime running
lamps) ............................................ 284
High-beam headlamps (vehicles
with LED daylight lamps) ...............284
Important safety notes ..................282
Overview of bulb types ..................283
Changing direction
Announcement phase ....................166
Change of direction phase .............167
Preparation phase .........................166
Character bar ..................................... 129
Characters Entering ......................................... 130
Entering (address book, phone
book) ............................................. 132
Entering (navigation) ......................129
Child-proof locks
Important safety notes ....................66
Rear doors ....................................... 67
Children
In the vehicle ................................... 62
Restraint systems ............................ 62
Child seat
LATCH-type (ISOFIX) child seat
anchors ............................................ 65
Special seat belt retractor ...............64
Top Tether ....................................... 65
Cigarette lighter ................................ 440Index7
Page 22 of 536
Roof load (maximum) ........................ 530
Route see Route guidance (navigation)
Route (navigation)
Displaying the distance to the
destination ..................................... 172
Route overview .............................. 172
Selecting an alternative route ........171
Setting route options (avoiding:
highways, toll roads, tunnels,
ferries) ........................................... 152
Setting the route type (short
route, fast route, dynamic route or
economic route) ............................ 152
Starting calculation ........................156
Route guidance
Canceling ....................................... 169
Continuing ..................................... 169
Destination reached ......................170
Lane recommendations .................167
Off-road ......................................... 173
Traffic reports ................................ 174
Route guidance (navigation) ............ 377
Route guidance (on-board
computer) .......................................... 377
Route information see Dynamic route guidance/TMC
S
Safety Children in the vehicle .....................62
Child restraint systems ....................62
Occupant Classification System
(OCS) ............................................... 50
Overview of occupant safety
systems ........................................... 44
Safety notes
Audio CD/DVD and MP3 mode .....220
Operating safety ............................ 116
Video DVD mode ........................... 240
Safety systems
see Driving safety systems
SatRadio ............................................. 216
Displaying information ...................220
Registering .................................... 217
Selecting a category ......................218
Screen
Selecting for remote control (Rear
Seat Entertainment System) ..........140
Switching on/off (Rear Seat
Entertainment System) ..................126
see Display
SD memory card
Loading .......................................... 221
Seat belts
Adjusting the driver's and front-
passenger seat belt .........................60
Adjusting the height ......................... 60
Automatic comfort-fit feature ..........62
Belt force limiters ............................ 61
Cleaning ......................................... 469
Correct usage .................................. 58
Emergency Tensioning Devices ........ 61
Fastening ......................................... 59
Important safety guidelines .............57
Releasing ......................................... 60
Safety guidelines ............................. 45
Special seat belt retractor ...............64
Switching belt adjustment on/off
(on-board computer) ......................386
Warning lamp ................................. 420
Warning lamp (function) ................... 61
Seats
Active multicontour seat ........ 108, 272
Adjusting (electrically) ...................104
Adjusting (rear compartment) ........104
Adjusting lumbar support ..............108
Adjusting the head restraint ..........106
Cleaning the cover .........................469
Correct driver's seat position ........102
Important safety notes ..................103
Multicontour seat .......................... 108
Seat heating problem ....................109
Seat ventilation problem ................109
Selecting (COMAND) .....................270
Storing settings (memory
function) ........................................ 113
Switching seat heating on/off .......108
Switching seat ventilation on/off ..109
Selecting stations (radio)
Using station presets .....................212
Using station search ......................212
Sending DTMF tones ......................... 203
Sensors (cleaning instructions) ....... 46720Index
Page 118 of 536
Useful information
i This Operator's Manual describes all
models and all standard and optional
equipment of your vehicle available at the
time of publication of the Operator's
Manual. Country-specific differences are
possible. Please note that your vehicle may
not be equipped with all features
described. This also applies to safety-
related systems and functions.
i Please read the information on qualified
specialist workshops ( Y page 31).
Introduction
Operating safety
General notes
GWARNING
Vehicles with HYBRID: ensure that you read
the "HYBRID" supplement. You may otherwise
fail to recognize dangers.
GWARNING
Making alterations to electronic components
can cause malfunctions.
Radio, satellite radio, amplifier, DVD changer,
navigation module, phone and voice control
are networked together. If one component is
not functional or if it has been incorrectly
removed/replaced, this could impair the
operation of other components.
This could seriously jeopardize the
operational safety of your vehicle.
We recommend that you always have
maintenance work on electronic components
carried out at an authorized Mercedes-Benz
Center.
GWARNING
In order to avoid distraction which could lead
to an accident, the driver should enter system
settings while the vehicle is at a standstill, and
operate the system only when permitted by
road, weather and traffic conditions.
Bear in mind that at a speed of just 30 mph
(approximately 50 km/h), your car covers a
distance of 44 feet (approximately 14 m) every
second.
COMAND supplies you with information to
help you select your route more easily and
guide you conveniently and safely to your
destination. For safety reasons, we
encourage the driver to stop the vehicle in a
safe place before answering or placing a call,
or consulting the COMAND screen to read
navigational maps, instructions, or
downloaded information.GWARNING
While the navigation system provides
directional assistance, the driver must remain
focused on safe driving behavior, especially
attention to traffic and street signs, and
should utilize the system's audio cues while
driving.
The navigation system does not supply any
information on stop signs, yield signs, traffic
regulations or traffic safety rules. Their
observance always remains in the driver's
personal responsibility. DVD maps do not
cover all areas nor all routes within an area.
i Canada only: This device complies with
RSS-210 of Industry Canada. Operation is
subject to the following two conditions:
1. This device may not cause interference,
and
2. this device must accept any interference
received, including interference that may
cause undesired operation of the device.
Any unauthorized modification to this
device could void the user's authority to
operate the equipment.
i USA only: This device complies with Part
15 of the FCC Rules. Operation is subject
to the following two conditions:
1. This device may not cause harmful
interference, and
116IntroductionCOMAND
Page 120 of 536
At a glance
COMAND operating system
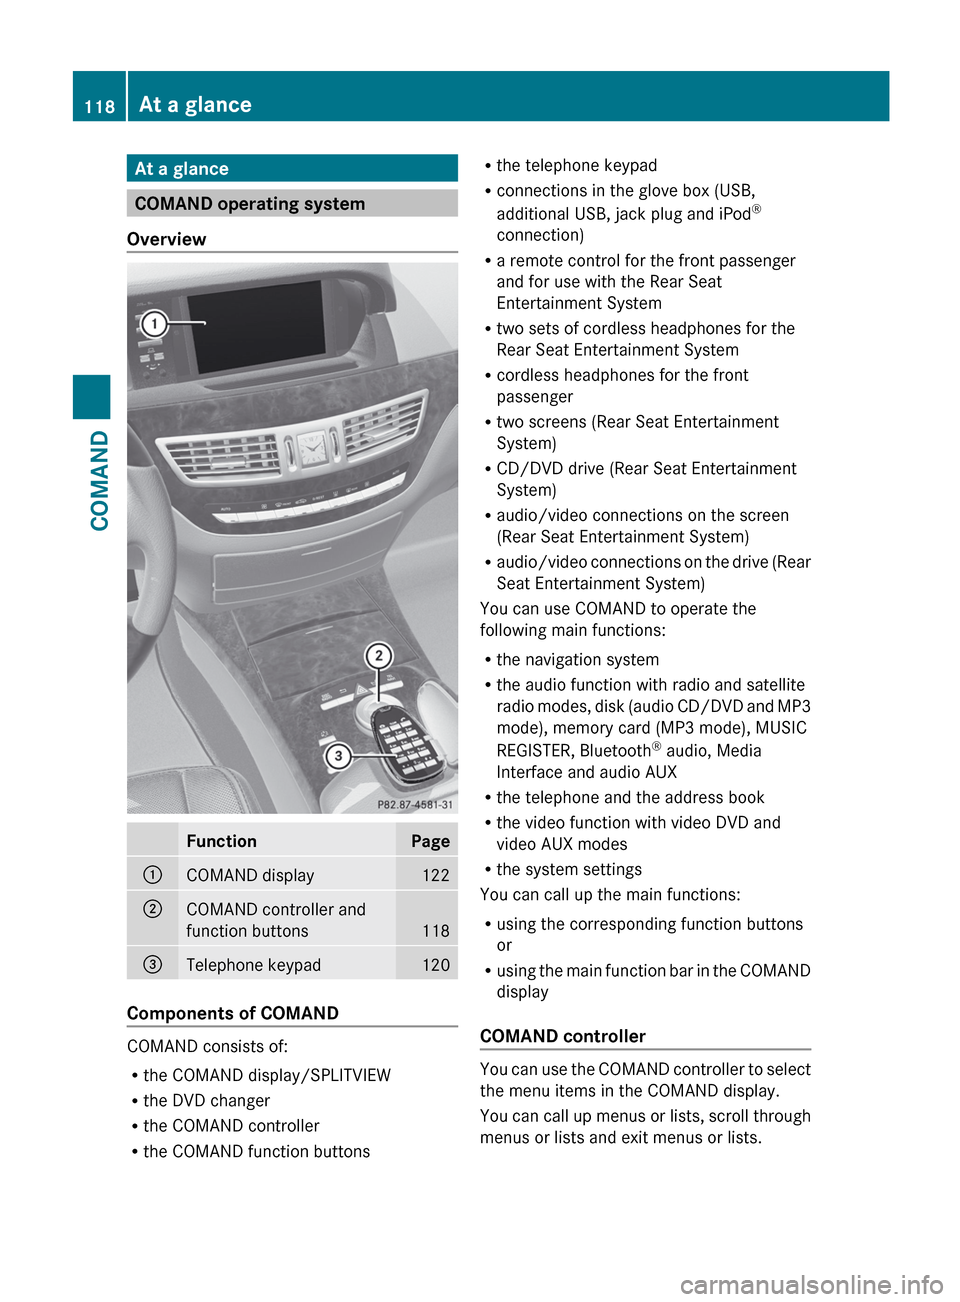
Overview
FunctionPage:COMAND display122;COMAND controller and
function buttons
118
=Telephone keypad120
Components of COMAND
COMAND consists of:
R the COMAND display/SPLITVIEW
R the DVD changer
R the COMAND controller
R the COMAND function buttons
R
the telephone keypad
R connections in the glove box (USB,
additional USB, jack plug and iPod ®
connection)
R a remote control for the front passenger
and for use with the Rear Seat
Entertainment System
R two sets of cordless headphones for the
Rear Seat Entertainment System
R cordless headphones for the front
passenger
R two screens (Rear Seat Entertainment
System)
R CD/DVD drive (Rear Seat Entertainment
System)
R audio/video connections on the screen
(Rear Seat Entertainment System)
R audio/video connections on the drive (Rear
Seat Entertainment System)
You can use COMAND to operate the
following main functions:
R the navigation system
R the audio function with radio and satellite
radio modes, disk (audio CD/DVD and MP3
mode), memory card (MP3 mode), MUSIC
REGISTER, Bluetooth ®
audio, Media
Interface and audio AUX
R the telephone and the address book
R the video function with video DVD and
video AUX modes
R the system settings
You can call up the main functions:
R using the corresponding function buttons
or
R using the main function bar in the COMAND
display
COMAND controller
You can use the COMAND controller to select
the menu items in the COMAND display.
You can call up menus or lists, scroll through
menus or lists and exit menus or lists.
118At a glanceCOMAND
Page 124 of 536
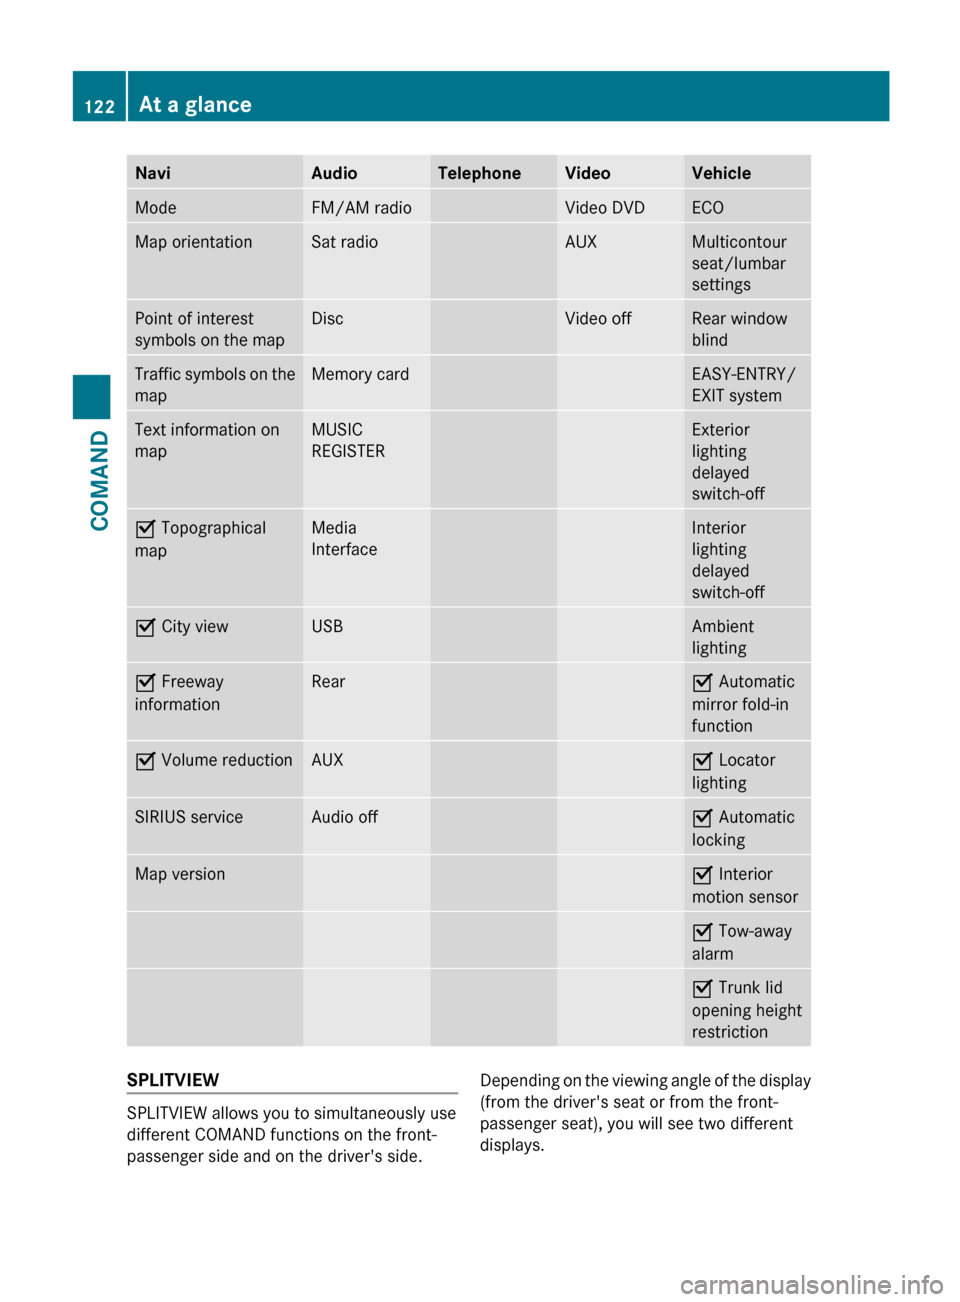
NaviAudioTelephoneVideoVehicleModeFM/AM radioVideo DVDECOMap orientationSat radioAUXMulticontour
seat/lumbar
settingsPoint of interest
symbols on the mapDiscVideo offRear window
blindTraffic symbols on the
mapMemory cardEASY-ENTRY/
EXIT systemText information on
mapMUSIC
REGISTERExterior
lighting
delayed
switch-offO Topographical
mapMedia
InterfaceInterior
lighting
delayed
switch-offO City viewUSBAmbient
lightingO Freeway
informationRearO Automatic
mirror fold-in
functionO Volume reductionAUXO Locator
lightingSIRIUS serviceAudio offO Automatic
lockingMap versionO Interior
motion sensorO Tow-away
alarmO Trunk lid
opening height
restrictionSPLITVIEW
SPLITVIEW allows you to simultaneously use
different COMAND functions on the front-
passenger side and on the driver's side.
Depending on the viewing angle of the display
(from the driver's seat or from the front-
passenger seat), you will see two different
displays.122At a glanceCOMAND
Page 176 of 536
Off-road during route guidance
Due to roadworks, for example, there may be
differences between the data on the digital
map and the actual course of the road.
In such cases, the system will temporarily be
unable to locate the vehicle position on the
digital map and thus considers the vehicle to
be in an off-road position.
In the display, you will see the Street
unknown message, an arrow and the distance
to the destination. The arrow shows the
compass heading to the last road you were
driving on.
As soon as the system can assign the vehicle
position to the map again, route guidance
continues in the usual way.
Route guidance on roads that are not
completely digitalized
COMAND attempts to avoid roads that have
not been completely digitalized. If the
vehicle's position or the destination is located
in an area that has not been completely
digitalized, then no active route guidance is
performed. Instead, the map shows a dashed
route along the roads and the target direction
is shown with an arrow. You hear the
announcement: "You will enter an area,
where turn-by-turn guidance can not be
provided. Please follow the arrow on the
display". Once these roads have been left,
regular route guidance is resumed.
Traffic reports
Prerequisite
i The SatRadio mode described below
requires optional satellite radio equipment
and a subscription to SIRIUS XM Satellite
Radio Traffic Message Service. Further
details on SatRadio are available in the
"SatRadio" section ( Y page 216).
COMAND can receive traffic reports via
SatRadio and incorporate them in the
navigation system. Traffic messages and map
symbols can then be shown in the COMAND
display.
COMAND uses high quality traffic data.
Nevertheless, there may be differences
between the traffic reports received and the
actual road and traffic conditions.
Switching traffic reports on/offXTo switch on: set the route type to
Dynamic Route 7
(Y page 152).XTo switch off: select the Fast Route or
Short Route route type (Y page 152).
i
COMAND calculates a new route if you
change the route type setting with route
guidance active. If you change the route
type setting when route guidance is
inactive, COMAND uses the new setting for
the next route guidance.
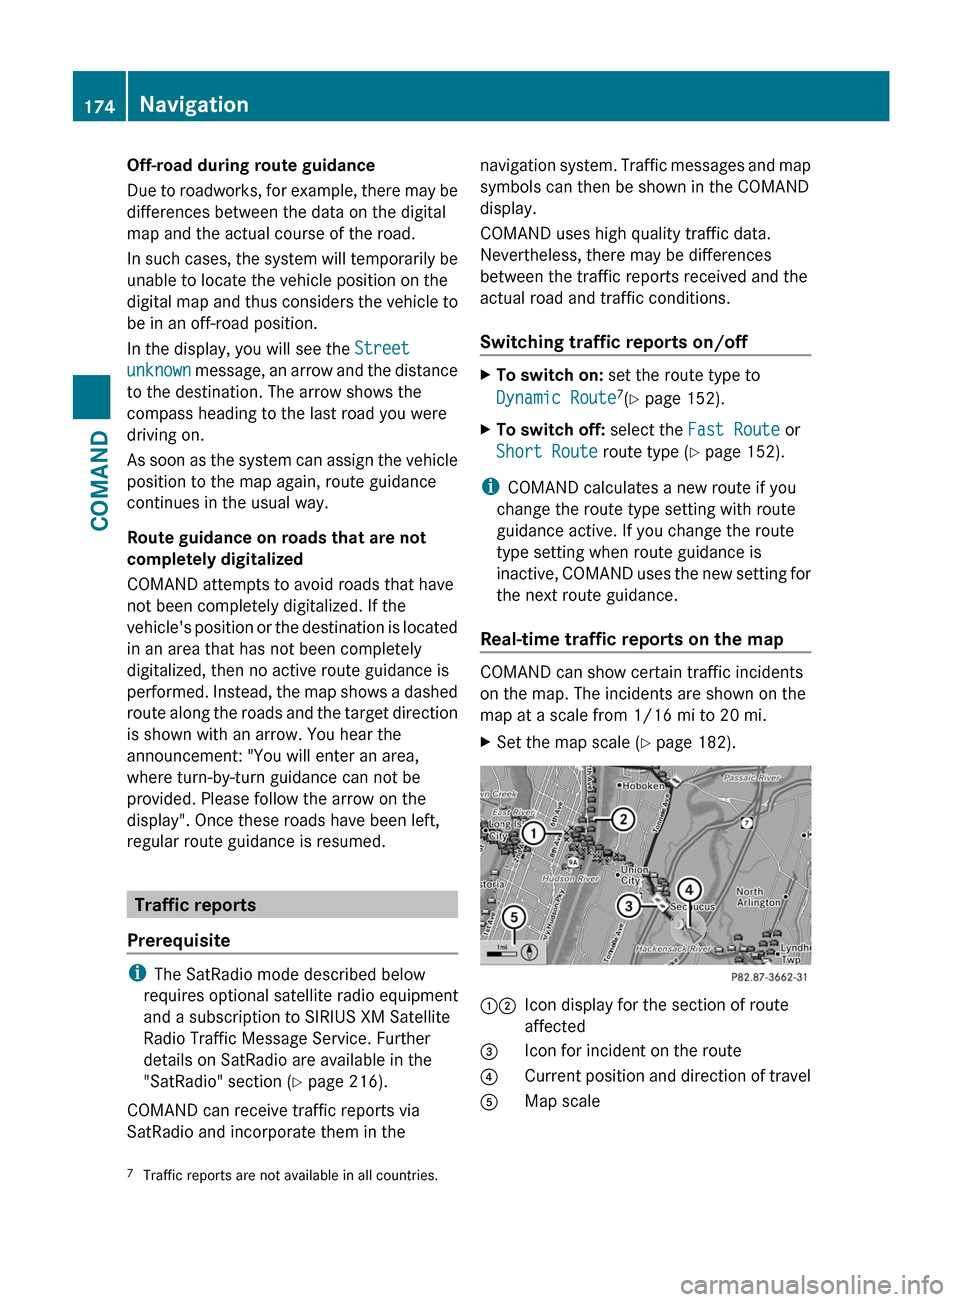
Real-time traffic reports on the map
COMAND can show certain traffic incidents
on the map. The incidents are shown on the
map at a scale from 1/16 mi to 20 mi.
XSet the map scale ( Y page 182).12Icon display for the section of route
affected3Icon for incident on the route4Current position and direction of travel5Map scale7 Traffic reports are not available in all countries.174NavigationCOMAND
Page 188 of 536
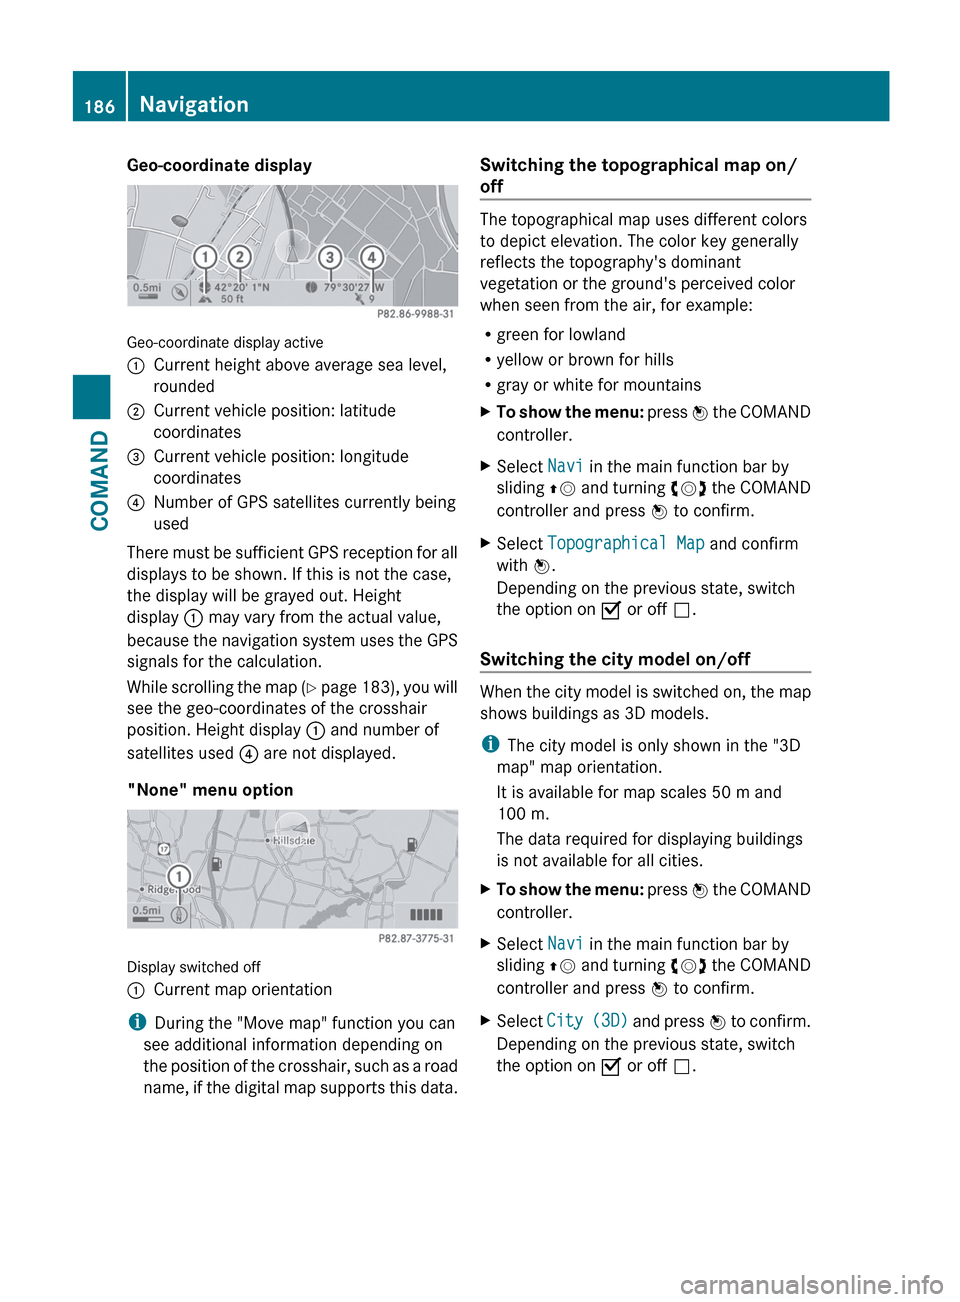
Geo-coordinate display
Geo-coordinate display active
:Current height above average sea level,
rounded;Current vehicle position: latitude
coordinates=Current vehicle position: longitude
coordinates?Number of GPS satellites currently being
used
There must be sufficient GPS reception for all
displays to be shown. If this is not the case,
the display will be grayed out. Height
display : may vary from the actual value,
because the navigation system uses the GPS
signals for the calculation.
While scrolling the map (Y page 183), you will
see the geo-coordinates of the crosshair
position. Height display : and number of
satellites used ? are not displayed.
"None" menu option
Display switched off
:Current map orientation
i During the "Move map" function you can
see additional information depending on
the position of the crosshair, such as a road
name, if the digital map supports this data.
Switching the topographical map on/
off
The topographical map uses different colors
to depict elevation. The color key generally
reflects the topography's dominant
vegetation or the ground's perceived color
when seen from the air, for example:
R green for lowland
R yellow or brown for hills
R gray or white for mountains
XTo show the menu: press W the COMAND
controller.XSelect Navi in the main function bar by
sliding ZV and turning cVd the COMAND
controller and press W to confirm.XSelect Topographical Map and confirm
with W.
Depending on the previous state, switch
the option on O or off ª.
Switching the city model on/off
When the city model is switched on, the map
shows buildings as 3D models.
i The city model is only shown in the "3D
map" map orientation.
It is available for map scales 50 m and
100 m.
The data required for displaying buildings
is not available for all cities.
XTo show the menu: press W the COMAND
controller.XSelect Navi in the main function bar by
sliding ZV and turning cVd the COMAND
controller and press W to confirm.XSelect City (3D) and press W to confirm.
Depending on the previous state, switch
the option on O or off ª.186NavigationCOMAND
Page 189 of 536
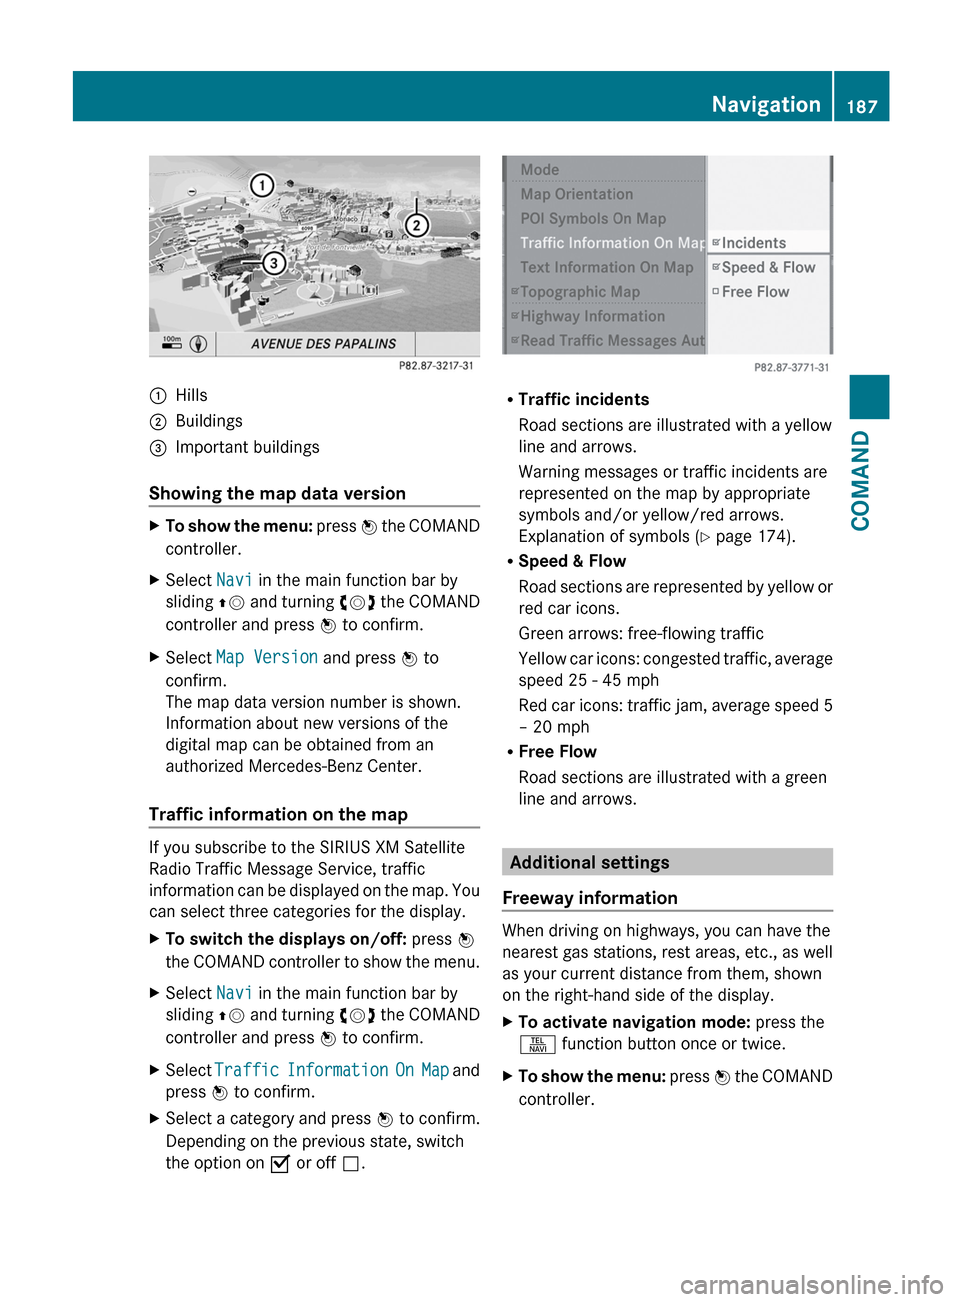
:Hills;Buildings=Important buildings
Showing the map data version
XTo show the menu: press W the COMAND
controller.XSelect Navi in the main function bar by
sliding ZV and turning cVd the COMAND
controller and press W to confirm.XSelect Map Version and press W to
confirm.
The map data version number is shown.
Information about new versions of the
digital map can be obtained from an
authorized Mercedes-Benz Center.
Traffic information on the map
If you subscribe to the SIRIUS XM Satellite
Radio Traffic Message Service, traffic
information can be displayed on the map. You
can select three categories for the display.
XTo switch the displays on/off: press W
the COMAND controller to show the menu.XSelect Navi in the main function bar by
sliding ZV and turning cVd the COMAND
controller and press W to confirm.XSelect Traffic Information On Map and
press W to confirm.XSelect a category and press W to confirm.
Depending on the previous state, switch
the option on O or off ª.
R
Traffic incidents
Road sections are illustrated with a yellow
line and arrows.
Warning messages or traffic incidents are
represented on the map by appropriate
symbols and/or yellow/red arrows.
Explanation of symbols ( Y page 174).
R Speed & Flow
Road sections are represented by yellow or
red car icons.
Green arrows: free-flowing traffic
Yellow car icons: congested traffic, average
speed 25 - 45 mph
Red car icons: traffic jam, average speed 5
– 20 mph
R Free Flow
Road sections are illustrated with a green
line and arrows.
Additional settings
Freeway information
When driving on highways, you can have the
nearest gas stations, rest areas, etc., as well
as your current distance from them, shown
on the right-hand side of the display.
XTo activate navigation mode: press the
S function button once or twice.XTo show the menu: press W the COMAND
controller.Navigation187COMANDZ
Page 190 of 536
XSelect Navi in the main function bar by
sliding ZV and turning cVd the COMAND
controller and press W to confirm.XSelect Highway Information and press
W to confirm.
Depending on the previous state, switch
the option on O or off ª.
SIRIUS XM service
Displaying SIRIUS XM service information
You can display the SIRIUS XM service
information.
XTo show the menu: press W the COMAND
controller.XSelect Navi in the main function bar by
sliding ZV and turning cVd the COMAND
controller and press W to confirm.XSelect SIRIUS Service and press W to
confirm.
Registering for the SIRIUS XM traffic
report service
XCall the traffic report provider's phone
number shown on the screen.
i You can also have the satellite service
activated online. To do so, visit the SIRIUS
XM Radio website at
http://www.sirius.com (USA) or
http://www.siriuscanada.com
(Canada).
Once the connection has been established:
XFollow the instructions of the operator.
The activation process may take up to ten
minutes.
If registration is not included when
purchasing the system, your credit card
details will be required to activate your
account.
Compass function
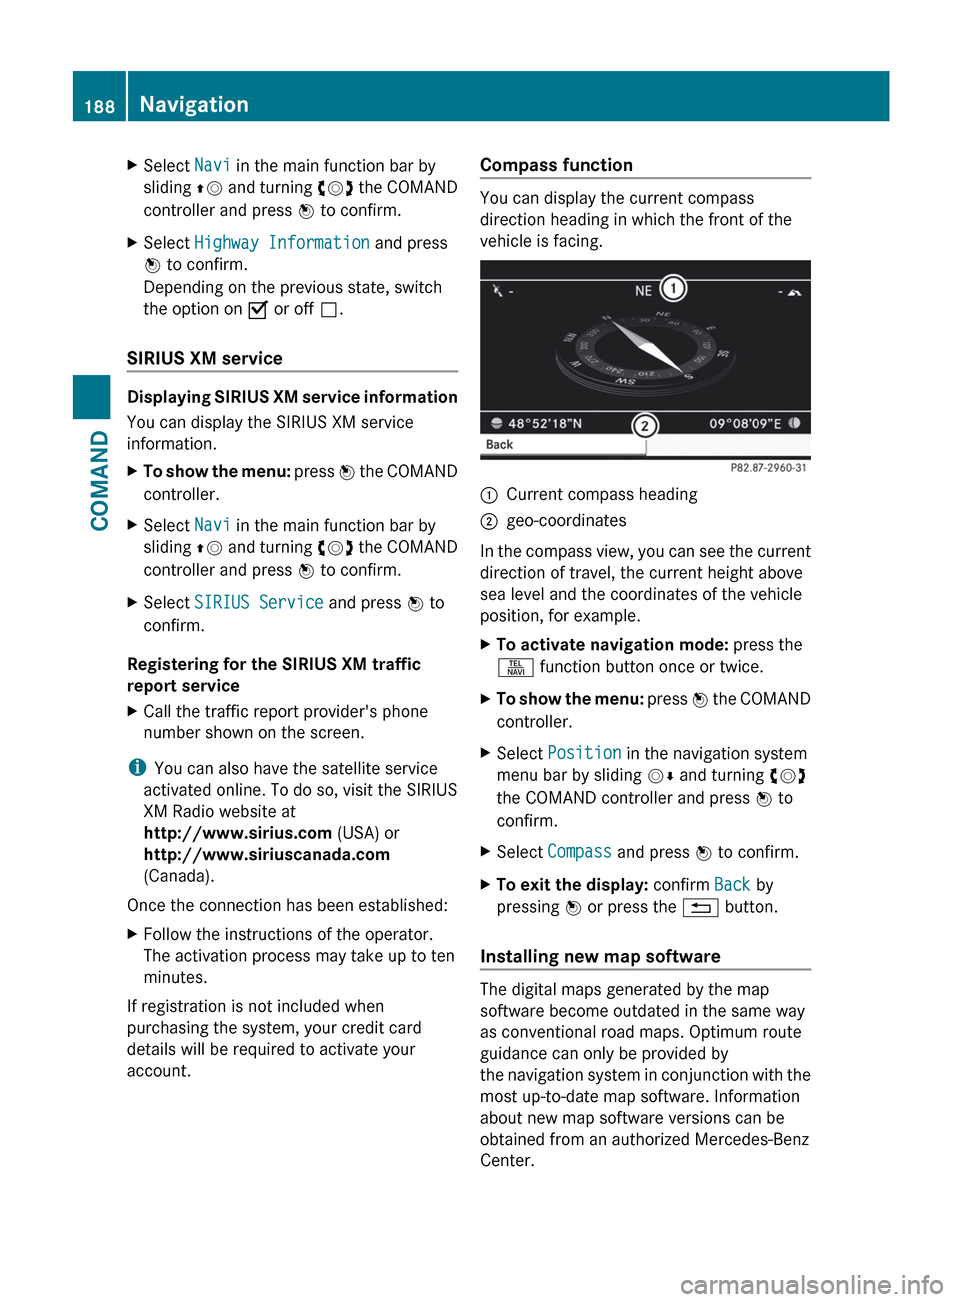
You can display the current compass
direction heading in which the front of the
vehicle is facing.
:Current compass heading;geo-coordinates
In the compass view, you can see the current
direction of travel, the current height above
sea level and the coordinates of the vehicle
position, for example.
XTo activate navigation mode: press the
S function button once or twice.XTo show the menu: press W the COMAND
controller.XSelect Position in the navigation system
menu bar by sliding VÆ and turning cVd
the COMAND controller and press W to
confirm.XSelect Compass and press W to confirm.XTo exit the display: confirm Back by
pressing W or press the % button.
Installing new map software
The digital maps generated by the map
software become outdated in the same way
as conventional road maps. Optimum route
guidance can only be provided by
the navigation system in conjunction with the
most up-to-date map software. Information
about new map software versions can be
obtained from an authorized Mercedes-Benz
Center.
188NavigationCOMAND
Page 219 of 536
Satellite radio mode may be temporarily
unavailable or interrupted for a variety of
reasons. These reasons include
environmental or topographical conditions
as well as other issues beyond the control
of Mercedes-Benz USA, LLC. Operation
may also be impaired in certain locations
(e.g. tunnels, multi-storey car parks or
within as well as close to buildings).
i SIRIUS XM Radio offers more than 130
digital-quality radio channels providing
100% commercial-free music, sport, news
and entertainment.
SIRIUS XM Radio employs a fleet of high-
performance satellites to broadcast around
the clock throughout the USA and Canada.
The satellite radio program is available for
a monthly fee. Details are available from
the SIRIUS XM Service Center and at
http://www.sirius.com (USA) or
http://www.siriuscanada.com
(Canada).
Registering satellite radioXSelect Audio in the main function bar by
sliding ZV and turning cVd the COMAND
controller and press W to confirm.XSelect Sat. Radio and press W to
confirm.
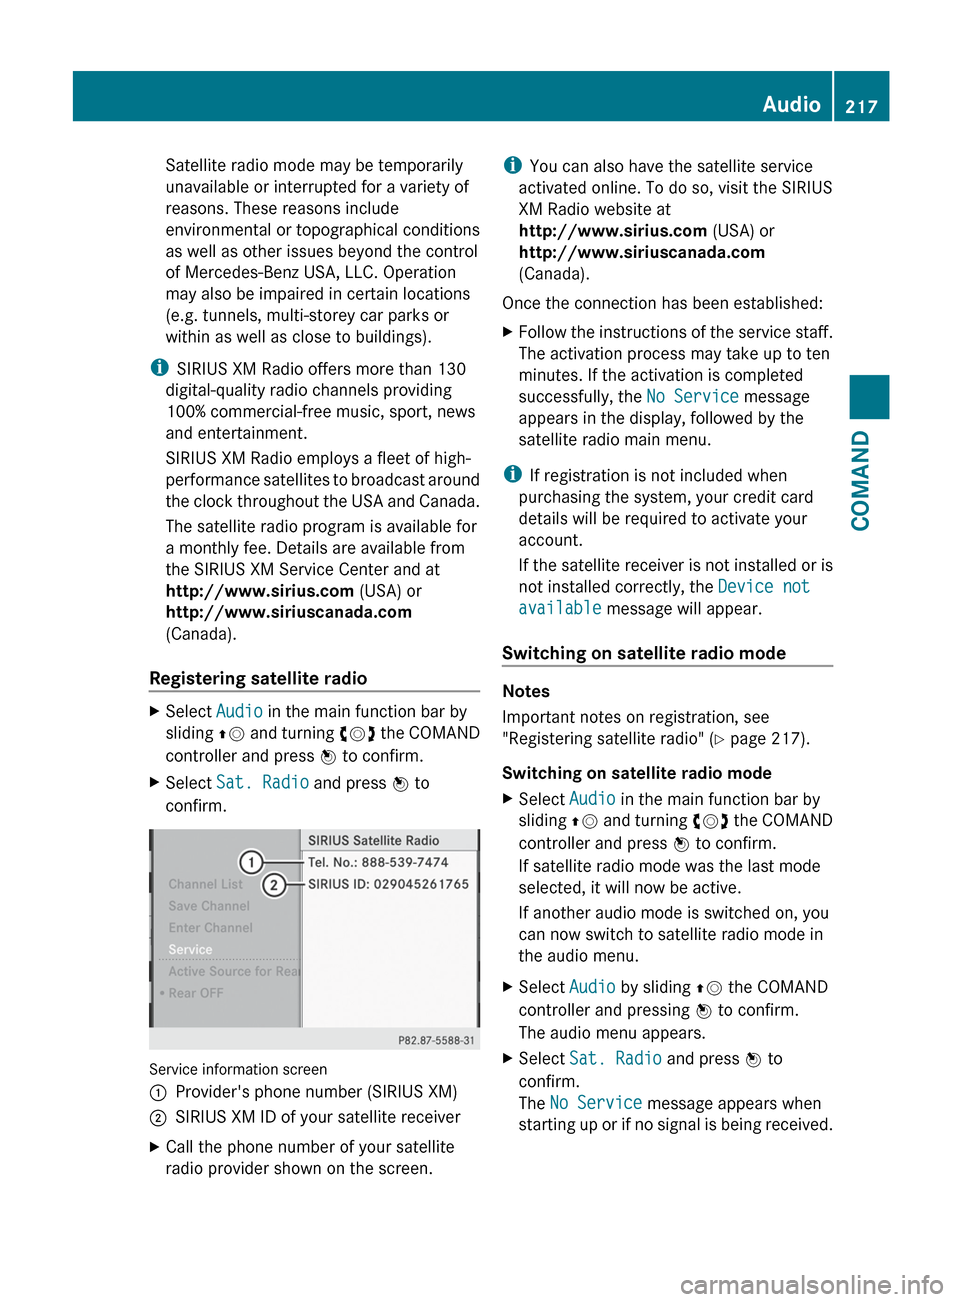
Service information screen
1Provider's phone number (SIRIUS XM)2SIRIUS XM ID of your satellite receiverXCall the phone number of your satellite
radio provider shown on the screen.i You can also have the satellite service
activated online. To do so, visit the SIRIUS
XM Radio website at
http://www.sirius.com (USA) or
http://www.siriuscanada.com
(Canada).
Once the connection has been established:XFollow the instructions of the service staff.
The activation process may take up to ten
minutes. If the activation is completed
successfully, the No Service message
appears in the display, followed by the
satellite radio main menu.
i If registration is not included when
purchasing the system, your credit card
details will be required to activate your
account.
If the satellite receiver is not installed or is
not installed correctly, the Device not
available message will appear.
Switching on satellite radio mode
Notes
Important notes on registration, see
"Registering satellite radio" ( Y page 217).
Switching on satellite radio mode
XSelect Audio in the main function bar by
sliding ZV and turning cVd the COMAND
controller and press W to confirm.
If satellite radio mode was the last mode
selected, it will now be active.
If another audio mode is switched on, you
can now switch to satellite radio mode in
the audio menu.XSelect Audio by sliding ZV the COMAND
controller and pressing W to confirm.
The audio menu appears.XSelect Sat. Radio and press W to
confirm.
The No Service message appears when
starting up or if no signal is being received.Audio217COMANDZ