ski MERCEDES-BENZ S-Class 2012 W221 Owner's Manual
[x] Cancel search | Manufacturer: MERCEDES-BENZ, Model Year: 2012, Model line: S-Class, Model: MERCEDES-BENZ S-Class 2012 W221Pages: 536, PDF Size: 25.27 MB
Page 57 of 536
PRE-SAFE®
(preventative occupant
protection)GWARNING
The PRE-SAFE ®
system reduces the impact of
an accident on vehicle occupants, as long as
their seat belts have been fastened correctly.
Although your vehicle is equipped with a PRE-
SAFE ®
system, the possibility of injury in the
event of an accident cannot be ruled out. You
should therefore always drive carefully and
adapt your driving style to the prevailing road,
weather and traffic conditions.
PRE-SAFE ®
takes preemptive measures to
protect occupants in certain hazardous
situations.
PRE-SAFE ®
intervenes:
R in emergency braking situations, e.g. if BAS
is activated or, in vehicles with DISTRONIC
PLUS, BAS PLUS intervenes powerfully
R if the radar sensor system detects an
imminent danger of collision in certain
situations (on vehicles with DISTRONIC
PLUS)
R in critical driving situations, e.g. when
physical limits are exceed and the vehicle
understeers or oversteers severely
PRE-SAFE ®
takes the following measures
depending on the hazardous situation
detected:
R the front seat belts are pre-tensioned.
R it adjusts the seats if the front-passenger
seat or the electrically adjustable outer
seats in the rear are in unfavorable
positions.
R vehicles with a multicontour seat or an
active multicontour seat: the air pressure
in the side bolsters on the seat cushion and
the side bolsters on the backrest is
increased.
R vehicles with multicontour seats in the
rear: the air pressure in the backrest side
bolsters of the outer seats in the rear is
increased.
R if the vehicle skids, the sliding sunroof/
panorama roof with power tilt/sliding
panel and the side windows are closed so
that only a small gap remains.
If the sliding sunroof, panorama roof with
power tilt/sliding panel or a side window is
obstructed during closing, the closing
procedure is stopped. The obstructed sliding
sunroof, panorama roof with power tilt/
sliding panel or side window opens again
slightly.
If the hazardous situation passes without
resulting in an accident, PRE-SAFE ®
slackens
the belt pretensioning. The air pressure in the
side bolsters on the multicontour seat/active
multicontour seat is reduced again. All
settings made by PRE-SAFE ®
can then be
reversed.
If the seat belts are not released:XMove the backrest back slightly, but only
when the vehicle is stationary.
The belt pretensioning is reduced and the
locking mechanism is released.GWARNING
Make sure that nobody can become trapped
as you adjust the seat.
! Make sure that there are no objects in the
footwell or behind the seats when resetting
the seats. There is a risk that the seats
and/or the objects could be damaged.
More information about seat-belt
adjustment, a convenience function
integrated into PRE-SAFE ®
, can be found in
the "Seat-belt adjustment" section
( Y page 60).
NECK-PRO head restraints/NECK-
PRO luxury head restraints
NECK-PRO head restraints/NECK-PRO luxury
head restraints increase protection of the
driver's and front-passenger's head and
Occupant safety55SafetyZ
Page 71 of 536
RADAPTIVE BRAKE
R PRE-SAFE ®
Brake
Important safety notes
GWARNING
The following factors increase the risk of
accidents:
R Excessive speed, especially in turns
R Wet and slippery road surfaces
R Following another vehicle too closely
The driving safety systems described in this
section cannot reduce these risks or prevent
the natural laws of physics from acting on the
vehicle. They cannot increase braking or
steering efficiency beyond that afforded by
the condition of the vehicle brakes and tires
or the traction afforded.
Only a safe, attentive, and skillful driver can
prevent accidents.
The capabilities of a vehicle equipped with the
driving safety systems described in this
section must never be exploited in a reckless
or dangerous manner which could jeopardize
the user's safety or the safety of others.
Always adjust your driving style to the
prevailing road and weather conditions and
keep a safe distance to other road users and
objects on the street.
If a driving system malfunctions, other driving
safety systems may also switch off. Observe
indicator and warning lamps that may come
on as well as messages in the multifunction
display that may appear.
GWARNING
HYBRID vehicles: It is imperative that you read
the HYBRID Supplemental Operating
Instructions included in your vehicle literature
portfolio. You may otherwise not receive all
necessary safety information and warning for
the operation of your vehicle.
i Please note that the driving safety
systems described only work as effectively
as possible when there is adequate contact
between the tires and the road surface. Pay
particular attention to the information
regarding tires, recommended minimum
tire tread depths etc. in the "Wheels and
tires" section ( Y page 490).
In wintry driving conditions, always use
winter tires (M+S tires) and if necessary,
snow chains. Only in this way will the
driving safety systems described in this
section work as effectively as possible.
ABS (Anti-lock Braking System)
Important safety notes
i Observe the "Important safety notes"
section ( Y page 69).
ABS regulates brake pressure in such a way
that the wheels do not lock when you brake.
This allows you to continue steering the
vehicle when braking.
ABS works from a speed of about
5 mph(8 km/h) upwards, regardless of road-
surface conditions. ABS works on slippery
surfaces, even when you only brake gently.
GWARNING
If the ABS malfunctions, other driving systems
such as the BAS or the ESP ®
are also switched
off. Observe indicator and warning lamps that
may come on as well as messages in the
multifunction display that may appear.
If the ABS malfunctions, the wheels may lock
during hard braking, reducing the steering
capability and extending the braking distance.
The ! warning lamp in the instrument
cluster lights up when the ignition is switched
on. It goes out when the engine is running.
Braking
If ABS intervenes when braking, you will feel
a pulsing in the brake pedal.
Driving safety systems69SafetyZ
Page 73 of 536
The brakes will work normally again if:
R you release the brake pedal.
R there is no longer any danger of a rear-end
collision.
R no obstacle is detected in front of your
vehicle.
BAS PLUS is then deactivated.
For BAS PLUS to assist you when driving, the
radar sensor system must be switched on and
operational, see "Radar sensor system" in the
index.GWARNING
BAS PLUS cannot always clearly identify
objects and complex traffic situations. BAS
PLUS cannot intervene in these cases.
There is a risk of an accident. Always pay
careful attention to the traffic situation and be
ready to brake.
In particular, the detection of obstacles can
be impaired if there is:
R dirt on the sensors or anything else
covering the sensors
R snow or heavy rain
R interference by other radar sources
R the possibility of strong radar reflections,
for example in parking garages
R a narrow vehicle traveling in front, e.g. a
motorbike
R a vehicle traveling in front on a different line
GWARNING
BAS PLUS does not react:
R to people or animals
R to oncoming vehicles
R to crossing traffic
R in curves
As a result, BAS PLUS cannot intervene in
critical situations. There is a risk of an
accident. Always pay careful attention to the
traffic situation and be ready to brake.
Following damage to the front end of the
vehicle, have the configuration and operation
of the radar sensors checked at a qualified
specialist workshop. This also applies to
collisions at low speeds where there is no
visible damage to the front of the vehicle.
If BAS PLUS is not available due to a
malfunction in the radar sensor system, the
brake system remains available with full
brake boosting effect and BAS.
ESP ®
(Electronic Stability Program)
Important safety notes
i See the "Important safety notes" section
( Y page 69).
If ESP ®
detects that the vehicle is deviating
from the direction desired by the driver, one
or more wheels are braked to stabilize the
vehicle. If necessary, the engine output is also
modified to keep the vehicle on the desired
course within physical limits. ESP ®
assists
the driver when pulling away on wet or
slippery roads. ESP ®
can also stabilize the
vehicle during braking.
If ESP ®
intervenes, the ÷ ESP®
warning
lamp flashes in the instrument cluster.
GWARNING
Under no circumstances should you
deactivate ESP ®
when the ÷ ESP®
warning lamp in the instrument cluster
flashes. Proceed as follows:
R when driving off, apply as little throttle as
possible.
R while driving, ease up on the accelerator
pedal.
R adapt your speed to suit the prevailing road
and weather conditions.
Failure to observe these guidelines could
cause the vehicle to skid. ESP ®
cannot
prevent accidents resulting from excessive
speed.
! The ignition must be switched off if the
vehicle is being towed with the front or rear
Driving safety systems71SafetyZ
Page 127 of 536
Cleaning instructions
! Do not touch the COMAND display. The
display has a very sensitive high-gloss
surface; there is a risk of scratching. If you
have to clean the screen, however, use a
mild cleaning agent and a soft, lint-free
cloth.
The display must be switched off and have
cooled down before you start cleaning. Clean
the display screen, when necessary, with a
commercially available microfiber cloth and
cleaning agent for TFT/LCD displays. Then,
dry the surface with a dry microfiber cloth.
Avoid using alcoholic thinners, gasoline or
abrasive cleaning agents. These could
damage the display surface. Do not apply
pressure to the display surface when cleaning
it, as this could cause irreversible damage.
Remote control
Overview
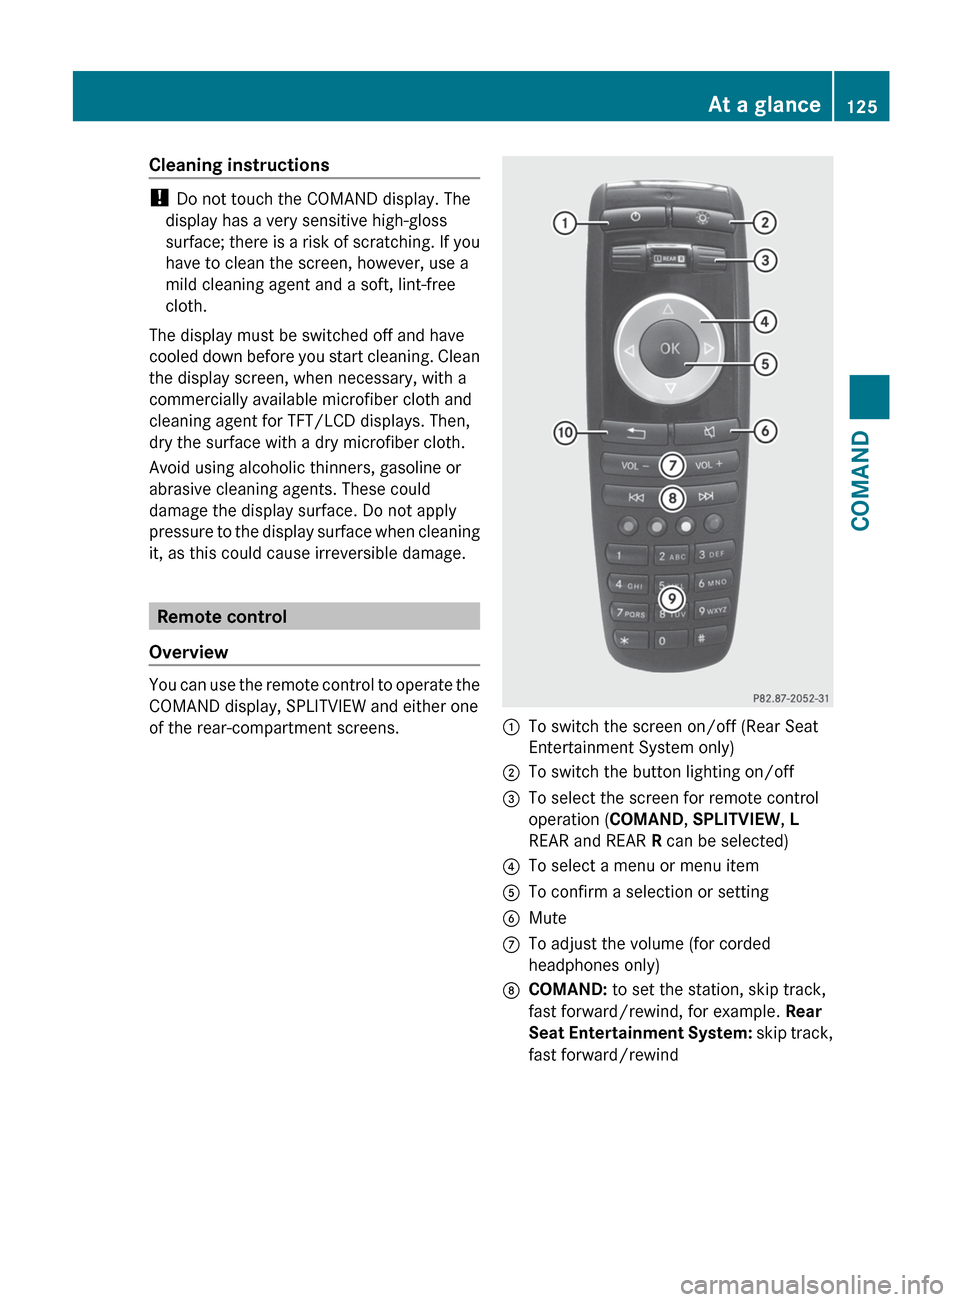
You can use the remote control to operate the
COMAND display, SPLITVIEW and either one
of the rear-compartment screens.
:To switch the screen on/off (Rear Seat
Entertainment System only);To switch the button lighting on/off=To select the screen for remote control
operation ( COMAND, SPLITVIEW , L
REAR and REAR R can be selected)?To select a menu or menu itemATo confirm a selection or settingBMuteCTo adjust the volume (for corded
headphones only)DCOMAND: to set the station, skip track,
fast forward/rewind, for example. Rear
Seat Entertainment System: skip track,
fast forward/rewindAt a glance125COMANDZ
Page 129 of 536
Functions with the E and F button
You can use the remote control to execute the same functions as the COMAND control panel.
ModeFunctionAudio modeSelects a station using the station search function ( Y page 212)Selects a track by skipping to a track ( Y page 224)Fast forward/rewind ( Y page 225)Video modeSelects a scene or chapter (video DVD mode) ( Y page 243)Fast-forward/rewind (video DVD mode) ( Y page 242)
Functions of the number keypad
You can use the remote control to execute the same functions as the COMAND control panel.
ModeFunctionAudio modeSelects stations via the station presets ( Y page 212)Sets stations by entering the frequency manually ( Y page 212)Stores stations manually ( Y page 213)Selects a track ( Y page 224)Selects a data medium via the media list ( Y page 224)Telephone modeTelephone number entry ( Y page 200)Character entryEnters characters (direct entry) ( Y page 130)Operating COMAND
Selecting a main function
Initial situation
You would like to change from the telephone
menu to the vehicle settings, for example.
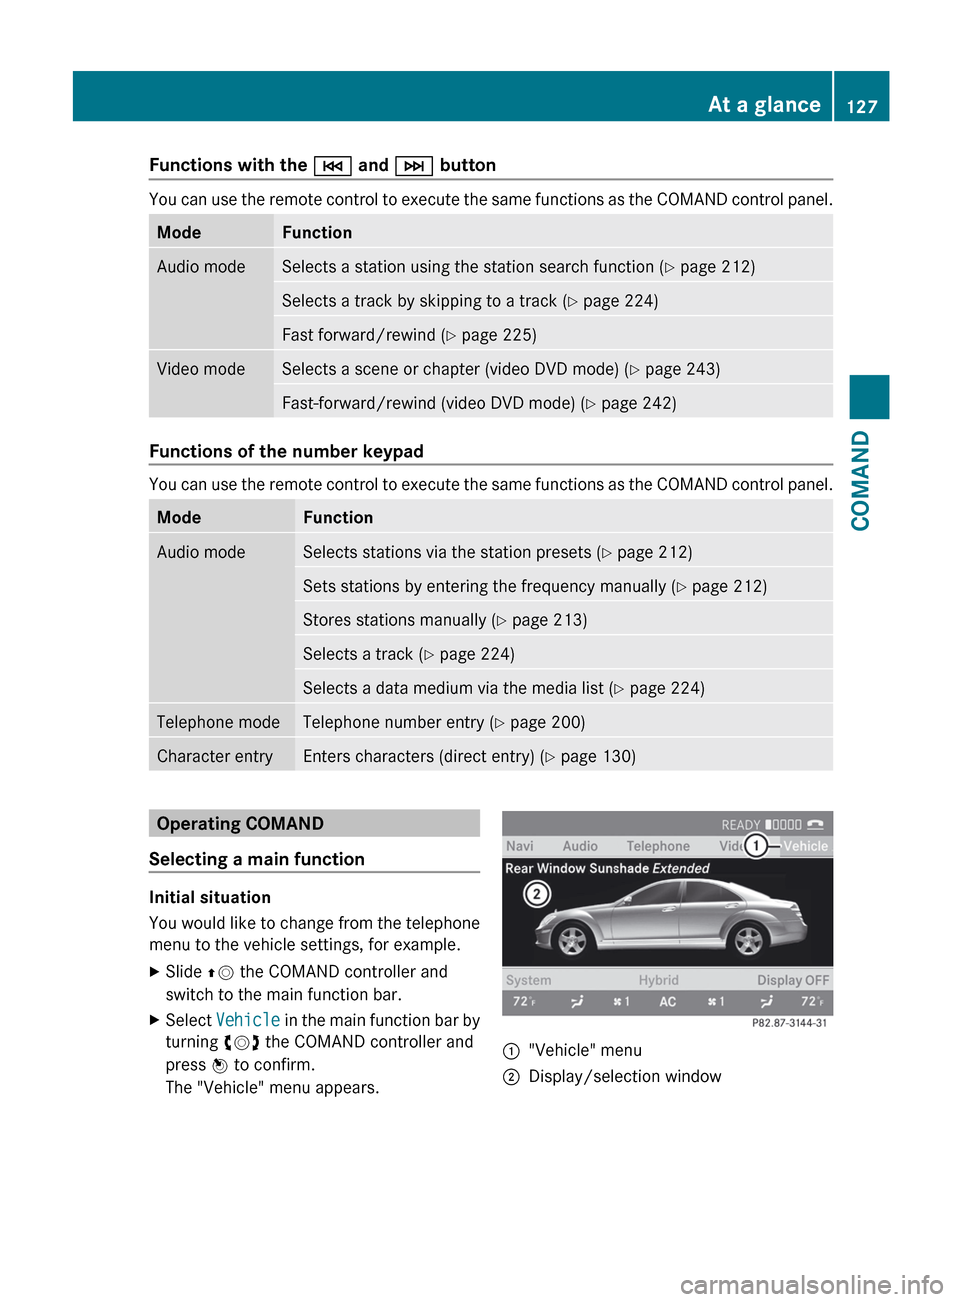
XSlide ZV the COMAND controller and
switch to the main function bar.XSelect Vehicle in the main function bar by
turning cVd the COMAND controller and
press W to confirm.
The "Vehicle" menu appears.:"Vehicle" menu;Display/selection windowAt a glance127COMANDZ
Page 142 of 536
Remote control
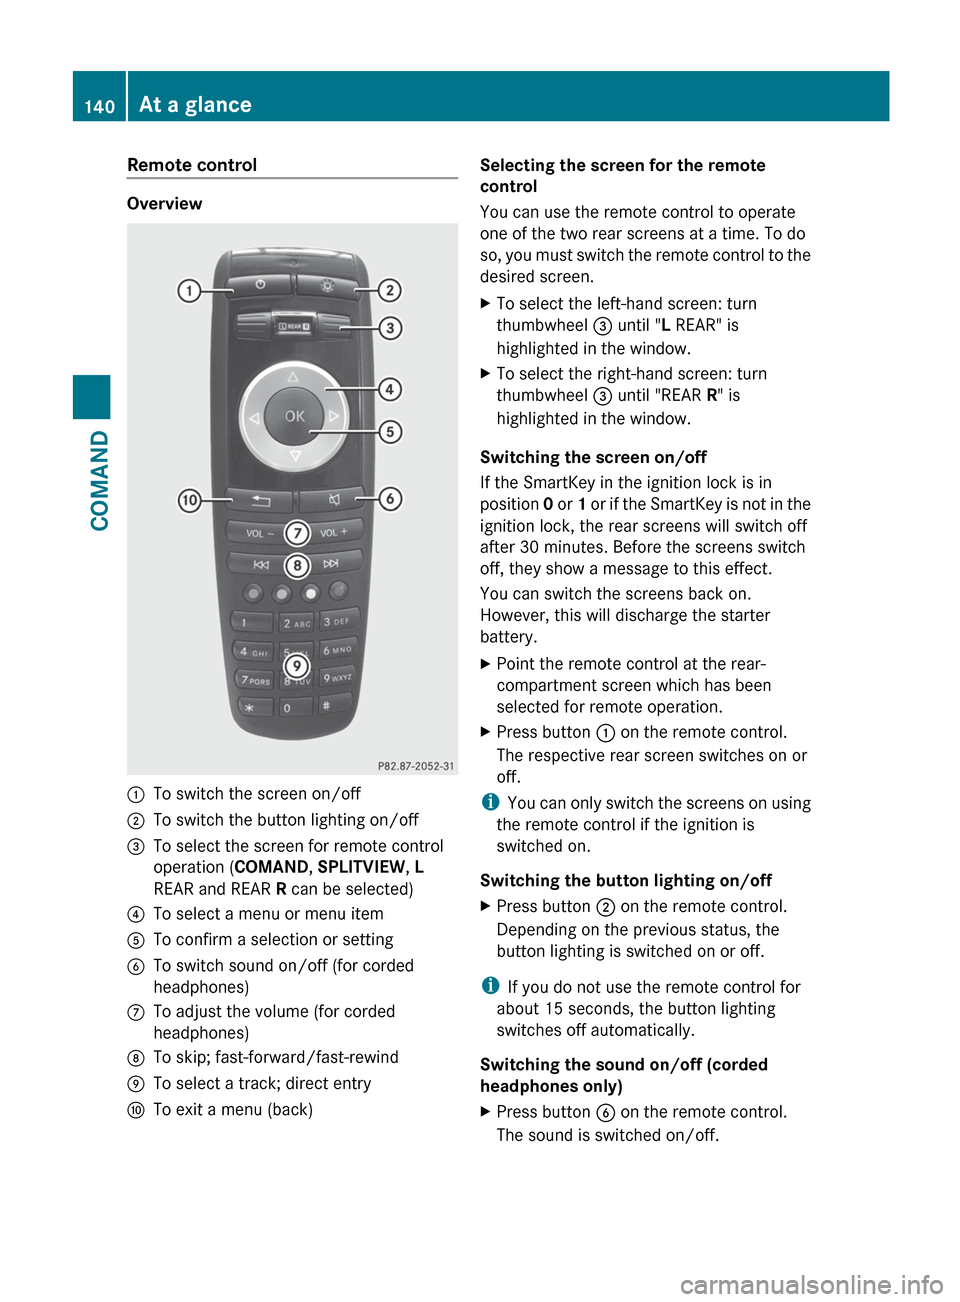
Overview
:To switch the screen on/off;To switch the button lighting on/off=To select the screen for remote control
operation ( COMAND, SPLITVIEW , L
REAR and REAR R can be selected)?To select a menu or menu itemATo confirm a selection or settingBTo switch sound on/off (for corded
headphones)CTo adjust the volume (for corded
headphones)DTo skip; fast-forward/fast-rewindETo select a track; direct entryFTo exit a menu (back)Selecting the screen for the remote
control
You can use the remote control to operate
one of the two rear screens at a time. To do
so, you must switch the remote control to the
desired screen.XTo select the left-hand screen: turn
thumbwheel = until " L REAR" is
highlighted in the window.XTo select the right-hand screen: turn
thumbwheel = until "REAR R" is
highlighted in the window.
Switching the screen on/off
If the SmartKey in the ignition lock is in
position 0 or 1 or if the SmartKey is not in the
ignition lock, the rear screens will switch off
after 30 minutes. Before the screens switch
off, they show a message to this effect.
You can switch the screens back on.
However, this will discharge the starter
battery.
XPoint the remote control at the rear-
compartment screen which has been
selected for remote operation.XPress button : on the remote control.
The respective rear screen switches on or
off.
i You can only switch the screens on using
the remote control if the ignition is
switched on.
Switching the button lighting on/off
XPress button ; on the remote control.
Depending on the previous status, the
button lighting is switched on or off.
i If you do not use the remote control for
about 15 seconds, the button lighting
switches off automatically.
Switching the sound on/off (corded
headphones only)
XPress button B on the remote control.
The sound is switched on/off.140At a glanceCOMAND
Page 148 of 536
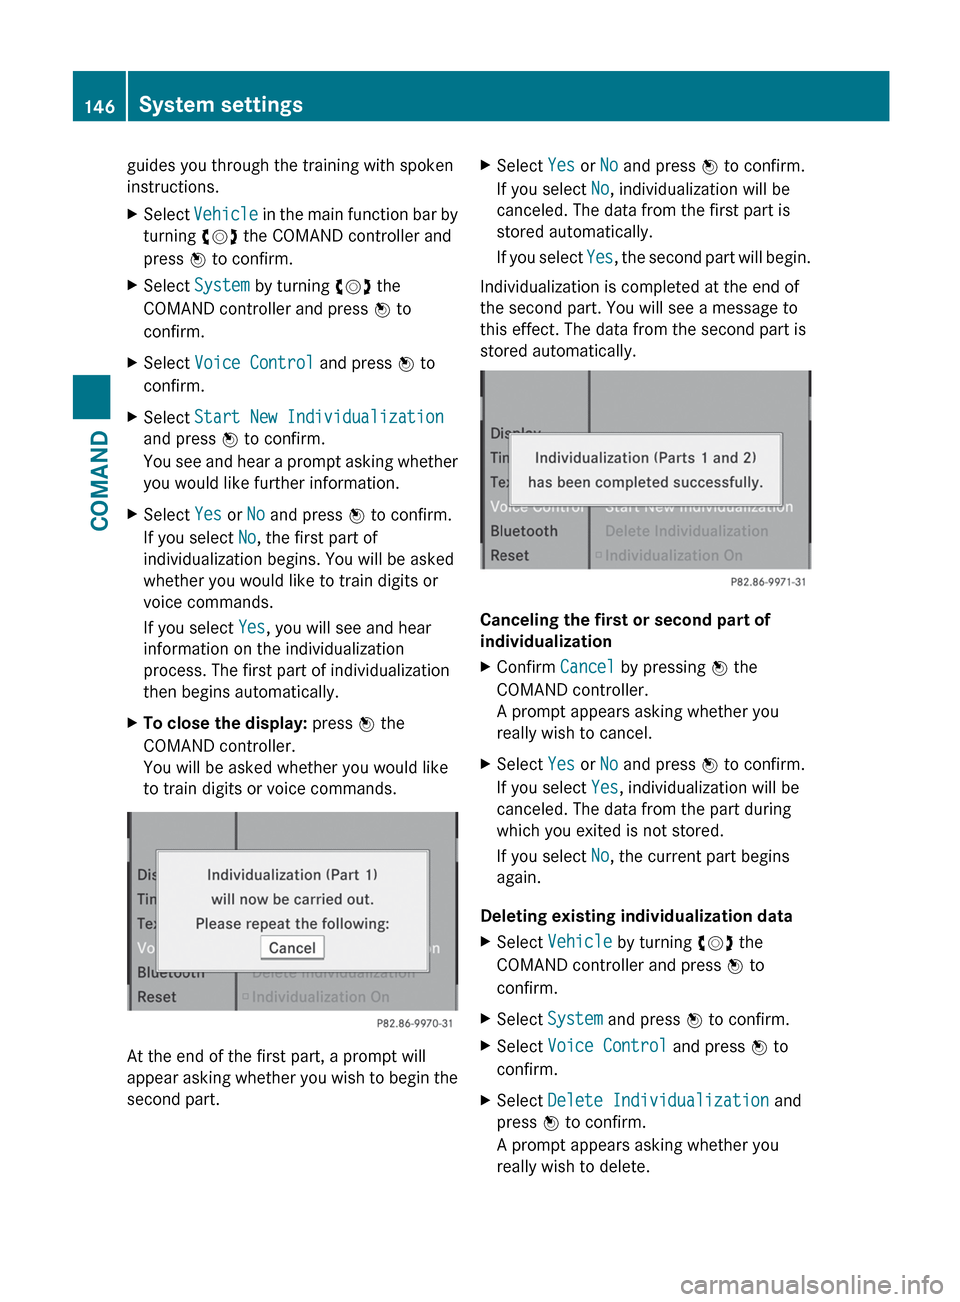
guides you through the training with spoken
instructions.XSelect Vehicle in the main function bar by
turning cVd the COMAND controller and
press W to confirm.XSelect System by turning cVd the
COMAND controller and press W to
confirm.XSelect Voice Control and press W to
confirm.XSelect Start New Individualization
and press W to confirm.
You see and hear a prompt asking whether
you would like further information.XSelect Yes or No and press W to confirm.
If you select No, the first part of
individualization begins. You will be asked
whether you would like to train digits or
voice commands.
If you select Yes, you will see and hear
information on the individualization
process. The first part of individualization
then begins automatically.XTo close the display: press W the
COMAND controller.
You will be asked whether you would like
to train digits or voice commands.
At the end of the first part, a prompt will
appear asking whether you wish to begin the
second part.
XSelect Yes or No and press W to confirm.
If you select No, individualization will be
canceled. The data from the first part is
stored automatically.
If you select Yes, the second part will begin.
Individualization is completed at the end of
the second part. You will see a message to
this effect. The data from the second part is
stored automatically.
Canceling the first or second part of
individualization
XConfirm Cancel by pressing W the
COMAND controller.
A prompt appears asking whether you
really wish to cancel.XSelect Yes or No and press W to confirm.
If you select Yes, individualization will be
canceled. The data from the part during
which you exited is not stored.
If you select No, the current part begins
again.
Deleting existing individualization data
XSelect Vehicle by turning cVd the
COMAND controller and press W to
confirm.XSelect System and press W to confirm.XSelect Voice Control and press W to
confirm.XSelect Delete Individualization and
press W to confirm.
A prompt appears asking whether you
really wish to delete.146System settingsCOMAND
Page 151 of 536
XTo confirm an entry in COMAND: select
¬ using the COMAND controller and
press W to confirm.
or
XSelect SEND on the telephone keypad.XEnter the same passcode into the
Bluetooth ®
device (see the operating
instructions for the respective device).
The device is authorized.
External authorization
If COMAND does not detect your
Bluetooth ®
device, this may be due to
particular security settings on your
Bluetooth ®
device. In this case, you can test
if your Bluetooth ®
device can find COMAND.
The Bluetooth ®
device name of COMAND is
"MB Bluetooth".
XSelect Update .XSelect Options by sliding VY the
COMAND controller and press W to
confirm.XSelect External Authorization and
press W to confirm.XStart the Bluetooth ®
scan process on the
Bluetooth ®
device (see separate operating
instructions of the respective device).XSelect COMAND ("MB Bluetooth").
i The order in which the passkey is entered
depends on the mobile phone.
XEnter the passkey on the Bluetooth ®
device
when prompted.XConfirm the Do you want to authorize
XX? question in COMAND with Yes.XEnter the passkey in COMAND.
Displaying the details of a Bluetooth ®
device
XIn the Bluetooth ®
device list, select the
desired device by turning cVd the
COMAND controller.XSelect Options by sliding VY the
COMAND controller and press W to
confirm.XSelect Details and press W to confirm.
The detailed display for this device
appears.XTo close the detailed view: turn cVd or
slide XVY the COMAND controller.
De-authorizing (de-registering) a
Bluetooth ®
device
Mercedes-Benz USA, LLC recommends de-
authorization in both COMAND and the
Bluetooth ®
device, e.g. the mobile phone.
Subsequent authorization may otherwise fail.
XIn the Bluetooth ®
device list, select the
authorized device by turning cVd the
COMAND controller.XSelect Options by sliding VY the
COMAND controller and press W to
confirm.XSelect De-authorize and press W to
confirm.
A prompt appears asking whether you
really wish to de-authorize this device.XSelect Yes or No and press W to confirm.
If you select Yes, the authorization for the
device will be revoked.
If you select No, the process will be aborted.
i
If a Bluetooth ®
device has been de-
authorized and is out of range, when a new
search is carried out it will not appear in the
Bluetooth ®
device list.
System language settings
This function allows you to determine the
language for the menu displays and the
navigation messages. The selected language
affects the characters available for entry.
When you set the system language, the
language of the Voice Control System will
System settings149COMANDZ
Page 152 of 536
change accordingly. If the selected language
is not supported by the Voice Control System,
"English" will be selected.XSelect Vehicle by turning cVd the
COMAND controller and press W to
confirm.XSelect System and press W to confirm.XSelect Language and press W to confirm.
The list of languages appears. The # dot
indicates the current setting.XSelect the language by turning cVd the
COMAND controller and press W to
confirm.
COMAND loads the selected language and
sets it.
Reset function
You can reset COMAND to the factory
settings. Amongst other things, this will
delete all personal data (e.g. station presets,
address book entries, entries in the
destination memory and in the list of previous
destinations in the navigation system).
Resetting is recommended before selling or
transferring ownership of your vehicle, for
example.
XSelect Vehicle in the main function bar by
turning cVd the COMAND controller and
press W to confirm.XSelect System by turning cVd the
COMAND controller and press W to
confirm.XSelect Reset and press W to confirm.
A prompt appears asking whether you wish
to reset.XSelect Yes or No and press W to confirm.
If you select No, the process will be aborted.
If you select Yes, another prompt appears
asking whether you really wish to reset.XSelect Yes or No and press W to confirm.
If you select Yes, a message will be shown.
COMAND is reset and restarted.If you select No, the process will be aborted.
Navigation
Introduction
Safety notes
GWARNING
For safety reasons, only enter a destination
when the vehicle is stationary. When the
vehicle is in motion, a passenger should enter
the destination. Study manual and select
route before driving.
Bear in mind that at a speed of just 30 mph
(approximately 50 km/h), your vehicle is
covering a distance of 44 feet (approximately
14 m) every second.
COMAND calculates the route to the
destination without taking account of the
following:
R Traffic lights
R Stop and right-of-way-signs
R Lane merging
R Parking or stopping prohibited areas
R Other road and traffic rules and regulations
R Narrow bridges
GWARNING
COMAND may give incorrect navigation
commands if the data in the digital map does
not correspond with the actual road/traffic
situation. Digital maps do not cover all areas
nor all routes within an area. For example, if
the traffic routing has been changed or the
direction of a one-way road has been
reversed.
For this reason, you must always observe
applicable road and traffic rules and
regulations during your journey. Road and
traffic rules and regulations always have
priority over the navigation commands
generated by the system.
150NavigationCOMAND
Page 158 of 536
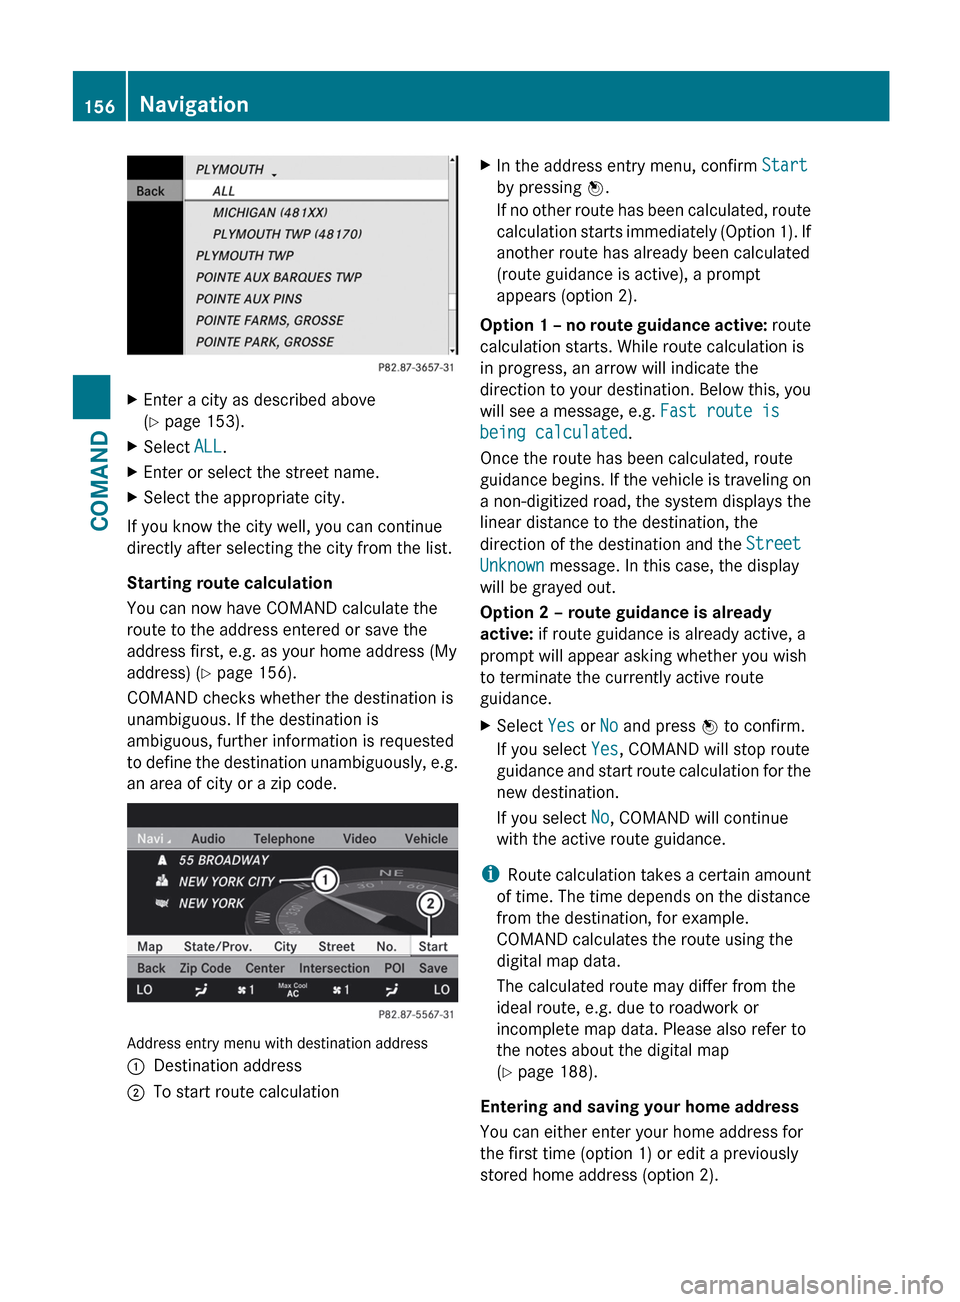
XEnter a city as described above
( Y page 153).XSelect ALL.XEnter or select the street name.XSelect the appropriate city.
If you know the city well, you can continue
directly after selecting the city from the list.
Starting route calculation
You can now have COMAND calculate the
route to the address entered or save the
address first, e.g. as your home address (My
address) ( Y page 156).
COMAND checks whether the destination is
unambiguous. If the destination is
ambiguous, further information is requested
to define the destination unambiguously, e.g.
an area of city or a zip code.
Address entry menu with destination address
:Destination address;To start route calculationXIn the address entry menu, confirm Start
by pressing W.
If no other route has been calculated, route
calculation starts immediately (Option 1). If
another route has already been calculated
(route guidance is active), a prompt
appears (option 2).
Option 1 – no route guidance active: route
calculation starts. While route calculation is
in progress, an arrow will indicate the
direction to your destination. Below this, you
will see a message, e.g. Fast route is
being calculated .
Once the route has been calculated, route
guidance begins. If the vehicle is traveling on
a non-digitized road, the system displays the
linear distance to the destination, the
direction of the destination and the Street
Unknown message. In this case, the display
will be grayed out.
Option 2 – route guidance is already
active: if route guidance is already active, a
prompt will appear asking whether you wish
to terminate the currently active route
guidance.
XSelect Yes or No and press W to confirm.
If you select Yes, COMAND will stop route
guidance and start route calculation for the
new destination.
If you select No, COMAND will continue
with the active route guidance.
i Route calculation takes a certain amount
of time. The time depends on the distance
from the destination, for example.
COMAND calculates the route using the
digital map data.
The calculated route may differ from the
ideal route, e.g. due to roadwork or
incomplete map data. Please also refer to
the notes about the digital map
( Y page 188).
Entering and saving your home address
You can either enter your home address for
the first time (option 1) or edit a previously
stored home address (option 2).
156NavigationCOMAND