key battery MERCEDES-BENZ S-Class 2013 W221 Owner's Guide
[x] Cancel search | Manufacturer: MERCEDES-BENZ, Model Year: 2013, Model line: S-Class, Model: MERCEDES-BENZ S-Class 2013 W221Pages: 542, PDF Size: 7.97 MB
Page 315 of 542
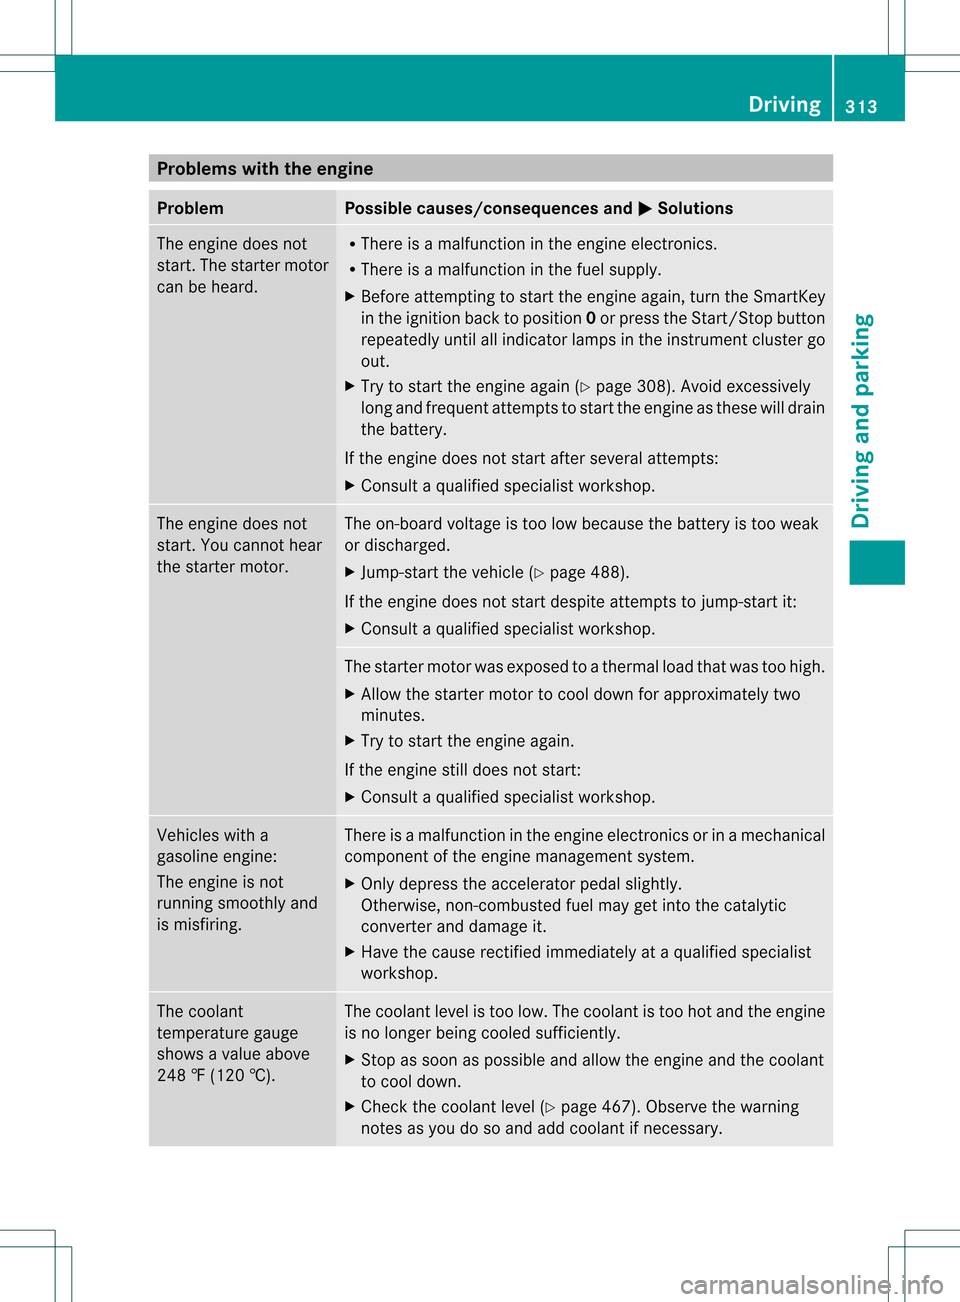
Problems with the engine
Problem Possible causes/consequences and
0004 Solutions
The engine does not
start. The starter motor
can be heard. R
There is a malfunction in the engine electronics.
R There is a malfunction in the fuel supply.
X Before attempting to start the engine again, turn the SmartKey
in the ignition back to position 0or press the Start/Stop button
repeatedly until all indicator lamps in the instrumen tcluster go
out.
X Try to start the engine again (Y page 308). Avoid excessively
long and frequent attempts to start the engine as these will drain
the battery.
If the engine does not start after several attempts:
X Consult a qualified specialist workshop. The engine does not
start. You cannot hear
the starter motor. The on-board voltage is too low because the battery is too weak
or discharged.
X
Jump-star tthe vehicle (Y page 488).
If the engine does not start despite attempts to jump-start it:
X Consult a qualified specialist workshop. The starter motor was exposed to a thermal load that was too high.
X
Allow the starter motor to cool down for approximately two
minutes.
X Try to start the engine again.
If the engine still does not start:
X Consult a qualified specialist workshop. Vehicles with a
gasoline engine:
The engine is not
running smoothly and
is misfiring. There is a malfunction in the engine electronics or in a mechanical
component of the engine management system.
X Only depress the accelerator pedal slightly.
Otherwise, non-combusted fuel may get into the catalytic
converter and damage it.
X Have the cause rectified immediately at a qualified specialist
workshop. The coolant
temperature gauge
shows a value above
248 ‡ (120 †). The coolant level is too low. The coolant is too hot and the engine
is no longer being cooled sufficiently.
X Stop as soon as possible and allow the engine and the coolant
to cool down.
X Check the coolant level (Y page 467). Observe the warning
notes as you do so and add coolant if necessary. Driving
313Driving and parking Z
Page 326 of 542
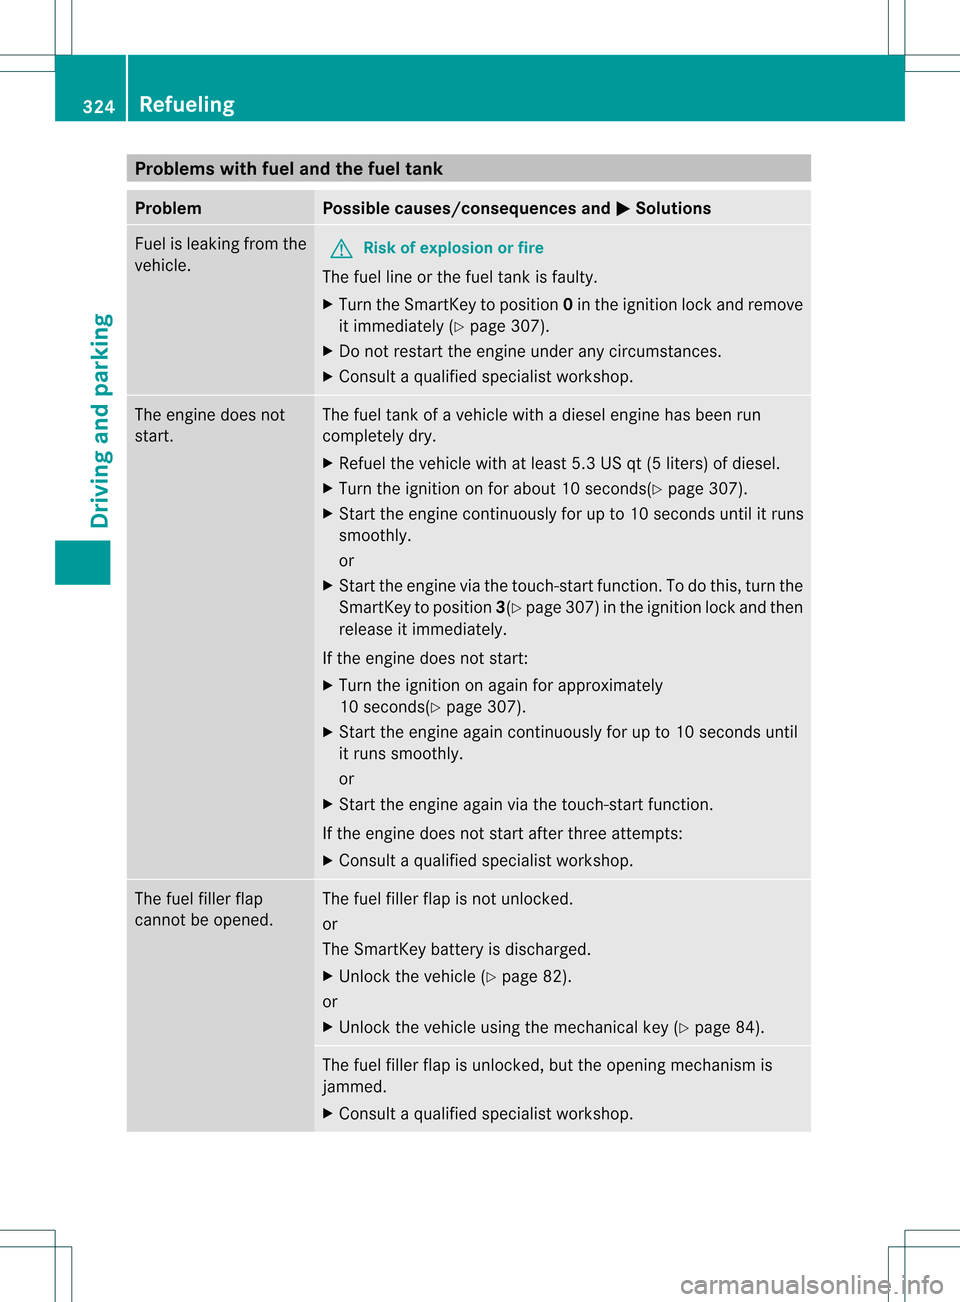
Problems with fuel and the fuel tank
Problem Possible causes/consequences and
0004 Solutions
Fuel is leaking from the
vehicle.
G
Risk of explosion or fire
The fuel line or the fuel tank is faulty.
X Turn the SmartKey to position 0in the ignition lock and remove
it immediately (Y page 307).
X Do not restart the engine under any circumstances.
X Consult a qualified specialist workshop. The engine does not
start. The fuel tank of a vehicle with a diesel engine has been run
completely dry.
X
Refuel the vehicle with at least 5.3 US qt (5 liters) of diesel.
X Turn the ignition on for about 10 seconds(Y page 307).
X Start the engine continuously for up to 10 seconds until it runs
smoothly.
or
X Start the engine via the touch-start function. To do this, turn the
SmartKey to position 3(Ypage 307) in the ignition lock and then
release it immediately.
If the engine does not start:
X Turn the ignition on again for approximately
10 seconds(Y page 307).
X Start the engine again continuously for up to 10 seconds until
it runs smoothly.
or
X Start the engine again via the touch-start function.
If the engine does not start after three attempts:
X Consult a qualified specialist workshop. The fuel filler flap
cannot be opened. The fuel filler flap is not unlocked.
or
The SmartKey battery is discharged.
X
Unlock the vehicle (Y page 82).
or
X Unlock the vehicle using the mechanical key (Y page 84).The fuel filler flap is unlocked, but the opening mechanism is
jammed.
X
Consult a qualified specialist workshop. 324
RefuelingDriving and parking
Page 349 of 542
R
the electrical syste minthe engine
compartment, the battery or the fuses are
tampered with.
R the battery is disconnected.
If you leave the vehicle or park it, deactivate
the HOLD function and secure the vehicle
against rolling away. AIRMATIC
Vehicle level Important safety notes
Your vehicle regulates its height
automatically
.All-round level control ensures
the best possible suspension and constant
ground clearance, even with a laden vehicle.
When you drive fast, the vehicle is lowered
automatically to improve driving safety and to
reduce fuel consumption.
The following vehicle levels are possible on
vehicles without 4MATIC:
R Normal
R raised: the vehicle is raised by about 1in
(25 mm) when compared with the normal
level
R lowered: the vehicle is lowered by about
0.60 in (15 mm) when compared with the
normal level
The following vehicle levels are possible on
vehicles with 4MATIC:
R normal: in Comfor tmode, the vehicle is
raised by about 0.40i n (10mm) when
compared with Sport mode
R raised: in Comfort mode, the vehicle is
raised by about 0.60 in (15 mm) and in
Sport mode by about 1 in (25 mm) when
compared with normal level
R lowered: the vehicle is lowered by about
0.40 in (10mm) when compared with the
normal level
The "Normal" and "Raised" vehicle levels can
be set manually. The "Lowered” vehicle level is set
automatically:
R
in vehicles withou t4MATIC at speeds
above 60 mph (100 km/h)
R in vehicles with 4MATIC at speeds above
50 mph (80 km/h).
Setting the vehicle level
Select the "Normal" setting for normal road
surfaces and "Raised" for driving with snow
chains or on particularly poor road surfaces.
Your selection remains stored even if you
remove the SmartKey from the ignition lock. G
WARNING
To help avoid personal injury, keep hands and
feet away from wheel housing area, and stay
away from under the vehicle when lowering
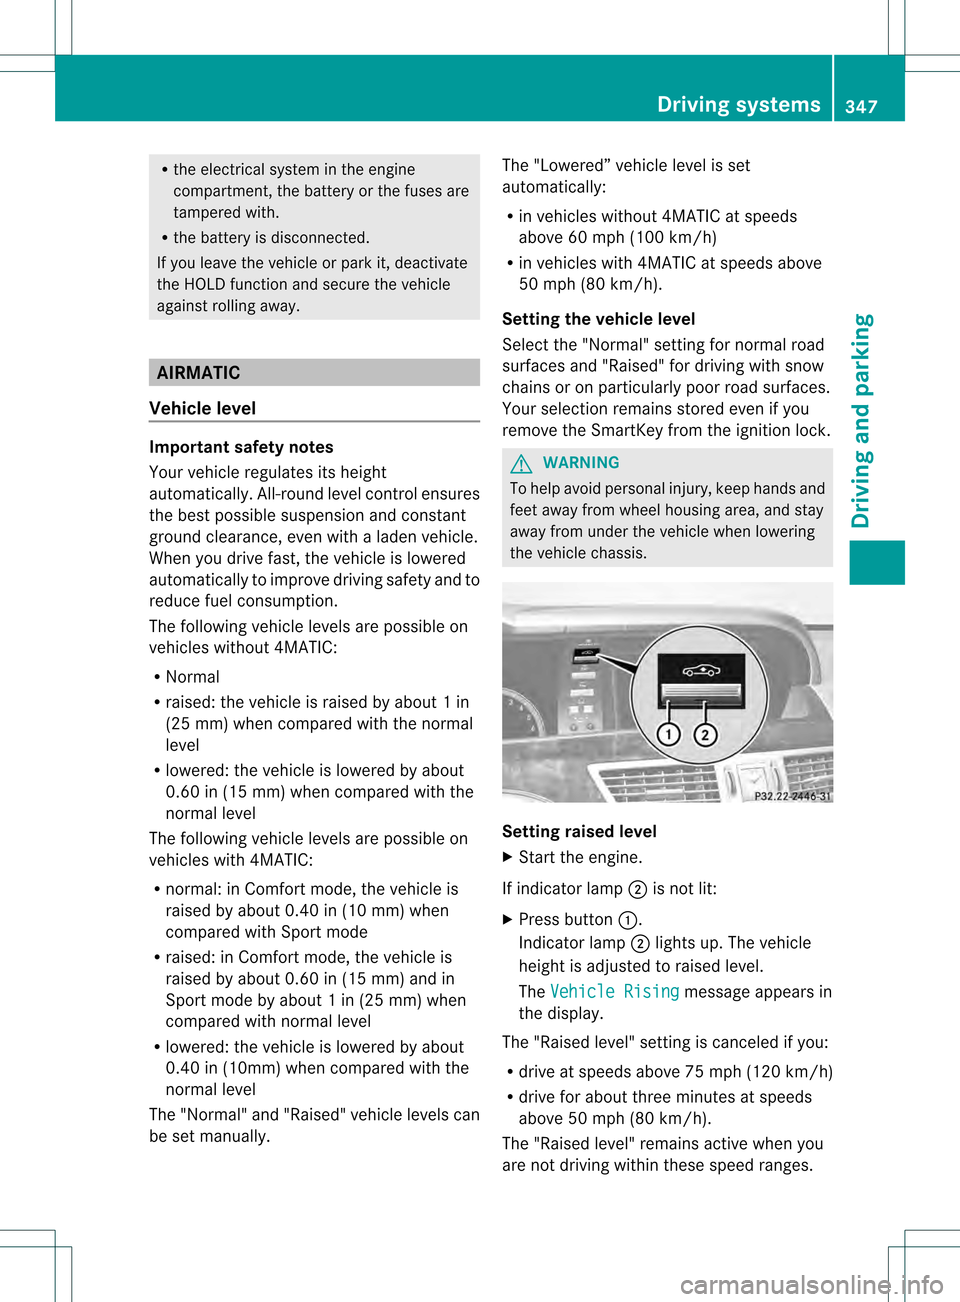
the vehicle chassis. Setting raised level
X
Start the engine.
If indicator lamp 0003is not lit:
X Press button 0002.
Indicator lamp 0003lights up. The vehicle
height is adjusted to raised level.
The Vehicle Rising message appears in
the display.
The "Raised level" setting is canceled if you:
R drive at speeds above 75 mph (120 km/h)
R drive for about three minutes at speeds
above 50 mph (80 km/h).
The "Raised level" remains active whe nyou
are not driving within these speed ranges. Driving systems
347Driving and parking Z
Page 426 of 542
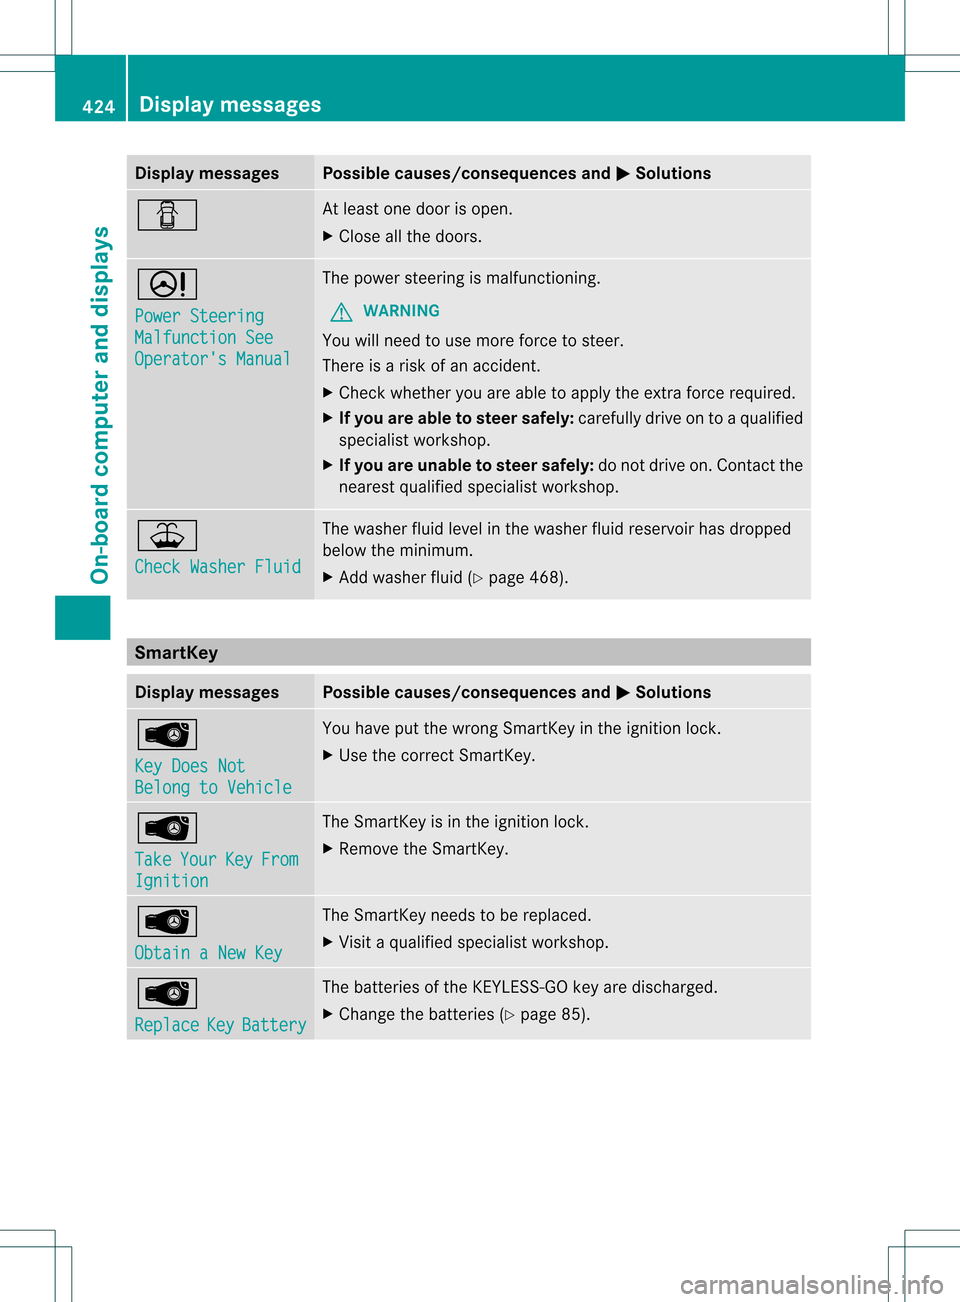
Display messages Possible causes/consequences and
0004 Solutions
0002 At leas
tone door is open.
X Close all the doors. 0003
Power Steering
Malfunction See
Operator's Manual The powe
rsteering is malfunctioning.
G WARNING
You will need to use more force to steer.
There is a risk of an accident.
X Check whether you are able to apply the extra force required.
X If yo uare able to steer safely: carefully drive on to a qualified
specialis tworkshop.
X If you are unable to steer safely: do not drive on. Contact the
nearest qualified specialist workshop. 0019
Check Washer Fluid The washer fluid level in the washer fluid reservoir has dropped
below the minimum.
X
Add washer fluid (Y page 468).SmartKey
Display messages Possible causes/consequences and
0004 Solutions
0002
Key Does Not
Belong to Vehicle You have put the wrong SmartKey in the ignition lock.
X
Use the correct SmartKey. 0002
Take
Your Key From
Ignition The SmartKey is in the ignition lock.
X
Remove the SmartKey. 0002
Obtain a New Key The SmartKey needs to be replaced.
X
Visit a qualified specialist workshop. 0002
Replace
Key Battery The batteries of the KEYLESS-GO key are discharged.
X
Change the batteries (Y page 85).424
Display messagesOn-board computer and displays
Page 449 of 542

If childre
nopen a door, they could injure other
persons or get out of the vehicle and injure
themselves or be injured by following traffic.
Do not expose the child restraint system to
direct sunlight .The child restraint system's
metal parts, for example, could become very
hot, and the child could be burned on these
parts. G
WARNING
Never touch the heating element or sides of
the lighter; they are extremely hot. Hold the
knob only.
Make sure any children traveling with you do
not injure themselves or start a fire with the
hot cigarette lighter. Center console, front
X
Turn the SmartKey to position 2in the
ignition lock.
X To open: slide cover 0002forwards until it
engages.
X Press in cigarette lighter 0003.
Cigarette lighter 0003will pop out
automatically when the heating element is
red-hot.
X To close: press cover 0002briefly at the
front.
The cover moves back. Center console, rear compartment
X
Press in cigarette lighter 0002.
Cigarette lighter 0002will pop out
automatically when the heating element is
red-hot. 12
Vsockets
Points to observe before use The sockets can be used for accessories with
a maximum draw of 180 W (15 A).
Accessories include such items as lamps or
chargers for mobile phones.
If you use the sockets for long periods when
the engine is switched off
,the battery may
discharge.
X Turn the SmartKey to position 1in the
ignition lock.
i An emergency cut-out ensures that the
on-board voltage does not drop too low. If
the on-board voltage is too low, the power
to the sockets is automatically cut. This
ensures that there is sufficient power to
start the engine. Features
447Stowage and features Z
Page 473 of 542
position
Pautomatically and locks the
wheels. You can preven tthis by shifting
the automatic transmission to N
beforehand.
R Vehicles with KEYLESS-GO:
Do not open the driver's door or front-
passenger door when the engine is
switched off. Otherwise, the automatic
transmission selects park position P
automatically and locks the wheels.
Observe the following to make sure that the
automatic transmission stays in position N:
X Make sure the vehicle is stationary and the
ignition is switched off.
X Turn the key to position 2(Ypage 307) in
the ignition lock.
Use the SmartKey instead of the Start/
Stop button on vehicles with KEYLESS-GO.
X Depress and hold the brake pedal.
X Shift the automatic transmission to
position N.
X Release the brake pedal.
X Release the electric parking brake.
X Switch off the ignition and leave the
SmartKey in the ignition lock.
! Make sure that:
R the side windows and the sliding sunroof
are fully closed.
R the ventilation/heating is switched off
(the OFF button has been pressed).
R the windshield wiper switch is in position
0.
Otherwise, the vehicle might be damaged.
After using an automatic car wash, wipe off
wax from the windshield and the wiper
blades. This will prevent smears and reduce
wiping noises caused by residue on the
windshield.
Washing by hand In some countries, washing by hand is only
allowed at specially equipped washing bays. Observe the legal requirements in all
countries concerned.
X
Do not use hot water and do not wash the
vehicle in direct sunlight.
X Use a soft sponge to clean.
X Use a mild cleaning agent, such as a car
shampoo approved by Mercedes-Benz.
X Thoroughly hose down the vehicle with a
gentle jet of water.
X Do not point the water jet directly towards
the air inlet.
X Use plenty of water and rinse out the
sponge frequently.
X Rinse the vehicle with clean water and dry
thoroughly with a chamois.
X Do not let the cleaning agent dry on the
paintwork.
When using the vehicle in winter, remove all
traces of road salt deposits carefully and as
soon as possible.
Powerw ashers G
WARNING
Do not use power washers with circular-jet
nozzles (dirt grinders) to clea nyour vehicle, in
particular the tires. You could otherwise
damage the tires and cause an accident.
! Always maintain a distance of at least
11.8 in (30 cm) between the vehicle and the
power washer nozzle. Information about
the correc tdistance is available fro mthe
equipment manufacturer.
Move the power washer nozzle around
when cleaning your vehicle.
Do not aim directly at any of the following:
R tires
R door gaps, roof gaps, joints, etc.
R electrical components
R battery
R connectors
R lights
R seals Care
471Maintenance and care Z
Page 488 of 542
R
you switch of fthe engine and remove the
SmartKey. On vehicles with KEYLESS-
GO, ensure that the ignition is switched
off. Check that all the indicator lamps in
the instrumentc luster are off.Otherwise,
electroni ccomponents, such as the
alternator, may be damaged.
R you first remove the negative terminal
clamp and then the positive terminal
clamp. Never swap the terminal clamps.
Otherwise, the vehicle's electronic
system may be damaged.
R the transmission is locked in position P
after disconnecting the battery. The
vehicle is secured against rolling away.
You can then no longer move the vehicle.
The battery and the cover of the positive
terminal clamp must be installed securely
during operation.
In order for the battery to achieve the
maximum possible service life, it must always
be sufficiently charged.
Like other batteries, the vehicle battery may
discharge over time if you do not use the
vehicle. In this case, have the battery
disconnected at a qualified specialist
workshop. You can also charge the battery
with a charger recommended by Mercedes-
Benz.C ontact a qualified specialist workshop
for further information.
Have the battery charge level checked more
frequently if you use the vehicle mainly for
short trips or if you leave it standing idle for
a lengthy period. Consult a qualified specialist
workshop if you wish to leave your vehicle
parked for a long period of time.
i Remove the SmartKey if you park the
vehicle and do not require any electrical
consumers. The vehicle will then use very
little energy, thus conserving battery
power. Charging the battery
G
WARNING
Never charge a battery still installed in the
vehicle unless a battery charger unit approved
by Mercedes-Benz is being used. Gases may
escape during charging and cause explosions
that may result in paint damage, corrosion or
personal injury.
Ab attery charge runit specially adapted for
Mercedes-Benz vehicles and tested and
approved by Mercedes-Benz is available as an
accessory. It permits the charging of the
battery in its installed position. Contact an
authorized Mercedes-Benz Center for further
informatio nand availability.
Charge the battery in accordance with the
separate instructions for the battery charger. G
WARNING
There is a ris kofacid burns during the
charging process due to the gases which
escape from the battery .Do not lean over the
battery during the charging process. G
WARNING
Battery acid is caustic. Avoid contact with the
skin, eyes or clothing.
! Only charge the installed battery with a
battery charger which has been tested and
approved by Mercedes-Benz. These battery
chargers allow the battery to be charged
while still installed in the vehicle.
! Only use battery chargers with a
maximum charging voltage of 14.8 V.
! Only charge the battery using the jump-
starting connection point.
The jump-starting connection point is in the
engine compartment (Y page 488).
X Open the hood (Y page 462).
X Connect the battery charger to the positive
terminal and ground point in the same
order as when connecting the donor 486
BatteryBreakdown assistance
Page 492 of 542
Towing and tow-starting
Important safety notes
G
WARNING
Hybrid vehicles: be sure to read the "HYBRID"
supplement. Otherwise, you could fail to
recognize dangers. G
WARNING
If you tow the vehicle, you must use a rigid
towing ba rif:
R the engine is not running.
R there is a brake system malfunction.
R there is a malfunction in the power supply
or the vehicle's electrical system.
The power assistance for the steering and the
brake force booster do not work when the
engine is not running. You will need more
force to steer and brake, you may have to
depress the brake pedal with maximu mforce.
Before towing away, make sure that the
steering can be moved and is not locked.
If you tow or tow-start another vehicle, its
weight must not exceed the maximum
permissible gross vehicle weight of your
vehicle.
It is better to have the vehicle transported
than to have it towed.
! The vehicle can be towed a maximum of
30 miles (50km). The towing speed of
30 mph (50 km/h) must not be exceeded.
If the vehicle has to be towed more than
30 miles (50km), the entire vehicle must be
raised and transported.
! Make sure that the electric parking brake
is released. If the electric parking brake is
faulty, visit a qualified specialist workshop.
! Only secure the tow rope or tow bar at the
towing eyes. Otherwise, the vehicle could
be damaged.
! Do not use the towing eye for recovery,
as this could damage the vehicle. If in
doubt, recover the vehicle with a crane. !
When towing, pull away slowly and
smoothly. If the tractive power is too high,
the vehicles could be damaged.
! Do not tow with sling-type equipment.
This could damage the vehicle.
! When towing vehicles with KEYLESS-GO,
use the key instead of the Start/Stop
button. Otherwise, the automatic
transmission may shift to position Pwhen
the driver's or front-passenger door are
opened, which could lead to damage to the
transmission.
The automatic transmission must be in
position Nwhen the vehicle is being towed.
The battery must be connected and charged.
Otherwise, you:
R cannot turn the SmartKey to position 2in
the ignition lock
R cannot shift the automatic transmission to
position N
i Switch off the automatic locking feature
(Y page 269) You could otherwise be
locked out when pushing or towing the
vehicle. Installing/removing the towing eye
Installing the towing eye X
Remove the towing eye from the vehicle
tool kit (Y page 478). G
WARNING
The exhaust tail pipe may be hot. You could
burn yourself if you touch the tail pipe. Be
particularly careful when removing the rear
cover.
The mountings for the removable towing eyes
are located in the bumpers. They are at the
front and at the rear, under the covers. 490
Towing and tow-startingBreakdown assistance
Page 494 of 542
X
Switch on the hazard warning lamps
(Y page 283).
X Leave the SmartKey in position 2in the
ignition lock.
i Whe ntowing with the hazard warning
lamps switched on, use the combination
switch as usual to signal a change of
direction .Inthis case, only the turn signals
for the desired direction flash. When the
combination switch is reset, the hazard
warning lamps start flashing again. Transporting the vehicle
The towing eye can be used to pull the vehicle
onto a trailer or transporter for transporting
purposes.
X Turn the SmartKey to position 2in the
ignition lock.
X Shift the automatic transmission to
position N.
As soon as the vehicle is loaded:
X Prevent the vehicle from rolling away by
applying the electric parking brake.
X Shift the automatic transmission to
position P.
X Turn the SmartKey to position 0in the
ignition lock and remove the SmartKey
from the ignition lock.
X Secure the vehicle.
! Only lash the vehicle down by the wheels
or wheel rims, not by parts of the vehicle
such as axle or steering components.
Otherwise, the vehicle could be damaged. Notes for 4MATIC vehicles
! Vehicles with 4MATIC must not be towed
with either the front or the rear axle raised,
as doing so will damage the transmission.
If the vehicle has transmission damage or
damage to the front or rear axle, have it
transported on a transporter or trailer. In the event of damage to the electrical
system
If the battery is defective, the automatic
transmission will be locked in position
P. To
shift the automatic transmission to position
N, you must provide power to the vehicle's
electrical system in the same way as when
jump-starting (Y page 488).
Have the vehicle transported on a transporter
or trailer. Tow-starting (emergency starting)
! Vehicles with automatic transmission
must not be started by tow-starting. This
could otherwise damage the transmission.
For further information on "Jump-starting"
see (Y page 488). Fuses
Important safety notes
G
WARNING
Only use fuses that have been approved for
Mercedes-Ben zvehicles and that have the
correct fuse rating for the systems
concerned. Do not attempt to repair or bridge
faulty fuses. Using fuses that have not been
approved or attempting to repair or bridge
faulty fuses could cause the fuse to be
overloaded and result in afire. Have the cause
traced and rectified at a qualified specialist
workshop.
The fuses in your vehicle serve to close down
faulty circuits. If afuse blows, all the
components on the circuit and their functions
stop operating.
Blown fuses must be replace dwith fuses of
the same rating, which you can recognize by
the color and value. The fuse ratings are listed
in the fuse allocation chart.
If a newly inserted fuse also blows, have the
cause traced and rectified at a qualified 492
FusesBreakdown assistance