washer fluid MERCEDES-BENZ S-Class 2014 W222 Owner's Manual
[x] Cancel search | Manufacturer: MERCEDES-BENZ, Model Year: 2014, Model line: S-Class, Model: MERCEDES-BENZ S-Class 2014 W222Pages: 434, PDF Size: 29.51 MB
Page 8 of 434
Brake fluid
Display message ............................ 272
Notes ............................................. 426
Brake force distribution,
electronic
see EBD (electronic brake force
distribution)
Brake lamps
Display message ............................ 281
Brakes
ABS .................................................. 71
Adaptive Brake Assist ......................75
BAS .................................................. 71
BAS PLUS with Cross-Traffic Assist .72
Brake fluid (notes) .........................426
Display message ............................ 266
EBD .................................................. 78
High-performance brake system ....197
Hill start assist ............................... 175
HOLD function ............................... 212
Important safety notes ..................196
Maintenance .................................. 196
Parking brake ................................ 192
Riding tips ...................................... 196
Warning lamp ................................. 303
Breakdown
see Flat tire
see Towing away
Buttons on the steering wheel .........249 C
California Important notice for retail
customers and lessees ....................24
Calling up a malfunction
see Display messages
Camera
see 360° camera
Car
see Vehicle
Care
360° camera ................................. 358
Carpets .......................................... 361
Car wash ........................................ 354
Display ........................................... 359
Exhaust pipe .................................. 359
Exterior lights ................................ 357Gear or selector lever
....................360
Interior ........................................... 359
Matte finish ................................... 356
Night View Assist Plus ...................359
Notes ............................................. 353
Paint .............................................. 356
Plastic trim .................................... 360
Power washer ................................ 355
Rear view camera .......................... 358
Roof lining ...................................... 361
Seat belt ........................................ 361
Seat cover ..................................... 361
Sensors ......................................... 358
Steering wheel ............................... 360
Trim pieces .................................... 360
Washing by hand ........................... 355
Wheels ........................................... 356
Windows ........................................ 357
Wiper blades .................................. 357
Wooden trim .................................. 360
Car key
see SmartKey
Car wash (care) ................................. 354
CD player/CD changer (on-board
computer) .......................................... 256
Center console Overview .......................................... 37
Stowage space .............................. 317
Center console in the rear
compartment
Stowage compartment ..................319
Central locking
Locking/unlocking (SmartKey) ........85
Chauffeur mode
Display message ............................ 299
Fully reclined position ....................121
General notes ................................ 117
Installing the head restraint ...........119
Moving front-passenger seat into
the chauffeur position .................... 118
Moving the front-passenger seat
into the normal position ................. 120
Removing the head restraint .......... 119
Child-proof locks
Important safety notes ....................69
Rear doors ....................................... 696
Index
Page 19 of 434
Important safety notes
..................423
Refrigerant (air-conditioning
system) .......................................... 428
Washer fluid .................................. .427
Settings
Factory (on-board computer) .........263
On-board computer .......................259
SETUP (on-board computer) .............264
Side impact air bag .............................49
Side marker lamp (display
message) ............................................ 282
Side windows Cleaning ......................................... 357
Convenience closing feature .......... 100
Convenience opening feature ........100
Important safety information ...........99
Opening/closing .............................. 99
Problem (malfunction) ...................102
Resetting ....................................... 101
Sliding sunroof
see Panorama roof with power
tilt/sliding panel
SmartKey
Changing the battery .......................87
Changing the programming .............86
Checking the battery .......................87
Convenience closing feature .......... 101
Convenience opening feature ........100
Display message ............................ 300
Door central locking/unlocking .......85
Important safety notes ....................84
Loss ................................................. 89
Mechanical key ................................ 86
Overview .......................................... 84
Positions (ignition lock) .................171
Problem (malfunction) .....................89
Starting the engine ........................174
Snow chains ...................................... 387
Sockets Center console .............................. 328
General notes ................................ 328
Rear compartment .........................328
Trunk ............................................. 329
Specialist workshop ............................ 27
Special seat belt retractor .................. 66
Speed, controlling see Cruise control Speedometer
Activating/deactivating the
additional speedometer .................263
Digital ............................................ 252
In the Instrument cluster .................33
Selecting the unit of measurement 262
see Instrument cluster
SRS (Supplemental Restraint
System)
Display message ............................ 276
Introduction ..................................... 45
Warning lamp ................................. 307
Warning lamp (function) ................... 45
Standing lamps
Display message ............................ 282
Switching on/off ........................... 139
Start/Stop button
Starting the engine ........................174
Start/stop function
see ECO start/stop function
Starting (engine) ................................ 173
STEER CONTROL .................................. 80
Steering Warning lamps ............................... 313
Steering (display message) ..............299
Steering Assist (DISTRONIC PLUS) Display message ............................ 293
Steering wheel
Adjusting (electrically) ...................127
Button overview ............................... 35
Buttons (on-board computer) ......... 249
Cleaning ......................................... 360
EASY ENTRY/EXIT feature .............129
Important safety notes ..................127
Paddle shifters ............................... 183
Steering wheel heating ..................128
Storing settings (memory function) 133
Steering wheel heating
Problem (malfunction) ...................129
Switching on/off ........................... 128
Steering wheel paddle shifters ........183
Stowage areas ................................... 316
Stowage compartments Armrest (under) ............................. 318
Center console .............................. 317
Center console in rear
compartment ................................. 319 Index
17
Page 22 of 434
Opening/closing (automatically
from outside)
................................... 94
Opening/closing (from outside,
HANDS-FREE ACCESS) ....................95
Opening/closing (manually from
outside) ............................................ 94
Power closing .................................. 92
Trunk lid
Display message ............................ 298
Obstacle recognition ........................93
Opening/closing .............................. 93
Opening dimensions ......................429
Trunk load (maximum) ......................429
Turn signals Display message ............................ 280
Switching on/off ........................... 140
Two-way radio
Windshield (infrared reflective) ......345
Type identification plate
see Vehicle identification plate U
Unlocking Emergency unlocking .......................92
From inside the vehicle (central
unlocking button) ............................. 91V
Vanity mirror (in the sun visor) ........324
Vehicle Correct use ...................................... 27
Data acquisition ............................... 28
Display message ............................ 297
Equipment ....................................... 23
Individual settings ..........................259
Limited Warranty ............................. 28
Loading .......................................... 395
Locking (in an emergency) ...............93
Locking (SmartKey) .......................... 85
Lowering ........................................ 412
Maintenance .................................... 24
Operating safety .............................. 25
Parking for a long period ................ 193
Pulling away ................................... 174
Raising ........................................... 409
Reporting problems .........................27Securing from rolling away
............408
Towing away .................................. 376
Transporting .................................. 378
Unlocking (in an emergency) ...........92
Unlocking (SmartKey) ......................85
Vehicle data ................................... 429
Vehicle data
Roof load (maximum )..................... 429
Trunk load (maximum )................... 429
Vehicle dimensions ...........................429
Vehicle emergency locking ................93
Vehicle identification number see VIN
Vehicle identification plate ..............422
Vehicle level Active Body Control (ABC) .............214
Display message .................... 287, 288
Vehicle maintenance
see ASSYST PLUS
Vehicle tool kit .................................. 364
Video Operating the DVD ......................... 256
VIN ...................................................... 422 W
Warning and indicator lamps ABS ................................................ 304
Brakes ........................................... 303
Check Engine ................................. 308
Coolant .......................................... 309
Distance warning ........................... 311
ESP ®
.............................................. 305
ESP ®
OFF ....................................... 306
Fuel tank ........................................ 308
Overview .......................................... 34
Parking brake ................................ 307
PASSENGER AIRBAG OFF ................51
Reserve fuel ................................... 308
Seat belt ........................................ 302
SRS ................................................ 307
Steering ......................................... 313
Tire pressure monitor ....................312
Warranty .............................................. 23
Washer fluid Display message ............................ 300
Wheel and tire combination
see Tires 20
Index
Page 23 of 434
Wheel bolt tightening torque
...........412
Wheel chock ...................................... 408
Wheels Changing a wheel .......................... 407
Checking ........................................ 385
Cleaning ......................................... 356
Cleaning (warning) .........................407
Important safety notes ..................384
Interchanging/changing ................407
Mounting a new wheel ...................411
Mounting a wheel .......................... 408
Removing a wheel ..........................411
Storing ........................................... 407
Tightening torque ........................... 412
Wheel size/tire size .......................413
Window curtain air bag
Operation ........................................ .50
Windows
see Side windows
Windshield
Defrosting ...................................... 161
Infrared reflective .......................... 345
Windshield washer fluid
see Windshield washer system
Windshield washer system
Adding washer fluid .......................351
Notes ............................................. 427
Windshield wipers
Problem (malfunction) ...................149
Replacing the wiper blades ............147
Switching on/off ........................... 146
Winter driving
Important safety notes ..................386
Slippery road surfaces ...................198
Snow chains .................................. 387
Winter operation
Summer tires ................................. 386
Winter tires
M+S tires ....................................... 386
Wiper blades
Cleaning ......................................... 357
Important safety notes ..................147
Replacing ....................................... 147
Wooden trim (cleaning instructions) 360
Workshop see Qualified specialist workshop Index
21
Page 148 of 434
Replacing bulbs
The front and rear light clusters of your
vehicle are equipped with LED light bulbs. Do
not replace the bulbs yourself. Contact a
qualified specialist workshop which has the
necessary specialist knowledge and tools to
carry out the work required.
Lamps are an important aspect of vehicle
safety. You must therefore make sure that
these function correctly at all times. Have the
headlamp setting checked regularly. Windshield wipers
Switching the windshield wipers on/
off
! Do not operate the windshield wipers
when the windshield is dry, as this could
damage the wiper blades. Moreover, dust
that has collected on the windshield can
scratch the glass if wiping takes place when
the windshield is dry.
If it is necessary to switch on the windshield
wipers in dry weather conditions, always
use washer fluid when operating the
windshield wipers.
! If the windshield wipers leave smears on
the windshield after the vehicle has been
washed in an automatic car wash, wax or
other residues may be the reason for this.
Clean the windshield using washer fluid
after washing the vehicle in an automatic
car wash.
! Vehicles with a rain sensor: if the
windshield becomes dirty in dry weather
conditions, the windshield wipers may be
activated inadvertently. This could then
damage the windshield wiper blades or
scratch the windshield.
For this reason, you should always switch
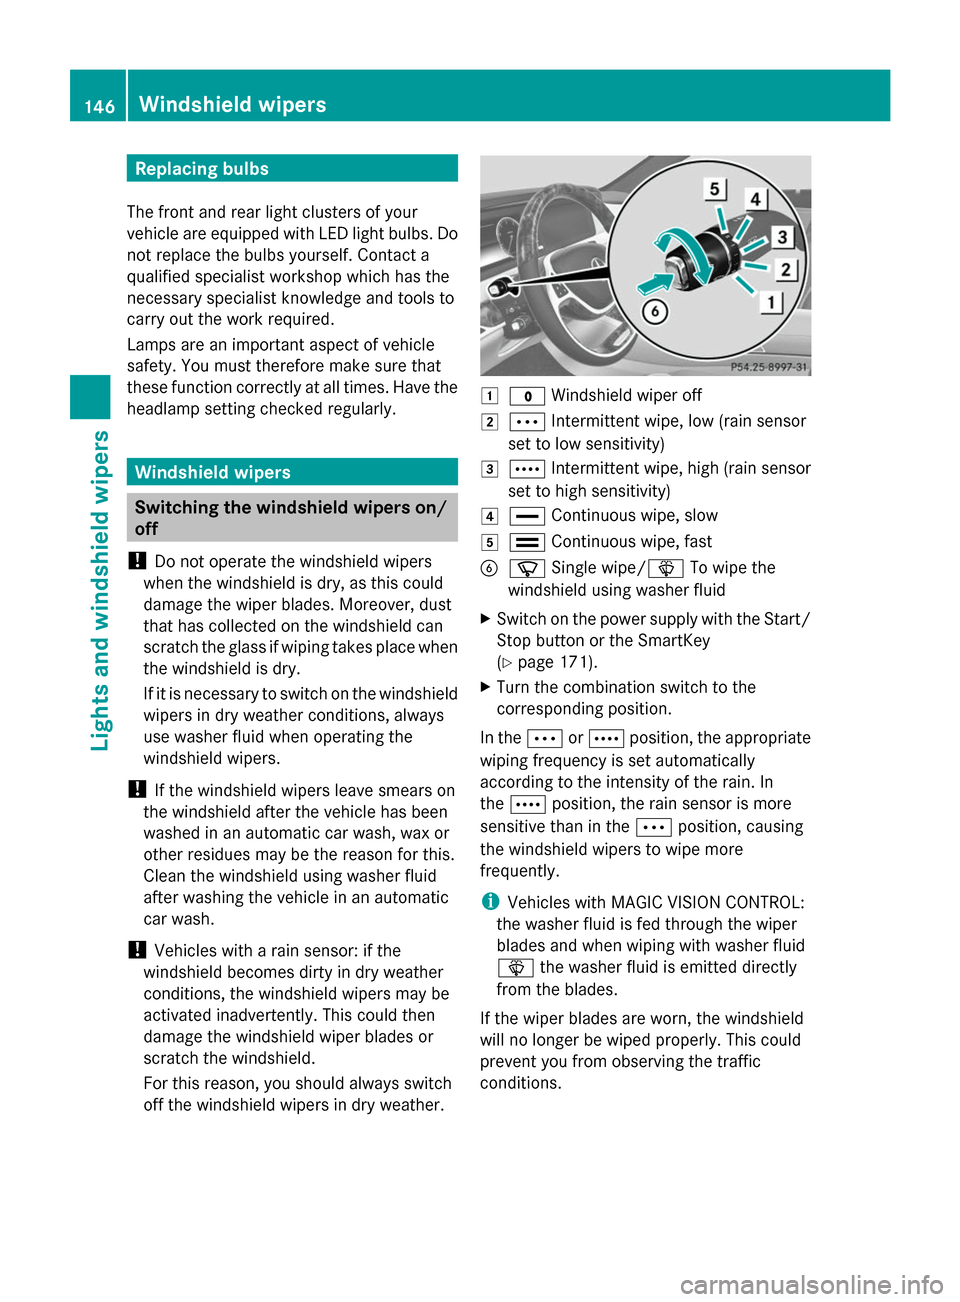
off the windshield wipers in dry weather. 0047
003F Windshield wiper off
0048 0062 Intermittent wipe, low (rain sensor
set to low sensitivity)
0049 0063 Intermittent wipe, high (rain sensor
set to high sensitivity)
004A 00AA Continuous wipe, slow
004B 00A9 Continuous wipe, fast
0084 00D3 Single wipe/00D4 To wipe the
windshield using washer fluid
X Switch on the power supply with the Start/
Stop button or the SmartKey
(Y page 171).
X Turn the combination switch to the
corresponding position.
In the 0062or0063 position, the appropriate
wiping frequency is set automatically
according to the intensity of the rain. In
the 0063 position, the rain sensor is more
sensitive than in the 0062position, causing
the windshield wipers to wipe more
frequently.
i Vehicles with MAGIC VISION CONTROL:
the washer fluid is fed through the wiper
blades and when wiping with washer fluid
00D4 the washer fluid is emitted directly
from the blades.
If the wiper blades are worn, the windshield
will no longer be wiped properly. This could
prevent you from observing the traffic
conditions. 146
Windshield wipersLights and windshield wipers
Page 151 of 434
Problems with the windshield wipers
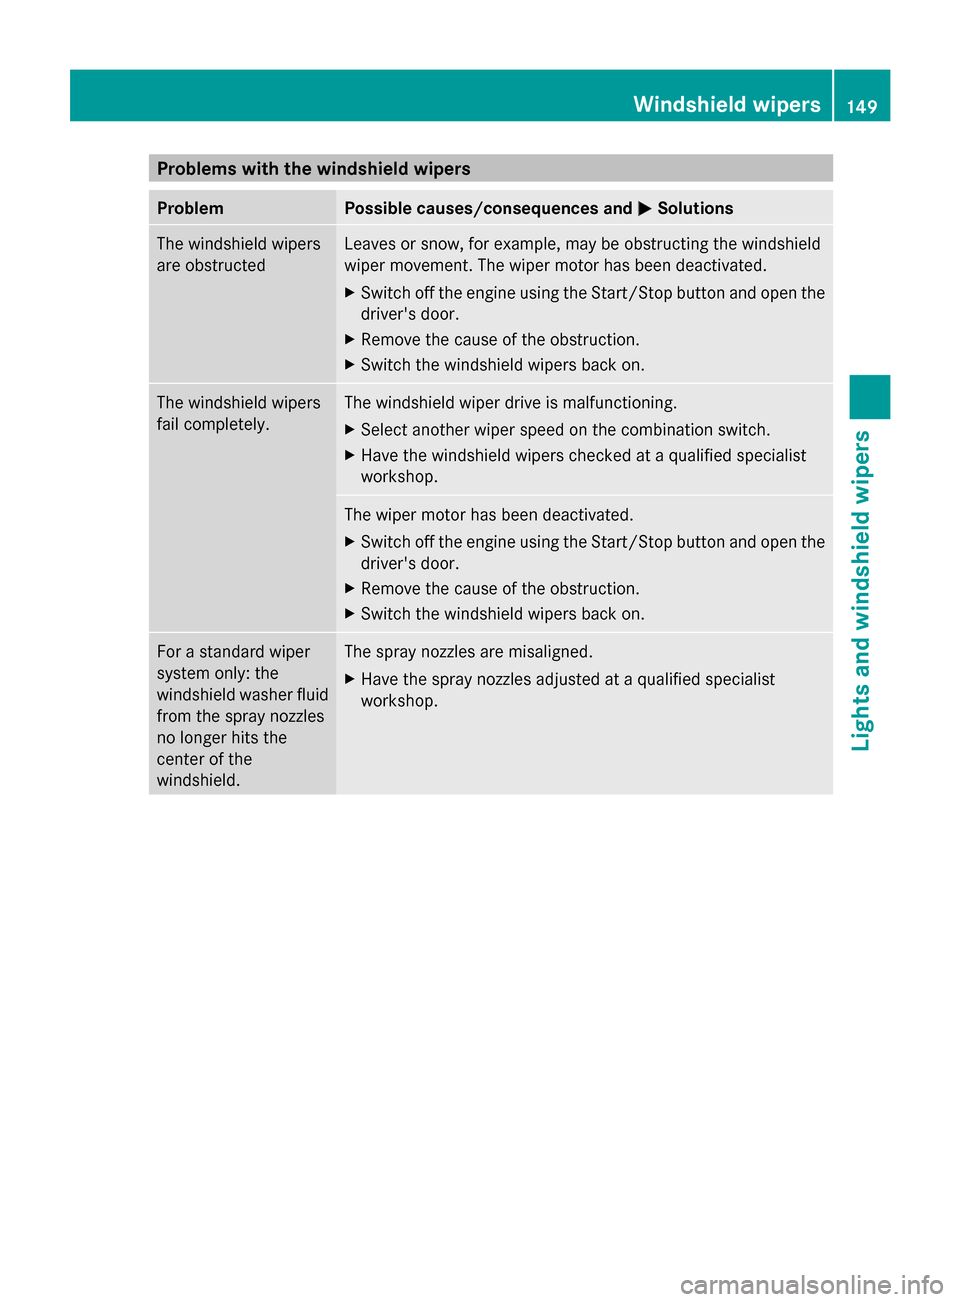
Problem Possible causes/consequences and
0050
0050Solutions The windshield wipers
are obstructed Leaves or snow, for example, may be obstructing the windshield
wiper movement. The wiper motor has been deactivated.
X
Switch off the engine using the Start/Stop button and open the
driver's door.
X Remove the cause of the obstruction.
X Switch the windshield wipers back on. The windshield wipers
fail completely. The windshield wiper drive is malfunctioning.
X
Select another wiper speed on the combination switch.
X Have the windshield wipers checked at a qualified specialist
workshop. The wiper motor has been deactivated.
X
Switch off the engine using the Start/Stop button and open the
driver's door.
X Remove the cause of the obstruction.
X Switch the windshield wipers back on. For a standard wiper
system only: the
windshield washer fluid
from the spray nozzles
no longer hits the
center of the
windshield. The spray nozzles are misaligned.
X
Have the spray nozzles adjusted at a qualified specialist
workshop. Windshield wipers
149Lights and windshield wipers Z
Page 302 of 434
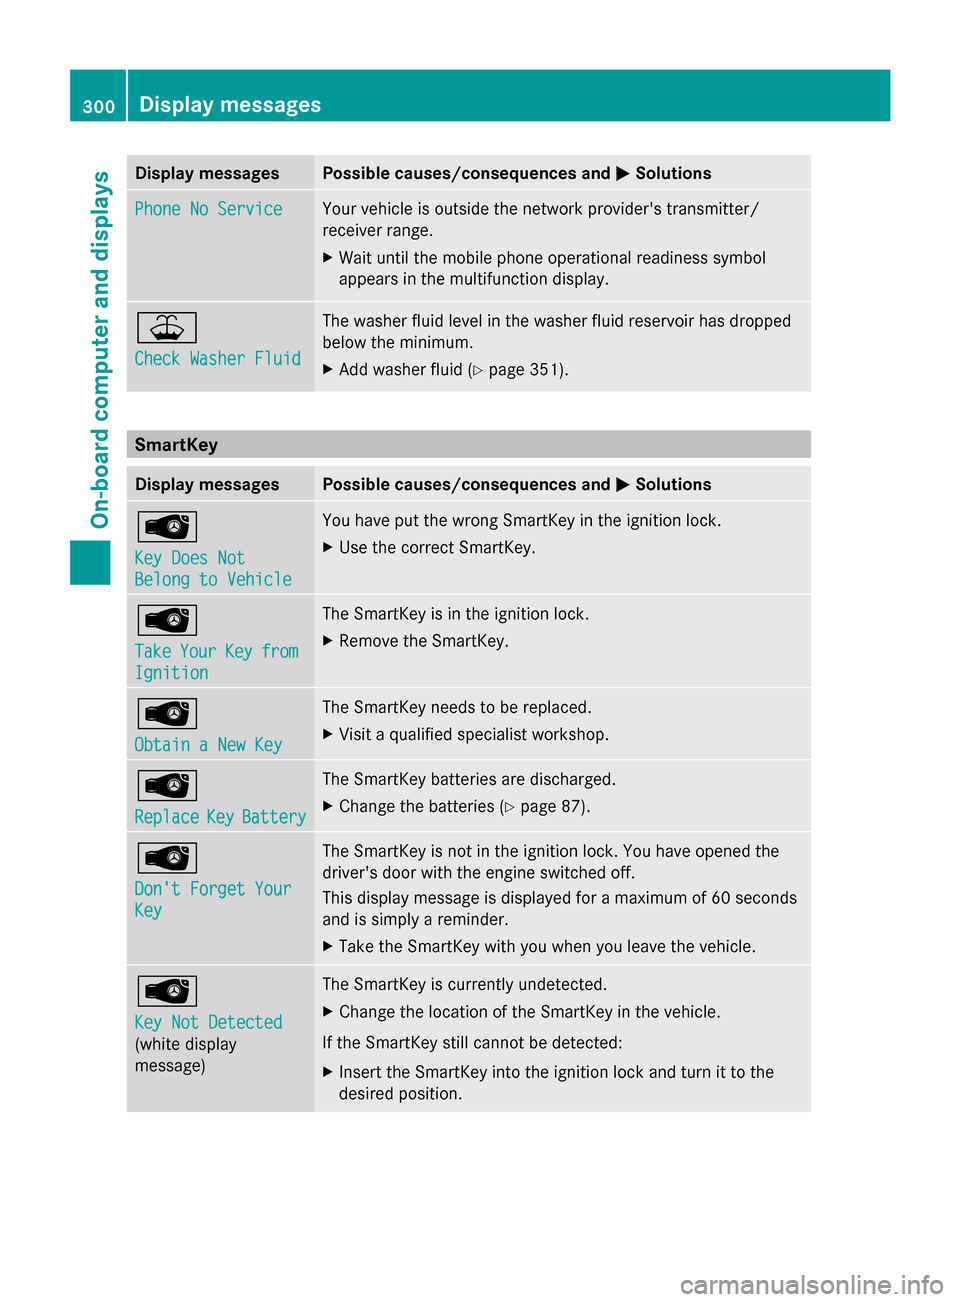
Display messages Possible causes/consequences and
0050
0050Solutions Phone No Service
Phone No Service Your vehicle is outside the network provider's transmitter/
receiver range.
X
Wait until the mobile phone operational readiness symbol
appears in the multifunction display. 00B2
Check Washer Fluid Check Washer Fluid The washer fluid level in the washer fluid reservoir has dropped
below the minimum.
X
Add washer fluid ( Ypage 351). SmartKey
Display messages Possible causes/consequences and
0050 0050Solutions 00AF
Key Does Not Key Does Not
Belong to Vehicle Belong to Vehicle You have put the wrong SmartKey in the ignition lock.
X
Use the correct SmartKey. 00AF
Take Take
Your
YourKey
Keyfrom
from
Ignition
Ignition The SmartKey is in the ignition lock.
X
Remove the SmartKey. 00AF
Obtain a New Key Obtain a New Key The SmartKey needs to be replaced.
X
Visit a qualified specialist workshop. 00AF
Replace Replace
Key
KeyBattery
Battery The SmartKey batteries are discharged.
X
Change the batteries ( Ypage 87). 00AF
Don't Forget Your Don't Forget Your
Key Key The SmartKey is not in the ignition lock. You have opened the
driver's door with the engine switched off.
This display message is displayed for a maximum of 60 seconds
and is simply a reminder.
X
Take the SmartKey with you when you leave the vehicle. 00AF
Key Not Detected Key Not Detected
(white display
message) The SmartKey is currently undetected.
X
Change the location of the SmartKey in the vehicle.
If the SmartKey still cannot be detected:
X Insert the SmartKey into the ignition lock and turn it to the
desired position. 300
Display
messagesOn-board computer and displays
Page 353 of 434
Additional service products
Checking coolant level G
WARNING
Certain components in the engine
compartment, such as the engine, radiator
and parts of the exhaust system, can become
very hot. Working in the engine compartment
poses a risk of injury.
Where possible, let the engine cool down and
touch only the components described in the
following. G
WARNING
The engine cooling system is pressurized,
particularly when the engine is warm. When
opening the cap, you could be scalded by hot
coolant spraying out. There is a risk of injury.
Let the engine cool down before opening the
cap. Wear eye and hand protection when
opening the cap. Open the cap slowly half a
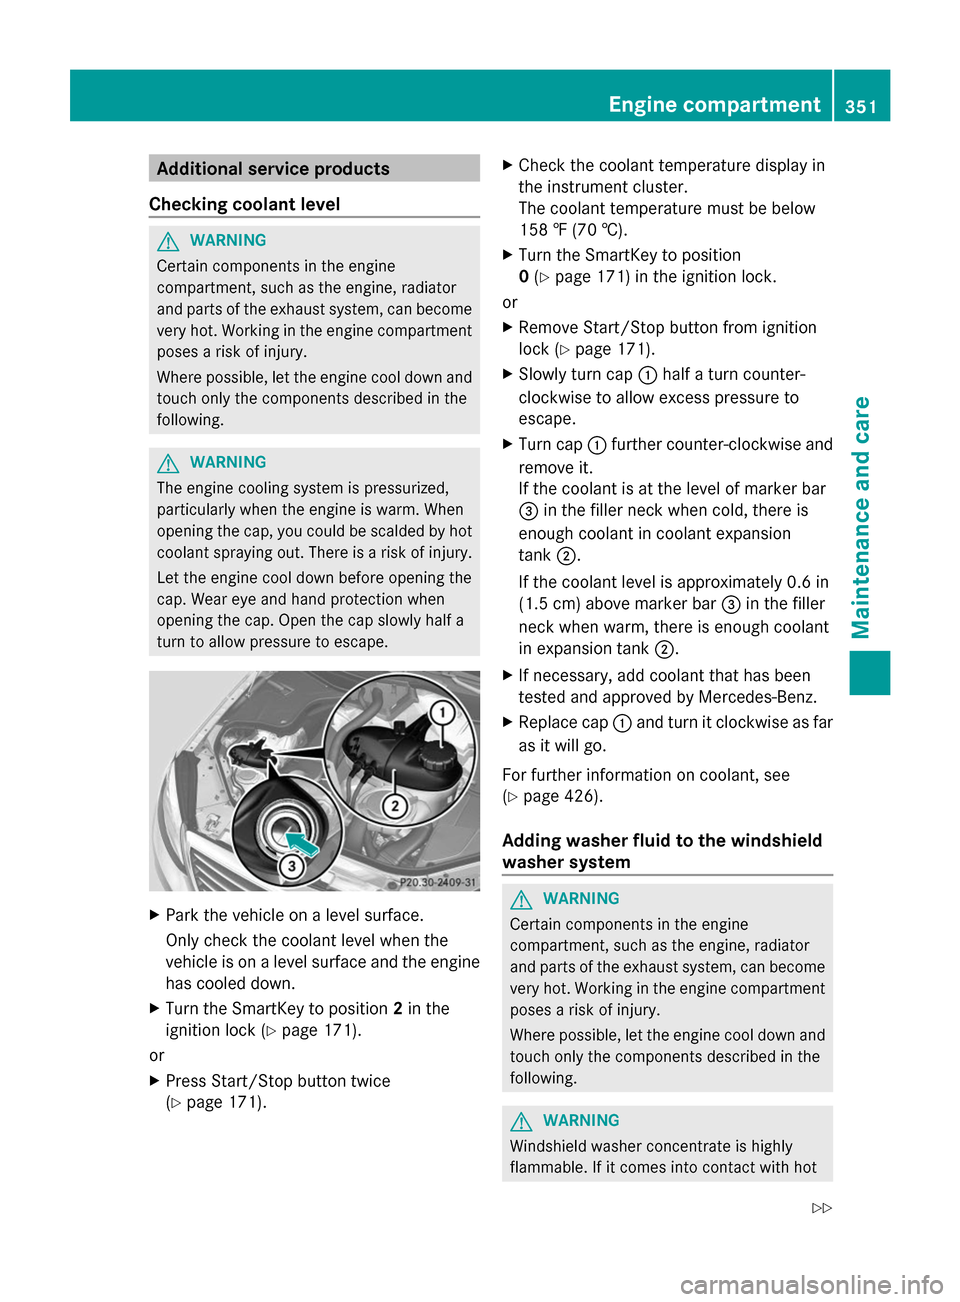
turn to allow pressure to escape. X
Park the vehicle on a level surface.
Only check the coolant level when the
vehicle is on a level surface and the engine
has cooled down.
X Turn the SmartKey to position 2in the
ignition lock (Y page 171).
or
X Press Start/Stop button twice
(Y page 171). X
Check the coolant temperature display in
the instrument cluster.
The coolant temperature must be below
158 ‡ (70 †).
X Turn the SmartKey to position
0(Y page 171) in the ignition lock.
or
X Remove Start/Stop button from ignition
lock (Y page 171).
X Slowly turn cap 0043half a turn counter-
clockwise to allow excess pressure to
escape.
X Turn cap 0043further counter-clockwise and
remove it.
If the coolant is at the level of marker bar
0087 in the filler neck when cold, there is
enough coolant in coolant expansion
tank 0044.
If the coolant level is approximately 0.6 in
(1.5 cm) above marker bar 0087in the filler
neck when warm, there is enough coolant
in expansion tank 0044.
X If necessary, add coolant that has been
tested and approved by Mercedes-Benz.
X Replace cap 0043and turn it clockwise as far
as it will go.
For further information on coolant, see
(Y page 426).
Adding washer fluid to the windshield
washer system G
WARNING
Certain components in the engine
compartment, such as the engine, radiator
and parts of the exhaust system, can become
very hot. Working in the engine compartment
poses a risk of injury.
Where possible, let the engine cool down and
touch only the components described in the
following. G
WARNING
Windshield washer concentrate is highly
flammable. If it comes into contact with hot Engine compartment
351Maintenance and care
Z
Page 354 of 434
engine components or the exhaust system it
could ignite. There is a risk of fire and injury.
Make sure that no windshield washer
concentrate is spilled next to the filler neck. X
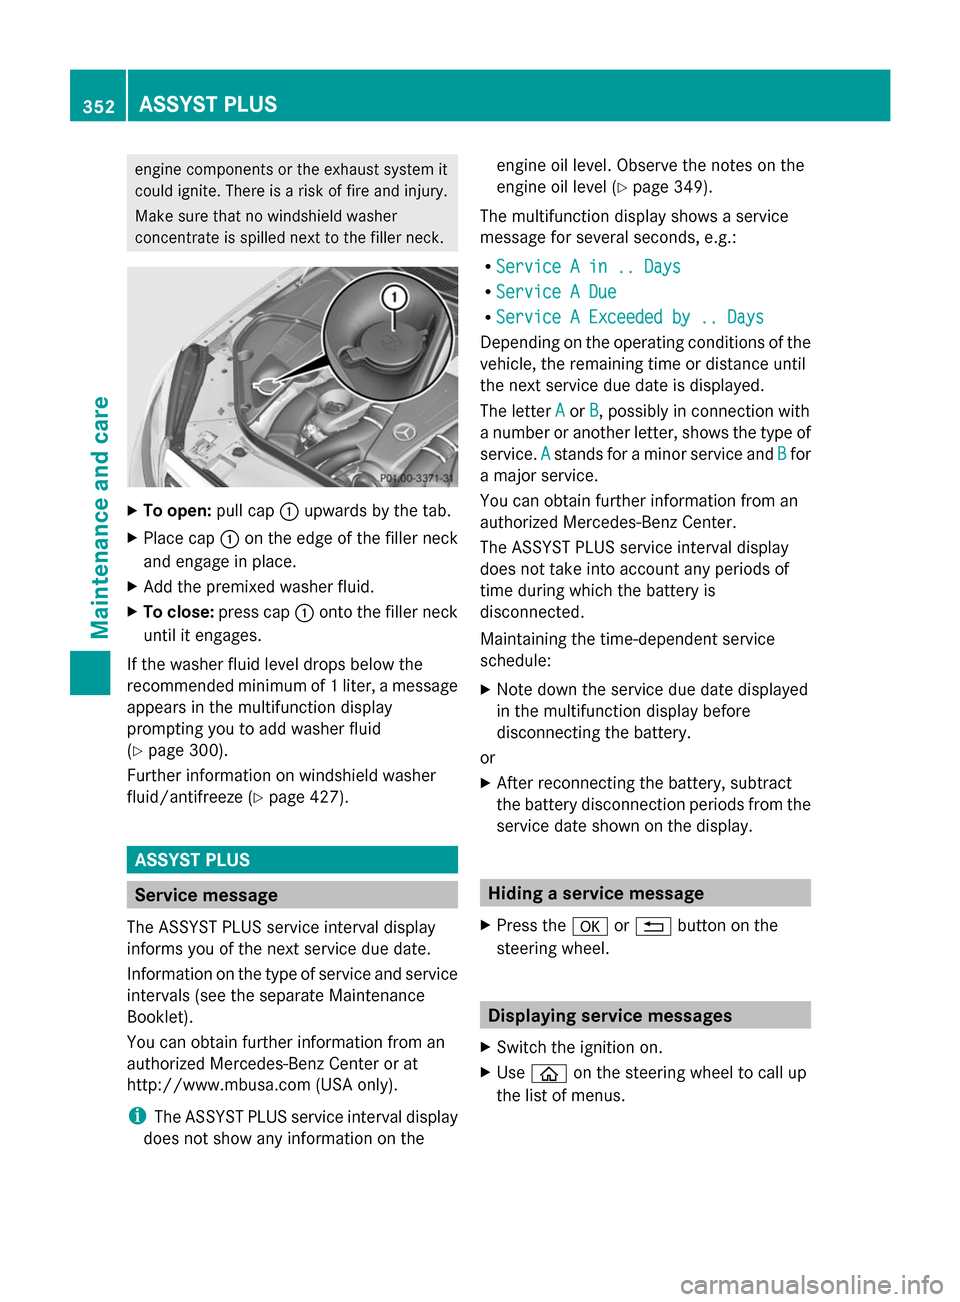
To open: pull cap0043upwards by the tab.
X Place cap 0043on the edge of the filler neck
and engage in place.
X Add the premixed washer fluid.
X To close: press cap 0043onto the filler neck
until it engages.
If the washer fluid level drops below the
recommended minimum of 1 liter, a message
appears in the multifunction display
prompting you to add washer fluid
(Y page 300).
Further information on windshield washer
fluid/antifreeze (Y page 427).ASSYST PLUS
Service message
The ASSYST PLUS service interval display
informs you of the next service due date.
Information on the type of service and service
intervals (see the separate Maintenance
Booklet).
You can obtain further information from an
authorized Mercedes-Benz Center or at
http://www.mbusa.com (USA only).
i The ASSYST PLUS service interval display
does not show any information on the engine oil level. Observe the notes on the
engine oil level (Y
page 349).
The multifunction display shows a service
message for several seconds, e.g.:
R Service A in .. Days
Service A in .. Days
R Service A Due Service A Due
R Service A Exceeded by .. Days
Service A Exceeded by .. Days
Depending on the operating conditions of the
vehicle, the remaining time or distance until
the next service due date is displayed.
The letter A Aor B
B, possibly in connection with
a number or another letter, shows the type of
service. A Astands for a minor service and B
Bfor
a major service.
You can obtain further information from an
authorized Mercedes-Benz Center.
The ASSYST PLUS service interval display
does not take into account any periods of
time during which the battery is
disconnected.
Maintaining the time-dependent service
schedule:
X Note down the service due date displayed
in the multifunction display before
disconnecting the battery.
or
X After reconnecting the battery, subtract
the battery disconnection periods from the
service date shown on the display. Hiding a service message
X Press the 0076or0038 button on the
steering wheel. Displaying service messages
X Switch the ignition on.
X Use 00E2 on the steering wheel to call up
the list of menus. 352
ASSYST PLUSMaintenance and care
Page 376 of 434
Do not start the vehicle using a rapid charging device. If your vehicle's battery is discharged,
the engine can be jump-started from another vehicle or from a second battery using jumper
cables. Observe the following points:
R The battery is not accessible in all vehicles. If the other vehicle's battery is not accessible,
jump-start the vehicle using a second battery or a jump-starting device.
R You may only jump-start the vehicle when the engine and exhaust system are cold.
R Do not start the engine if the battery is frozen. Let the battery thaw first.
R Only jump-start from batteries with a 12 V voltage rating.
R Only use jumper cables which have a sufficient cross-section and insulated terminal clamps.
R If the battery is fully discharged, leave the battery that is being used to jump-start connected
for a few minutes before attempting to start. This charges the battery slightly.
R Make sure that the two vehicles do not touch.
Make sure that:
R the jumper cables are not damaged.
R when the jumper cables are connected to the battery, uninsulated sections of the terminal
clamp do not come into contact with other metal sections.
R the jumper cables cannot come into contact with parts which can move when the engine
is running, such as the V-belt pulley or the fan.
X Secure the vehicle by applying the electric parking brake.
X Shift the transmission to position P.
X Make sure that the ignition is switched off (Y page 171). All indicator lamps in the instrument
cluster must be off. When using the SmartKey, turn the SmartKey to position 0in the ignition
lock and remove it (Y page 171).
X Switch off all electrical consumers, e.g. rear window defroster, lighting, etc.
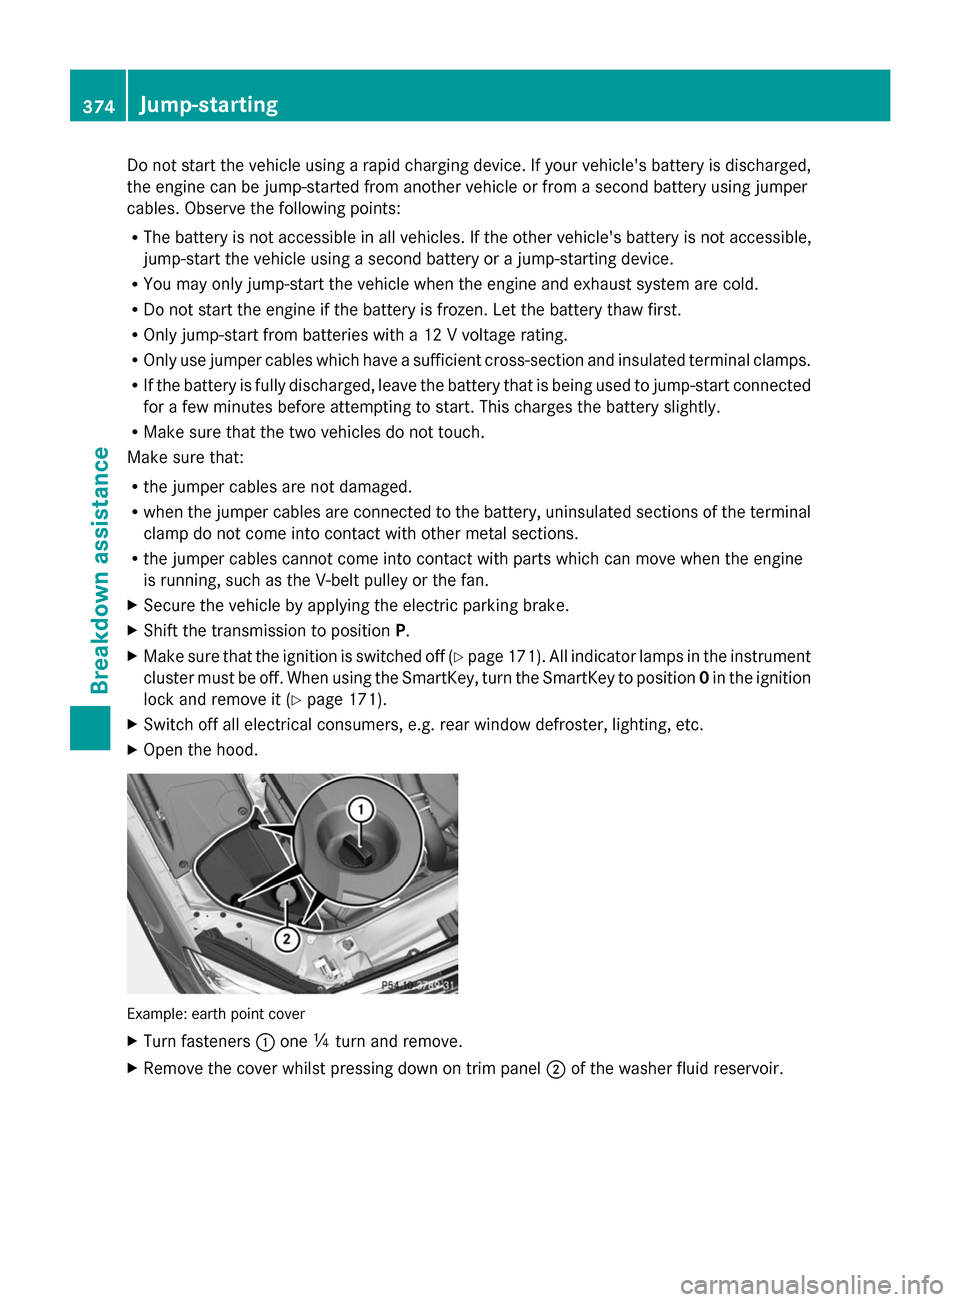
X Open the hood. Example: earth point cover
X
Turn fasteners 0043one 00C4turn and remove.
X Remove the cover whilst pressing down on trim panel 0044of the washer fluid reservoir. 374
Jump-startingBreakdown assistance