Distance MERCEDES-BENZ S-Class 2015 W222 User Guide
[x] Cancel search | Manufacturer: MERCEDES-BENZ, Model Year: 2015, Model line: S-Class, Model: MERCEDES-BENZ S-Class 2015 W222Pages: 502, PDF Size: 9.59 MB
Page 82 of 502
Distance warning function
Important safety notes
i Observe the "Important safety notes" sec-
tion for driving safety systems (Y page 76).G
WARNING
The distance warning function does not react:
R to people or animals
R to oncoming vehicles
R to crossing traffic
R when cornering
Thus, the distance warning function cannot
provide a warning in all critical situations.
There is a risk of an accident.
Always pay careful attention to the traffic sit-
uation and be ready to brake. G
WARNING
The distance warning function cannot always
clearly identify objects and complex traffic
situations.
In such cases, the distance warning function
may:
R give an unnecessary warning
R not give a warning
There is a risk of an accident.
Always pay careful attention to the traffic sit-
uation and do not rely solely on the distance
warning function.
Function X To activate/deactivate: activate or deac-
tivate the distance warning function in the
on-board computer (Y page 309).
If the distance warning function is not activa-
ted, the æsymbol appears in the assis-
tance graphics display.
The distance warning function can help you to minimize the risk of a front-end collision with
a vehicle ahead or reduce the effects of such
a collision. If the distance warning function
detects that there is a risk of a collision, you
will be warned visually and acoustically. Starting at a speed of around 4 mph (7 km/h),
the distance warning function warns you if
you rapidly approach a vehicle in front. An
intermittent warning tone will then sound,
and the ·distance warning lamp will light
up in the instrument cluster.
X Brake immediately in order to increase the
distance from the vehicle in front.
or
X Take evasive action, provided it is safe to do
so.
Due to the nature of the system, particularly
complicated but non-critical driving condi-
tions may also cause the system to display a
warning.
With the help of the radar sensor system, the
distance warning function can detect obsta-
cles that are in the path of your vehicle for an extended period of time.
Up to a speed of around 44 mph (70 km/h),
the distance warning function can also react
to stationary obstacles, such as stopped or
parked vehicles.
If you approach an obstacle and the distance
warning function detects a risk of a collision,
the system will initially alert you both visually
and acoustically.
Autonomous braking function If the driver does not react to the distance
warning signal in a critical situation, COLLI-
SION PREVENTION ASSIST PLUS can assist
with the autonomous braking function.
The autonomous braking function:
R gives the driver more time to react to criti-
cal driving situations
R can help the driver to avoid an accident or
R reduces the effects of an accident
The autonomous braking function is available in the following speed ranges:
R from 5 mph (7 km/h) to approx. 65 mph
(105 km/ h)for moving objects
R from 5 mph (7 km/h) to approx. 31 mph
(50 km/h) for stationary objects 80
Driving safety systemsSafety
Page 83 of 502
If the autonomous braking function requires a
particularly high braking force, preventative
passenger protection measures (PRE-SAFE ®
)
are activated simultaneously.
Adaptive Brake Assist i
Observe the "Important safety notes" sec-
tion (Y page 76).
Adaptive Brake Assist provides braking assis-
tance in hazardous situations at speeds
above 4 mph (7 km/h). It uses radar sensor
technology to assess the traffic situation. G
WARNING
Adaptive Brake Assist cannot always clearly
identify objects and complex traffic situa-
tions.
In such cases, Adaptive Brake Assist can:
R intervene unnecessarily
R not intervene
There is a risk of an accident.
Always pay careful attention to the traffic sit- uation and be ready to brake. Terminate the
intervention in a non-critical driving situation. G
WARNING
Adaptive Brake Assist does not react:
R to people or animals
R to oncoming vehicles
R to crossing traffic
R when cornering
As a result, the Adaptive Brake Assist may not intervene in all critical conditions. There is a
risk of an accident.
Always pay careful attention to the traffic sit- uation and be ready to brake.
Due to the nature of the system, particularly
complicated but non-critical driving condi-
tions may also cause Brake Assist to inter-
vene.
If adaptive Brake Assist is not available due to a malfunction in the radar sensor system, the brake system remains available with full
brake boosting effect and BAS.
With the help of adaptive Brake Assist, the
distance warning signal can detect obstacles
that are in the path of your vehicle for an
extended period of time.
If adaptive Brake Assist detects a risk of col-
lision with the vehicle in front, it calculates
the braking force necessary to avoid a colli-
sion. If you apply the brakes forcefully, adap-
tive Brake Assist will automatically increase
the braking force to a level suitable for the
traffic conditions.
X Keep the brake pedal depressed until the
emergency braking situation is over.
ABS prevents the wheels from locking.
The brakes will work normally again if:
R you release the brake pedal.
R there is no longer any danger of a collision.
R no obstacle is detected in front of your
vehicle.
Adaptive Brake Assist is then deactivated.
If adaptive Brake Assist demands particularly
high braking force, preventative passenger
protection measures (PRE-SAFE ®
) are activa-
ted simultaneously.
Up to a speed of approximately 155 mph
(250 km/h), adaptive Brake Assist is capable
of reacting to moving objects that have
already been detected as such at least once
over the period of observation.
Up to a speed of approximately 44 mph
(70 km/h), adaptive Brake Assist reacts to
stationary obstacles. ESP
®
(Electronic Stability Program)
General notes i
Observe the "Important safety notes" sec-
tion (Y page 76).
ESP ®
monitors driving stability and traction,
i.e. power transmission between the tires and
the road surface. Driving safety systems
81Safety Z
Page 86 of 502
Observe information regarding indicator and
warning lamps (Y page 358) as well as dis-
play messages (Y page 320).ADAPTIVE BRAKE
ADAPTIVE BRAKE enhances braking safety
and offers increased braking comfort. In addi-
tion to the braking function, ADAPTIVE BRAKE
also has the HOLD function (Y page 242) and
hill start assist (Y page 192). PRE-SAFE
®
Brake
General information i
Pay attention to the important safety
notes in the "Driving safety systems" sec-
tion (Y page 76).
PRE‑SAFE ®
Brake is only available for vehi-
cles with the Driving Assistance package.
For PRE-SAFE ®
Brake to assist you when driv-
ing, the radar sensor system and the camera
system must be switched on and be opera-
tional.
With the help of the radar sensor system and
the camera system, PRE-SAFE ®
Brake can
detect obstacles that are in front of your vehi-
cle for an extended period of time.
In addition, pedestrians in the path of your
vehicle can be detected.
PRE-SAFE ®
Brake detects pedestrians using
typical characteristics such as the body con-
tours and posture of a person standing
upright.
Observe the restrictions described in the
"Important safety notes" sec-
tion“ (Y page 84).
PRE-SAFE ®
Brake can help you to minimize
the risk of a collision with a vehicle ahead or a pedestrian, and reduce the effects of such a
collision. If PRE-SAFE ®
Brake has detected a
risk of collision, you will be warned visually
and acoustically as well as by automatic brak- ing. Important safety notes G
WARNING
PRE-SAFE ®
Brake will initially brake your vehi-
cle by a partial application of the brakes if a
danger of collision is detected. There may be
a collision unless you brake yourself. Even
after subsequent full application of the brakes
a collision cannot always be avoided, partic-
ularly when approaching at too high a speed.
There is a risk of an accident.
Always apply the brakes yourself and try to
take evasive action, provided it is safe to do
so. G
WARNING
PRE-SAFE ®
Brake cannot always clearly iden-
tify objects and complex traffic conditions.
In these cases, PRE-SAFE ®
Brake may:
R give an unnecessary warning and then
brake the vehicle
R not give a warning or intervene
There is a risk of an accident.
Always pay particular attention to the traffic
situation and be ready to brake, especially if
PRE-SAFE ®
Brake warns you. Terminate the
intervention in a non-critical driving situation.
In order to maintain the appropriate distance
to the vehicle in front and thus prevent a col- lision, you must apply the brakes yourself.
PRE-SAFE ®
Brake can also brake the vehicle
automatically under the following conditions:
R the driver and front-passenger have their
seat belts fastened
and
R the vehicle speed is between approx-
imately 4 mph (7 km/h) and 124 mph
(200 km/h)
At a speed of up to approximately 44 mph
(70 km/h), PRE-SAFE ®
Brake can also detect:
R stationary objects in the path of your vehi-
cle, e.g. stopped or parked vehicles
R pedestrians in the path of your vehicle 84
Driving safety systemsSafety
Page 87 of 502
G
WARNING
PRE-SAFE ®
Brake does not react:
R to small people, e.g. children
R to animals
R to oncoming vehicles
R to crossing traffic
R when cornering
As a result, PRE-SAFE ®
Brake may neither
give warnings nor intervene in all critical sit-
uations. There is a risk of an accident.
Always pay careful attention to the traffic sit- uation and be ready to brake.
In the event of snowfall or heavy rain, the rec-
ognition can be impaired.
Recognition by the radar sensor system is
also impaired in the event of:
R there is dirt on the sensors or anything else
covering the sensors
R there is interference by other radar sources
R there are strong radar reflections, for
example in parking garages
R a narrow vehicle traveling in front, e.g. a
motorbike
R a vehicle traveling in front on a different line
relative to the center of your vehicle
Recognition by the camera system is also
impaired in the event of:
R dirt on the camera or if the camera is cov-
ered
R there is glare on the camera system, e.g.
from the sun being low in the sky
R darkness
R if:
- pedestrians move quickly, e.g. into the
path of the vehicle
- the camera system no longer recognizes
a pedestrian as a person due to special
clothing or other objects
- a pedestrian is concealed by other
objects
- the typical outline of a person is not dis-
tinguishable from the background Following damage to the front end of the vehi-
cle, have the configuration and operation of
the radar sensors checked at a qualified spe-
cialist workshop. This also applies to colli-
sions at low speeds where there is no visible
damage to the front of the vehicle.
Following damage to the windshield, have the
configuration and operation of the camera
system checked at a qualified specialist work- shop.
Function X
To activate/deactivate: activate or deac-
tivate PRE-SAFE ®
Brake in the on-board
computer (Y page 309).
If the PRE-SAFE ®
Brake is not activated, the
æ symbol appears in the multifunction
display.
Starting at a speed of around 4 mph (7 km/h),
this function warns you if you rapidly
approach a vehicle in front. An intermittent
warning tone will then sound and the ·
distance warning lamp will light up in the
instrument cluster.
X Brake immediately to defuse the situation.
or X Take evasive action provided it is safe to do
so.
i If there is an increased risk of collision,
preventive passenger protection measures
(PRE-SAFE ®
) are activated.
If the risk of collision with the vehicle in front
remains and you do not brake, take evasive
action or accelerate significantly, the vehicle
may perform automatic emergency braking,
up to the point of full brake application. Auto- matic emergency braking is not performed
until immediately prior to an imminent acci-
dent.
You can prevent the intervention of the PRE-
SAFE ®
Brake at any time by:
R depressing the accelerator pedal further.
R activating kickdown.
R releasing the brake pedal. Driving safety systems
85Safety Z
Page 93 of 502
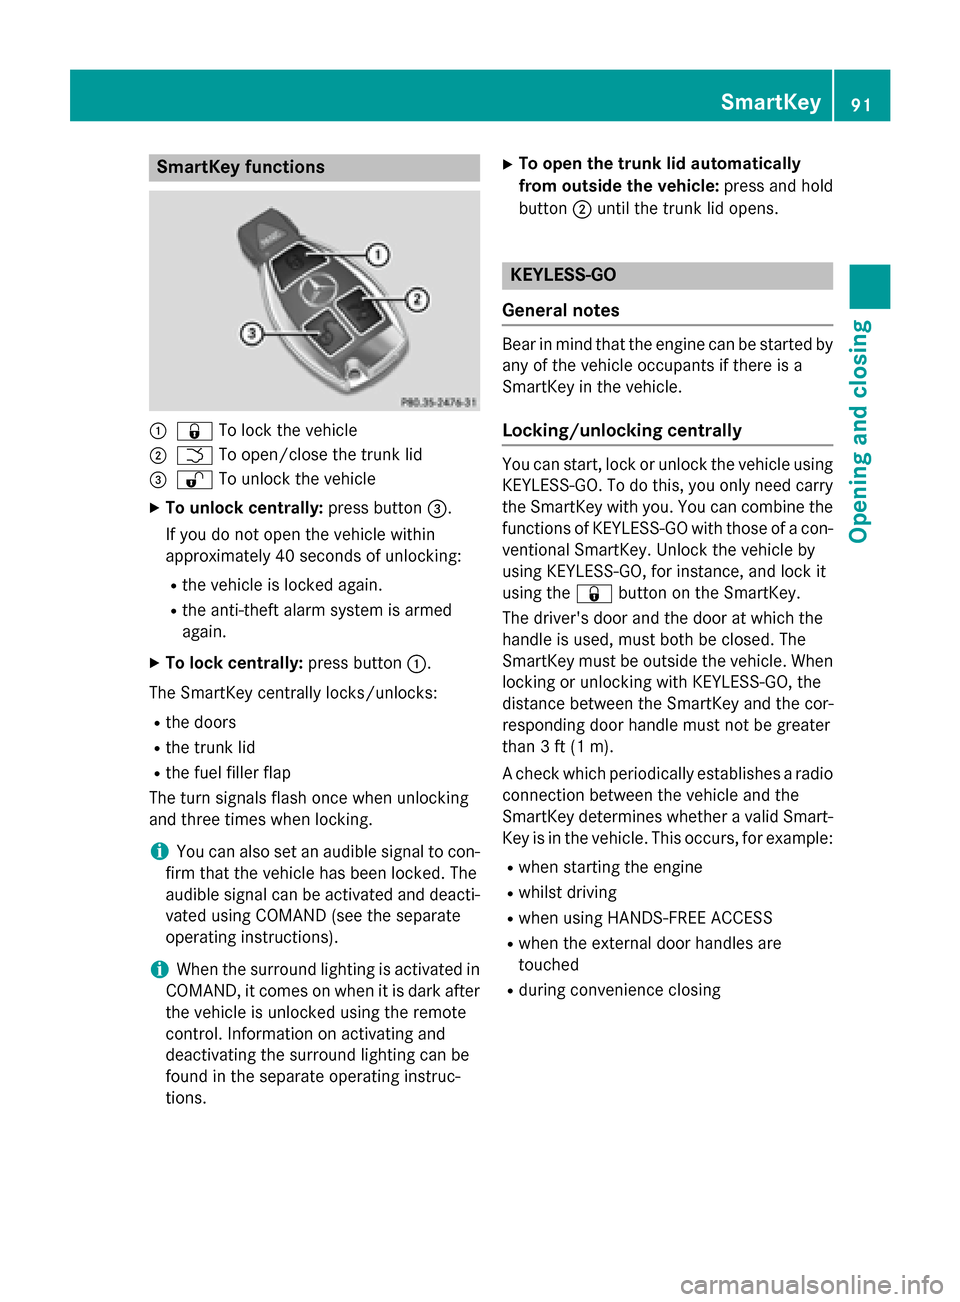
SmartKey functions
:
& To lock the vehicle
; F To open/close the trunk lid
= % To unlock the vehicle
X To unlock centrally: press button=.
If you do not open the vehicle within
approximately 40 seconds of unlocking:
R the vehicle is locked again.
R the anti-theft alarm system is armed
again.
X To lock centrally: press button:.
The SmartKey centrally locks/unlocks:
R the doors
R the trunk lid
R the fuel filler flap
The turn signals flash once when unlocking
and three times when locking.
i You can also set an audible signal to con-
firm that the vehicle has been locked. The
audible signal can be activated and deacti-
vated using COMAND (see the separate
operating instructions).
i When the surround lighting is activated in
COMAND, it comes on when it is dark after
the vehicle is unlocked using the remote
control. Information on activating and
deactivating the surround lighting can be
found in the separate operating instruc-
tions. X
To open the trunk lid automatically
from outside the vehicle: press and hold
button ;until the trunk lid opens. KEYLESS-GO
General notes Bear in mind that the engine can be started by
any of the vehicle occupants if there is a
SmartKey in the vehicle.
Locking/unlocking centrally You can start, lock or unlock the vehicle using
KEYLESS-GO. To do this, you only need carry
the SmartKey with you. You can combine the
functions of KEYLESS-GO with those of a con- ventional SmartKey. Unlock the vehicle by
using KEYLESS-GO, for instance, and lock it
using the &button on the SmartKey.
The driver's door and the door at which the
handle is used, must both be closed. The
SmartKey must be outside the vehicle. When
locking or unlocking with KEYLESS-GO, the
distance between the SmartKey and the cor-
responding door handle must not be greater
than 3 ft (1 m).
A check which periodically establishes a radio
connection between the vehicle and the
SmartKey determines whether a valid Smart- Key is in the vehicle. This occurs, for example:
R when starting the engine
R whilst driving
R when using HANDS-FREE ACCESS
R when the external door handles are
touched
R during convenience closing SmartKey
91Opening and closing Z
Page 134 of 502
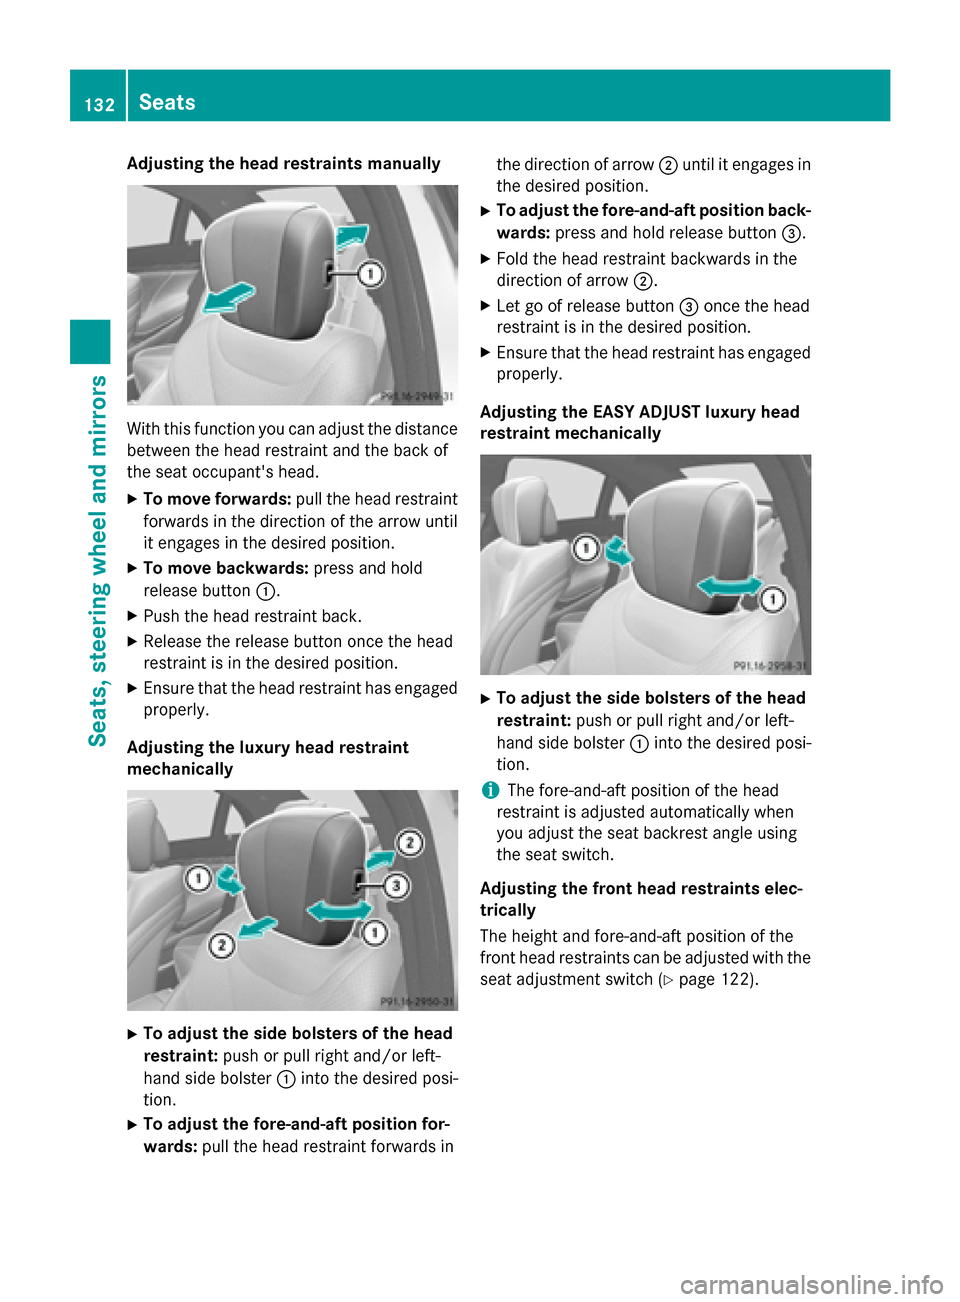
Adjusting the head restraints manually
With this function you can adjust the distance
between the head restraint and the back of
the seat occupant's head.
X To move forwards: pull the head restraint
forwards in the direction of the arrow until
it engages in the desired position.
X To move backwards: press and hold
release button :.
X Push the head restraint back.
X Release the release button once the head
restraint is in the desired position.
X Ensure that the head restraint has engaged
properly.
Adjusting the luxury head restraint
mechanically X
To adjust the side bolsters of the head
restraint: push or pull right and/or left-
hand side bolster :into the desired posi-
tion.
X To adjust the fore-and-aft position for-
wards: pull the head restraint forwards in the direction of arrow
;until it engages in
the desired position.
X To adjust the fore-and-aft position back-
wards: press and hold release button =.
X Fold the head restraint backwards in the
direction of arrow ;.
X Let go of release button =once the head
restraint is in the desired position.
X Ensure that the head restraint has engaged
properly.
Adjusting the EASY ADJUST luxury head
restraint mechanically X
To adjust the side bolsters of the head
restraint: push or pull right and/or left-
hand side bolster :into the desired posi-
tion.
i The fore-and-aft position of the head
restraint is adjusted automatically when
you adjust the seat backrest angle using
the seat switch.
Adjusting the front head restraints elec-
trically
The height and fore-and-aft position of the
front head restraints can be adjusted with the seat adjustment switch (Y page 122).132
SeatsSeats, steering wheel and
mirrors
Page 142 of 502
i
The steering wheel only moves upwards if
it has not already reached the upper stop.
The driver's seat only moves backwards if it is not already in the rearmost position.
Position of the steering wheel and the
driver's seat for driving The steering wheel and the driver's seat are
moved to the previously set position if:
R the driver's door is closed and you insert
the SmartKey into the ignition lock
R you close the driver's door when the igni-
tion is switched on
R you press the Start/Stop button once on
vehicles with KEYLESS-GO
i The steering wheel and the driver's seat
only return to the last set position when the
driving position is stored after seat or steer-
ing wheel adjustment (Y page 144).
The last position of the steering wheel or seat is stored if:
R the ignition is switched off
R the setting is stored with the memory func-
tion (Y page 144).
Crash-responsive EASY-EXIT feature If the crash-responsive EASY-EXIT feature is
triggered in an accident, the steering column
will move upwards when the driver's door is
opened or the SmartKey is removed from the ignition lock. This makes it easier to exit the
vehicle and rescue the occupants.
The crash-responsive EASY-EXIT feature is
only operational if the EASY-EXIT/ENTRY fea-
ture is activated in COMAND (see the sepa-
rate operating instructions). Mirrors
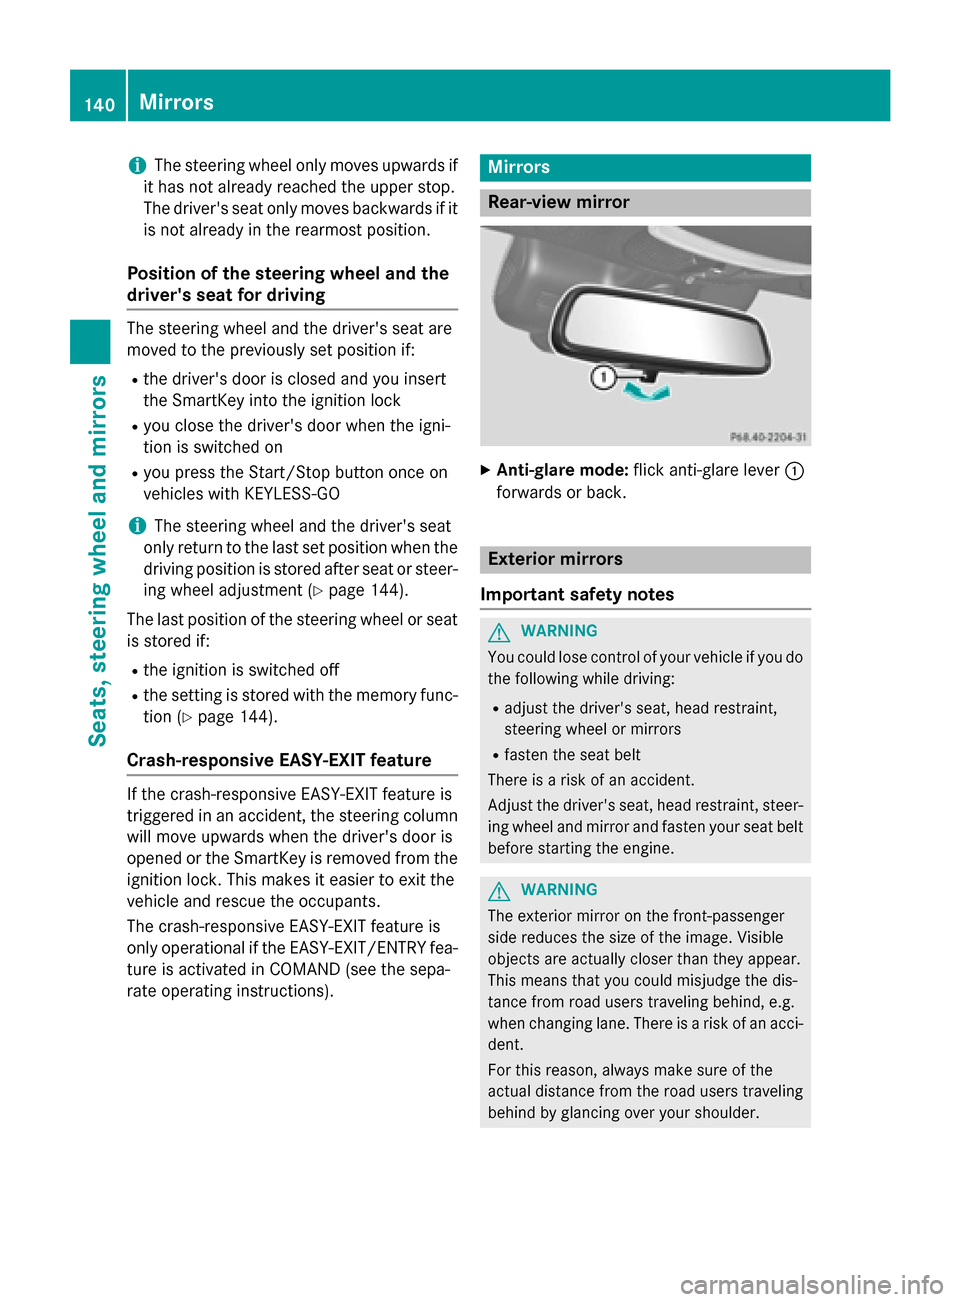
Rear-view mirror
X
Anti-glare mode: flick anti-glare lever :
forwards or back. Exterior mirrors
Important safety notes G
WARNING
You could lose control of your vehicle if you do the following while driving:
R adjust the driver's seat, head restraint,
steering wheel or mirrors
R fasten the seat belt
There is a risk of an accident.
Adjust the driver's seat, head restraint, steer-
ing wheel and mirror and fasten your seat belt before starting the engine. G
WARNING
The exterior mirror on the front-passenger
side reduces the size of the image. Visible
objects are actually closer than they appear.
This means that you could misjudge the dis-
tance from road users traveling behind, e.g.
when changing lane. There is a risk of an acci-
dent.
For this reason, always make sure of the
actual distance from the road users traveling
behind by glancing over your shoulder. 140
MirrorsSeats, steering wheel and mirrors
Page 156 of 502
Important safety notes
G
WARNING
Adaptive Highbeam Assist Plus does not rec-
ognize road users:
R who have no lights, e.g. pedestrians
R who have poor lighting, e.g. cyclists
R whose lighting is blocked, e.g. by a barrier
In very rare cases, Adaptive Highbeam Assist
Plus may not recognize road users who do
have lights, or may recognize them too late. In
this or similar situations, the automatic high-
beam headlamps will not be deactivated or
will be activated regardless. There is a risk of
an accident.
Always carefully observe the traffic conditions and switch off the high-beam headlamps in
good time.
Adaptive Highbeam Assist Plus cannot take
into account road, weather or traffic condi-
tions. Adaptive Highbeam Assist Plus is only
an aid. You are responsible for adjusting the
vehicle's lighting to the prevailing light, visi-
bility and traffic conditions.
In particular, the detection of obstacles can
be restricted if there is:
R poor visibility, e.g. due to fog, heavy rain or
snow
R dirt on the sensors or the sensors are
obscured Switching Adaptive Highbeam Assist
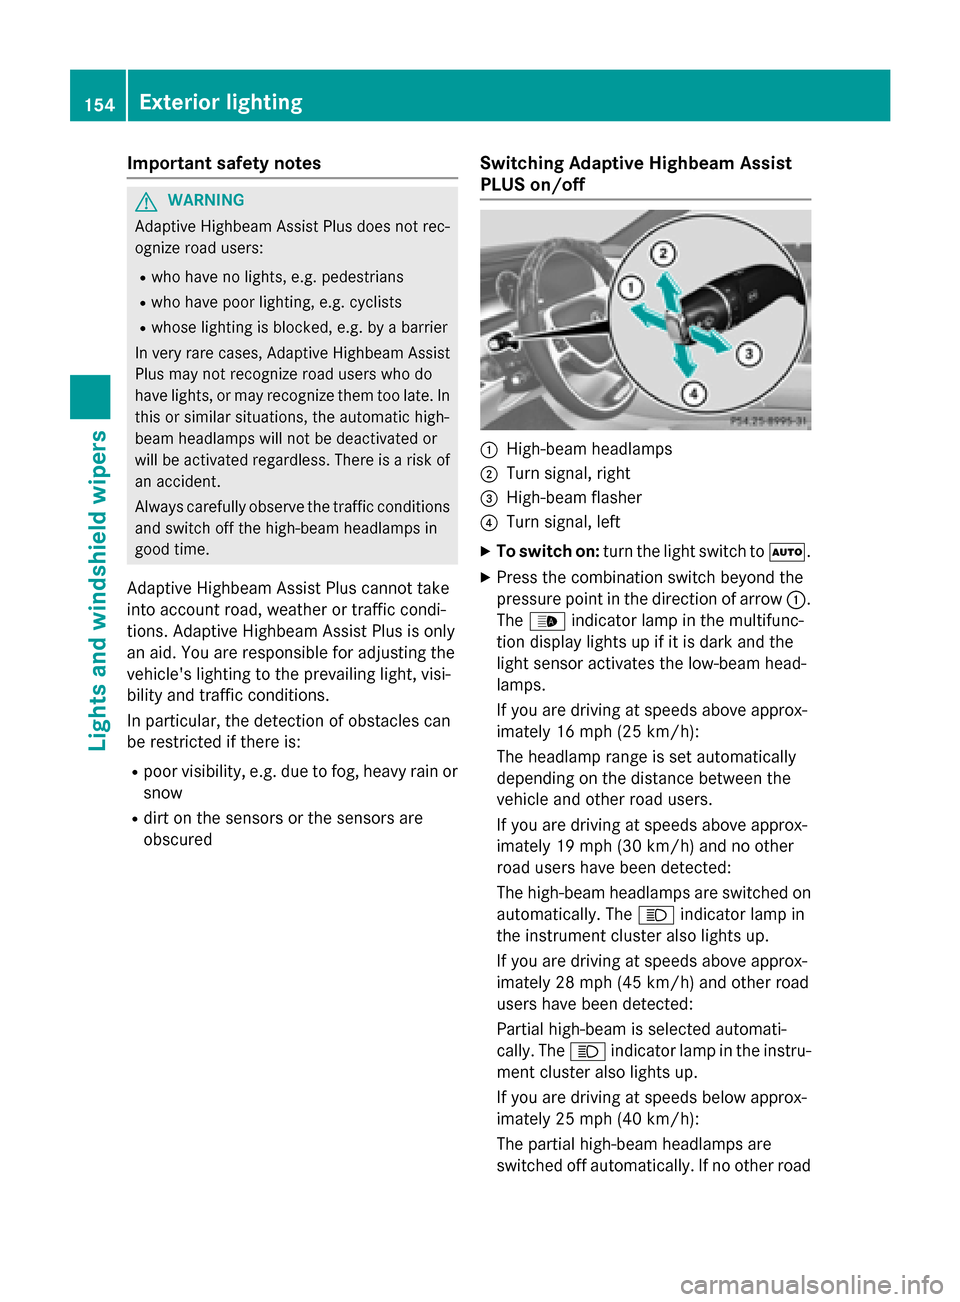
PLUS on/off :
High-beam headlamps
; Turn signal, right
= High-beam flasher
? Turn signal, left
X To switch on: turn the light switch to Ã.
X Press the combination switch beyond the
pressure point in the direction of arrow :.
The _ indicator lamp in the multifunc-
tion display lights up if it is dark and the
light sensor activates the low-beam head-
lamps.
If you are driving at speeds above approx-
imately 16 mph (25 km/h):
The headlamp range is set automatically
depending on the distance between the
vehicle and other road users.
If you are driving at speeds above approx-
imately 19 mph (30 km/h) and no other
road users have been detected:
The high-beam headlamps are switched on
automatically. The Kindicator lamp in
the instrument cluster also lights up.
If you are driving at speeds above approx-
imately 28 mph (45 km/h)and other road
users have been detected:
Partial high-beam is selected automati-
cally. The Kindicator lamp in the instru-
ment cluster also lights up.
If you are driving at speeds below approx-
imately 25 mph (40 km/h):
The partial high-beam headlamps are
switched off automatically. If no other road 154
Exterior lightingLights and windshield wipers
Page 186 of 502
The colors of the indicator lamps in the rocker
switch have the following meanings:
R blue: cooling activated
R red: heating activated
R yellow: departure time preselected
X To activate/deactivate "Immediate pre-
entry climate control" : press rocker
switch :up or down.
The blue or red indicator lamp above the
rocker switch lights up or goes out. Setting the air vents
Important safety notes
G
WARNING
Very hot or very cold air can flow from the air vents. This could result in burns or frostbite in the immediate vicinity of the air vents. There
is a risk of injury.
Make sure that all vehicle occupants always
maintain a sufficient distance to the air out-
lets. If necessary, redirect the airflow to
another area of the vehicle interior.
In order to ensure the direct flow of fresh air
through the air vents into the vehicle interior,
please observe the following notes:
R keep the air inlet between the windshield
and the hood free of blockages, such as ice, snow or leaves.
R never cover the air vents or air intake grilles
in the vehicle interior. Setting the center air vents
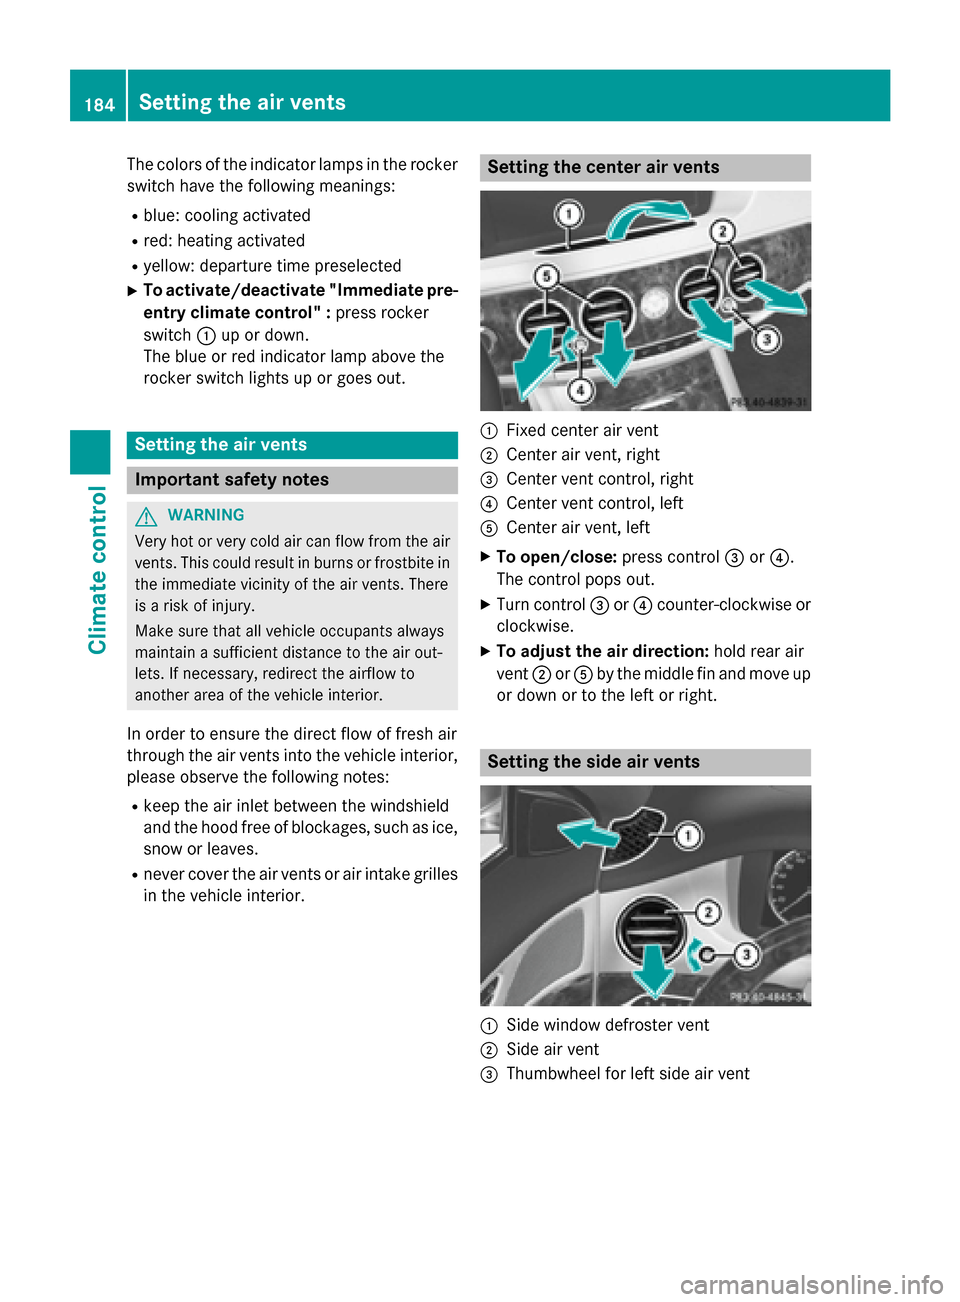
:
Fixed center air vent
; Center air vent, right
= Center vent control, right
? Center vent control, left
A Center air vent, left
X To open/close: press control=or?.
The control pops out.
X Turn control =or? counter-clockwise or
clockwise.
X To adjust the air direction: hold rear air
vent ;orA by the middle fin and move up
or down or to the left or right. Setting the side air vents
:
Side window defroster vent
; Side air vent
= Thumbwheel for left side air vent 184
Setting the air ventsClimate control
Page 190 of 502
Useful information
i This Operator's Manual describes all
models and all standard and optional equip- ment of your vehicle available at the time of
publication of the Operator's Manual.
Country-specific differences are possible.
Please note that your vehicle may not be
equipped with all features described. This
also applies to safety-related systems and
functions.
i Read the information on qualified special-
ist workshops (Y page 29). Notes on breaking-in a new vehicle
Important safety notes
The sensor system of some driving and driv-
ing safety systems adjusts automatically
while a certain distance is being driven after
the vehicle has been delivered or after
repairs. Full system effectiveness is not
reached until the end of this teach-in proce-
dure.
New and replaced brake pads and discs only
reach their optimum braking effect after sev-
eral hundred kilometers of driving. Compen-
sate for this by applying greater force to the
brake pedal. The first 1000 miles (1500 km)
The more you look after the engine when it is
new, the more satisfied you will be with its
performance in the future.
R You should therefore drive at varying vehi-
cle and engine speeds for the first
1000 miles (1500 km).
R Avoid heavy loads, e.g. driving at full throt-
tle, during this period.
R When shifting gears manually, upshift in
good time, before the tachometer needle
reaches Ôof the way to the red area of the
tachometer. R
Do not manually shift to a lower gear to
brake the vehicle.
R Try to avoid depressing the accelerator
pedal beyond the point of resistance (kick-
down).
R All vehicles (except AMG vehicles): ide-
ally, for the first 1,000 miles (1,500 km),
drive in program E.
Additional breaking-in notes for AMG vehi-
cles:
R Do not drive faster than 85 mph
(140 km/ h)for the first 1,000 miles
(1,500 km).
R Only allow the engine to reach a maximum
engine speed of 4,500 rpm briefly.
R Change gear in good time.
R Ideally, for the first 1,000 miles (1,500 km),
drive in program C.
After 1000 mile s(1500 km), you can increase
the engine speed gradually and accelerate
the vehicle to full speed.
You should also observe these notes on
breaking in if the engine or parts of the drive
train on your vehicle have been replaced.
Always observe the respective speed limits. Driving
Important safety notes
G
WARNING
Objects in the driver's footwell can restrict the pedal travel or obstruct a depressed pedal.
The operating and road safety of the vehicle is
jeopardized. There is a risk of an accident.
Make sure that all objects in the vehicle are
stowed correctly, and that they cannot enter
the driver's footwell. Install the floormats
securely and as specified in order to ensure
sufficient clearance for the pedals. Do not use loose floormats and do not place floormats on
top of one another. 188
DrivingDriving and parking