Distance MERCEDES-BENZ S-Class 2015 W222 Service Manual
[x] Cancel search | Manufacturer: MERCEDES-BENZ, Model Year: 2015, Model line: S-Class, Model: MERCEDES-BENZ S-Class 2015 W222Pages: 502, PDF Size: 9.59 MB
Page 260 of 502
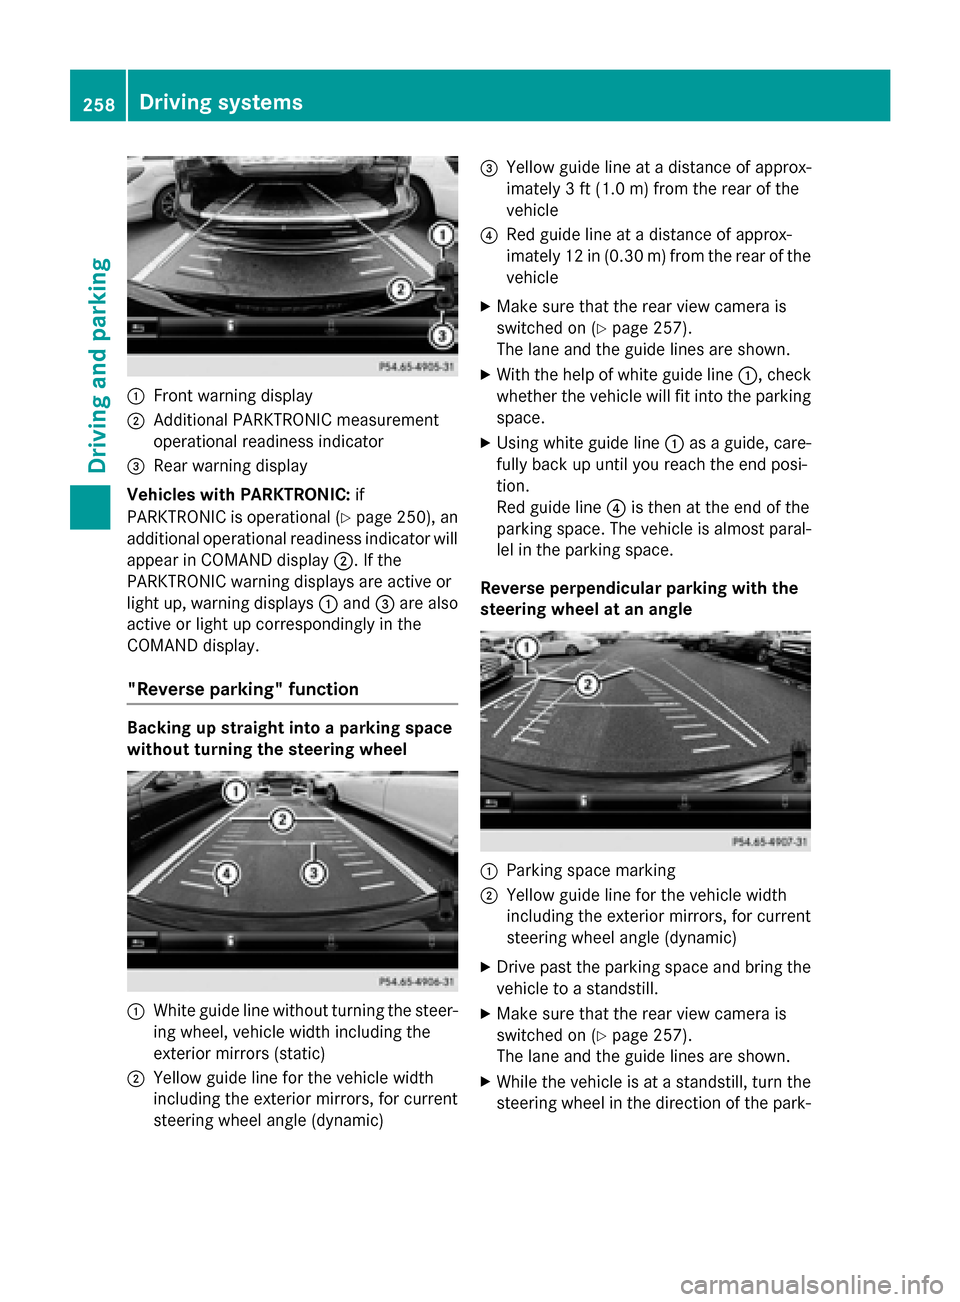
:
Front warning display
; Additional PARKTRONIC measurement
operational readiness indicator
= Rear warning display
Vehicles with PARKTRONIC: if
PARKTRONIC is operational (Y page 250), an
additional operational readiness indicator will appear in COMAND display ;. If the
PARKTRONIC warning displays are active or
light up, warning displays :and =are also
active or light up correspondingly in the
COMAND display.
"Reverse parking" function Backing up straight into a parking space
without turning the steering wheel
:
White guide line without turning the steer-
ing wheel, vehicle width including the
exterior mirrors (static)
; Yellow guide line for the vehicle width
including the exterior mirrors, for current
steering wheel angle (dynamic) =
Yellow guide line at a distance of approx-
imately 3 ft (1.0 m) fromthe rear of the
vehicle
? Red guide line at a distance of approx-
imately 12 in (0.30 m) fromthe rear of the
vehicle
X Make sure that the rear view camera is
switched on (Y page 257).
The lane and the guide lines are shown.
X With the help of white guide line :, check
whether the vehicle will fit into the parking space.
X Using white guide line :as a guide, care-
fully back up until you reach the end posi-
tion.
Red guide line ?is then at the end of the
parking space. The vehicle is almost paral-
lel in the parking space.
Reverse perpendicular parking with the
steering wheel at an angle :
Parking space marking
; Yellow guide line for the vehicle width
including the exterior mirrors, for current
steering wheel angle (dynamic)
X Drive past the parking space and bring the
vehicle to a standstill.
X Make sure that the rear view camera is
switched on (Y page 257).
The lane and the guide lines are shown.
X While the vehicle is at a standstill, turn the
steering wheel in the direction of the park- 258
Driving systemsDriving an
d parking
Page 261 of 502
ing space until yellow guide line
;reaches
parking space marking :.
X Keep the steering wheel in that position
and back up carefully. :
Yellow guide line for the vehicle width
including the exterior mirrors, for current
steering wheel angle (dynamic)
X Stop the vehicle when it is almost exactly in
front of the parking space.
The white lane should be as close to parallel
with the parking space marking as possi-
ble. :
White guide line at current steering wheel
angle
; Parking space marking
X Turn the steering wheel to the center posi-
tion while the vehicle is stationary. :
Red guide line at a distance of approx-
imately 12 in (0.30 m) from the rear of the
vehicle
; White guide line without turning the steer-
ing wheel
= End of parking space
X Back up carefully until you have reached
the final position.
Red guide line :is then at end of parking
space =. The vehicle is almost parallel in
the parking space.
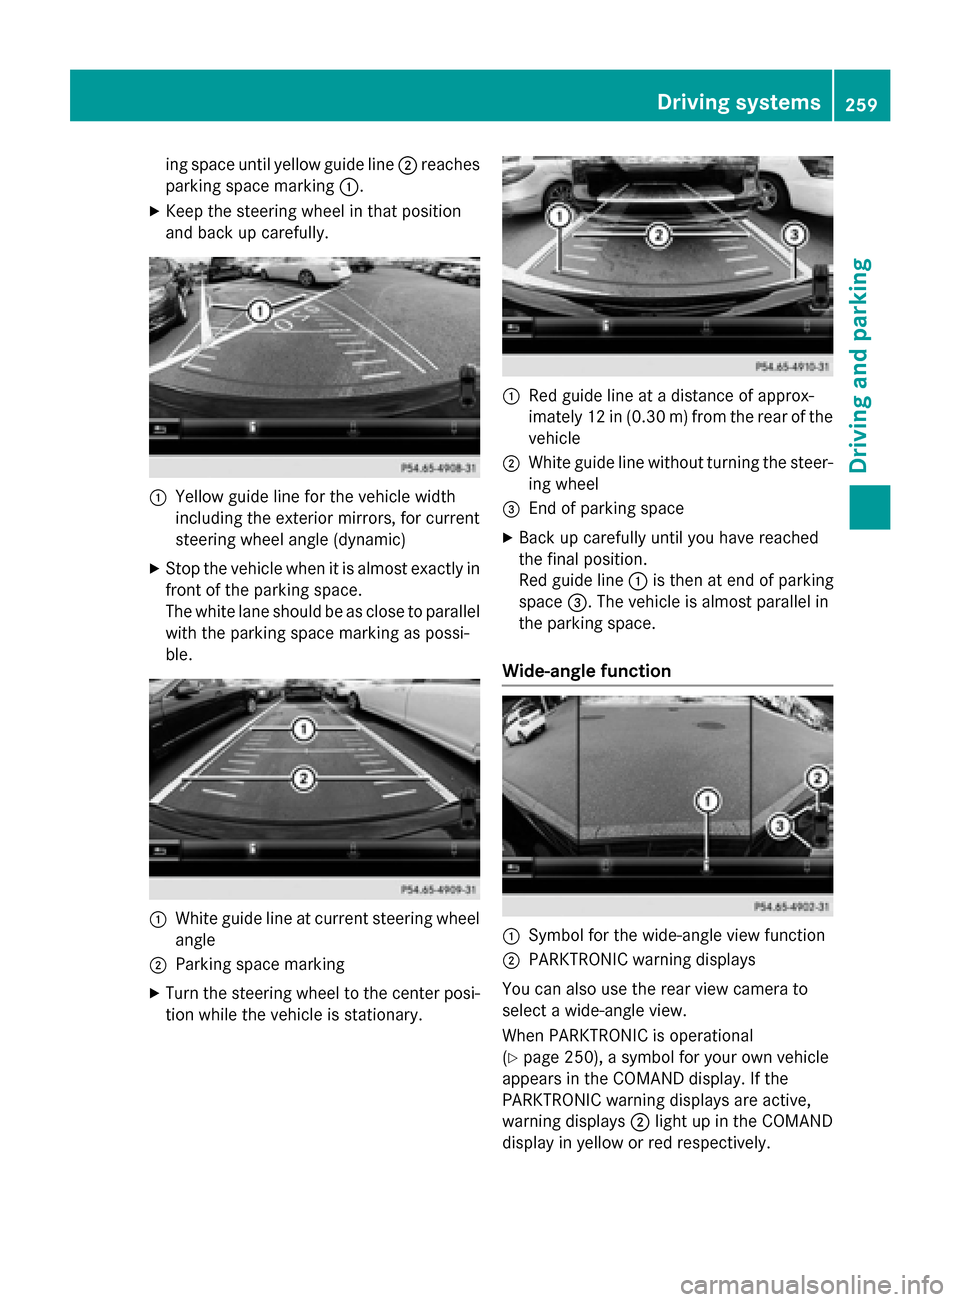
Wide-angle function :
Symbol for the wide-angle view function
; PARKTRONIC warning displays
You can also use the rear view camera to
select a wide-angle view.
When PARKTRONIC is operational
(Y page 250), a symbol for your own vehicle
appears in the COMAND display. If the
PARKTRONIC warning displays are active,
warning displays ;light up in the COMAND
display in yellow or red respectively. Driving systems
259Driving and parking Z
Page 263 of 502
R
if the camera lenses are dirty or covered.
Observe the notes on cleaning
(Y page 416)
R if the vehicle components in which the
cameras are installed are damaged. In this
event, have the camera position and setting checked at a qualified specialist workshop.
Do not use the 360° camera in this case. You
can otherwise injure others or cause damage to objects or the vehicle.
The guide lines in the COMAND display showthe distances to your vehicle. The distances
only apply to road level.
In trailer mode, the guide lines show the dis-
tances at the level of the trailer coupling.
The cameras in the front and in the rear area
are each protected by a flap. These flaps are
opened when the 360° camera is activated.
Observe the notes on cleaning (Y page 416).
For technical reasons, the flaps may remain
open briefly after the 360° camera has been
deactivated.
Activation conditions The 360° camera image can be displayed if:
R COMAND is switched on (see the separate
operating instructions)
R The 360° Camera
360° Camera function is switched on.
i If the 360° camera is activated at speeds
above approximately 19 mph (30 km/h), a
warning message appears.
The warning message disappears if:
R the vehicle's speed falls below approx-
imately 19 mph (30 km/h). The 360°
camera is then activated.
R the message is confirmed with the %
button. Switching the 360° camera on and off
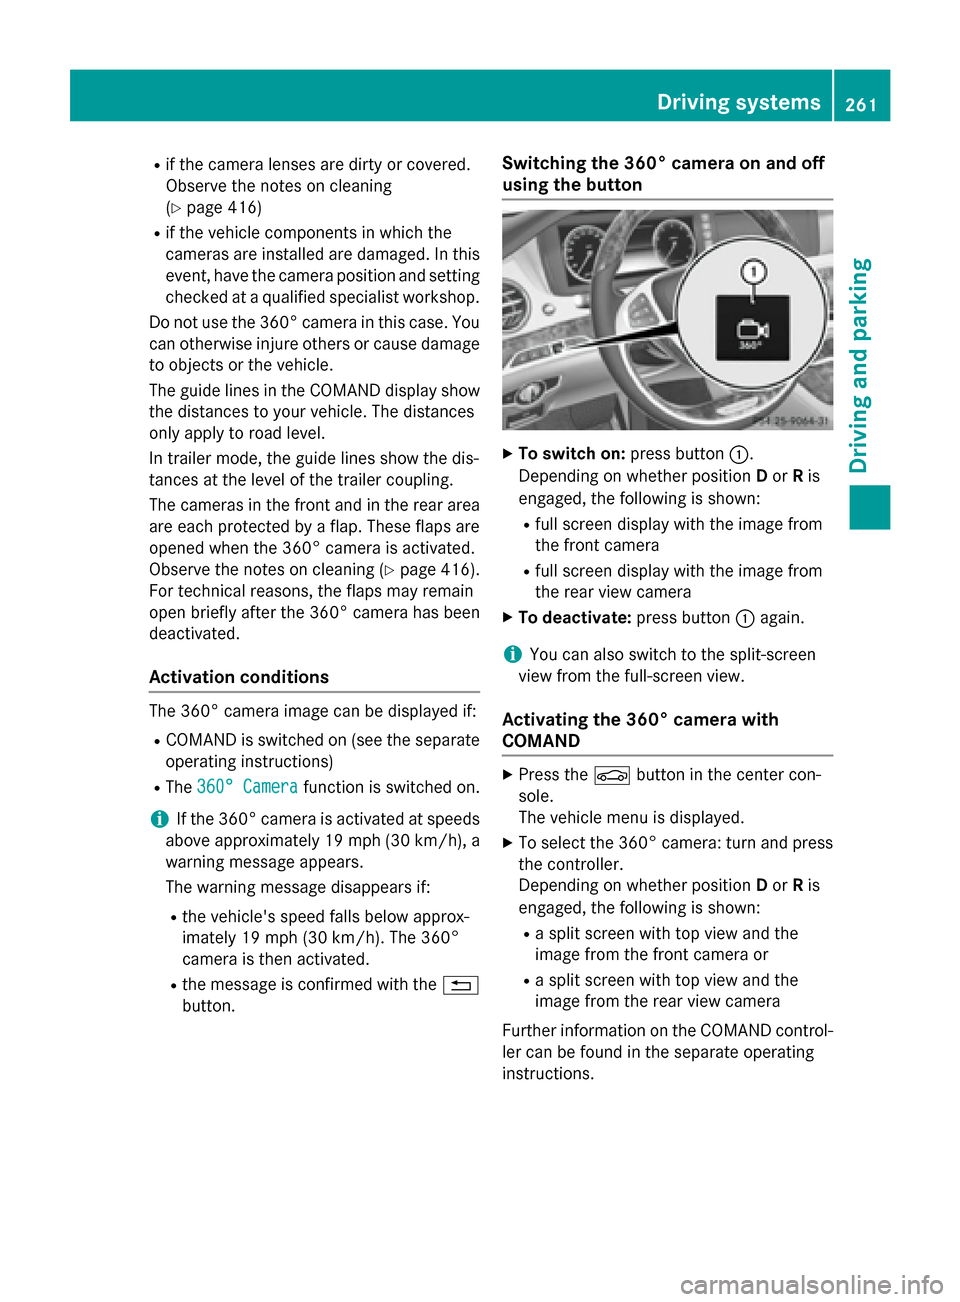
using the button X
To switch on: press button:.
Depending on whether position Dor Ris
engaged, the following is shown:
R full screen display with the image from
the front camera
R full screen display with the image from
the rear view camera
X To deactivate: press button:again.
i You can also switch to the split-screen
view from the full-screen view.
Activating the 360° camera with
COMAND X
Press the Øbutton in the center con-
sole.
The vehicle menu is displayed.
X To select the 360° camera: turn and press
the controller.
Depending on whether position Dor Ris
engaged, the following is shown:
R a split screen with top view and the
image from the front camera or
R a split screen with top view and the
image from the rear view camera
Further information on the COMAND control-
ler can be found in the separate operating
instructions. Driving systems
261Driving and parking Z
Page 264 of 502
Activating the 360° camera using
reverse gear The 360° camera images can be automati-
cally displayed by engaging reverse gear.
X Make sure that the SmartKey is in position
2 in the ignition lock.
X Make sure that the Activation by R
Activation by R
gear gear function is selected in COMAND (see
separate operating instructions).
X To show the 360° camera image: engage
reverse gear.
The area behind the vehicle is shown in the
COMAND display in split-screen mode. You see the top view of the vehicle and the
image from the rear view camera.
Selecting the split-screen and full
screen displays Switching between split screen views:
X To switch to the line with the vehicle icons:
slide ZVthe controller.
X To select a vehicle icon: turn the controller.
Switching to full screen mode:
X 180° View
180° View Turn and press the controller.
i The 180° option is only available in the
following views:
R Top view with picture from the rear view
camera
R Top view with picture from the front cam-
era
Displays in the COMAND display Important safety notes
The camera system may show a distorted
view of obstacles, show them incorrectly or
not at all. Obstacles are not shown by the
system in the following locations:
R under the front and rear bumpers
R very close to the front and rear bumpers
R in close range above the handle on the
trunk lid R
very close to the exterior mirrors
R in the transitional areas between the vari-
ous cameras in the virtual top view
! Objects not at ground level may appear to
be further away than they actually are, e.g.:
R the bumper of a parked vehicle
R the drawbar of a trailer
R the ball coupling of a trailer tow hitch
R the rear section of an HGV
R a slanted post
Use the guidelines only for orientation.
Approach objects no further than the bot-
tom-most guideline.
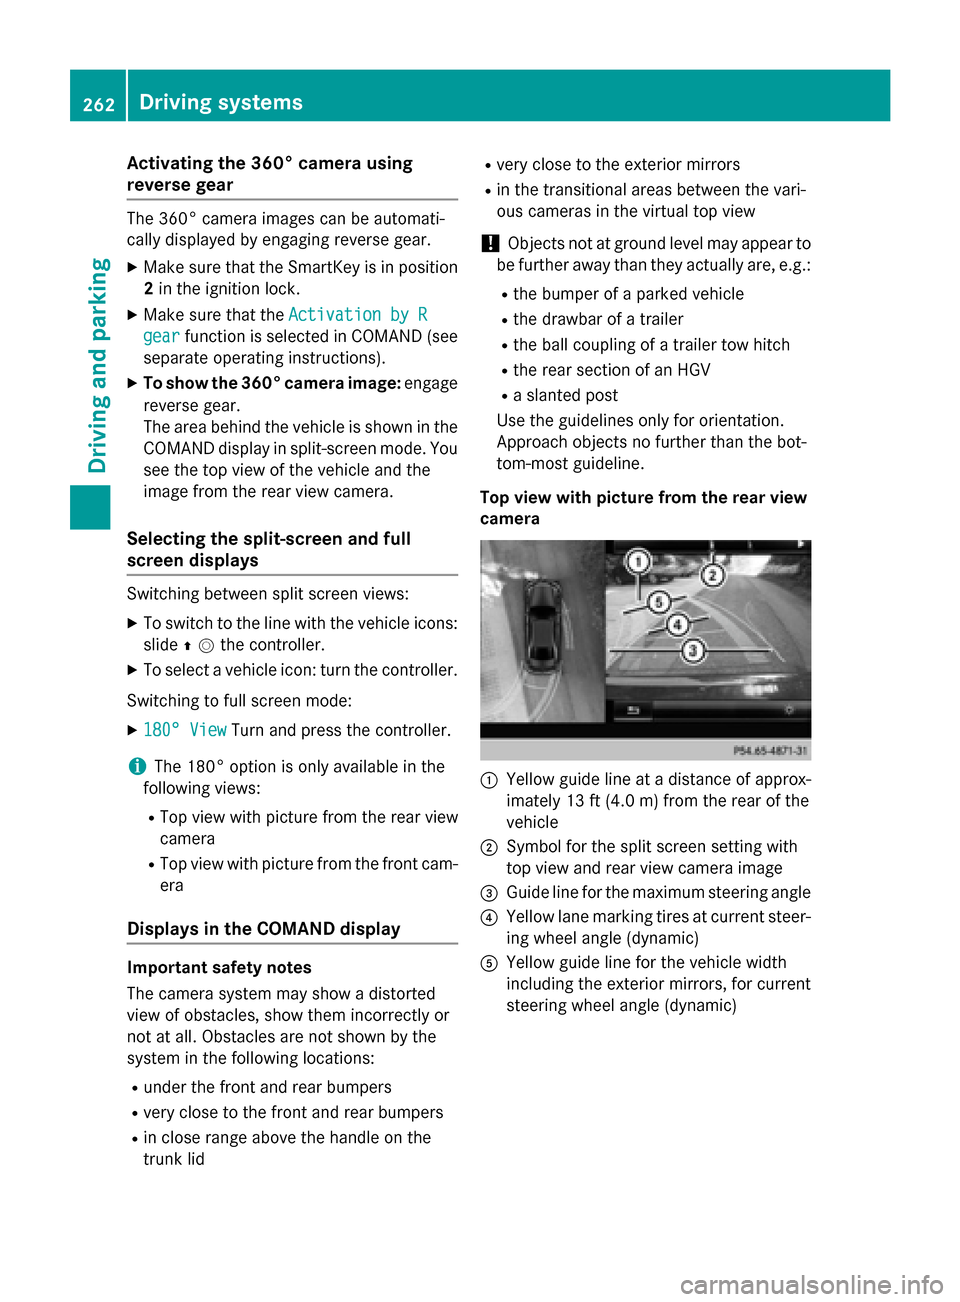
Top view with picture from the rear view
camera :
Yellow guide line at a distance of approx-
imately 13 ft (4.0 m) from the rear of the
vehicle
; Symbol for the split screen setting with
top view and rear view camera image
= Guide line for the maximum steering angle
? Yellow lane marking tires at current steer-
ing wheel angle (dynamic)
A Yellow guide line for the vehicle width
including the exterior mirrors, for current
steering wheel angle (dynamic) 262
Driving systemsDriving an
d parking
Page 265 of 502
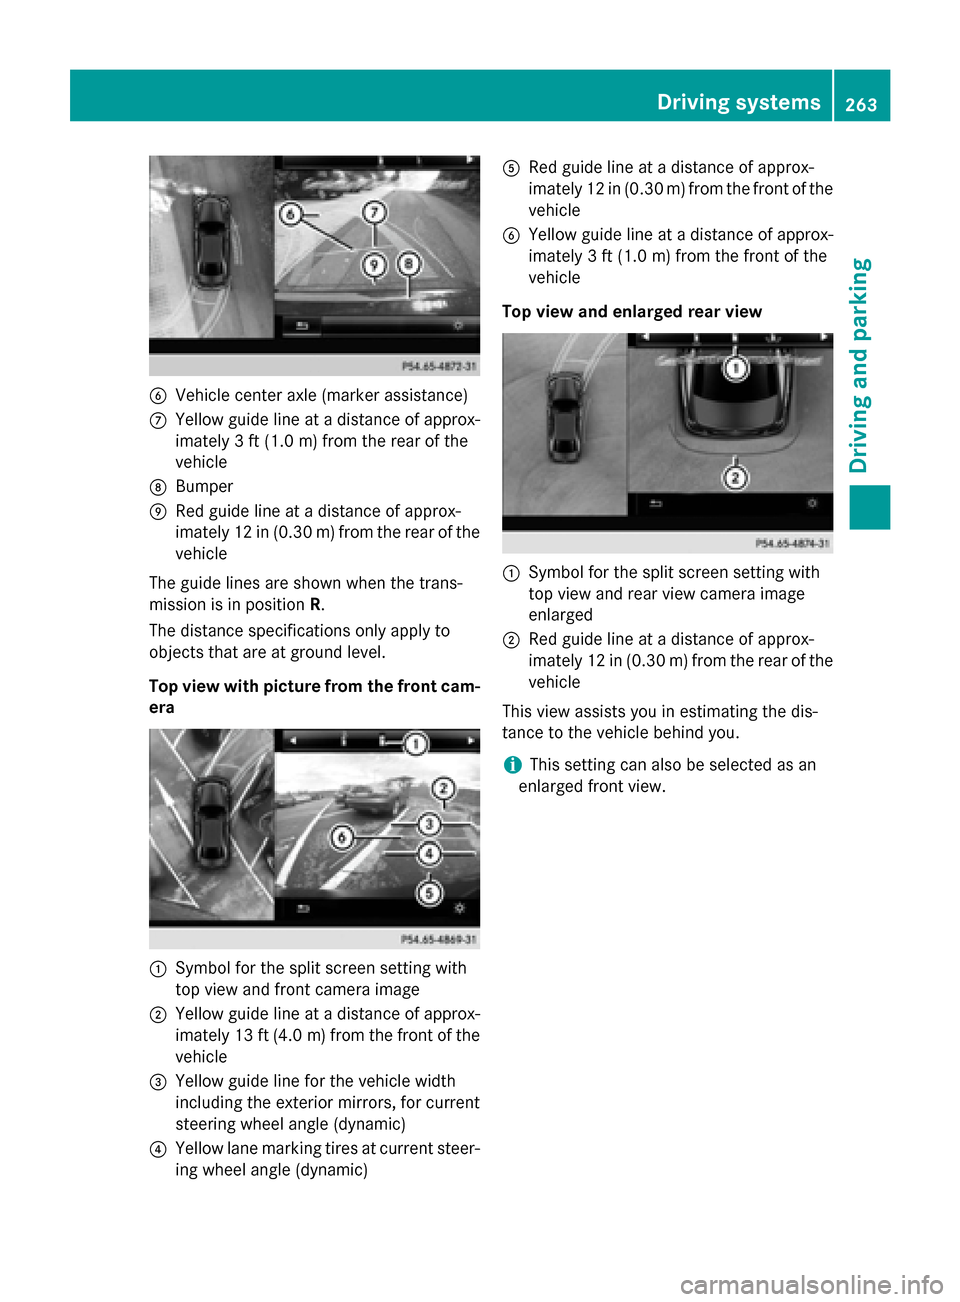
B
Vehicle center axle (marker assistance)
C Yellow guide line at a distance of approx-
imately 3 ft (1.0 m) from the rear of the
vehicle
D Bumper
E Red guide line at a distance of approx-
imately 12 in (0.30 m) from the rear of the
vehicle
The guide lines are shown when the trans-
mission is in position R.
The distance specifications only apply to
objects that are at ground level.
Top view with picture from the front cam-
era :
Symbol for the split screen setting with
top view and front camera image
; Yellow guide line at a distance of approx-
imately 13 ft (4.0 m)from the front of the
vehicle
= Yellow guide line for the vehicle width
including the exterior mirrors, for current
steering wheel angle (dynamic)
? Yellow lane marking tires at current steer-
ing wheel angle (dynamic) A
Red guide line at a distance of approx-
imately 12 in (0.30 m) from the front of the
vehicle
B Yellow guide line at a distance of approx-
imately 3 ft (1.0 m) from the front of the
vehicle
Top view and enlarged rear view :
Symbol for the split screen setting with
top view and rear view camera image
enlarged
; Red guide line at a distance of approx-
imately 12 in (0.30 m) from the rear of the
vehicle
This view assists you in estimating the dis-
tance to the vehicle behind you.
i This setting can also be selected as an
enlarged front view. Driving systems
263Driving and parking Z
Page 268 of 502
In addition to the message shown in the mul-
tifunction display, you will then hear a warn-
ing tone.
X If necessary, take a break.
X Confirm the message by pressing the a
button on the steering wheel.
On long journeys, take regular breaks in good time to allow yourself to rest properly. If you
do not take a break and ATTENTION ASSIST
continues to detect increasing lapses in con-centration, you will be warned again after
15 minutes at the earliest. This will only hap-
pen if ATTENTION ASSIST still detects typical indicators of fatigue or increasing lapses in
concentration.
If a warning is output in the multifunction dis-
play, a service station search is performed in
COMAND. You can select a service station
and navigation to this service station will then
begin. This function can be activated and
deactivated in COMAND. Night View Assist Plus
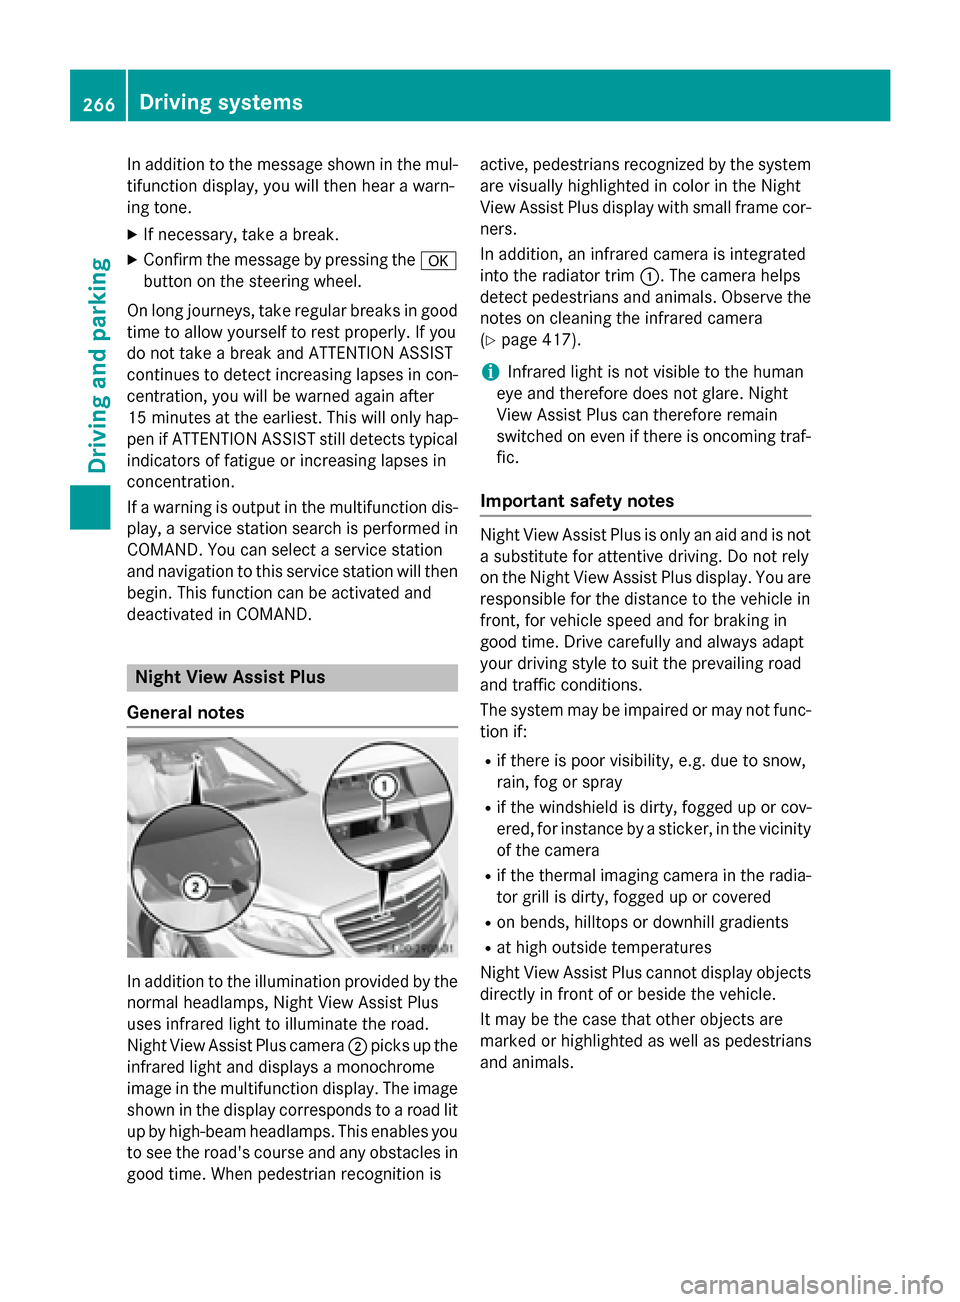
General notes In addition to the illumination provided by the
normal headlamps, Night View Assist Plus
uses infrared light to illuminate the road.
Night View Assist Plus camera ;picks up the
infrared light and displays a monochrome
image in the multifunction display. The image
shown in the display corresponds to a road lit
up by high-beam headlamps. This enables you to see the road's course and any obstacles in
good time. When pedestrian recognition is active, pedestrians recognized by the system
are visually highlighted in color in the Night
View Assist Plus display with small frame cor- ners.
In addition, an infrared camera is integrated
into the radiator trim :. The camera helps
detect pedestrians and animals. Observe the notes on cleaning the infrared camera
(Y page 417).
i Infrared light is not visible to the human
eye and therefore does not glare. Night
View Assist Plus can therefore remain
switched on even if there is oncoming traf- fic.
Important safety notes Night View Assist Plus is only an aid and is not
a substitute for attentive driving. Do not rely
on the Night View Assist Plus display. You are responsible for the distance to the vehicle in
front, for vehicle speed and for braking in
good time. Drive carefully and always adapt
your driving style to suit the prevailing road
and traffic conditions.
The system may be impaired or may not func-
tion if:
R if there is poor visibility, e.g. due to snow,
rain, fog or spray
R if the windshield is dirty, fogged up or cov-
ered, for instance by a sticker, in the vicinity of the camera
R if the thermal imaging camera in the radia-
tor grill is dirty, fogged up or covered
R on bends, hilltops or downhill gradients
R at high outside temperatures
Night View Assist Plus cannot display objects
directly in front of or beside the vehicle.
It may be the case that other objects are
marked or highlighted as well as pedestrians
and animals. 266
Driving systemsDriving and parking
Page 269 of 502
Pedestrian and animal recognition
General notes
Pedestrian or animal recognition may be
impaired or inoperative if:
R pedestrians or animals are partially or
entirely obscured by other objects, e.g.
parked vehicles
R the silhouette of the pedestrian or of the
animal in the Night View Assist Plus display
is incomplete or interrupted, e.g. by pow-
erful light reflections
R pedestrians or animals do not contrast with
the surroundings
R the camera system no longer recognizes
pedestrians as persons due to special
clothing or other objects
R pedestrians are not in an upright position,
e.g. sitting, squatting or lying
R animals are not recognized by the system,
e.g. because of their size or shape
The pedestrian and animal recognition is
deactivated at temperatures above 90 ‡ (32 †). The spotlight function and automatic
delayed switch-off are then no longer active.
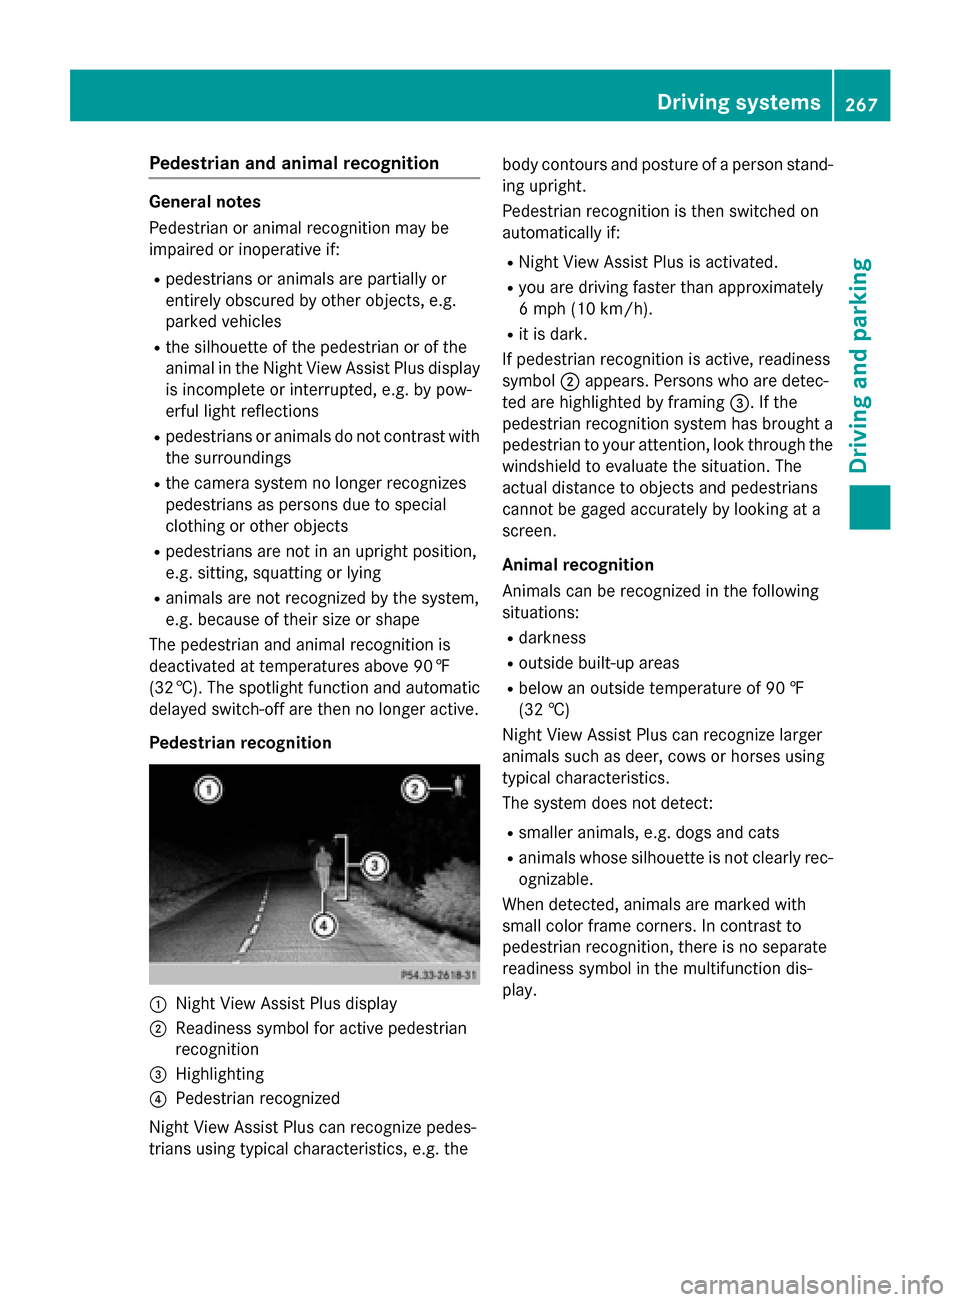
Pedestrian recognition :
Night View Assist Plus display
; Readiness symbol for active pedestrian
recognition
= Highlighting
? Pedestrian recognized
Night View Assist Plus can recognize pedes-
trians using typical characteristics, e.g. the body contours and posture of a person stand-
ing upright.
Pedestrian recognition is then switched on
automatically if:
R Night View Assist Plus is activated.
R you are driving faster than approximately
6 mph (10 km/h).
R it is dark.
If pedestrian recognition is active, readiness
symbol ;appears. Persons who are detec-
ted are highlighted by framing =. If the
pedestrian recognition system has brought a pedestrian to your attention, look through the
windshield to evaluate the situation. The
actual distance to objects and pedestrians
cannot be gaged accurately by looking at a
screen.
Animal recognition
Animals can be recognized in the following
situations:
R darkness
R outside built-up areas
R below an outside temperature of 90 ‡
(32 †)
Night View Assist Plus can recognize larger
animals such as deer, cows or horses using
typical characteristics.
The system does not detect:
R smaller animals, e.g. dogs and cats
R animals whose silhouette is not clearly rec-
ognizable.
When detected, animals are marked with
small color frame corners. In contrast to
pedestrian recognition, there is no separate
readiness symbol in the multifunction dis-
play. Driving systems
267Driving and parking Z
Page 273 of 502
As a result, Active Blind Spot Assist may nei-
ther give warnings nor intervene in such sit-
uations. There is a risk of an accident.
Always observe the traffic conditions care-
fully, and maintain a safe lateral distance.
i USA only: This device has been approved
by the FCC as a "Vehicular Radar System". The radar sensor is intended for use in an
automotive radar system only. Removal,
tampering, or altering of the device will void
any warranties, and is not permitted by the
FCC. Do not tamper with, alter, or use in
any non-approved way.
Any unauthorized modification to this
device could void the user's authority to
operate the equipment.
i Canada only: This device complies with
RSS-210 of Industry Canada. Operation is
subject to the following two conditions:
1. This device may not cause harmful inter-
ference, and
2. This device must accept any interference received, including interference that may
cause undesired operation of the device.
Removal, tampering, or altering of the
device will void any warranties, and is not
permitted. Do not tamper with, alter, or use
in any non-approved way.
Any unauthorized modification to this
device could void the user's authority to
operate the equipment.
Radar sensors
The Active Blind Spot Assist radar sensors are integrated into the front and rear bumpers
and behind a cover in the radiator trim. Make
sure that the bumpers and the cover in the
radiator grill are free of dirt, ice or slush. The rear sensors must not be covered, e.g. by
bicycle racks or overhanging loads. Following
a severe impact or in the event of damage to the bumpers, have the function of the radar
sensors checked at a qualified specialist
workshop. Active Blind Spot Assist may oth-
erwise no longer work properly. Monitoring area G
WARNING
Active Blind Spot Assist does not detect all
traffic situations and road users. There is a
risk of an accident.
Always make sure that there is sufficient dis-
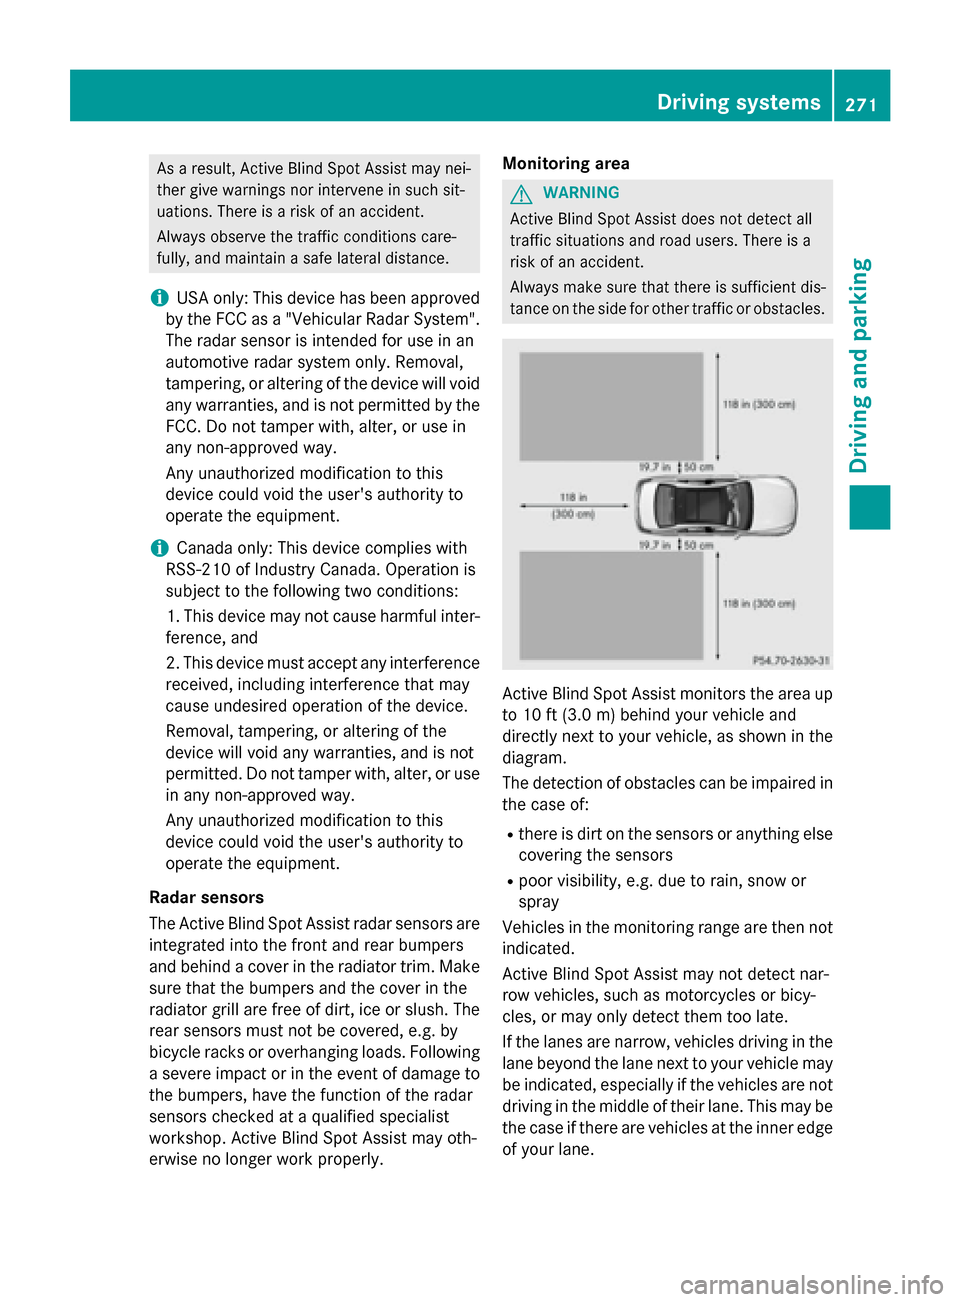
tance on the side for other traffic or obstacles. Active Blind Spot Assist monitors the area up
to 10 ft (3.0 m) behind your vehicle and
directly next to your vehicle, as shown in the
diagram.
The detection of obstacles can be impaired in the case of:
R there is dirt on the sensors or anything else
covering the sensors
R poor visibility, e.g. due to rain, snow or
spray
Vehicles in the monitoring range are then not
indicated.
Active Blind Spot Assist may not detect nar-
row vehicles, such as motorcycles or bicy-
cles, or may only detect them too late.
If the lanes are narrow, vehicles driving in the
lane beyond the lane next to your vehicle may be indicated, especially if the vehicles are not
driving in the middle of their lane. This may be
the case if there are vehicles at the inner edge of your lane. Driving systems
271Driving and parking Z
Page 274 of 502
Due to the nature of the system:
R warnings may be issued in error when driv-
ing close to crash barriers or similar solid
lane borders.
R warnings may be interrupted when driving
alongside particularly long vehicles, e.g.
trucks, for a prolonged time.
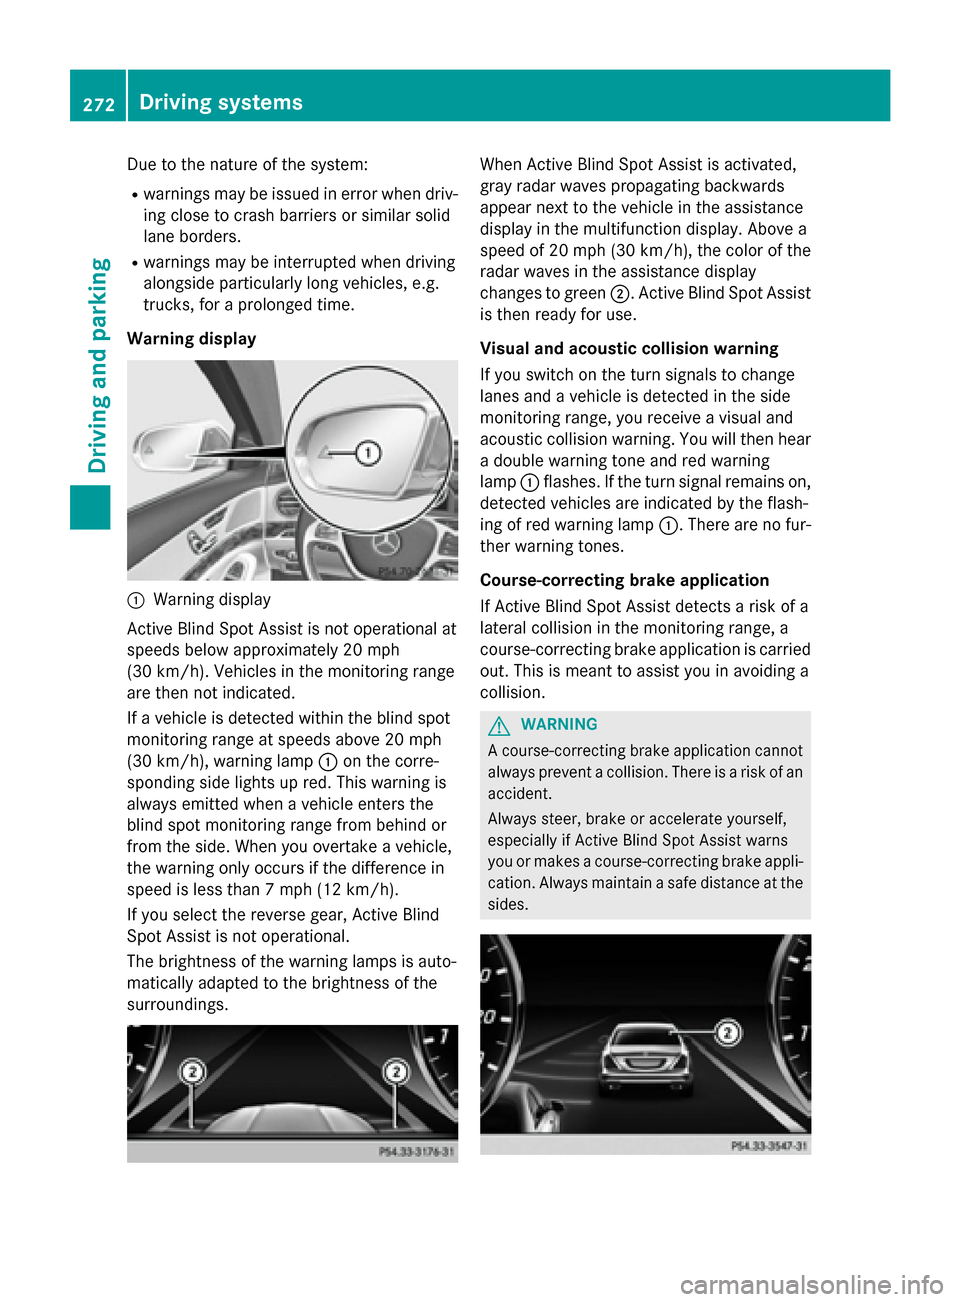
Warning display :
Warning display
Active Blind Spot Assist is not operational at
speeds below approximately 20 mph
(30 km/h). Vehicles in the monitoring range
are then not indicated.
If a vehicle is detected within the blind spot
monitoring range at speeds above 20 mph
(30 km/h), warning lamp :on the corre-
sponding side lights up red. This warning is
always emitted when a vehicle enters the
blind spot monitoring range from behind or
from the side. When you overtake a vehicle,
the warning only occurs if the difference in
speed is less than 7 mph (12 km/h).
If you select the reverse gear, Active Blind
Spot Assist is not operational.
The brightness of the warning lamps is auto-
matically adapted to the brightness of the
surroundings. When Active Blind Spot Assist is activated,
gray radar waves propagating backwards
appear next to the vehicle in the assistance
display in the multifunction display. Above a
speed of 20 mph (30 km/h), the color of the
radar waves in the assistance display
changes to green ;. Active Blind Spot Assist
is then ready for use.
Visual and acoustic collision warning
If you switch on the turn signals to change
lanes and a vehicle is detected in the side
monitoring range, you receive a visual and
acoustic collision warning. You will then hear a double warning tone and red warning
lamp :flashes. If the turn signal remains on,
detected vehicles are indicated by the flash-
ing of red warning lamp :. There are no fur-
ther warning tones.
Course-correcting brake application
If Active Blind Spot Assist detects a risk of a
lateral collision in the monitoring range, a
course-correcting brake application is carried
out. This is meant to assist you in avoiding a
collision. G
WARNING
A course-correcting brake application cannot always prevent a collision. There is a risk of an
accident.
Always steer, brake or accelerate yourself,
especially if Active Blind Spot Assist warns
you or makes a course-correcting brake appli-
cation. Always maintain a safe distance at the sides. 272
Driving systemsDriving an
d parking
Page 275 of 502
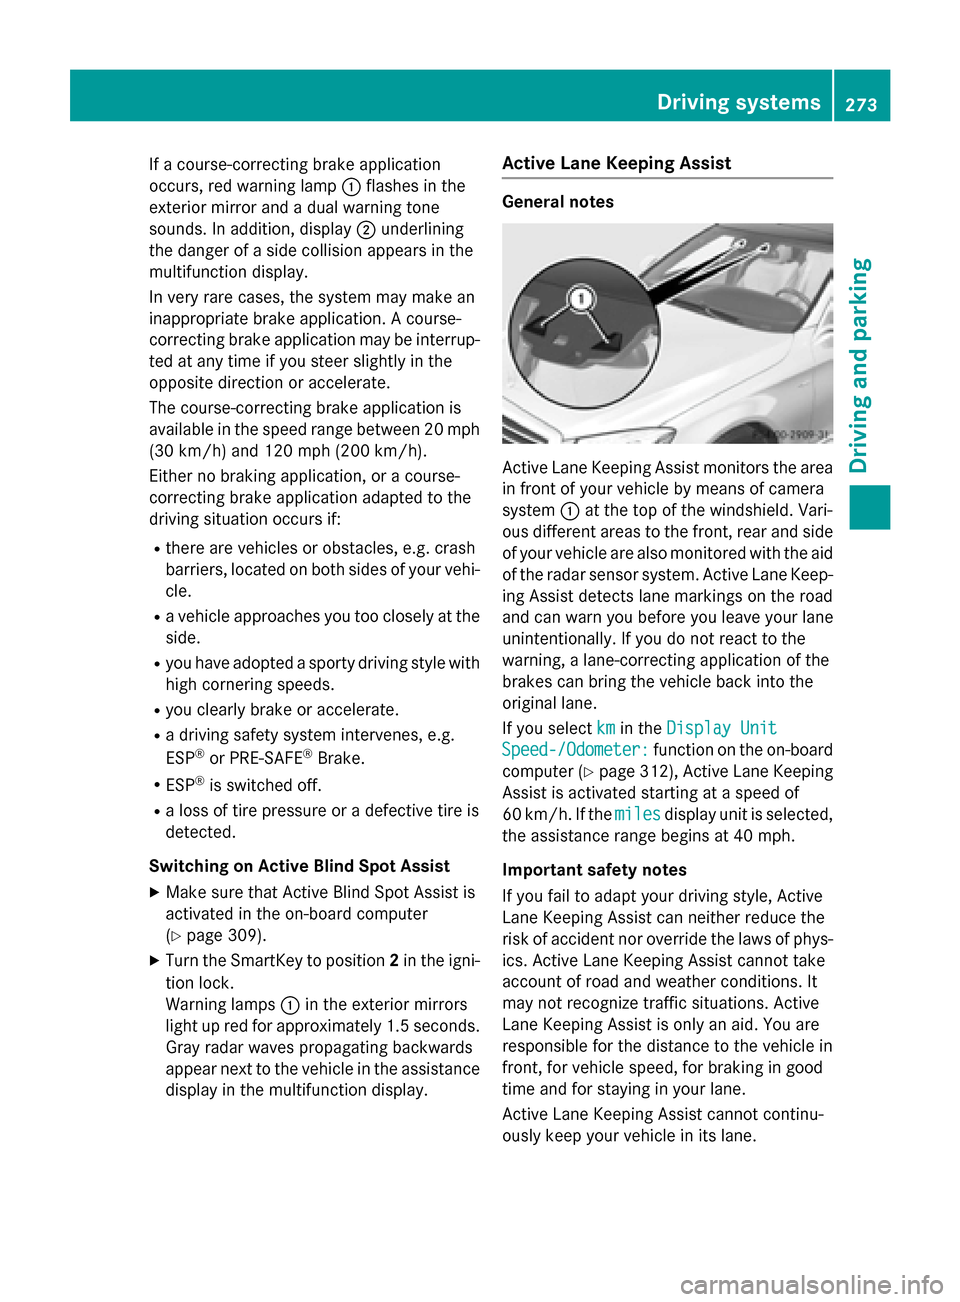
If a course-correcting brake application
occurs, red warning lamp :flashes in the
exterior mirror and a dual warning tone
sounds. In addition, display ;underlining
the danger of a side collision appears in the
multifunction display.
In very rare cases, the system may make an
inappropriate brake application. A course-
correcting brake application may be interrup-
ted at any time if you steer slightly in the
opposite direction or accelerate.
The course-correcting brake application is
available in the speed range between 20 mph (30 km/h) and 120 mph (200 km/h).
Either no braking application, or a course-
correcting brake application adapted to the
driving situation occurs if:
R there are vehicles or obstacles, e.g. crash
barriers, located on both sides of your vehi-
cle.
R a vehicle approaches you too closely at the
side.
R you have adopted a sporty driving style with
high cornering speeds.
R you clearly brake or accelerate.
R a driving safety system intervenes, e.g.
ESP ®
or PRE-SAFE ®
Brake.
R ESP ®
is switched off.
R a loss of tire pressure or a defective tire is
detected.
Switching on Active Blind Spot Assist X Make sure that Active Blind Spot Assist is
activated in the on-board computer
(Y page 309).
X Turn the SmartKey to position 2in the igni-
tion lock.
Warning lamps :in the exterior mirrors
light up red for approximately 1.5 seconds. Gray radar waves propagating backwards
appear next to the vehicle in the assistance
display in the multifunction display. Active Lane Keeping Assist General notes
Active Lane Keeping Assist monitors the area
in front of your vehicle by means of camera
system :at the top of the windshield. Vari-
ous different areas to the front, rear and side of your vehicle are also monitored with the aid
of the radar sensor system. Active Lane Keep-
ing Assist detects lane markings on the road
and can warn you before you leave your lane
unintentionally. If you do not react to the
warning, a lane-correcting application of the
brakes can bring the vehicle back into the
original lane.
If you select km kmin the Display Unit
Display Unit
Speed-/Odometer:
Speed-/Odometer: function on the on-board
computer (Y page 312), Active Lane Keeping
Assist is activated starting at a speed of
60 km/h. If the miles milesdisplay unit is selected,
the assistance range begins at 40 mph.
Important safety notes
If you fail to adapt your driving style, Active
Lane Keeping Assist can neither reduce the
risk of accident nor override the laws of phys- ics. Active Lane Keeping Assist cannot take
account of road and weather conditions. It
may not recognize traffic situations. Active
Lane Keeping Assist is only an aid. You are
responsible for the distance to the vehicle in
front, for vehicle speed, for braking in good
time and for staying in your lane.
Active Lane Keeping Assist cannot continu-
ously keep your vehicle in its lane. Driving systems
273Driving and parking Z