interior lights MERCEDES-BENZ S-Class 2015 W222 Owner's Manual
[x] Cancel search | Manufacturer: MERCEDES-BENZ, Model Year: 2015, Model line: S-Class, Model: MERCEDES-BENZ S-Class 2015 W222Pages: 502, PDF Size: 9.59 MB
Page 8 of 502
Brake force distribution, elec-
tronic
see EBD (electronic brake force
distribution)
Brake lamps
Display message ............................ 334
Brake pedal
Pedal resistance/pedal travel .......... 48
Brakes
ABS .................................................. 76
Adaptive Brake Assist ...................... 81
BAS .................................................. 77
BAS PLUS with Cross-Traffic
Assist ............................................... 77
Brake fluid (notes) ......................... 492
Display message ............................ 317
EBD .................................................. 83
High-performance brake system .... 227
Hill start assist ............................... 192
HOLD function ............................... 242
Important safety notes .................. 226
Maintenance .................................. 226
Parking brake ................................ 222
RBS warning lamp .......................... 366
Recuperative Brake System ............. 48
Riding tips ...................................... 226
Warning lamp ................................. 357
Breakdown
see Flat tire
see Towing away
Brightness control (instrument
cluster lighting) ................................... 37
Buttons on the steering wheel ......... 295C
California Important notice for retail cus-
tomers and lessees .......................... 26
Calling up a malfunction
see Display messages
Camera
see 360° camera
Car
see Vehicle
Car key
see SmartKey Care
360° camera ................................. 416
Car wash ........................................ 411
Carpets .......................................... 419
Display ........................................... 417
Exhaust pipe .................................. 417
Exterior lights ................................ 415
Gear or selector lever .................... 418
Interior ........................................... 417
Matte finish ................................... 414
Night View Assist Plus ................... 417
Note s............................................. 411
Paint .............................................. 413
Plastic trim .................................... 418
Power washer ................................ 413
Rear view camera .......................... 416
Roof lining ...................................... 419
Seat belt ........................................ 419
Seat cove r..................................... 418
Sensors ......................................... 415
Steering wheel ............................... 418
Trim pieces .................................... 418
Washing by hand ........................... 413
Wheels ........................................... 414
Windows ........................................ 415
Wiper blades .................................. 415
Wooden trim .................................. 418
CD player/CD changer (on-board
computer) .......................................... 304
Center console
Overview .......................................... 39
Stowage space .............................. 373
Center console in the rear com-
partment
Stowage compartment .................. 375
Central locking
Locking/unlocking (SmartKey )........ 91
Charging
see Charging the high-voltage bat-tery (important safety notes)
Charging cable
Connecting .................................... 214
Controls ......................................... 213
Important safety notes .................. 212
Indicator lamp ................................ 214
Removing ....................................... 215
Storing ........................................... 212
Warming up ................................... 211 6
Index
Page 15 of 502
Light sensor (display message)
.......3 35
Lights
Adaptive Highbeam Assist PLUS .... 153
Automatic headlamp mode ............ 150
Cornering light function ................. 153
Driving abroad ............................... 150
Fogged up headlamps .................... 155
Hazard warning lamps ................... 152
High beam flasher .......................... 152
High-beam headlamps ................... 152
Light switch ................................... 150
Low-beam headlamps .................... 151
Parking lamps ................................ 151
Setting exterior lighting ................. 150
Standing lamps .............................. 151
Switching the daytime running
lamps on/off (on-board com-
puter) ............................................. 312
Switching the spotlight on/off ....... 312
Turn signals ................................... 152
see Interior lighting
see Replacing bulbs
Loading guidelines ............................ 372
Locking
see Central locking
Locking (doors)
Automatic ........................................ 98
Emergency locking ........................... 99
From inside (central locking but-
ton) ................................................. .97
Locking centrally
see Central locking
Low-beam headlamps
Display message ............................ 333
Setting for driving abroad (sym-
metrical) ........................................ 150
Switching on/off .......................... .151
Lumbar support
Adjusting the 4-way lumbar sup-
port ................................................ 134
Luxury head restraints ..................... 132M
M+S tires ............................................ 444
Magic Body Control ........................... 243
MAGIC SKY CONTROL ....................... 114Malfunction message
see Display messages
Matte finish (cleaning instruc-
tions) ................................................. .414
Maximum charge current
Setting (charging cable) ................. 213
Setting (on-board computer) .......... 310
MBC
see Magic Body Control
mbrace
Call priority ................................... .393
Display message ............................ 324
Downloading destinations
(COMAND) ..................................... 394
Downloading routes ....................... 397
Emergency call .............................. 391
General notes ................................ 389
Geo fencing ................................... 397
Locating a stolen vehicle .............. .396
MB info call button ........................ 393
Remote fault diagnosi s.................. 396
Remote vehicle locking .................. 395
Roadside Assistance button .......... 392
Search & Send ............................... 394
Self-test ......................................... 390
Speed alert .................................... 397
System .......................................... 390
Triggering the vehicle alarm ........... 397
Vehicle remote unlocking .............. 395
Mechanical key
Function/note s................................ 93
Inserting .......................................... 93
Locking vehicle ................................ 99
Removing ......................................... 93
Unlocking the driver's door .............. 98
Media Interface
see Separate operating instructions
Memory card (audio) ......................... 304
Memory function
In the rear compartment ................ 144
Seats, steering wheel, exterior
mirrors ........................................... 143
Storing settings (rear compart-
ment) ............................................. 145
Mercedes-Benz Intelligent Drive
360°camera .................................. 260
ABS (Anti-lock Brake System) .......... 76
Active Blind Spot Assist ................. 270 Index
13
Page 53 of 502
ted. It will then not be deployed in the event
of an accident.
R PASSENGER AIR BAG ON ;lights up: the
front-passenger front air bag is enabled. If,
in the event of an accident, all deployment
criteria are met, the front-passenger front
air bag is deployed.
Depending on the person in the front-
passenger seat, the front-passenger front air
bag must either be deactivated or enabled;
see the following points. You must make sure
of this both before and during a journey.
R Children in a child restraint system:
whether the front-passenger front air bag is
enabled or deactivated depends on the
installed child restraint system, and the age and size of the child. Therefore, be sure to
observe the notes on the "Occupant Clas-
sification System (OCS)" (Y page 59) and
on "Children in the vehicle" (Y page 69).
There you will also find instructions on rear-
ward and forward-facing child restraint sys- tems on the front-passenger seat.
R All other persons: depending on the clas-
sification of the person in the front-
passenger seat, the front-passenger front
air bag is enabled or deactivated
(Y page 59). Be sure to observe the notes
on "Seat belts“ (Y page 51) and "Air bags"
(Y page 56). There you can also find infor-
mation on the correct seat position. Seat belts
Introduction Seat belts are the most effective means of
restricting the movement of vehicle occu-
pants in the event of an accident or the vehi-
cle rolling over. This reduces the risk of vehi- cle occupants coming into contact with parts
of the vehicle interior or being ejected from
the vehicle. Furthermore, the seat belt helps
to keep the vehicle occupant in the best posi- tion in relation to the air bag. The seat belt system comprises:
R Seat belts
R Emergency Tensioning Devices for the
front seat belts and the outer seat belts in
the rear
R Seat belt force limiters for the front seat
belts and the outer seat belts in the rear
R Belt bags for the outer seat belts in the rear,
depending on the vehicle's equipment
If the seat belt is pulled out of the belt outlet quickly or with a jerky movement, the belt
retractor locks. The belt strap cannot be
extracted any further.
The Emergency Tensioning Device tightens
the seat belt in an accident, pulling the belt
close against the body. However it does not
pull the vehicle occupant back in the direction
of the backrest.
The Emergency Tensioning Device does not
correct an incorrect seat position or the rout-
ing of an incorrectly fastened seat belt.
When triggered, seat belt force limiters help
to reduce the force exerted by the seat belt on the vehicle occupant.
The seat belt force limiters for the front seats
are synchronized with the front air bags,
which absorb part of the deceleration force.
This can reduce the force exerted on the vehi-
cle occupants during an accident.
! If the front-passenger seat is unoccupied,
do not insert the belt tongue into the buckle of the front-passenger seat. This may oth-
erwise lead to the triggering of the Emer-
gency Tensioning Device in the event of an accident, which will then need to be
replaced.
Important safety notes The use of seat belts and child restraint sys-
tems is required by law in:
R all 50 states
R the U.S. territories
R the District of Columbia
R all Canadian provinces Occupant safety
51Safety Z
Page 62 of 502
the child restraint system. Never place
objects under or behind the child restraint
system, e.g. cushions. Fully retract the seat
cushion length. The entire base of the child
restraint system must always rest on the seat cushion of the front-passenger seat. The
backrest of the forwards-facing child restraint
system must, as far as possible, be resting on the backrest of the front-passenger seat.
The child restraint system must not touch the
roof or be put under strain by the head
restraint. Adjust the angle of the seat back-
rest and the head restraint position accord-
ingly.
Only then can OCS be guaranteed to function correctly. Always observe the child restraint
system manufacturer's installation instruc-
tions.
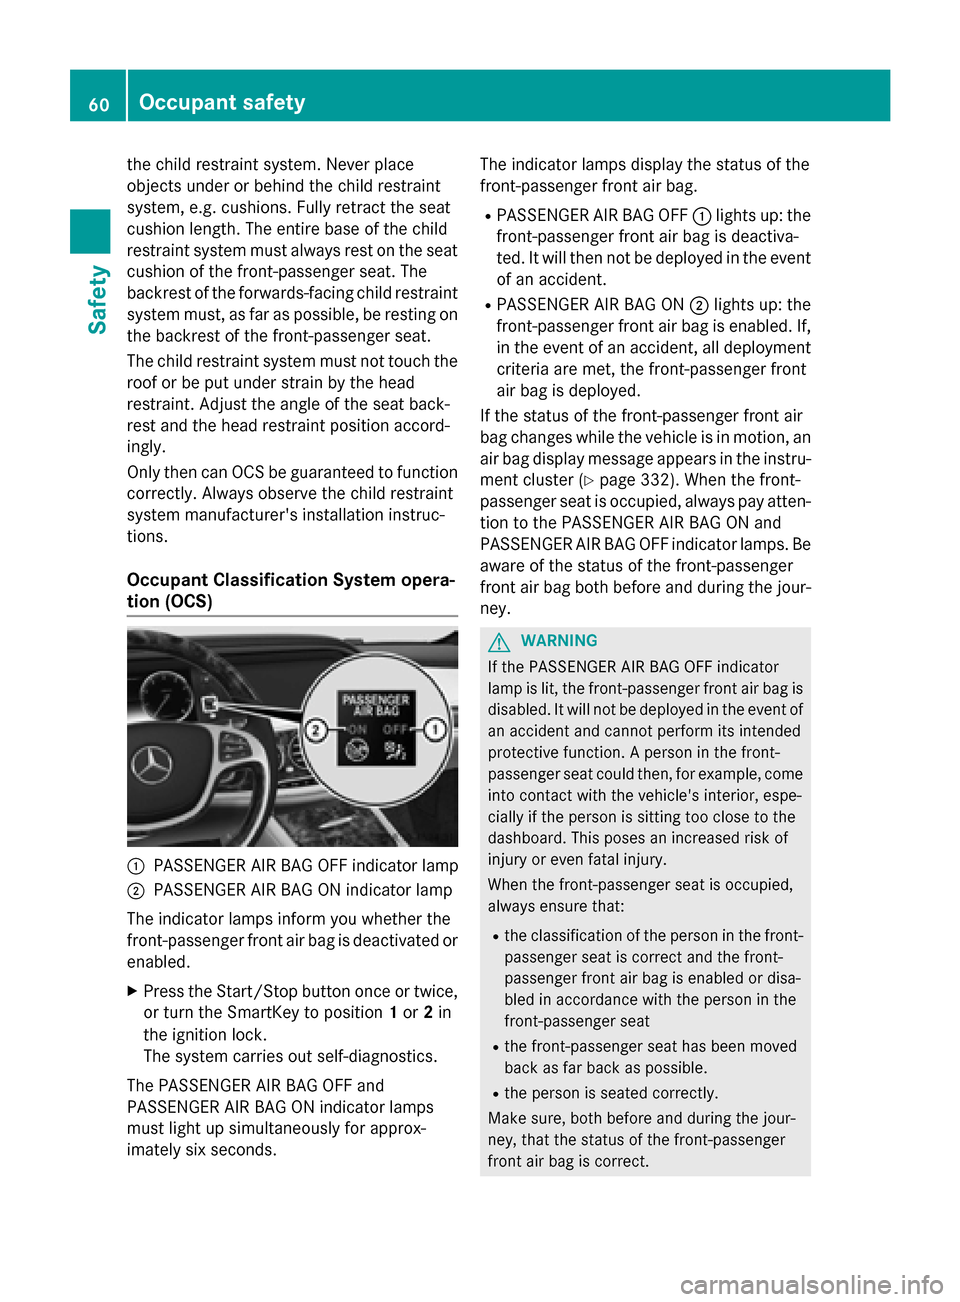
Occupant Classification System opera-
tion (OCS) :
PASSENGER AIR BAG OFF indicator lamp
; PASSENGER AIR BAG ON indicator lamp
The indicator lamps inform you whether the
front-passenger front air bag is deactivated or
enabled.
X Press the Start/Stop button once or twice,
or turn the SmartKey to position 1or 2in
the ignition lock.
The system carries out self-diagnostics.
The PASSENGER AIR BAG OFF and
PASSENGER AIR BAG ON indicator lamps
must light up simultaneously for approx-
imately six second s. The indi
cator lamps display the status of the
front-passenger front air bag.
R PASSENGER AIR BAG OFF :lights up: the
front-passenger front air bag is deactiva-
ted. It will then not be deployed in the event
of an accident.
R PASSENGER AIR BAG ON ;lights up: the
front-passenger front air bag is enabled. If, in the event of an accident, all deployment
criteria are met, the front-passenger front
air bag is deployed.
If the status of the front-passenger front air
bag changes while the vehicle is in motion, an air bag display message appears in the instru-
ment cluster (Y page 332). When the front-
passenger seat is occupied, always pay atten-
tion to the PASSENGER AIR BAG ON and
PASSENGER AIR BAG OFF indicator lamps. Be aware of the status of the front-passenger
front air bag both before and during the jour- ney. G
WARNING
If the PASSENGER AIR BAG OFF indicator
lamp is lit, the front-passenger front air bag is disabled. It will not be deployed in the event of
an accident and cannot perform its intended
protective function. A person in the front-
passenger seat could then, for example, come
into contact with the vehicle's interior, espe-
cially if the person is sitting too close to the
dashboard. This poses an increased risk of
injury or even fatal injury.
When the front-passenger seat is occupied,
always ensure that:
R the classification of the person in the front-
passenger seat is correct and the front-
passenger front air bag is enabled or disa-
bled in accordance with the person in the
front-passenger seat
R the front-passenger seat has been moved
back as far back as possible.
R the person is seated correctly.
Make sure, both before and during the jour-
ney, that the status of the front-passenger
front air bag is correct. 60
Occupant safetySafety
Page 151 of 502
Useful information
............................150
Exterior lighting ................................ 150
Interior lighting ................................. 155
Replacing bulbs ................................. 157
Windshield wipers ............................157 149Lights and windshield wipers
Page 157 of 502
users are recognize, the high-beam head-
lamps are switched on.
If you are driving at speeds below approx-
imately 16 mph (25 km/h) or the roads are
adequately illuminated:
The high-beam headlamps are switched off automatically. The Kindicator lamp in
the instrument cluster goes out. The _
indicator lamp in the multifunction display
remains lit.
X To switch off: move the combination
switch back to its normal position or move the light switch to another position.
The _ indicator lamp in the multifunc-
tion display goes out. Headlamps fogged up on the inside
Certain climatic and physical conditions may
cause moisture to form in the headlamp. This moisture does not affect the functionality of
the headlamp. Interior lighting
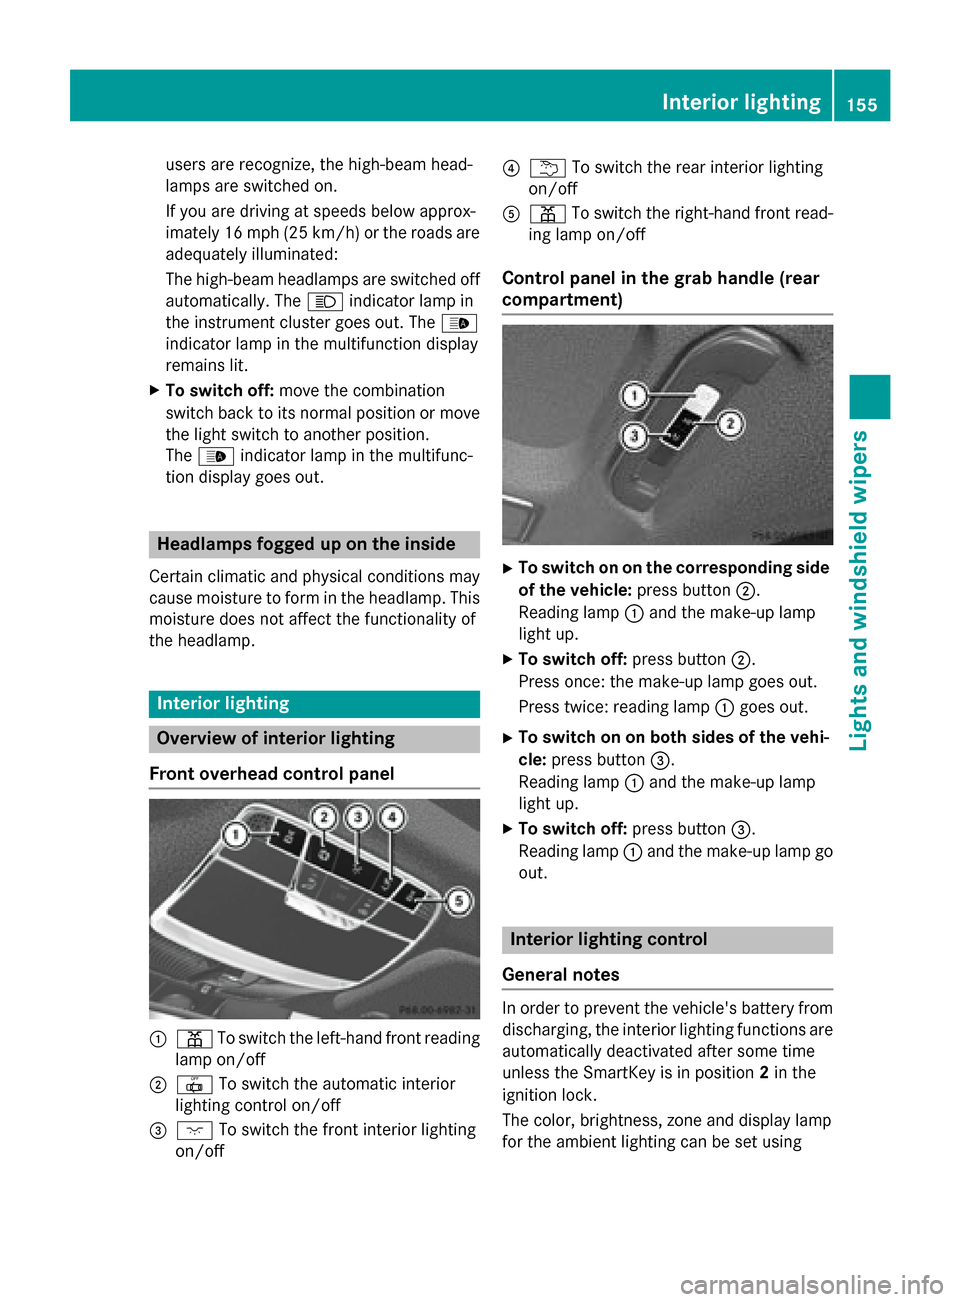
Overview of interior lighting
Front overhead control panel :
p To switch the left-hand front reading
lamp on/off
; | To switch the automatic interior
lighting control on/off
= c To switch the front interior lighting
on/off ?
u To switch the rear interior lighting
on/off
A p To switch the right-hand front read-
ing lamp on/off
Control panel in the grab handle (rear
compartment) X
To switch on on the corresponding side
of the vehicle: press button;.
Reading lamp :and the make-up lamp
light up.
X To switch off: press button;.
Press once: the make-up lamp goes out.
Press twice: reading lamp :goes out.
X To switch on on both sides of the vehi-
cle: press button =.
Reading lamp :and the make-up lamp
light up.
X To switch off: press button=.
Reading lamp :and the make-up lamp go
out. Interior lighting control
General notes In order to prevent the vehicle's battery from
discharging, the interior lighting functions are
automatically deactivated after some time
unless the SmartKey is in position 2in the
ignition lock.
The color, brightness, zone and display lamp
for the ambient lighting can be set using Interior lighting
155Lights and windshield wipers Z
Page 158 of 502
COMAND (see the separate operating
instructions for COMAND).
The interior lighting control can be operated
using the front overhead control panel.
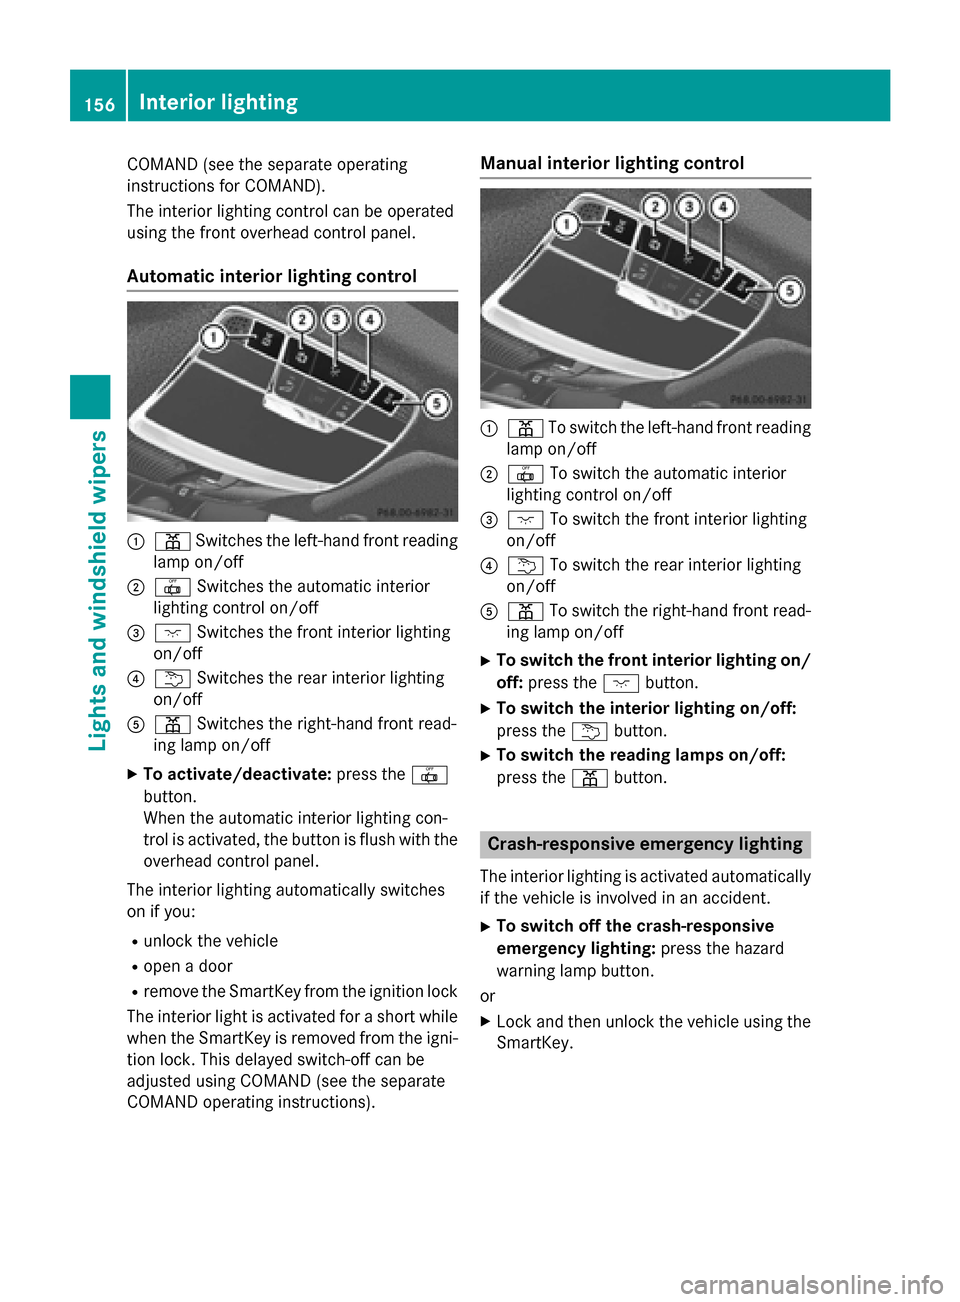
Automatic interior lighting control :
p Switches the left-hand front reading
lamp on/off
; | Switches the automatic interior
lighting control on/off
= c Switches the front interior lighting
on/off
? u Switches the rear interior lighting
on/off
A p Switches the right-hand front read-
ing lamp on/off
X To activate/deactivate: press the|
button.
When the automatic interior lighting con-
trol is activated, the button is flush with the overhead control panel.
The interior lighting automatically switches
on if you:
R unlock the vehicle
R open a door
R remove the SmartKey from the ignition lock
The interior light is activated for a short while when the SmartKey is removed from the igni-
tion lock. This delayed switch-off can be
adjusted using COMAND (see the separate
COMAND operating instructions). Manual interior lighting control
:
p To switch the left-hand front reading
lamp on/off
; | To switch the automatic interior
lighting control on/off
= c To switch the front interior lighting
on/off
? u To switch the rear interior lighting
on/off
A p To switch the right-hand front read-
ing lamp on/off
X To switch the front interior lighting on/
off: press the cbutton.
X To switch the interior lighting on/off:
press the ubutton.
X To switch the reading lamps on/off:
press the pbutton. Crash-responsive emergency lighting
The interior lighting is activated automatically
if the vehicle is involved in an accident.
X To switch off the crash-responsive
emergency lighting: press the hazard
warning lamp button.
or X Lock and then unlock the vehicle using the
SmartKey. 156
Interior lightingLights and windshield wipers
Page 171 of 502
Notes on using automatic climate
control
Climate control system Below, you can find a number of notes and
recommendations to help you use climate
control optimally.
R Activate climate control using the Ã
rocker switch. The indicator lamp in the
à rocker switch lights up.
R Set the temperature to 72 ‡ (22 †).
R Only use the "Windshield defrosting" func-
tion briefly until the windshield is clear
again.
R Only use air-recirculation mode briefly, e.g.
if there are unpleasant outside odors or
when in a tunnel. The windows could oth-
erwise fog up, since no fresh air is drawn
into the vehicle in air-recirculation mode.
R Use the residual heat function if you want to
heat or ventilate the vehicle interior when
the ignition is switched off. The residual
heat function can only be activated or deac- tivated with the ignition switched off. The
residual heat function is switched off whenthe ignition is switched on.
If you are controlling the rear climate control using the front control panel, note the follow-
ing:
R If you set rear-compartment climate con-
trol using the front control panel, the Y
symbol appears in the rear-compartment
control panel display.
R If the rear-compartment climate control is
set using the front control panel, it cannot
be set at the same time using the rear con- trol panel. If controlling the rear climate
control from the front control panel is
locked, wait five seconds. You will then be
able to control the rear climate control
using the rear control panel.
R After selecting the rear compartment set-
tings, the front climate control can be con-
trolled automatically again via COMAND
after five seconds. Alternatively, you can select "Cancel rear
compartment" in the COMAND air-condi-
tioning function bar.
ECO start/stop function During automatic engine switch-off, the cli-
mate control system only operates at a
reduced capacity. If you require the full cli-
mate control output, you can switch off the
ECO start/stop function by pressing the ECO
button (Y page 194). Operating the climate control sys-
tems Switching climate control on/off
General notes When the climate control is switched off, the
air supply and air circulation are also
switched off. The windows could fog up.
Therefore, switch off climate control only
briefly
Switch on climate control primarily using the
à rocker switch (Y page 171).
Switching the front climate control on
and off using the control panel X
Turn the SmartKey to position 2in the igni-
tion lock (Y page 189).
X To activate: press thetrocker switch
up or down.
The COMAND climate control menu opens.
X Activate climate control via the air-condi-
tioning setting bar in COMAND (see the
separate operating instructions).
X To deactivate: press thetrocker
switch up or down.
The COMAND climate control menu opens.
X Deactivate climate control via the air-con-
ditioning setting bar in COMAND (see the
separate operating instructions). Operating the climate control systems
169Climate control
Page 179 of 502
Problems with the rear window defroster
Problem
Possible causes/consequences and
M
MSolutions The rear window
defroster has deactiva-
ted prematurely or can-
not be activated. The battery has not been sufficiently charged.
X Switch off any consumers that are not required, e.g. reading
lamps, interior lighting or the seat heating.
When the battery is sufficiently charged, the rear window
defroster can be activated again. Activating/deactivating air-recircula-
tion mode
General notes You can also temporarily deactivate the flow
of fresh air manually if unpleasant odors are
entering the vehicle from outside. The air
already inside the vehicle will then be recir-
culated.
If you switch on air-recirculation mode, the
windows can fog up more quickly, in particu-
lar at low temperatures. Only use air-recircu-
lation mode briefly to prevent the windows
from fogging up.
Activating/deactivating X
Turn the SmartKey to position 2in the igni-
tion lock (Y page 189).
X To activate: press thegrocker switch
up or down.
The indicator lamp in the grocker
switch lights up.
Air-recirculation mode is automatically acti-
vated at high levels of pollution or at high out- side temperatures. The indicator lamp in the
g rocker switch is not lit when automatic
air-recirculation mode is activated. Outside
air is added after about 30 minutes.
X To deactivate: press thegrocker
switch up or down.
The indicator lamp in the grocker
switch goes out. Air-recirculation mode deactivates automati-
cally:
R after approximately five minutes at outside
temperatures below approximately 41 ‡
(5 †)
R after approximately five minutes if cooling
with air dehumidification is deactivated
R after approximately 30 minutes at outside
temperatures above approximately 41 ‡
(5 †) if the "Cooling with air dehumidifica-
tion" function is activated Activating/deactivating the residual
heat function
General notes Vehicles with rear-compartment climate
control:
once the engine is switched off, it is
possible to make use of the residual heat of
the engine to continue heating or ventilating
the rear and front compartment of the vehicle
for approximately 15 minutes. If the "Residual
heat" function is set for only the front or only
the rear compartment, it is possible to con-
tinue heating or ventilating for approximately
30 minutes.
Vehicles without rear-compartment cli-
mate control: once the engine is switched
off, it is possible to make use of the residual
heat of the engine to continue heating or ven- tilating the front compartment of the vehicle
for approximately 30 minutes.
The heating or ventilation time depends on
the temperature that has been set. Operating the climate control systems
177Climate control
Page 186 of 502
The colors of the indicator lamps in the rocker
switch have the following meanings:
R blue: cooling activated
R red: heating activated
R yellow: departure time preselected
X To activate/deactivate "Immediate pre-
entry climate control" : press rocker
switch :up or down.
The blue or red indicator lamp above the
rocker switch lights up or goes out. Setting the air vents
Important safety notes
G
WARNING
Very hot or very cold air can flow from the air vents. This could result in burns or frostbite in the immediate vicinity of the air vents. There
is a risk of injury.
Make sure that all vehicle occupants always
maintain a sufficient distance to the air out-
lets. If necessary, redirect the airflow to
another area of the vehicle interior.
In order to ensure the direct flow of fresh air
through the air vents into the vehicle interior,
please observe the following notes:
R keep the air inlet between the windshield
and the hood free of blockages, such as ice, snow or leaves.
R never cover the air vents or air intake grilles
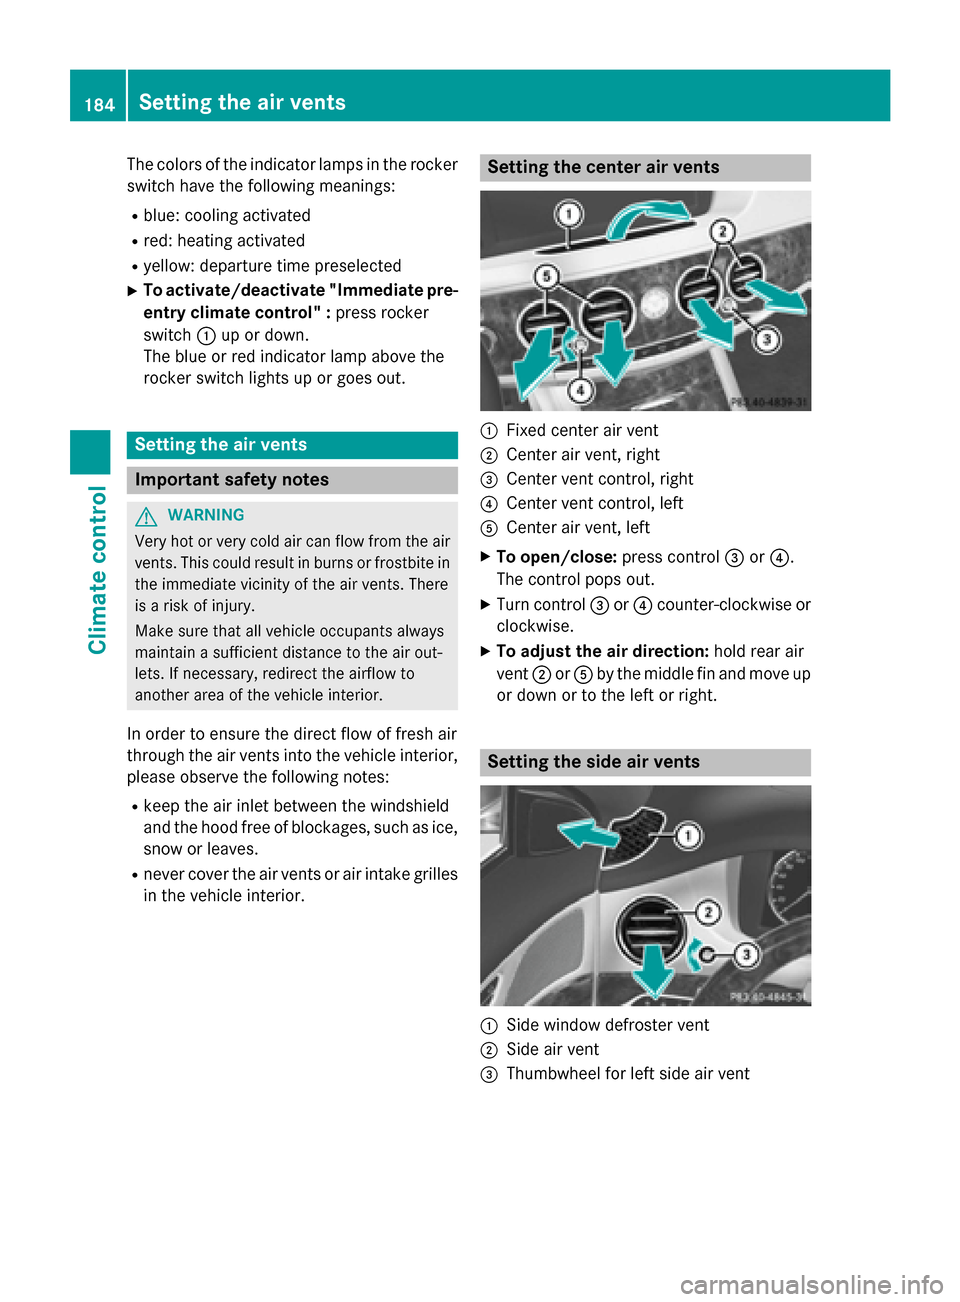
in the vehicle interior. Setting the center air vents
:
Fixed center air vent
; Center air vent, right
= Center vent control, right
? Center vent control, left
A Center air vent, left
X To open/close: press control=or?.
The control pops out.
X Turn control =or? counter-clockwise or
clockwise.
X To adjust the air direction: hold rear air
vent ;orA by the middle fin and move up
or down or to the left or right. Setting the side air vents
:
Side window defroster vent
; Side air vent
= Thumbwheel for left side air vent 184
Setting the air ventsClimate control