wheel size MERCEDES-BENZ S CLASS 2018 Owners Manual
[x] Cancel search | Manufacturer: MERCEDES-BENZ, Model Year: 2018, Model line: S CLASS, Model: MERCEDES-BENZ S CLASS 2018Pages: 562, PDF Size: 7.25 MB
Page 420 of 562
Fu rt her re lated subjects:R
No te s on tire pressure ( →
page 41 4)R
Ti re pressure ta ble ( →
page 41 6)R
Ti re and Loading In fo rm ation placard
( →
page 420)
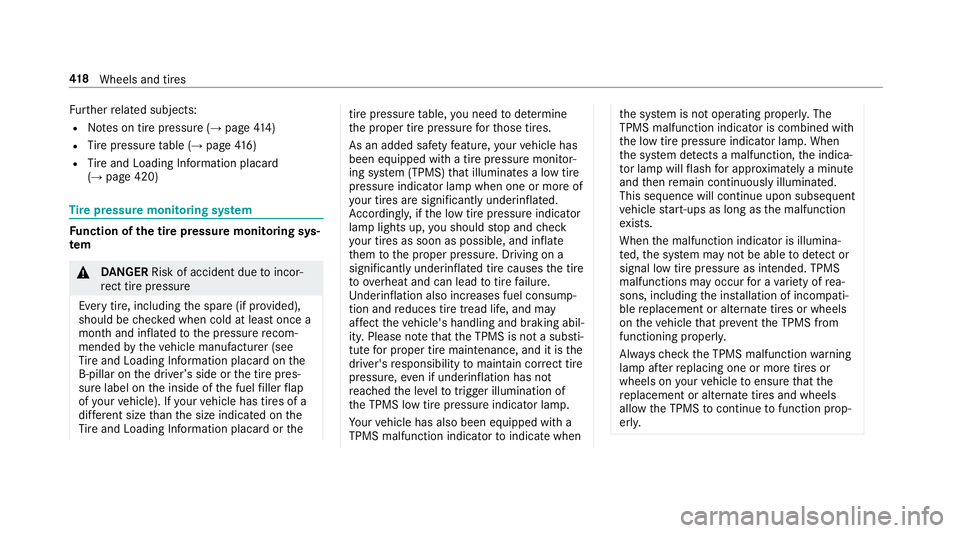
Ti re pressure moni to ri ng sy st em
Fu nction of th e tire pressure moni to ri ng sys‐
te m
�q
DA NG ER Risk of accident due to incor‐
re ct tire pressure
Every tire, including th e spare (if pr ov ided),
should be ch ec ke d when cold at least once a
month and inflated to th e pressure re com‐
mended by th e ve hicle manufacturer (see
Ti re and Loading In fo rm ation placard on th e
B-pillar on th e driver ’s side or th e tire pres‐
sure label on th e inside of th e fuel fi ller fl ap
of yo ur ve hicle). If yo ur ve hicle has tires of a
dif fe re nt size th an th e size indicated on th e
Ti re and Loading In fo rm ation placard or th e tire pressu re ta ble, yo u need to de te rm ine
th e proper tire pressure fo r th ose tires.
As an added saf et y fe ature, yo ur ve hicle has
been equipped with a tire pressure monitor‐
ing sy st em (TPMS) th at illuminates a low tire
pressure indicator lamp when one or more of
yo ur tires are sign if icantly underinflated.
Ac cording ly , if th e low tire pressure indicator
lamp lights up, yo u should st op and ch eck
yo ur tires as soon as possible, and inflate
th em to th e proper pressure. Driving on a
significant ly underinflated tire causes th e tire
to ove rh eat and can lead to tire fa ilure.
Und erinflation also increases fuel consump‐
tion and re duces tire tread life, and may
af fe ct th e ve hicle's handling and braking abil‐
ity. Please no te th at th e TPMS is not a substi‐
tute fo r proper tire maintenance, and it is th e
driver's re sponsibility to maintain cor re ct tire
pressure, ev en if underinflation has not
re ached th e le ve l to trig ge r illumination of
th e TPMS low tire pressure indicator lamp.
Yo ur ve hicle has also been equipped with a
TPMS malfunction indicator to indicate when th e sy st em is not operating properly. The
TPMS malfunction indicator is combined with
th e low tire pressure indicator lamp. When
th e sy st em de te cts a malfunction, th e indica‐
to r lamp will fl ash fo r app ro xima te ly a minute
and th en re main continuously illumina te d.
This sequence will continue upon subsequent
ve hicle st art-ups as long as th e malfunction
ex ists.
When th e malfunction indicator is illumina‐
te d, th e sy st em may not be able to de te ct or
signal low tire pressure as intended. TPMS
malfunctions may occur fo r a va ri et y of re a‐
sons, including th e ins ta llation of incompati‐
ble re placement or alternate tires or wheels
on th e ve hicle th at pr ev ent th e TPMS from
functioning proper ly .
Alw ay s ch eck th e TPMS malfunction wa rn ing
lamp af te r re placing one or more tires or
wheels on yo ur ve hicle to ensure th at th e
re placement or alternate tires and wheels
allow th e TPMS to continue to function prop‐
er ly .41 8
Wheels and tires
Page 434 of 562
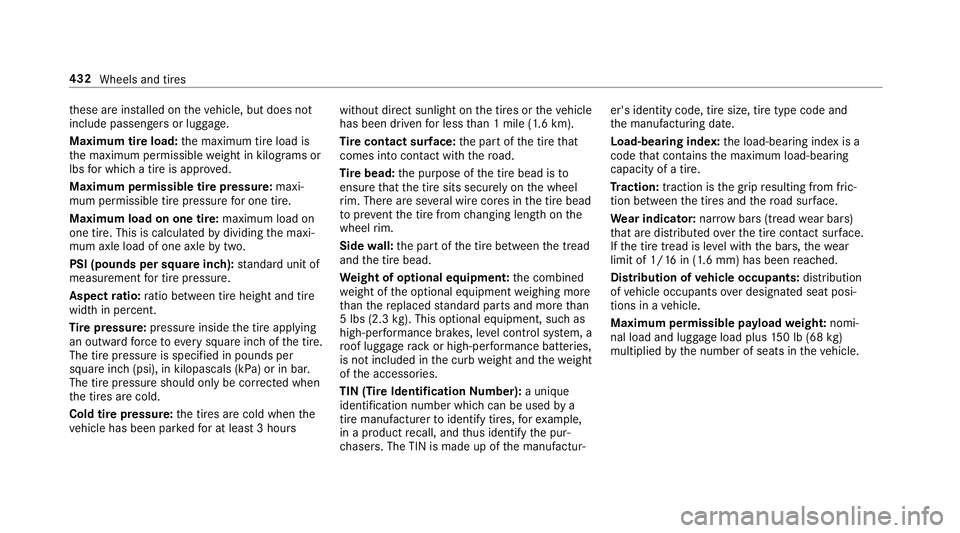
th ese are ins ta lled on th e ve hicle, but does not
include passengers or luggage.
Maximum tire load: th e maximum tire load is
th e maximum permissible we ight in kilog ra ms or
lbs fo r whi ch a tire is appr ove d.
Maximum permissible tire pressure: maxi‐
mum permissible tire pressure fo r one tire.
Maximum load on one tire: maximum load on
one tire. This is calculated by dividing th e maxi‐
mum axle load of one axle by two.
PSI (pounds per square in ch ): st andard unit of
measurement fo r tire pressu re .
Aspect ra tio: ra tio between tire height and tire
width in pe rc ent.
Ti re pressure: pressure inside th e tire applying
an outward fo rc e to eve ry square inch of th e tire.
The tire pressure is specified in pounds per
square inch (psi), in kilopascals (kPa) or in bar.
The tire pressure should only be cor re cted when
th e tires are cold.
Cold tire pressure: th e tires are cold when th e
ve hicle has been par ke d fo r at lea st 3 hou rs without direct sunlight on th e tires or th e ve hicle
has been driven fo r less th an 1 mile (1.6 km).
Ti re contact sur fa ce: th e part of th e tire th at
comes into con ta ct wi th th e ro ad.
Ti re bead: th e purpose of th e tire bead is to
ensure th at th e tire sits securely on th e wheel
ri m. There are se ve ra l wire cores in th e tire bead
to pr eve nt th e t ir
e from ch anging length on th e
wheel ri m.
Side wa ll: th e part of th e tire between th e tread
and th e tire bead.
We ight of optional equipment: th e combined
we ight of th e optional equipment we ighing more
th an th e re placed st andard parts and more th an
5 lbs (2.3 kg ). This optional equipment, such as
high-per fo rm ance brakes, le ve l control sy st em, a
ro of luggage ra ck or high-per fo rm ance bat te ri es,
is not included in th e curb we ight and th e we ight
of th e accessories.
TIN (Tire Identification Nu mber): a uni qu e
identification number which can be used by a
tire manufactu re r to identify tires, fo r ex ample,
in a product re call, and th us identify th e pur‐
ch asers. The TIN is made up of th e manufactur‐ er's identity code, tire size, tire type code and
th e manufacturing date.
Load-bearing index: th e load-bearing index is a
code th at con ta ins th e maximum load-bearing
capacity of a tire.
Tr action: traction is th e grip re sulting from fric‐
tion between th e tires and th e ro ad sur fa ce.
We ar indicator: nar row bars (tread we ar bars)
th at are distributed ove r th e tire con ta ct su rf ace.
If th e tire tread is le ve l with th e bars, th e we ar
limit of 1/ 16 in (1.6 mm) has been re ached.
Distribution of ve hicle occupants: distribution
of ve hicle occupants ov er designated seat posi‐
t ions in a ve hicle.
Maximum permissible pa yl oad we ight: nomi‐
nal load and luggage load plus 15 0 lb (68 kg )
multiplied by th e number of seats in th e ve hicle.432
Wheels and tires
Page 435 of 562
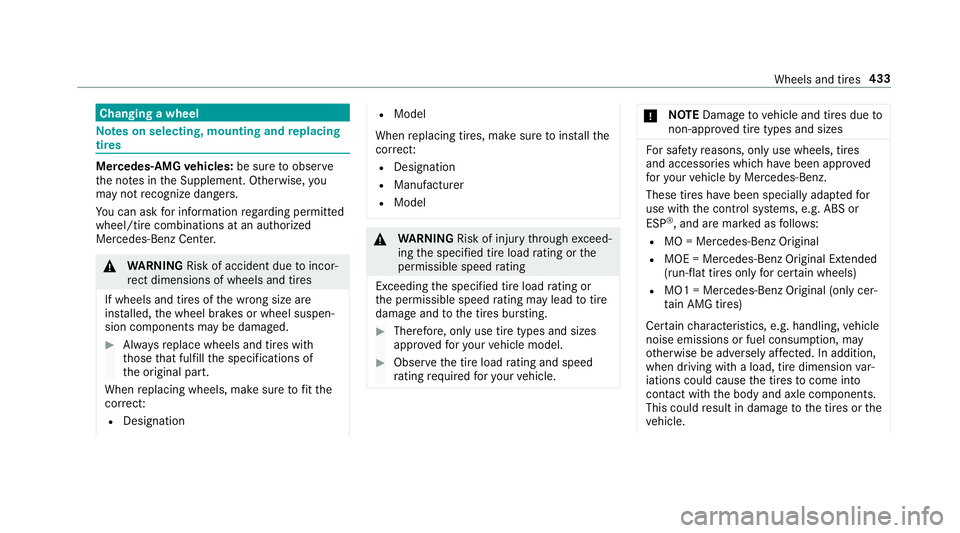
Changing a wheel
Note s on selecting, mounting and re placing
tires
Mercedes -A MG ve hicles: be sure to obser ve
th e no te s in th e Supplement. Otherwise, yo u
may not re cognize dangers.
Yo u can ask fo r information re ga rd ing permit te d
wheel/tire combinations at an authorized
Mercedes-Benz Center.
�q
WA RNING Risk of accident due to incor‐
re ct dimensions of wheels and tires
If wheels and tires of th e wrong size are
ins ta lled, th e wheel brakes or wheel suspen‐
sion components may be damaged. �
Page 437 of 562
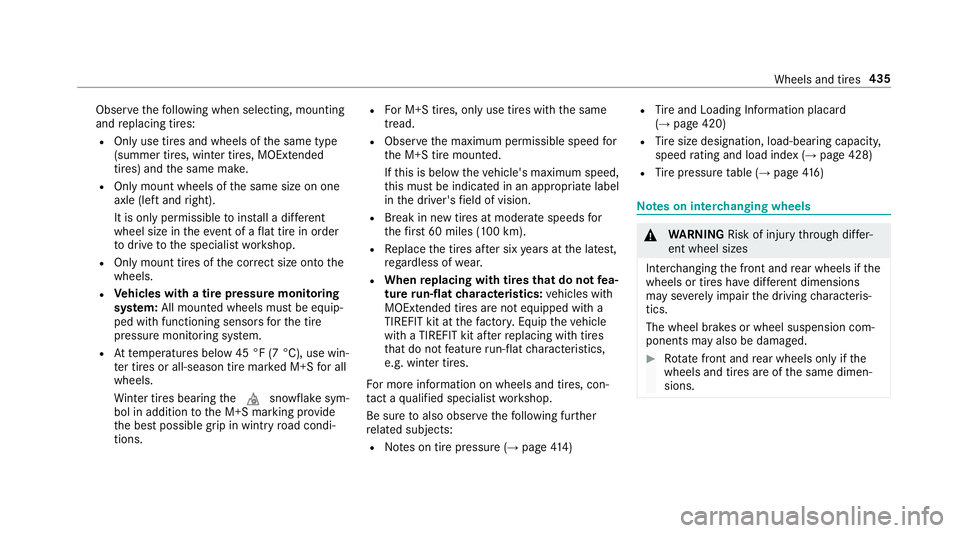
Obser ve th e fo llowing when selecting, mounting
and re placing tires:R
Only use tires and wheels of th e same type
(summer tires, winter tires, MOEx te nded
tires) and th e same make.R
Only mount wheels of th e same size on one
axle (left and ri ght).
It is only permissible to ins ta ll a dif fe re nt
wheel size in th e eve nt of a fl at tire in order
to drive to th e specialist wo rk shop.R
Only mount tires of th e cor re ct size onto th e
wheels. R
Ve hicles with a tire pressure monitoring
sy st em: All moun te d wheels must be equip‐
ped with functioning sensors fo r th e tire
pressure monitoring sy st em.R
At te mp eratures below 45 °F (7 °C), use win‐
te r tires or all-season tire mar ke d M+S fo r all
wheels.
Wi nter tires bearing th e �M snowflake sym‐
bol in addition to th e M+S marking pr ov ide
th e best possible grip in wintry ro ad condi‐
tions. R
Fo r M+S tires, only use tires with th e same
tread. R
Obser ve th e maximum permissible speed fo r
th e M+S tire mounted.
If th is is below th e ve hicle's maximum speed,
th is must be indicated in an appropriate label
in th e driver's fi eld of vision. R
Break in new tires at moderate speeds fo r
th e fi rs t 60 miles (100 km). R
Re place th e tires af te r six ye ars at th e latest,
re ga rd less of we ar. R
When re placing with tires that do no t fe a‐
ture ru n-flat ch aracteristics: ve hicles with
MOExtended tires are not equipped with a
TIREFIT kit at th e fa ctor y. Equip th e ve hicle
with a TIREFIT kit af te r re placing with tires
th at do not fe ature ru n-flat ch aracteristics,
e.g. winter tires.
Fo r more information on wheels and tires, con‐
ta ct a qu alified specialist wo rk shop.
Be sure to also obse rv e th e fo llowing fur th er
re lated subjects: R
No te s on tire pressure ( →
page 41 4) R
Ti re and Loading In fo rm ation placard
( →
page 420) R
Ti re size designation, load-bea ri ng capacity,
speed ra ting and load ind ex ( →
page 428)R
Ti re pressure ta ble ( →
page 41 6)
Note s on inter ch anging wheels
�q
WA RNING Risk of inju ry th ro ugh dif fe r‐
ent wheel sizes
Inter ch anging th e front and re ar wheels if th e
wheels or tires ha ve dif fe re nt dimensions
may se ve re ly impair th e driving ch aracteris‐
tics.
The wheel brakes or wheel suspension com‐
ponents may also be damaged. �
Page 438 of 562
The we ar pat te rn s on th e front and re ar wheels
dif fe r:R
Fr ont wheels we ar more on th e shoulder of
th e tire.R
Re ar wheels we ar more in th e center of th e
tire.
On ve hicles th at ha ve th e same size front and
re ar wheels, inter ch ange th e wheels according
to th e inter va ls in th e tire manufacturer's wa r‐
ra nty book in yo ur ve hicle documents. If th is is
not av ailable, inter ch ange th e tires eve ry
3000 to 6000 miles (5000 to 10 000 km),
depending on th e we ar. Ensure th at th e direction
of ro ta tion is maintained.
It is impe ra tive to obser ve th e instructions and
saf et y no te s on "Wheel ch ange" when doing so.
Note s on st oring wheelsR
Af te r re moving wheels, st ore th em in a cool,
dry and preferably dark place. R
Pr ot ect th e tires from con ta ct wi th oil, grease
or fuel. Overview of th e tire-chan ge to ol kit
Apart from some countr y- specific va ri ants, ve hi‐
cles are not equipped with a tire-change to ol kit.
Fo r more information on whi ch tire-changing
to ols are requ ired and appr ov ed fo r per fo rm ing a
wheel ch ange on yo ur ve hicle, consult a qu alified
specialist wo rk shop.
Re qu ired tire-change to ols may include, fo r
ex ample: R
Jack R
ch ock R
Lu g wrench R
Centering pin
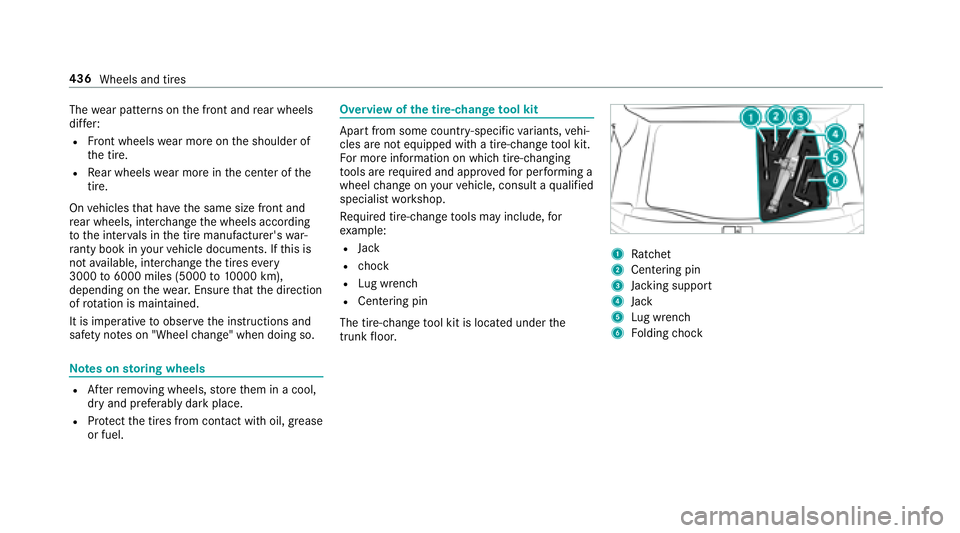
The tire-change to ol kit is located under th e
trunk fl oor. 1
Ra tchet 2
Centering pin
3
Ja ck ing support
4
Jack
5
Lu g wrench
6
Fo lding ch ock436
Wheels and tires
Page 558 of 562
We bsite
Calling up ............................................ 334
Showing/hiding th e we b br ows er
menu ................................................... 334
Wheel ch ock ............................................ 436
St orage location ................................. .4 36
Wheel ch ock
see Wheel ch ock
Wheels
Care ................................................... .3 89
Changing hub caps .............................. 437
Che ck ing .............................................. 41 3
Checking th e tire pressure (man‐
ually) ................................................... .4 17
Checking th e tire pressure (tire pres‐
sure monitoring sy st em) ..................... .4 19
Definitions ........................................... 430
DO T, Ti re Identification Nu mber (TIN)
............................................................ .4 26
Flat tire ................................................ 393
Inter ch anging ...................................... 435
Load ind ex ........................................... 428
Load-bearing capacity ......................... 428
Maximum tire load .............................. 427
Maximum tire pressure ....................... 427 MOExtended tires ................................ 394
Mounting ............................................. 44 0
No ise .................................................. .4 13
No te s on mounting .............................. 433
Overview of tire labeling ..................... .4 25
R e mo ving ............................................ 44 0
Re placing .................................... 433, 437
Re st arting th e tire pressure monitor‐
ing sy st em .......................................... .4 20
Selection ............................................. 433
Snow ch ains ........................................ .4 14
Speed ra ting ........................................ 428
St oring ................................................ 436
Te mp erature grade .............................. 425
Ti re and Loading In fo rm ation placard
............................................................ .4 20
Ti re ch aracteristics .............................. 428
Ti re pressure (no te s) ........................... .4 14
Ti re pressure monitoring sy st em
(function) ............................................. 41 8
Ti re pressure ta ble .............................. .4 16
Ti re Quality Grading ............................. 425
Ti re size designation ........................... .4 28
TIREFIT kit .......................................... .3 95
Tr action gr ade .................................... .4 25
Tr ead we ar grade ................................ .4 25 Un usual han dlin g ch arac teristics ........ .4 13
Wi -F i
Overview ............................................. 280
Setting ................................................ .2 80
Setting up a hotspot ............................ 281
Setting up an Internet connection ....... 331
Wi ndow air bag .......................................... 38
Wi ndow lif te r
see Side windo ws
Wi ndo ws
see Side windo ws
Wi ndo ws (Care) ...................................... .3 89
Wi ndshield ................................................ 15 1
Infrared re fl ective ................................ 15 5
Re placing th e wiper blades .................. 15 1
Re placing wiper blades (MAGIC
VISION CO NTROL) ............................... 15 1
Wi ndshield
see Wi ndshield
Wi ndshield heater ................................... 16 2
Wi ndshield heating
see Wi ndshield hea te r556
Index