fog light MERCEDES-BENZ S-Class CABRIOLET 2017 A217 Owner's Manual
[x] Cancel search | Manufacturer: MERCEDES-BENZ, Model Year: 2017, Model line: S-Class CABRIOLET, Model: MERCEDES-BENZ S-Class CABRIOLET 2017 A217Pages: 338, PDF Size: 8.14 MB
Page 14 of 338
Adjusting (rear) ................................ 97
Head-up display
Adjusting the brightness ................ 201
Displays and operating .................. 190
Function/notes ............................. 189
Important safety notes .................. 189
Selecting displays .......................... 201
Setting the position ....................... 201
Storing settings (memory func-
tion) ............................................... 106
Headlamps
Fogging up ..................................... 110
see Automatic headlamp mode
Heating
see Climate control
High beam flasher ............................. 108
High-beam headlamps
Adaptive Highbeam Assist PLUS .... 109
Display message ............................ 216
Switching on/off ........................... 108
Hill start assist .................................. 127
HOLD function
Activating ....................................... 159
Activation conditions ..................... 158
Deactivating ................................... 159
Display message ............................ 224
Function/notes ............................. 158
General notes ................................ 158
Home address
see also Digital Operator's Man-
ual .................................................. 243
Hood
Closing ........................................... 273
Display message ............................ 229
Important safety notes .................. 272
Opening ......................................... 272
Horn ...................................................... 33
HUD
see Head-up display
Hydroplaning ..................................... 148
I
Ignition lock
see Key positions
Immobilizer .......................................... 70 Indicator and warning lamps
COLLISION PREVENTION ASSIST
PLUS .............................................. 240
Indicator lamps
see Warning and indicator lamps
Indicators
see Turn signals
Insect protection on the radiator .... 273
Instrument cluster
Overview .......................................... 34
Warning and indicator lamps ........... 34
Instrument cluster lighting .............. 187
Interior lighting
Automatic control .......................... 111
Control ........................................... 111
Manual control ............................... 111
Overview ........................................ 111
Reading lamp ................................. 111
iPod
®
see also Digital Operator's Man-
ual .................................................. 243
J
Jack Using ............................................. 322
Jump starting (engine) ...................... 294
K
Key positions
SmartKey ....................................... 124
Start/Stop button .......................... 124
KEYLESS-GO
Activating ......................................... 73
Convenience closing feature ............ 87
Deactivation ..................................... 73
Locking ............................................ 73
Start function ................................... 74
Unlocking ......................................... 73
Kickdown
Driving tips .................................... 134
Knee bag .............................................. 48
L
Lamps
see Warning and indicator lamps
12Index
Page 15 of 338
Lane Keeping Assistsee Active Lane Keeping Assist
LATCH-type (ISOFIX) child seat
anchors ................................................ 59
License plate lamp (display mes-
sage) .................................................. .216
Light sensor (display message) ....... 216
Lights
Adaptive Highbeam Assist PLUS .... 109
Automatic headlamp mode ............ 107
Cornering light function ................. 109
Fogged up headlamps .................... 110
General notes ................................ 107
Hazard warning lamps ................... 109
High beam flasher .......................... 108
High-beam headlamps ................... 108
Light switch ................................... 107
Low-beam headlamps .................... 108
Parking lamps ................................ 108
Rear fog lamp ................................ 108
Setting exterior lighting ................. 107
Standing lamps .............................. 108
Switching the daytime running
lamps on/off (on-board com-
puter) ............................................. 202
Switching the spotlight on/off ....... 202
Turn signals ................................... 108
see Interior lighting
Loading guidelines ............................ 254
Locking
see Central locking
Locking (doors)
Automatic ........................................ 79
Emergency locking ........................... 79
From inside (central locking but-
ton) ..................................................7 8
Locking centrally
see Central locking
Low-beam headlamps
Display message ............................ 216
Switching on/off .......................... .108
Luggage cover
see Trunk partition
Lumbar support
Adjusting the 4-way lumbar sup-
port ............................ ......................9
8M
M+S tires............................................ 304
Malfunction message
see Display messages
Matte finish (cleaning instruc-
tions) .................................................. 281
mbrace
Call priority ....................................2 64
Display message ............................ 210
Downloading destinations
(COMAND) ..................................... 264
Downloading routes ....................... 267
Emergency call .............................. 262
General notes ................................ 261
Geo fencing ................................... 267
Info call button .............................. 263
Locating a stolen vehicle ...............2 66
Remote fault diagnosis .................. 266
Remote vehicle locking .................. 266
Roadside Assistance button .......... 263
Search & Send ............................... 265
Self-test ......................................... 261
Speed alert ....................................2 67
System .......................................... 261
Triggering the vehicle alarm ........... 267
Vehicle remote unlocking .............. 265
Mechanical key
Function/notes ................................ 74
General notes .................................. 74
Inserting .......................................... 74
Locking vehicle ................................ 79
Removing ......................................... 74
Unlocking the driver's door .............. 79
Media Interface
USB port in the armrest of the
center console ............................... 256
see Digital Operator's Manual
Memory card (audio) ......................... 195
Memory function
Seats, steering wheel, exterior
mirrors ...........................................1 05
Mercedes-Benz Intelligent Drive
360°camera .................................. 172
ABS (Anti-lock Brake System) .......... 61
Active Blind Spot Assist ................. 181
Active Lane Keeping Assist ............ 184
Active Parking Assist ..................... 164
Index13
Page 36 of 338
Instrument cluster
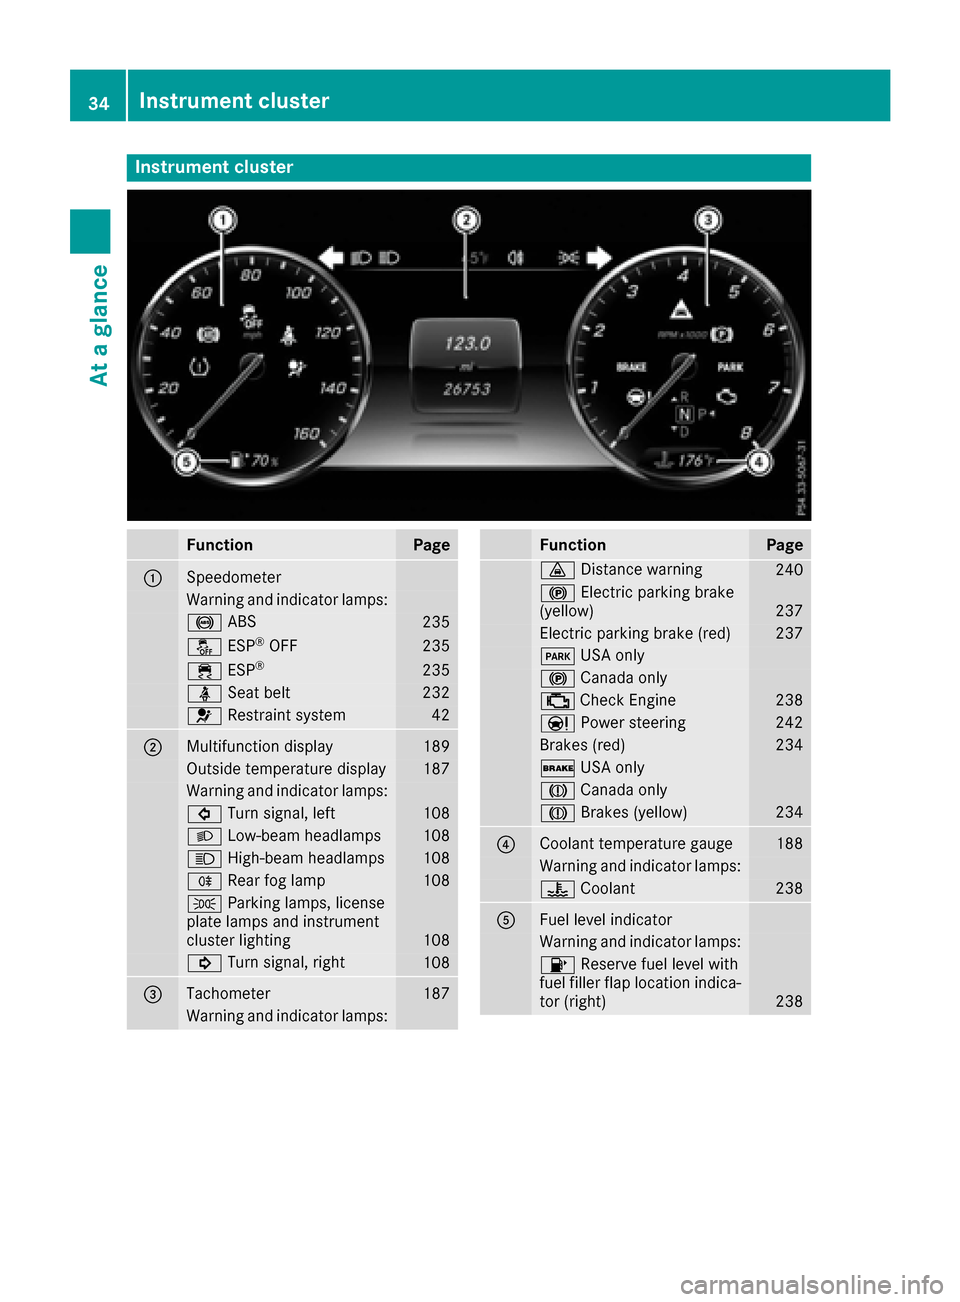
FunctionPage
:Speedometer
Warning and indicator lamps:
! ABS235
å ESP®OF F235
÷ ESP®23 5
ü Seat belt232
6 Restrain tsystem42
;Multifunction display18 9
Outside temperature display187
Warning and indicator lamps:
# Turn signal, lef t108
L Low-beam headlamps108
K High-beam headlamps108
R Rear fog lamp108
T Parking lamps, license
plat elamp sand instrumen t
cluste rlighting
10 8
! Turn signal, right108
=Tachometer187
Warning and indicator lamps:
FunctionPag e
· Distanc ewarning24 0
! Electric parking brak e
(yellow)23 7
Electric parking brak e(red)23 7
F USAonly
! Canad aonly
; CheckEngin e238
Ð Powersteering24 2
Brake s(red)23 4
$ USAonly
J Canad aonly
J Brakes(yellow)23 4
?Coolan ttemperature gauge18 8
Warning and indicator lamps:
? Coolan t238
AFue llevel indicator
Warning and indicator lamps:
8 Reserve fuel level wit h
fuel filler flap location indica-
to r(right )
238
34Instrument cluster
At a glance
Page 109 of 338
Exterior lighting
General notes
USA only: if you wish to drive during the daytime
without lights, switch off theDaytime Run‐
ning Lightsfunction via the on-board com-
puter (Ypage 202).
Setting the exterior lighting
Setting options
Exterior lighting can be set using:
Rthe light switch (Ypage 107)
Rthe combination switch (Ypage 108)
Rthe on-board computer (Ypage 202)
Light switch
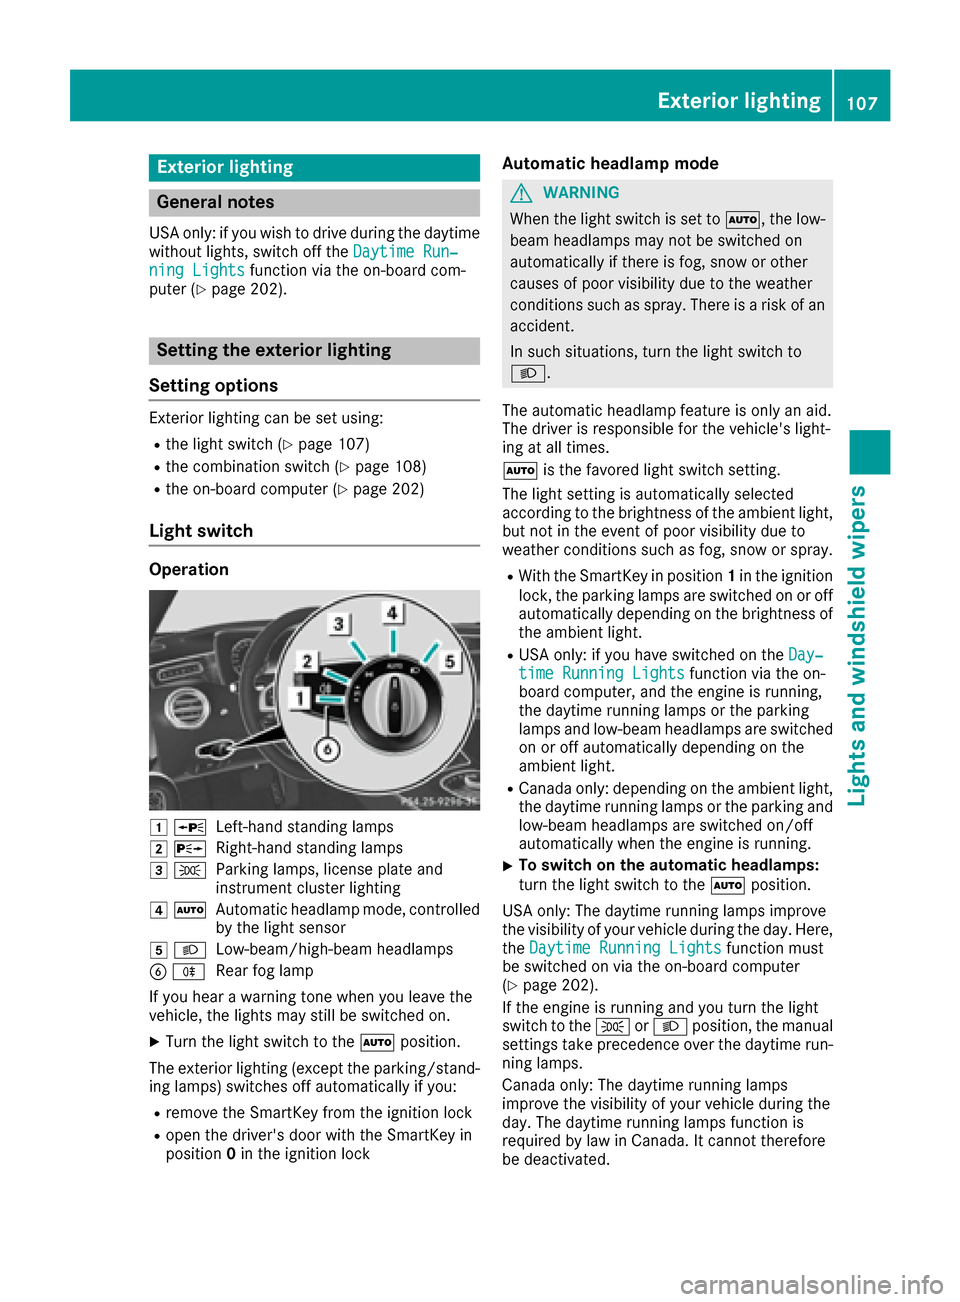
Operation
1 WLeft-hand standing lamps
2XRight-hand standing lamps
3TParking lamps, license plate and
instrument cluster lighting
4ÃAutomatic headlamp mode, controlled
by the light sensor
5 LLow-beam/high-beam headlamps
BRRear fog lamp
If you hear a warning tone when you leave the
vehicle, the lights may still be switched on.
XTurn the light switch to the Ãposition.
The exterior lighting (except the parking/stand-
ing lamps) switches off automatically if you:
Rremove the SmartKey from the ignition lock
Ropen the driver's door with the SmartKey in
position 0in the ignition lock
Automatic headlamp mode
GWARNING
When the light switch is set to Ã, the low-
beam headlamps may not be switched on
automatically if there is fog, snow or other
causes of poor visibility due to the weather
conditions such as spray. There is a risk of an
accident.
In such situations, turn the light switch to
L.
The automatic headlamp feature is only an aid.
The driver is responsible for the vehicle's light-
ing at all times.
à is the favored light switch setting.
The light setting is automatically selected
according to the brightness of the ambient light,
but not in the event of poor visibility due to
weather conditions such as fog, snow or spray.
RWith the SmartKey in position 1in the ignition
lock, the parking lamps are switched on or off
automatically depending on the brightness of
the ambient light.
RUSA only: if you have switched on the Day‐time Running Lightsfunction via the on-
board computer, and the engine is running,
the daytime running lamps or the parking
lamps and low-beam headlamps are switched
on or off automatically depending on the
ambient light.
RCanada only: depending on the ambient light,
the daytime running lamps or the parking and
low-beam headlamps are switched on/off
automatically when the engine is running.
XTo switch on the automatic headlamps:
turn the light switch to the Ãposition.
USA only: The daytime running lamps improve
the visibility of your vehicle during the day. Here,
the Daytime Running Lights
function must
be switched on via the on-board computer
(
Ypage 202).
If the engine is running and you turn the light
switch to the TorL position, the manual
settings take precedence over the daytime run-
ning lamps.
Canada only: The daytime running lamps
improve the visibility of your vehicle during the
day. The daytime running lamps function is
required by law in Canada. It cannot therefore
be deactivated.
Exterior lighting107
Lights and windshield wipers
Z
Page 110 of 338
When the engine is running and the vehicle is
stationary: if you move the selector lever from a
driving position toP, the daytime running lamps
and low-beam headlamps go out after three
minutes.
When the engine is running, the vehicle is sta-
tionary and in bright ambient light: if you turn the
light switch to the Tposition, the daytime
running lamps and parking lamps switch on.
If the engine is running and you turn the light
switch to the Lposition, the manual settings
take precedence over the daytime running
lamps.
Low-beam headlamps
GWARNING
When the light switch is set to Ã, the low-
beam headlamps may not be switched on
automatically if there is fog, snow or other
causes of poor visibility due to the weather
conditions such as spray. There is a risk of an
accident.
In such situations, turn the light switch to
L.
Even if the light sensor does not detect that it is
dark, the parking lamps and low-beam head-
lamps switch on when the ignition is switched on and the light switch is set to the Lposition.
This is a particularly useful function in the event
of rain and fog.
XTo switch on the low-beam headlamps:
turn the SmartKey in the ignition lock to posi- tion 2or start the engine.
XTurn the light switch to the Lposition.
The green Lindicator lamp in the instru-
ment cluster lights up.
Rear fog lamp
The rear fog lamp improves visibility of your
vehicle for the traffic behind in the event of thick
fog. You must observe the legal requirements
for the country in which you are currently driving
when operating the rear fog lamp.
XTo switch on the rear fog lamp: turn the
SmartKey in the ignition lock to position 2or
start the engine.
XTurn the light switch to the LorÃ
position.
XPress the Rbutton.
The yellow Rindicator lamp in the instru-
ment cluster lights up.
Parking lamps
!If the battery charge is very low, the parking
lamps or standing lamps are automatically
switched off to enable the next engine start.
Always park your vehicle safely and in a well lit
area, in accordance with the relevant legal
stipulations. Avoid using the Tparking
lamps over a period of several hours. If pos-
sible, switch on the right-hand Xor left-
hand W standing lamps.
XTo switch on the parking lamps: turn the
light switch to the Tposition.
The green Tindicator lamp on the instru-
ment cluster lights up.
Standing lamps
Switching on the standing lamps ensures the
corresponding side of the vehicle is illuminated.
XTo switch on the standing lamps: turn the
Smart Key to position 0in the ignition lock or
remove the SmartKey.
XTurn the light switch to the W(left-hand
side of the vehicle) or X(right-hand side of
the vehicle) position.
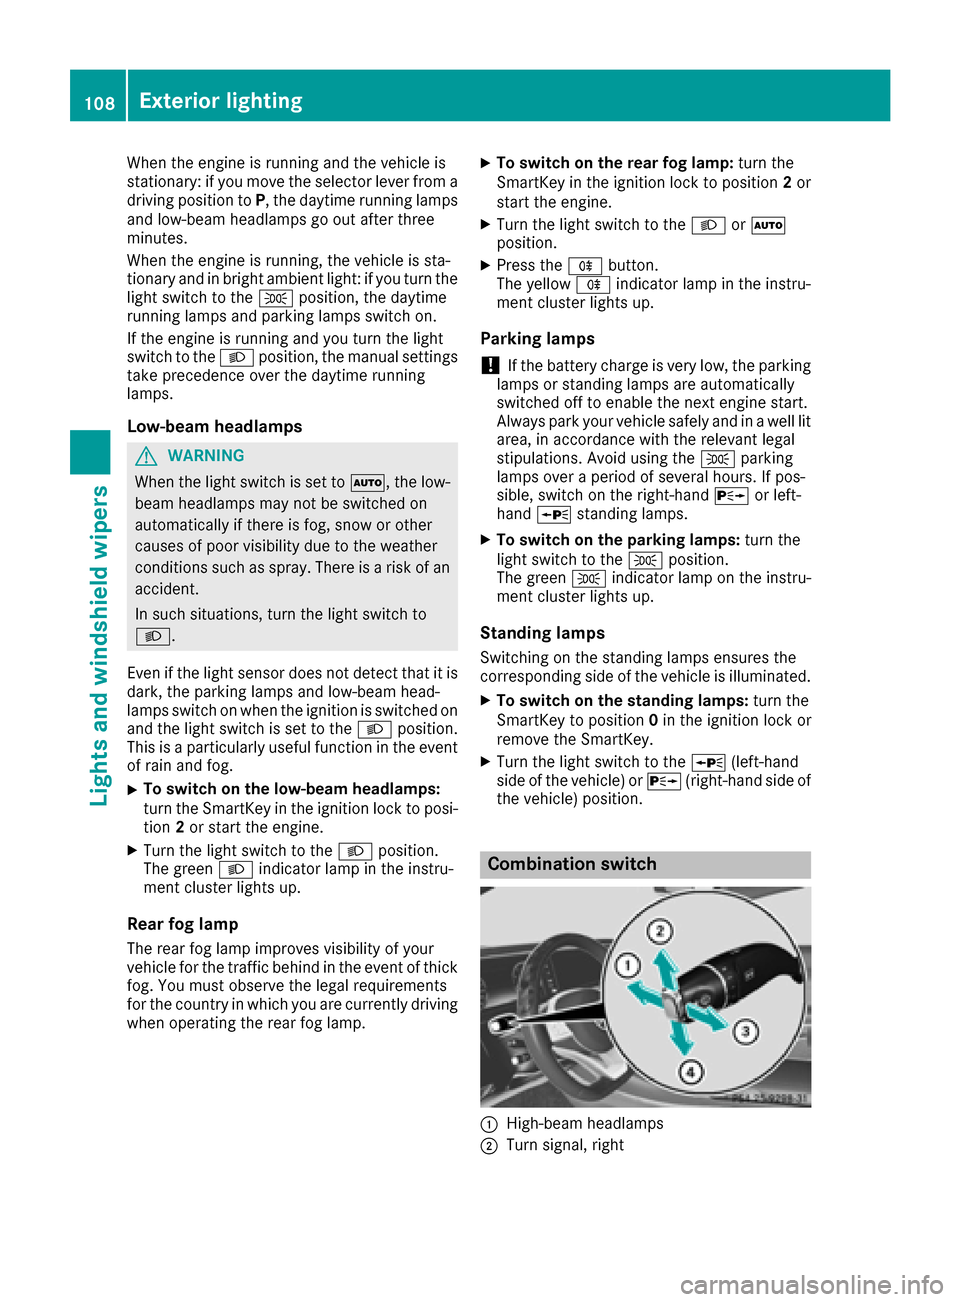
Combination switch
:High-beam headlamps
;Turn signal, right
108Exterior lighting
Lights and windshield wipers
Page 112 of 338
detects any other vehicles, it reactivates the
high-beam headlamps.
If the reflected light from the high-beam head-
lamps or partial high-beam headlamps from traf-
fic signs is too strong, the lights are automati-
cally dimmed. Glare for the driver caused by the
reflections is thus avoided.
The system's optical sensor is located behind
the windshield near the overhead control panel.
Important safety notes
GWARNING
Adaptive Highbeam Assist Plus does not react
to road users:
Rwho have no lights, e.g. pedestrians
Rwho have poor lighting, e.g. cyclists
Rwhose lighting is blocked, e.g. by a barrier
In very rare cases, Adaptive Highbeam Assist
Plus may not react to road users who do have
lights, or may recognize them too late. In this,
or in similar situations, the automatic high-
beam headlamps will not be deactivated or
will be activated regardless. There is a risk of
an accident.
Always carefully observe the traffic conditions
and switch off the high-beam headlamps in
good time.
Adaptive Highbeam Assist Plus cannot take into
account road, weather or traffic conditions.
Adaptive Highbeam Assist Plus is only an aid.
You are responsible for adjusting the vehicle's
lighting to the prevailing light, visibility and traf-
fic conditions.
In particular, the detection of obstacles can be
impaired if:
Rthere is poor visibility, e.g. due to fog, heavy
rain or snow
Rthere is dirt on the sensors or anything else
covering the sensors
Switching Adaptive Highbeam Assist
Plus on/off
XTo switch on: turn the light switch to the
à position.
XPress the combination switch forwards
beyond the pressure point (Ypage 108).
The _ indicator lamp on the multifunction
display lights up when it is dark and the light
sensor switches on the low-beam headlamps.
If you are driving at speeds above approx-
imately 16 mph (25 km/h):
The headlamp range is set automatically
depending on the distance between the vehi-
cle and other road users.
If you are driving at speeds above approx-
imately 19 mph (30 km/ h)and no other road
users are detected:
The high-beam headlamps are switched on
automatically. The Kindicator lamp on the
instrument cluster also lights up.
If other road users are detected, the partial
high-beam headlamps are automatically
switched on.
If you are driving at speeds below approx-
imately 16 mph (25 km/h) or the roads are
adequately illuminated:
The partial high-beam or high-beam head-
lamps are switched off automatically. The
K indicator lamp on the instrument cluster
goes out. The _indicator lamp on the
multifunction display remains lit.
XTo switch off: move the combination switch
back to its normal position or move the light
switch to another position.
The _ indicator lamp on the multifunction
display goes out.
Headlamps fogged up on the inside
Certain climatic and physical conditions may
cause moisture to form in the headlamp. This
moisture does not affect the functionality of the
headlamp.
110Exterior lighting
Lights and windshield wipers
Page 117 of 338
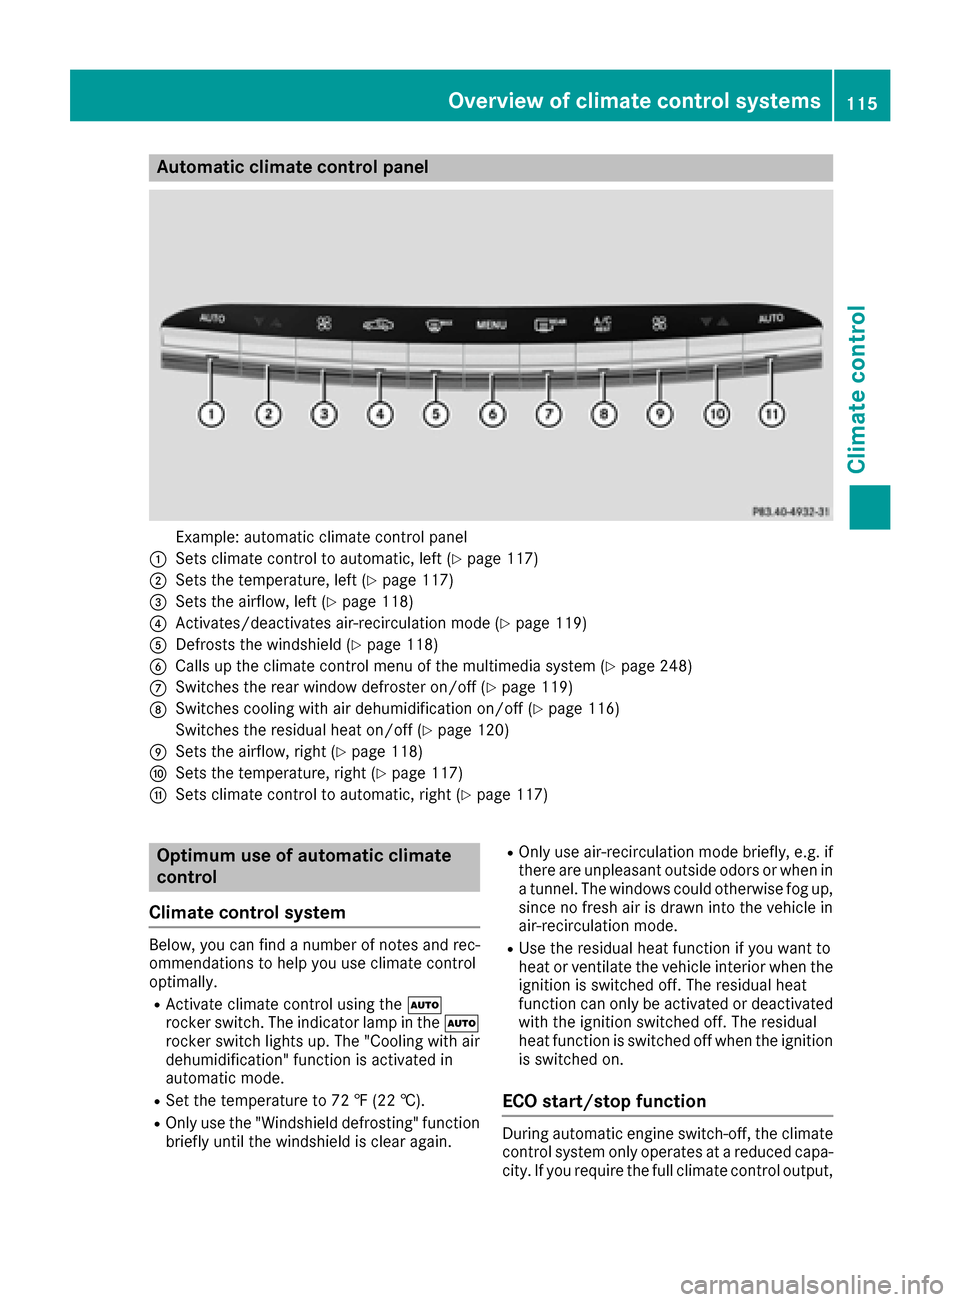
Automa tic climate control panel
Example: automatic climat econtrol panel
:Sets climat econtrol to automatic, lef t (Ypage 117)
;Sets thetemperature, lef t (Ypage 117)
=Sets theairflow, lef t (Ypage 118)
?Activates/deactivates air-recirculation mod e (Ypage 119)
ADefroststh ewindshield (Ypage 118)
BCalls up theclimat econtrol men uof th emultimedia system (Ypage 248)
CSwitches therear window defroste ron/off (Ypage 119)
DSwitches coolin gwit hair dehumidification on/off (Ypage 116)
Switches th eresidual heat on/off (
Ypage 120)
ESets theairflow, right (Ypage 118)
FSets thetemperature, right (Ypage 117)
GSets climatecontrol to automatic, right (Ypage 117)
Optimum use ofautomatic climate
control
Climate control system
Below, you can fin d anumber of note sand rec -
ommendation sto help you use climat econtrol
optimally.
RActivat eclimat econtrol usin gth eÃ
rocke rswitch .The indicator lamp in th eÃ
rocke rswitch lights up. The "Cooling wit hair
dehumidification "function is activated in
automatic mode.
RSe tth etemperature to 72 ‡(22 †).
ROnly use th e"Windshield defrosting "function
briefl yuntil th ewindshield is clear again .
ROnly use air-recirculation mod ebriefly, e.g. if
there are unpleasant outside odor sor when in
a tunnel. The windows could otherwise fog up,
since no fresh air is draw nint oth evehicl ein
air-recirculation mode.
RUse th eresidual heat function if you want to
heat or ventilat eth evehicl einterior when th e
ignition is switched off .The residual heat
function can only be activated or deactivated
wit hth eignition switched off .The residual
heat function is switched off when th eignition
is switched on .
ECO start/stop function
During automatic engin eswitch-off ,th eclimat e
control system only operate sat areduce dcapa-
city. If you require th efull climat econtrol output ,
Overview of climate control systems115
Climate control
Page 118 of 338
you can switch off theECO start/sto pfunction
by pressing th eECO butto n (Ypage 129).
Operating the climate contro l sys-
tems
Activating/deactivating climate con-
tr ol
Gene ral notes
Whe nth eclimat econtrol is switched off ,th eair
supply and air circulation are also switched off .
The windows could fog up. Therefore ,switch off
climat econtrol only briefl y
Switc hon climat econtrol primarily usin gth e
à rockerswitch (
Ypage 117).
Activating/deactivating
XTurn theSmartKey to position 2in th eignition
loc k (Ypage 124).
XTo activate: set theairflow to level 1or higher
usin gth eK rockerswitch .
XTo deactivate: set theairflow to level 0usin g
th eK rockerswitch .
Switching cooling with air dehumidi-
ficationon/off
Gene ral notes
If you deactivat eth e"Coolin gwit hair-dehumid -
ification "function ,th eair inside th evehicl ewill no
tbe cooled .The air inside th evehicl ewill also
no tbe dehumidified. The windows can fog up
mor equickly. Therefore ,only deactivat eth e
"Coolin gwit hair-dehumidification "function
briefly.
The "Coolin gwit hair dehumidification "function
is only available when th eengin eis running .The
air inside th evehicl eis cooled and dehumidifie d
accordin gto th etemperature selected.
Condensation may dri pfrom th eunderside of
th evehicl ewhen it is in coolin gmode. This is
normal and no t asign that there is amalfunc -
tion .
Acti vating/deactivating
XTo activate: press theÁ rockerswitch up
or down .
The indicato rlamp abov eth erocke rswitch
lights up.
XTo switch off :press th eÁ rockerswitch
up or down .
The indicato rlamp abov eth erocke rswitch
goe sout .
Problems with the "Cooling with air dehumidification" function
ProblemPossible causes/consequences and MSolutions
The indicatorlamp in th e
Á buttonflashes
three times or remain s
off .Cooling wit hair
dehumidification can
also no longer be activa-
te dusin gth emultimedia
system; see th eDigital
Operator' sManual.Cooling wit hair dehumidification has been deactivated due to amal-
function .
XVisitaqualified specialist workshop .
116Operating the climate control systems
Climate control
Page 120 of 338
Setting the air distribution via the mul-
timedia system
The air distribution for the left and right sides of
the driver's and front-passenger areas can be
adjusted using the multimedia system (see the
Digital Operator's Manual).
Setting the airflow
General notes
You can select different airflow settings for the
driver's and front-passenger sides.
Setting the airflow
XTurn the SmartKey to position 2in the ignition
lock (Ypage 124).
XTo increase or reduce: press theK
rocker switch up or down.
iYou can also set the airflow using the mul-
timedia system (see the Digital Operator's
Manual).
Activating or deactivating the syn-
chronization function
Climate control can be set centrally using the
synchronization function. The settings for tem-
perature, air distribution and airflow on the driv-
er's side are adopted for the front-passenger
side.
XTo activate or deactivate: activate or deac-
tivate the "Synchronization" function via the
multimedia system (see the Digital Operator's
Manual).
The synchronization function deactivates if the
settings for the front-passenger side are
changed.
Defrosting the windshield
General notes
You can use this function to defrost the wind-
shield or to clear a fogged up windshield or front
side windows on the inside.
Switch off the "Windshield defrosting" function
as soon as the windshield is clear again.
Switching the "Windshield defrosting"
function on or off
XTurn the SmartKey to position 2in the ignition
lock (Ypage 124).
XTo activate: press the¬rocker switch on
the front control panel up or down.
The indicator lamp in the ¬rocker switch
lights up.
The climate control system switches to the
following functions:
Rhigh airflow
Rhigh temperature
Rair distribution to the windshield and front
side windows
Rair-recirculation mode off
Rwindshield heating on
Rcooling with air dehumidification on
XTo deactivate: press the¬rocker switch
up or down.
The indicator lamp in the ¬rocker switch
goes out. The previously selected settings are restored. Air-recirculation mode remains
deactivated.
Defrosting the windows
Windows fogged up on the inside
XActivate the "Cooling with air dehumidifica-
tion" function with the Árocker switch.
or
XActivate the "Cooling with air dehumidifica-
tion" function via the multimedia system; see
the Digital Operator's Manual.
XSwitch on automatic mode using the Ã
rocker switch.
XIf the windows continue to fog up: activate the
"Windshield defrosting" function using the
¬ rocker switch. The windshield heating is
switched on.
iYou should only select this setting until the
windshield is clear again.
Windows fogged up on the outside
XActivate the windshield wipers.
XSwitch on automatic mode using the Ã
rocker switch.
118Operating the climate control systems
Climate control
Page 121 of 338
iIf you clean the windows regularly, they do
not fog up so quickly.
Rear window defroster
General notes
The rear window defroster has a high current
draw. You should therefore switch it off as soon
as the rear window is clear. Otherwise, the rear
window defroster switches off automatically
after several minutes. If the battery voltage is too low, the rear window
defroster may switch off.
Activating or deactivating
XTurn the SmartKey to position 2in the ignition
lock (Ypage 124).
XPress the ¤rocker switch up or down.
The indicator lamp in the ¤rocker switch
lights up or goes out.
Problems with the rear window defroster
ProblemPossible causes/consequences and MSolutions
The rear window
defroster has deactiva-
ted prematurely or can-
not be activated.The battery has not been sufficiently charged.
XSwitch off any consumers that are not required, e.g. reading lamps,
interior lighting or the seat heating.
When the battery is sufficiently charged, the rear window defroster
can be activated again.
Switching air-recirculation mode
on/off
General notes
You can also temporarily deactivate the flow of
fresh air manually if unpleasant odors are enter-
ing the vehicle from outside. The air already
inside the vehicle will then be recirculated.
If you switch on air-recirculation mode, the win-
dows can fog up more quickly, in particular at
low temperatures. Only use air-recirculation
mode briefly to prevent the windows from fog-
ging up.
When the soft top is open, air-recirculation
mode is deactivated and cannot be activated
manually.
Activating/deactivating
XTurn the SmartKey to position 2in the ignition
lock (Ypage 124).
XTo activate: press thegrocker switch up
or down.
The indicator lamp in the grocker switch
lights up. Air-recirculation mode switches on automati-
cally:
Rat high outside temperatures
Rat high levels of pollution
Rin a tunnel
The indicator lamp in the grocker switch is
not lit when automatic air-recirculation mode is
activated. Outside air is added after about
30 minutes.
XTo deactivate: press thegrocker switch
up or down.
The indicator lamp in the grocker switch
goes out.
Air-recirculation mode deactivates automati-
cally:
Rafter approximately five minutes at outside
temperatures below approximately 41 ‡
(5 †)
Rafter approximately five minutes if cooling
with air dehumidification is deactivated
Rafter approximately 30 minutes at outside
temperatures above approximately 41 ‡
(5 †) if the "Cooling with air dehumidifica-
tion" function is activated
Operating the climate control systems119
Climate control