turn signal MERCEDES-BENZ S-Class CABRIOLET 2017 A217 Owner's Manual
[x] Cancel search | Manufacturer: MERCEDES-BENZ, Model Year: 2017, Model line: S-Class CABRIOLET, Model: MERCEDES-BENZ S-Class CABRIOLET 2017 A217Pages: 338, PDF Size: 8.14 MB
Page 9 of 338
Washing by hand ........................... 280
Wheels ...........................................283
Wind deflector ............................... 282
Wind screen ................................... 283
Windows ........................................ 283
Wiper blades .................................. 283
Wooden trim .................................. 286
CD
see also Digital Operator's Man-
ual ..................................................2 43
CD player (on-board computer) ........195
Center console
Overview .......................................... 37
Stowage space .............................. 255
Center console in the rear com-
partment
Stowage compartment .................. 256
Central locking
Locking/unlocking (SmartKey) ........7 2
Changing the media source .............195
Child
Restraint system .............................. 58
Child seat
Forward-facing restraint system ...... 60
LATCH-type (ISOFIX) child seat
anchors ............................................ 59
On the front-passenger seat ............ 60
Rearward-facing restraint system .... 60
Children
Special seat belt retractor ............... 58
Cigarette lighter ................................ 260
Cleaning
Mirror turn signal ........................... 284
Climate control
Adjusting the footwell tempera-
ture (multimedia system) ............... 249
Automatic climate control ............. 115
Controlling automatically ............... 117
Cooling with air dehumidification .. 116
Cooling with air dehumidification
(multimedia system) ...................... 249
Defrosting the windows ................. 118
Defrosting the windshield .............. 118
ECO start/stop function ................ 115
General notes ................................ 114
Indicator lamp ................................ 116
Ionization ....................................... 121
Ionization (multimedia system) ...... 248 Note
s on using the automatic cli-
mate control .................................. 115
Overview ........................................ 247
Overview of systems ...................... 114
Perfume atomizer .......................... 120
Perfume atomizer (multimedia
system) .......................................... 248
Problem with the rear window
defroster ........................................ 119
Problems with cooling with air
dehumidification ............................ 116
Refrigerant ..................................... 333
Refrigerant filling capacity ............. 334
Setting the air distribution ............. 117
Setting the air vents ...................... 121
Setting the airflow ......................... 118
Setting the climate mode ............... 117
Setting the climate mode (multi-
media system) ............................... 248
Setting the temperature ................ 117
Switching air-recirculation mode
on/off ............................................ 119
Switching on/off ........................... 116
Switching residual heat on/off ...... 120
Switching the rear window
defroster on/off ............................ 119
Switching the synchronization
function on and off ........................ 118
Synchronization function (multi-
media system) ............................... 249
Climate control settings
Multimedia system ........................ 247
Climate control system
Climate control .............................. 115
Cockpit
Overview .......................................... 33
COLLISION PREVENTION ASSIST
PLUS
Activating/deactivating ................. 199
Display message ............................ 210
Operation/notes .............................. 64
COMAND display
Cleaning ......................................... 285
Combination switch .......................... 108
Connecting a USB device
see also Digital Operator's Man-
ual .................................................. 243
Index7
Page 14 of 338
Adjusting (rear) ................................ 97
Head-up display
Adjusting the brightness ................ 201
Displays and operating .................. 190
Function/notes ............................. 189
Important safety notes .................. 189
Selecting displays .......................... 201
Setting the position ....................... 201
Storing settings (memory func-
tion) ............................................... 106
Headlamps
Fogging up ..................................... 110
see Automatic headlamp mode
Heating
see Climate control
High beam flasher ............................. 108
High-beam headlamps
Adaptive Highbeam Assist PLUS .... 109
Display message ............................ 216
Switching on/off ........................... 108
Hill start assist .................................. 127
HOLD function
Activating ....................................... 159
Activation conditions ..................... 158
Deactivating ................................... 159
Display message ............................ 224
Function/notes ............................. 158
General notes ................................ 158
Home address
see also Digital Operator's Man-
ual .................................................. 243
Hood
Closing ........................................... 273
Display message ............................ 229
Important safety notes .................. 272
Opening ......................................... 272
Horn ...................................................... 33
HUD
see Head-up display
Hydroplaning ..................................... 148
I
Ignition lock
see Key positions
Immobilizer .......................................... 70 Indicator and warning lamps
COLLISION PREVENTION ASSIST
PLUS .............................................. 240
Indicator lamps
see Warning and indicator lamps
Indicators
see Turn signals
Insect protection on the radiator .... 273
Instrument cluster
Overview .......................................... 34
Warning and indicator lamps ........... 34
Instrument cluster lighting .............. 187
Interior lighting
Automatic control .......................... 111
Control ........................................... 111
Manual control ............................... 111
Overview ........................................ 111
Reading lamp ................................. 111
iPod
®
see also Digital Operator's Man-
ual .................................................. 243
J
Jack Using ............................................. 322
Jump starting (engine) ...................... 294
K
Key positions
SmartKey ....................................... 124
Start/Stop button .......................... 124
KEYLESS-GO
Activating ......................................... 73
Convenience closing feature ............ 87
Deactivation ..................................... 73
Locking ............................................ 73
Start function ................................... 74
Unlocking ......................................... 73
Kickdown
Driving tips .................................... 134
Knee bag .............................................. 48
L
Lamps
see Warning and indicator lamps
12Index
Page 15 of 338
Lane Keeping Assistsee Active Lane Keeping Assist
LATCH-type (ISOFIX) child seat
anchors ................................................ 59
License plate lamp (display mes-
sage) .................................................. .216
Light sensor (display message) ....... 216
Lights
Adaptive Highbeam Assist PLUS .... 109
Automatic headlamp mode ............ 107
Cornering light function ................. 109
Fogged up headlamps .................... 110
General notes ................................ 107
Hazard warning lamps ................... 109
High beam flasher .......................... 108
High-beam headlamps ................... 108
Light switch ................................... 107
Low-beam headlamps .................... 108
Parking lamps ................................ 108
Rear fog lamp ................................ 108
Setting exterior lighting ................. 107
Standing lamps .............................. 108
Switching the daytime running
lamps on/off (on-board com-
puter) ............................................. 202
Switching the spotlight on/off ....... 202
Turn signals ................................... 108
see Interior lighting
Loading guidelines ............................ 254
Locking
see Central locking
Locking (doors)
Automatic ........................................ 79
Emergency locking ........................... 79
From inside (central locking but-
ton) ..................................................7 8
Locking centrally
see Central locking
Low-beam headlamps
Display message ............................ 216
Switching on/off .......................... .108
Luggage cover
see Trunk partition
Lumbar support
Adjusting the 4-way lumbar sup-
port ............................ ......................9
8M
M+S tires............................................ 304
Malfunction message
see Display messages
Matte finish (cleaning instruc-
tions) .................................................. 281
mbrace
Call priority ....................................2 64
Display message ............................ 210
Downloading destinations
(COMAND) ..................................... 264
Downloading routes ....................... 267
Emergency call .............................. 262
General notes ................................ 261
Geo fencing ................................... 267
Info call button .............................. 263
Locating a stolen vehicle ...............2 66
Remote fault diagnosis .................. 266
Remote vehicle locking .................. 266
Roadside Assistance button .......... 263
Search & Send ............................... 265
Self-test ......................................... 261
Speed alert ....................................2 67
System .......................................... 261
Triggering the vehicle alarm ........... 267
Vehicle remote unlocking .............. 265
Mechanical key
Function/notes ................................ 74
General notes .................................. 74
Inserting .......................................... 74
Locking vehicle ................................ 79
Removing ......................................... 74
Unlocking the driver's door .............. 79
Media Interface
USB port in the armrest of the
center console ............................... 256
see Digital Operator's Manual
Memory card (audio) ......................... 195
Memory function
Seats, steering wheel, exterior
mirrors ...........................................1 05
Mercedes-Benz Intelligent Drive
360°camera .................................. 172
ABS (Anti-lock Brake System) .......... 61
Active Blind Spot Assist ................. 181
Active Lane Keeping Assist ............ 184
Active Parking Assist ..................... 164
Index13
Page 16 of 338
ATTENTION ASSIST ........................ 176
BAS (Brake Assist) ........................... 62
BAS PLUS (Brake Assist PLUS)
with Cross-Traffic Assist .................. 62
DISTRONIC PLUS ........................... 150
DISTRONIC PLUS with Steering
Assist and Stop&Go Pilot ............... 156
ESP
®(Electronic Stability Pro-
gram) ............................................... 66
General notes ................................ 148
Night View Assist Plus ...................1 78
PARKTRONIC ................................. 161
PRE-SAFE
®(anticipatory occu-
pant protection) ............................... 56
PRE-SAFE
®Brake .............................6 8
PRE-SAFE®PLUS (anticipatory
occupant protection PLUS) .............. 56
Rear view camera .......................... 168
Traffic Sign Assist .......................... 177
Message memory (on-board com-
puter) .................................................. 204
Messages
see Display messages
see Warning and indicator lamps
Mirror turn signal
Cleaning ......................................... 284
Mirrors
see Exterior mirrors
see Vanity mirror (in the sun visor)
Mobile phone
Connecting (Bluetooth
®inter-
face) ..............................................2 51
Connecting another mobile
phone ............................................ 252
Frequencies ................................... 327
Installation ..................................... 327
Menu (on-board computer) ............ 196
Transmission output (maximum) .... 327
Modifying the programming
(SmartKey) ...........................................7 4
MOExtended tires .............................. 289
Mounting wheels
Lowering the vehicle ...................... 325
Mounting a new wheel ................... 324
Preparing the vehicle .....................3 21
Raising the vehicle ......................... 322
Removing a wheel .......................... 324 Securing the vehi
cle a
gainst roll-
ing away ........................................ 321
MP3
Operation ....................................... 195
see also Digital Operator's Man-
ual ..................................................2 43
Multifunction display
Function/notes .............................1 89
Multifunction steering wheel
Operating the on-board computer .. 188
Overview .......................................... 35
Multimedia system
Switching on and off ......................2 44
Music files
see also Digital Operator's Man-
ual ..................................................2 43
N
Navigation
Menu (on-board computer) ............ 192
see also Digital Operator's Man-
ual ..................................................2 43
Night View Assist Plus
Activating/deactivating ................. 180
Cleaning ......................................... 285
Display message ............................ 223
Function/notes .............................1 78
Pedestrian and animal recogni-
tion ................................................ 179
Problem (malfunction) ................... 181
Switching automatic activation
on/off ............................................ 199
Notes on breaking-in a new vehi-
cle ....................................................... 123
O
Occupant Classification System
(OCS)
Conditions ....................................... 49
Faults ............................................... 53
Operation ......................................... 49
System self-test ............................... 52
Occupant safety
Air bags ...........................................4 6
Automatic measures after an acci-
dent ................................................. 57
Children in the vehicle ..................... 57
14Index
Page 24 of 338
Power closing ..................................79
Trunk lid
Display message ............................ 229
Obstacle recognition ........................8 0
Opening dimensions ......................3 34
Opening/closing .............................. 80
Trunk load (maximum) ......................334
Trunk partition
Display message ............................ 230
General notes .................................. 91
Opening/closing .............................. 91
Turn signals
Display message ............................ 216
Switching on/off ........................... 108
Two-way radio
Frequencies ................................... 327
Installation ..................................... 327
Transmission output (maximum) .... 327
Windshield (infrared reflective) ...... 271
Type identification plate
see Vehicle identification plate
U
UnlockingEmergency unlocking ....................... 79
From inside the vehicle (central
unlocking button) .............................7 8
Upshift indicator (on-board com-
puter, Mercedes-AMG vehicles) .......203
USB devices
Connecting to the Media Inter-
face ............................................... 252
V
Vanity mirror (in the sun visor) ........259
Vehicle
Correct use ...................................... 29
Data acquisition ............................... 30
Display message ............................ 227
Equipment ....................................... 26
Individual settings .......................... 198
Limited Warranty .............................3 0
Loading .......................................... 311
Locking (in an emergency) ............... 79
Locking (SmartKey) .......................... 72
Lowering ........................................ 325 Maintenance .................................... 27
Operating safety .............................. 28
Parking .......................................... 140
Parking for a long period ................ 143
Pulling away ................................... 127
Raising ........................................... 322
Reporting problems ......................... 29
Securing from rolling away ............ 321
Towing away .................................. 297
Transporting .................................. 299
Unlocking (in an emergency) ........... 79
Unlocking (SmartKey) ...................... 72
Vehicle data ................................... 334
Vehicle dimensions ........................... 334
Vehicle emergency locking ................ 79
Vehicle identification number
see VIN
Vehicle identification plate .............. 328
Vehicle level
AIRMATIC ...................................... 160
Display message ............................ 220
Vehicle tool kit .................................. 288
Video
Operating the DVD ......................... 196
see also Digital Operator's Man-
ual .................................................. 243
Video-AUX
Connecting an external video
source ............................................ 253
VIN
Type plate ...................................... 328
W
Warning and indicator lampsABS ................................................ 235
Brakes ........................................... 234
Check Engine ................................. 238
Coolant .......................................... 238
Distance warning ........................... 240
ESP
®.............................................. 235
ESP®OFF ....................................... 237
Fuel tank ........................................ 238
General notes ................................ 232
Overview .......................................... 34
Parking brake ................................ 237
PASSENGER AIR BAG ...................... 42
Reserve fuel ................................... 238
22Index
Page 36 of 338
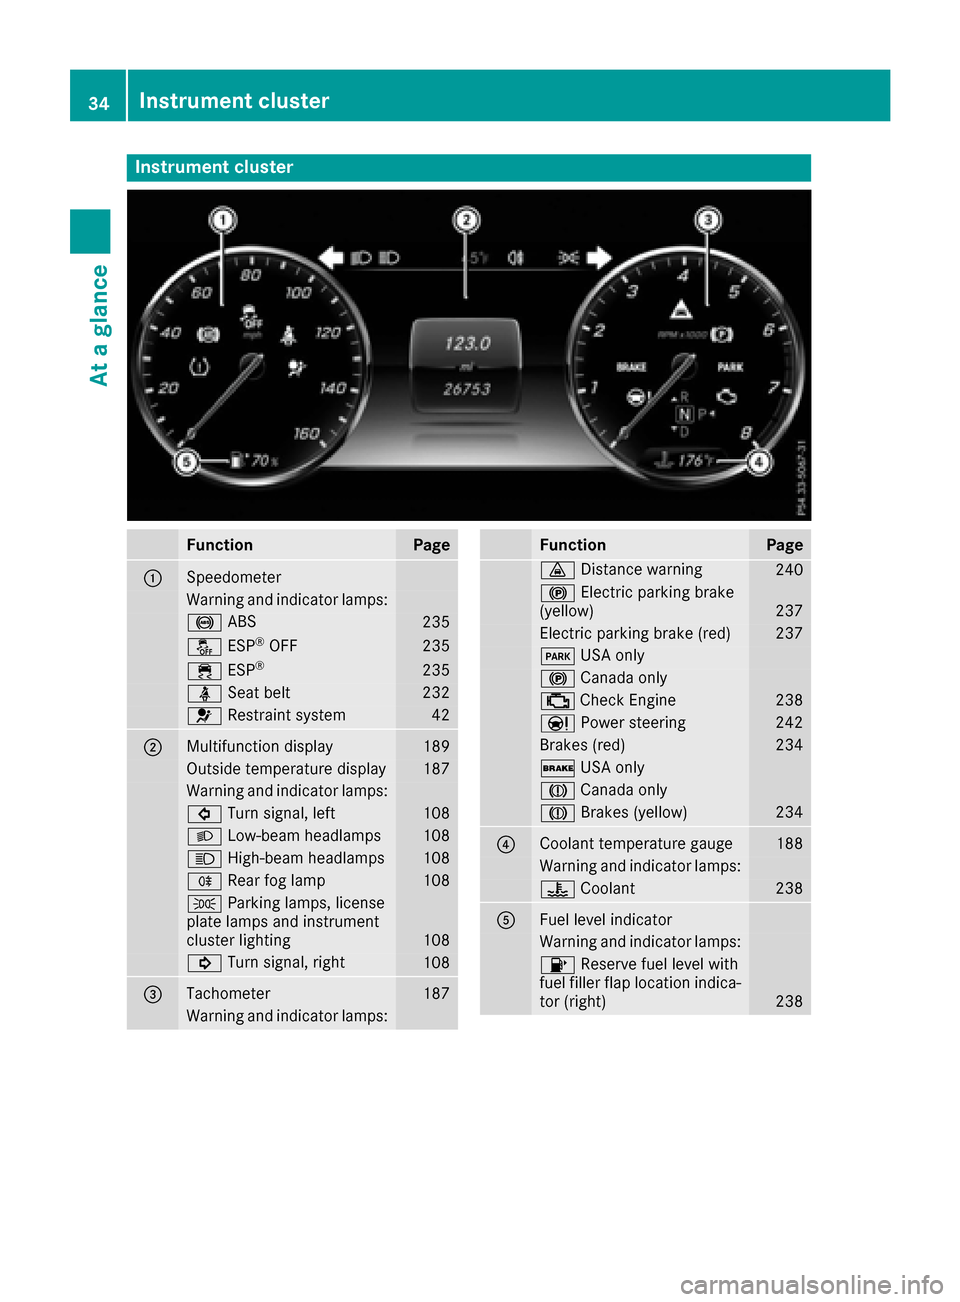
Instrument cluster
FunctionPage
:Speedometer
Warning and indicator lamps:
! ABS235
å ESP®OF F235
÷ ESP®23 5
ü Seat belt232
6 Restrain tsystem42
;Multifunction display18 9
Outside temperature display187
Warning and indicator lamps:
# Turn signal, lef t108
L Low-beam headlamps108
K High-beam headlamps108
R Rear fog lamp108
T Parking lamps, license
plat elamp sand instrumen t
cluste rlighting
10 8
! Turn signal, right108
=Tachometer187
Warning and indicator lamps:
FunctionPag e
· Distanc ewarning24 0
! Electric parking brak e
(yellow)23 7
Electric parking brak e(red)23 7
F USAonly
! Canad aonly
; CheckEngin e238
Ð Powersteering24 2
Brake s(red)23 4
$ USAonly
J Canad aonly
J Brakes(yellow)23 4
?Coolan ttemperature gauge18 8
Warning and indicator lamps:
? Coolan t238
AFue llevel indicator
Warning and indicator lamps:
8 Reserve fuel level wit h
fuel filler flap location indica-
to r(right )
238
34Instrument cluster
At a glance
Page 74 of 338

SmartKey
Important safety notes
GWARNING
If children are left unsupervised in the vehicle,
they could:
Ropen the doors, thus endangering other
people or road users.
Rget out and disrupt traffic.
Roperate the vehicle's equipment.
Additionally, children could set the vehicle in
motion if, for example, they:
Rrelease the parking brake.
Rshifting the automatic transmission out of
park position P
RStart the engine.
There is a risk of an accident and injury.
When leaving the vehicle, always take the
SmartKey with you and lock the vehicle. Never
leave children or animals unattended in the
vehicle. Always keep the SmartKey out of
reach of children.
GWARNING
If you attach heavy or large objects to the
SmartKey, the SmartKey could be uninten-
tionally turned in the ignition lock. This could
cause the engine to be switched off. There is a risk of an accident.
Do not attach any heavy or large objects to the
SmartKey. Remove any bulky key rings before
inserting the SmartKey into the ignition lock.
!Keep the SmartKey away from strong mag-
netic fields. Otherwise, the remote control
function could be affected.
Strong magnetic fields can occur in the vicin-
ity of powerful electrical installations.
Do not keep the SmartKey:
Rwith electronic devices, e.g. a mobile phone
or another SmartKey.
Rwith metallic objects, e.g. coins or metal foil.
Rinside metallic objects, e.g. a metal case.
This can affect the functionality of the Smart- Key. Vehicles with KEYLESS-GO start function:
do
not keep the SmartKey on the parcel shelf or in
the trunk. Otherwise, the SmartKey may not be
detected, e.g. when starting the engine using
the Start/Stop button.
A brief radio connection between the vehicle
and the SmartKey determines whether a valid
SmartKey is in, or in the direct vicinity of, the
vehicle. This occurs, for example:
Rwhen starting the engine
Rwhile driving
Rwhen using HANDS-FREE ACCESS
Rwhen the external door handles are touched
Rduring convenience closing
SmartKey functions
:& Locks the vehicle
;FOpens/closes the trunk lid
=%Unlocks the vehicle
XTo unlock centrally: press the%button.
If you do not open the vehicle within approx-
imately 40 seconds of unlocking:
Rthe vehicle is locked again.
Ranti-theft protection is reactivated.
XTo lock centrally: press the&button.
The SmartKey centrally locks and unlocks the
following components:
Rthe doors
Rthe trunk lid
Rthe glove box
Rthe fuel filler flap
The turn signals flash once when unlocking and
three times when locking.
You can also set an audible signal to confirm
that the vehicle has been locked. The audible
72SmartKey
Opening and closing
Page 110 of 338
When the engine is running and the vehicle is
stationary: if you move the selector lever from a
driving position toP, the daytime running lamps
and low-beam headlamps go out after three
minutes.
When the engine is running, the vehicle is sta-
tionary and in bright ambient light: if you turn the
light switch to the Tposition, the daytime
running lamps and parking lamps switch on.
If the engine is running and you turn the light
switch to the Lposition, the manual settings
take precedence over the daytime running
lamps.
Low-beam headlamps
GWARNING
When the light switch is set to Ã, the low-
beam headlamps may not be switched on
automatically if there is fog, snow or other
causes of poor visibility due to the weather
conditions such as spray. There is a risk of an
accident.
In such situations, turn the light switch to
L.
Even if the light sensor does not detect that it is
dark, the parking lamps and low-beam head-
lamps switch on when the ignition is switched on and the light switch is set to the Lposition.
This is a particularly useful function in the event
of rain and fog.
XTo switch on the low-beam headlamps:
turn the SmartKey in the ignition lock to posi- tion 2or start the engine.
XTurn the light switch to the Lposition.
The green Lindicator lamp in the instru-
ment cluster lights up.
Rear fog lamp
The rear fog lamp improves visibility of your
vehicle for the traffic behind in the event of thick
fog. You must observe the legal requirements
for the country in which you are currently driving
when operating the rear fog lamp.
XTo switch on the rear fog lamp: turn the
SmartKey in the ignition lock to position 2or
start the engine.
XTurn the light switch to the LorÃ
position.
XPress the Rbutton.
The yellow Rindicator lamp in the instru-
ment cluster lights up.
Parking lamps
!If the battery charge is very low, the parking
lamps or standing lamps are automatically
switched off to enable the next engine start.
Always park your vehicle safely and in a well lit
area, in accordance with the relevant legal
stipulations. Avoid using the Tparking
lamps over a period of several hours. If pos-
sible, switch on the right-hand Xor left-
hand W standing lamps.
XTo switch on the parking lamps: turn the
light switch to the Tposition.
The green Tindicator lamp on the instru-
ment cluster lights up.
Standing lamps
Switching on the standing lamps ensures the
corresponding side of the vehicle is illuminated.
XTo switch on the standing lamps: turn the
Smart Key to position 0in the ignition lock or
remove the SmartKey.
XTurn the light switch to the W(left-hand
side of the vehicle) or X(right-hand side of
the vehicle) position.
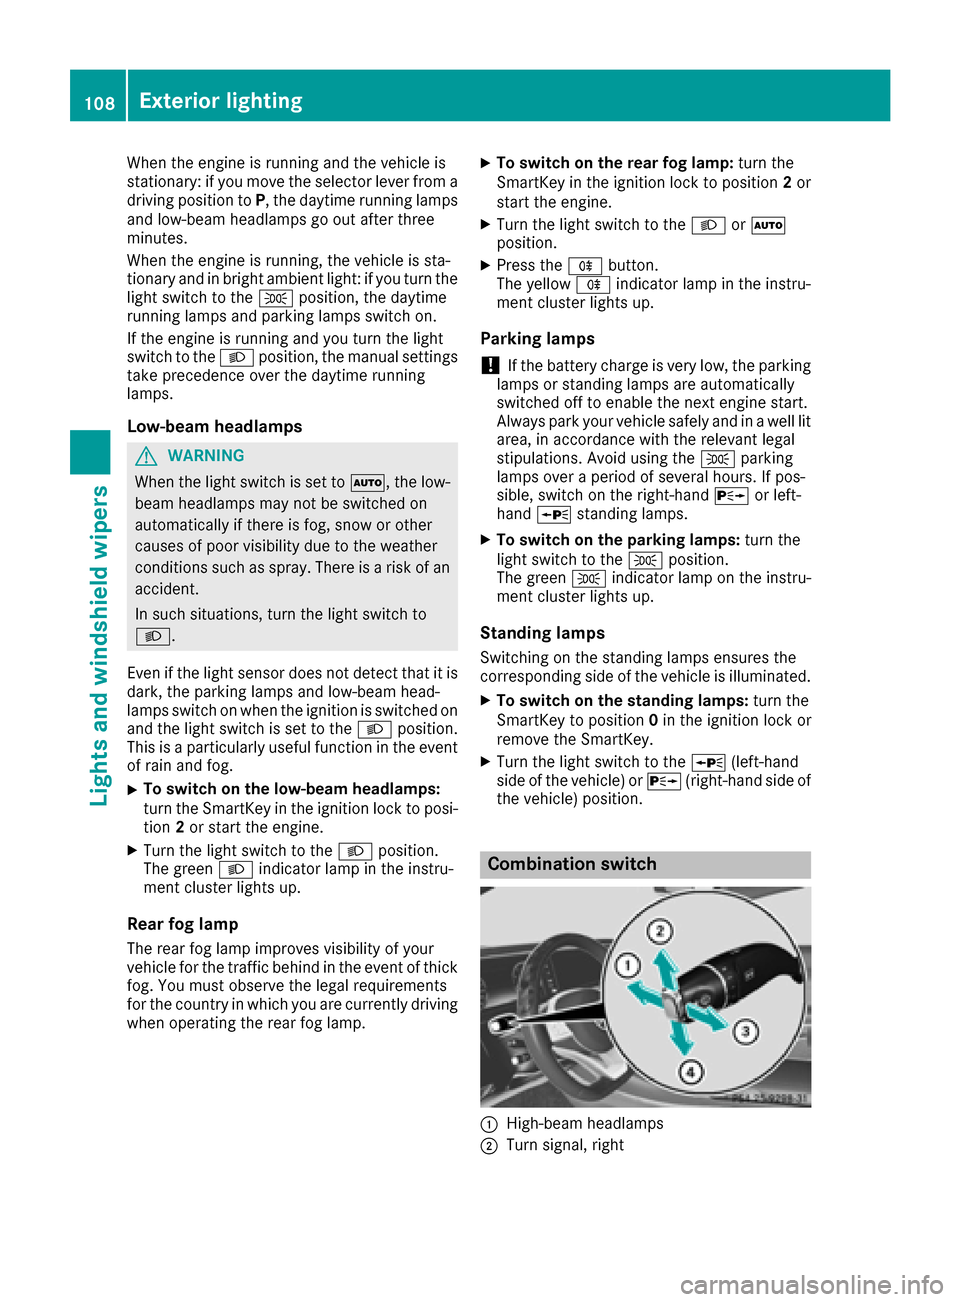
Combination switch
:High-beam headlamps
;Turn signal, right
108Exterior lighting
Lights and windshield wipers
Page 111 of 338
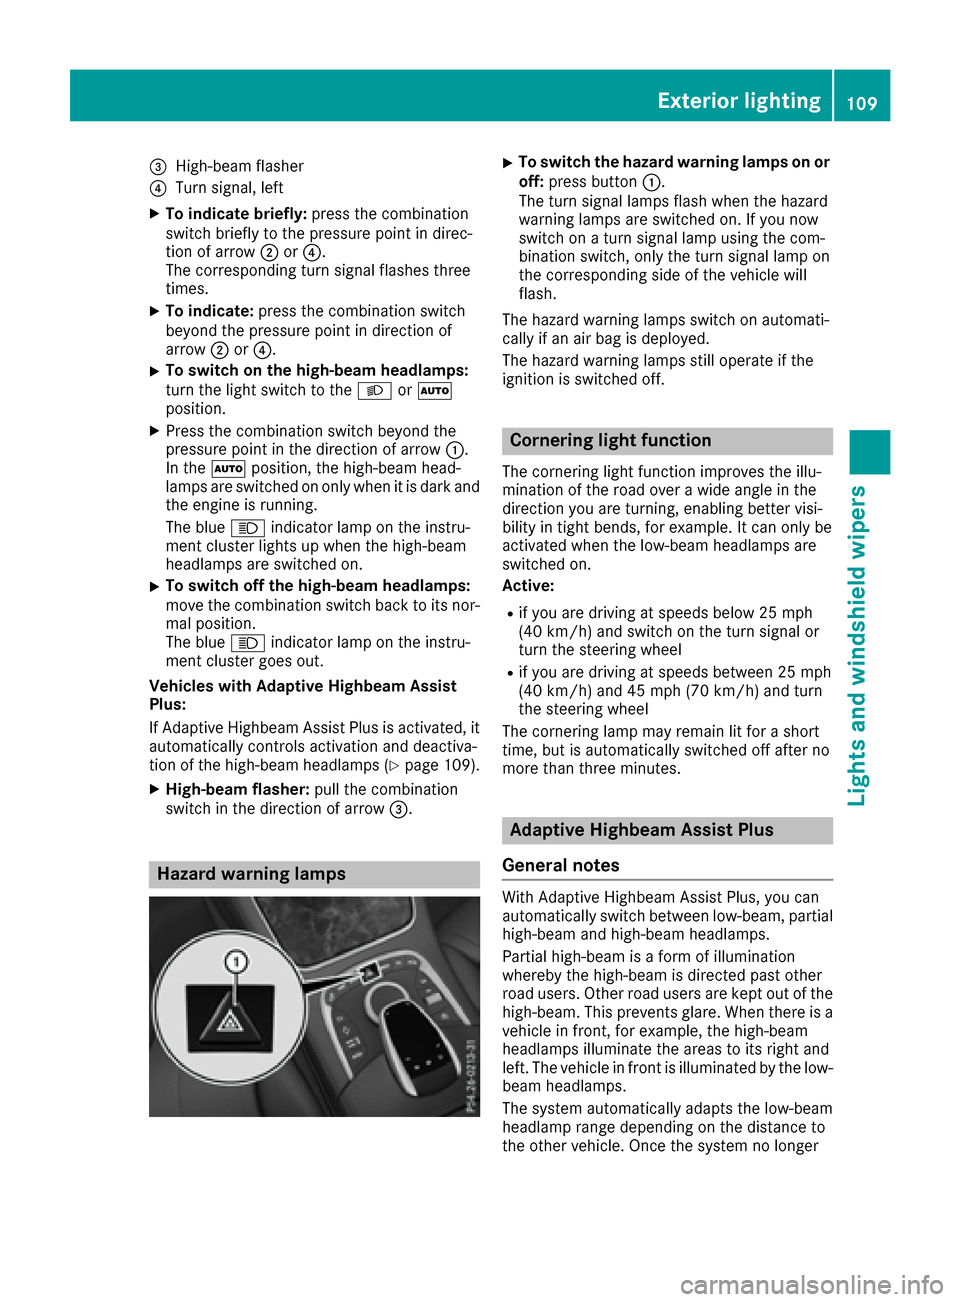
=High-beam flasher
?Turn signal, left
XTo indicate briefly:press the combination
switch briefly to the pressure point in direc-
tion of arrow ;or?.
The corresponding turn signal flashes three
times.
XTo indicate: press the combination switch
beyond the pressure point in direction of
arrow ;or?.
XTo switch on the high-beam headlamps:
turn the light switch to the LorÃ
position.
XPress the combination switch beyond the
pressure point in the direction of arrow :.
In the Ãposition, the high-beam head-
lamps are switched on only when it is dark and
the engine is running.
The blue Kindicator lamp on the instru-
ment cluster lights up when the high-beam
headlamps are switched on.
XTo switch off the high-beam headlamps:
move the combination switch back to its nor-
mal position.
The blue Kindicator lamp on the instru-
ment cluster goes out.
Vehicles with Adaptive Highbeam Assist
Plus:
If Adaptive Highbeam Assist Plus is activated, it
automatically controls activation and deactiva-
tion of the high-beam headlamps (
Ypage 109).
XHigh-beam flasher: pull the combination
switch in the direction of arrow =.
Hazard warning lamps
XTo switch the hazard warning lamps on or
off: press button :.
The turn signal lamps flash when the hazard
warning lamps are switched on. If you now
switch on a turn signal lamp using the com-
bination switch, only the turn signal lamp on
the corresponding side of the vehicle will
flash.
The hazard warning lamps switch on automati-
cally if an air bag is deployed.
The hazard warning lamps still operate if the
ignition is switched off.
Cornering light function
The cornering light function improves the illu-
mination of the road over a wide angle in the
direction you are turning, enabling better visi-
bility in tight bends, for example. It can only be
activated when the low-beam headlamps are
switched on.
Active:
Rif you are driving at speeds below 25 mph
(40 km/h) and switch on the turn signal or
turn the steering wheel
Rif you are driving at speeds between 25 mph
(40 km/h) and 45 mph (70 km/h) and turn
the steering wheel
The cornering lamp may remain lit for a short
time, but is automatically switched off after no
more than three minutes.
Adaptive Highbeam Assist Plus
General notes
With Adaptive Highbeam Assist Plus, you can
automatically switch between low-beam, partial
high-beam and high-beam headlamps.
Partial high-beam is a form of illumination
whereby the high-beam is directed past other
road users. Other road users are kept out of the
high-beam. This prevents glare. When there is a
vehicle in front, for example, the high-beam
headlamps illuminate the areas to its right and
left. The vehicle in front is illuminated by the low-
beam headlamps.
The system automatically adapts the low-beam
headlamp range depending on the distance to
the other vehicle. Once the system no longer
Exterior lighting109
Lights and windshield wipers
Z
Page 155 of 338
ates or decelerates. If you do not know the
stored speed, the vehicle could accelerate orbrake unexpectedly. There is a risk of an acci-
dent.
Pay attention to the road and traffic condi-
tions before calling up the stored speed. If you
do not know the stored speed, store the
desired speed again.
XBriefly pull the cruise control lever towards
you ?.
XRemove your foot from the accelerator pedal.
DISTRONIC PLUS is activated. The first time it
is activated, the current speed is stored. Oth-
erwise, it sets the vehicle speed to the previ-
ously stored value.
Driving with DISTRONIC PLUS
Pulling away and driving
XIf you want to pull away with DISTRONIC
PLUS: remove your foot from the brake pedal.
XBriefly pull the cruise control lever towards
you?.
or
XAccelerate briefly.
The vehicle pulls away and adapts its speed to that of the vehicle in front. If no vehicle is
detected in front, your vehicle accelerates to
the stored speed.
The vehicle can also pull away when it is facing
an unidentified obstacle or is driving on a differ- ent line from another vehicle. The vehicle then
brakes automatically.
If DISTRONIC PLUS does not detect a vehicle in
front, the system operates like a cruise control.
If DISTRONIC PLUS detects that the vehicle in
front is driving slower, your vehicle brakes. In
this way, the specified minimum distance you
have selected is maintained.
If DISTRONIC PLUS detects a faster-moving
vehicle in front, it increases the driving speed to
the set speed.
Selecting the drive program
All vehicles (except Mercedes-AMG):
DISTRONIC PLUS supports a sporty driving stylewhen you select the Sdrive program
(
Ypage 134). Acceleration behind the vehicle in
front or to the set speed is then noticeably more
dynamic. If you have selected the Edriving pro- gram, the vehicle accelerates more gently. This
setting is recommended in stop-and-start traf-
fic.
Mer
cedes-
AMG vehicles:
DISTRONIC PLUS
supports a sporty driving style when you select
the Sor Mdrive program (
Ypage 134). Accel-
eration behind the vehicle in front or to the set
speed is then noticeably more dynamic. When
you select the Cdrive program, the vehicle
accelerates more gently. This setting is recom-
mended in stop-and-start traffic.
Changing lanes
DISTRONIC PLUS aids you when switching to
the overtaking lane, if:
Ryou are driving faster than 45 mph (70 km/h)
Ryou switch on the appropriate turn signal
RDISTRONIC PLUS does not detect a danger of
a collision
If these conditions are fulfilled, your vehicle is
accelerated. Acceleration will be interrupted if
changing lanes takes too long or if the distance
between your vehicle and the vehicle in front
becomes too small.
When you change lanes, DISTRONIC PLUS mon-
itors the left lane (on left-hand-drive vehicles) or the right lane (on right-hand-drive vehicles).
Stopping
GWARNING
When leaving the vehicle, even if it is braked
only by DISTRONIC PLUS, it could roll away if:
Rthere is a malfunction in the system or in
the voltage supply.
RDISTRONIC PLUS has been deactivated
with the cruise control lever, e.g. by a vehi-
cle occupant or from outside the vehicle.
Rthe electrical system in the engine com-
partment, the battery or the fuses have
been tampered with.
Rthe battery is disconnected.
Rthe accelerator pedal has been depressed, e.g. by a vehicle occupant.
There is a risk of an accident.
If you wish to exit the vehicle, always turn off
DISTRONIC PLUS and secure the vehicle
against rolling away.
Driving systems153
Driving and parking
Z