center console MERCEDES-BENZ S-CLASS CABRIOLET 2019 Owner's Manual
[x] Cancel search | Manufacturer: MERCEDES-BENZ, Model Year: 2019, Model line: S-CLASS CABRIOLET, Model: MERCEDES-BENZ S-CLASS CABRIOLET 2019Pages: 518, PDF Size: 13.78 MB
Page 17 of 518
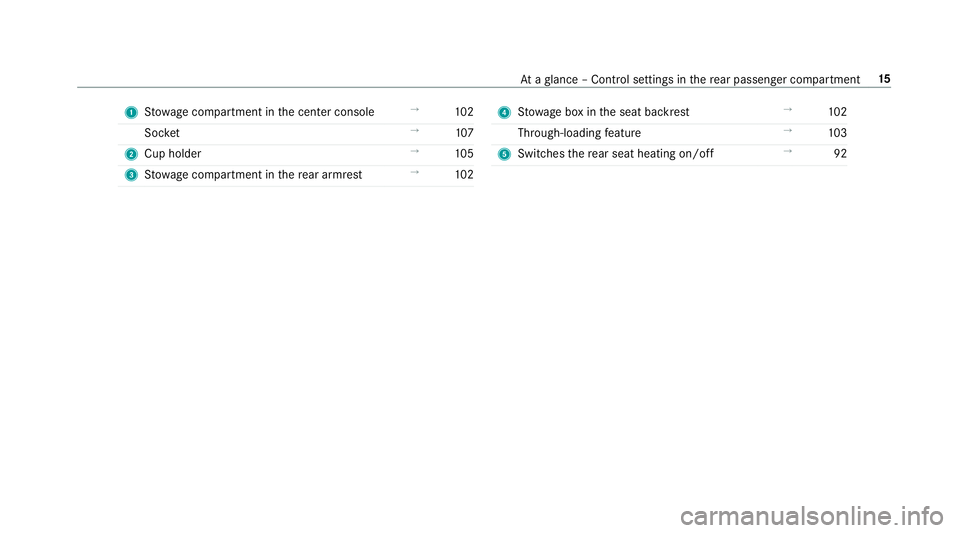
1
Stow age compartment in the center console →
102
Soc ket →
107
2 Cup holder →
105
3 Stow age compartment in there ar armrest →
102 4
Stow age box in the seat backrest →
102
Through-loading feature →
103
5 Switches there ar seat heating on/off →
92 At
aglance – Control settings in there ar passenger compartment 15
Page 22 of 518
*
NO
TEImpairment of the operating ef fi‐
ciency of there stra int sy stems from
ins talling accessory parts or from repairs
or we lding Airbags and Emer
gency Tensioning Devices,
as well as control units and sensors forthe
re stra int sy stems, may be ins talled in thefo l‐
lowing areas of your vehicle:
R Doors
R Door pillars
R Door sills
R Seats
R Cockpit
R Instrument clus ter
R Cen ter console
R Lateral roof frame #
Do not ins tall accessory parts such as
audio sy stems in these areas. #
Do not car ryout repairs or welding. #
Have afte rm arke t ins tallation of acces‐
sories car ried out at a qualified special‐
ist workshop. Yo
u could jeopardize the operating saf ety of your
ve hicle if you use parts, tires and wheels as well
as accessories releva nt tosaf ety which ha venot
been appr ovedby Mercedes-Benz. Saf ety-re le‐
va nt sy stems, e.g. the brake sy stem, may mal‐
function. Only use Mercedes-Benz Genuine Parts
or parts of equal qualit y.Only use tires, wheels
and accessories that ha vebeen specifically
appr ovedfo ryo ur vehicle model.
Mercedes-Benz Genuine Parts are subject to
st rict quality control. Each part has been spe‐
cially de veloped, manufactured or selec tedfor
Mercedes-Benz vehicles and fine-tuned forth em.
Therefore, only Mercedes-Benz Genuine Parts
should be used.
More than 300,000 dif fere nt Mercedes-Benz
Genuine Parts are available for Mercedes-Benz
models.
All auth orized Mercedes-Benz Centers maintain
a supply of Mercedes-Benz Genuine Parts for necessa
ryservice and repair work. In addition,
st ra tegically located parts delivery centers pro‐
vide forqu ick and reliable parts service.
Alw ays specify theve hicle identification number
(VIN) (→ page 408) when ordering Mercedes-
Benz Genuine Parts. Operator's Manual
This Operator's Manual describes all models and
all standard and optional equipment available for
yo ur vehicle at the time of this Opera tor's Man‐
ual going topress. Countr y-specific dif fere nces
are possible. No tethat your vehicle may not be
equipped with all features desc ribed. This is also
th e case for sy stems and functions releva nt to
saf ety. Therefore, the equipment on your vehicle
may dif fer from that in the descriptions and illus‐
trations.
The original pur chase agreement foryo ur vehicle
contains a list of all of the sy stems in your vehi‐
cle.
Should you ha veany questions concerning
equipment and operation, please consult an
authorized Mercedes-Benz Center. 20
General no tes
Page 95 of 518
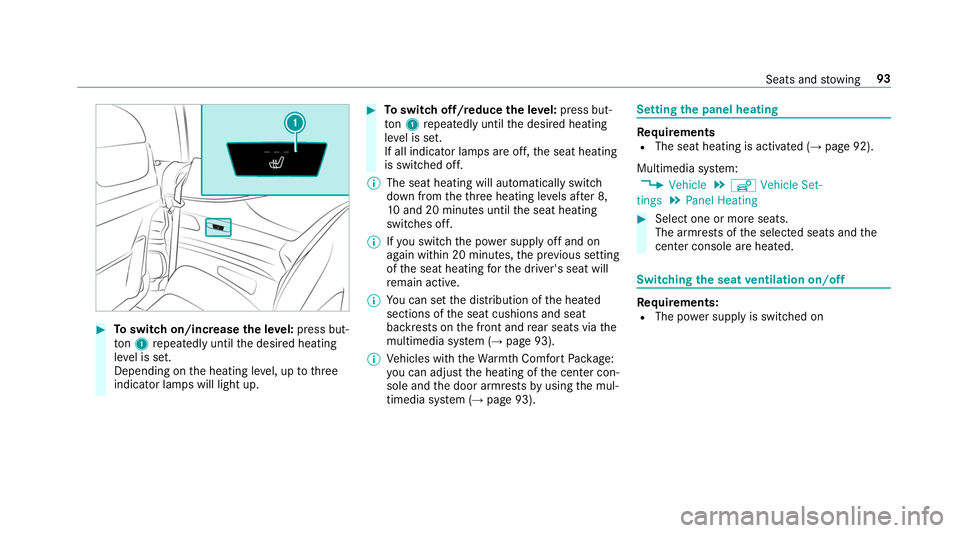
#
Toswitch on/increase the le vel:press but‐
to n1 repeatedly until the desired heating
le ve l is set.
Depending on the heating le vel, up tothree
indicator lamps will light up. #
Toswitch off/reduce the le vel:press but‐
to n1 repeatedly until the desired heating
le ve l is set.
If all indicator lamps are off, the seat heating
is switched off.
% The seat heating will automatically switch
down from theth re e heating le vels af ter 8,
10 and 20 minutes until the seat heating
switches off.
% Ifyo u swit ch the power supply off and on
again within 20 minutes, the pr evious setting
of the seat heating forth e driver's seat will
re main active.
% You can set the distribution of the heated
sections of the seat cushions and seat
backrests on the front and rear seats via the
multimedia sy stem (→ page 93).
% Vehicles with theWa rmthComfort Package:
yo u can adjust the heating of the center con‐
sole and the door armrests byusing the mul‐
timedia sy stem (→ page 93). Setting
the panel heating Re
quirements
R The seat heating is activated (→ page 92).
Multimedia sy stem:
, Vehicle .
î Vehicle Set-
tings .
Panel Heating #
Select one or more seats.
The armrests of the selected seats and the
center console are hea ted. Switching
the seat ventilation on/off Re
quirements:
R The po wer supply is switched on Seats and
stowing 93
Page 103 of 518
St
ow age spaces in theve hicle interior Overview of
the front stowage compa rt‐
ments &
WARNING Risk of inju rydue toobjects
being stowed incor rectly
If yo u do not adequately stowobjects in the
ve hicle interior, they could slip or be tossed
around and thereby strike vehicle occupants.
In addition, cup holders, open stowage
spaces and mobile phone brac kets cann ot
alw aysre stra in the objects they contain in
th eev ent of an accident.
There is a risk of injur y,particularly in the
ev ent of sudden braking or a sudden change
in direction. #
Alw aysstow objects in such a wayth at
th ey cannot be tossed about in these or
similar situations. #
Alw ays make sure that objects do not
project from stowage spaces, parcel
nets or stowage nets. #
Close the loc kable stow age spaces
before starting a journe y. #
Alw aysstow and secure objects that
are heavy, hard, poin ted, sharp-edged,
fragile or too large in the trunk. Obser
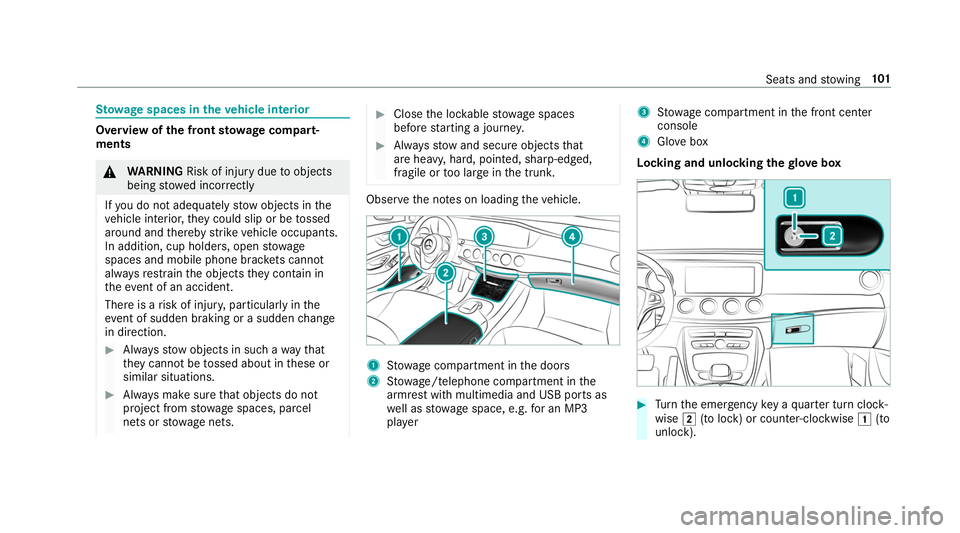
vethe no tes on loading theve hicle. 1
Stow age compartment in the doors
2 Stow age/telephone compartment in the
armrest with multimedia and USB ports as
we ll as stow age space, e.g. for an MP3
pla yer 3
Stow age compartment in the front center
console
4 Glovebox
Locking and unlocking thegl ove box #
Turn the emer gency key a quarter turn clock‐
wise 0048(to lock) or counter-clockwise 0047(to
unlock). Seats and
stowing 101
Page 104 of 518
Opening
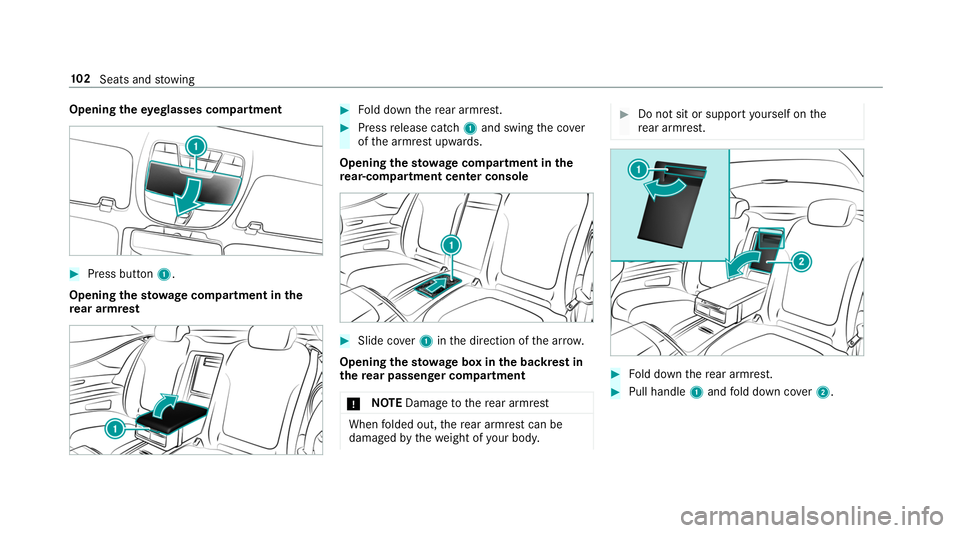
theey eglasses compa rtment #
Press button 1.
Opening the stowage compa rtment in the
re ar armrest #
Fold down there ar armrest. #
Press release cat ch1 and swing the co ver
of the armrest upwards.
Opening thesto wage compa rtment in the
re ar-co mpartment center console #
Slide co ver1 inthe direction of the ar row.
Opening thesto wage box in the backrest in
th ere ar passenger comp artment
* NO
TEDama getothere ar armrest When
folded out, there ar armrest can be
damaged bythewe ight of your body. #
Do not sit or suppo rtyo urself on the
re ar armrest. #
Fold down there ar armrest. #
Pull handle 1and fold down co ver2. 102
Seats and stowing
Page 107 of 518
Cup holder
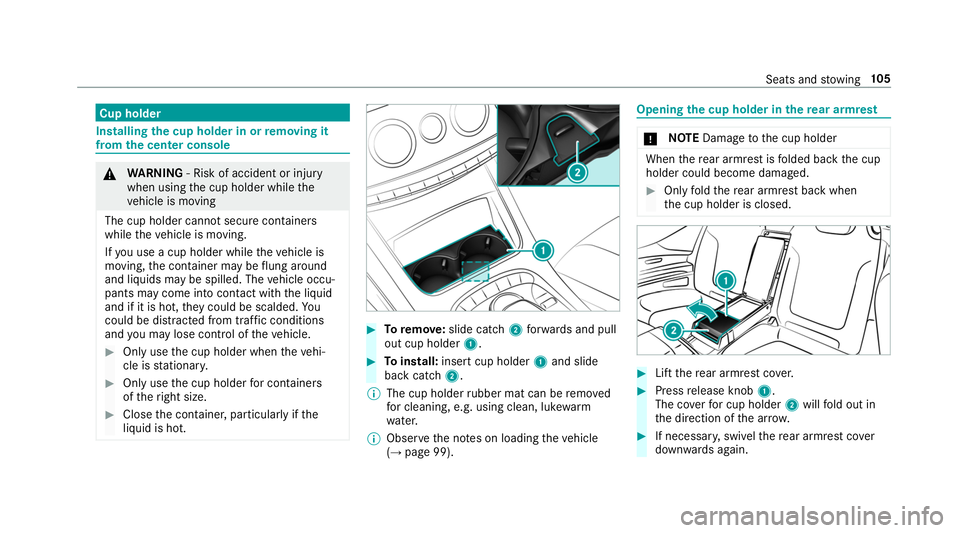
Installing
the cup holder in or removing it
from the center console &
WARNING ‑ Risk of accident or inju ry
when using the cup holder while the
ve hicle is moving
The cup holder cannot secure containers
while theve hicle is moving.
If yo u use a cup holder while theve hicle is
moving, the conta iner may be flung around
and liquids may be spilled. The vehicle occu‐
pants may come into contact with the liquid
and if it is hot, they could be scalded. Yo u
could be di stra cted from traf fic conditions
and you may lose cont rol of theve hicle. #
Only use the cup holder when theve hi‐
cle is stationar y. #
Only use the cup holder for containers
of theright size. #
Close the conta iner, particular lyifthe
liquid is hot. #
Toremo ve: slide catch 2forw ards and pull
out cup holder 1. #
Toinstall: insert cup holder 1and slide
back cat ch2.
% The cup holder rubber mat can be remo ved
fo r cleaning, e.g. using clean, luk ewarm
wate r.
% Obser vethe no tes on loading theve hicle
(→ page 99). Opening
the cup holder in there ar armrest *
NO
TEDama getothe cup holder When
there ar armrest is folded back the cup
holder could become damaged. #
Only fold there ar armrest back when
th e cup holder is closed. #
Lift there ar armrest co ver. #
Press release knob 1.
The co verfo r cup holder 2will fold out in
th e direction of the ar row. #
If necessar y,swivel there ar armrest co ver
down wards again. Seats and
stowing 105
Page 108 of 518
Asht
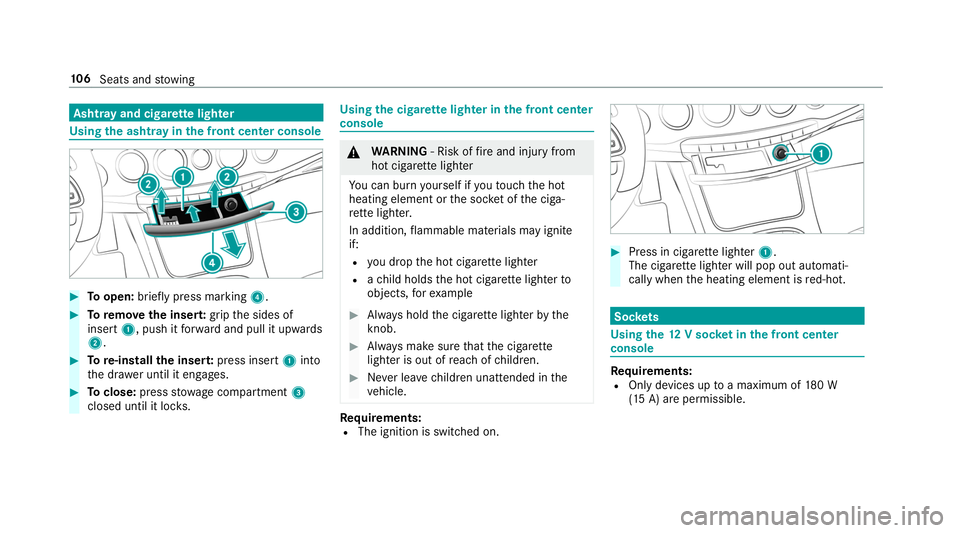
ray and cigar ette lighter Using
the ashtr ayinthe front center console #
Toopen: briefly press marking 4.#
Toremo vethe inser t:grip the sides of
insert 1, push it forw ard and pull it upwards
2. #
Tore-install the inser t:press insert 1into
th e dr awe r until it engages. #
Toclose: pressstowage compartment 3
closed until it loc ks. Using
the cigar ette lighter in the front center
console &
WARNING ‑ Risk of fire and injury from
hot cigar ette lighter
Yo u can burn yourself if youto uch the hot
heating element or the soc ket of the ciga‐
re tte lighter.
In addition, flammable materials may ignite
if:
R you drop the hot cigar ette lighter
R ach ild holds the hot cigar ette lighter to
objects, forex ample #
Alw ays hold the cigar ette lighter bythe
knob. #
Alw ays make sure that the cigar ette
lighter is out of reach of children. #
Never lea vechildren unat tended in the
ve hicle. Re
quirements:
R The ignition is switched on. #
Press in cigar ette lighter 1.
The cigar ette lighter will pop out automati‐
cally when the heating element is red-hot. Soc
kets Using the
12V so cket inthe front center
console Re
quirements:
R Only devices up toa maximum of 180 W
(15 A) are permissible. 106
Seats and stowing
Page 258 of 518
Multimedia sy
stem:
, System .
Software Update
Au tomatic update #
Switch Automatic Online Update on0073.
Up dates are per form ed.
The cur rent status of the updates is dis‐
pla yed.
Manual update #
Deactivate 0053Automatic Online Update. #
Select an update from the list and start the
update.
Ac tivating the so ftwa reupdate #
Restart the sy stem.
Fu nction of important sy stem upda tes
Impor tant sy stem updates may be necessary for
th e security of your multimedia sy stem's data.
Please ins tallth ese updates, or else the security
of your multimedia sy stem cann otbe ensured.
% If automatic software updates are activated,
th e sy stem updates will be downloaded auto‐
matically (→ page 255). As soon as an update is
available for download,
a cor responding message appears onthe media
displa y.
Yo u ha vethefo llowing selection options:
R Download
The update will be downloaded in the back‐
ground.
R Details
Information about the pending sy stem
update is displa yed.
R Later
The update can be downloaded manually at a
later time (→ page 255).
If th e download is comple ted and the update is
re ady for ins tallation, you will be informed of this
af te rth e next ignition cycle, forex ample.
% Park theve hicle safely in a suitable location
before starting the ins tallation.
Re quirements forth e ins tallation:
R The ignition is switched on.
R The engine is not running. R
Notes and warnings ha vebeen read and
accep ted.
R The parking brake is applied.
If all requirements are met, the update will be
ins talled. The multimedia sy stem cann otbe
operated while the update is being ins talled and
ve hicle functions are restricted.
If er rors should occur during the ins tallation, the
multimedia sy stem automatically attem ptsto
re store the pr evious version. If restoration of the
pr ev ious version is not possible, a symbol
appears on the center console displa y.Please
consult a qualified specialist workshop to
re solve the problem. Re
set function Multimedia sy
stem:
, System .
Reset
Pe rsonal data is dele ted, forex ample:
R Station presets
R Connec ted mobile phones 256
Multimedia sy stem
Page 292 of 518
Information on
NearField Communication
(NFC)
NFC enables short- range wi reless data transfer
or (re)connection of a mobile phone with the
multimedia sy stem.
The following functions are available without
having authorized a mobile phone:
R Trans ferring a URL tobe vie wed in the multi‐
media sy stem (see the manufacturer's oper‐
ating instructions).
R Setting up theve hicle's Wi-Fi access da tavia
th e sy stem settings (→ page 250).
Fu rther information can be found at: http://
www.mercedes-benz.com/connect
Using the mobile phone with NearField Com‐
munication (NFC)
Requ irements:
R NFC is activated on the mobile phone (see
th e manufacturer's operating instructions)
R The mobile phone's screen is switched on
and unloc ked (see the manufacturer's oper‐
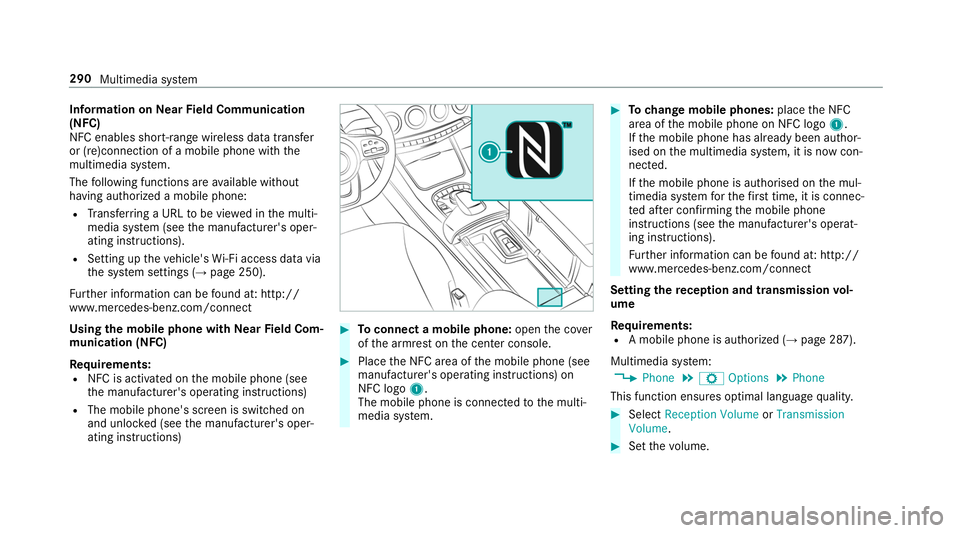
ating instructions) #
Toconnect a mobile phone: openthe co ver
of the armrest on the center console. #
Place the NFC area of the mobile phone (see
manufacturer's operating instructions) on
NFC logo 1.
The mobile phone is connected tothe multi‐
media sy stem. #
Tochange mobile phones: placethe NFC
area of the mobile phone on NFC logo 1.
If th e mobile phone has already been author‐
ised on the multimedia sy stem, it is now con‐
nected.
If th e mobile phone is authorised on the mul‐
timedia sy stem forth efirs t time, it is connec‐
te d af ter confirming the mobile phone
instructions (see the manufacturer's operat‐
ing instructions).
Fu rther information can be found at: http://
www.mercedes-benz.com/connect
Setting there ception and transmission vol‐
ume
Re quirements:
R A mobile phone is authorized (→ page 287).
Multimedia sy stem:
, Phone .
Z Options .
Phone
This function ensures optimal language qualit y. #
Select Reception Volume orTransmission
Volume. #
Set thevo lume. 290
Multimedia sy stem
Page 318 of 518
Connecting USB devices
* NO
TEDama gecaused byhigh temp era‐
tures High
temp eratures can damage USB devices. #
Remo vethe USB device af ter use and
ta ke it out of theve hicle. The multimedia connection unit is
found in the
stow age compartment under the armrest and
has two USB ports.
Depending on theve hicle's equipment, addi‐
tional USB ports can be found in thestow age
compartment of the center console and in the
re ar passenger compartment. #
Connect the USB device tothe USB port.
Pla yable music files are pla yed back only if
th e cor responding media display is activated.
% Use the USB port identified by00C2 touse
Apple CarPlay™ and Android Auto.
% Depending on theve hicle equipment there is
an additional USB port in there ar passenger
compartment. Ports th at are labeled with a bat
tery symbol can only be used tocharge
USB devices.
Selecting a track in the media playba ck
Multimedia sy stem:
, Media
Selecting a track byskipping toa track #
Toskip backwards or forw ards toa
track: navigate up or down.
Selecting a track using the cur rent track list #
Select 00D3. #
Select Current Track List. #
Select a tra ck.
Selecting playback options
Multimedia sy stem:
, Media .
Z Options
Playing back similar trac ks #
Select Play Similar Tracks.
A track li stwith similar trac ksis created and
pla yed bac k. Playback mode #
Select Random Mode - Current Playlist .
The cur rent track li stis pla yed in random
orde r. #
Select Random Mode - Current Medium.
All trac kson the active data storage medium
are pla yed in random orde r. #
Select Normal Track Sequence.
The cur rent track li stis pla yed in the order it
appears on the data storage medium.
Controlling media playback
Multimedia sy stem:
, Media .
Y Playback Control
A bar with playback controls is shown. #
Topause playback: select and confirm
Y with th e cent ral control element.
The 00CF symbol is displa yed. #
Toresume playback: select and confirm
Y again with the cent ral control element.
The 00D0 symbol is displa yed.
To fast forw ard/r ewind #
Move00CF onthe timeline. 316
Multimedia sy stem