MERCEDES-BENZ S-CLASS COUPE 2014 Owners Manual
Manufacturer: MERCEDES-BENZ, Model Year: 2014, Model line: S-CLASS COUPE, Model: MERCEDES-BENZ S-CLASS COUPE 2014Pages: 413, PDF Size: 12.76 MB
Page 111 of 413
The seats should only be occupied by
passengers, if possible.
R when the seat heating is in operation, do
not cover the seats with insulating mate-
rials, e.g. blankets, coats, bags, seat cov- ers, child seats or booster seats.
! Make sure that there are no objects in the
footwell under or behind the seats when
moving the seats back. There is a risk that
the seats and/or the objects could be dam- aged. Adjusting the seats
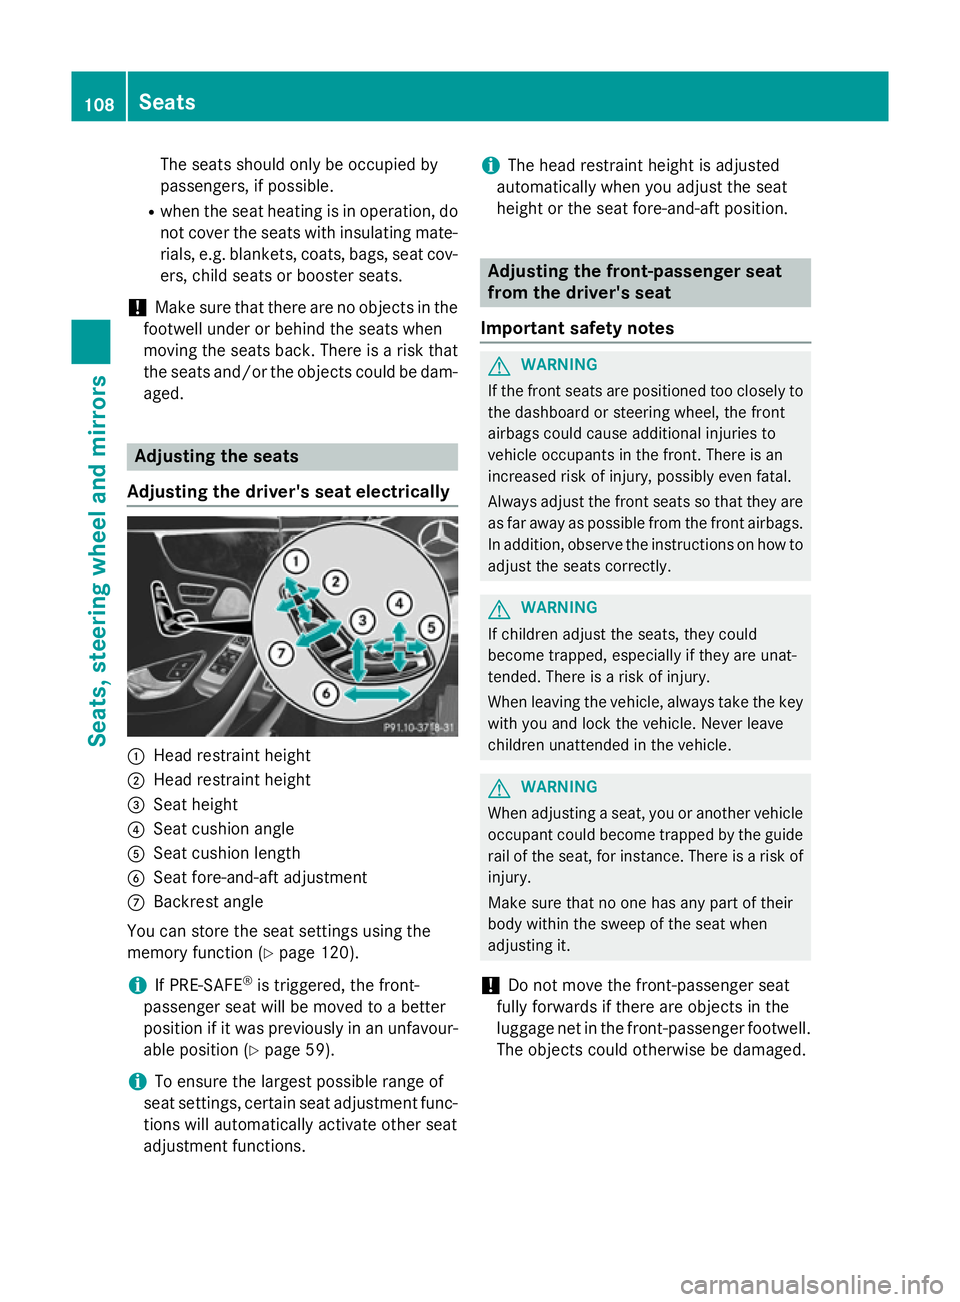
Adjusting the driver's seat electrically :
Head restraint height
; Head restraint height
= Seat height
? Seat cushion angle
A Seat cushion length
B Seat fore-and-aft adjustment
C Backrest angle
You can store the seat settings using the
memory function (Y page 120).
i If PRE-SAFE ®
is triggered, the front-
passenger seat will be moved to a better
position if it was previously in an unfavour- able position (Y page 59).
i To ensure the largest possible range of
seat settings, certain seat adjustment func- tions will automatically activate other seat
adjustment functions. i
The head restraint height is adjusted
automatically when you adjust the seat
height or the seat fore-and-aft position. Adjusting the front-passenger seat
from the driver's seat
Important safety notes G
WARNING
If the front seats are positioned too closely to the dashboard or steering wheel, the front
airbags could cause additional injuries to
vehicle occupants in the front. There is an
increased risk of injury, possibly even fatal.
Always adjust the front seats so that they are
as far away as possible from the front airbags.
In addition, observe the instructions on how to
adjust the seats correctly. G
WARNING
If children adjust the seats, they could
become trapped, especially if they are unat-
tended. There is a risk of injury.
When leaving the vehicle, always take the key with you and lock the vehicle. Never leave
children unattended in the vehicle. G
WARNING
When adjusting a seat, you or another vehicle occupant could become trapped by the guiderail of the seat, for instance. There is a risk of
injury.
Make sure that no one has any part of their
body within the sweep of the seat when
adjusting it.
! Do not move the front-passenger seat
fully forwards if there are objects in the
luggage net in the front-passenger footwell.
The objects could otherwise be damaged. 108
SeatsSeats, steering wheel and mirrors
Page 112 of 413
Adjusting the front-passenger seat
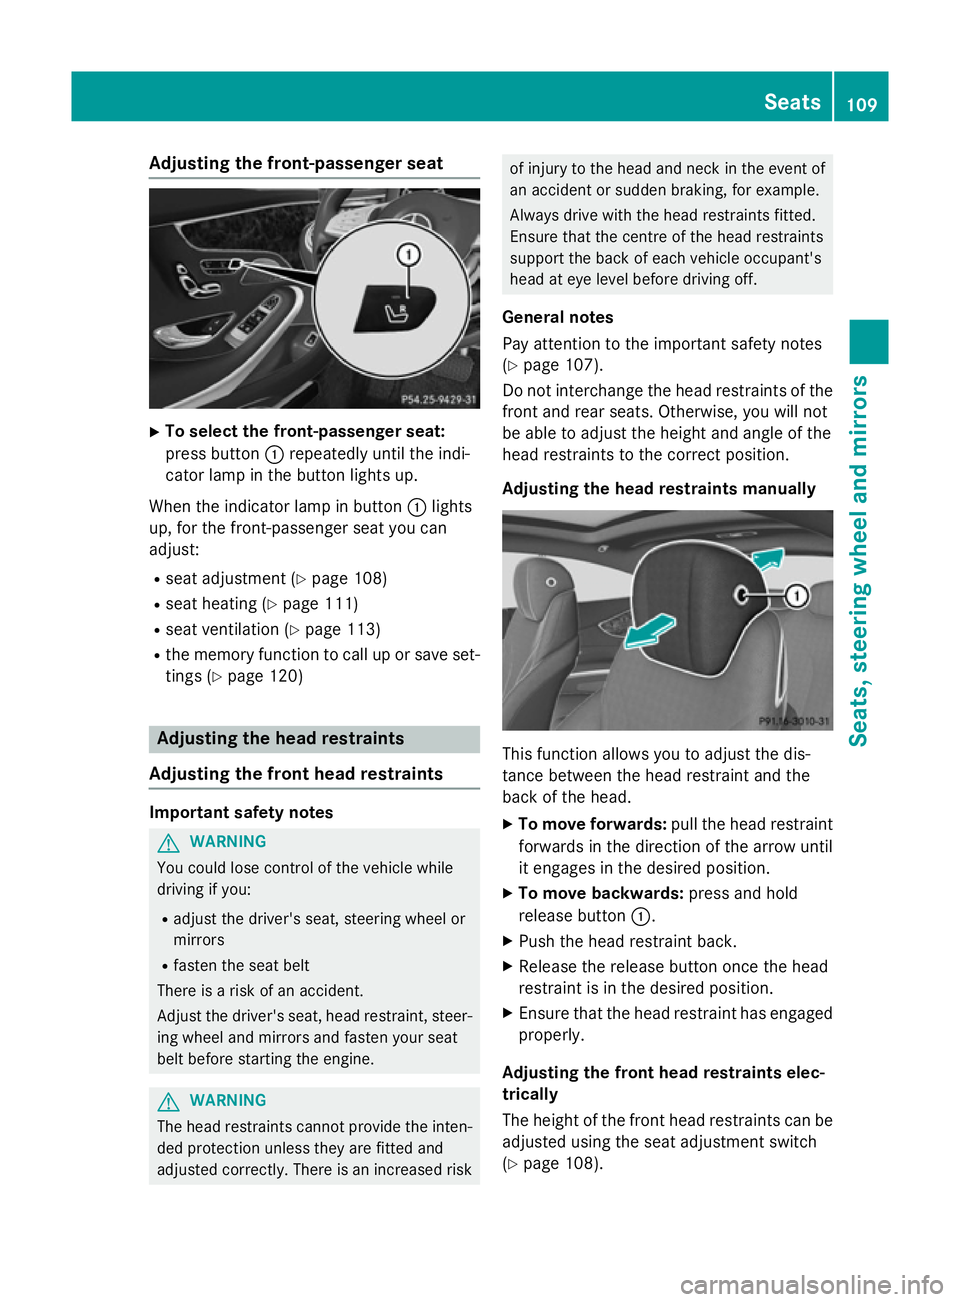
X
To select the front-passenger seat:
press button :repeatedly until the indi-
cator lamp in the button lights up.
When the indicator lamp in button :lights
up, for the front-passenger seat you can
adjust:
R seat adjustment (Y page 108)
R seat heating (Y page 111)
R seat ventilation (Y page 113)
R the memory function to call up or save set-
tings (Y page 120) Adjusting the head restraints
Adjusting the front head restraints Important safety notes
G
WARNING
You could lose control of the vehicle while
driving if you:
R adjust the driver's seat, steering wheel or
mirrors
R fasten the seat belt
There is a risk of an accident.
Adjust the driver's seat, head restraint, steer-
ing wheel and mirrors and fasten your seat
belt before starting the engine. G
WARNING
The head restraints cannot provide the inten-
ded protection unless they are fitted and
adjusted correctly. There is an increased risk of injury to the head and neck in the event of
an accident or sudden braking, for example.
Always drive with the head restraints fitted.
Ensure that the centre of the head restraints
support the back of each vehicle occupant's
head at eye level before driving off.
General notes
Pay attention to the important safety notes
(Y page 107).
Do not interchange the head restraints of the
front and rear seats. Otherwise, you will not
be able to adjust the height and angle of the
head restraints to the correct position.
Adjusting the head restraints manually This function allows you to adjust the dis-
tance between the head restraint and the
back of the head.
X To move forwards: pull the head restraint
forwards in the direction of the arrow until
it engages in the desired position.
X To move backwards: press and hold
release button :.
X Push the head restraint back.
X Release the release button once the head
restraint is in the desired position.
X Ensure that the head restraint has engaged
properly.
Adjusting the front head restraints elec-
trically
The height of the front head restraints can be adjusted using the seat adjustment switch
(Y page 108). Seats
109Seats, steering wheel and mirrors Z
Page 113 of 413
Adjusting the outer rear seat head
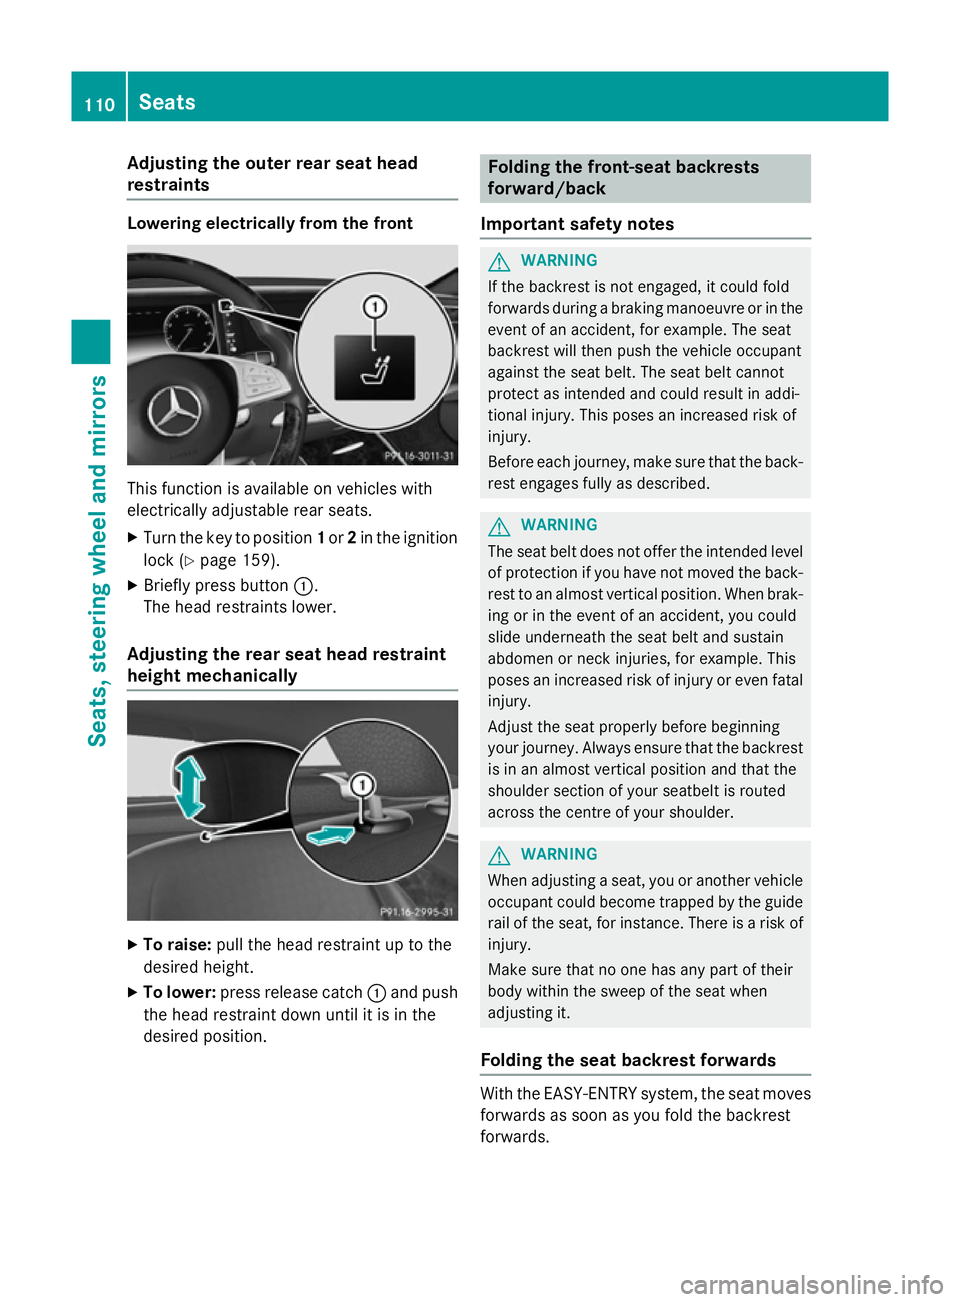
restraints Lowering electrically from the front
This function is available on vehicles with
electrically adjustable rear seats.
X Turn the key to position 1or 2in the ignition
lock (Y page 159).
X Briefly press button :.
The head restraints lower.
Adjusting the rear seat head restraint
height mechanically X
To raise: pull the head restraint up to the
desired height.
X To lower: press release catch :and push
the head restraint down until it is in the
desired position. Folding the front-seat backrests
forward/back
Important safety notes G
WARNING
If the backrest is not engaged, it could fold
forwards during a braking manoeuvre or in the event of an accident, for example. The seat
backrest will then push the vehicle occupant
against the seat belt. The seat belt cannot
protect as intended and could result in addi-
tional injury. This poses an increased risk of
injury.
Before each journey, make sure that the back- rest engages fully as described. G
WARNING
The seat belt does not offer the intended level of protection if you have not moved the back-
rest to an almost vertical position. When brak-
ing or in the event of an accident, you could
slide underneath the seat belt and sustain
abdomen or neck injuries, for example. This
poses an increased risk of injury or even fatal injury.
Adjust the seat properly before beginning
your journey. Always ensure that the backrest
is in an almost vertical position and that the
shoulder section of your seatbelt is routed
across the centre of your shoulder. G
WARNING
When adjusting a seat, you or another vehicle occupant could become trapped by the guiderail of the seat, for instance. There is a risk of
injury.
Make sure that no one has any part of their
body within the sweep of the seat when
adjusting it.
Folding the seat backrest forwards With the EASY-ENTRY system, the seat moves
forwards as soon as you fold the backrest
forwards. 110
SeatsSeats
, steering wheel and mirrors
Page 114 of 413
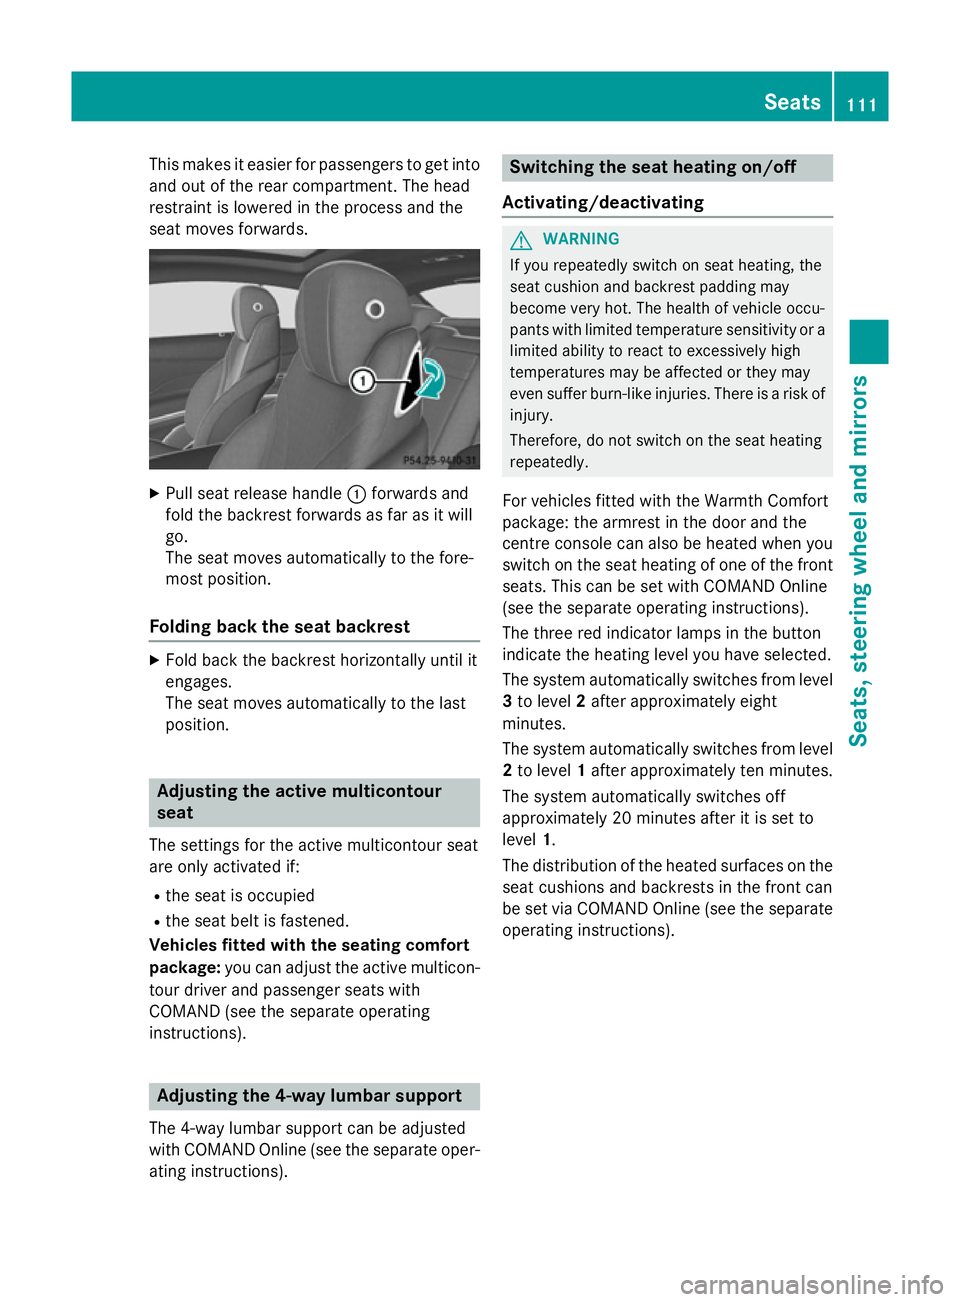
This makes it easier for passengers to get into
and out of the rear compartment. The head
restraint is lowered in the process and the
seat moves forwards. X
Pull seat release handle :forwards and
fold the backrest forwards as far as it will
go.
The seat moves automatically to the fore-
most position.
Folding back the seat backrest X
Fold back the backrest horizontally until it
engages.
The seat moves automatically to the last
position. Adjusting the active multicontour
seat
The settings for the active multicontour seat
are only activated if:
R the seat is occupied
R the seat belt is fastened.
Vehicles fitted with the seating comfort
package: you can adjust the active multicon-
tour driver and passenger seats with
COMAND (see the separate operating
instructions). Adjusting the 4-way lumbar support
The 4-way lumbar support can be adjusted
with COMAND Online (see the separate oper- ating instructions). Switching the seat heating on/off
Activating/deactivating G
WARNING
If you repeatedly switch on seat heating, the
seat cushion and backrest padding may
become very hot. The health of vehicle occu-
pants with limited temperature sensitivity or a limited ability to react to excessively high
temperatures may be affected or they may
even suffer burn-like injuries. There is a risk of
injury.
Therefore, do not switch on the seat heating
repeatedly.
For vehicles fitted with the Warmth Comfort
package: the armrest in the door and the
centre console can also be heated when you
switch on the seat heating of one of the front
seats. This can be set with COMAND Online
(see the separate operating instructions).
The three red indicator lamps in the button
indicate the heating level you have selected.
The system automatically switches from level
3 to level 2after approximately eight
minutes.
The system automatically switches from level
2 to level 1after approximately ten minutes.
The system automatically switches off
approximately 20 minutes after it is set to
level 1.
The distribution of the heated surfaces on the seat cushions and backrests in the front can
be set via COMAND Online (see the separateoperating instructions). Seats
111Seats, steering wheel and mirrors Z
Page 115 of 413
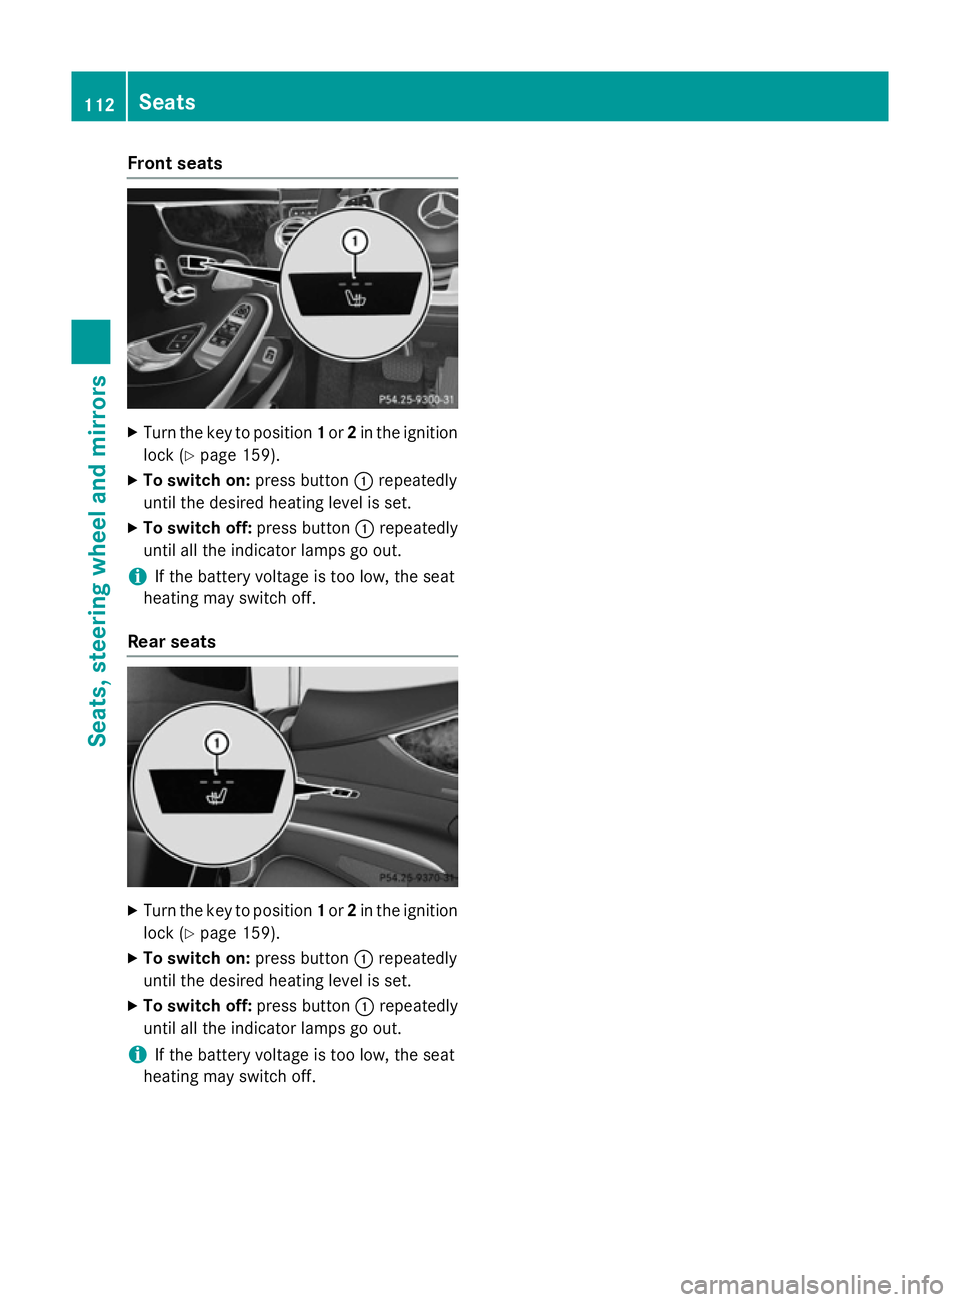
Front seats
X
Turn the key to position 1or 2in the ignition
lock (Y page 159).
X To switch on: press button:repeatedly
until the desired heating level is set.
X To switch off: press button:repeatedly
until all the indicator lamps go out.
i If the battery voltage is too low, the seat
heating may switch off.
Rear seats X
Turn the key to position 1or 2in the ignition
lock (Y page 159).
X To switch on: press button:repeatedly
until the desired heating level is set.
X To switch off: press button:repeatedly
until all the indicator lamps go out.
i If the battery voltage is too low, the seat
heating may switch off. 112
SeatsSeats, steering wheel and
mirrors
Page 116 of 413
Problems with the seat heating
Problem
Possible causes/consequences and
M
MSolutions The seat heating has
switched off prema-
turely or cannot be
switched on. The on-board voltage is too low because too many electrical con-
sumers are switched on.
X Switch off electrical consumers that you do not need, such as
the rear window heating or interior lighting.
Once the battery is sufficiently charged, the seat heating can be
switched back on manually. Switching the seat ventilation on/off
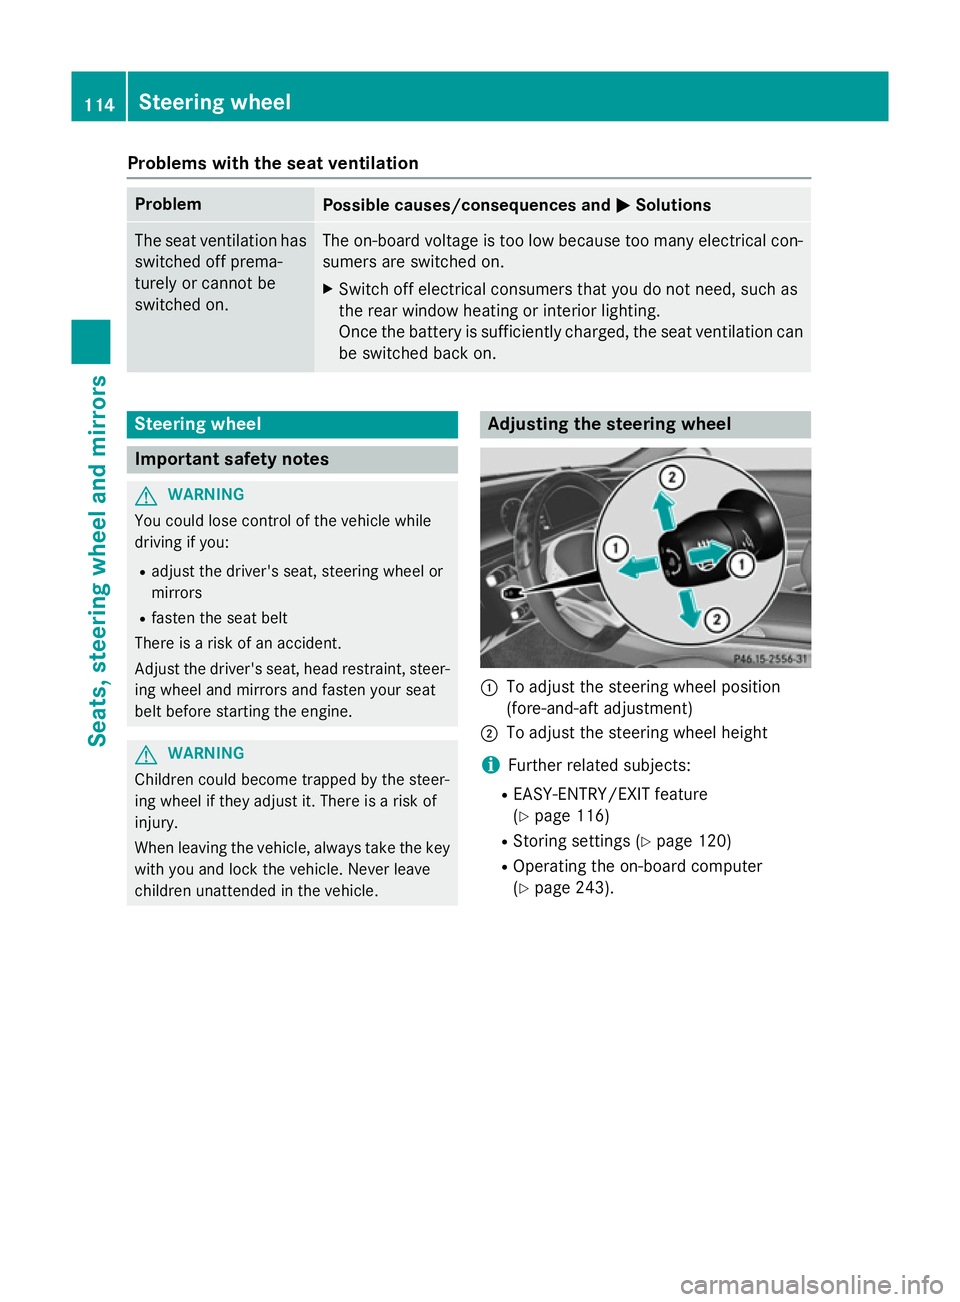
Front seats The three blue indicator lamps in the buttons
indicate the blower setting you have selected.
X Turn the key to position 1or 2in the ignition
lock (Y page 159).
X To switch on: press button:repeatedly
until the desired blower setting is set.
X To switch off: press button:repeatedly
until all the indicator lamps go out.
i If the battery voltage is too low, the seat
ventilation may switch off.
i You can open the side windows using the
"Convenience opening" feature
(Y page 100). The seat ventilation of the
driver's seat automatically switches to the
highest level.
i When the vehicle is stationary, the fan
speed can be reduced automatically. This
reduces the noises of the seat ventilation. Seats
113Seats, steering wheel and mirrors Z
Page 117 of 413
Problems with the seat ventilation
Problem
Possible causes/consequences and
M
MSolutions The seat ventilation has
switched off prema-
turely or cannot be
switched on. The on-board voltage is too low because too many electrical con-
sumers are switched on.
X Switch off electrical consumers that you do not need, such as
the rear window heating or interior lighting.
Once the battery is sufficiently charged, the seat ventilation can
be switched back on. Steering wheel
Important safety notes
G
WARNING
You could lose control of the vehicle while
driving if you:
R adjust the driver's seat, steering wheel or
mirrors
R fasten the seat belt
There is a risk of an accident.
Adjust the driver's seat, head restraint, steer-
ing wheel and mirrors and fasten your seat
belt before starting the engine. G
WARNING
Children could become trapped by the steer-
ing wheel if they adjust it. There is a risk of
injury.
When leaving the vehicle, always take the key with you and lock the vehicle. Never leave
children unattended in the vehicle. Adjusting the steering wheel
:
To adjust the steering wheel position
(fore-and-aft adjustment)
; To adjust the steering wheel height
i Further related subjects:
R EASY-ENTRY/EXIT feature
(Y page 116)
R Storing settings (Y page 120)
R Operating the on-board computer
(Y page 243). 114
Steering wheelSeats, steering wheel and mirrors
Page 118 of 413
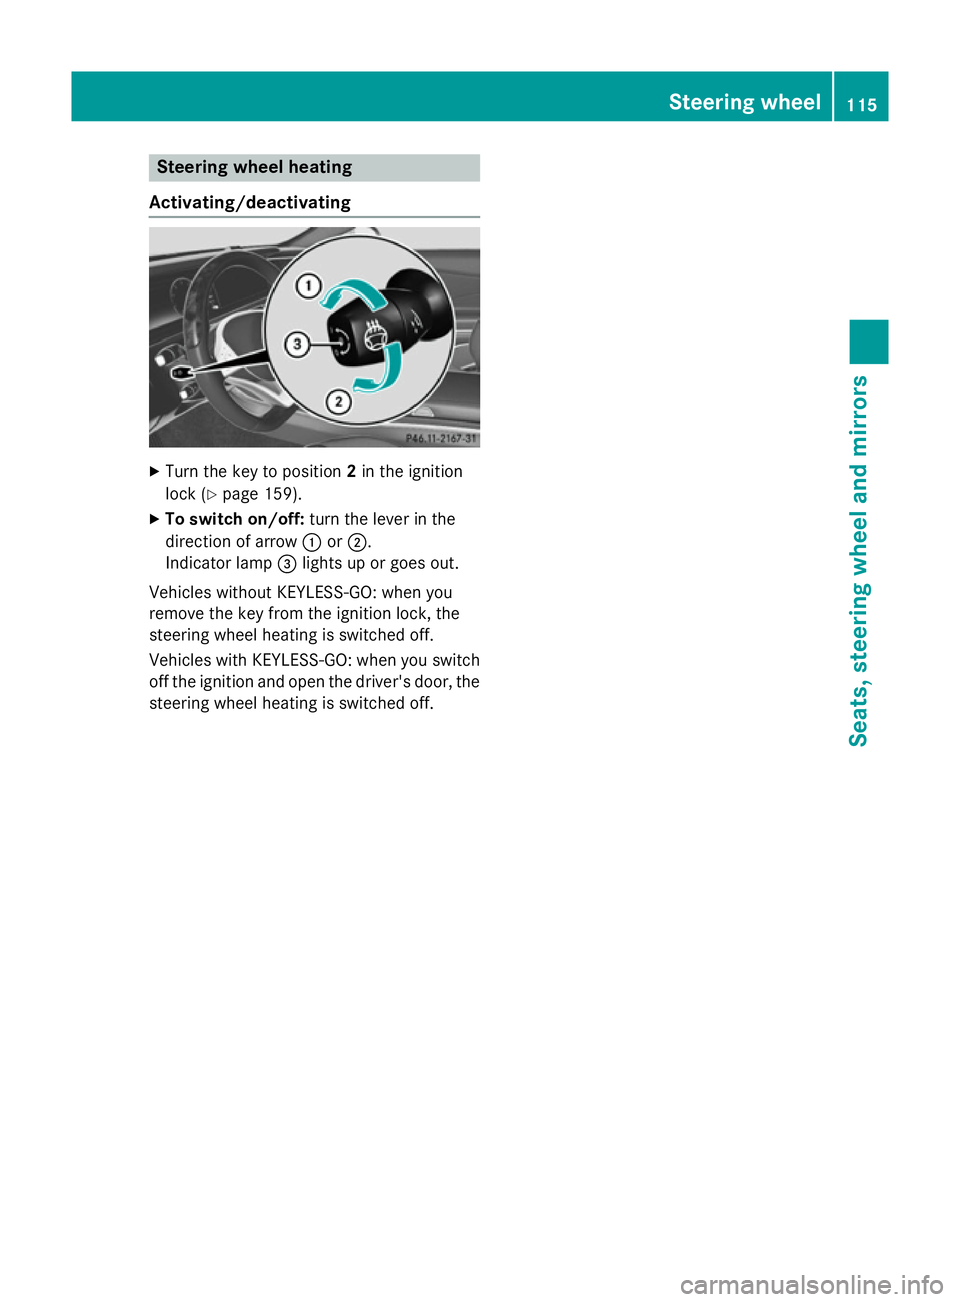
Steering wheel heating
Activating/deactivating X
Turn the key to position 2in the ignition
lock (Y page 159).
X To switch on/off: turn the lever in the
direction of arrow :or;.
Indicator lamp =lights up or goes out.
Vehicles without KEYLESS-GO: when you
remove the key from the ignition lock, the
steering wheel heating is switched off.
Vehicles with KEYLESS-GO: when you switch
off the ignition and open the driver's door, the steering wheel heating is switched off. Steering wheel
115Seats, steering wheel and mirrors Z
Page 119 of 413
Problems with the steering wheel heating
Problem
Possible causes/consequences and
M
MSolutions The steering wheel
heating has switched
itself off prematurely or
cannot be switched on. The on-board voltage is too low because too many electrical con-
sumers are switched on.
X Switch off electrical consumers that you do not need, such as
the rear window heating or interior lighting. EASY-ENTRY/EXIT feature
Important safety notes G
WARNING
When the EASY-ENTRY/EXIT feature adjusts
the steering wheel and the driver's seat, you
and other vehicle occupants – particularly
children – could become trapped. There is a
risk of injury.
While the EASY-ENTRY/EXIT feature is mak-
ing adjustments, make sure that no one has
any body parts in the sweep of the seat and
the steering wheel.
If there is a risk of becoming trapped by
R the steering wheel: move the steering
wheel adjustment lever.
R the seat: press the switch for seat adjust-
ment.
The adjustment process is stopped.
Press one of the memory function position
switches. The adjustment process is stopped. G
WARNING
If children activate the EASY-ENTRY/EXIT fea- ture, they can become trapped, particularly
when unattended. There is a risk of injury.
When leaving the vehicle, always take the key with you and lock the vehicle. Never leave
children unattended in the vehicle. G
WARNING
If you drive off while the EASY-ENTRY/EXIT
feature is making adjustments, you could lose
control of the vehicle. There is a risk of an
accident. Always wait until the adjustment process is
complete before driving off.
The EASY-ENTRY/EXIT feature makes getting in and out of your vehicle easier.
You can activate and deactivate the EASY-
ENTRY/EXIT feature using COMAND Online
(see the separate operating instructions).
Position of the steering wheel and the
driver's seat when the EASY-ENTRY/
EXIT feature is active The steering wheel tilts upwards and the driv-
er's seat moves backwards if you:
R remove the key from the ignition lock
R with KEYLESS-GO: open the driver's door;
KEYLESS-GO must be in position 1
R with the key: open the driver's door; the
key must be in position 0or 1in the ignition
lock (Y page 159)
R open the driver's door when the ignition is
switched off
i The steering wheel only tilts upwards and
the driver's seat only moves backwards if
the driving position is stored after seat or
steering wheel adjustment (Y page 120).
The last position of the steering wheel or seat is stored if:
R the ignition is switched off
R the setting is stored using the memory
function (Y page 120)
i The steering wheel only moves upwards if
it has not already reached the upper stop. 116
Steering wheelSeats, steering wheel and mirrors
Page 120 of 413
The driver's seat moves backwards unless
it is already in the rearmost position.
Position of the steering wheel and the
driver's seat for driving The steering wheel and the driver's seat are
moved to the previously set position if:
R the driver's door is closed and you insert
the key into the ignition lock
R you close the driver's door when the igni-
tion is switched on
R you press the Start/Stop button once on
vehicles with KEYLESS-GO
i The steering wheel and the driver's seat
only return to the last set position when the
driving position is stored after seat or steer-
ing wheel adjustment (Y page 120).
The last position of the steering wheel or seat is stored if:
R the ignition is switched off
R the setting is stored using the memory
function (Y page 120)
Crash-responsive EASY-EXIT feature If the crash-responsive EASY-EXIT feature is
triggered in an accident, the steering column
will move upwards when the driver's door is
opened or the key is removed from the igni-
tion lock. This makes it easier to exit the vehi- cle and rescue the occupants.
The crash-responsive EASY-EXIT feature is
only operational if the EASY-EXIT/ENTRY fea-
ture is activated in COMAND Online (see the
separate operating instructions). Mirrors
Rear-view mirror
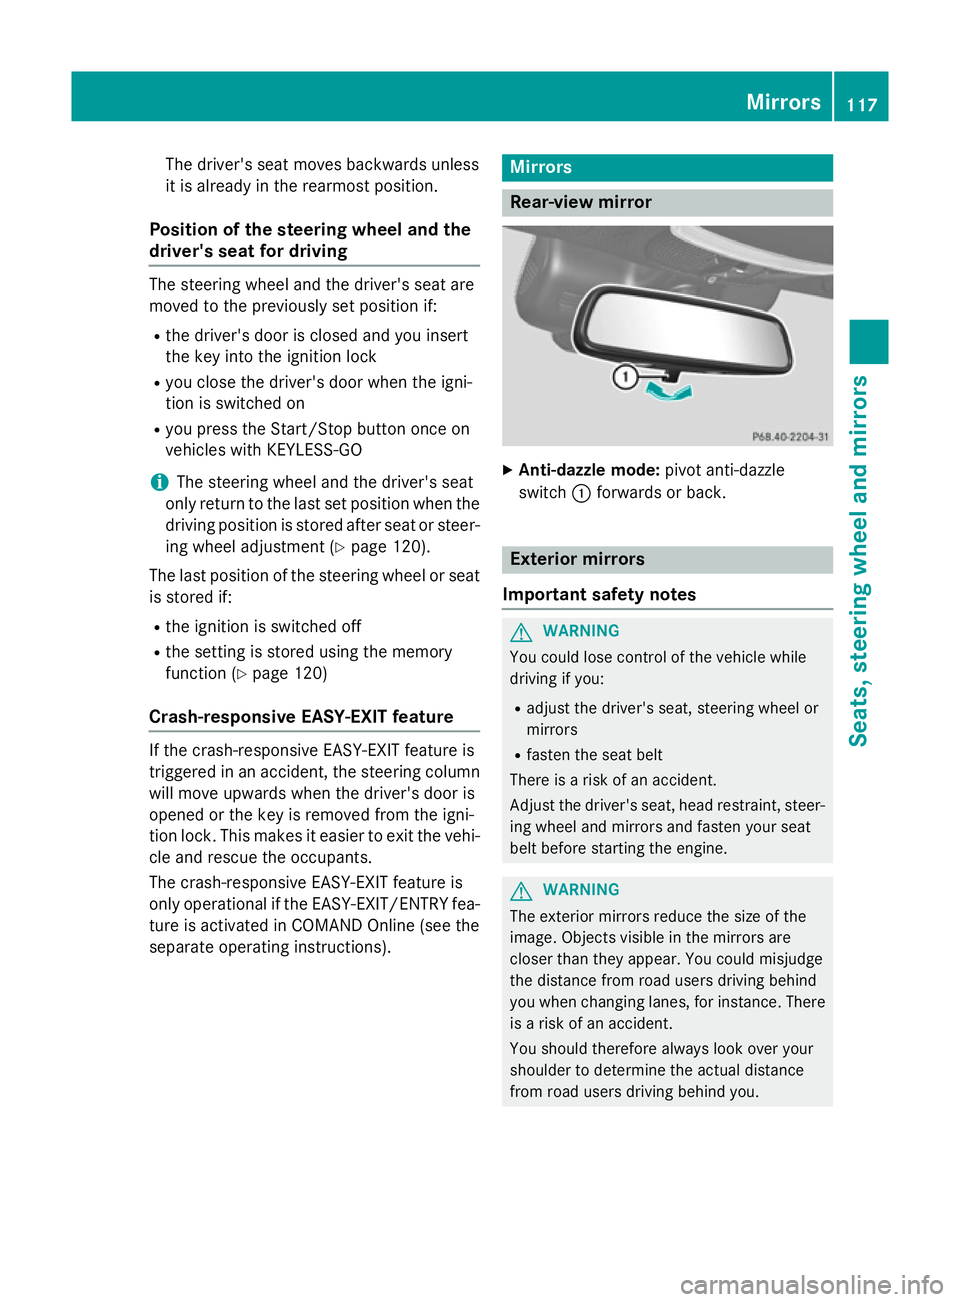
X
Anti-dazzle mode: pivot anti-dazzle
switch :forwards or back. Exterior mirrors
Important safety notes G
WARNING
You could lose control of the vehicle while
driving if you:
R adjust the driver's seat, steering wheel or
mirrors
R fasten the seat belt
There is a risk of an accident.
Adjust the driver's seat, head restraint, steer-
ing wheel and mirrors and fasten your seat
belt before starting the engine. G
WARNING
The exterior mirrors reduce the size of the
image. Objects visible in the mirrors are
closer than they appear. You could misjudge
the distance from road users driving behind
you when changing lanes, for instance. There is a risk of an accident.
You should therefore always look over your
shoulder to determine the actual distance
from road users driving behind you. Mirrors
117Seats, steering wheel and mirrors Z