tire pressure MERCEDES-BENZ S-Class COUPE 2015 C217 Owner's Manual
[x] Cancel search | Manufacturer: MERCEDES-BENZ, Model Year: 2015, Model line: S-Class COUPE, Model: MERCEDES-BENZ S-Class COUPE 2015 C217Pages: 402, PDF Size: 7.3 MB
Page 20 of 402
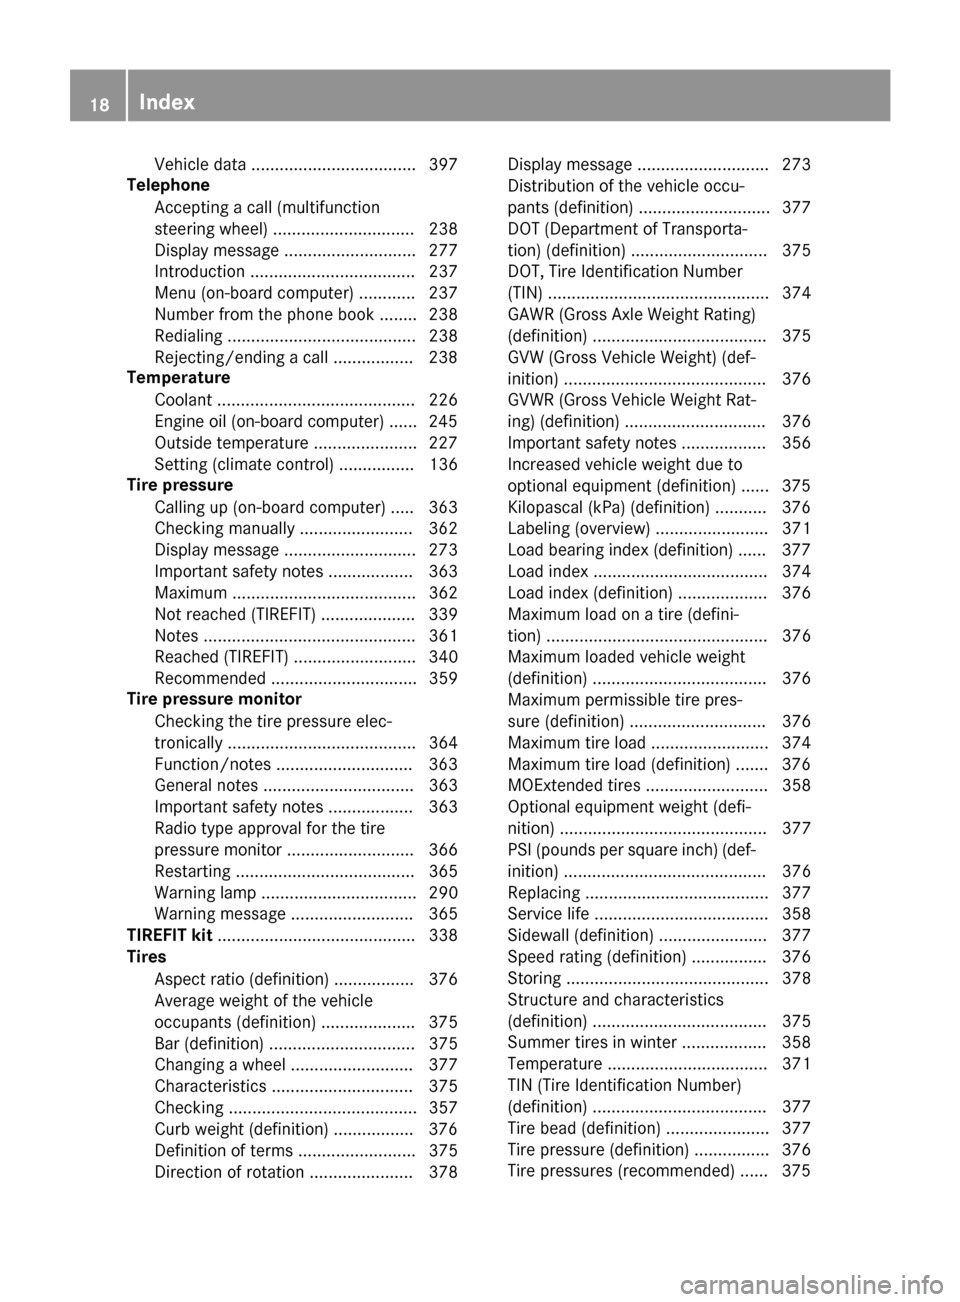
Vehicle data ................................... 397
Telephone
Accepting a call (multifunction
steering wheel) .............................. 238
Display message ............................ 277
Introduction ................................... 237
Menu (on-board computer) ............ 237
Number from the phone book ........ 238
Redialing ........................................ 238
Rejecting/ending a call .................2 38
Temperature
Coolant .......................................... 226
Engine oil (on-board computer) ...... 245
Outside temperature ..................... .227
Setting (climate control) ................ 136
Tire pressure
Calling up (on-board computer) ..... 363
Checking manually ........................ 362
Display message ............................ 273
Important safety notes .................. 363
Maximum ....................................... 362
Not reached (TIREFIT) .................... 339
Notes ............................................. 361
Reached (TIREFIT) .......................... 340
Recommended ............................... 359
Tire pressure monitor
Checking the tire pressure elec-
tronically ........................................ 364
Function/notes ............................ .363
General notes ................................ 363
Important safety notes .................. 363
Radio type approval for the tire
pressure monitor ........................... 366
Restarting ...................................... 365
Warning lamp ................................. 290
Warning message .......................... 365
TIREFIT kit .......................................... 338
Tires
Aspect ratio (definition) ................. 376
Average weight of the vehicle
occupants (definition) .................... 375
Bar (definition) ............................... 375
Changing a wheel .......................... 377
Characteristics .............................. 375
Checking ........................................ 357
Curb weight (definition) ................. 376
Definition of terms ......................... 375
Direction of rotatio n...................... 378 Display message ............................ 273
Distribution of the vehicle occu-
pants (definition) ............................ 377
DOT (Department of Transporta-
tion) (definition) ............................. 375
DOT, Tire Identification Number
(TIN) ............................................... 374
GAWR (Gross Axle Weight Rating)
(definition) ..................................... 375
GVW (Gross Vehicle Weight) (def-
inition) ........................................... 376
GVWR (Gross Vehicle Weight Rat-
ing) (definition) .............................. 376
Important safety notes .................. 356
Increased vehicle weight due to
optional equipment (definition) ...... 375
Kilopascal (kPa) (definition) ........... 376
Labeling (overview) ........................ 371
Load bearing index (definition) ...... 377
Load index ..................................... 374
Load index (definition) ................... 376
Maximum load on a tire (defini-
tion) ............................................... 376
Maximum loaded vehicle weight
(definition) ..................................... 376
Maximum permissible tire pres-
sure (definition) ............................. 376
Maximum tire load ......................... 374
Maximum tire load (definition) ....... 376
MOExtended tire s.......................... 358
Optional equipment weight (defi-
nition) ............................................ 377
PSI (pounds per square inch) (def-
inition) ........................................... 376
Replacing ....................................... 377
Service life ..................................... 358
Sidewall (definition) ....................... 377
Speed rating (definition) ................ 376
Storing ........................................... 378
Structure and characteristics
(definition) ..................................... 375
Summer tires in winter .................. 358
Temperature .................................. 371
TIN (Tire Identification Number)
(definition) ..................................... 377
Tire bead (definition) ...................... 377
Tire pressure (definition) ................ 376
Tire pressures (recommended) ...... 375 18
Index
Page 22 of 402
Unlocking (in an emergency) ........... 86
Unlocking (SmartKey) ......................79
Vehicle data ................................... 397
Vehicle dimensions ........................... 397
Vehicle emergency locking ................ 87
Vehicle identification number
see VIN
Vehicle identification plate .............. 390
Vehicle level
Active Body Control ABC ............... 190
Display message ............................ 267
Vehicle maintenance
see ASSYST PLUS
Vehicle tool kit .................................. 336
Video
Operating the DVD .........................2 37
VIN ...................................................... 390 W
Warning and indicator lamps ABS ................................................ 281
Brakes .......................................... .280
Check Engine ................................. 286
Coolant .......................................... 287
Distance warning ........................... 289
ESP ®
.............................................. 283
ESP ®
OFF ....................................... 284
Fuel tank ........................................ 286
Overview .......................................... 32
Parking brake ................................ 285
PASSENGER AIR BAG ..................... .43
Reserve fuel .................................. .286
Restraint system ............................ 285
Seat belt ........................................ 279
Steering ......................................... 291
Tire pressure monitor .................... 290
Warranty .............................................. 22
Washer fluid
Display message ............................ 277
Wheel and tire combination
see Tires
Wheel bolt tightening torque ........... 382
Wheel chock ...................................... 378
Wheels
Changing a wheel .......................... 377
Checking ........................................ 357
Cleaning ......................................... 328 Important safety notes .................. 356
Interchanging/changing ................ 377
Mounting a new wheel ................... 381
Mounting a wheel .......................... 378
Removing a wheel .......................... 381
Storing .......................................... .378
Tightening torque ........................... 382
Wheel size/tire size ....................... 382
Window curtain air bag
Operation ......................................... 51
Windows
see Side windows
Windshield
Defrosting ...................................... 137
Infrared reflective .......................... 315
Windshield washer fluid
see Windshield washer system
Windshield washer system
Adding washer fluid ....................... 323
Notes ............................................. 396
Windshield wipers
Problem (malfunction) ................... 129
Replacing the wiper blades ............ 127
Switching on/off ........................... 126
Winter driving
Important safety notes .................. 358
Slippery road surfaces ................... 174
Snow chains .................................. 359
Winter operation
Summer tires ................................. 358
Winter tires
M+S tires ....................................... 358
Wiper blades
Cleaning ......................................... 329
Important safety notes .................. 127
Replacing ....................................... 127
Wooden trim (cleaning instruc-
tions) ................................................. .332
Workshop
see Qualified specialist workshop 20
Index
Page 23 of 402
Protection of the environment
General notes
H
Environmental note
Daimler's declared policy is one of compre-
hensive environmental protection.
The objectives are for the natural resources
that form the basis of our existence on this
planet to be used sparingly and in a manner
that takes the requirements of both nature
and humanity into account.
You too can help to protect the environment
by operating your vehicle in an environmen-
tally responsible manner.
Fuel consumption and the rate of engine,
transmission, brake and tire wear are affected by these factors:
R operating conditions of your vehicle
R your personal driving style
You can influence both factors. You should
bear the following in mind:
Operating conditions:
R avoid short trips as these increase fuel con-
sumption.
R always make sure that the tire pressures
are correct.
R do not carry any unnecessary weight.
R remove roof racks once you no longer need
them.
R a regularly serviced vehicle will contribute
to environmental protection. You should
therefore adhere to the service intervals.
R always have service work carried out at a
qualified specialist workshop.
Personal driving style:
R do not depress the accelerator pedal when
starting the engine.
R do not warm up the engine when the vehicle
is stationary.
R drive carefully and maintain a safe distance
from the vehicle in front.
R avoid frequent, sudden acceleration and
braking. R
change gear in good time and use each gear
only up to 00C3of its maximum engine speed.
R switch off the engine in stationary traffic.
R keep an eye on the vehicle's fuel consump-
tion. Environmental concerns and recom-
mendations
Wherever the operating instructions require
you to dispose of materials, first try to regen-
erate or re-use them. Observe the relevant
environmental rules and regulations when
disposing of materials. In this way you will
help to protect the environment. Genuine Mercedes-Benz parts
H
Environmental note
Daimler AG also supplies reconditioned major
assemblies and parts which are of the same
quality as new parts. They are covered by the same Limited Warranty entitlements as new
parts.
! Air bags and Emergency Tensioning Devi-
ces, as well as control units and sensors for these restraint systems, may be installed inthe following areas of your vehicle:
R doors
R door pillars
R door sills
R seats
R cockpit
R instrument cluster
R center console
Do not install accessories such as audio
systems in these areas. Do not carry out
repairs or welding. You could impair the
operating efficiency of the restraint sys-
tems.
Have aftermarket accessories installed at a qualified specialist workshop. Introduction
21 Z
Page 34 of 402
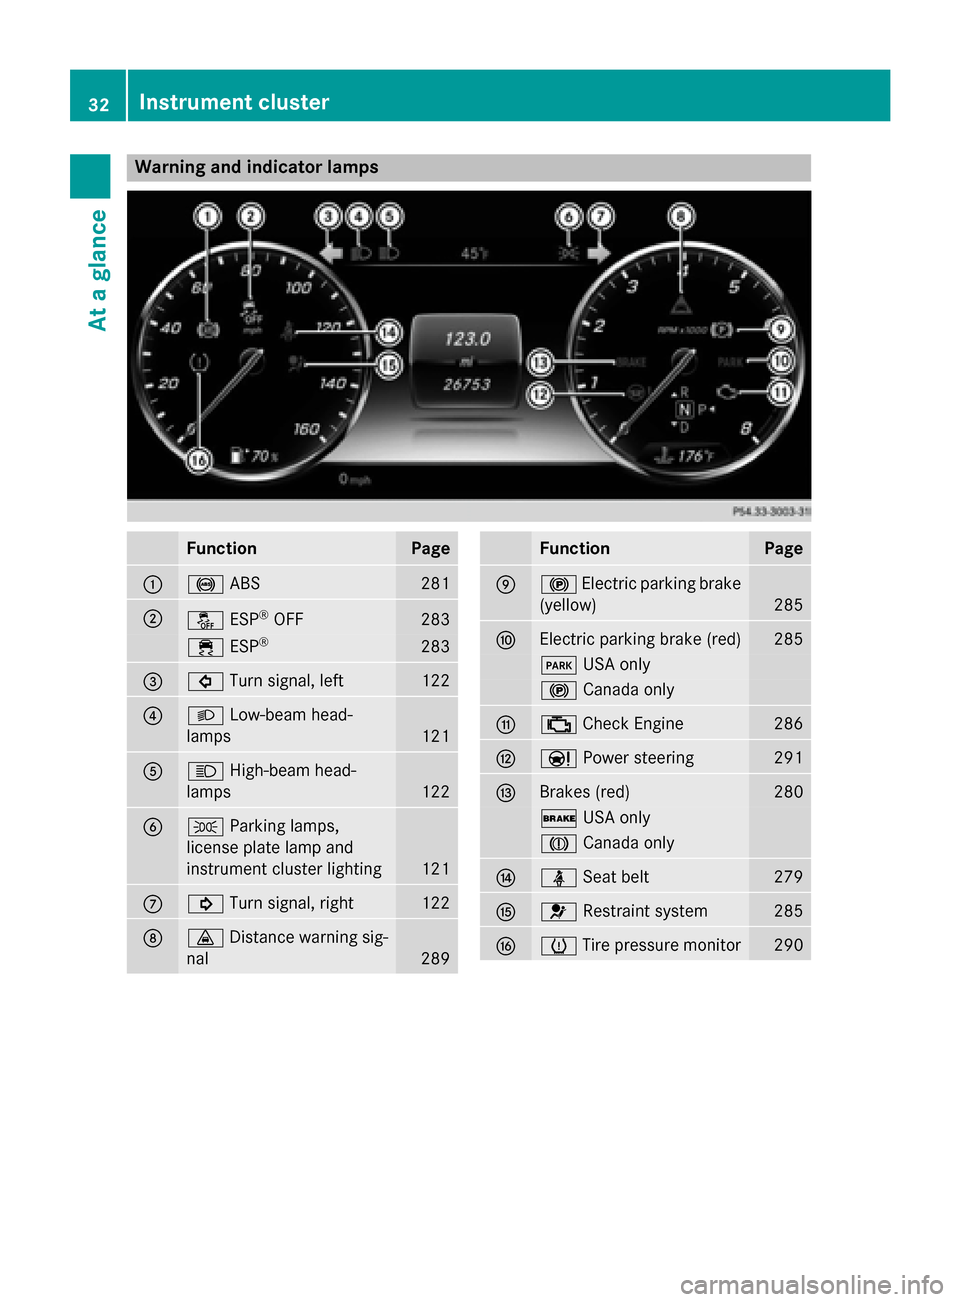
Warning and indicator lamps
Function Page
0043
0025
ABS 281
0044
00BB
ESP®
OFF 283
00E5
ESP® 283
0087
003E
Turn signal, left 122
0085
0058
Low-beam head-
lamps 121
0083
0057
High-beam head-
lamps 122
0084
0060
Parking lamps,
license plate lamp and
instrument cluster lighting 121
006B
003D
Turn signal, right 122
006C
00BA
Distance warning sig-
nal 289 Function Page
006D
0024
Electric parking brake
(yellow) 285
006E
Electric parking brake (red) 285
0049
USA only 0024
Canada only 006F
00B9
Check Engine 286
0070
00CC
Power steering 291
0071
Brakes (red) 280
0027
USA only 004D
Canada only 0072
00E9
Seat belt 279
0073
0075
Restraint system 285
0074
0077
Tire pressure monitor 29032
Instrument clusterAt a glance
Page 68 of 402
The driving safety systems described only
work as effectively as possible when there is
adequate contact between the tires and the
road surface. Please pay special attention to
the notes on tires, recommended minimum
tire tread depths, etc. (Y page 356).
In wintry driving conditions, always use winter
tires (M+S tires) and if necessary, snow
chains. Only in this way will the driving safety systems described in this section work as
effectively as possible. ABS (Anti-lock Braking System)
General information ABS regulates brake pressure in such a way
that the wheels do not lock when you brake.
This allows you to continue steering the vehi-
cle when braking.
The 0025 ABS warning lamp in the instrument
cluster lights up when the ignition is switched on. It goes out when the engine is running.
Important safety notes i
Observe the "Important safety notes" sec-
tion (Y page 65). G
WARNING
If ABS is faulty, the wheels could lock when
braking. The steerability and braking charac-
teristics may be severely impaired. Addition-
ally, further driving safety systems are deac-
tivated. There is an increased danger of skid- ding and accidents.
Drive on carefully. Have ABS checked imme-
diately at a qualified specialist workshop.
When ABS is malfunctioning, other systems,
including driving safety systems, will also
become inoperative. Observe the information on the ABS warning lamp (Y page 281) and
display messages which may be shown in the
instrument cluster (Y page 247).
ABS works from a speed of about 5 mph
(8 km/h) , regardless of road-surface condi- tions. ABS works on slippery surfaces, even
when you only brake gently.
Braking X
If ABS intervenes: continue to depress the
brake pedal vigorously until the braking sit- uation is over.
X To make a full brake application:
depress the brake pedal with full force.
If ABS intervenes when braking, you will feel a pulsing in the brake pedal.
The pulsating brake pedal can be an indica-
tion of hazardous road conditions, and func-
tions as a reminder to take extra care while
driving. BAS (Brake Assist System)
General information BAS operates in emergency braking situa-
tions. If you depress the brake pedal quickly,
BAS automatically boosts the braking force,
thus shortening the stopping distance.
Important safety notes i
Observe the "Important safety notes" sec-
tion (Y page 65). G
WARNING
If BAS is malfunctioning, the braking distance
in an emergency braking situation is
increased. There is a risk of an accident.
In an emergency braking situation, depress
the brake pedal with full force. ABS prevents
the wheels from locking.
Braking X
Keep the brake pedal firmly depressed until
the emergency braking situation is over.
ABS prevents the wheels from locking.
The brakes will function as usual once you
release the brake pedal. BAS is deactivated. 66
Driving safety systemsSafety
Page 166 of 402
If you or others come into contact with fuel,
observe the following:
R Wash away fuel from skin immediately
using soap and water.
R If fuel comes into contact with your eyes,
immediately rinse them thoroughly with
clean water. Seek medical assistance with- out delay.
R If fuel is swallowed, seek medical assis-
tance without delay. Do not induce vomit-
ing.
R Immediately change out of clothing which
has come into contact with fuel. G
WARNING
Electrostatic buildup can create sparks and
ignite fuel vapors. There is a risk of fire and
explosion.
Always touch the vehicle body before opening the fuel filler flap or touching the fuel pump
nozzle. Any existing electrostatic buildup is
thereby discharged.
Do not get into the vehicle again during the
refueling process. Otherwise, electrostatic
charge could build up again.
! Do not use diesel to refuel vehicles with a
gasoline engine. Do not switch on the igni-
tion if you accidentally refuel with the
wrong fuel. Otherwise, the fuel will enter
the fuel system. Even small amounts of the wrong fuel could result in damage to the
fuel system and the engine. Notify a quali-
fied specialist workshop and have the fuel
tank and fuel lines drained completely.
! Overfilling the fuel tank could damage the
fuel system.
! Take care not to spill any fuel on painted
surfaces. You could otherwise damage the
paintwork.
! Use a filter when refueling from a fuel can.
Otherwise, the fuel lines and/or injection
system could be blocked by particles from
the fuel can. If you overfill the fuel tank, fuel could spray
out when the fuel pump nozzle is removed.
For further information on fuel and fuel quality
(Y page 392). Refueling
General information Pay attention to the important safety notes
(Y
page 163).
If you unlock/lock the vehicle from the out-
side, the fuel filler flap also unlocks/locks.
The position of the fuel filler cap is displayed
00B6 in the instrument cluster. The arrow
next to the filling pump indicates the side of
the vehicle.
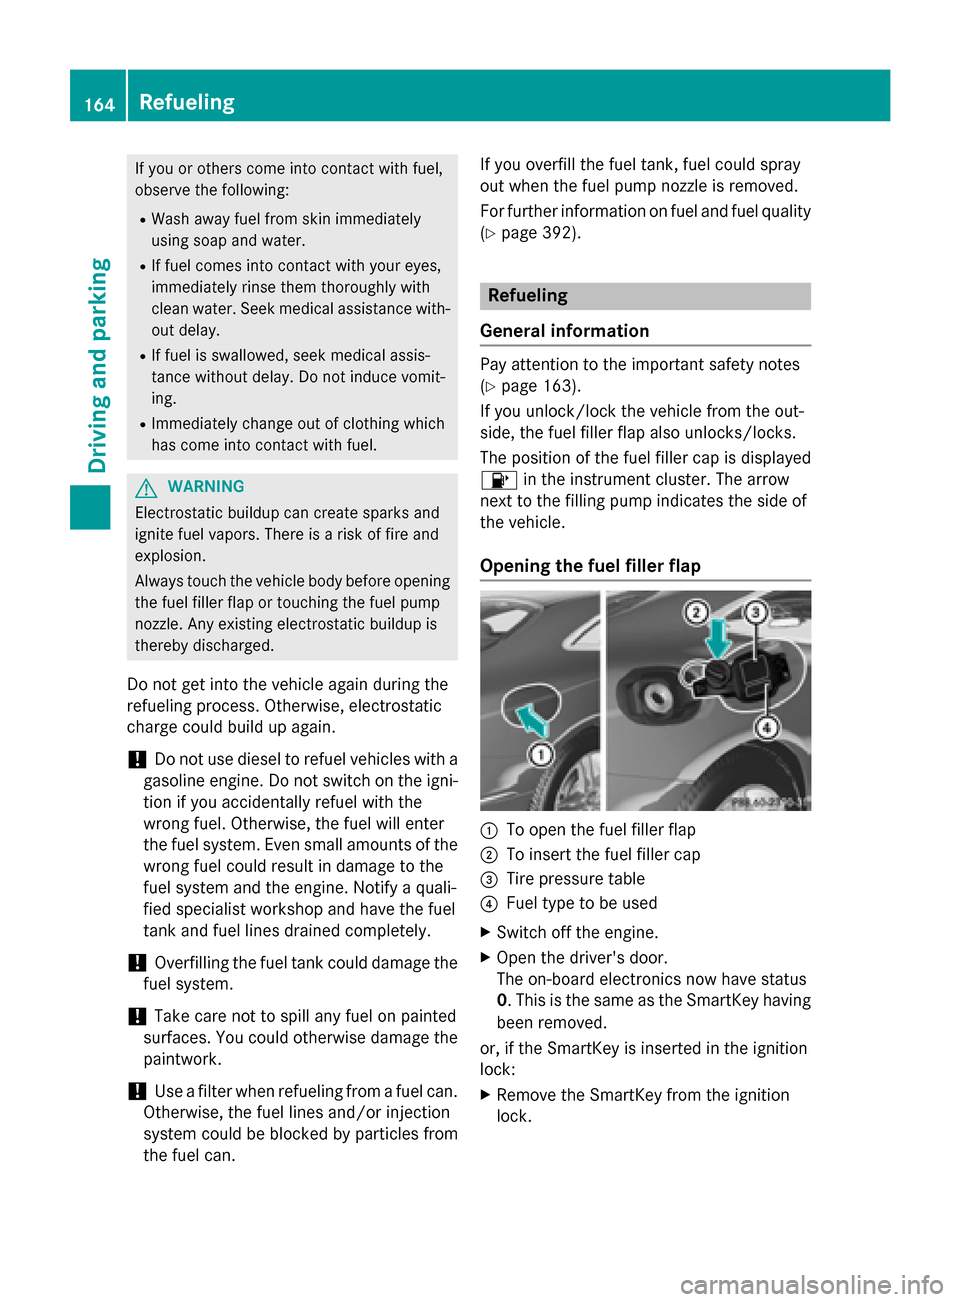
Opening the fuel filler flap 0043
To open the fuel filler flap
0044 To insert the fuel filler cap
0087 Tire pressure table
0085 Fuel type to be used
X Switch off the engine.
X Open the driver's door.
The on-board electronics now have status
0. This is the same as the SmartKey having
been removed.
or, if the SmartKey is inserted in the ignition
lock: X Remove the SmartKey from the ignition
lock. 164
RefuelingDriving and parking
Page 172 of 402
Driving tips
General driving tips
Important safety notes G
WARNING
If you switch off the ignition while driving,
safety-relevant functions are only available
with limitations, or not at all. This could affect, for example, the power steering and the brake
boosting effect. You will require considerably
more effort to steer and brake. There is a risk of an accident.
Do not switch off the ignition while driving. G
WARNING
If you operate mobile communication equip-
ment while driving, you will be distracted from traffic conditions. You could also lose controlof the vehicle. There is a risk of an accident.
Only operate this equipment when the vehicleis stationary.
Observe the legal requirements for the coun- try in which you are driving. Some jurisdic-
tions prohibit the driver from using a mobile
phone while driving a vehicle.
If you make a call while driving, always use
hands-free mode. Only operate the telephone
when the traffic situation permits. If you are
unsure, pull over to a safe location and stop
before operating the telephone.
Bear in mind that at a speed of only 30 mph
(approximately 50 km/h), the vehicle covers
a distance of 44 ft (approximately 14 m) per
second.
Drive sensibly – save fuel Observe the following tips to save fuel:
X The tires should always be inflated to the
recommended tire pressure.
X Remove unnecessary loads.
X Remove roof racks when they are not nee-
ded.
X Warm up the engine at low engine speeds. X
Avoid frequent acceleration or braking.
X Have all maintenance work carried out as
indicated by the service intervals in the
Maintenance Booklet or by the service
interval display.
Fuel consumption also increases when driv-
ing in cold weather, in stop-start traffic and in
hilly terrain.
Drinking and driving G
WARNING
Drinking and driving and/or taking drugs and driving are very dangerous combinations.
Even a small amount of alcohol or drugs can
affect your reflexes, perceptions and judg-
ment.
The possibility of a serious or even fatal acci-
dent is greatly increased when you drink or
take drugs and drive.
Do not drink or take drugs and drive or allow
anyone to drive who has been drinking or tak-
ing drugs.
Emission control G
WARNING
Combustion engines emit poisonous exhaust
gases such as carbon monoxide. Inhaling
these exhaust gases leads to poisoning. There is a risk of fatal injury. Therefore never leave
the engine running in enclosed spaces with-
out sufficient ventilation.
Certain engine systems are designed to keep
the level of poisonous components in exhaust fumes within legal limits.
These systems only work at peak efficiency if they are serviced exactly in accordance with
the manufacturer's specifications. For this
reason, all work on the engine must be carried
out by qualified and authorized Mercedes-
Benz technicians.
The engine settings must not be changed
under any circumstances. Furthermore, all
specific service work must be carried out at 170
Driving tipsDriving and pa
rking
Page 173 of 402
regular intervals and in accordance with the
Mercedes-Benz service requirements. Details
can be found in the Maintenance Booklet. ECO display
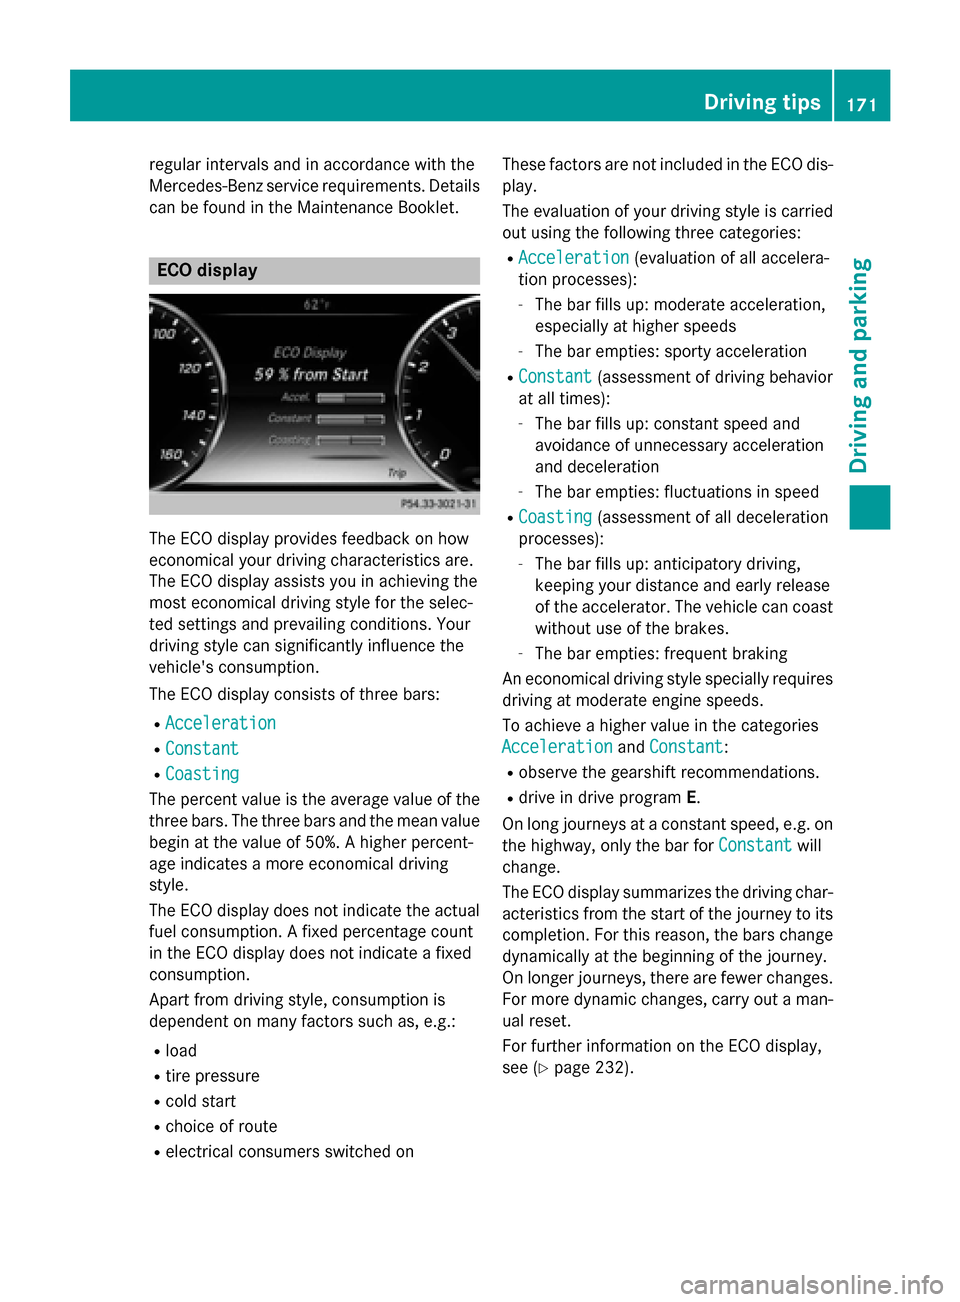
The ECO display provides feedback on how
economical your driving characteristics are.
The ECO display assists you in achieving the
most economical driving style for the selec-
ted settings and prevailing conditions. Your
driving style can significantly influence the
vehicle's consumption.
The ECO display consists of three bars:
R Acceleration
Acceleration
R Constant Constant
R Coasting
Coasting
The percent value is the average value of the three bars. The three bars and the mean value
begin at the value of 50%. A higher percent-
age indicates a more economical driving
style.
The ECO display does not indicate the actual fuel consumption. A fixed percentage count
in the ECO display does not indicate a fixed
consumption.
Apart from driving style, consumption is
dependent on many factors such as, e.g.:
R load
R tire pressure
R cold start
R choice of route
R electrical consumers switched on These factors are not included in the ECO dis-
play.
The evaluation of your driving style is carried
out using the following three categories:
R Acceleration
Acceleration (evaluation of all accelera-
tion processes):
- The bar fills up: moderate acceleration,
especially at higher speeds
- The bar empties: sporty acceleration
R Constant
Constant (assessment of driving behavior
at all times):
- The bar fills up: constant speed and
avoidance of unnecessary acceleration
and deceleration
- The bar empties: fluctuations in speed
R Coasting Coasting (assessment of all deceleration
processes):
- The bar fills up: anticipatory driving,
keeping your distance and early release
of the accelerator. The vehicle can coast
without use of the brakes.
- The bar empties: frequent braking
An economical driving style specially requires driving at moderate engine speeds.
To achieve a higher value in the categories
Acceleration
Acceleration andConstant Constant :
R observe the gearshift recommendations.
R drive in drive program E.
On long journeys at a constant speed, e.g. on
the highway, only the bar for Constant
Constantwill
change.
The ECO display summarizes the driving char- acteristics from the start of the journey to its completion. For this reason, the bars change
dynamically at the beginning of the journey.
On longer journeys, there are fewer changes. For more dynamic changes, carry out a man- ual reset.
For further information on the ECO display,
see (Y page 232). Driving tips
171Driving and parking Z
Page 189 of 402
The support provided by the system can be
impaired if:
R there is poor visibility, e.g. due to insuffi-
cient illumination of the road, or due to
snow, rain, fog or spray
R there is glare, e.g. from oncoming traffic,
the sun or reflections (e.g. when the road
surface is wet)
R the windshield is dirty, fogged up, damaged
or covered, for instance by a sticker, in the
vicinity of the camera
R there are no, several or unclear lane mark-
ings for a lane, e.g. in areas with road con-
struction work
R the lane markings are worn away, dark or
covered up, e.g. by dirt or snow
R the distance to the vehicle in front is too
small and the lane markings thus cannot be
detected
R the lane markings change quickly, e.g.
lanes branch off, cross one another or
merge
R the road is narrow and winding
R there are strong shadows cast on the road
The system is switched to passive and no lon-
ger assists you by performing steering inter-
ventions if:
R you actively change lane
R you switch on the turn signal
R take your hands off the steering wheel or do
not steer for a prolonged period of time
i Steering Assist and Stop&Go Pilot are
activated again automatically after a lane
change is completed.
Steering Assist and Stop&Go Pilot do not pro- vide any support:
R on very sharp corners
R when a loss of tire pressure or a defective
tire has been detected and displayed
Pay attention also to the important safety
notes for DISTRONIC PLUS (Y page 178).
The steering interventions are carried out
with a limited steering moment. The system requires the driver to keep his hands on the
steering wheel and to steer himself.
If you do not steer yourself or if you take your
hands off the steering wheel for a prolonged
period of time, the system will first alert you
with a visual warning. A steering wheel sym-
bol appears in the multifunction display. If you have still not started to steer and have not
taken hold of the steering wheel after five
seconds at the latest, a warning tone also
sounds to remind you to take control of the
vehicle. Steering Assist and Stop&Go Pilot are
switched to passive. DISTRONIC PLUS
remains active.
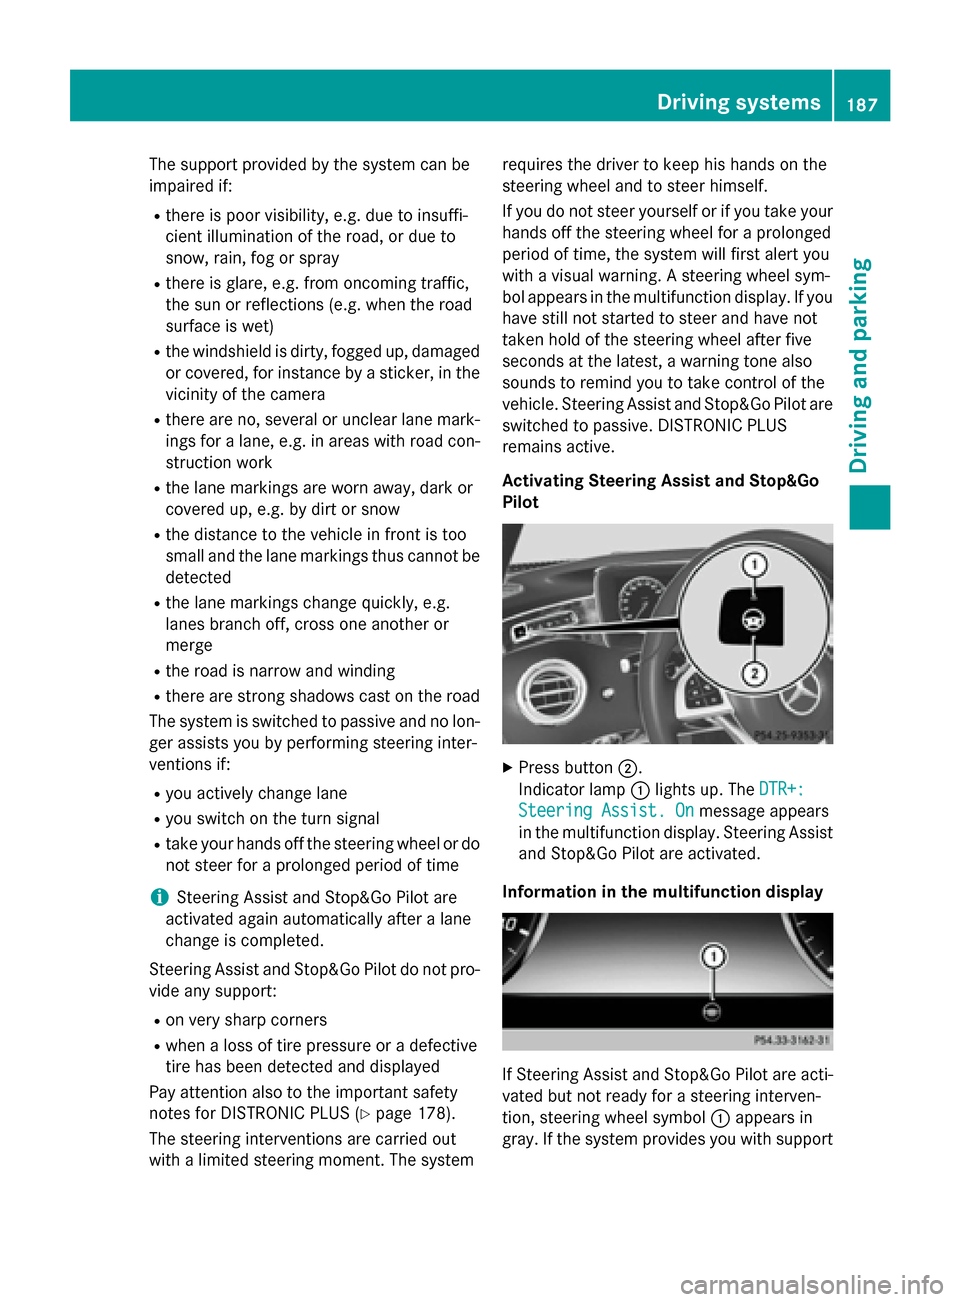
Activating Steering Assist and Stop&Go
Pilot X
Press button 0044.
Indicator lamp 0043lights up. The DTR+: DTR+:
Steering Assist. On
Steering Assist. On message appears
in the multifunction display. Steering Assist and Stop&Go Pilot are activated.
Information in the multifunction display If Steering Assist and Stop&Go Pilot are acti-
vated but not ready for a steering interven-
tion, steering wheel symbol 0043appears in
gray. If the system provides you with support Driving systems
187Driving and parking Z
Page 201 of 402
Parking tips:
R On narrow roads, drive as close to the park-
ing space as possible.
R Parking spaces that are littered or over-
grown might be identified or measured
incorrectly.
R Parking spaces that are partially occupied
by trailer drawbars might not be identified
as such or be measured incorrectly.
R Snowfall or heavy rain may lead to a parking
space being measured inaccurately.
R Pay attention to the PARKTRONIC
(Y page 196) warning messages during the
parking procedure.
R You can intervene in the steering procedure
to correct it at any time. Active Parking
Assist will then be canceled.
R When transporting a load which protrudes
from your vehicle, you should not use
Active Parking Assist.
R Never use Active Parking Assist when snow
chains are installed.
R Make sure that the tire pressures are
always correct. This has a direct influence
on the parking characteristics of the vehi-
cle.
Use Active Parking Assist for parking spaces:
R parallel or at right angles to the direction of
travel
R that are on straight roads, not bends
R that are on the same level as the road, e.g.
not on the pavement
Detecting parking spaces Objects located above the height range of
Active Parking Assist will not be detected
when the parking space is measured. These
are not taken into account when the parking
procedure is calculated, e.g. overhanging
loads, tail sections or loading ramps of goods vehicles. G
WARNING
If there are objects above the detection range:
R Active Park Assist may steer too early
R the vehicle may not stop in front of these
objects.
You may cause a collision as a result. There is
a risk of an accident.
If there are objects above the detection range,
stop and deactivate Active Parking Assist.
For further information on the detection
range (Y page 195).
Active Parking Assist does not assist you
parking in spaces at right angles to the direc-
tion of travel if:
R two parking spaces are located directly
next to one another
R the parking space is directly next to a low
obstacle such as a low curb
R you park forwards
Active Parking Assist does not assist you
parking in spaces that are parallel or at right
angles to the direction of travel if:
R the parking space is on a curb
R the system reads the parking space as
being blocked, for example by foliage or
grass paving blocks
R the area is too small for the vehicle to
maneuver into
R the parking space is bordered by an obsta-
cle, e.g. a tree, a post or a trailer Driving systems
199Driving and parking Z