MERCEDES-BENZ S-CLASS COUPE 2018 Manual Online
Manufacturer: MERCEDES-BENZ, Model Year: 2018, Model line: S-CLASS COUPE, Model: MERCEDES-BENZ S-CLASS COUPE 2018Pages: 502, PDF Size: 6.29 MB
Page 81 of 502
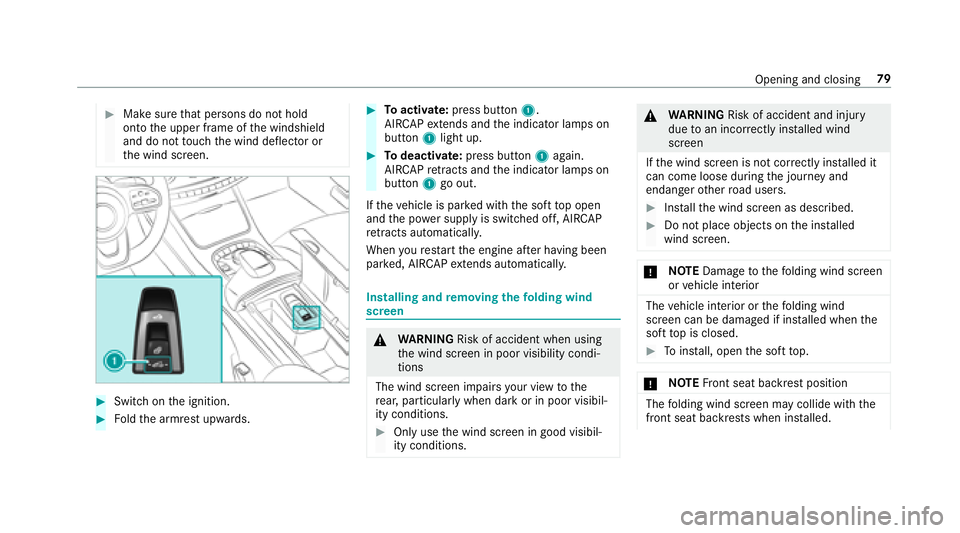
#Make surethat persons do not hold
onto the upper frame of the windshield
and do not touch the wind deflector or
th e wind screen.
#Switch on the ignition.
#Fo ldthe armrest upwards.
#To activate: press button 1.
AIR CAPex tends and the indicator lamps on
button 1light up.
#Todeactivate: press button 1again.
AIR CAPre tracts and the indicator lamps on
button 1go out.
If th eve hicle is par ked with the soft top open
and the po wer supp lyis switched off, AI RCAP
re tracts au tomatical ly.
When youre start the engine af ter having been
par ked, AIR CAPex tends au tomatically.
Installing and removing the folding wind
screen
& WARNING Risk of accident when using
th e wind screen in poor visibility condi‐
tions
The wind screen impairs your view tothe
re ar, particular ly when darkor in poor visibil‐
ity conditions.
#Only use the wind screen in good visibil‐
ity conditions.
& WARNING Risk of accident and injury
due toan incor rectly ins talled wind
screen
If th e wind screen is not cor rectly ins talled it
can come loose during the journey and
endanger other road users.
#Inst allthe wind screen as described.
#Do not place objects on the ins talled
wind screen.
* NO
TEDama getothefo lding wind screen
or vehicle interior
The vehicle interior or thefo lding wind
screen can be damaged if ins talled when the
soft top is closed.
#To install, open the soft top.
* NO
TEFront seat backrest position
The folding wind screen may collide with the
front seat backrests when ins talled.
Opening and closing 79
Page 82 of 502
#Adjust the backrest positions of the
front seats.
The folding wind screen is ins talled over there ar
seats toprotect against wind when you are driv‐
ing withth e soft top open. Only the front seats
can be occupied when thefo lding wind screen is
ins talled.
The bag con taining thefo lding wind screen is
st ored in the trunk.
Yo u should preferably per form operations in volv‐
in g th efo lding wind screen on the side facing
aw ay from traf fic.
#Open all side windo wsand the soft top.
#To remo vethe bag, open the trunk lid.
#Re mo vethefo lding wind screen from the
bag.
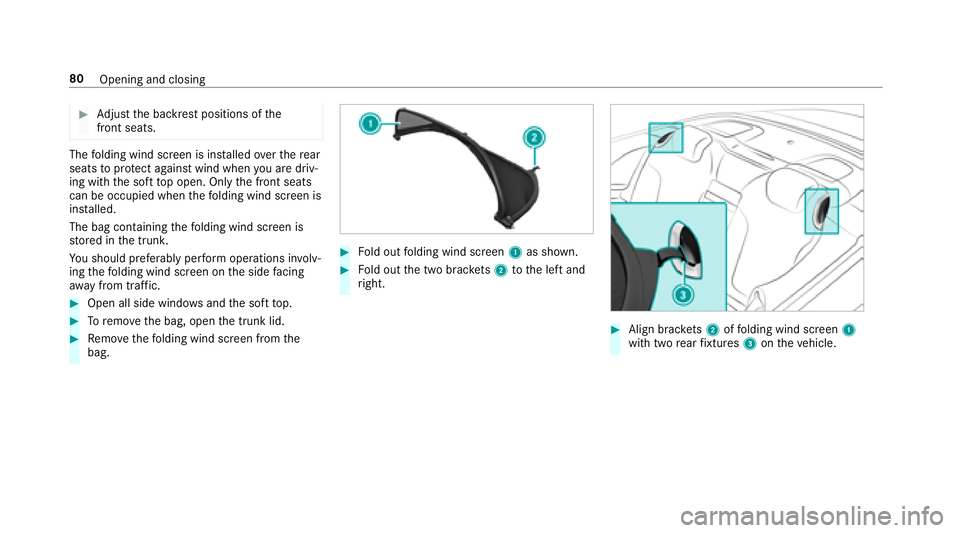
#Fo ld out folding wind screen 1as shown.
#Fold out the two brac kets 2 tothe left and
ri ght.
#Align brac kets 2 offolding wind screen 1
with two rear fixtures 3ontheve hicle.
80
Opening and closing
Page 83 of 502
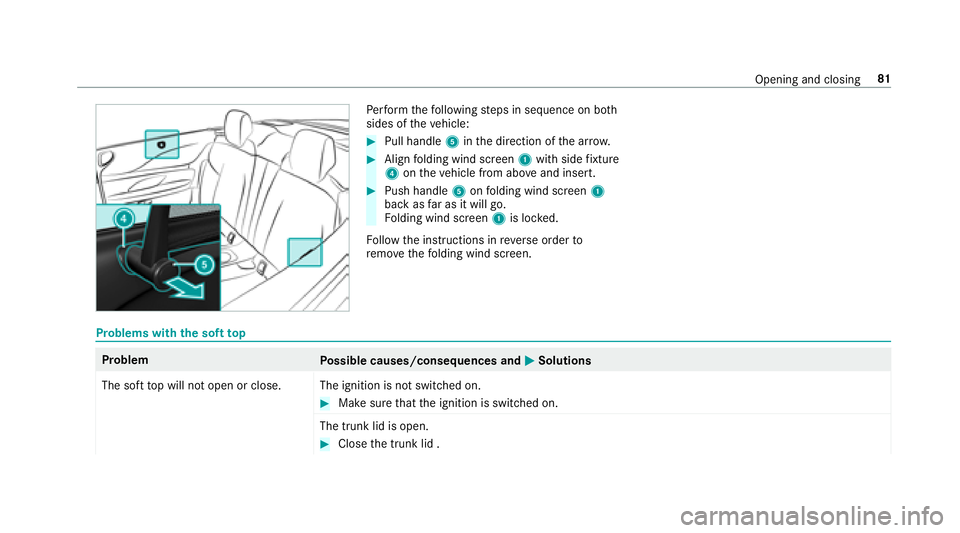
Perform thefo llowing steps in sequence on bo th
sides of theve hicle:
#Pull handle 5inthe direction of the ar row.
#Align folding wind screen 1with side fixture
4 ontheve hicle from abo veand insert.
#Push handle 5onfolding wind screen 1
back as far as it will go.
Fo lding wind screen 1is loc ked.
Fo llow the instructions in reve rse order to
re mo vethefo lding wind screen.
Problems with the soft top
Problem
Possible causes/consequences and MSolutions
The soft top will not open or close. The ignition is not switched on.
#Make sure that the ignition is switched on.
The trunk lid is open.
#Close the trunk lid .
Opening and closing 81
Page 84 of 502
ProblemPossible causes/consequences and MSolutions
The trunk partition is not closed.
#Re mo ve ov erhanging luggage and close the trunk partition.
The mechanical soft- top components or control sy stem are defective.
#Vi sit a qualified specialist workshop.
The soft top has been opened and closed se veral times in a row. The soft-top drive has been switched off
au tomatical lyand will be available again af ter app roxima tely ten minu tes.
#Re peat the opening or closing procedure af ter app roxima tely ten minu tes.
Anti-theft pr otection
Fu nction of the immobilizer
The immobilizer pr events your vehicle from being
st ar ted without the cor rect SmartK ey.
The immobilizer is automatically activated when
th e ignition is switched off and deactivated when
th e ignition is switched on.
When leaving theve hicle, alw aysta ke the Smart‐
Ke ywit hyo u and lock theve hicle. An yone can
st art the engine if a valid SmartK eyhas been left
inside theve hicle. %
Intheeve ntthe engine cannot bestar ted
(y et theve hicle ’sstar ter battery is charge d),
th e sy stem is not operational. Contact an
authorized Mercedes-Benz Center or call
1-800-FO R-MERCedes (in the USA) or
1-800-387-0 100 (in Canada).
ATA (anti-theft alarm system)
Fu nction of theATA system (anti-theft ala rm
sy stem)
If th eATA system is armed, a visual and audible
alarm is triggered in thefo llowing situations:
RWhen a door is opened
RWhen the trunk lid is opened
RWhen the hood is opened
RWhen theglove box is opened
82
Opening and closing
Page 85 of 502
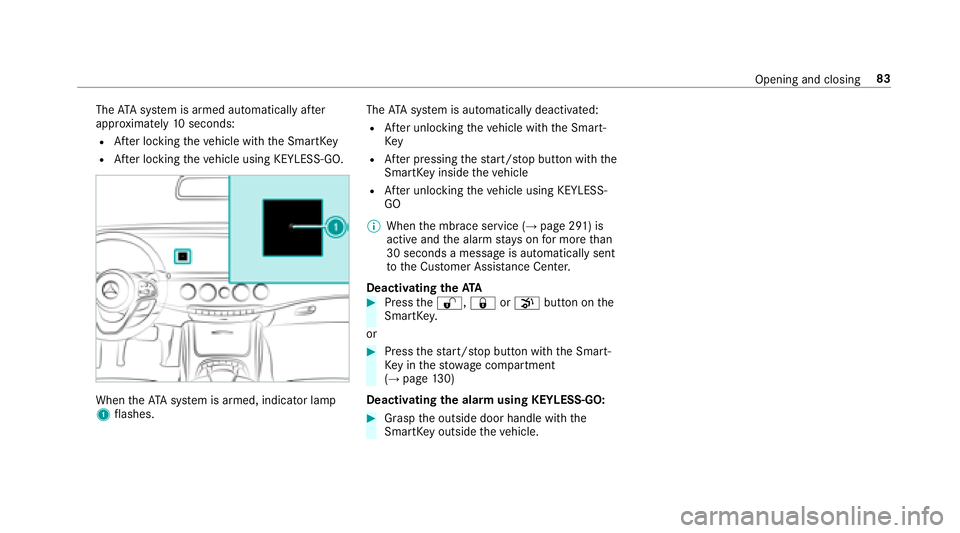
TheATA sy stem is armed automatically af ter
appr oximately 10seconds:
RAfter locking theve hicle with the SmartK ey
RAfter locking theve hicle using KEYLESS-GO.
When theATA system is armed, indicator lamp
1 flashes. The
ATA sy stem is automatically deactivated:
RAf ter unlocking theve hicle with the Smart‐
Ke y
RAfter pressing thest art/ stop button with the
SmartK eyinside theve hicle
RAfter unlocking theve hicle using KEYLESS-
GO
% When the mbrace service (
→page 291) is
active and the alarm stay s on for more than
30 seconds a message is automatically sent
to the Cus tomer Assis tance Center.
Deacti vating the ATA
#Pressthe%, &orp button on the
SmartK ey.
or
#Press thest art/ stop button with the Smart‐
Ke yin thestow age compartment
(
→page 130)
Deactivating the ala rmusing KEYLESS-GO:
#Grasp the outside door handle with the
SmartK eyoutside theve hicle.
Opening and closing 83
Page 86 of 502
Notes onthe cor rect driver's seat position
&
WARNING Risk of injury from adjusting
th eve hicle settings while theve hicle is in
motion
Yo u could lose cont rol of theve hicle in the
fo llowing situations:
Rifyo u adjust the driver's seat, the head
re stra int, thesteering wheel or the mir ror
while theve hicle is in motion
Rifyo ufa sten your seat belt while theve hi‐
cle is in motion
#Before starting the engine: adjust the
driver's seat, the head restra int, the
st eering wheel or the mir ror and fasten
yo ur seat belt.
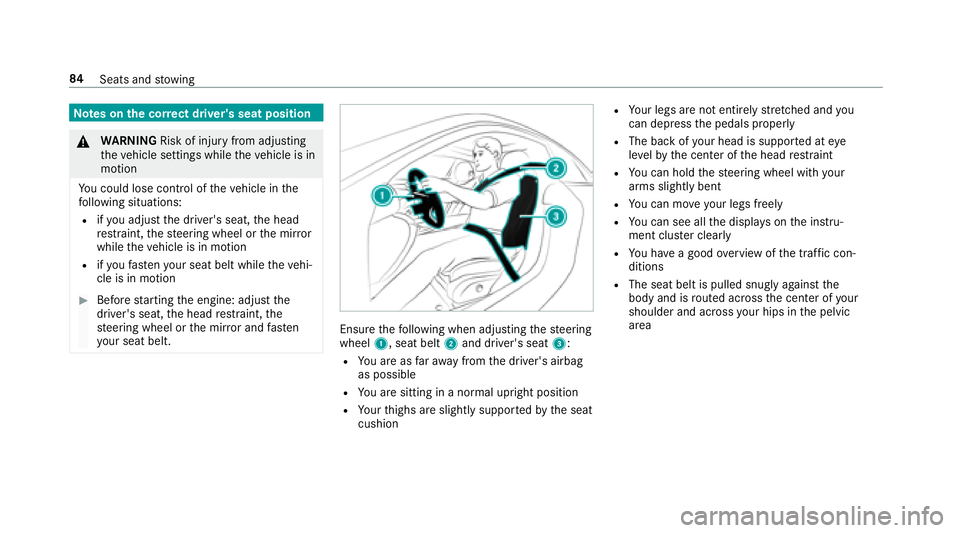
Ensure thefo llowing when adjusting thesteering
wheel 1, seat belt 2and driver's seat 3:
RYou are as faraw ay from the driver's airbag
as possible
RYo u are sitting in a no rmal upright position
RYour thighs are slightly supportedby the seat
cushion
RYo ur legs are not entirely stre tched and you
can dep ress the pedals properly
RThe back of your head is support ed ateye
le ve lby the center of the head restra int
RYo u can hold thesteering wheel with your
arms slightly bent
RYo u can mo veyour legs freely
RYo u can see all the displa yson the instru‐
ment clus ter clearl y
RYou ha vea good overview of the traf fic con‐
ditions
RThe seat belt is pulled snugly against the
body and is routed across the center of your
shoulder and across your hips in the pelvic
area
84 Seats and stowing
Page 87 of 502
Seats
Adjusting the front seat electrically
&
WARNING Risk of becoming trapped if
th e seats are adjus tedby children
Children could become trapped if they adjust
th e seats, particularly when unattended.
#When leaving theve hicle, alw aysta ke
th e SmartK eywith you and lock the
ve hicle.
#Ne ver lea vechildren unatte nded inthe
ve hicle.
The seats can be adjus ted when the ignition is
switched off.
& WARNING Risk of becoming trapped
when adjusting the seats
When you adjust a seat, you or other vehicle
occupants could become trapped, e.g. on the
seat guide rail.
#Make sure when adjusting a seat that
no one has any body parts in the sweep
of the seat.
Obser vethe saf etyno tes on "Airbags" and "Chil‐
dren in theve hicle".
&
WARNING Risk of injury from adjusting
th eve hicle settings while theve hicle is in
motion
Yo u could lose cont rol of theve hicle in the
fo llowing situations:
Rifyo u adjust the driver's seat, the head
re stra int, thesteering wheel or the mir ror
while theve hicle is in motion
Rifyo ufa sten your seat belt while theve hi‐
cle is in motion
#Before starting the engine: adjust the
driver's seat, the head restra int, the
st eering wheel or the mir ror and fasten
yo ur seat belt.
&
WARNING Risk of becoming trapped if
th e seat height is adjus ted carelessly
If yo u adjust the seat height carelessly, you
or other vehicle occupants could be trapped
and thereby injured.
Children in particular could accidenta lly
press the electrical seat adjustment buttons
and become trapped.
#While moving the seats, make sure that
hands or other body parts do not get
under the le ver assembly of the seat
adjustment sy stem.
&
WARNING Risk of injury duetohead
re stra ints which are not ins talled or are
adjus ted incor rectly
If head restra ints are not ins talled or are
adjus ted incor rectly, the head restra ints can‐
not pr ovide pr otection as intended.
There is an increased risk of injury in the
head and neck area, e.g. in theeve nt of an
accident or when braking.
Seats and stowing 85
Page 88 of 502
#Always drive with the head restra ints
ins talled.
#Before driving off, make sure forev ery
ve hicle occupant that the center of the
head restra int supports the back of the
head at about eye le vel.
Do not swap the head restra ints of the front and
re ar seats. Otherwise, you cannot adjust the
height and angle of the head restra ints cor rectl y.
Ad just the head restra int fore -and-aft position so
th at it is as close as possible tothe back of your
head.
& WARNING Risk of injury or death dueto
incor rect seat position
The seat belt does not of ferth e intended
le ve l of pr otection if you ha venot mo vedth e
seat backrest toan almost vertical position.
When braking or in theeve nt of an accident,
yo u could slideunderneath the seat belt and
sus tain abdominal or neck injuries, forex am‐
ple.
#Ad just the seat proper lybefore begin‐
ning your journe y.
#Always ensure that the seat backrest is
in an almost vertical position and that
th e shoulder section of your seat belt is
ro uted across the center of your shoul‐
der.
* NO
TEDama getothe seats when moving
th e seats back
The seats may be damaged byobjects when
moving the seats bac k.
#When moving the seats bac k,make
sure that there are no objects in the
fo ot we ll or under or behind the seats.
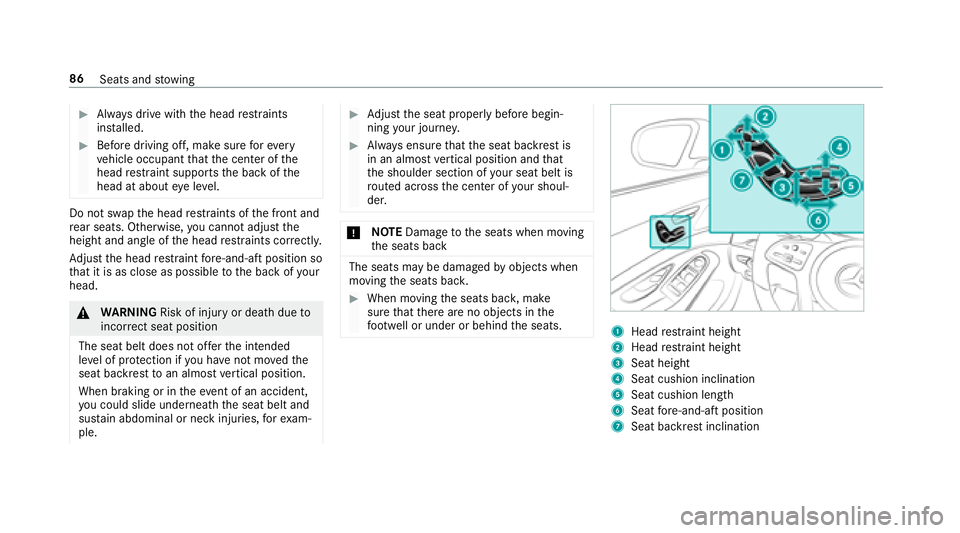
1Head restra int height
2Head restra int height
3Seat height
4Seat cushion inclination
5Seat cushion length
6Seat fore -and-aft position
7Seat ba ckrest inclination
86
Seats and stowing
Page 89 of 502
#Save the settings with the memory function
(→page 96).
% The head restra int height is adjus ted auto‐
matically when you adjust the seat height or
th e seat fore -and-aft position.
Ad justing the front passen ger seat from the
driver's seat electrically
Re quirements:RTo select the front passenger seat: the po wer
supply is switched on.
Yo u can call up thefo llowing functions forth e
front passenger seat:
RSeat adjustment
RSeat heating
RSeat ventilation
RMemory function
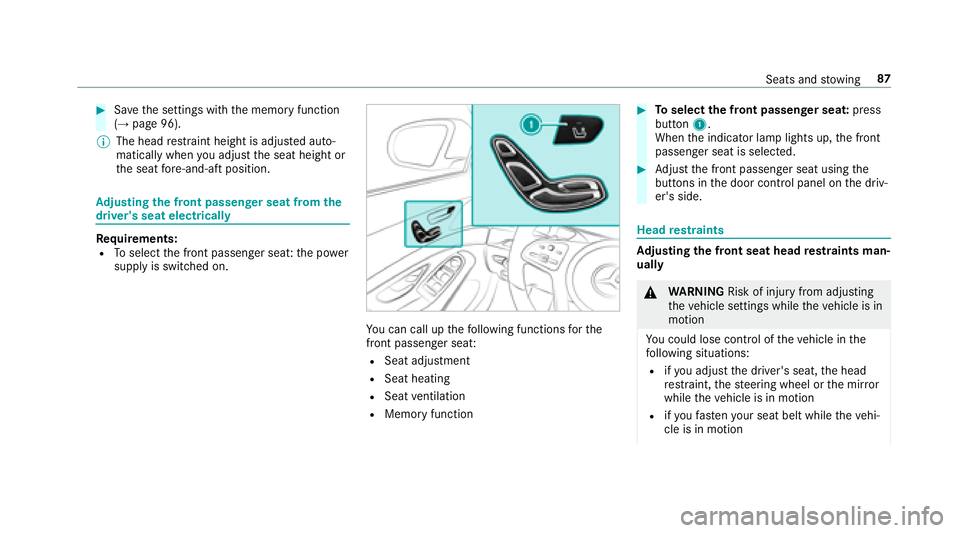
#To select the front passenger seat: press
button 1.
When the indicator lamp lights up, the front
passenger seat is selected.
#Ad just the front passenger seat using the
buttons in the door control panel on the driv‐
er's side.
Head restra ints
Ad justing the front seat head restra ints man‐
ually
& WARNING Risk of injury from adjusting
th eve hicle settings while theve hicle is in
motion
Yo u could lose cont rol of theve hicle in the
fo llowing situations:
Rifyo u adjust the driver's seat, the head
re stra int, thesteering wheel or the mir ror
while theve hicle is in motion
Rifyo ufa sten your seat belt while theve hi‐
cle is in motion
Seats and stowing 87
Page 90 of 502
#Beforestarting the engine: adjust the
driver's seat, the head restra int, the
st eering wheel or the mir ror and fasten
yo ur seat belt.
&
WARNING Risk of injury duetohead
re stra ints which are not ins talled or are
adjus ted incor rectly
If head restra ints are not ins talled or are
adjus ted incor rectly, the head restra ints can‐
not pr ovide pr otection as intended.
There is an increased risk of injury in the
head and neck area, e.g. in theeve nt of an
accident or when braking.
#Alw ays drive with the head restra ints
ins talled.
#Before driving off, make sure forev ery
ve hicle occupant that the center of the
head restra int supports the back of the
head at about eye le vel.
Do not rotate the head restra ints of the front and
re ar seats. Otherwise, you cannot adjust the
height and angle of the head restra ints cor rectl y. Ad
just the head restra int fore -and-aft position so
th at it is as close as possible tothe back of your
head.
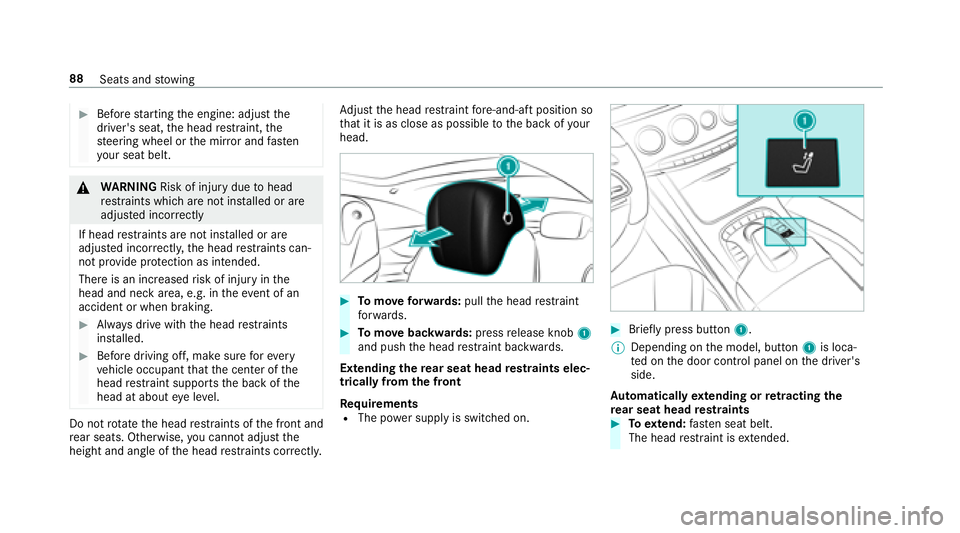
#To mo veforw ards: pullthe head restra int
fo rw ards.
#To mo vebackwards: pressrelease knob 1
and push the head restra int backwards.
Extending there ar seat head restra ints elec‐
trically from the front
Re quirements
RThe po wer supply is switched on.
#Brief lypress button 1.
% Depending on the model, button 1is loca‐
te d on the door control panel on the driver's
side.
Au tomatically extending or retracting the
re ar seat head restra ints
#To extend: fasten seat belt.
The head restra int is extended.
88
Seats and stowing