spare tire location MERCEDES-BENZ S-CLASS SEDAN 2012 Owners Manual
[x] Cancel search | Manufacturer: MERCEDES-BENZ, Model Year: 2012, Model line: S-CLASS SEDAN, Model: MERCEDES-BENZ S-CLASS SEDAN 2012Pages: 536, PDF Size: 39.39 MB
Page 14 of 536
ETS/4ETS (Electronic Traction
System) ................................................ 76
Exhaust check ................................... 331
Exhaust tail pipe (cleaning
instructions) ...................................... 470
Exterior lighting see Exterior lighting
Exterior mirror parking position
Adjusting (COMAND) .....................266
Exterior mirrors
Adjusting ....................................... 116
Dipping (automatic) .......................117
Folding in/out (automatically) .......116
Folding in/out (electrically) ...........116
Out of position (troubleshooting) ...116
Storing settings (memory
function) ........................................ 118
Storing the parking position ..........117
Eyeglasses compartment ................. 435
F
Factory setting (reset function) ....... 154
Fader, setting .................................... 139
Fast forward Audio mode (CD, DVD, MP3) .........230
Rear Seat Entertainment System ...260
Video DVD ..................................... 247
Fast rewind
Audio mode (CD, DVD, MP3) .........230
Rear Seat Entertainment System ...260
Video DVD ..................................... 247
Favorites (COMAND) ......................... 124
Filler cap see Fuel filler flap
First-aid kit ......................................... 474
Flat tire Changing a wheel/mounting the
spare wheel ................................... 475
MOExtended run-flat system .........480
Preparing the vehicle .....................475
Raising the vehicle .........................476
Floormat ............................................. 455
Freeway information ......................... 191
Front fog lamps ................................. 282
Display message ............................ 404
Switching on/off ........................... 282
Front-passenger seat
Adjusting from the driver's seat ..... 109
Adjusting from the rear
compartment ................................. 109
Front windshield
see Windshield
Fuel
Additives ........................................ 526
Displaying the current
consumption .................................. 378
Displaying the range ......................378
Driving tips .................................... 330
Fuel gauge ....................................... 37
Grade (gasoline) ............................ 525
Important safety notes ..................525
Premium-grade unleaded gasoline . 525
Problem (malfunction) ...................324
Quality (diesel) ............................... 526
Refueling ........................................ 321
Tank content/reserve fuel .............525
Fuel filler flap, opening/closing ....... 322
Fuel filter (display message) ............ 409
Fuel level Calling up the range (on-board
computer) ...................................... 378
Fuel tank
Capacity ........................................ 525
Problem (malfunction) ...................324
Function buttons (COMAND) ............ 123
Fuses Allocation chart ............................. 488
Before changing ............................. 488
Dashboard fuse box .......................488
Engine emergency stop .................490
Fuse box in the engine
compartment ................................. 489
Fuse box in the rear compartment . 488
Important safety notes ..................487
G
Garage door opener Clearing the memory .....................455
Notes ............................................. 452
12Index
Page 24 of 536
Sound settingsBalance and fader ..........................139
Calling up the sound menu ............139
Rear Seat Entertainment System ...253
Surround sound ............................. 140
Treble and bass ............................. 139
Spare wheel
Notes/data .................................... 518
Storage location ............................ 474
see Emergency spare wheel
Specialist workshop ............................ 31
Speech control see Voice Control System
Speed, controlling
see Cruise control
Speedometer
Activating/deactivating the
additional speedometer .................388
Digital ............................................ 378
In the Instrument cluster .................37
Selecting the unit of
measurement ................................ 388
see Instrument cluster
SPLITVIEW ......................................... 126
SRS (Supplemental Restraint
System) Display message ............................ 399
Introduction ..................................... 48
Warning lamp ................................. 428
Warning lamp (function) ................... 48
Standing lamps
Display message ............................ 404
Switching on/off ........................... 280
Starting (engine) ................................ 308
Station memory ................................. 217
Steering (display message) .............. 420
Steering wheel Adjusting (electrically) ...................114
Button overview ............................... 39
Buttons (on-board
computer) ...................................... 375
Cleaning ......................................... 472
Important safety notes ..................114
Paddle shifters ............................... 318
Steering wheel heating ..................114
Storing settings (memory
function) ........................................ 118Steering wheel heating
Switching on/off ........................... 114
Steering wheel paddle shifters ........ 318
Stop function Audio DVD ..................................... 228
Rear Seat Entertainment System ...260
Video DVD ..................................... 247
Stopwatch (RACETIMER) ................... 382
Storing stations Manually ........................................ 217
Storing stations (radio)
Automatically ................................. 217
Stowage areas ................................... 434
Stowage compartments Armrest (under) ............................. 435
Cup holders ................................... 439
Door ............................................... 435
Eyeglasses compartment ...............435
Glove box ....................................... 434
Important safety information .........434
Parcel net ...................................... 437
Rear ............................................... 436
Rear seat backrest ......................... 436
Rear seats (between) .....................436
Stowage well ..................................... 438
Stowage well beneath the trunk
floor .................................................... 438
Summer opening see Convenience opening feature
Summer tires ..................................... 494
Sun visor ............................................ 440
Supplemental Restraint System see SRS (Supplemental Restraint
System)
Surround sound
see 3D sound (Harman Kardon ®
surround sound system)
Surround sound (harman/
kardon ®
surround sound system)
Notes ............................................. 140
Switching on/off ........................... 140
Suspension tuning
Active Body Control .......................349
AIRMATIC ...................................... 348
Switching air-recirculation mode
on/off ................................................. 30122Index
Page 356 of 536
GWARNING
Objects located above the height range of
Parking Guidance will not be detected when
the parking space is measured. These objects
are not taken into account when the parking
procedure is calculated, e.g. overhanging
loads, tail sections or loading ramps of goods
vehicles. Under some circumstances, Parking
Guidance might therefore issue steering
instructions too soon. This may lead to a
collision. For this reason, you should avoid
using Parking Guidance in such situations.
GWARNING
Make sure that no persons or animals are in
the maneuvering range. Otherwise, they
could be injured.
! Pay particular attention to low objects or
objects with flat surfaces, such as trailer
drawbars, posts, cross beams and curbs.
These types of objects cannot be detected
by Parking Guidance and may damage the
vehicle.
When PARKTRONIC is deactivated, Parking
Guidance is also unavailable.
Use Parking Guidance for parking spaces:
R that are parallel to the direction of travel
R that are on straight roads, not bends
R that are on the same level as the road, i.e.
not on the pavement, for example. Parking
Guidance may not detect flat curbs
Parking tips:
R on narrow roads, drive past the parking
space as close as possible.
R parking spaces that are littered, overgrown
or partially occupied by trailer drawbars
might be identified incorrectly or not at all.
R snowfall or heavy rain may lead to a parking
space being measured inaccurately.
R pay attention to the PARKTRONIC
( Y page 351) warning messages during the
parking procedure.
R when transporting a load which protrudes
from your vehicle, you must not use Parking
Guidance.
R never use Parking Guidance with snow
chains or an emergency spare wheel
mounted.
R make sure that the tire pressures are
always correct. This has a direct effect on
the steering instructions.
R the way your vehicle is positioned in the
parking space after parking is dependent
on various factors. These include the
position and shape of the vehicles parked
in front and behind it and the conditions of
the location. In some cases, Parking
Guidance may guide you too far or not far
enough into a parking space. In some
cases, it may also lead you across or onto
the curb. If necessary, cancel the parking
procedure with Parking Guidance.
! If unavoidable, you should drive over
obstacles such as curbs slowly and not at
a sharp angle. Otherwise, you may damage
the wheels or tires.
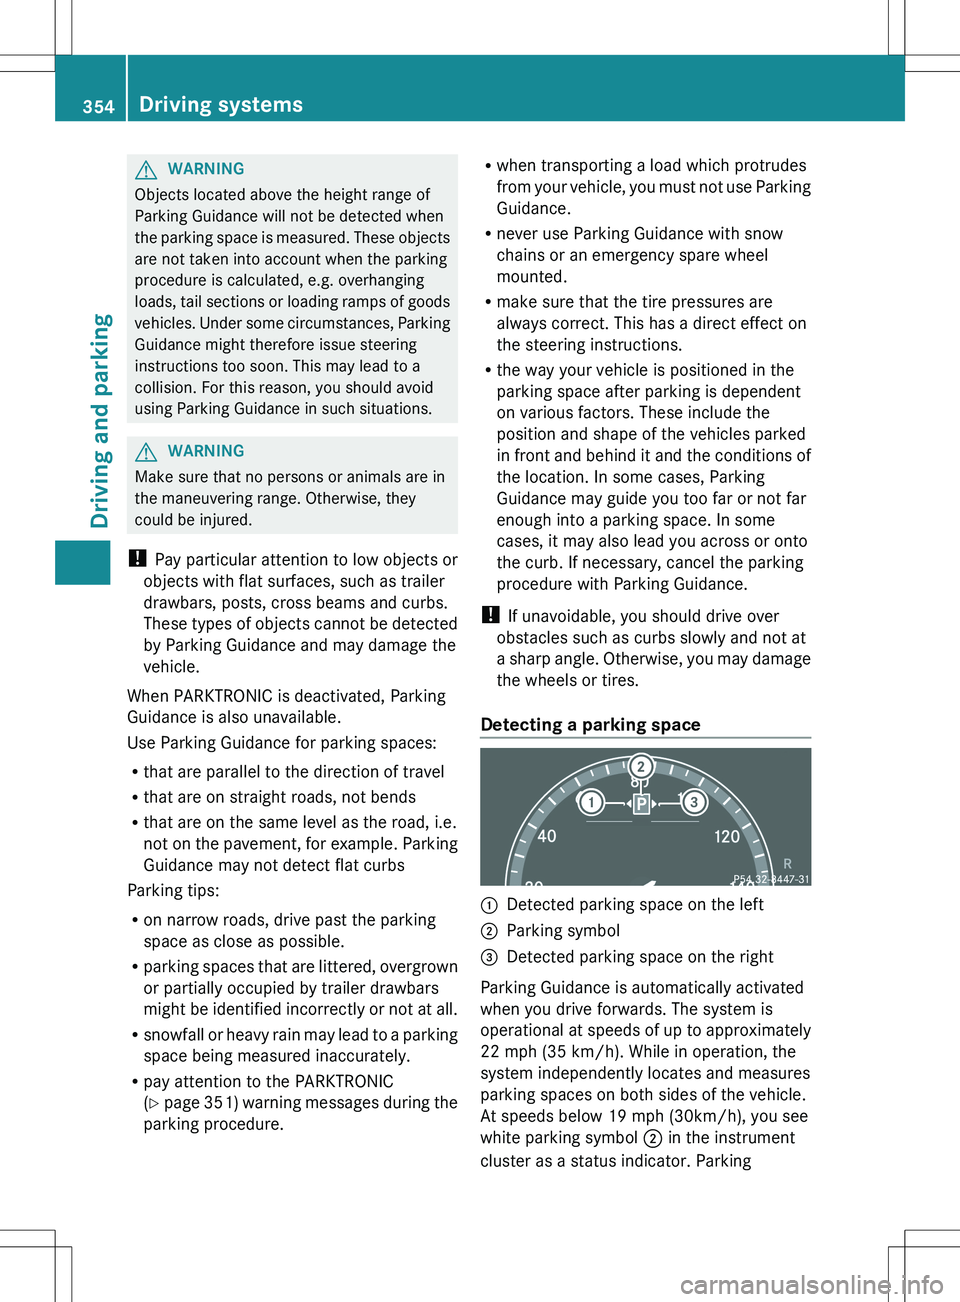
Detecting a parking space:Detected parking space on the left;Parking symbol=Detected parking space on the right
Parking Guidance is automatically activated
when you drive forwards. The system is
operational at speeds of up to approximately
22 mph (35 km/h). While in operation, the
system independently locates and measures
parking spaces on both sides of the vehicle.
At speeds below 19 mph (30km/h), you see
white parking symbol ; in the instrument
cluster as a status indicator. Parking
354Driving systemsDriving and parking
Page 495 of 536
Notes on regularly inspecting wheels
and tiresGWARNING
Damaged tires can cause tire inflation
pressure loss. As a result, you could lose
control of your vehicle. There is a risk of
accident.
Check the tires regularly for signs of damage
and replace any damaged tires immediately.
R Regularly check the wheels and tires of
your vehicle for damage (e.g. cuts,
punctures, tears, bulges on tires and
deformation or cracks or severe corrosion
on wheels) at least once a month, as well
as after driving off-road or on rough roads.
Damaged wheels can cause a loss of tire
pressure.
R Regularly check the tire tread depth and
the condition of the tread across the whole
width of the tire (Y page 493). If necessary,
turn the front wheels to full lock in order to
inspect the inner side of the tire surface.
R All wheels must have a valve cap to protect
the valve against dirt and moisture. Do not
mount anything onto the valve (such as tire
pressure monitoring systems) other than
the standard valve cap or other valve caps
approved by Mercedes-Benz for your
vehicle.
R Regularly check the pressure of all the tires
including the emergency spare wheel or the
spare wheel, particularly prior to long trips,
and correct the pressure as necessary
( Y page 495).
Tire tread
GWARNING
Insufficient tire tread will reduce tire traction.
The tire is no longer able to dissipate water.
This means that on wet road surfaces, the risk
of hydroplaning increases, in particular where
speed is not adapted to suit the driving
conditions. There is a risk of accident.
If the tire pressure is too high or too low, tires
may exhibit different levels of wear at
different locations on the tire tread. Thus, you
should regularly check the tread depth and
the condition of the tread across the entire
width of all tires.
Minimum tire tread depth for:
R Summer tires: â in (3 mm)
R M+S tires: ã in (4 mm)
For safety reasons, replace the tires before
the legally prescribed limit for the minimum
tire tread depth is reached.
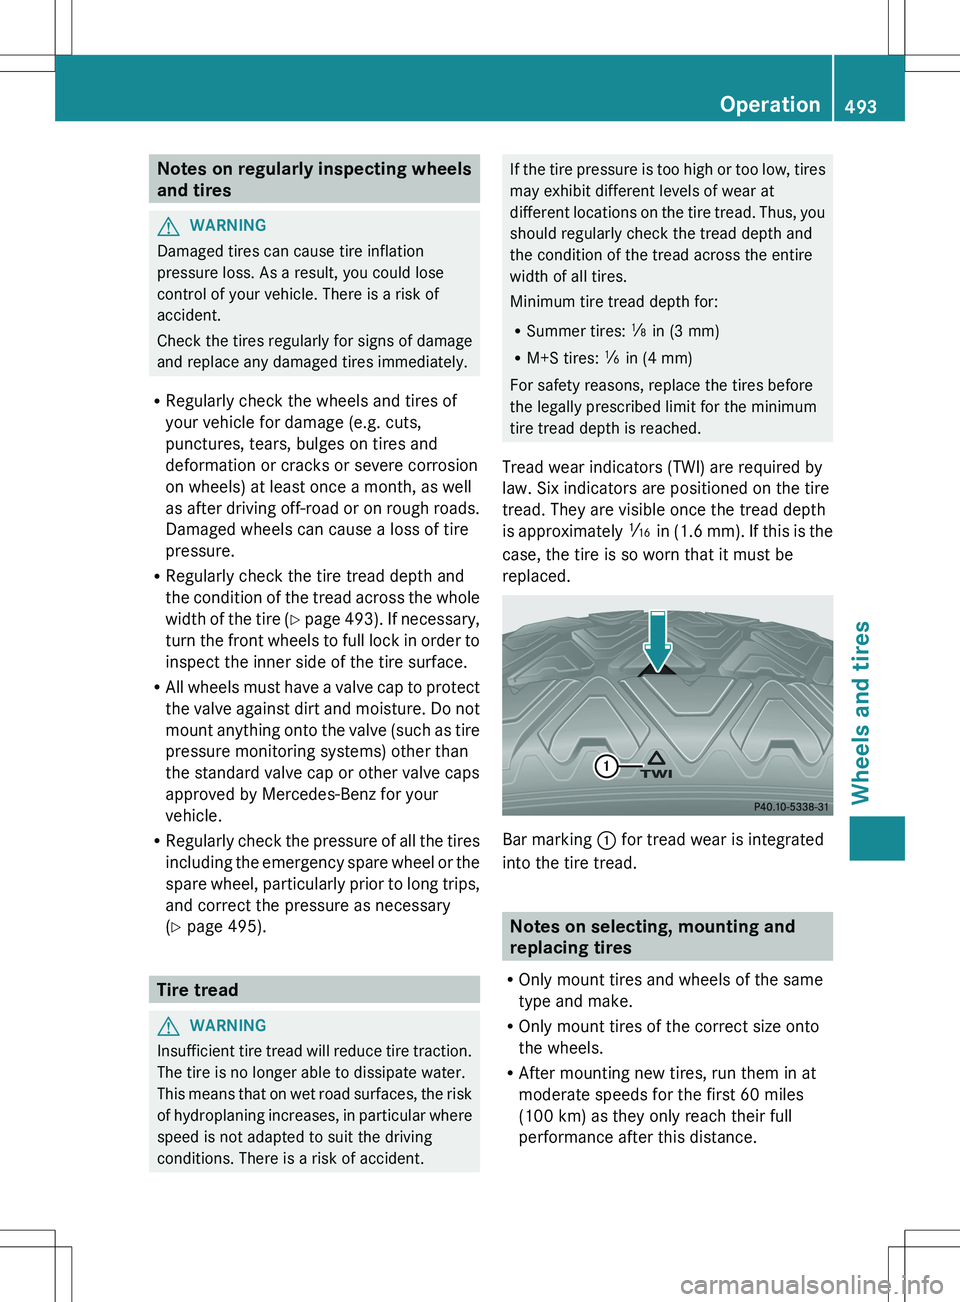
Tread wear indicators (TWI) are required by
law. Six indicators are positioned on the tire
tread. They are visible once the tread depth
is approximately á in (1.6 mm). If this is the
case, the tire is so worn that it must be
replaced.
Bar marking : for tread wear is integrated
into the tire tread.
Notes on selecting, mounting and
replacing tires
R Only mount tires and wheels of the same
type and make.
R Only mount tires of the correct size onto
the wheels.
R After mounting new tires, run them in at
moderate speeds for the first 60 miles
(100 km) as they only reach their full
performance after this distance.
Operation493Wheels and tiresZ
Page 503 of 536
2. this device must accept any interference
received, including interference that may
cause undesired operation of the device.
Any unauthorized modification to this
device could void the user’s authority to
operate the equipment.
i Canada only:
This device complies with RSS-210 of
Industry Canada. Operation is subject to
the following two conditions:
1. This device may not cause harmful
interference, and
2. this device must accept any interference
received, including interference that may
cause undesired operation of the device.
Any unauthorized modification to this
device could void the user’s authority to
operate the equipment.
Checking tire pressure electronicallyXMake sure that the SmartKey is in
position 2(Y page 307) in the ignition lock.XPress the = or ; button on the
steering wheel to select the Service
menu.XPress the 9 or : button to select
Tire Pressure .XPress the a button.
The current tire pressure for each wheel will
be displayed in the multifunction display.
If the vehicle has been parked for longer than
20minutes, the Tire pressures will be
displayed after driving for a few
minutes message appears.
After a teach-in period, the tire pressure
monitor automatically recognizes new wheels
or new sensors. As long as a clear allocation
of the tire pressure values to the individual
wheels is not possible, the Tire Pressure
Monitor Active display message is shown
instead of the tire pressure display. The tire
pressures are already being monitored.
i If a spare wheel/emergency spare wheel
is mounted, the system may continue to
show the tire pressure of the wheel that has
been removed for a few minutes. If this
occurs, note that the value displayed for
the position where the spare tire is
mounted is not the same as the spare
wheel/emergency spare wheel's current
tire pressure.
Tire pressure monitor warning
messages
If the tire pressure monitor detects a
significant pressure loss on one or more tires,
a warning message is shown in the
multifunction display. A warning tone also
sounds and the tire pressure warning lamp
lights up in the instrument cluster.
Each tire that is affected by a significant loss
of pressure is highlighted with a color.
If the Correct Tire Pressure message
appears in the multifunction display:
XCheck the tire pressure on all four wheels
and correct it if necessary.
i If the wheel positions on the vehicle are
interchanged, the tire pressures may be
displayed for the wrong positions for a
short time. This is rectified after a few
minutes of driving, and the tire pressures
are displayed for the correct positions.
Restarting the tire pressure monitor
When you restart the tire pressure monitor,
all existing warning messages are deleted and
the warning lamps go out. The monitor uses
the currently set tire pressures as the
reference values for monitoring.
The tire pressure monitor must be restarted
when you set the tire pressure to a new value
(as a result of changed drive or load
characteristics, for example). The tire
pressure monitor then monitors the new tire
pressure values.
i Canada only: in most cases, the tire
pressure monitor recognizes the new
reference values automatically. However,
Tire pressure501Wheels and tiresZ