window MERCEDES-BENZ S-CLASS SEDAN 2013 Service Manual
[x] Cancel search | Manufacturer: MERCEDES-BENZ, Model Year: 2013, Model line: S-CLASS SEDAN, Model: MERCEDES-BENZ S-CLASS SEDAN 2013Pages: 536, PDF Size: 24.14 MB
Page 216 of 536
Weather Band
Switching on
X
Select the currently set waveband FM or
AM by sliding VÆ and turning cVd the
COMAND controller and press W to
confirm.
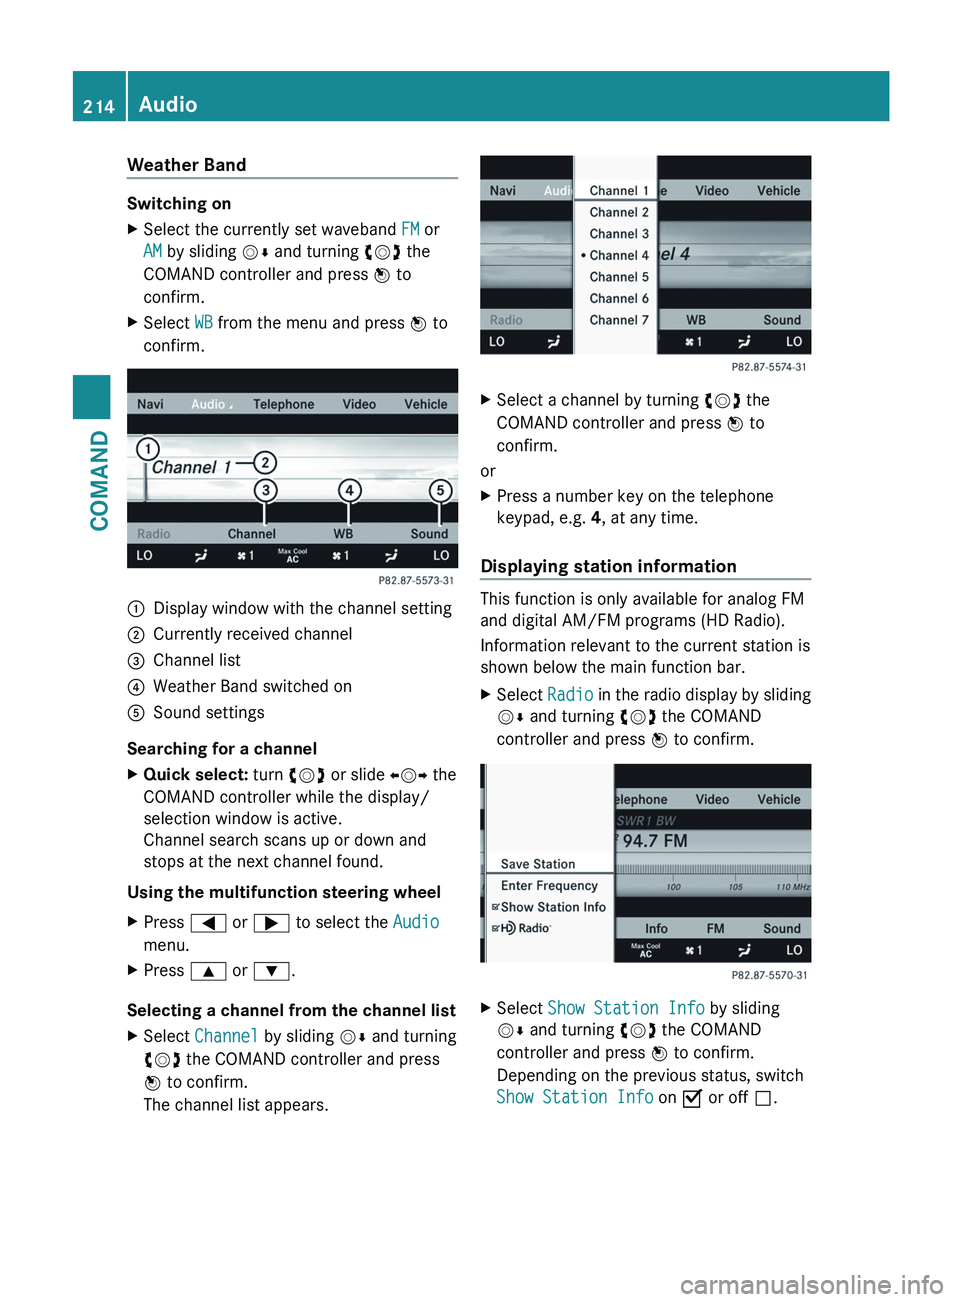
X Select WB from the menu and press W to
confirm. :
Display window with the channel setting
; Currently received channel
= Channel list
? Weather Band switched on
A Sound settings
Searching for a channel
X Quick select: turn cVd or slide XVY the
COMAND controller while the display/
selection window is active.
Channel search scans up or down and
stops at the next channel found.
Using the multifunction steering wheel
X Press = or ; to select the Audio
menu.
X Press 9 or :.
Selecting a channel from the channel list
X Select Channel by sliding VÆ and turning
cVd the COMAND controller and press
W to confirm.
The channel list appears. X
Select a channel by turning cVd the
COMAND controller and press W to
confirm.
or
X Press a number key on the telephone
keypad, e.g. 4, at any time.
Displaying station information This function is only available for analog FM
and digital AM/FM programs (HD Radio).
Information relevant to the current station is
shown below the main function bar.
X
Select Radio in the radio display by sliding
VÆ and turning cVd the COMAND
controller and press W to confirm. X
Select Show Station Info by sliding
VÆ and turning cVd the COMAND
controller and press W to confirm.
Depending on the previous status, switch
Show Station Info on O or off ª. 214
Audio
COMAND
Page 217 of 536
Displaying program information
This function is only available for analog FM
and digital AM/FM programs (HD Radio).
Information relevant to the current station is
shown in the display window.
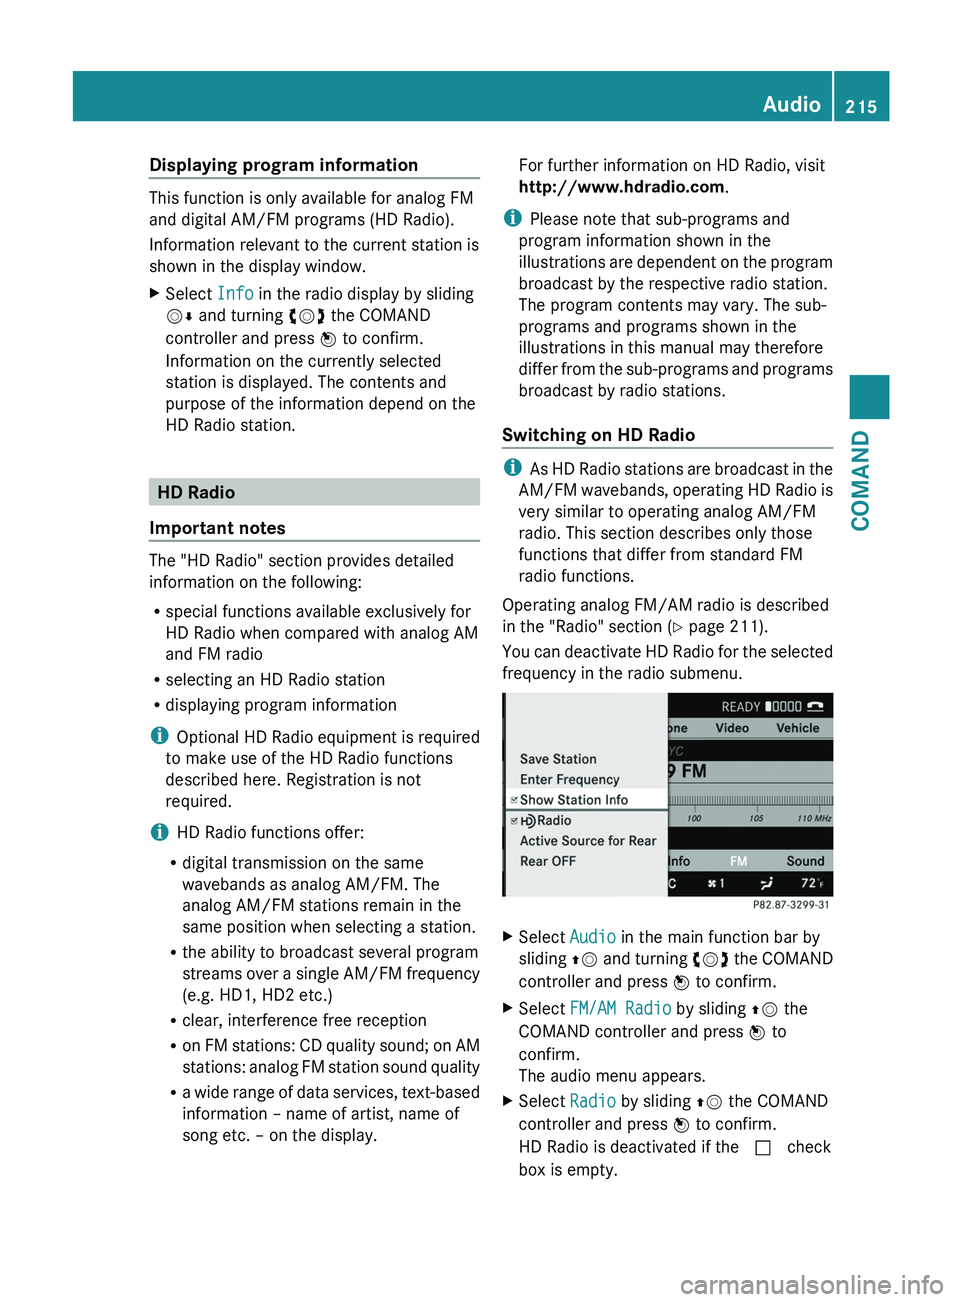
X
Select Info in the radio display by sliding
VÆ and turning cVd the COMAND
controller and press W to confirm.
Information on the currently selected
station is displayed. The contents and
purpose of the information depend on the
HD Radio station. HD Radio
Important notes The "HD Radio" section provides detailed
information on the following:
R
special functions available exclusively for
HD Radio when compared with analog AM
and FM radio
R selecting an HD Radio station
R displaying program information
i Optional
HD Radio equipment is required
to make use of the HD Radio functions
described here. Registration is not
required.
i HD Radio functions offer:
R digital transmission on the same
wavebands as analog AM/FM. The
analog AM/FM stations remain in the
same position when selecting a station.
R the ability to broadcast several program
streams over a single AM/FM frequency
(e.g. HD1, HD2 etc.)
R clear, interference free reception
R on FM stations: CD quality sound; on AM
stations: analog FM station sound quality
R a wide range of data services, text-based
information – name of artist, name of
song etc. – on the display. For further information on HD Radio, visit
http://www.hdradio.com
.
i Please note that sub-programs and
program information shown in the
illustrations
are dependent on the program
broadcast by the respective radio station.
The program contents may vary. The sub-
programs and programs shown in the
illustrations in this manual may therefore
differ from the sub-programs and programs
broadcast by radio stations.
Switching on HD Radio i
As
HD Radio stations are broadcast in the
AM/FM wavebands, operating HD Radio is
very similar to operating analog AM/FM
radio. This section describes only those
functions that differ from standard FM
radio functions.
Operating analog FM/AM radio is described
in the "Radio" section ( Y page 211).
You can deactivate HD Radio for the selected
frequency in the radio submenu. X
Select Audio in the main function bar by
sliding ZV
and turning cVd the COMAND
controller and press W to confirm.
X Select FM/AM Radio by sliding ZV the
COMAND controller and press W to
confirm.
The audio menu appears.
X Select Radio by sliding ZV the COMAND
controller and press W to confirm.
HD Radio is deactivated if the c check
box is empty. Audio
215
COMAND Z
Page 218 of 536
You hear the analog program of this
frequency.
As
soon as you change to another HD Radio
frequency, the HD Radio is reactivated.
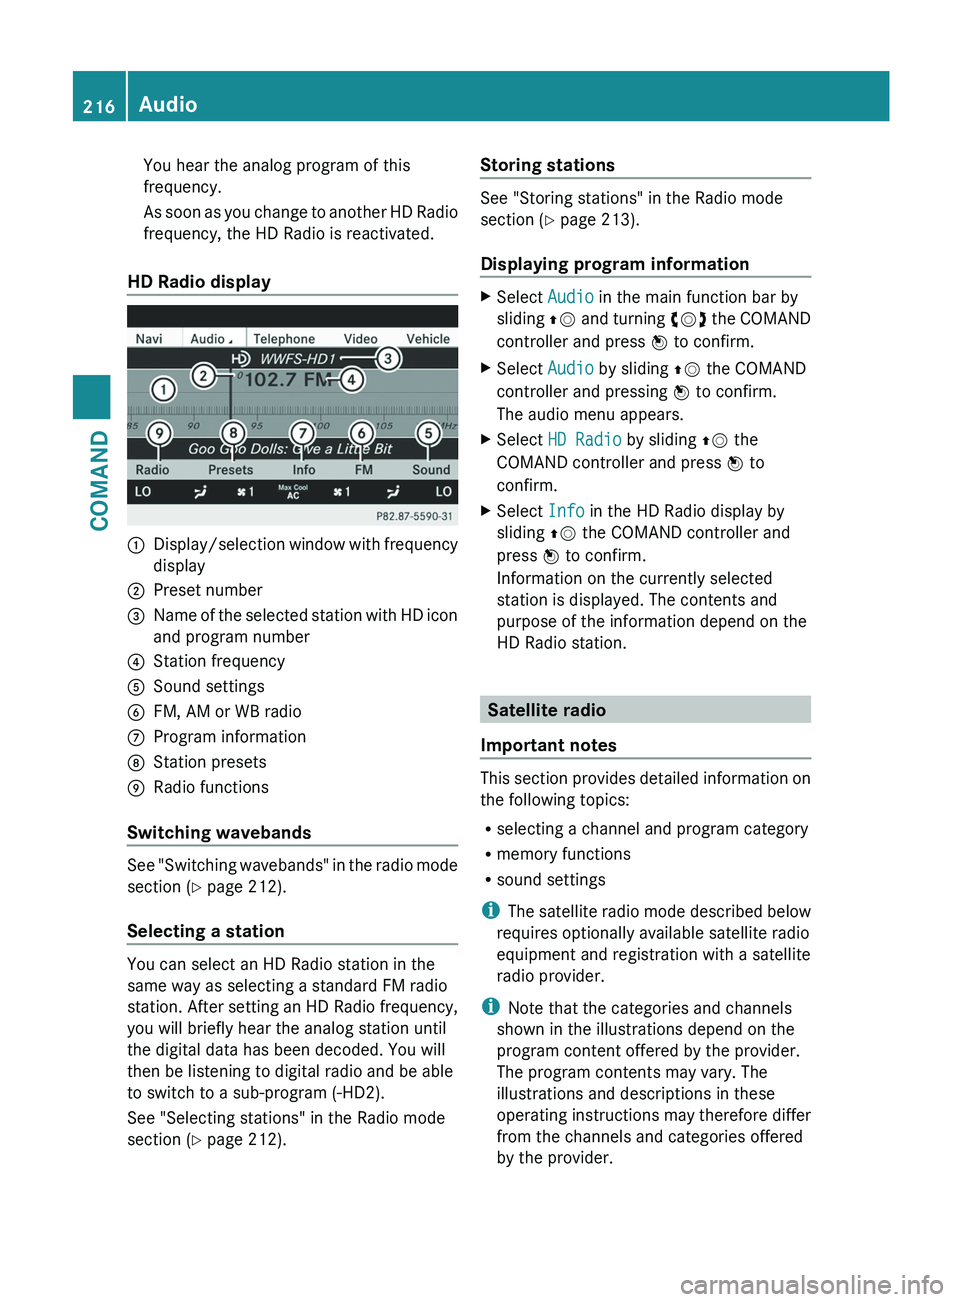
HD Radio display 1
Display/selection window with frequency
display
2 Preset number
3 Name of the selected station with HD icon
and program number
4 Station frequency
5 Sound settings
6 FM, AM or WB radio
7 Program information
8 Station presets
9 Radio functions
Switching wavebands See "Switching wavebands" in the radio mode
section (
Y page 212).
Selecting a station You can select an HD Radio station in the
same way as selecting a standard FM radio
station.
After setting an HD Radio frequency,
you will briefly hear the analog station until
the digital data has been decoded. You will
then be listening to digital radio and be able
to switch to a sub-program (-HD2).
See "Selecting stations" in the Radio mode
section ( Y page 212). Storing stations See "Storing stations" in the Radio mode
section (
Y page 213).
Displaying program information X
Select Audio in the main function bar by
sliding ZV
and turning cVd the COMAND
controller and press W to confirm.
X Select Audio by sliding ZV the COMAND
controller and pressing W to confirm.
The audio menu appears.
X Select HD Radio by sliding ZV the
COMAND controller and press W to
confirm.
X Select Info in the HD Radio display by
sliding ZV the COMAND controller and
press W to confirm.
Information on the currently selected
station is displayed. The contents and
purpose of the information depend on the
HD Radio station. Satellite radio
Important notes This section provides detailed information on
the following topics:
R
selecting a channel and program category
R memory functions
R sound settings
i The
satellite radio mode described below
requires optionally available satellite radio
equipment and registration with a satellite
radio provider.
i Note that the categories and channels
shown in the illustrations depend on the
program content offered by the provider.
The program contents may vary. The
illustrations and descriptions in these
operating instructions may therefore differ
from the channels and categories offered
by the provider. 216
Audio
COMAND
Page 220 of 536
If the satellite receiver is not installed or is
not installed correctly, the Device not
available message will appear.
Once COMAND receives the signal, the
satellite radio display appears. The station
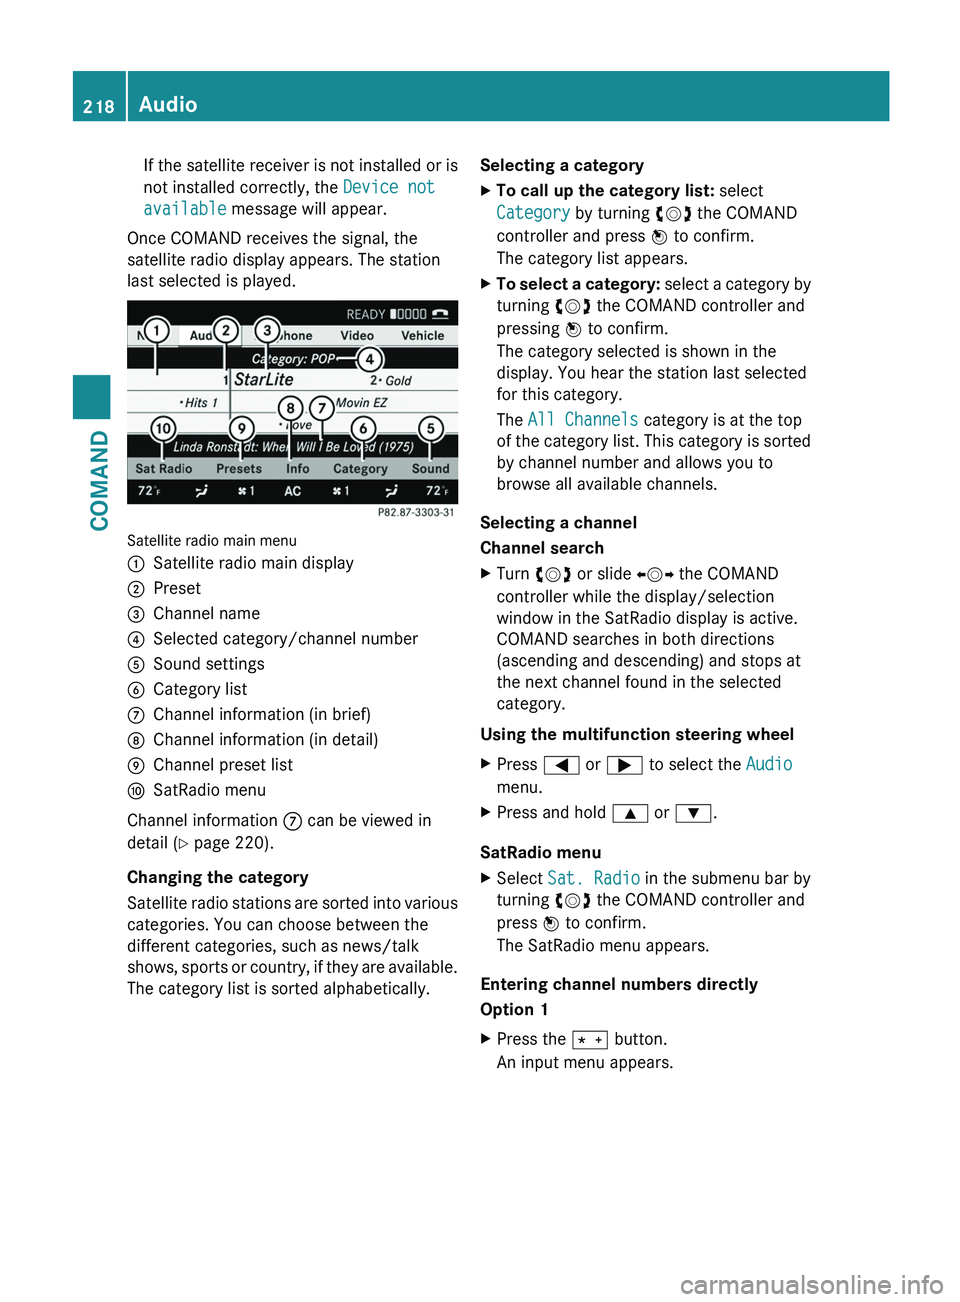
last selected is played. Satellite radio main menu
1
Satellite radio main display
2 Preset
3 Channel name
4 Selected category/channel number
5 Sound settings
6 Category list
7 Channel information (in brief)
8 Channel information (in detail)
9 Channel preset list
a SatRadio menu
Channel information 7 can be viewed in
detail ( Y page 220).
Changing the category
Satellite
radio stations are sorted into various
categories. You can choose between the
different categories, such as news/talk
shows, sports or country, if they are available.
The category list is sorted alphabetically. Selecting a category
X
To call up the category list: select
Category by turning cVd the COMAND
controller and press W to confirm.
The category list appears.
X To select a category:
select a category by
turning cVd the COMAND controller and
pressing W to confirm.
The category selected is shown in the
display. You hear the station last selected
for this category.
The All Channels category is at the top
of the category list. This category is sorted
by channel number and allows you to
browse all available channels.
Selecting a channel
Channel search
X Turn cVd or slide XVY the COMAND
controller while the display/selection
window in the SatRadio display is active.
COMAND searches in both directions
(ascending and descending) and stops at
the next channel found in the selected
category.
Using the multifunction steering wheel
X Press = or ; to select the Audio
menu.
X Press and hold 9 or :.
SatRadio menu
X Select Sat. Radio in the submenu bar by
turning cVd the COMAND controller and
press W to confirm.
The SatRadio menu appears.
Entering channel numbers directly
Option 1
X Press the Ä button.
An input menu appears.218
Audio
COMAND
Page 221 of 536
Option 2
X
Select Sat. Radio in the submenu bar by
turning cVd the COMAND controller and
press W to confirm.
X Select Enter Channel and press W to
confirm.
An input menu appears.
X To enter a channel: irrespective of the
option, press the corresponding number
keys on the control panel one after the
other.
COMAND sets the selected channel.
i You can only select currently permitted
digits.
Selecting a channel from the SatRadio
channel list
X Select Sat. Radio in the submenu bar by
turning cVd the COMAND controller and
press W to confirm.
X Select Channel List and press W to
confirm.
The channel list appears.
X Select a channel by turning cVd the
COMAND controller and press W to
confirm.
Memory functions
Storing channels
i There are ten presets available.
X Press W the COMAND controller when the
display/selection window is active.
or
X Select Presets in the submenu bar by
turning cVd the COMAND controller and
press W to confirm.
In
both cases, the channel presets appear.
The R dot in front of a preset position
indicates that the currently selected
channel is stored there. X
Select a preset by turning cVd the
COMAND controller and press and hold
W until you hear a tone.
or
X Press and hold a number button, e.g. 4,
until you hear a tone.
The channel is stored under the preset.
Storing channels automatically
This function automatically stores channels
with adequate reception in the preset
memory. Channels stored manually in the
preset memory will be overwritten.
X Option 1:
press W the COMAND controller
when the display/selection window is
active.
X Select Autostore
in the presets by turning
cVd the COMAND controller and press
W to confirm.
X Option 2: select Presets in the submenu
bar by sliding VÆ and turning cVd the
COMAND controller and press W to
confirm.
X Select Autostore
and press W to confirm.
In both cases, COMAND searches for
channels that can be received. You will see
a message to this effect. The available
channels are automatically stored in the
preset positions.
X To cancel storing: select Cancel and
press W to confirm.
Selecting a channel from the preset list
X To call up the channel list: select
Presets by turning cVd the COMAND
controller and press W to confirm.
The channel preset list appears.
X To set a channel: select a preset by
turning cVd the COMAND controller and
press W to confirm.
or
X Press a number key, e.g. 4. Audio
219
COMAND Z
Page 226 of 536
Selecting CD/audio DVD/MP3 discs
Selecting via the media list
X
In CD/audio DVD and MP3 mode: select
Media by sliding VÆ or turning cVd the
COMAND controller and press W to
confirm.
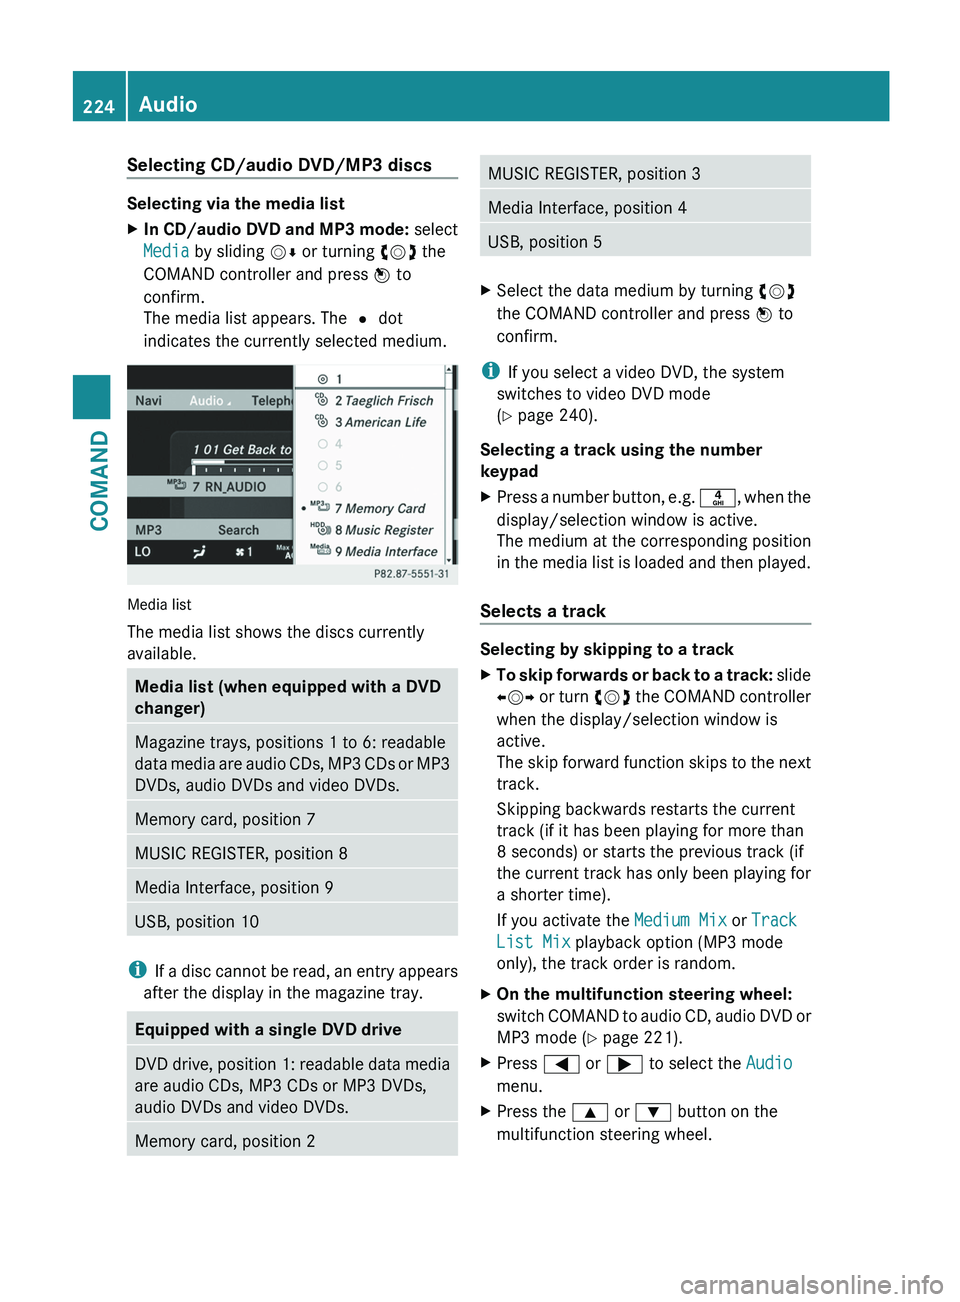
The media list appears. The # dot
indicates the currently selected medium. Media list
The media list shows the discs currently
available.
Media list (when equipped with a DVD
changer)
Magazine trays, positions 1 to 6: readable
data
media are audio CDs, MP3 CDs or MP3
DVDs, audio DVDs and video DVDs. Memory card, position 7
MUSIC REGISTER, position 8
Media Interface, position 9
USB, position 10
i
If
a disc cannot be read, an entry appears
after the display in the magazine tray. Equipped with a single DVD drive
DVD drive, position 1: readable data media
are audio CDs, MP3 CDs or MP3 DVDs,
audio DVDs and video DVDs.
Memory card, position 2 MUSIC REGISTER, position 3
Media Interface, position 4
USB, position 5
X
Select the data medium by turning cVd
the COMAND controller and press W to
confirm.
i If you select a video DVD, the system
switches to video DVD mode
(Y page 240).
Selecting a track using the number
keypad
X Press a number button, e.g. n,
when the
display/selection window is active.
The medium at the corresponding position
in the media list is loaded and then played.
Selects a track Selecting by skipping to a track
X
To skip forwards or back to a track:
slide
XVY or turn cVd the COMAND controller
when the display/selection window is
active.
The skip forward function skips to the next
track.
Skipping backwards restarts the current
track (if it has been playing for more than
8 seconds) or starts the previous track (if
the current track has only been playing for
a shorter time).
If you activate the Medium Mix or Track
List Mix playback option (MP3 mode
only), the track order is random.
X On the multifunction steering wheel:
switch
COMAND to audio CD, audio DVD or
MP3 mode ( Y page 221).
X Press = or ; to select the Audio
menu.
X Press the 9 or : button on the
multifunction steering wheel. 224
Audio
COMAND
Page 227 of 536
Selecting by track list
X
In audio mode, select Search by sliding
VÆ or turning cVd the COMAND
controller and press W to confirm.
X Select Current Track List.
or
X Press W the COMAND controller in audio
mode when the display/selection window
is active.
X Select Current Track List by turning
cVd the COMAND controller and press
W to confirm.
X Select the track by turning cVd and press
W to confirm.
i In
MP3 mode, the list shows all the tracks
in alphabetical order.
X On the multifunction steering wheel:
switch
COMAND to audio CD, audio DVD or
MP3 mode ( Y page 221).
X Press = or ; to select the Audio
menu.
X Press and hold the 9 or : button
until the desired track has been reached.
If you hold down 9 or :, the system
runs through the list more quickly. Not all
audio drives or data carriers support this
function.
If track information is stored on the audio
drive or data storage device, the
multifunction display shows the number and
name of the track.
Selecting a track using the number
keypad
X Press the Ä button on the number
keypad.
A numerical entry field appears. The
number
of positions offered corresponds to
the number of tracks on the CD/DVD. Only
numbers that correspond to a track
number on the CD/DVD can be entered.
X Enter the desired track number using the
number keys. Fast forward/rewind X
While the display/selection window is
active, slide XVY and hold the COMAND
controller until the desired position has
been reached.
Music search You can use the following characteristics to
search music:
R
Keyword search
R Playlist
R Artists
R Albums
R Tracks
R Genres
R Year
X In audio mode, select Search by sliding
VÆ or turning cVd the COMAND
controller and press W to confirm.
A selection list appears.
X Select the desired characteristic by sliding
VÆ and turning cVd the COMAND
controller and press W to confirm.
For the search, the media inserted is scanned
and the music track data is stored in a
COMAND database. A medium that has
already
been scanned is not scanned again if
another search is carried out. The scanning
process may take some time for media with
a large capacity. The search can be carried
out after the scanning process is finished.
Selecting a folder This function is only available in MP3 mode.
X
Switch on MP3 mode (Y page 221).
X Select Search by sliding VÆ and turning
cVd the COMAND controller and press
W to confirm.
X Select Folder by sliding VÆ and turning
cVd the COMAND controller and press
W to confirm.
You will see the tracks in the folder. Audio
225
COMAND Z
Page 230 of 536
X
Select Group by turning cVd and press
W to confirm.
The list of available groups appears. The
# dot indicates the group currently
selected.
X To exit the menu: slide XVY the COMAND
controller or press the % button.
Playback options The following options are available to you:
R
Normal Track Sequence
The tracks are played in the normal order
(e.g. track 1, 2, 3, etc.).
In
MP3 mode, the track order is determined
by the order in which the tracks are written
to the MP3 data carrier when it is created.
Alphabetical order is the most common.
Once all the tracks in a folder have been
played, the tracks in the next folder are
played.
R Medium Mix
All the tracks on the medium are played in
random order (e.g. track 3, 8, 5 etc.).
R Track List Mix (MP3 mode only)
All the tracks that are listed in the current
track list are played in random order.
X To select options: switch on audio CD/
DVD or MP3 mode ( Y page 221).
X Select CD, DVD-A
or MP3 by sliding VÆ and
turning cVd the COMAND controller and
press W to confirm.
The options list appears. The # dot
indicates the option selected.
X Select an option by turning cVd
and press
W to confirm.
The option is switched on. For all options
except "Normal track sequence", you will
see a corresponding display in the display/
selection window. See the example of the
display in audio CD mode ( Y page 221).
i The "Normal track sequence" option is
automatically selected when you change
the medium you are currently listening to or when you select a different medium. If
an option is selected, it remains selected
after COMAND is switched on or off.
Notes on MP3 mode Permissible discs
R
CD-R and CD-RW
R DVD+R and DVD+RW
R DVD-R and DVD-RW
R SD memory card:
R USB stick
R iPod ®
R MP3 player
Permissible file systems
R ISO 9660/Joliet standard for CDs
R UDF for audio and video DVDs
R FAT16 or FAT32 for storage media
Multisession CDs
For
multisession CDs, the content of the first
session determines how COMAND will
process the CD. COMAND plays only one
session and gives priority to the audio CD
session.
If possible, use COMAND to play only CDs
which have been written in one session.
File structure of a data carrier
When you create a disc with compressed
music files, the tracks can be organized in
folders. A folder may also contain subfolders.
A disc can contain a maximum of 255 folders.
Each folder can contain a maximum of
255 tracks and 255 subfolders.
The disc may contain no more than eight
directory levels. Files beyond the eighth level
will not be recognized by the system.
Track and file names
When you create a disc with compressed
music files, you can assign names to the
tracks and folders.
COMAND uses these names accordingly for
the display. Folders which contain data other 228
Audio
COMAND
Page 231 of 536
than MP3 or WMA tracks are not displayed by
COMAND.
If MP3 or WMA files are stored in the root
directory
itself, the root directory will also be
treated as a folder. COMAND will then show
the name of the root directory as the folder
name.
You must observe the following when
assigning track names:
R track names must have at least 1
character.
R track names must have the extension
"mp3" or "wma".
R there must be a full stop between the track
name and the extension.
Example of a correct track name:
"Track1.mp3".
i COMAND does not support ID3 tags.
Permissible formats
COMAND supports the following formats:
R Microsoft Windows Media Audio V2, V7, V8
and V9 (WMA)
Permissible bit and sampling rates
COMAND supports MP3 files of the following
types:
R fixed and variable bit rates from 32 kbit/s
to 320 kbit/s
R sampling rates of 8 kHz to 48 kHz
COMAND supports WMA files of the
following types:
R fixed bit rates from 5 kbit/s to 384 kbit/s
R sampling rates of 8 kHz to 48 kHz
COMAND does not support WMA files of the
following types:
R DRM (Digital Rights Management)
encrypted files
i Only use tracks with a bit rate of at least
128 kbit/s and a sampling rate of at least
44.1 kHz. Lower rates can cause a
noticeable deterioration in quality. This is
especially the case if you have activated a
surround sound function. Notes on copyright
MP3 or WMA tracks that you create or play
back are generally subject to copyright
protection in accordance with the applicable
international and national regulations.
In many countries, reproductions, even for
private use, are not permitted without the
prior consent of the copyright holder.
Make
sure that you know about the applicable
copyright regulations and that you comply
with these.
If you own these rights yourself, e.g. for your
own compositions and recordings, or if the
copyright holder has granted you permission,
these restrictions do not apply.
Notes on CDs/DVDs
Discs with copy protection are not
compatible with the audio CD standard and
therefore may not be able to be played by
COMAND.
There may be playback problems when
playing copied discs. There is a wide range of
data carriers, disc-writing software and
writers available. This variety means that
there is no guarantee that the system will be
able to play discs that you have copied
yourself.
There may be playback problems if you play
CDs that you have copied yourself with a
storage capacity of more than 700 MB. CDs
of this type do not conform to the currently
applicable standards.
i On many DVD audio discs, the last track
does not contain any music and COMAND
then switches to the next disc. This is
normal system behavior and does not mean
that there is a malfunction.
! Do not affix stickers or labels to the discs.
They could peel off and damage the drive.
The drive is designed to hold discs which
comply with the EN 60908 standard.
Therefore, you can only use discs with a
maximum thickness of 1.3 mm. Audio
229
COMAND Z
Page 235 of 536
X
Enter a name for the folder/track.
X To save the changes: select ¬ and
press W to confirm.
Deleting folders/tracks
X Select Rename/Delete Files by sliding
VÆ and turning cVd the COMAND
controller and press W to confirm.
X Select the folder/track by turning cVd.
X Select Options by sliding VY and press
W to confirm.
X Select Delete and press W to confirm.
A query appears. No is highlighted.
If you select Yes, the folders/tracks are
deleted. You see the Please wait...
message. Then, you see the Deletion
Successful message.
If
you select No, the process will be aborted.
Playback options The following options are available:
R
Normal Track Sequence
The tracks are played in the normal order
(e.g. track 1, 2, 3, etc.).
R Medium Mix
All the tracks on the medium are played in
random order.
R Track List Mix (MP3 mode only)
All the tracks that are listed in the current
track list are played in random order.
X To select options: switch on the MUSIC
REGISTER (Y page 230).
X Select Music
Register by sliding VÆ and
turning cVd the COMAND controller and
press W to confirm.
The options list appears. The # dot
indicates the option selected.
X Select an option and press W to confirm.
The option is switched on. All options
except Normal Track Sequence will be
indicated by a corresponding icon in the
display/selection window. i
The Normal Track Sequence option is
automatically selected when you change
the disc you are currently listening to or
when you select a different medium. If an
option
is selected, it remains selected after
COMAND is switched on or off. Media Interface mode
Connection options Overview
You will find the connection sockets in the
glove box.
Device-specific adapter cables are required
to connect external devices to the Media
Interface. These cables are included in the
Media Interface scope of delivery.
i
Store individual parts in a safe place.
Only use genuine Mercedes-Benz
connection cables.
You can connect the following data carriers
to COMAND via the Media Interface:
R iPod ®
R USB devices (USB sticks, USB hard drives,
MP3 players)
i iPod ®
is a registered trademark of Apple
Inc., Cupertino, California, USA.
Supported iPod ®
variants
The following are examples of supported
iPod ®
variants:
R iPod ®
nano
R iPod ®
classic
R iPod ®
touch
R iPhone ®
Supported USB devices
The following USB devices are supported:
R USB sticks (flash memory)
R USB hard drives requiring a startup/
permanent current of a maximum of Audio
233
COMAND Z