Center MERCEDES-BENZ S-Class SEDAN 2016 W222 Comand Manual
[x] Cancel search | Manufacturer: MERCEDES-BENZ, Model Year: 2016, Model line: S-Class SEDAN, Model: MERCEDES-BENZ S-Class SEDAN 2016 W222Pages: 298, PDF Size: 9.16 MB
Page 3 of 298
Welcome to the world of Mercedes-Benz
First, familiarize yourself with your COMAND
system. Read these operating instructions,
particularly the safety and warning notes,
before you drive off.
This will help you to obtain the maximum
pleasure from your COMAND system and to
avoid endangering yourself and others.
The equipment level and functions of your
COMAND system may differ depending on:
Rmodel
Rorder
Rcountry specification
Ravailability
Mercedes-Benz therefore reserves the right
to introduce changes in the following areas:
Rdesign
Requipment
Rtechnical features
The equipment in your vehicle may therefore
differ from that shown in the descriptions and
illustrations.
Consult an authorized Mercedes-Benz Center
if you have further questions.
The Operator's Manual and all supplements
are integral parts of the vehicle. You should
always keep it in the vehicle and pass it on to
the new owner if you sell the vehicle.
The technical documentation team at
Daimler AG wishes you safe and pleasant
motoring.
Mercedes-Benz USA, LLC
Mercedes-Benz Canada, Inc.
A Daimler Company
2225842104
É2225842104)ËÍ
Page 18 of 298
Declarations of conformity
Vehicl ecomponent swhich receive
and/o rtransmit radi owaves
USA only :The wireles sdevices of this vehicle
compl ywit hPar t15 of th eFCC Rules .Oper-
ation is subjec tto th efollowing tw ocondi-
tions:
1) These devices may no tcaus einterference,
and
2) These devices mus taccept any interfer-
ence ,includin ginterferenc ethat may caus e
undesired operation of th edevice.
Changes or modification sno texpressl y
approved by th eparty responsible fo rcom-
pliance could void th euser's authorit yto
operat eth eequipment.
Canad aonly :The wireles sdevices of this
vehicle compl ywit hIndustry Canada license-
exemp tRSS standard(s) .Operation is subjec t
to th efollowing tw oconditions:
1) These devices may no tcaus einterference,
and
2) These devices mus taccept any interfer-
ence ,includin ginterferenc ethat may caus e
undesired operation of th edevice.
Correct us e
GWARNING
Modification sto electronic components, their
software as well as wirin gcan impair their
function and/o rth efunction of other net-
worke dcomponents. In particular, systems
relevant to safet ycould also be affected. As a
result ,these may no longer function as inten-
ded and/o rjeopardiz eth eoperatin gsafet yof
th evehicle. There is an increase dris kof an
acciden tand injury.
Never tampe rwit hth ewirin gas well as elec -
tronic component sor their software .You
should hav eall wor kto electrical and elec -
tronic equipmen tcarrie dout at aqualified
specialis tworkshop .
Observeth efollowing information when usin g
COMAND:
Rth esafet ynote sin this manual
Rtraffic rule sand regulation s
Rlaws and safet ystandard spertainin gto
moto rvehicles
Roof antenna functionalit y(telephone, satel-
lit eradio, GPS )can be affecte dby th euse of
roof carrie rsystems .
Attachin gmetalized retrofit fil mto th ewind-
shield may affec tradio reception and hav e a
negative impact on all other antennas (e.g.
emergency antenna) in th evehicle interior.
Protection against theft :this devic eis
equipped wit htechnica
l provision sto protect
it against theft. Further information on pro -
tection against thef tcan be obtained from an
authorized Mercedes-Ben zCenter.
Qualified specialist workshop
Read th einformation on qualified specialist
workshop sin th evehicle Operator's Manual.
Function restrictions
Fo rsafet yreasons, som efunction sare
restricte dor unavailable whil eth evehicle is in
motion .You will notice this, fo rexample,
because either you will no tbe able to selec t
certain men uitems or amessage will appear
to this effect .
Datastored in th evehicle
Dat arecording
Thi svehicle is capable of recordin gdiagnostic
information relatin gto vehicle operation ,mal-
functions, and user settings. Thi smay include
information about th eperformanc eor status
of various systems ,includin gbut no tlimited
to ,engine, throttle, steerin gor brake sys-
tems ,that is stored and can be rea dout wit h
suitable devices, particularly when th evehi-
16Introduction
Page 23 of 298
Overview
Components
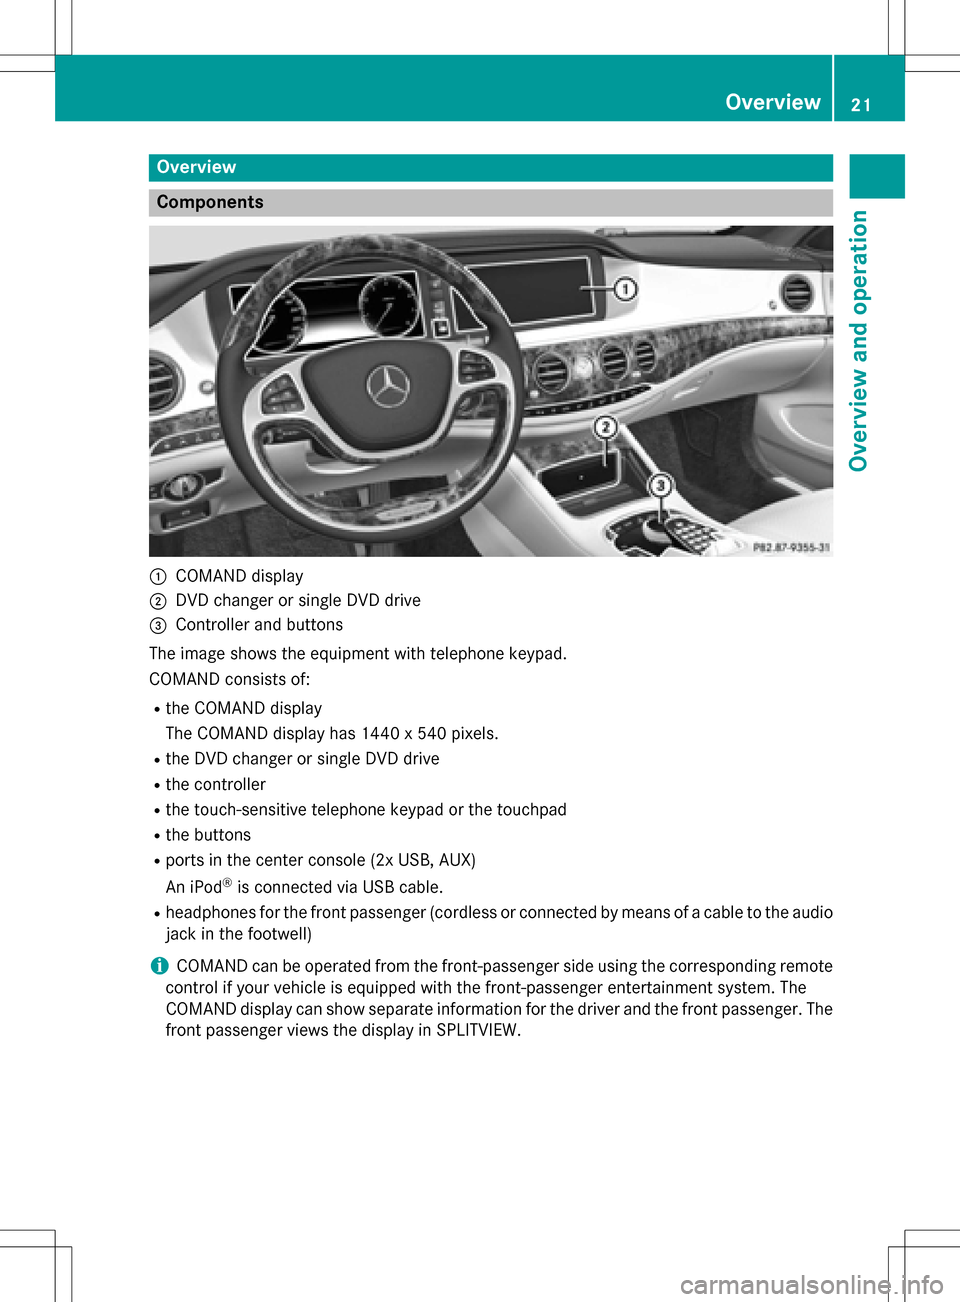
:COMAND display
;DVD changer or single DVD drive
=Controller and buttons
The image shows the equipment with telephone keypad.
COMAND consists of:
Rthe COMAND display
The COMAND display has 1440 x 540 pixels.
Rthe DVD changer or single DVD drive
Rthe controller
Rthe touch-sensitive telephone keypad or the touchpad
Rthe buttons
Rports in the center console (2x USB, AUX)
An iPod
®is connected via USB cable.
Rheadphones for the front passenger (cordless or connected by means of a cable to the audio
jack in the footwell)
iCOMAND can be operated from the front-passenger side using the corresponding remote
control if your vehicle is equipped with the front-passenger entertainment system. The
COMAND display can show separate information for the driver and the front passenger. The
front passenger views the display in SPLITVIEW.
Overview21
Overview and operation
Page 28 of 298
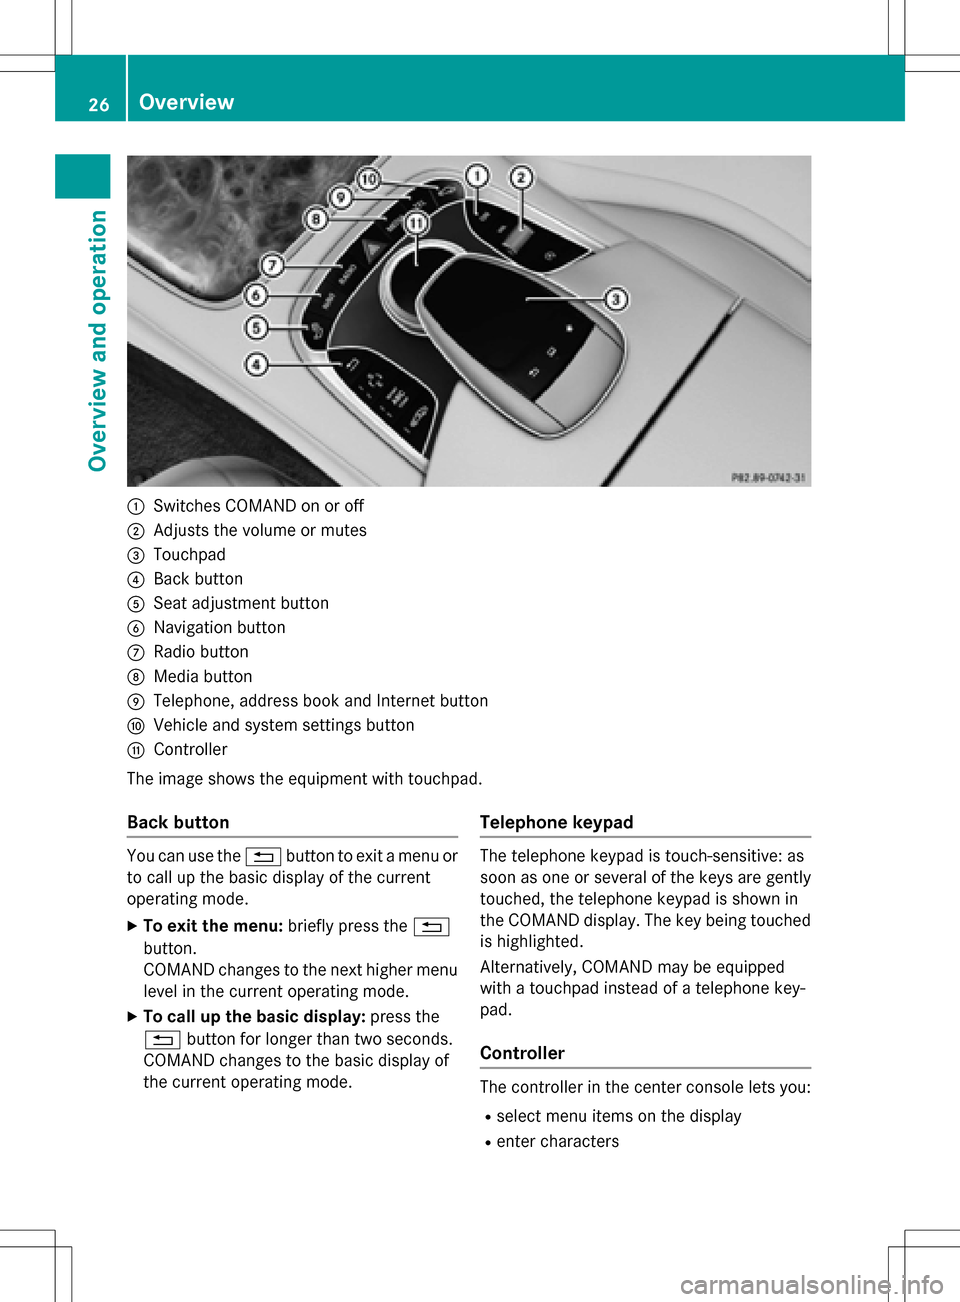
:Switches COMAND on or off
;Adjusts the volume or mutes
=Touchpad
?Back button
ASeat adjustment button
BNavigation button
CRadio button
DMedia button
ETelephone, address book and Internet button
FVehicle and system settings button
GController
The image shows the equipment with touchpad.
Back button
You can use the %button to exit a menu or
to call up the basic display of the current
operating mode.
XTo exit the menu: briefly press the%
button.
COMAND changes to the next higher menu
level in the current operating mode.
XTo call up the basic display: press the
% button for longer than two seconds.
COMAND changes to the basic display of
the current operating mode.
Telephone keypad
The telephone keypad is touch-sensitive: as
soon as one or several of the keys are gently
touched, the telephone keypad is shown in
the COMAND display. The key being touched
is highlighted.
Alternatively, COMAND may be equipped
with a touchpad instead of a telephone key-
pad.
Controller
The controller in the center console lets you:
Rselect menu items on the display
Renter characters
26Overview
Overview and operation
Page 29 of 298
Rselect a destination on the map
Rsave entries
The controller can be:
Rturned
Rslid left or right1
Rslid forwards or back 4
Rslid diagonally2
Rpressed briefly or pressed and held
Touchpad
Alternatively, COMAND may be equipped
with a touchpad instead of a telephone key-
pad.
As an alternative to the controller, the touch-
pad enables menu items to be selected and
character entry including handwriting recog-
nition, for example.
XTo activate the touchpad: press the sur-
face of the touchpad.
Further information (
Ypage 32).
Basic COMAND functions
Switching COMAND on/off
XPress the ubutton on the center con-
sole to the right of the controller.
When you switch on COMAND, a warning
message will appear. COMAND calls up the
previously selected menu.
If you switch off COMAND, playback of the current media source will also be switched
off.
Adjusting the volume
Adjusting the volume for media sources
XTurn the thumbwheel to the right of the
controller.
or
XPress the WorX button on the mul-
tifunction steering wheel.
The volume of the media source currently
selected changes.
Adjusting the volume for traffic
announcements and navigation
announcements
During traffic or navigation announcements:
XTurn the thumbwheel to the right of the
controller.
or
XPress the WorX button on the mul-
tifunction steering wheel.
iYou can set the volume for navigation
announcements to be different from the
volume of the respective media source.
Adjusting the volume for phone calls
You can adjust the volume for hands-free
mode during a telephone call.
XTurn the thumbwheel to the right of the
controller.
or
XPress the WorX button on the mul-
tifunction steering wheel.
iSetting the volume for the Voice Control
System voice output, see the separate
operating instructions.
Basic COMAND functions27
Overview and operation
Page 40 of 298
You can select from the following media:
MEDIUMFunction/location
AUXDevices that are
connected to the
AUX socket. The
AUX socket is loca-
ted under the center
console armrest in
the rear compart-
ment.
COMAND discCDs or DVDs that
are inserted into
COMAND at the
front of the vehicle.
COMAND memory
cardMemory card inser-
ted into COMAND in
the front compart-
ment.
COMAND Media
InterfaceDevices inserted
into the USB ports at
the front of the vehi-cle.
DiscCD or DVD inserted
into the rear-com-
partment drive.
Media RegisterMedia found in the
MEDIA REGISTER.
Media Interface 1
Media Interface 2Devices connected
to USB ports 1 and
2. USB ports 1 and 2
are located under
the center console
armrest in the rear
compartment.
Bluetooth AudioDevices connected
with COMAND via
Bluetooth
®.
TVTelevision
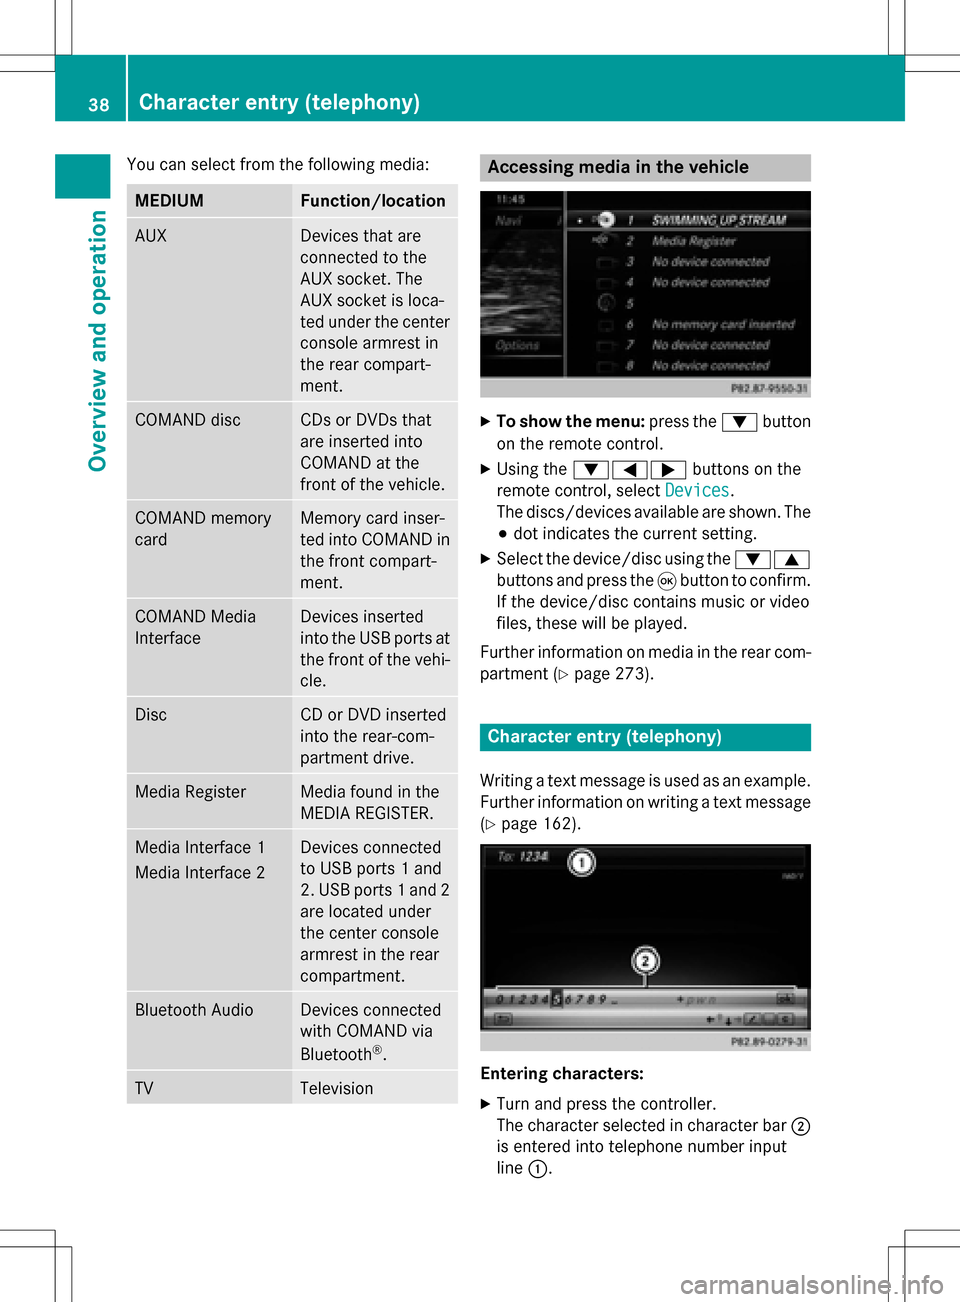
Accessing media in the vehicle
XTo show the menu: press the:button
on the remote control.
XUsing the :=; buttons on the
remote control, select Devices
.
The discs/devices available are shown. The
# dot indicates the current setting.
XSelect the device/disc using the :9
buttons and press the 9button to confirm.
If the device/disc contains music or video
files, these will be played.
Further information on media in the rear com- partment (
Ypage 273).
Character entry (telephony)
Writing a text message is used as an example.
Further information on writing a text message
(
Ypage 162).
Entering characters:
XTurn and press the controller.
The character selected in character bar ;
is entered into telephone number input
line :.
38Character entry (telephony)
Overview and operation
Page 61 of 298
XTo enter the 4-digit PIN and select¬:
turn and press the controller.
You will be prompted to enter the PIN
again.
XEnter the PIN again and select ¬.
The PIN prompt now protects your personal
data from unwanted export.
iIf you deactivate your PIN protection, you
will first be prompted to enter your PIN. If
you have forgotten your PIN, an authorized
Mercedes-Benz Center can deactivate your
PIN protection for you. Alternatively, you
can deactivate PIN protection by resetting
your personal COMAND data
(
Ypage 59).
Importing/exporting data
XInsert the SD memory card (Ypage 217).
or
XConnect a USB device (e.g. a USB memory
stick) (
Ypage 217).
XPress the Øbutton.
or
XPress Vehiclein the main function bar.
The vehicle menu is displayed.
XTo select SystemSettings: slide6and
press the controller.
A menu appears.
XTo select Data Import/Export: turn and
press the controller.
XSelect Import DataorExport Data.
iIf you import data such as address data,
the existing data on COMAND is overwrit- ten. You will see a message to this effect.
COMAND is restarted after the data import.
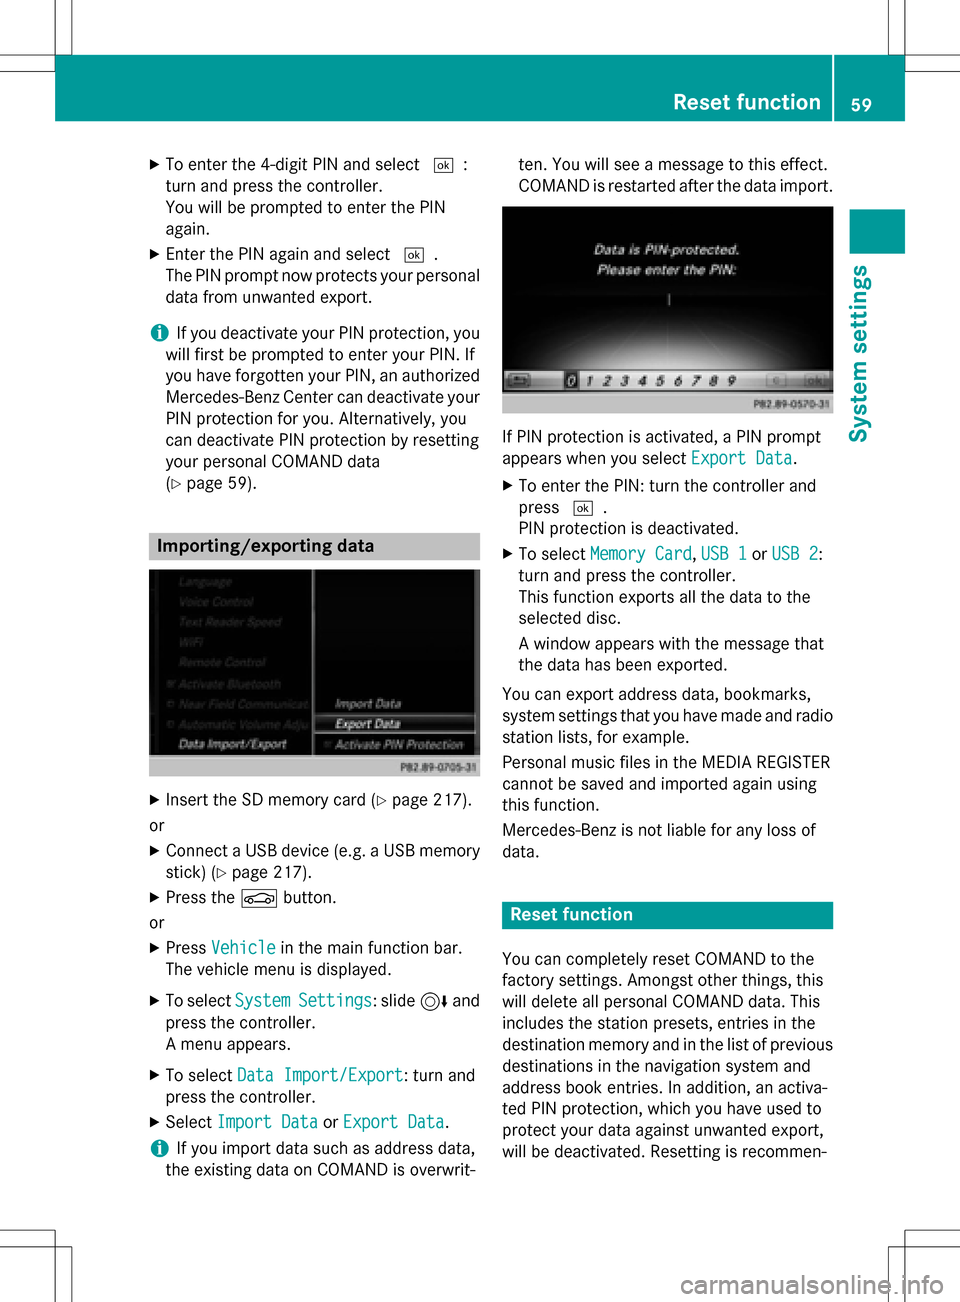
If PIN protection is activated, a PIN prompt
appears when you select
Export Data
.
XTo enter the PIN: turn the controller and
press¬.
PIN protection is deactivated.
XTo select Memory Card,USB 1or USB 2:
turn and press the controller.
This function exports all the data to the
selected disc.
A window appears with the message that
the data has been exported.
You can export address data, bookmarks,
system settings that you have made and radio
station lists, for example.
Personal music files in the MEDIA REGISTER
cannot be saved and imported again using
this function.
Mercedes-Benz is not liable for any loss of
data.
Reset function
You can completely reset COMAND to the
factory settings. Amongst other things, this
will delete all personal COMAND data. This
includes the station presets, entries in the
destination memory and in the list of previous
destinations in the navigation system and
address book entries. In addition, an activa-
ted PIN protection, which you have used to
protect your data against unwanted export,
will be deactivated. Resetting is recommen-
Reset function59
System settings
Z
Page 90 of 298
Address entryoptions
Examples of how you can ente ran address :
RCity/ZIP, street, hous enumber
RCity/ZIP, stree t
RCity/ZIP, center
RCity/ZIP, street, intersection
RStreet, City/ZIP, hous enumber
RStreet, City/ZIP, intersection
The address can be entered faste rby enterin g
th estree tbefore th ecit yif th eaddress has an
unusual stree tname.
Whil eenterin gan address ,you can also
switch to other destination entr yoptions:
RKeyword search (Ypage 91)
RMap(Ypage 97)
RPOI (Ypage 93)
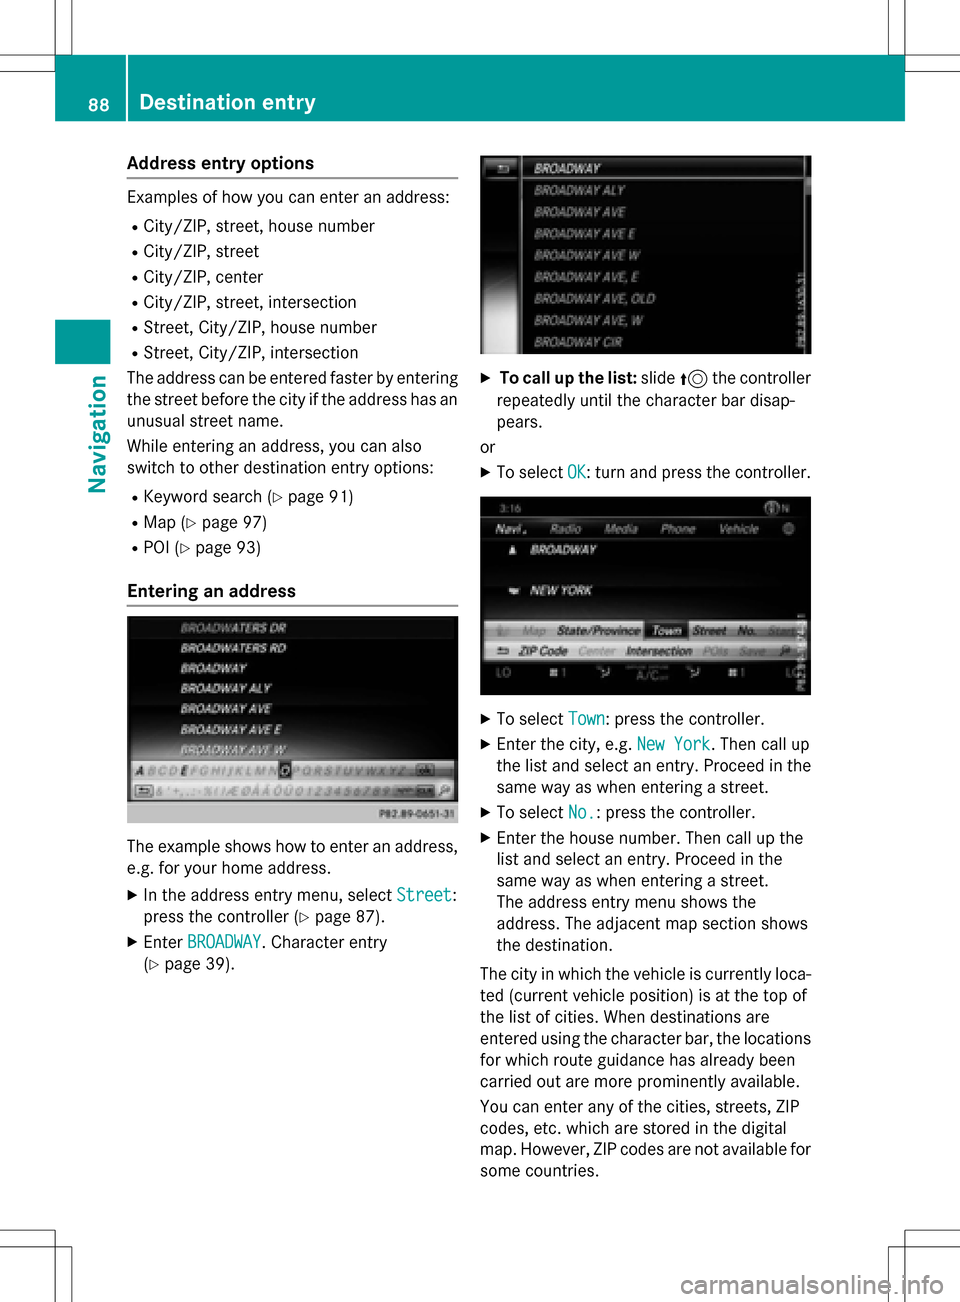
Entering an address
The exampl eshows how to ente ran address ,
e.g. for your hom eaddress .
XIn theaddress entr ymenu, select Street:
press th econtroller (
Ypage 87).
XEnterBROADWAY.Character entr y
(
Ypage 39).
XTo call up th elist :slide 5thecontroller
repeatedly until th echaracte rbar disap -
pear s.
or
XTo select OK:tur nand press th econtroller .
XTo select Town:press th econtroller .
XEnterth ecity, e.g. New York.The ncall up
th elist and select an entry. Proceed in th e
sam eway as when enterin g astreet.
XTo select No.:press th econtroller .
XEnterth ehous enumber .The ncall up th e
list and select an entry. Proceed in th e
sam eway as when enterin g astreet.
The addr essentr ymen u shows th e
address .The adjacent map section shows
th edestination .
The cit yin whic hth evehicl eis currentl yloca-
te d(curren tvehicl eposition )is at th eto pof
th elist of cities. When destination sare
entered usin gth echaracte rbar, th elocation s
for whic hrout eguidance has already been
carrie dout are mor eprominentl yavailable.
You can ente rany of th ecities, streets , ZIP
codes, etc. whic hare store din th edigital
map. However, ZIP codes are no tavailable for
som ecountrie s.
88Destination entry
Navigation
Page 91 of 298
State/province and city are sufficient to start
navigating. You can enter either a city or a ZIP
code. The street and house number complete
the destination address.
Entering additional address data
You can enter additional address data:
RState/province
You can useLast Used
to select the last
selected state (USA) or province (Canada). You can also select Mexico and The Baha-
mas.
RZIP code
Entering a ZIP code will delete a previously
entered city.
RCenter
Entering a center will delete a previously
entered street.
RIntersection
Entering an intersection will delete a previ-
ously entered house number.
XSelect the address entry menu (Ypage 87).
XTo select: State/Province,ZIP Code,
Ctr.
or Intersectionturn, slide 6and
press the controller.
XSelect an entry (Ypage 88).
Saving an address
You can store the addressed entered as:
Rhome address in the address book
Ra navigable address book contact
For further information on the address
book, see (
Ypage 166)
Ra personal destination on the SD memory
card (
Ypage 121)
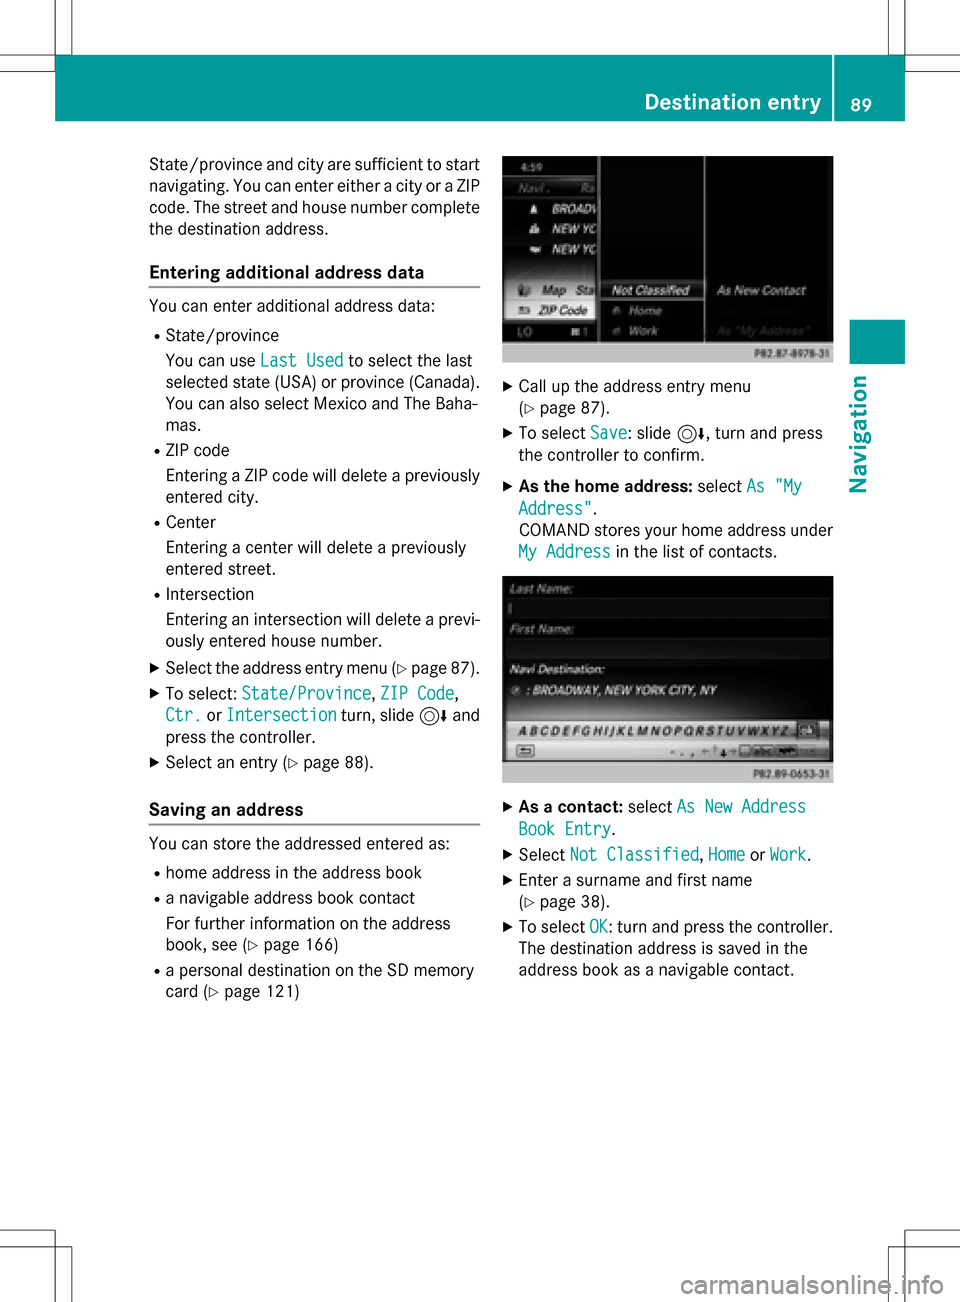
XCall up the address entry menu
(
Ypage 87).
XTo select Save: slide6, turn and press
the controller to confirm.
XAs the home address: selectAs "My
Address".
COMAND stores your home address under
My Address
in the list of contacts.
XAs a contact: selectAs New Address
Book Entry.
XSelect Not Classified,Homeor Work.
XEnter a surname and first name
(
Ypage 38).
XTo select OK: turn and press the controller.
The destination address is saved in the
address book as a navigable contact.
Destination entry89
Navigation
Z
Page 125 of 298
Map functions
General notes
Company logos displayed on the map are trademarks of the respective companies and used
solely for the purpose of indicating the locations of these companies. The use of such logos on
the map does not indicate approval of, support of or advertising by these companies for the
navigation system itself.
iEquipment with a touchpad: alternatively you can carry out this operation using the touch-
pad (
Ypage 32).
Map settings
Setting the map scale
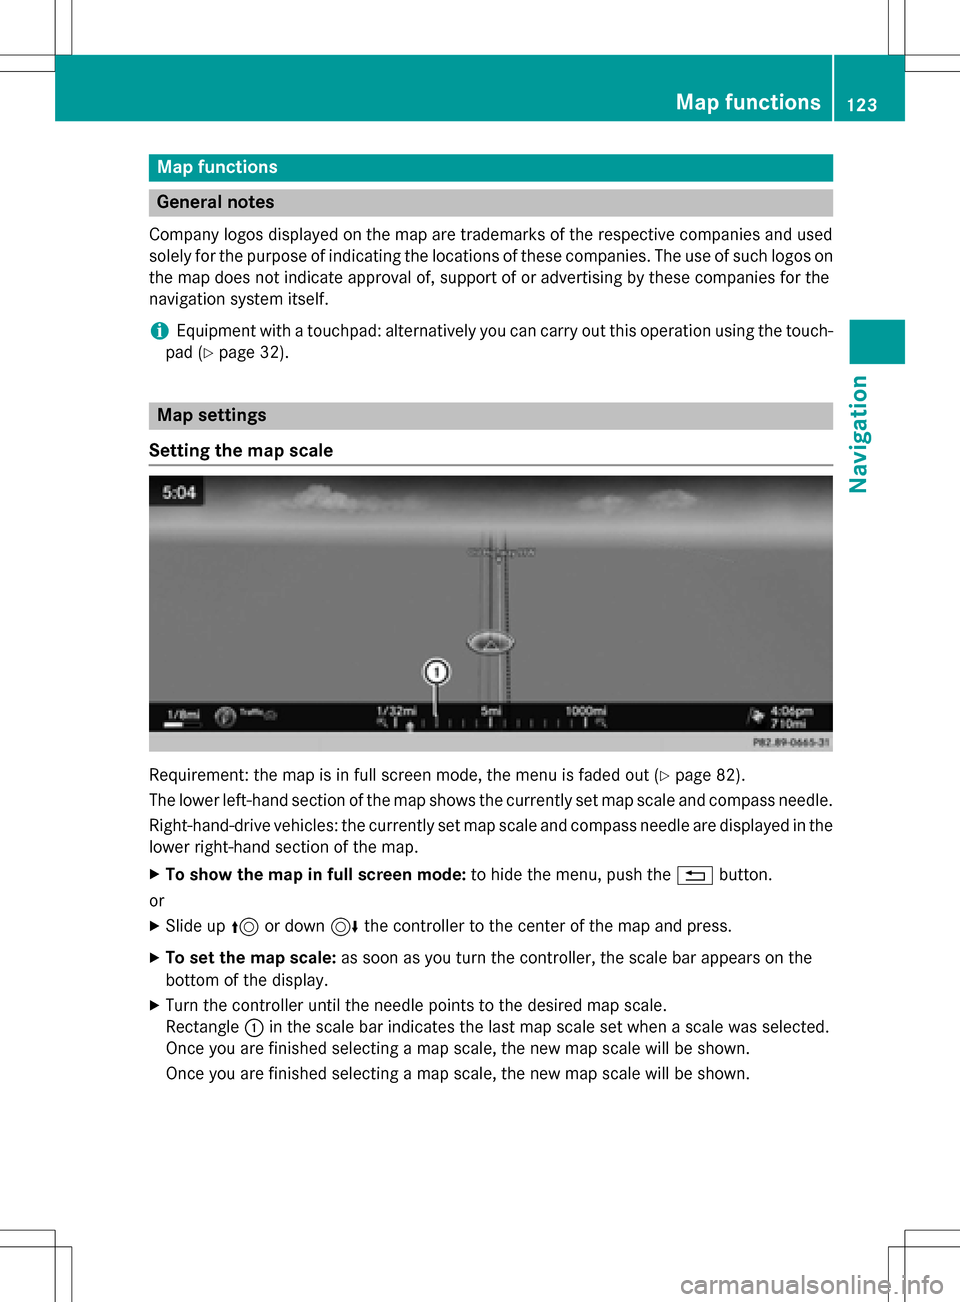
Requirement: the map is in full screen mode, the menu is faded out (Ypage 82).
The lower left-hand section of the map shows the currently set map scale and compass needle.
Right-hand-drive vehicles: the currently set map scale and compass needle are displayed in the
lower right-hand section of the map.
XTo show the map in full screen mode: to hide the menu, push the%button.
or
XSlide up 5or down 6the controller to the center of the map and press.
XTo set the map scale: as soon as you turn the controller, the scale bar appears on the
bottom of the display.
XTurn the controller until the needle points to the desired map scale.
Rectangle :in the scale bar indicates the last map scale set when a scale was selected.
Once you are finished selecting a map scale, the new map scale will be shown.
Once you are finished selecting a map scale, the new map scale will be shown.
Map functions123
Navigation
Z