battery light MERCEDES-BENZ S-Class SEDAN 2016 W222 Owner's Manual
[x] Cancel search | Manufacturer: MERCEDES-BENZ, Model Year: 2016, Model line: S-Class SEDAN, Model: MERCEDES-BENZ S-Class SEDAN 2016 W222Pages: 438, PDF Size: 10.93 MB
Page 6 of 438
Anti-Theft Alarm systemsee ATA (Anti-Theft Alarm system)
Arm rest
St owage compartment .................. 327
Asht ray.............................................. .334
Assistance display (on-board com-
puter) ..................................................2 68
Assistance menu (on-board com-
puter) ..................................................2 69
ASSYST PLUS
Displaying a service message ........3 58
Hiding a service message .............. 358
Resetting the service interval dis-
play ................................................ 358
Service message ............................ 357
Special service requirements ......... 358
ATA (Anti-Theft Alarm system)
Activating/deactivating ................... 78
Function ...........................................7 8
Switching off the alarm .................... 78
ATTENTION ASSIST
Activating/deactivating ................. 271
Display message ............................ 299
Function/notes ............................. 228
Authorized Mercedes-Benz Center
see Qualified specialist workshop
Authorized workshop
see Qualified specialist workshop
AUTO lights
Display message ............................ 293
see Lights
Automatic car wash (care) ............... 359
Automatic engine start (ECO start/
stop function) .................................... 167
Automatic engine switch-off (ECO
start/stop function) .......................... 166
Automatic headlamp mode .............. 130
Automatic transmission
Accelerator pedal position ............. 173
Automatic drive program ............... 174
Changing gear ............................... 173
DIRECT SELECT lever ..................... 170
Display message ............................ 308
Driving tips .................................... 173
Emergency running mode .............. 177
Engaging drive pos itio
n .................. 171
Engaging neutral ............................ 171 Engaging park position automati-
cally ............................................... 170
Engaging reverse gear ................... 171
Engaging the park position ............ 170
Kickdown ....................................... 173
Manual drive program .................... 174
Manual drive program (Mercedes-
AMG vehicles) ................................ 175
Oil temperature (on-board com-
puter, Mercedes-AMG vehicles) ..... 275
Overview ........................................ 170
Problem (malfunction) ................... 177
Program selector button ................ 173
Pulling away ................................... 165
Starting the engine ........................ 164
Steering wheel paddle shifters ...... 174
Transmission position display ........ 172
Transmission positions .................. 172
Automatic transmission emer-
gency mode ....................................... 177
B
BAS (Brake Assist System) ................. 69
BAS PLUS (Brake Assist System
PLUS) with Cross-Traffic Assist
Function/notes ................................ 69
BAS PLUS with Cross-Traffic Assist
(Brake Assist PLUS with Cross-
Traffic Assist)
Important safety notes .................... 69
Battery (high-voltage)
see High-voltage battery
Battery (SmartKey)
Checking .......................................... 82
Important safety notes .................... 82
Replacing ......................................... 82
Battery (vehicle)
Charging ........................................ 374
Display message ............................ 295
Important safety notes .................. 372
Jump starting ................................. 376
Belt
see Seat belts
Belt bag ................................................ 48
Blind Spot Assist
see Active Blind Spot Assist
4Index
Page 8 of 438
Removing...................................... .185
Storing ...........................................1 83
Warming up ................................... 182
Charging the high-voltage battery
(important safety notes) ................... 180
Chauffeur mode
Display message ............................ 310
Fully reclined position .................... 114
General notes ................................ 111
Installing the head restraint ........... 113
Moving front-passenger seat into
the chauffeur position .................... 112
Moving the front-passenger seat
into the normal position ................. 113
Removing the head restraint .......... 113
Child
Restraint system .............................. 62
Child seat
Forward-facing restraint system ...... 66
LATCH-type (ISOFIX) child seat
anchors ............................................ 63
On the front-passenger seat ............ 65
Rearward-facing restraint system .... 66
Top Tether ....................................... 64
Child-proof locks
Important safety notes .................... 66
Rear doors ....................................... 67
Children
Special seat belt retractor ............... 62
Cigarette lighter ................................ 335
Cleaning
Mirror turn signal ........................... 362
Climate control
Automatic climate control ............. 141
Controlling automatically ............... 147
Cooling with air dehumidification .. 146
Defrosting the windows ................. 151
Defrosting the windshield .............. 151
ECO start/stop function ................ 145
General notes ................................ 140
Immediate pre-entry climate con-
trol ................................................. 158
Indicator lamp ................................ 147
Ionization ....................................... 155
Notes on using the automatic cli-
mate control .................................. 145
Overview of systems ...................... 140
Perfume atomizer .......................... 153 Pre-entry climate control at
departure time ............................... 157
Pre-entry climate control via
key ... 155
P
roblem with the rear window
defroster ........................................ 152
Problems with cooling with air
dehumidification ............................ 147
Rear control panel ......................... 141
Refrigerant ..................................... 432
Refrigerant filling capacity ............. 432
Setting the air distribution ............. 149
Setting the air vents ...................... 158
Setting the airflow ......................... 150
Setting the climate mode ............... 148
Setting the temperature ................ 148
Switching air-recirculation mode
on/off ............................................ 152
Switching on/off ........................... 145
Switching residual heat on/off ...... 152
Switching the rear window
defroster on/off ............................ 151
Switching the synchronization
function on and off ........................ 150
Climate control system
Climate control .............................. 145
Cockpit
Overview .......................................... 32
COLLISION PREVENTION ASSIST
PLUS
Activating/deactivating ................. 270
Display message ............................ 284
Operation/notes .............................. 71
COMAND display
Cleaning ......................................... 364
Combination switch .......................... 131
Consumption statistics (on-board
computer) .......................................... 262
Convenience closing feature .............. 96
Convenience opening feature ............ 95
Coolant (engine)
Checking the level ......................... 356
Display message ............................ 294
Displaying the temperature (on-
board computer) ............................ 269
Filling capacity ............................... 431
Important safety notes .................. 431
Temperature gauge ........................ 257
Warning lamp ................................. 320
6Index
Page 11 of 438
ECO displayFunction/notes ............................ .193
On-board computer ....................... 262
ECO start/stop function
Automatic engine start .................. 167
Automatic engine switch-off .......... 166
Deactivating/activating ................. 167
General information ....................... 166
Important safety notes .................. 166
Introduction ................................... 166
Electronic Stability Program
see ESP
®(Electronic Stability Program)
Emergency
Automatic measures after an acci-
dent ................................................. 61
Emergency release
Driver's door ....................................8 7
Trunk ............................................... 94
Vehicle ............................................. 87
Emergency Tensioning Devices
Activation ......................................... 57
Emissions control
Service and warranty information ....2 5
Engine
Check Engine warning lamp .......... .320
Display message ............................ 294
ECO start/stop function ................ 166
Engine number ............................... 427
Irregular running ............................ 169
Jump-starting ................................. 376
Starting (important safety notes) ... 164
Starting problems .......................... 169
Starting the engine with the
SmartKey ....................................... 164
Starting via smartphone ................ 164
Starting with the Start/Stop but-
ton ................................................. 164
Switching off .................................. 190
Switching off with the Start/Stop
button ............................................ 190
Switching off with the vehicle key .. 190
Tow-starting (vehicle) ..................... 381
Engine electronics
Problem (malfunction) ................... 169
Engine oil
Adding ...........................................3 55
Additives ........................................ 430
Checking the oil leve l ..................... 353 C
hecking the oil level using the
dipstick .......................................... 353
Checking the oil level using the
on-board computer ........................ 355
Display message ............................ 296
Filling capacity ............................... 430
General notes ................................ 429
Notes about oil grades ................... 429
Notes on oil level/consumption .... 353
Temperature (on-board computer,
Mercedes-AMG vehicles) ...............2 75
Viscosity ........................................ 430
ESP
®(Electronic Stability Pro-
gram)
AMG menu (on-board computer) ... 276
Characteristics ................................. 73
Deactivating/activating ................. 269
Deactivating/activating (notes) ....... 74
Display message ............................ 278
Function/notes ................................ 73
General notes .................................. 73
Important safety information ........... 73
Trailer stabilization ........................... 74
Warning lamp ................................. 317
ETS/4ETS (Electronic Traction Sys-
tem) ...................................................... 73
Exhaust
see Exhaust pipe
Exhaust check ................................... 193
Exhaust pipe
Cleaning ......................................... 363
Exhaustive discharging (high-volt-
age battery) ....................................... 374
Exterior lighting
Cleaning ......................................... 362
see Lights
Exterior mirrors
Adjusting ....................................... 123
Dipping (automatic) ....................... 124
Folding in/out (automatically) ....... 124
Folding in/out (electrically) ........... 124
Out of position (troubleshooting) ... 124
Setting ........................................... 124
Storing settings (memory func-
tion) ............................................... 126
Storing the parking position .......... 125
Eyeglasses compartment ................. 326
Index9
Page 13 of 438
High-voltage batteryBattery care ................................... 182
Charging (charging station) ............ 186
Charging (mains socket) ................1 83
Charging (wallbox) ......................... 185
Charging cable warming ................ 182
Cruise range .................................. 182
Energy consumption ......................1 82
General notes .................................. 43
Method of operation ......................1 81
Outside temperatures .................... 182
Overvoltage protection .................. 182
Problems with the charging proc-
ess ................................................. 187
Terms of use .................................. 182
Vehicle fire ....................................... 43
Hill start assist .................................. 165
HOLD function
Activating ....................................... 209
Activation conditions ..................... 209
Deactivating ................................... 209
Display message ............................ 303
Function/notes .............................2 08
General notes ................................ 208
Hood
Closing ...........................................3 53
Display message ............................ 310
Important safety notes .................. 352
Opening ......................................... 352
Horn ...................................................... 32
HUD
see Head-up display
Hybrid drive system
Automatic switch off ........................ 42
Danger of electric shock .................. 42
Display message ............................ 297
General notes .................................. 42
High-voltage battery ........................ 43
Important safety notes .................... 42
Manual switch off ............................ 42
Opening the hood ............................ 43
Warning lamp ................................. 315
Hybrid vehicles
Important safety notes .................... 42
Hydroplaning ..................................... 196I
Ignition lock
see Key positions
Immobilizer .......................................... 78
Indicator and warning lamps
COLLISION PREVENTION ASSIST
PLUS .............................................. 322
Indicator lamps
see Warning and indicator lamps
Indicators
see Turn signals
Instrument cluster
Overview .......................................... 33
Warning and indicator lamps ........... 34
Instrument cluster lighting .............. 256
Interior lighting
Control ...........................................1 35
Emergency lighting ........................ 135
Overview ........................................ 134
Reading lamp ................................. 134
J
Jack
Using ............................................. 406
Jump starting (engine) ......................376
K
Key positions
SmartKey ....................................... 162
Start/Stop button .......................... 162
KEYLESS-GO
Convenience closing feature ............ 96
Deactivation ..................................... 80
Locking ............................................ 80
Start function ................................... 81
Unlocking ......................................... 80
Kickdown
Driving tips ....................................1 73
Knee bag .............................................. 52
L
Lamps
see Warning and indicator lamps
Lane Keeping Assist
see Active Lane Keeping Assist
Index11
Page 45 of 438
Deactivate the hybrid system manually if:
Rthe6 restraint system warning lamp in the
instrument cluster lights up after an accident
Rthe vehicle is badly damaged, e.g. after an
accident, and the restraint system compo-
nents were not activated
Rthe vehicle is badly damaged and has to be
towed or transported
XIf possible, move the vehicle out of the
danger zone: shift the automatic transmis-
sion into position N.
XRelease the electric parking brake.
XRoll the vehicle to a safe place and park it
safely.
Get assistance from others if necessary.
iThe vehicle is locked automatically when
the ignition is switched on and the wheels are
turning. There is therefore a risk of being
locked out if the vehicle is being pushed or
tested on a dynamometer.
XSwitch the ignition off.
XShift the automatic transmission to park posi-
tion P(Ypage 170).
Depress the electric parking brake
(
Ypage 190).
Secure the vehicle against rolling away
(
Ypage 406).
XTo use the high-voltage switch-off device:
open the trunk lid.
XLift the trunk floor upwards (Ypage 329).
XRemove the right-hand paneling in the trunk.
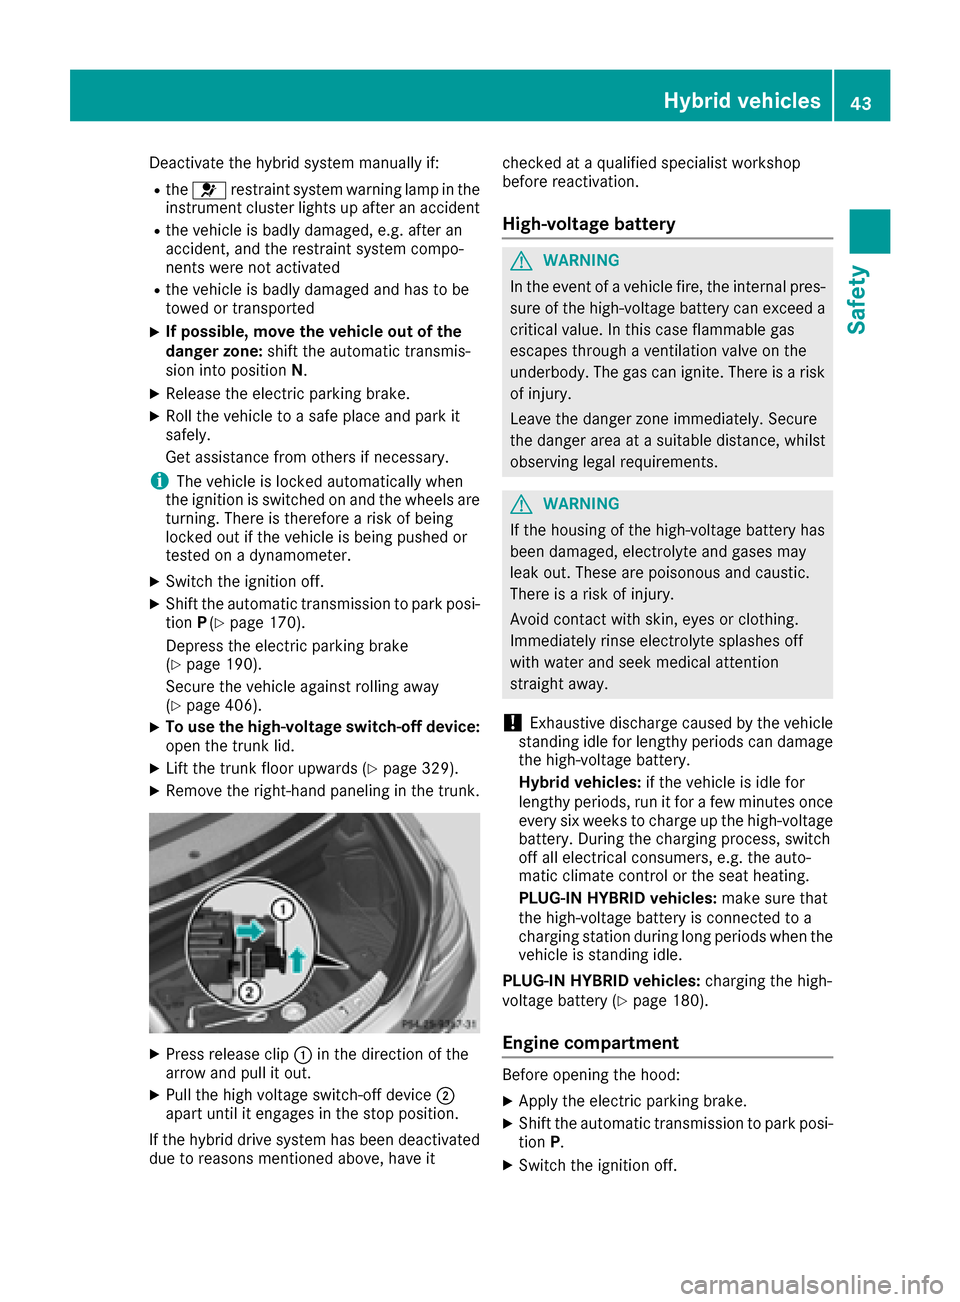
XPress release clip :in the direction of the
arrow and pull it out.
XPull the high voltage switch-off device ;
apart until it engages in the stop position.
If the hybrid drive system has been deactivated
due to reasons mentioned above, have it checked at a qualified specialist workshop
before reactivation.
High-voltage battery
GWARNING
In the event of a vehicle fire, the internal pres- sure of the high-voltage battery can exceed a
critical value. In this case flammable gas
escapes through a ventilation valve on the
underbody. The gas can ignite. There is a risk
of injury.
Leave the danger zone immediately. Secure
the danger area at a suitable distance, whilst
observing legal requirements.
GWARNING
If the housing of the high-voltage battery has
been damaged, electrolyte and gases may
leak out. These are poisonous and caustic.
There is a risk of injury.
Avoid contact with skin, eyes or clothing.
Immediately rinse electrolyte splashes off
with water and seek medical attention
straight away.
!Exhaustive discharge caused by the vehicle
standing idle for lengthy periods can damage
the high-voltage battery.
Hybrid vehicles: if the vehicle is idle for
lengthy periods, run it for a few minutes once every six weeks to charge up the high-voltage
battery. During the charging process, switch
off all electrical consumers, e.g. the auto-
matic climate control or the seat heating.
PLUG-IN HYBRID vehicles: make sure that
the high-voltage battery is connected to a
charging station during long periods when the
vehicle is standing idle.
PLUG-IN HYBRID vehicles: charging the high-
voltage battery (
Ypage 180).
Engine compartment
Before opening the hood:
XApply the electric parking brake.
XShift the automatic transmission to park posi-
tion P.
XSwitch the ignition off.
Hybrid vehicles43
Safety
Z
Page 83 of 438
conserving battery power. For the purposes of
activation/deactivation, the vehicle must not be
nearby.
XTo deactivate:press the&button on the
SmartKey twice in rapid succession.
The battery check lamp (
Ypage 82) of the
SmartKey flashes twice briefly and lights up
once, then KEYLESS-GO is deactivated .
XTo activate: press any button on the Smart-
Key.
or
XInsert the SmartKey into the ignition lock.
KEYLESS-GO and all of its associated features
are available again.
KEYLESS-GO start function
General notes
Bear in mind that the engine can be started by
any of the vehicle occupants if there is a Smart-
Key in the vehicle (
Ypage 164).
Changing the settings of the locking
system
You can change the settings of the locking sys-
tem. This means that only the driver's door and
the fuel filler flap are unlocked when the vehicle
is unlocked. This is useful if you frequently travel
on your own.
XTo change the setting: press and hold down
the % and& buttons simultaneously
for approximately six seconds until the bat-
tery check lamp flashes twice (
Ypage 82).
If the setting of the locking system is changed
within the signal range of the vehicle, pressing
the & or% button:
Rlocks or
Runlocks the vehicle
The SmartKey now functions as follows:
XTo unlock: press the%button once.
XTo unlock centrally: press the%button
twice.
XTo lock: press the &button. The KEYLESS-GO function is changed as fol-
lows:
XTo unlock the driver's door:
touch the inner
surface of the door handle on the driver's
door.
XTo unlock centrally: touch the inner surface
of the door handle on the front-passenger
door or the rear door.
XTo lock centrally: touch the outer sensor
surface on one of the door handles.
XTo restore the factory settings: press and
hold the %and& buttons simultane-
ously for approximately six seconds until the
battery check lamp flashes twice
(
Ypage 82).
Mechanical key
General notes
If the vehicle can no longer be locked or
unlocked with the SmartKey or KEYLESS-GO,
use the mechanical key.
If you use the mechanical key to unlock and
open the driver's door, the anti-theft alarm sys-
tem will be triggered. Switch off the alarm
(
Ypage 78).
If you unlock the vehicle using the mechanical
key, the fuel filler flap will not be unlocked auto-
matically.
XTo unlock the fuel filler flap: insert the
SmartKey into the ignition lock.
Removing the mechanical key
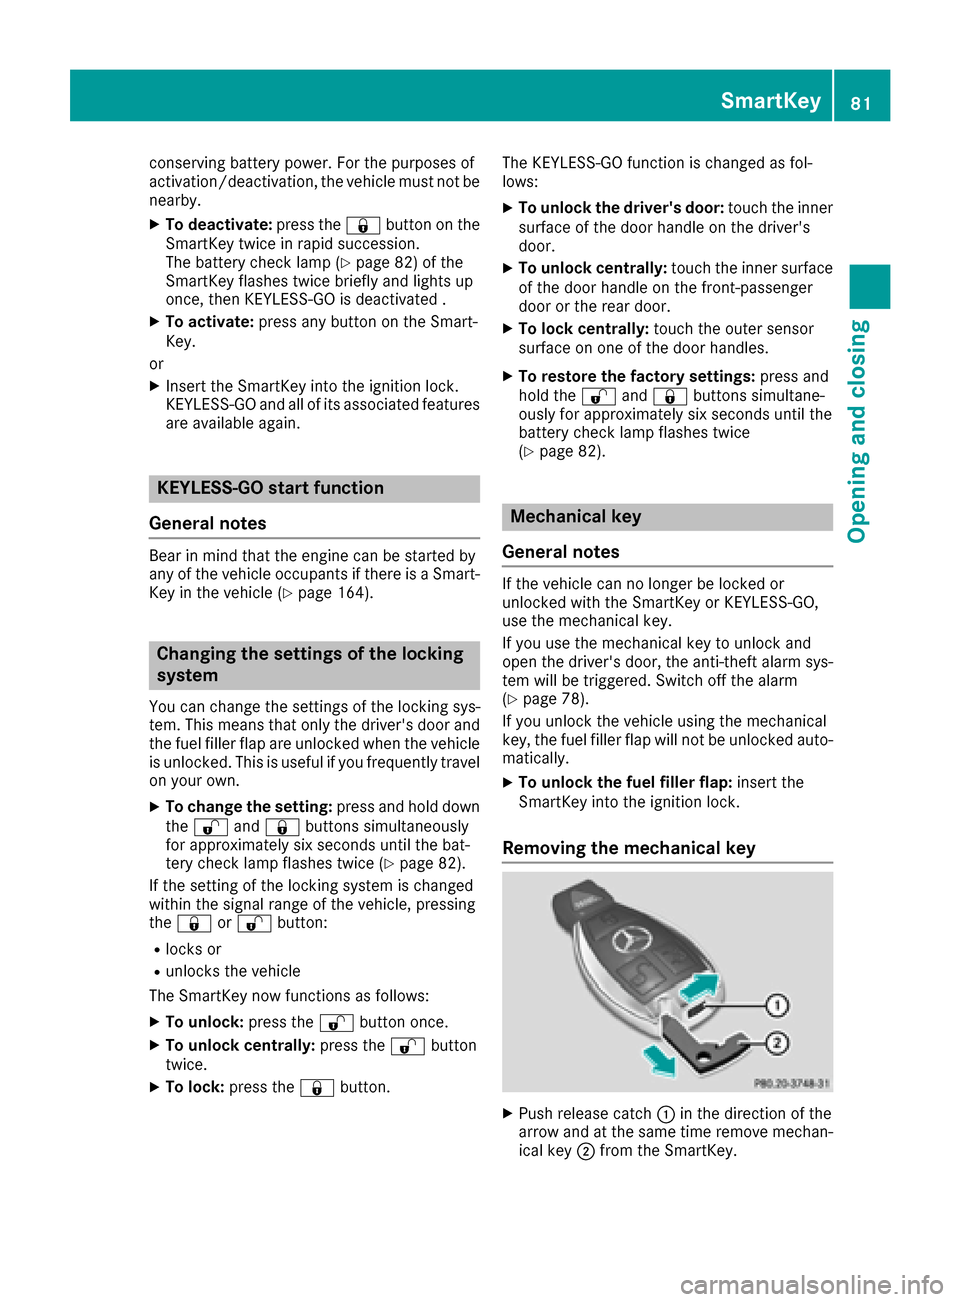
XPush release catch :in the direction of the
arrow and at the same time remove mechan- ical key ;from the SmartKey.
SmartKey81
Opening and closing
Z
Page 84 of 438
For further information about:
Runlocking the driver's door (Ypage 87)
Runlocking the trunk (Ypage 93)
Rlocking the vehicle (Ypage 88)
Inserting the mechanical key
XPush mechanical key;completely into the
SmartKey until it engages and release
catch :is back in its basic position.
SmartKey battery
Important safety notes
GWARNING
Batteries contain toxic and corrosive substan- ces. If batteries are swallowed, it can result in
severe health problems. There is a risk of fatalinjury.
Keep batteries out of the reach of children. If
a battery is swallowed, seek medical attention immediately.
HEnvironmental note
Batteries contain dangerous
substances. It is against the
law to dispose of them with
the household rubbish. They
must be collected separatelyand recycled to protect the
environment.
Dispose of batteries in an
environmentally friendly
manner. Take discharged
batteries to a qualified spe-
cialist workshop or a special
collection point for used bat-
teries.
The SmartKey batteries contain perchlorate
material, which may require special handling
and regard for the environment. National guide-
lines must be observed during disposal. In Cal-
ifornia, see www.dtsc.ca.gov/
HazardousWaste/Perchlorate/index.cfm .Mercedes-Benz recommends that you have the
batteries replaced at a qualified specialist work-
shop.
Checking the battery
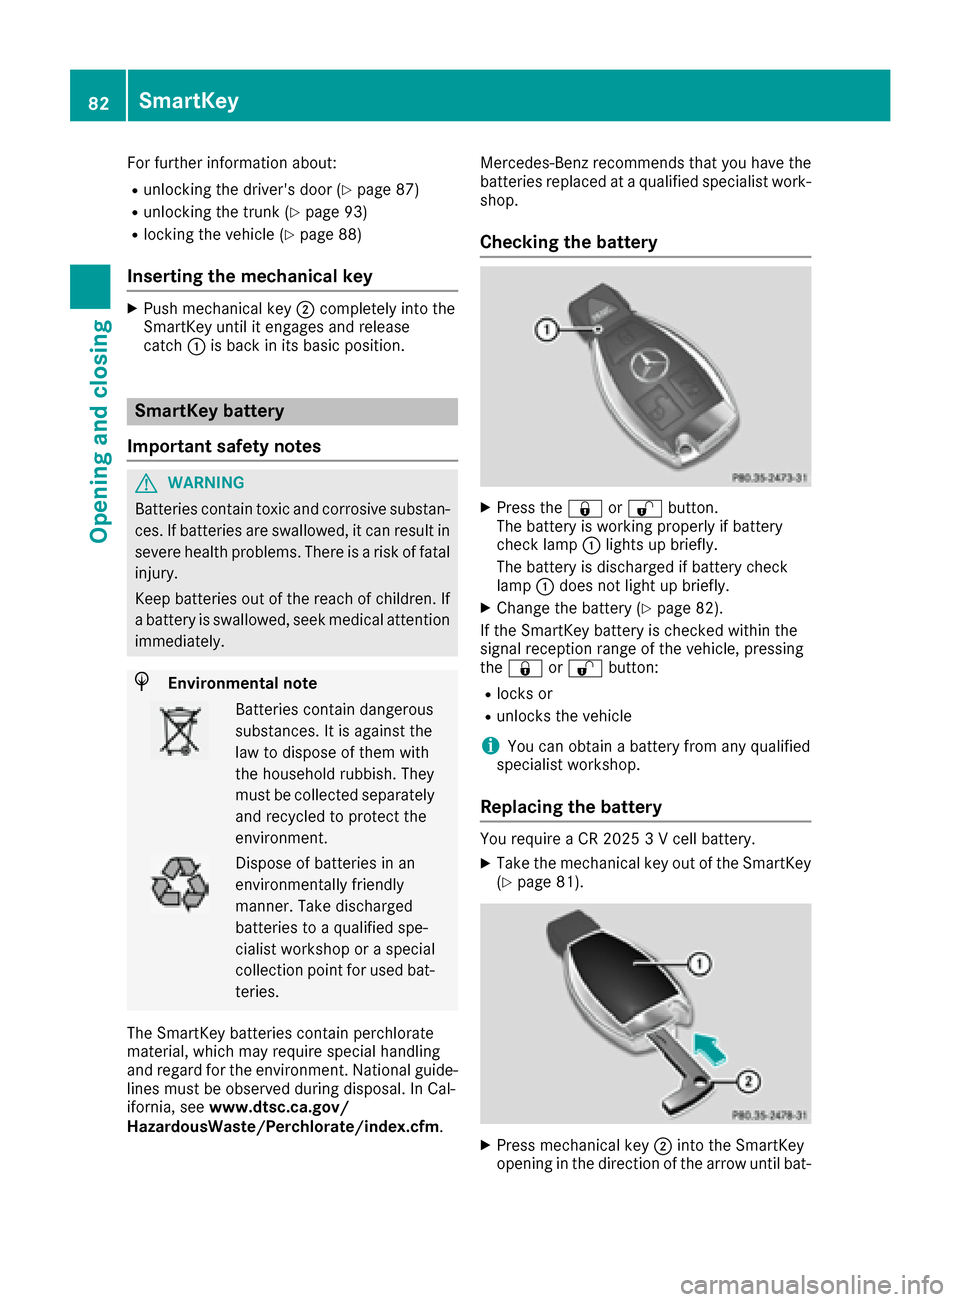
XPress the
&or% button.
The battery is working properly if battery
check lamp :lights up briefly.
The battery is discharged if battery check
lamp :does not light up briefly.
XChange the battery (Ypage 82).
If the SmartKey battery is checked within the
signal reception range of the vehicle, pressing
the & or% button:
Rlocks or
Runlocks the vehicle
iYou can obtain a battery from any qualified
specialist workshop.
Replacing the battery
You require a CR 2025 3 V cell battery.
XTake the mechanical key out of the SmartKey
(Ypage 81).
XPress mechanical key ;into the SmartKey
opening in the direction of the arrow until bat-
82SmartKey
Opening and closing
Page 87 of 438
ProblemPossible causes/consequences andMSolutions
The engine cannot be
started using the Smart-
Key.The on-board voltage is too low.
XSwitch off non-essential consumers, e.g. seat heating or interior
lighting, and try to start the engine again.
If this does not work:
XCheck the starter battery and charge it if necessary (Ypage 374).
or
XJump-start the vehicle (Ypage 376).
or
XConsult a qualified specialist workshop.
The engine cannot be
started using the Start/
Stop button. The Smart-
Key is in the vehicle.The vehicle is locked.
XUnlock the vehicle and try to start the vehicle again.
The SmartKey battery is discharged or nearly discharged.
XCheck the SmartKey battery (Ypage 82) and replace it if necessary
(Ypage 82).
If this does not work:
XStart your vehicle with the SmartKey in the ignition lock.
There is interference from a powerful source of radio waves.
XStart your vehicle with the SmartKey in the ignition lock.
You have lost a Smart-
Key.XHave the SmartKey deactivated at a qualified specialist workshop.
XReport the loss immediately to the vehicle insurers.
XIf necessary, have the locks changed as well.
You have lost the
mechanical key.XReport the loss immediately to the vehicle insurers.
XIf necessary, have the locks changed as well.
Doors
Important safety notes
GWARNING
If children are left unsupervised in the vehicle,
they could:
Ropen the doors, thus endangering other
people or road users.
Rget out and disrupt traffic.
Roperate the vehicle's equipment.
Additionally, children could set the vehicle in
motion if, for example, they:
Rrelease the parking brake.
Rshifting the automatic transmission out of
park position P
RStart the engine.
There is a risk of an accident and injury.
When leaving the vehicle, always take the
SmartKey with you and lock the vehicle. Never
leave children or animals unattended in the
vehicle. Always keep the SmartKey out of
reach of children.
Doors85
Opening and closing
Z
Page 96 of 438
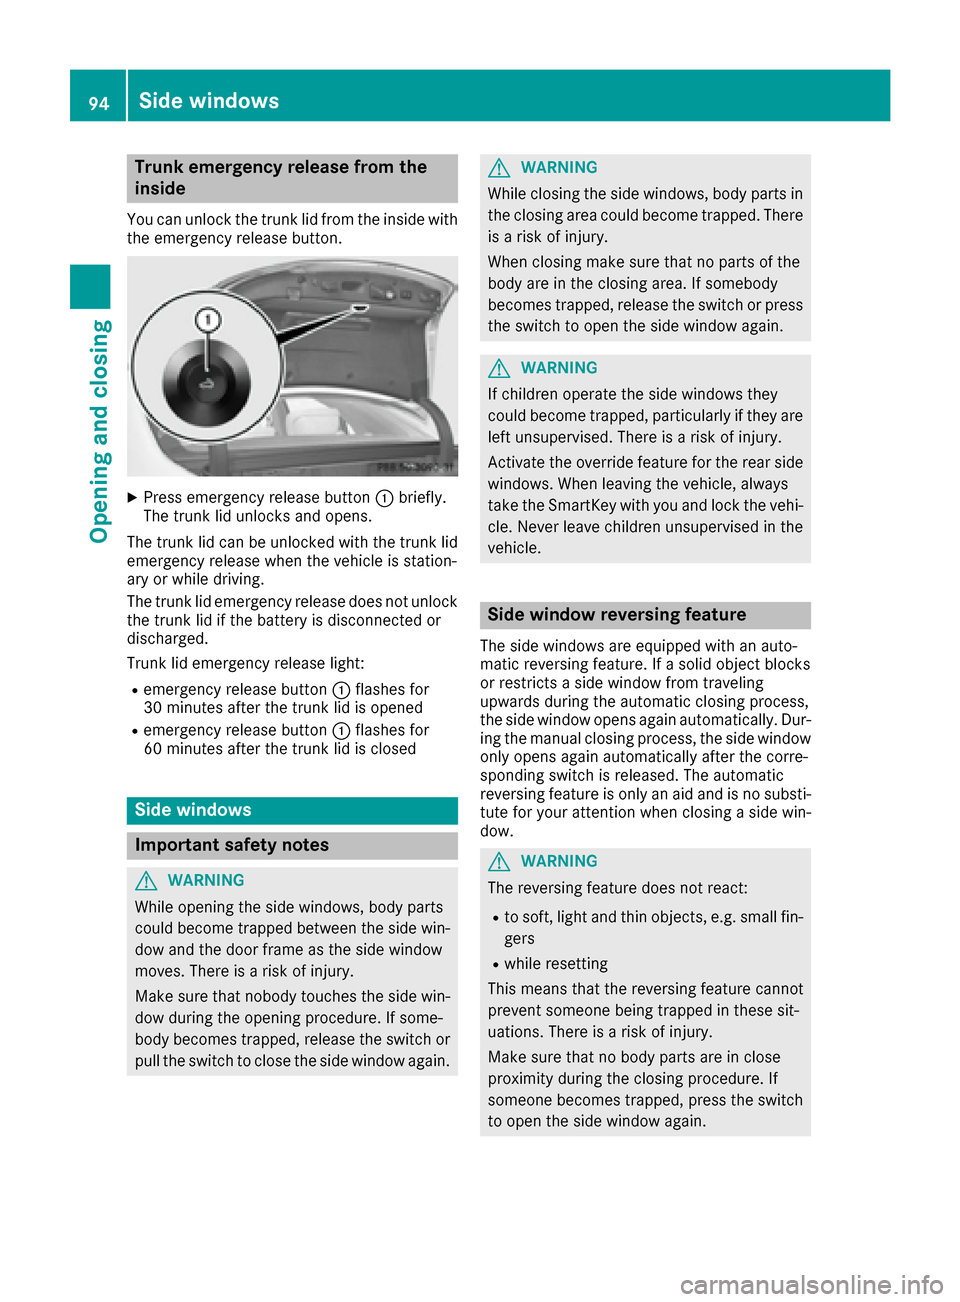
Trunk emergency release from the
inside
You can unlock the trunk lid from the inside with
the emergency release button.
XPress emergency release button :briefly.
The trunk lid unlocks and opens.
The trunk lid can be unlocked with the trunk lid
emergency release when the vehicle is station-
ary or while driving.
The trunk lid emergency release does not unlock
the trunk lid if the battery is disconnected or
discharged.
Trunk lid emergency release light:
Remergency release button :flashes for
30 minutes after the trunk lid is opened
Remergency release button :flashes for
60 minutes after the trunk lid is closed
Side windows
Important safety notes
GWARNING
While opening the side windows, body parts
could become trapped between the side win-
dow and the door frame as the side window
moves. There is a risk of injury.
Make sure that nobody touches the side win-
dow during the opening procedure. If some-
body becomes trapped, release the switch or
pull the switch to close the side window again.
GWARNING
While closing the side windows, body parts in
the closing area could become trapped. There is a risk of injury.
When closing make sure that no parts of the
body are in the closing area. If somebody
becomes trapped, release the switch or press
the switch to open the side window again.
GWARNING
If children operate the side windows they
could become trapped, particularly if they are left unsupervised. There is a risk of injury.
Activate the override feature for the rear side
windows. When leaving the vehicle, always
take the SmartKey with you and lock the vehi-
cle. Never leave children unsupervised in the
vehicle.
Side window reversing feature
The side windows are equipped with an auto-
matic reversing feature. If a solid object blocks
or restricts a side window from traveling
upwards during the automatic closing process,
the side window opens again automatically. Dur-
ing the manual closing process, the side windowonly opens again automatically after the corre-
sponding switch is released. The automatic
reversing feature is only an aid and is no substi-
tute for your attention when closing a side win-
dow.
GWARNING
The reversing feature does not react:
Rto soft, light and thin objects, e.g. small fin-
gers
Rwhile resetting
This means that the reversing feature cannot
prevent someone being trapped in these sit-
uations. There is a risk of injury.
Make sure that no body parts are in close
proximity during the closing procedure. If
someone becomes trapped, press the switch
to open the side window again.
94Side windows
Openin gan d closing
Page 121 of 438
Problems with the seat heating
ProblemPossible causes/consequences andMSolutions
The seat heating has
switched off prematurely
or cannot be switched
on.The on-board voltage is too low because too many electrical consum-
ers are switched on.
XSwitch off electrical consumers that you do not need, such as the
rear window defroster or interior lighting.
Once the battery is sufficiently charged, the seat heating can be
switched back on manually.
Switching the seat ventilation on/off
Front seats
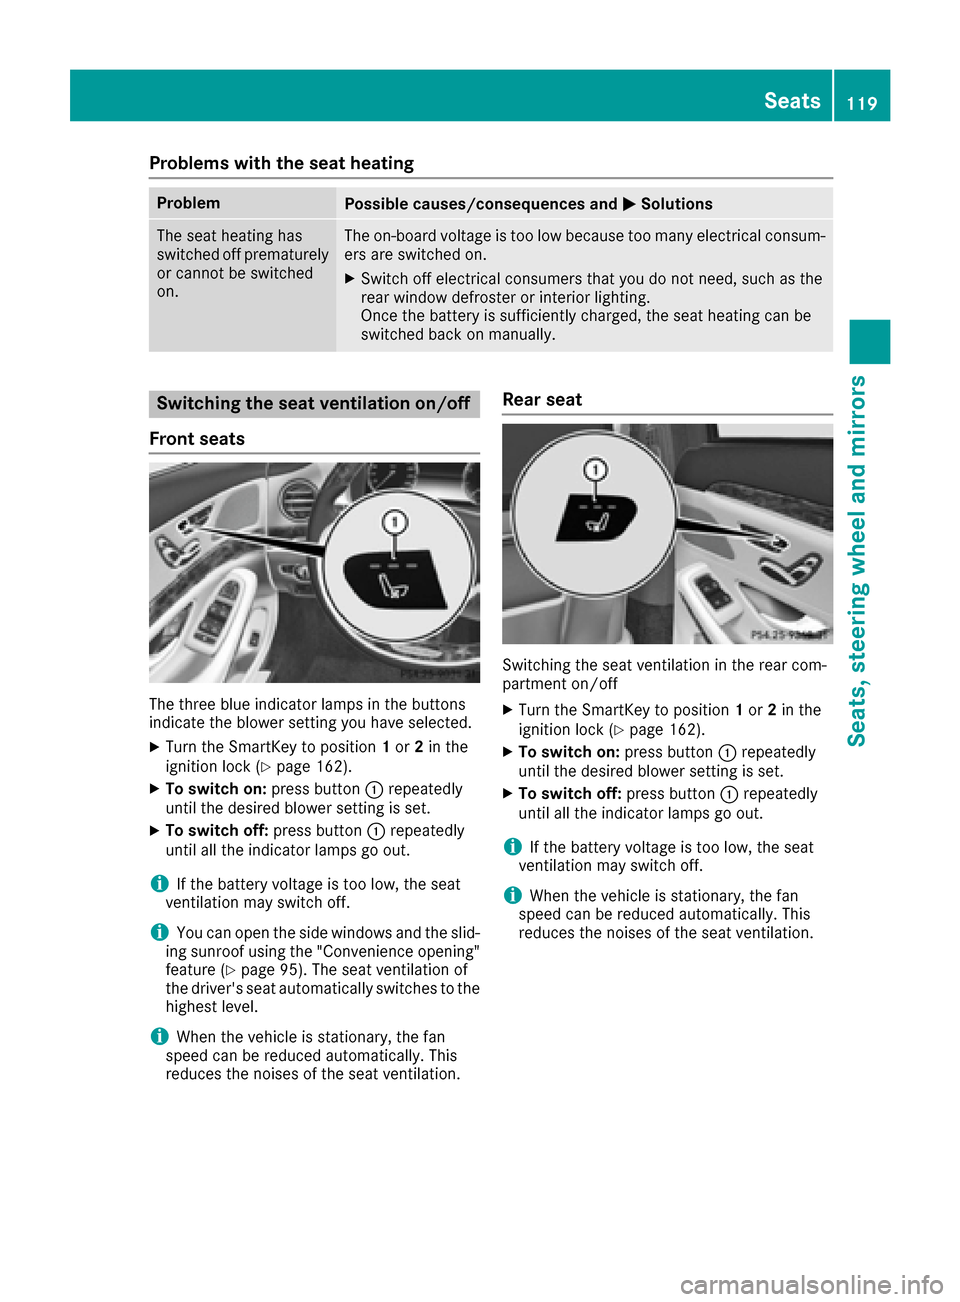
The three blue indicator lamps in the buttons
indicate the blower setting you have selected.
XTurn the SmartKey to position 1or 2in the
ignition lock (Ypage 162).
XTo switch on: press button:repeatedly
until the desired blower setting is set.
XTo switch off: press button:repeatedly
until all the indicator lamps go out.
iIf the battery voltage is too low, the seat
ventilation may switch off.
iYou can open the side windows and the slid-
ing sunroof using the "Convenience opening"
feature (
Ypage 95). The seat ventilation of
the driver's seat automatically switches to the
highest level.
iWhen the vehicle is stationary, the fan
speed can be reduced automatically. This
reduces the noises of the seat ventilation.
Rear seat
Switching the seat ventilation in the rear com-
partment on/off
XTurn the SmartKey to position 1or 2in the
ignition lock (Ypage 162).
XTo switch on: press button:repeatedly
until the desired blower setting is set.
XTo switch off: press button:repeatedly
until all the indicator lamps go out.
iIf the battery voltage is too low, the seat
ventilation may switch off.
iWhen the vehicle is stationary, the fan
speed can be reduced automatically. This
reduces the noises of the seat ventilation.
Seats119
Seats, steering wheel and mirrors
Z