buttons MERCEDES-BENZ S63AMG 2010 W221 User Guide
[x] Cancel search | Manufacturer: MERCEDES-BENZ, Model Year: 2010, Model line: S63AMG, Model: MERCEDES-BENZ S63AMG 2010 W221Pages: 548, PDF Size: 12.48 MB
Page 117 of 548
XSwitching manually to the street list
without predictive speller: Slide ZV.
or
XSelect ¬ in the second line from the
bottom and press W.
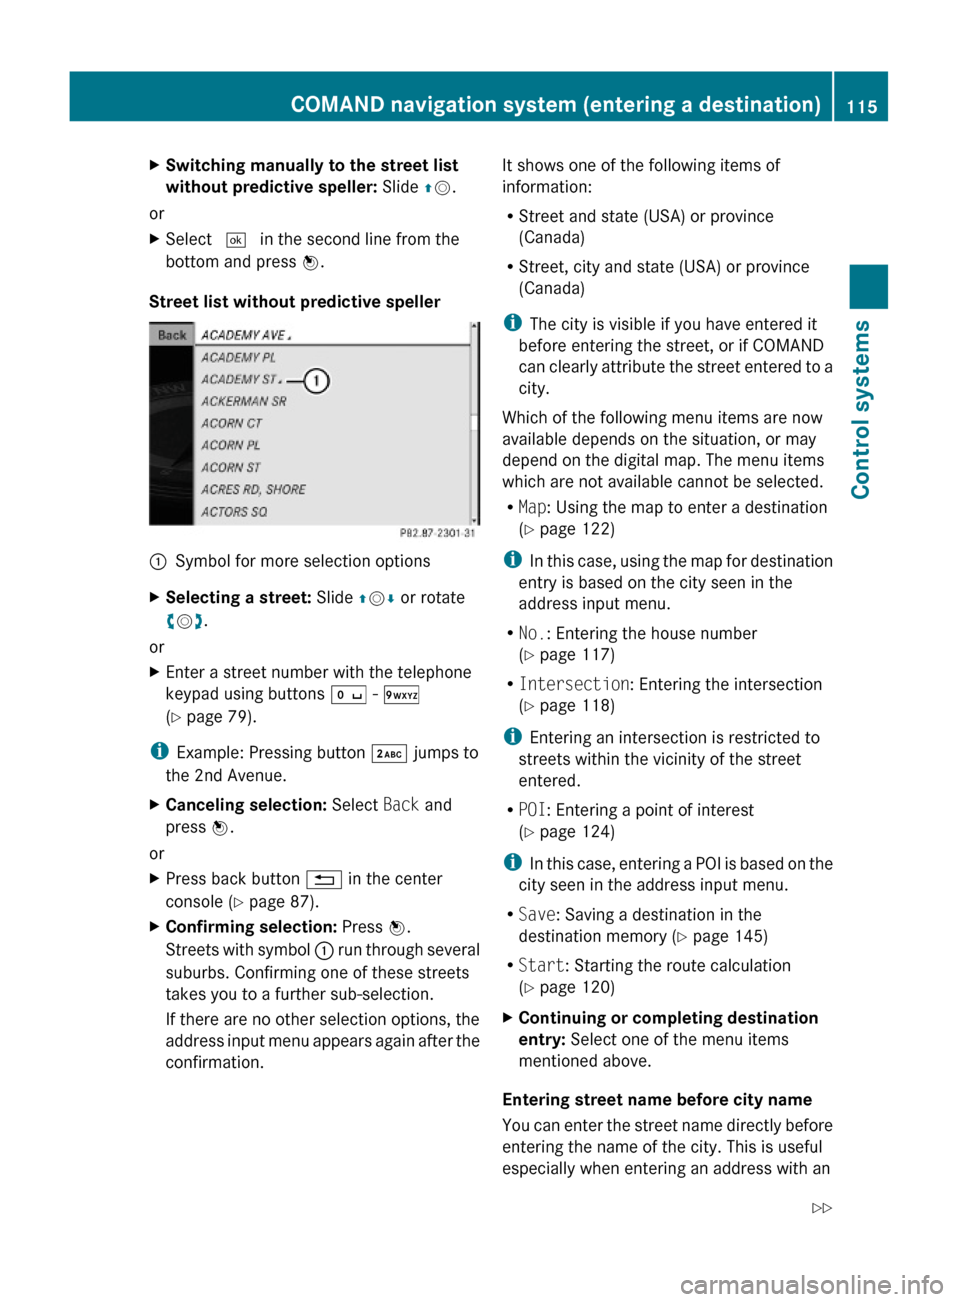
Street list without predictive speller
:Symbol for more selection optionsXSelecting a street: Slide ZVÆ or rotate
cVd.
or
XEnter a street number with the telephone
keypad using buttons Å - Ã
(Y page 79).
iExample: Pressing button · jumps to
the 2nd Avenue.
XCanceling selection: Select Back and
press W.
or
XPress back button % in the center
console (Y page 87).
XConfirming selection: Press W.
Streets with symbol : run through several
suburbs. Confirming one of these streets
takes you to a further sub-selection.
If there are no other selection options, the
address input menu appears again after the
confirmation.
It shows one of the following items of
information:
RStreet and state (USA) or province
(Canada)
RStreet, city and state (USA) or province
(Canada)
iThe city is visible if you have entered it
before entering the street, or if COMAND
can clearly attribute the street entered to a
city.
Which of the following menu items are now
available depends on the situation, or may
depend on the digital map. The menu items
which are not available cannot be selected.
RMap: Using the map to enter a destination
(Y page 122)
iIn this case, using the map for destination
entry is based on the city seen in the
address input menu.
RNo.: Entering the house number
(Y page 117)
RIntersection: Entering the intersection
(Y page 118)
iEntering an intersection is restricted to
streets within the vicinity of the street
entered.
RPOI: Entering a point of interest
(Y page 124)
iIn this case, entering a POI is based on the
city seen in the address input menu.
RSave: Saving a destination in the
destination memory (Y page 145)
RStart: Starting the route calculation
(Y page 120)
XContinuing or completing destination
entry: Select one of the menu items
mentioned above.
Entering street name before city name
You can enter the street name directly before
entering the name of the city. This is useful
especially when entering an address with an
COMAND navigation system (entering a destination)115Control systems221_AKB; 6; 20, en-USd2ugruen,Version: 2.11.8.12009-09-24T13:28:17+02:00 - Seite 115Z
Page 120 of 548
XSelecting numbers: Slide XVY or rotate
cVd.
XConfirming number selection: Press W.
or
XEntering a number with the telephone
keypad using buttons Å - Ã
(Y page 79).
XDeleting individual numbers: Select F
in the bottom line and press W.
XDeleting an entire entry: Select F in the
bottom line and press W and hold until the
entire entry is deleted.
XCanceling an entry: Select % in the
bottom line and press W.
or
XPress back button % in the center
console (Y page 87).
XConfirming entry: Select ¬ in the
second line from the bottom and press W.
If COMAND cannot clearly attribute the
house number to a city, the city input menu
appears.
Entering city: Proceed as described in the
“Entering a city” section (Y page 111).
After the city has been entered, the address
input menu appears again.
If COMAND can clearly attribute the house
number to a city, the address input menu
also appears.
In both cases, the address input menu
shows the house number, street, city and
state (USA) or province (Canada).
Which of the following menu items are now
available may depend on the data version of
the digital map. The menu items which are not
available cannot be selected.
RMap: Using the map to enter a destination
(Y page 122)
iIn this case, using the map for destination
entry is based on the city seen in the
address input menu.
RPOI: Entering a point of interest
(Y page 124)
iIn this case, entering a POI is based on the
city seen in the address input menu.
RSave: Saving a destination in the
destination memory (Y page 145)
RStart: Starting the route calculation
(Y page 120)
XContinuing or completing destination
entry: Select one of the menu items
mentioned above.
Entering an intersection
iThe intersection can only be entered after
the street has been entered.
You can only enter intersections which are
available on the digital map.
XIn the address input menu, select
Intersection.
The list of intersections appears either with
or without the predictive speller
(Y page 119). Whether or not the
predictive speller appears depends on how
many intersections are available for the
selected street.
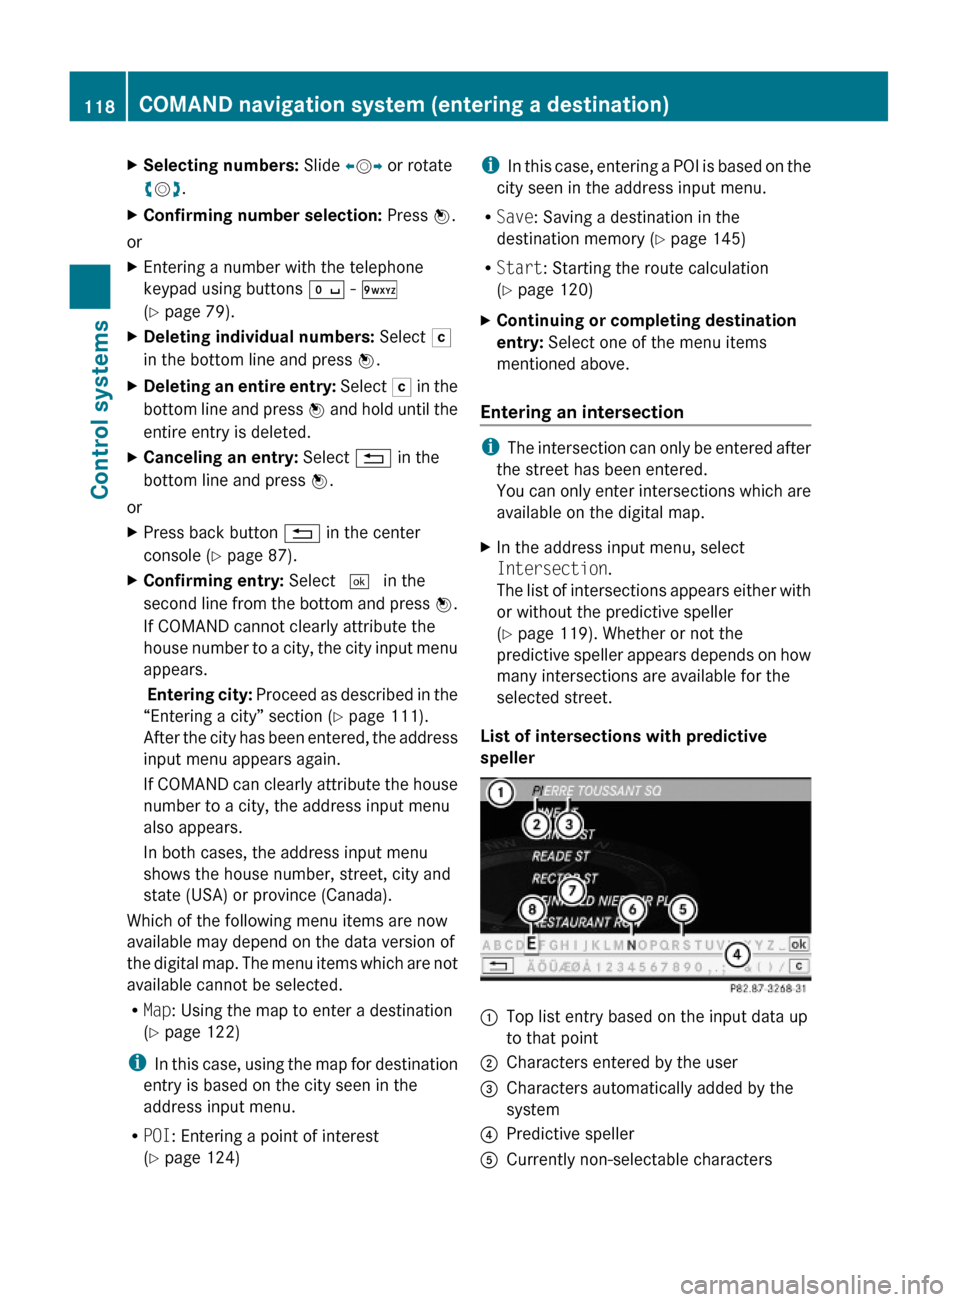
List of intersections with predictive
speller
:Top list entry based on the input data up
to that point
;Characters entered by the user=Characters automatically added by the
system
?Predictive spellerACurrently non-selectable characters118COMAND navigation system (entering a destination)Control systems
221_AKB; 6; 20, en-USd2ugruen,Version: 2.11.8.12009-09-24T13:28:17+02:00 - Seite 118
Page 152 of 548
outgoing call, the No Service message will
appear for a short while.
RThe SIM card is not inserted in GSM type
phone.
RWhen you remove the SmartKey from the
starter switch during a call in hand-free
mode, the call will be maintained for up to
30 minutes. It will then be terminated.
Switch to “Private Mode” on the mobile
phone before switching off COMAND to
maintain the call beyond that time limit.
Refer to the operating instructions of your
mobile phone.
RWhen you want to switch off COMAND
during a call in hands-free mode, the
message You cannot shut off COMAND
until you have finished your
telephone call. appears.
Activating telephone mode
XSelect Telephone.
or
XPress button 6 on telephone keypad.
or
XPress shortcut button S once or twice.
iThe number of times you have to press
shortcut button S depends on the
operating mode currently selected.
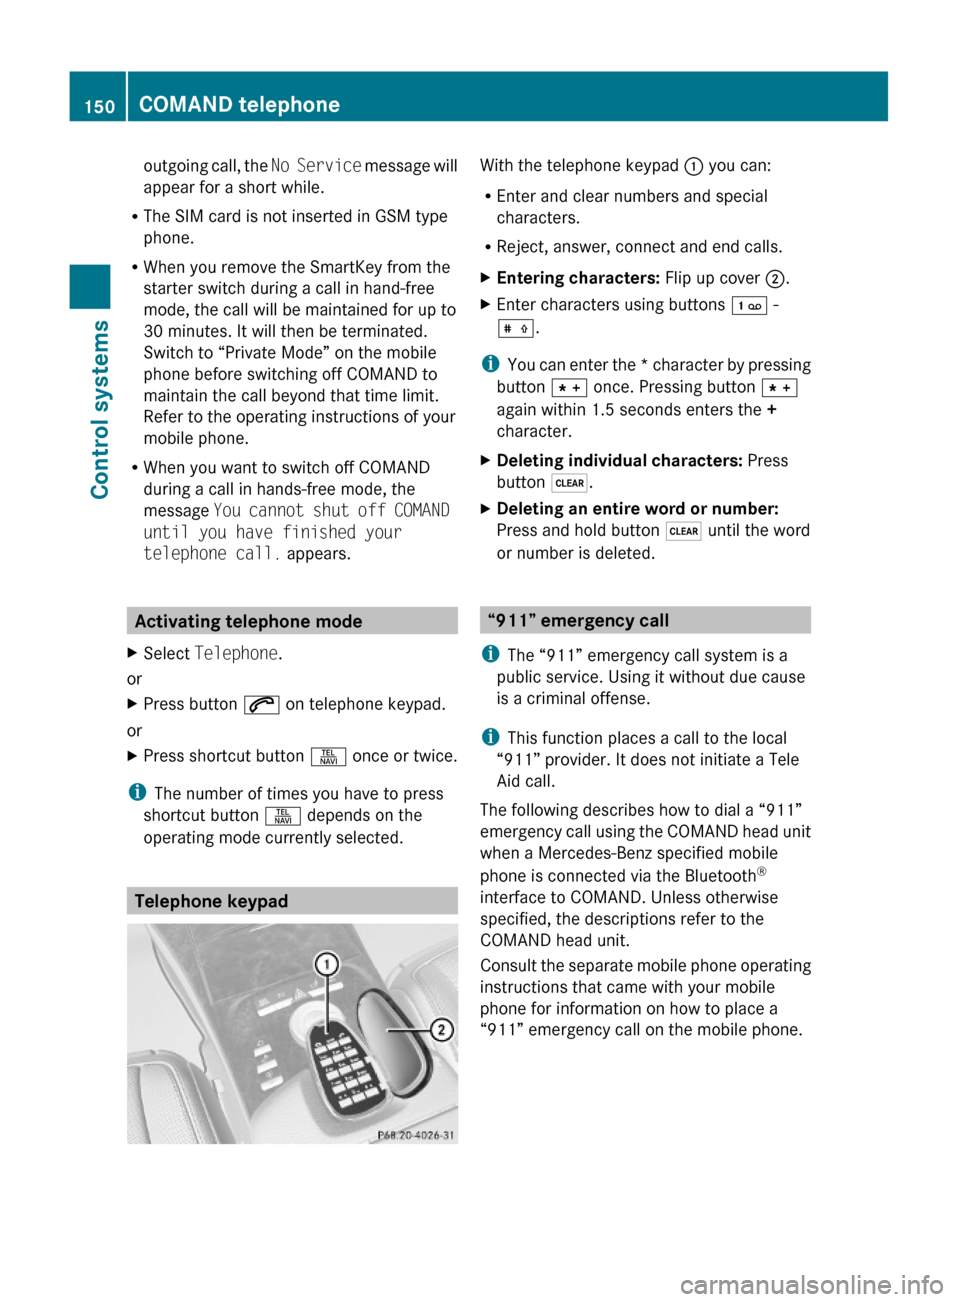
Telephone keypad
With the telephone keypad : you can:
REnter and clear numbers and special
characters.
RReject, answer, connect and end calls.
XEntering characters: Flip up cover ;.XEnter characters using buttons ´ -
Æ.
iYou can enter the * character by pressing
button à once. Pressing button Ã
again within 1.5 seconds enters the +
character.
XDeleting individual characters: Press
button $.
XDeleting an entire word or number:
Press and hold button $ until the word
or number is deleted.
“911” emergency call
iThe “911” emergency call system is a
public service. Using it without due cause
is a criminal offense.
iThis function places a call to the local
“911” provider. It does not initiate a Tele
Aid call.
The following describes how to dial a “911”
emergency call using the COMAND head unit
when a Mercedes-Benz specified mobile
phone is connected via the Bluetooth®
interface to COMAND. Unless otherwise
specified, the descriptions refer to the
COMAND head unit.
Consult the separate mobile phone operating
instructions that came with your mobile
phone for information on how to place a
“911” emergency call on the mobile phone.
150COMAND telephoneControl systems
221_AKB; 6; 20, en-USd2ugruen,Version: 2.11.8.12009-09-24T13:28:17+02:00 - Seite 150
Page 170 of 548
Selecting stations/channels using the
search functionXSlide XV Y or rotate cV d when the main
area is selected.
Depending on the direction in which the
controller is being slid or rotated, the
system searches upward or downward and
stops at the next receivable station/
channel.
or
XPress and hold button 9 or : on the
multifunction steering wheel 24
.
Selecting stations using station presets
i This function is not available for Weather
Band.
XSelect Audio Q FM/AM Radio Q FM or
AM .XSelect Presets .
or
XPress W when the main area is selected.
The preset menu appears. The dot # in
front of a preset position indicates that the
currently selected station is saved there.XSelect station preset by rotating cV d or
sliding ZV Æ and press W.
or
XEnter a position number with the telephone
keypad using buttons ´ - Ã
( Y page 79).
or
XPress button 9 or : on the
multifunction steering wheel briefly 24
.
i Vehicles with rear multicontour seats:
Rear occupants can also select a station
using the buttons on the rear armrest
( Y page 80).
Selecting stations by entering the
frequency manually
i This function is not available for Weather
Band.
XSelect Audio Q FM/AM Radio Q FM or
AM .
Entering the frequency using the
COMAND controller
XSelect Radio Q Enter Frequency .
The menu for manual frequency entry
appears.XExiting menu without making an entry:
Press back button % in the center
console ( Y page 87).XIncreasing or decreasing number: Slide
Z V Æ or rotate cV d.
i
You can only select available frequencies.
XSelecting the next number: Slide VY.XConfirming frequency entry: Press W.
COMAND tunes in to the frequency
entered.
i If you enter a frequency which is outside
the frequency range, COMAND tunes in to
the next lowest frequency.
Entering the frequency using the
telephone keypad
XPress button à on the telephone
keypad ( Y page 79).XEnter frequency using buttons Å -
à .
COMAND tunes in to the frequency
entered.
Selecting channels using the WB
channel
i This function is only available for Weather
Band.
24 Function is only available if the Audio menu is selected in the instrument cluster.168COMAND FM/AM radioControl systems
221_AKB; 6; 20, en-USd2ugruen,Version: 2.11.8.12009-09-24T13:28:17+02:00 - Seite 168
Page 171 of 548
XSelect Audio Q FM/AM Radio Q WB
Q Channel.
or
XPress W when the main area is selected.
The channel list appears. The dot # in
front of a list entry indicates the currently
selected channel.
XSelect channel by rotating cVd or sliding
ZVÆ and press W.
iVehicles with rear multicontour seats:
Rear occupants can also select a channel
using the buttons on the rear armrest
(Y page 80).
Saving stations
iTwenty stations can be saved in each
wave band except for Weather Band.
You have the following options:
RSaving stations manually
RSaving stations using the autostore
function
Saving stations manually
Option 1
XSelect Audio Q FM/AM Radio Q FM or
AM.
XSelect Radio Q Save Station.
Option 2
XPress W when the main area is selected.
Option 3
XSelect Audio Q FM/AM Radio Q FM or
AM.
XSelect Presets.
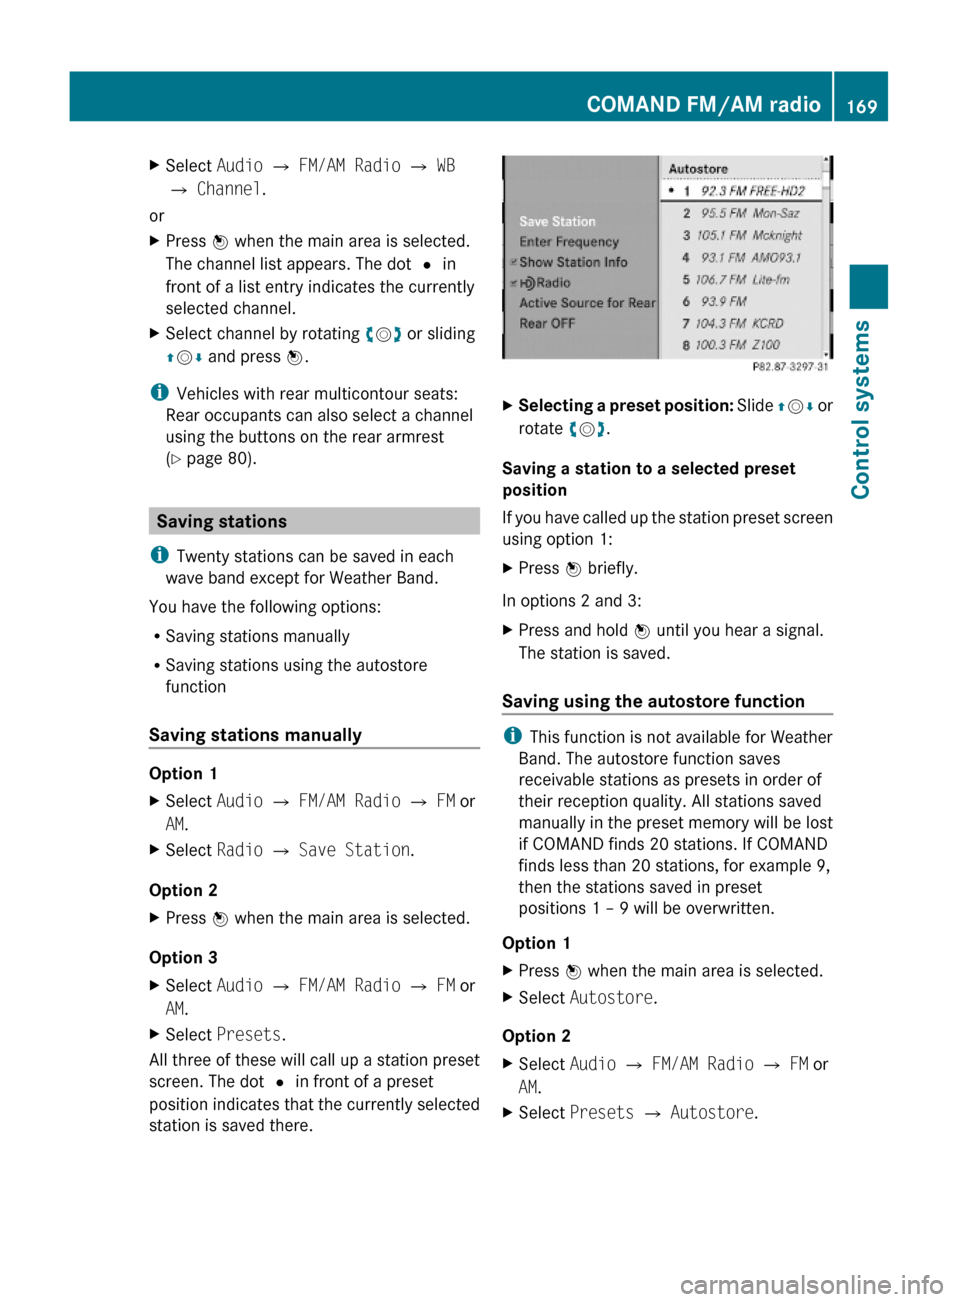
All three of these will call up a station preset
screen. The dot # in front of a preset
position indicates that the currently selected
station is saved there.
XSelecting a preset position: Slide ZVÆ or
rotate cVd.
Saving a station to a selected preset
position
If you have called up the station preset screen
using option 1:
XPress W briefly.
In options 2 and 3:
XPress and hold W until you hear a signal.
The station is saved.
Saving using the autostore function
iThis function is not available for Weather
Band. The autostore function saves
receivable stations as presets in order of
their reception quality. All stations saved
manually in the preset memory will be lost
if COMAND finds 20 stations. If COMAND
finds less than 20 stations, for example 9,
then the stations saved in preset
positions 1 – 9 will be overwritten.
Option 1
XPress W when the main area is selected.XSelect Autostore.
Option 2
XSelect Audio Q FM/AM Radio Q FM or
AM.
XSelect Presets Q Autostore.COMAND FM/AM radio169Control systems221_AKB; 6; 20, en-USd2ugruen,Version: 2.11.8.12009-09-24T13:28:17+02:00 - Seite 169Z
Page 176 of 548
XSelect station preset and briefly press W.
or
XEnter a position number with the telephone
keypad using buttons ´ - Ã
( Y page 79).
COMAND tunes in the corresponding
channel as long as it is included in your
subscription and is still available.
i Vehicles with rear multicontour seats:
Rear occupants can also select a channel
using the buttons on the rear armrest
( Y page 80).
If the channel is not included in your
subscription, you will see the message
described in the section “Satellite radio
service is not activated” ( Y page 171).
If the channel is no longer available, you will
see the message Invalid Channel .
XClosing message: Press W.
Tuning in channels using manual
channel number entry
i If you try to tune in a channel when the
satellite radio service is not activated, you
will see the screen described in the section
“Satellite radio service is not activated”
( Y page 171).
Entering the channel number using the
COMAND controller
XSelect Audio Q Audio Q Sat. Radio
Q Sat. Radio Q Channel Entry .
The menu for manual channel number entry
appears.XExiting menu without making an entry:
Press back button % in the center
console ( Y page 87).XIncrease or decreasing number: Slide
Z V Æ or rotate cV d.XSelecting next number: Slide XV Y.XConfirming channel entry: Press W.
Further operation depends on whether the
selected channel number is valid or if the
channel is included in your subscription.
Entering the channel number using the
telephone keypad
XPress button à on the telephone
keypad ( Y page 79).XEnter channel number using buttons Å
- Ã .
Further operation depends on whether the
selected channel number is valid or if the
channel is included in your subscription.
Channel number is valid and channel is
included in subscription
COMAND tunes in the channel entered.
Channel number is invalid
You will see the message Invalid Channel.
XClosing message: Press W.
Channel number is valid but channel is
not included in subscription
You will see the screen described in the
section “Satellite radio service is not
activated” ( Y page 171).
XClosing display: Press W.
Tuning in channels using the channel
list
XSelect Audio Q Audio Q Sat. Radio
Q Sat. Radio Q Channel List .
The channel list appears. The dot # in
front of a list entry indicates the currently
selected channel.XSelect channel by rotating cV d or sliding
Z V Æ and press W.
i
The contents of the channel list depends
on which channels are included in your
subscription and which program category
you have selected (Y page 173). If satellite
174COMAND satellite radioControl systems
221_AKB; 6; 20, en-USd2ugruen,Version: 2.11.8.12009-09-24T13:28:17+02:00 - Seite 174
Page 185 of 548
BElapsed track timeCElapsed track time and track number
(graphical display)DSound settingsEMedium selectionFTrack searchGArtist (ID3 tags)HMP3 functions
CD/DVD/MP3 functions
Stop function
i This function is only available in audio
DVD mode.
XStopping playback: Select Audio Q
Media Q DVD-A Q ± (twice).XRestarting playback: Select Audio Q
Media Q DVD-A Q M .
Playback restarts at the beginning of the
DVD.
Pause function
In audio CD, audio DVD and MP3 mode
XPausing playback: Press button 8 on
the multifunction steering wheel briefly.XContinuing playback: Press button 8
on the multifunction steering wheel briefly
once more.
In audio DVD mode only
XPausing playback: Select Audio Q
Media Q DVD-A Q « .
M appears instead of «.XContinuing playback: Select Audio Q
Audio Q DVD-A Q M .
« appears instead of M.Selecting CD/DVD/MP3 media XSelect Audio Q Media .
The media list appears. The dot # indicates
the currently selected medium.XSelect a medium.
or
XEnter a media number with the telephone
keypad using buttons ´ - Å
( Y page 79).
Selecting a track
Selecting by skipping tracks
XSkipping forward or backward: Slide
X V Y or rotate cV d.
or
XPress button 9 or : on the
multifunction steering wheel 27
.
i The skip forward function takes you to the
next track. The skip backward function
takes you to the beginning of the current
track, provided it has been played for
longer that 8 seconds. When the track has
been played for less than 8 seconds, you
will skip to the track before the current one.
When you switch on the option Random
Tracks , the track is chosen at random.
Selecting a track using the telephone
keypad
XPress button à on the telephone
keypad ( Y page 79).XEnter track number using buttons ´ -
Å .
Fast forward/rewind
XSelect the main area.XSlide XV Y and hold until the desired track
part is reached.27 Function is only available if the Audio menu is selected in the instrument cluster.COMAND audio CD/audio DVD/MP3183Control systems221_AKB; 6; 20, en-USd2ugruen,Version: 2.11.8.12009-09-24T13:28:17+02:00 - Seite 183Z
Page 196 of 548
XPause playback: Select II.
In the display, II changes to M.XContinue playback: Select M.
Play is continued from the point at which it
was stopped.
Selecting scene/chapter
Entering scene/chapter using the
COMAND controller
XMake sure that the control menu is shown
( Y page 192).XSkipping forwards or back: Slide XV Y or
turn cV d.
or
XPress button 9 or : on the
multifunction steering wheel 28
.
i Vehicles with rear multicontour seats:
Rear occupants can also select a scene/
chapter using the buttons on the rear
armrest ( Y page 80).
Entering the scene/chapter using the
telephone keypad
XPress button à on the telephone
keypad ( Y page 79).XEnter scene/chapter using buttons j -
x .
COMAND tunes in to the scene/chapter
entered.
Selecting film/track
i This function is only available if the DVD
is comprised of several films/tracks.
XSelect Video Q Video DVD .XShow the menu system, if necessary
( Y page 193).XSelect DVD-V Q DVD Functions Q
Title Selection .
A selection list appears.XSelect a film/track.
Screen settings
Setting brightness, contrast and color
XSelect Video Q Video DVD .XShow the menu system, if necessary
( Y page 193).XSelect DVD-V Q Brightness Q
Contrast or Color .XChanging settings: Slide ZV Æ or turn
c V d until you reach the desired setting.XSaving settings: Press W.
Changing the picture format
XSelect Video Q Video DVD .XShow the menu system, if necessary
( Y page 193).XSelect DVD-V.
The DVD-V menu appears. The dot # in
front of a menu item - 16:9 Optimized,
4:3 or Widescreen indicates the current
format.XChanging the format: Slide ZV Æ or turn
c V d, until you reach the desired setting.XSaving the format: Press W.
DVD menu
The DVD menu is the menu stored on the DVD
itself. It is structured in various ways
according to the individual DVD and permits
certain actions and settings.
28 Function is only available if the Audio menu is selected in the instrument cluster.194COMAND video DVDControl systems
221_AKB; 6; 20, en-USd2ugruen,Version: 2.11.8.12009-09-24T13:28:17+02:00 - Seite 194
Page 210 of 548
Setting easy-entry/exit feature
iThe components and operating principles
of COMAND can be found on (Y page 76).
GWarning!
You must make sure no one can become
trapped or injured by the moving steering
wheel and driver’s seat when the easy-entry/
exit feature is activated.
To stop seat/steering wheel movement, do
one of the following:
RPress seat adjustment switch.
RMove steering wheel adjustment stalk.
RPress one of the memory position buttons
or the memory button M.
Do not leave children unattended in the
vehicle, or with access to an unlocked vehicle.
Children could open the driver’s door and
unintentionally activate the easy-entry/exit
feature, which could result in an accident
and/or serious personal injury.
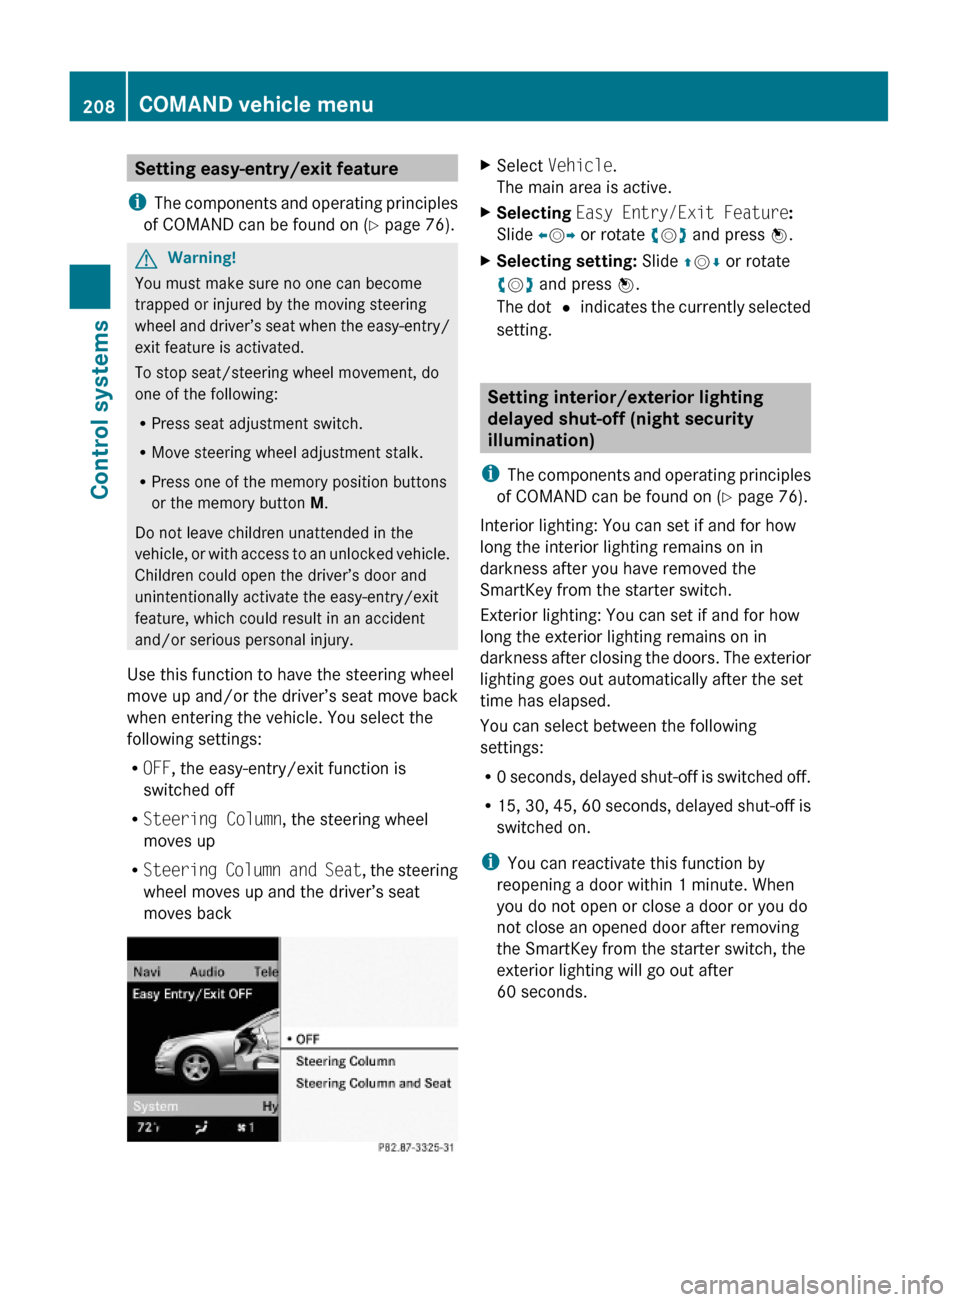
Use this function to have the steering wheel
move up and/or the driver’s seat move back
when entering the vehicle. You select the
following settings:
ROFF, the easy-entry/exit function is
switched off
RSteering Column, the steering wheel
moves up
RSteering Column and Seat, the steering
wheel moves up and the driver’s seat
moves back
XSelect Vehicle.
The main area is active.
XSelecting Easy Entry/Exit Feature:
Slide XVY or rotate cVd and press W.
XSelecting setting: Slide ZVÆ or rotate
cVd and press W.
The dot # indicates the currently selected
setting.
Setting interior/exterior lighting
delayed shut-off (night security
illumination)
iThe components and operating principles
of COMAND can be found on (Y page 76).
Interior lighting: You can set if and for how
long the interior lighting remains on in
darkness after you have removed the
SmartKey from the starter switch.
Exterior lighting: You can set if and for how
long the exterior lighting remains on in
darkness after closing the doors. The exterior
lighting goes out automatically after the set
time has elapsed.
You can select between the following
settings:
R0 seconds, delayed shut-off is switched off.
R15, 30, 45, 60 seconds, delayed shut-off is
switched on.
iYou can reactivate this function by
reopening a door within 1 minute. When
you do not open or close a door or you do
not close an opened door after removing
the SmartKey from the starter switch, the
exterior lighting will go out after
60 seconds.
208COMAND vehicle menuControl systems
221_AKB; 6; 20, en-USd2ugruen,Version: 2.11.8.12009-09-24T13:28:17+02:00 - Seite 208
Page 213 of 548
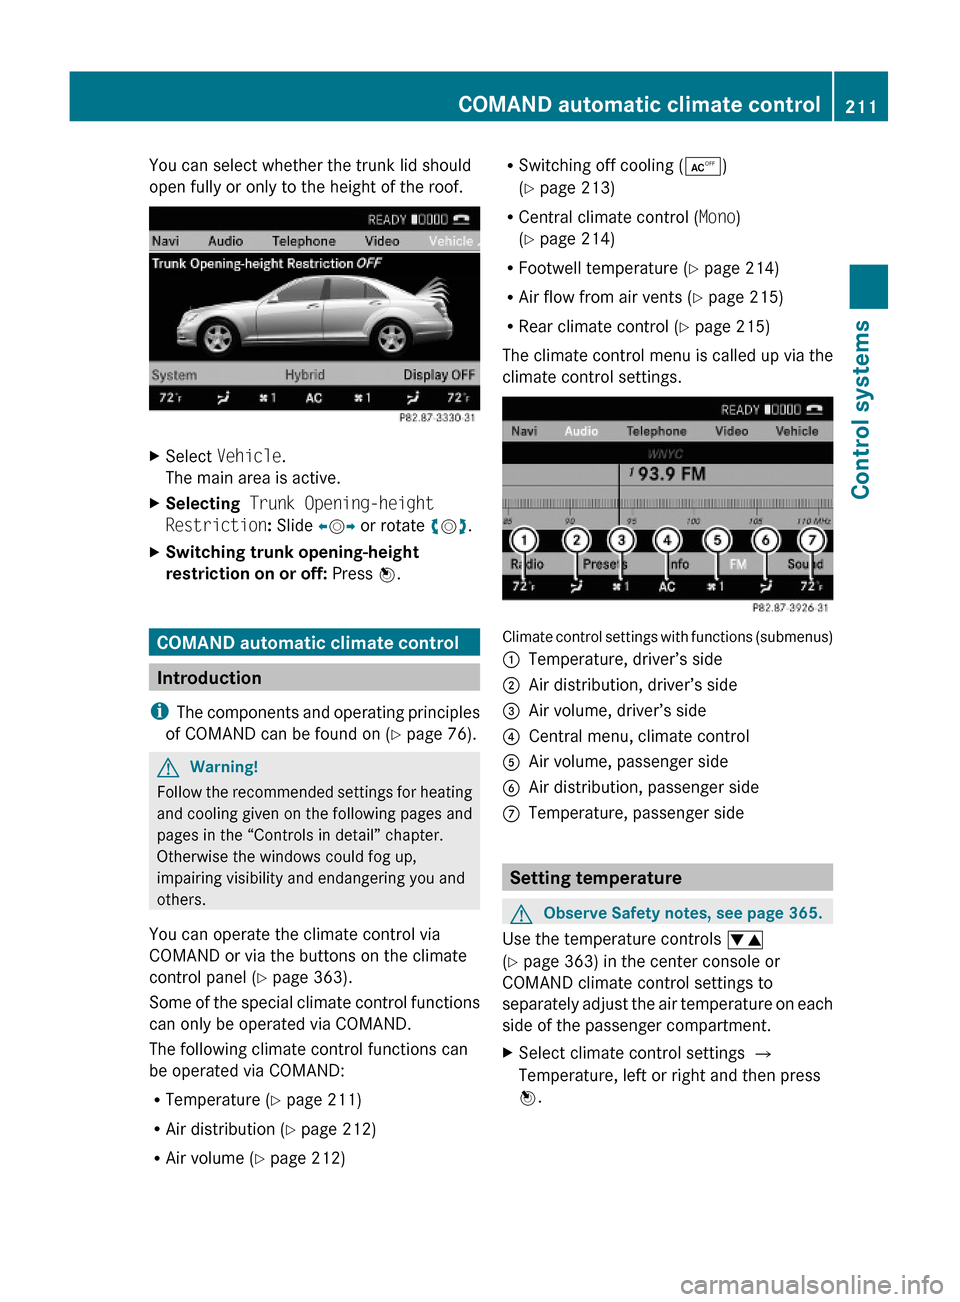
You can select whether the trunk lid should
open fully or only to the height of the roof.
XSelect Vehicle.
The main area is active.
XSelecting Trunk Opening-height
Restriction: Slide XVY or rotate cVd.
XSwitching trunk opening-height
restriction on or off: Press W.
COMAND automatic climate control
Introduction
iThe components and operating principles
of COMAND can be found on (Y page 76).
GWarning!
Follow the recommended settings for heating
and cooling given on the following pages and
pages in the “Controls in detail” chapter.
Otherwise the windows could fog up,
impairing visibility and endangering you and
others.
You can operate the climate control via
COMAND or via the buttons on the climate
control panel (Y page 363).
Some of the special climate control functions
can only be operated via COMAND.
The following climate control functions can
be operated via COMAND:
RTemperature (Y page 211)
RAir distribution (Y page 212)
RAir volume (Y page 212)
RSwitching off cooling (Æ)
(Y page 213)
RCentral climate control (Mono)
(Y page 214)
RFootwell temperature (Y page 214)
RAir flow from air vents (Y page 215)
RRear climate control (Y page 215)
The climate control menu is called up via the
climate control settings.
Climate control settings with functions (submenus)
:Temperature, driver’s side;Air distribution, driver’s side=Air volume, driver’s side?Central menu, climate controlAAir volume, passenger sideBAir distribution, passenger sideCTemperature, passenger side
Setting temperature
GObserve Safety notes, see page 365.
Use the temperature controls w
(Y page 363) in the center console or
COMAND climate control settings to
separately adjust the air temperature on each
side of the passenger compartment.
XSelect climate control settings Q
Temperature, left or right and then press
W.
COMAND automatic climate control211Control systems221_AKB; 6; 20, en-USd2ugruen,Version: 2.11.8.12009-09-24T13:28:17+02:00 - Seite 211Z