buttons MERCEDES-BENZ S63AMG 2010 W221 Owner's Guide
[x] Cancel search | Manufacturer: MERCEDES-BENZ, Model Year: 2010, Model line: S63AMG, Model: MERCEDES-BENZ S63AMG 2010 W221Pages: 548, PDF Size: 12.48 MB
Page 216 of 548
! If the air conditioning cannot be activated
again, this indicates that the air
conditioning is losing refrigerant. The
compressor has turned off.
Have the air conditioning checked at the
nearest authorized Mercedes-Benz Center.
Selecting Mono mode
Mono is used to adjust the climate zones for
the entire vehicle at the same time. When the
Mono function is switched on and you change
the climate on the driver’s side, these
changes will be carried out in the same
manner for all climate zones.
XSelect climate control settings Q Central
climate control menu.
XSelecting Mono: Slide ZVÆ or rotate
cVd.
XConfirming selection: Press W.
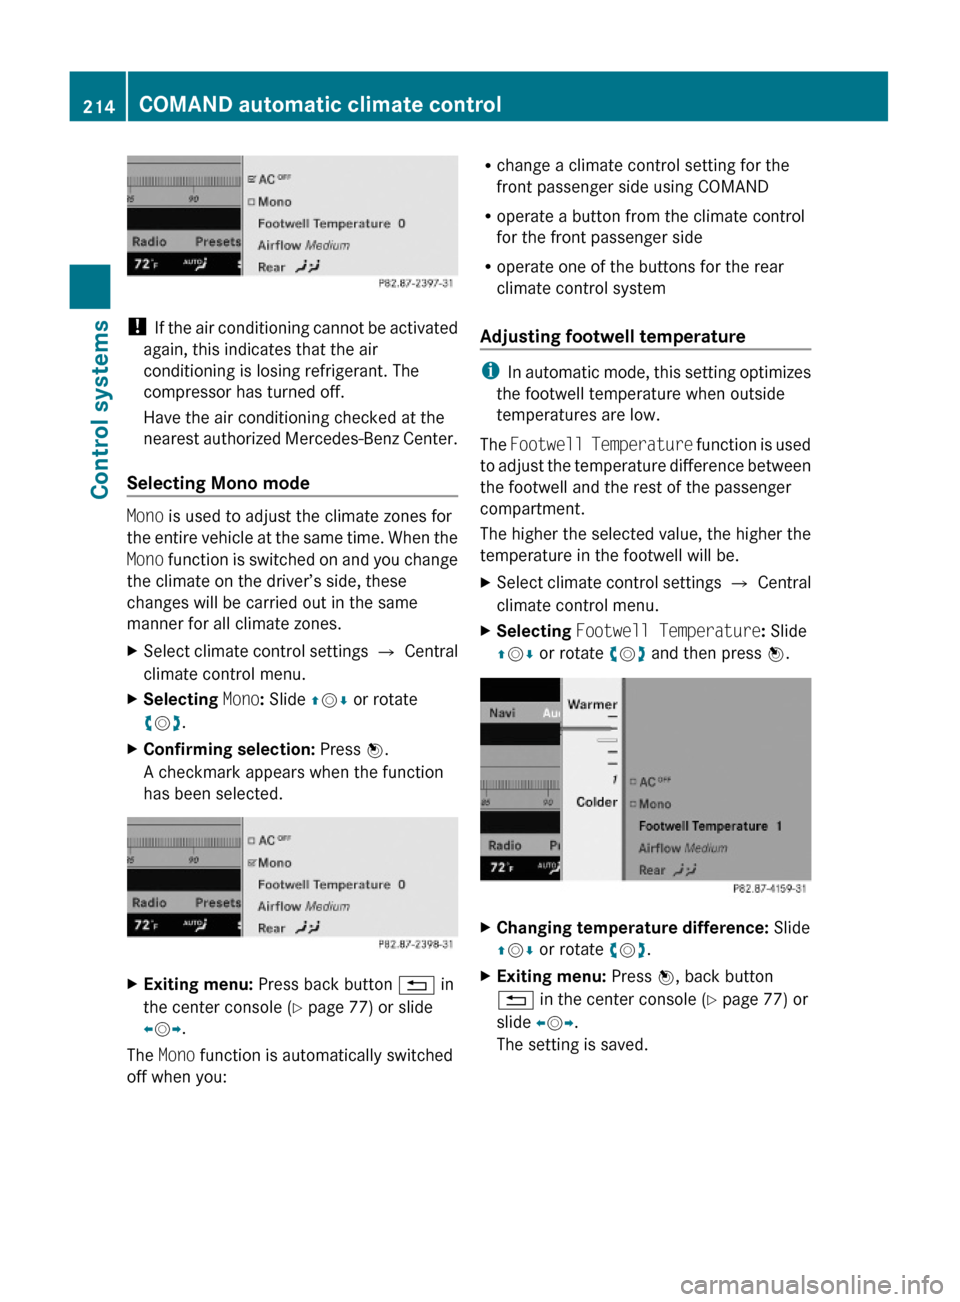
A checkmark appears when the function
has been selected.
XExiting menu: Press back button % in
the center console (Y page 77) or slide
XVY.
The Mono function is automatically switched
off when you:
Rchange a climate control setting for the
front passenger side using COMAND
Roperate a button from the climate control
for the front passenger side
Roperate one of the buttons for the rear
climate control system
Adjusting footwell temperature
iIn automatic mode, this setting optimizes
the footwell temperature when outside
temperatures are low.
The Footwell Temperature function is used
to adjust the temperature difference between
the footwell and the rest of the passenger
compartment.
The higher the selected value, the higher the
temperature in the footwell will be.
XSelect climate control settings Q Central
climate control menu.
XSelecting Footwell Temperature: Slide
ZVÆ or rotate cVd and then press W.
XChanging temperature difference: Slide
ZVÆ or rotate cVd.
XExiting menu: Press W, back button
% in the center console (Y page 77) or
slide XVY.
The setting is saved.
214COMAND automatic climate controlControl systems
221_AKB; 6; 20, en-USd2ugruen,Version: 2.11.8.12009-09-24T13:28:17+02:00 - Seite 214
Page 223 of 548
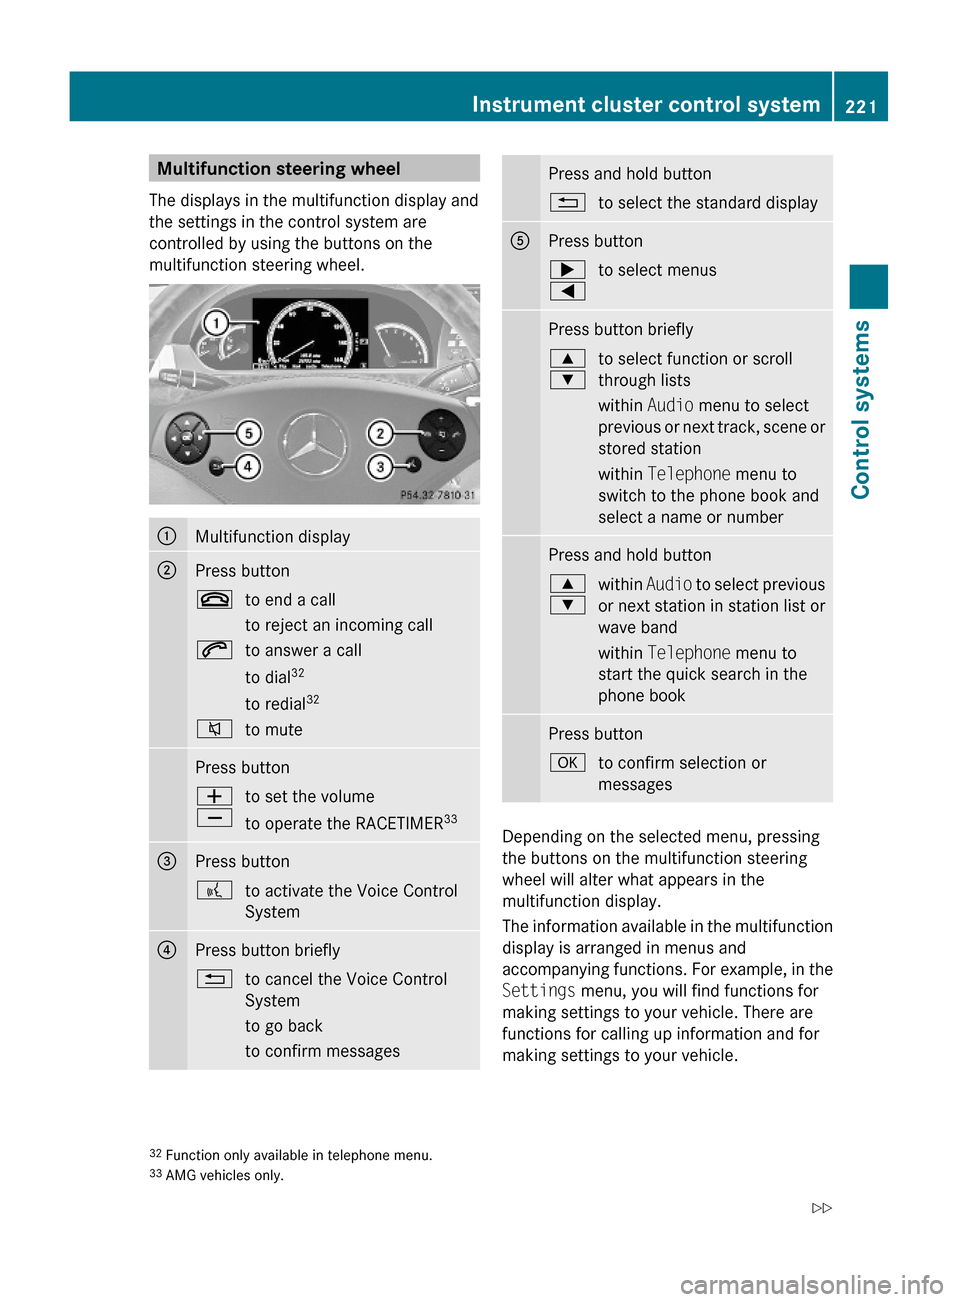
Multifunction steering wheel
The displays in the multifunction display and
the settings in the control system are
controlled by using the buttons on the
multifunction steering wheel.
:Multifunction display;Press button~to end a call
to reject an incoming call
6to answer a call
to dial32
to redial32
8to mutePress buttonW
X
to set the volume
to operate the RACETIMER33
=Press button?to activate the Voice Control
System
?Press button briefly%to cancel the Voice Control
System
to go back
to confirm messages
Press and hold button%to select the standard displayAPress button;
=
to select menusPress button briefly9
:
to select function or scroll
through lists
within Audio menu to select
previous or next track, scene or
stored station
within Telephone menu to
switch to the phone book and
select a name or number
Press and hold button9
:
within Audio to select previous
or next station in station list or
wave band
within Telephone menu to
start the quick search in the
phone book
Press buttonato confirm selection or
messages
Depending on the selected menu, pressing
the buttons on the multifunction steering
wheel will alter what appears in the
multifunction display.
The information available in the multifunction
display is arranged in menus and
accompanying functions. For example, in the
Settings menu, you will find functions for
making settings to your vehicle. There are
functions for calling up information and for
making settings to your vehicle.
32Function only available in telephone menu.33AMG vehicles only.
Instrument cluster control system221Control systems221_AKB; 6; 20, en-USd2ugruen,Version: 2.11.8.12009-09-24T13:28:17+02:00 - Seite 221Z
Page 230 of 548
The engine oil temperature will be shown in
blue if the engine oil temperature has not yet
reached 176‡ (80†). During this time, avoid
driving at full engine speed.
If the engine reaches the overspeed range in
the manual shift program, you will see up next
to gear indicator : as a reminder to upshift.
Use buttons : or 9 to select the
following functions in the AMG menu:
RRACETIMER (Y page 228)
ROverall analysis (Y page 229)
RLap analysis (Y page 229)
RACETIMER
GWarning!
The RACETIMER feature is only for use on
roads and in conditions where high speed
driving is permitted. Racing on public roads is
prohibited under all circumstances. The driver
is and must always remain responsible for
following posted speed limits.
The RACETIMER allows you to time and save
driving stretches.
XPress button = or ; to select the
AMG menu.
XPress button 9 to select the
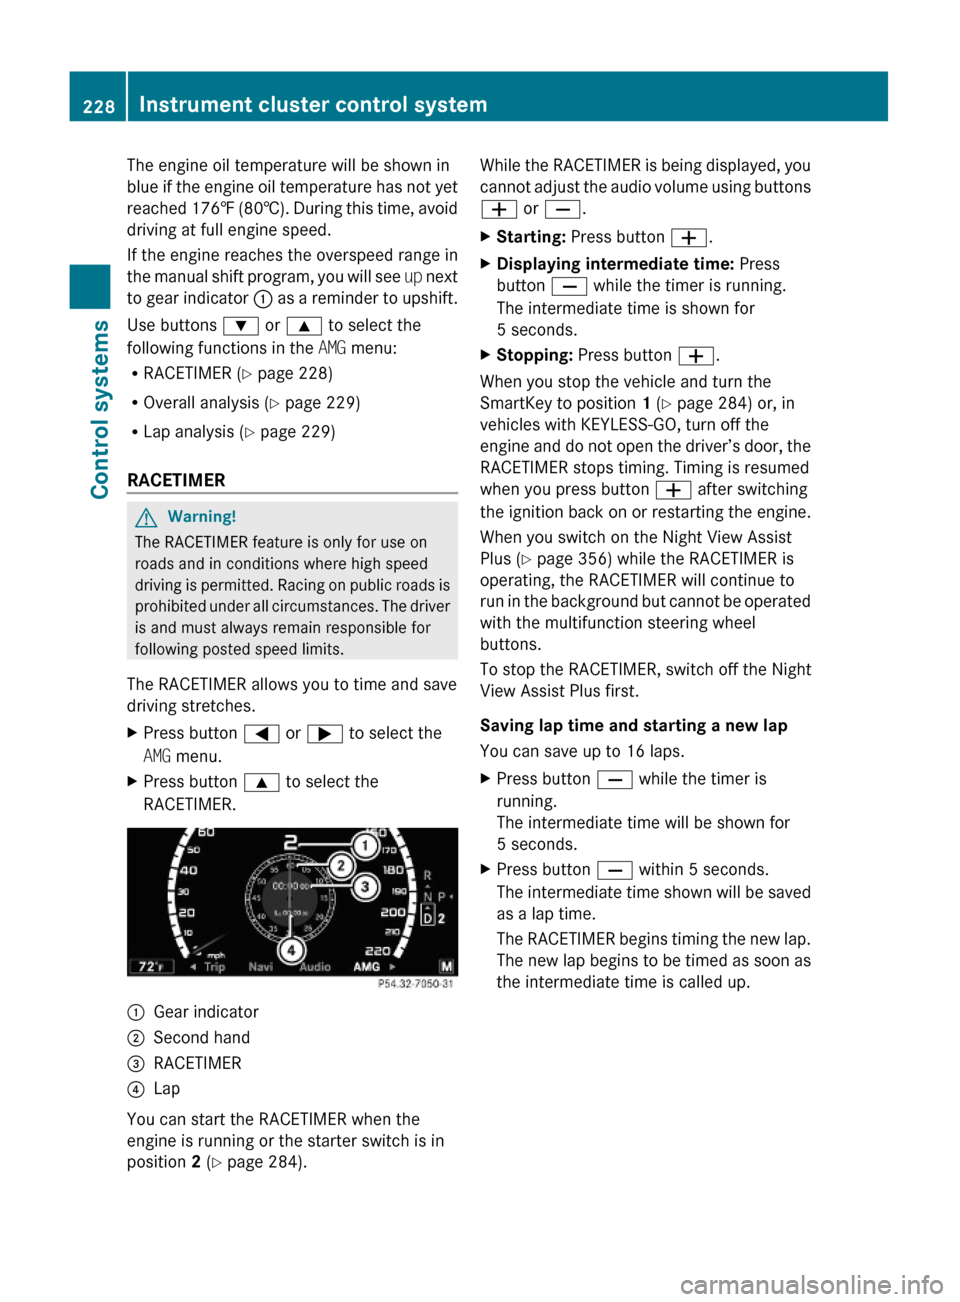
RACETIMER.
:Gear indicator;Second hand=RACETIMER?Lap
You can start the RACETIMER when the
engine is running or the starter switch is in
position 2 (Y page 284).
While the RACETIMER is being displayed, you
cannot adjust the audio volume using buttons
W or X.
XStarting: Press button W.XDisplaying intermediate time: Press
button X while the timer is running.
The intermediate time is shown for
5 seconds.
XStopping: Press button W.
When you stop the vehicle and turn the
SmartKey to position 1 (Y page 284) or, in
vehicles with KEYLESS-GO, turn off the
engine and do not open the driver’s door, the
RACETIMER stops timing. Timing is resumed
when you press button W after switching
the ignition back on or restarting the engine.
When you switch on the Night View Assist
Plus (Y page 356) while the RACETIMER is
operating, the RACETIMER will continue to
run in the background but cannot be operated
with the multifunction steering wheel
buttons.
To stop the RACETIMER, switch off the Night
View Assist Plus first.
Saving lap time and starting a new lap
You can save up to 16 laps.
XPress button X while the timer is
running.
The intermediate time will be shown for
5 seconds.
XPress button X within 5 seconds.
The intermediate time shown will be saved
as a lap time.
The RACETIMER begins timing the new lap.
The new lap begins to be timed as soon as
the intermediate time is called up.
228Instrument cluster control systemControl systems
221_AKB; 6; 20, en-USd2ugruen,Version: 2.11.8.12009-09-24T13:28:17+02:00 - Seite 228
Page 240 of 548
GWarning!
Please do not use the Voice Control System
in an emergency, as the tone of your voice
may change in a stressful situation. This could
cause a delay in completing your phone call
in a timely manner. This could distract you in
an emergency situation and cause you to be
involved in an accident.
General information
Depending on vehicle equipment, you can
operate the following systems via the Voice
Control System:
RTelephone (Y page 245)
RNavigation (Y page 240)
RAddress book (Y page 249)
RAudio (Y page 252) (AM/FM radio,
Satellite radio, CD/DVD changer, MP3
mode (SD card, USB, Music Register, Media
Interface), AUX)
RVideo
You control these systems using spoken
commands. Moreover, controls such as the
buttons on the multifunction steering wheel
(Y page 238) allow you to keep your hands
on the steering wheel.
The Voice Control System recognizes
commands and number sequences,
irrespective of the speaker. To optimize
speech recognition for your voice follow the
individualization process (Y page 271).
You can use the Voice Control System to call
up all of COMAND’s main menu items.
The commands can be spoken without
pausing between the individual words. If an
unavailable or incorrect command is used,
the Voice Control System will prompt you for
a new command by asking “Please repeat” or
“Please repeat your entry”.
The Voice Control System will confirm
important commands and inform you in case
of incorrect entries.
iTo support the user, the Voice Control
System contains an extensive help function
(Y page 267).
You can use the commands “Continue” or
“Back” to scroll up or down in lists.
The command “Correction” lets you repeat
the entry.
Controls
Operation via the multifunction
steering wheel
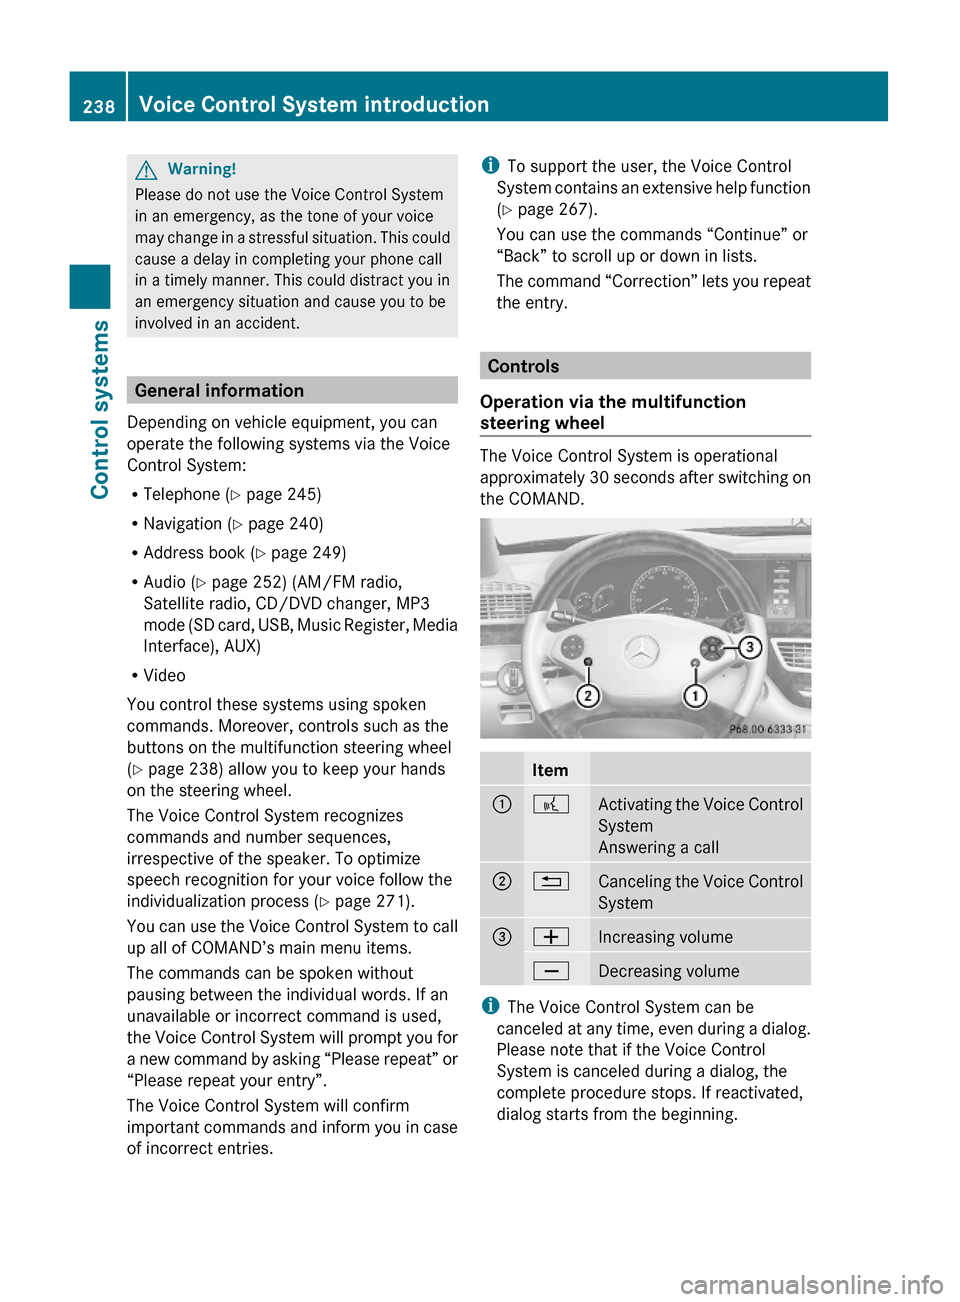
The Voice Control System is operational
approximately 30 seconds after switching on
the COMAND.
Item:?Activating the Voice Control
System
Answering a call
;%Canceling the Voice Control
System
=WIncreasing volumeXDecreasing volume
iThe Voice Control System can be
canceled at any time, even during a dialog.
Please note that if the Voice Control
System is canceled during a dialog, the
complete procedure stops. If reactivated,
dialog starts from the beginning.
238Voice Control System introductionControl systems
221_AKB; 6; 20, en-USd2ugruen,Version: 2.11.8.12009-09-24T13:28:17+02:00 - Seite 238
Page 277 of 548
interference that may cause undesired
operation.
Any unauthorized modification to this
device could void the user’s authority to
operate the equipment.
i Canada only:
This device complies with RSS-210 of
Industry Canada. Operation is subject to
the following two conditions:
1. This device may not cause interference,
and
2. this device must accept any interference received, including
interference that may cause undesired
operation of the device.
Any unauthorized modification to this
device could void the user’s authority to
operate the equipment.
Factory setting XGlobal unlocking: Press button %.
Unless you open a door or the trunk within
approximately 40 seconds after unlocking
the vehicle:
R The vehicle will be locked again.
R The anti-theft alarm system will be
rearmed.
XGlobal locking: Press button &.
Selective setting
If you frequently travel alone, you may wish
to reprogramm the SmartKey. Pressing
button % will then only unlock the driver’s
door and the fuel filler flap.
XSwitching on/off: Press and hold buttons
% and & simultaneously for
approximately 6 seconds until the battery
check lamp ( Y page 277) flashes twice.
The SmartKey will then function as follows:
XUnlocking driver’s door and fuel filler
flap: Press button % once.XGlobal unlocking: Press button %
twice.XGlobal locking: Press button &.
KEYLESS-GO
Vehicles equipped with KEYLESS-GO come
with two SmartKeys with KEYLESS-GO, each
with remote control and a removable
mechanical key.
The KEYLESS-GO function is integrated into
the SmartKey. The validity of the SmartKey is
checked every time you grasp an outside door
handle.
When the SmartKey is valid, your vehicle
unlocks
R the doors
R the trunk lid
R the fuel filler flap
i USA only:
This device complies with Part 15 of the
FCC Rules. Operation is subject to the
following two conditions:
1. This device may not cause harmful interference, and
2. this device must accept any interference received, including
interference that may cause undesired
operation.
Any unauthorized modification to this
device could void the user’s authority to
operate the equipment.
Locking and unlocking275Controls in detail221_AKB; 6; 20, en-USd2ugruen,Version: 2.11.8.12009-09-24T13:28:17+02:00 - Seite 275Z
Page 279 of 548
Possibility 2 (One SmartKey in the vehicle,
no SmartKey outside the vehicle):
When exiting and trying to lock the vehicle,
the message Key Detected In Vehicle
appears in the multifunction display. The
vehicle will not be locked.
Factory setting
XGlobal unlocking: Pull an outside door
handle.
Unless you open a door or the trunk within
approximately 40 seconds after unlocking
the vehicle:
RThe vehicle will be locked again.
RThe anti-theft alarm system will be
rearmed.
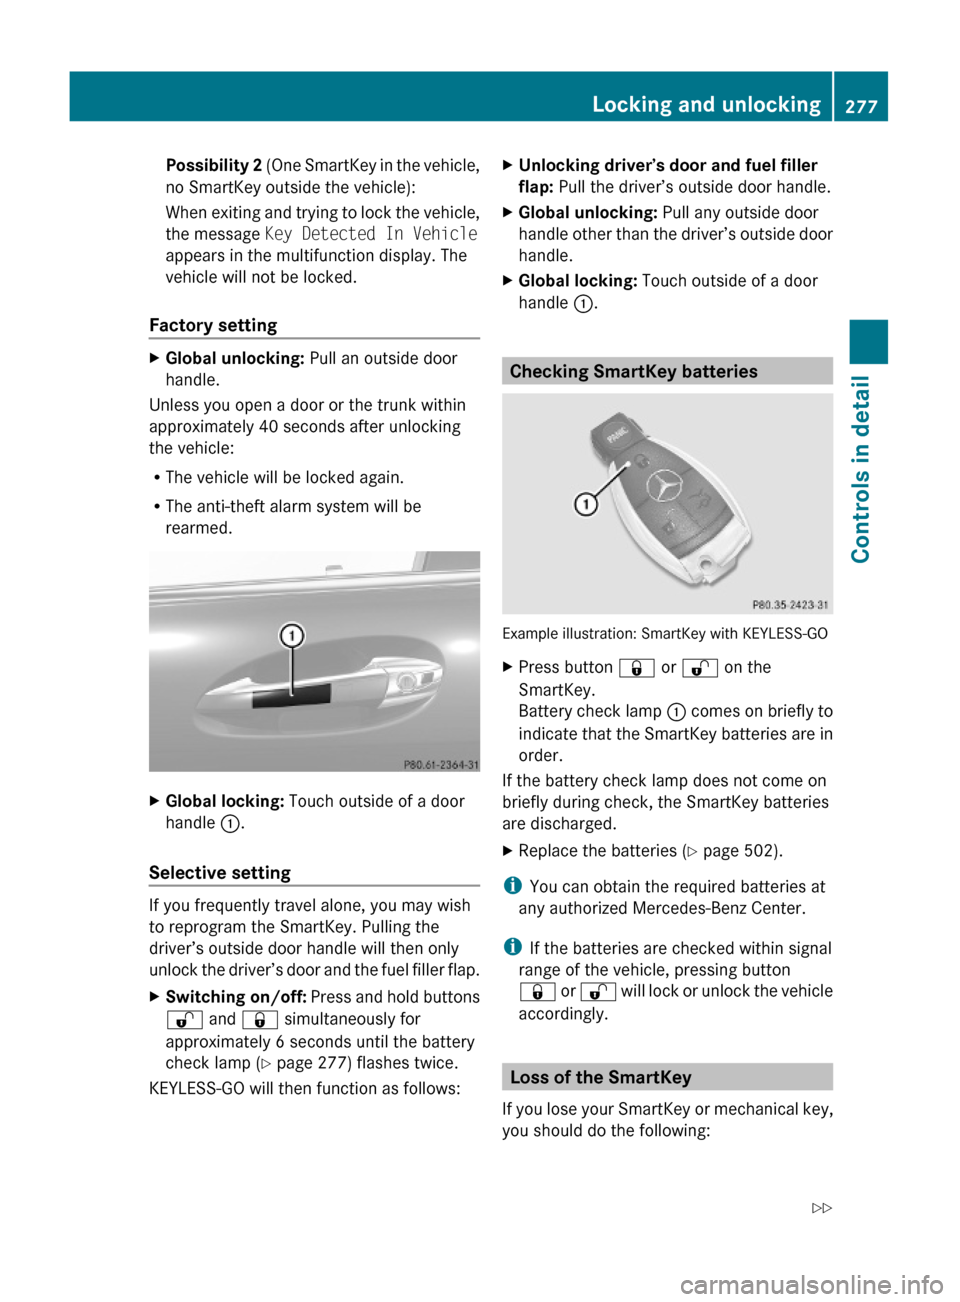
XGlobal locking: Touch outside of a door
handle :.
Selective setting
If you frequently travel alone, you may wish
to reprogram the SmartKey. Pulling the
driver’s outside door handle will then only
unlock the driver’s door and the fuel filler flap.
XSwitching on/off: Press and hold buttons
% and & simultaneously for
approximately 6 seconds until the battery
check lamp (Y page 277) flashes twice.
KEYLESS-GO will then function as follows:
XUnlocking driver’s door and fuel filler
flap: Pull the driver’s outside door handle.
XGlobal unlocking: Pull any outside door
handle other than the driver’s outside door
handle.
XGlobal locking: Touch outside of a door
handle :.
Checking SmartKey batteries
Example illustration: SmartKey with KEYLESS-GO
XPress button & or % on the
SmartKey.
Battery check lamp : comes on briefly to
indicate that the SmartKey batteries are in
order.
If the battery check lamp does not come on
briefly during check, the SmartKey batteries
are discharged.
XReplace the batteries (Y page 502).
iYou can obtain the required batteries at
any authorized Mercedes-Benz Center.
iIf the batteries are checked within signal
range of the vehicle, pressing button
& or % will lock or unlock the vehicle
accordingly.
Loss of the SmartKey
If you lose your SmartKey or mechanical key,
you should do the following:
Locking and unlocking277Controls in detail221_AKB; 6; 20, en-USd2ugruen,Version: 2.11.8.12009-09-24T13:28:17+02:00 - Seite 277Z
Page 291 of 548
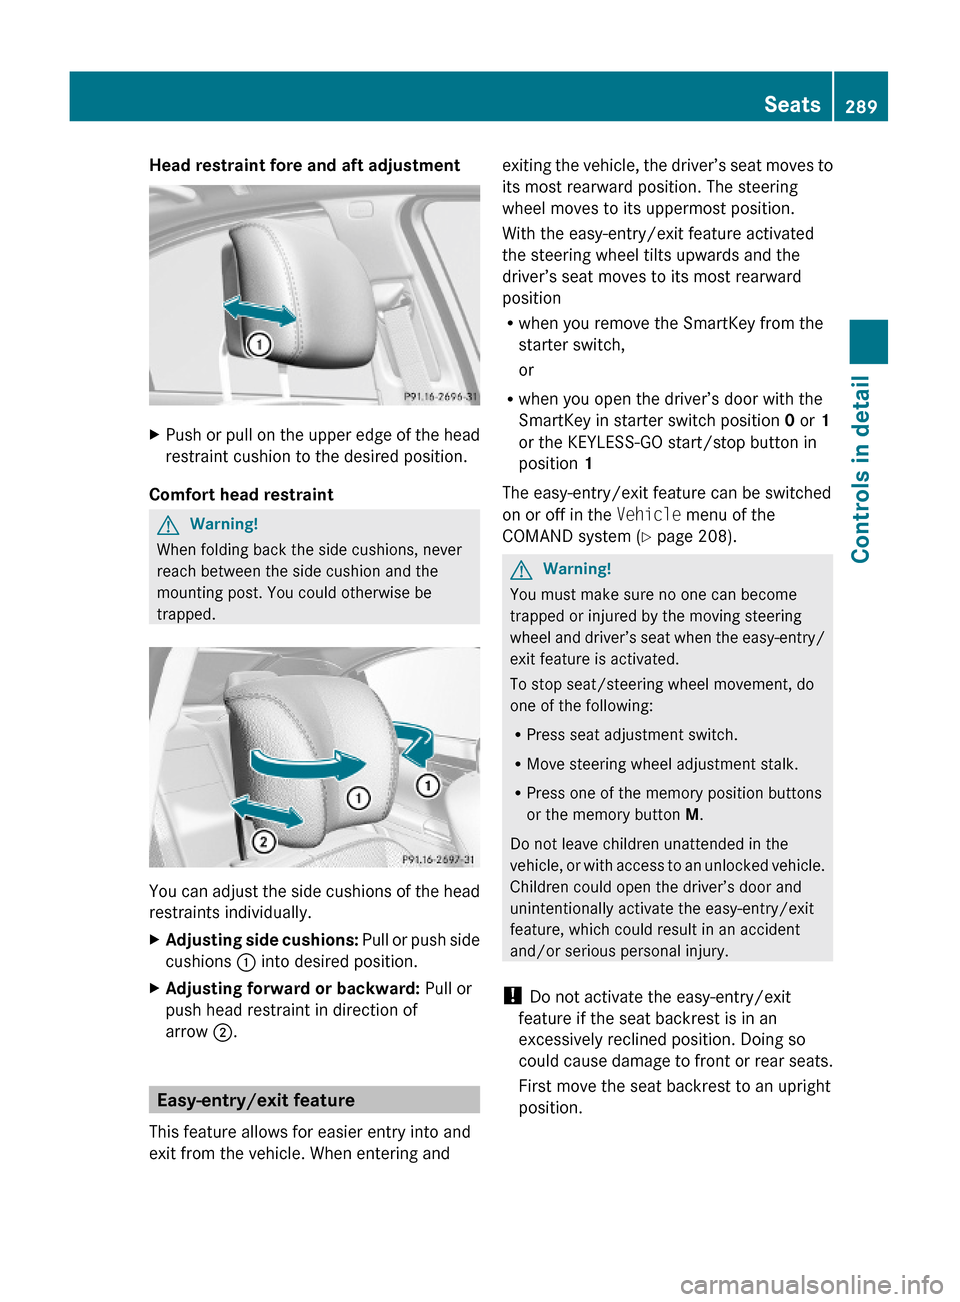
Head restraint fore and aft adjustment XPush or pull on the upper edge of the head
restraint cushion to the desired position.
Comfort head restraint
GWarning!
When folding back the side cushions, never
reach between the side cushion and the
mounting post. You could otherwise be
trapped.
You can adjust the side cushions of the head
restraints individually.
XAdjusting side cushions: Pull or push side
cushions : into desired position.
XAdjusting forward or backward: Pull or
push head restraint in direction of
arrow ;.
Easy-entry/exit feature
This feature allows for easier entry into and
exit from the vehicle. When entering and
exiting the vehicle, the driver’s seat moves to
its most rearward position. The steering
wheel moves to its uppermost position.
With the easy-entry/exit feature activated
the steering wheel tilts upwards and the
driver’s seat moves to its most rearward
position
Rwhen you remove the SmartKey from the
starter switch,
or
Rwhen you open the driver’s door with the
SmartKey in starter switch position 0 or 1
or the KEYLESS-GO start/stop button in
position 1
The easy-entry/exit feature can be switched
on or off in the Vehicle menu of the
COMAND system (Y page 208).
GWarning!
You must make sure no one can become
trapped or injured by the moving steering
wheel and driver’s seat when the easy-entry/
exit feature is activated.
To stop seat/steering wheel movement, do
one of the following:
RPress seat adjustment switch.
RMove steering wheel adjustment stalk.
RPress one of the memory position buttons
or the memory button M.
Do not leave children unattended in the
vehicle, or with access to an unlocked vehicle.
Children could open the driver’s door and
unintentionally activate the easy-entry/exit
feature, which could result in an accident
and/or serious personal injury.
! Do not activate the easy-entry/exit
feature if the seat backrest is in an
excessively reclined position. Doing so
could cause damage to front or rear seats.
First move the seat backrest to an upright
position.
Seats289Controls in detail221_AKB; 6; 20, en-USd2ugruen,Version: 2.11.8.12009-09-24T13:28:17+02:00 - Seite 289Z
Page 295 of 548
Multicontour seats, rear
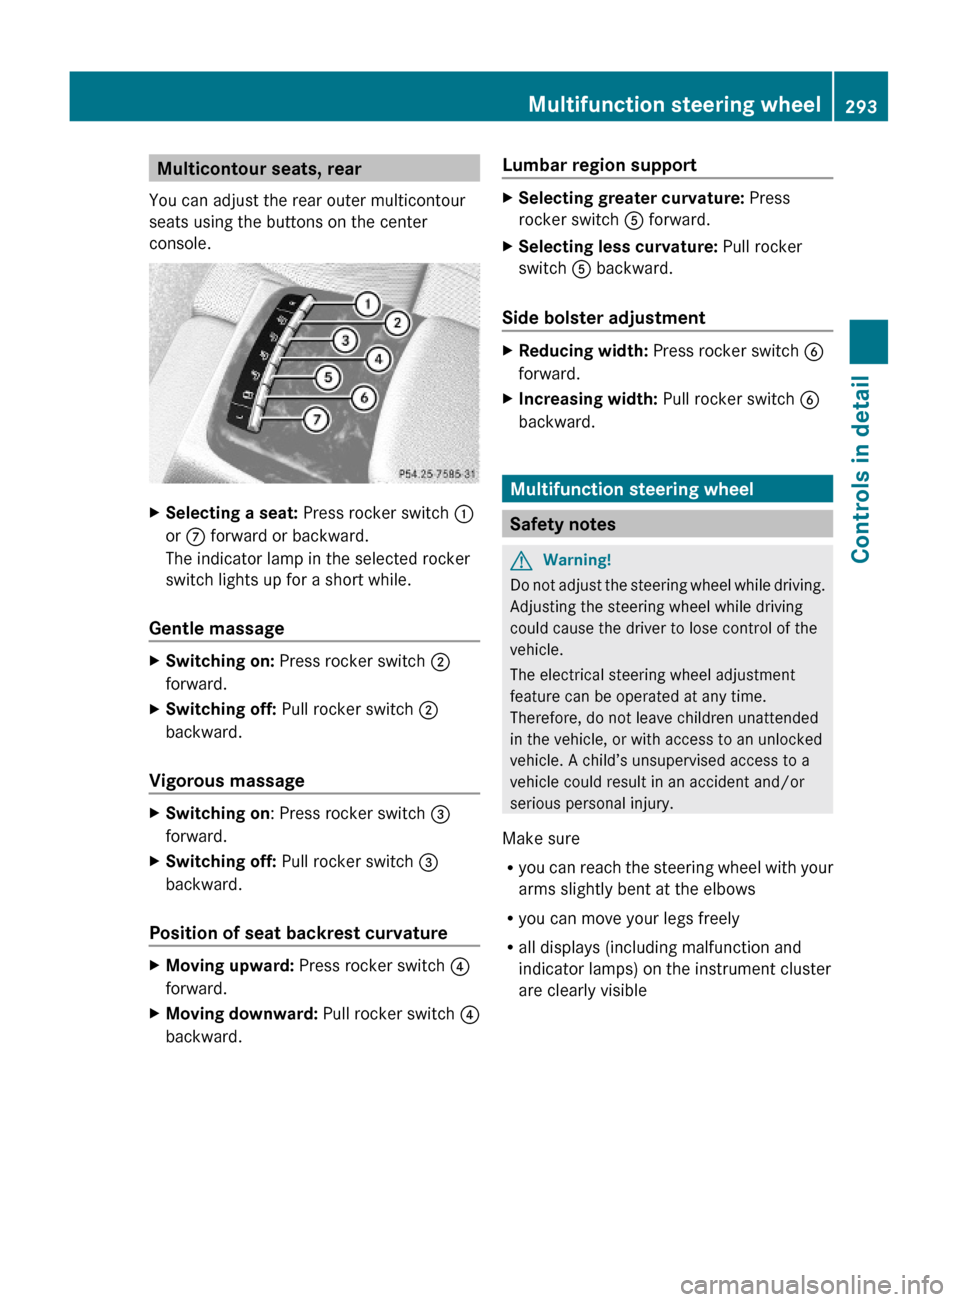
You can adjust the rear outer multicontour
seats using the buttons on the center
console.
XSelecting a seat: Press rocker switch :
or C forward or backward.
The indicator lamp in the selected rocker
switch lights up for a short while.
Gentle massage
XSwitching on: Press rocker switch ;
forward.
XSwitching off: Pull rocker switch ;
backward.
Vigorous massage
XSwitching on: Press rocker switch =
forward.
XSwitching off: Pull rocker switch =
backward.
Position of seat backrest curvature
XMoving upward: Press rocker switch ?
forward.
XMoving downward: Pull rocker switch ?
backward.
Lumbar region supportXSelecting greater curvature: Press
rocker switch A forward.
XSelecting less curvature: Pull rocker
switch A backward.
Side bolster adjustment
XReducing width: Press rocker switch B
forward.
XIncreasing width: Pull rocker switch B
backward.
Multifunction steering wheel
Safety notes
GWarning!
Do not adjust the steering wheel while driving.
Adjusting the steering wheel while driving
could cause the driver to lose control of the
vehicle.
The electrical steering wheel adjustment
feature can be operated at any time.
Therefore, do not leave children unattended
in the vehicle, or with access to an unlocked
vehicle. A child’s unsupervised access to a
vehicle could result in an accident and/or
serious personal injury.
Make sure
Ryou can reach the steering wheel with your
arms slightly bent at the elbows
Ryou can move your legs freely
Rall displays (including malfunction and
indicator lamps) on the instrument cluster
are clearly visible
Multifunction steering wheel293Controls in detail221_AKB; 6; 20, en-USd2ugruen,Version: 2.11.8.12009-09-24T13:28:17+02:00 - Seite 293Z
Page 306 of 548
Switching offXSwitch off the left or right turn signal.
or
XSteer straight ahead.
The corner-illuminating lamp goes out.
iThere may be a brief delay before the
corner-illuminating lamps go out.
Interior lighting in the front
iEven with the SmartKey being removed
from the starter switch you can still use the
lighting for the storage compartment, glove
box and vanity mirrors, when you open a
door or press one of the interior lighting
buttons. If a lamp is switched on and you
do not lock the vehicle, it will be switched
off automatically after 30 minutes.
When you lock the vehicle from the outside,
the interior lighting is switched off.
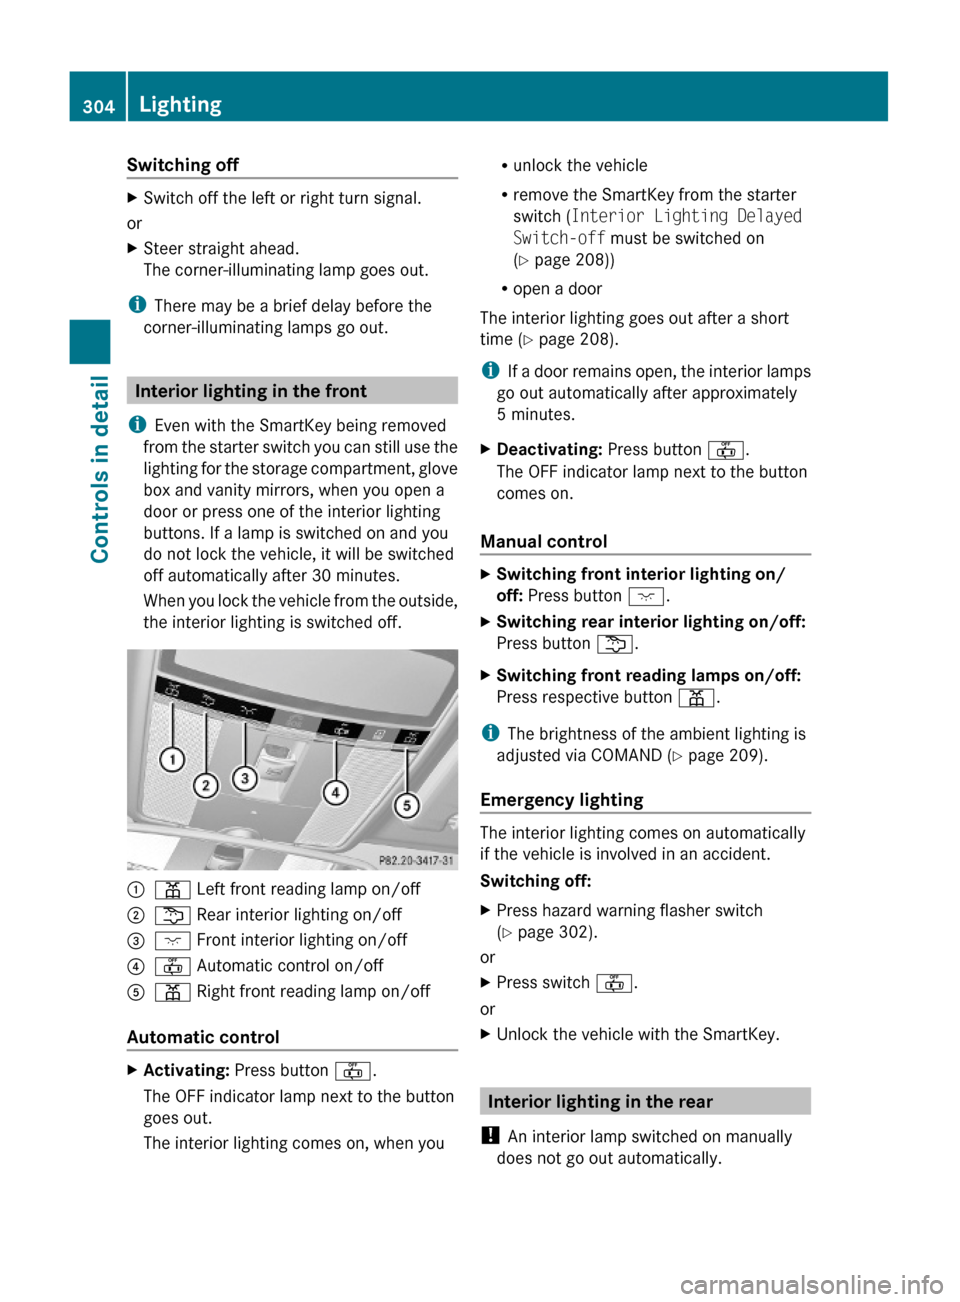
:p Left front reading lamp on/off ;s Rear interior lighting on/off=c Front interior lighting on/off ?~ Automatic control on/offAp Right front reading lamp on/off
Automatic control
XActivating: Press button ~.
The OFF indicator lamp next to the button
goes out.
The interior lighting comes on, when you
Runlock the vehicle
Rremove the SmartKey from the starter
switch (Interior Lighting Delayed
Switch-off must be switched on
(Y page 208))
Ropen a door
The interior lighting goes out after a short
time (Y page 208).
iIf a door remains open, the interior lamps
go out automatically after approximately
5 minutes.
XDeactivating: Press button ~.
The OFF indicator lamp next to the button
comes on.
Manual control
XSwitching front interior lighting on/
off: Press button c.
XSwitching rear interior lighting on/off:
Press button s.
XSwitching front reading lamps on/off:
Press respective button p.
iThe brightness of the ambient lighting is
adjusted via COMAND (Y page 209).
Emergency lighting
The interior lighting comes on automatically
if the vehicle is involved in an accident.
Switching off:
XPress hazard warning flasher switch
(Y page 302).
or
XPress switch ~.
or
XUnlock the vehicle with the SmartKey.
Interior lighting in the rear
! An interior lamp switched on manually
does not go out automatically.
304LightingControls in detail
221_AKB; 6; 20, en-USd2ugruen,Version: 2.11.8.12009-09-24T13:28:17+02:00 - Seite 304
Page 360 of 548
and cannot check the function of the Night
View Assist Plus.
Image on multifunction display
When you switch on the Night View Assist
Plus, the dial for the speedometer changes on
the multifunction display. The speedometer
dial is shown as a bar on the lower edge of
the multifunction display. The line for main
menus is no longer available. If you would like
to change a setting using the steering wheel
buttons, you must first switch off the Night
View Assist Plus.
Pedestrian detection
The Night View Assist Plus detects
pedestrians by means of specific
characteristics, e.g. a human silhouette.
Pedestrian detection is activated when
Rthe Night View Assist Plus is switched on
Rthe vehicle speed is above approximately
6 mph (10 km/h)
Rdriving in darkness, e.g. on highways
without road lighting
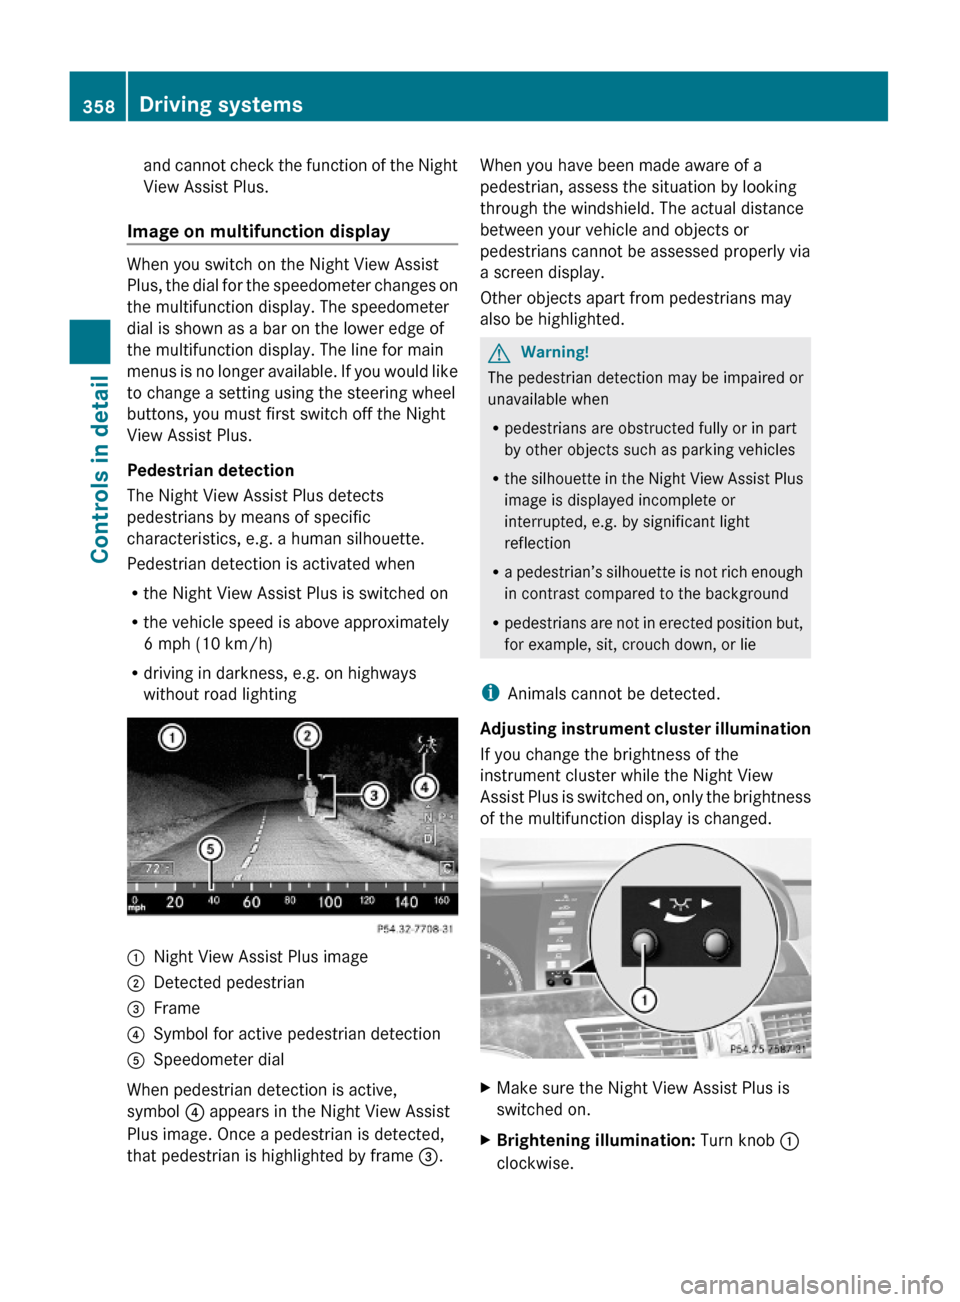
:Night View Assist Plus image;Detected pedestrian=Frame?Symbol for active pedestrian detectionASpeedometer dial
When pedestrian detection is active,
symbol ? appears in the Night View Assist
Plus image. Once a pedestrian is detected,
that pedestrian is highlighted by frame =.
When you have been made aware of a
pedestrian, assess the situation by looking
through the windshield. The actual distance
between your vehicle and objects or
pedestrians cannot be assessed properly via
a screen display.
Other objects apart from pedestrians may
also be highlighted.
GWarning!
The pedestrian detection may be impaired or
unavailable when
Rpedestrians are obstructed fully or in part
by other objects such as parking vehicles
Rthe silhouette in the Night View Assist Plus
image is displayed incomplete or
interrupted, e.g. by significant light
reflection
Ra pedestrian’s silhouette is not rich enough
in contrast compared to the background
Rpedestrians are not in erected position but,
for example, sit, crouch down, or lie
iAnimals cannot be detected.
Adjusting instrument cluster illumination
If you change the brightness of the
instrument cluster while the Night View
Assist Plus is switched on, only the brightness
of the multifunction display is changed.
XMake sure the Night View Assist Plus is
switched on.
XBrightening illumination: Turn knob :
clockwise.
358Driving systemsControls in detail
221_AKB; 6; 20, en-USd2ugruen,Version: 2.11.8.12009-09-24T13:28:17+02:00 - Seite 358