MERCEDES-BENZ S63AMG 2010 W221 Owner's Manual
Manufacturer: MERCEDES-BENZ, Model Year: 2010, Model line: S63AMG, Model: MERCEDES-BENZ S63AMG 2010 W221Pages: 548, PDF Size: 12.48 MB
Page 191 of 548
Rear Seat Entertainment SystemGObserve Safety notes, see page 76.GWarning!
The driver should not wear a Rear Seat
Entertainment headphone while operating the
vehicle under any circumstances. The use of
a headphone while driving the vehicle could
drastically impair the ability to react to audible
traffic conditions (e.g. emergency sirens from
police/fire/ambulance, another car’s horn,
etc.).
GWarning!
When not in use, headphones or external
video sources should be stored in a safe
location (e.g. one of the vehicle’s storage
compartments) so that they are not loose
within the passenger compartment during
braking, vehicle maneuvers or a traffic
accident. Objects moving within the
passenger compartment could cause serious
personal injury to vehicle occupants.
GWarning!
Due to a potential choking hazard, wired
headphone usage by children should only
occur with adult supervision.
You can operate the Rear Seat Entertainment
System via the remote controls ( Y page 81)
that come with the vehicle.
The playback of audio and video sources with
the Rear Seat Entertainment System is
identical to playback with the COMAND to a
large extent.
The COMAND and the Rear Seat
Entertainment System can be operated
simultaneously almost independent of each
other. However, some menus may cause
conflicts when the systems are used by
multiple users. Conflicts can occur between
the rear screens as well as COMAND and the
Rear Seat Entertainment System.
Remote controls for Rear Seat
Entertainment System
The Rear Seat Entertainment System
contains two remote controls for the rear
passenger compartment.
For information on using the remote controls,
see ( Y page 81).
Headphones for Rear Seat
Entertainment System
The Rear Seat Entertainment System
contains two headphones for the rear
passenger compartment.
For information on using the headphones, see
( Y page 82).
Related topics
R Inserting/ejecting CDs and DVDs
( Y page 180)
R Connecting and playing back external
devices ( Y page 186)
R Remote control ( Y page 81)
R Playing back audio CDs/audio DVDs
( Y page 176)
R Playing back video CDs/audio DVDs
( Y page 191)
CD/DVD drive
GObserve Safety notes, see page 176.
When both screens are used with the CD/
DVD drive, selecting certain menus or
changing certain settings on one screen will
also be applied to the other screen.
The following functions will be applied to both
screens:
R Changing Playback options
R Selecting track
R Using Play, Pause, and Stop
Rear Seat Entertainment System189Control systems221_AKB; 6; 20, en-USd2ugruen,Version: 2.11.8.12009-09-24T13:28:17+02:00 - Seite 189Z
Page 192 of 548
RForward and Rewind as well as Skipping
tracks
RSelecting the DVD menu and moving within
that menu
RChanging language, subtitles and camera
angle
RCalling up interactive DVD contents
The following functions will be applied to one
screen only:
RChanging audio, video and screen settings
RSwitching between full screen, menu
system and control menu
Switching between main functions
By selecting the main functions you set the
playback options of the various audio and
video sources.
Main functionDiscPlayback with rear
CD/DVD drive
COMANDPlayback with
COMAND System
AuxPlayback with an
external device
connected in the
rear
SystemMenu for basic
settings
When exiting a main function, the settings are
saved. When calling up again the function
later the following is possible:
RThe main function is already running on
both screens.
RThe main function does not run on the other
screen.
In the first case, the main function appears
the way it is already displayed on the other
screen.
In the second case, the setting at which you
have exited the main function the last time
appears.
Inserting/ejecting CDs and DVDs
Loading or ejecting a disc is only displayed on
the screen on which the main function Disc
is selected. Storage of the current settings for
both screens are reset to the original settings.
Simultaneous usage of COMAND and
the Rear Seat Entertainment System
Adopting the audio signal from Rear
Seat Entertainment System for front
passenger
You can transmit the audio signal of the CD/
DVD drive of the Rear Seat Entertainment
System to the headphone of the front
passenger. The volume is adjusted on the
headphone. The audio signal is transmitted to
the COMAND when the main function Disc is
selected on either rear screen. When the
main function Disc is not selected on at least
one rear screen, the audio signal is not
transmitted to the COMAND.
XSelect Audio Q Rear in the COMAND.
Playing the active COMAND source on
the Rear Seat Entertainment System
190Rear Seat Entertainment SystemControl systems
221_AKB; 6; 20, en-USd2ugruen,Version: 2.11.8.12009-09-24T13:28:17+02:00 - Seite 190
Page 193 of 548
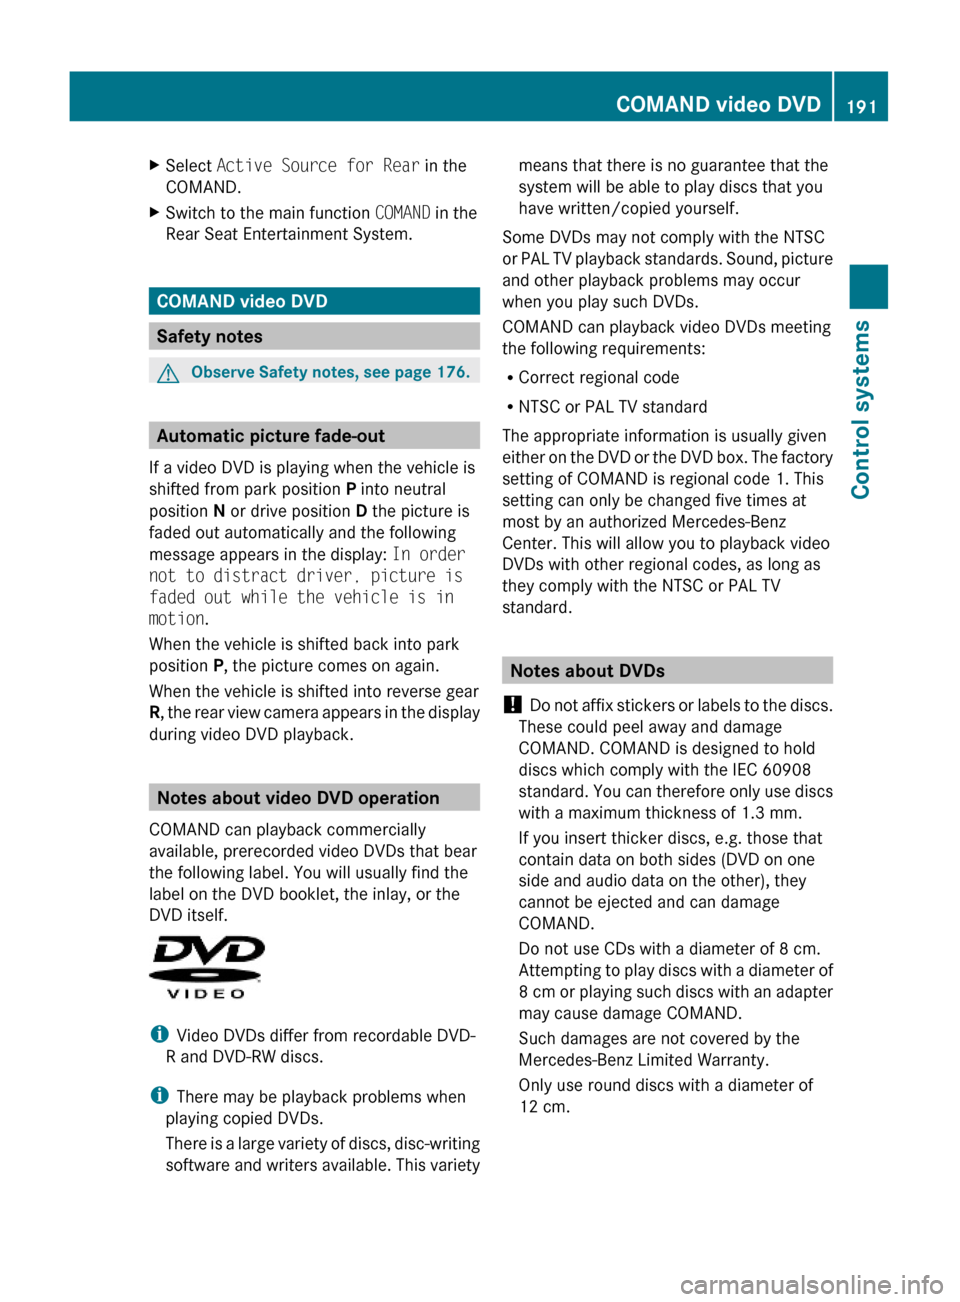
XSelect Active Source for Rear in the
COMAND.
XSwitch to the main function COMAND in the
Rear Seat Entertainment System.
COMAND video DVD
Safety notes
GObserve Safety notes, see page 176.
Automatic picture fade-out
If a video DVD is playing when the vehicle is
shifted from park position P into neutral
position N or drive position D the picture is
faded out automatically and the following
message appears in the display: In order
not to distract driver, picture is
faded out while the vehicle is in
motion.
When the vehicle is shifted back into park
position P, the picture comes on again.
When the vehicle is shifted into reverse gear
R, the rear view camera appears in the display
during video DVD playback.
Notes about video DVD operation
COMAND can playback commercially
available, prerecorded video DVDs that bear
the following label. You will usually find the
label on the DVD booklet, the inlay, or the
DVD itself.
iVideo DVDs differ from recordable DVD-
R and DVD-RW discs.
iThere may be playback problems when
playing copied DVDs.
There is a large variety of discs, disc-writing
software and writers available. This variety
means that there is no guarantee that the
system will be able to play discs that you
have written/copied yourself.
Some DVDs may not comply with the NTSC
or PAL TV playback standards. Sound, picture
and other playback problems may occur
when you play such DVDs.
COMAND can playback video DVDs meeting
the following requirements:
RCorrect regional code
RNTSC or PAL TV standard
The appropriate information is usually given
either on the DVD or the DVD box. The factory
setting of COMAND is regional code 1. This
setting can only be changed five times at
most by an authorized Mercedes-Benz
Center. This will allow you to playback video
DVDs with other regional codes, as long as
they comply with the NTSC or PAL TV
standard.
Notes about DVDs
! Do not affix stickers or labels to the discs.
These could peel away and damage
COMAND. COMAND is designed to hold
discs which comply with the IEC 60908
standard. You can therefore only use discs
with a maximum thickness of 1.3 mm.
If you insert thicker discs, e.g. those that
contain data on both sides (DVD on one
side and audio data on the other), they
cannot be ejected and can damage
COMAND.
Do not use CDs with a diameter of 8 cm.
Attempting to play discs with a diameter of
8 cm or playing such discs with an adapter
may cause damage COMAND.
Such damages are not covered by the
Mercedes-Benz Limited Warranty.
Only use round discs with a diameter of
12 cm.
COMAND video DVD191Control systems221_AKB; 6; 20, en-USd2ugruen,Version: 2.11.8.12009-09-24T13:28:17+02:00 - Seite 191Z
Page 194 of 548
Notes about handling DVDs
For notes about handling DVDs, see
( Y page 179).
Functional limitations
Depending on the DVD, it is possible that
certain functions or actions may be
temporarily or permanently unavailable. If
you try to utilize such functions or carry out
such actions, you will see the K symbol in
the display.
Inserting or ejecting DVDs
GObserve Safety notes, see page 176.XInserting or ejecting a DVD ( Y page 179).
Video DVD submenu overview
DVD-VII/ M¯MediaSoundDVD FunctionsPausing
playback IIStopping
playback ¯Selecting
mediumTrebleBrightnessContinuing
playback MBassContrastBalance/FaderColor3D Sound16:9 Optimized4:3WidescreenActive Source
for RearRear OFFSwitching to video DVD modeXInsert a DVD ( Y page 179).
or
XSelect Video Q Video DVD .
or
XPress shortcut button R once or twice.
i
Shortcut button R takes you directly
to the previously set disc mode (audio CD/
DVD, MP3-CD/DVD or video DVD). The
number of times you have to press the
shortcut button depends on the previously
set mode.
Showing/hiding the DVD control
menu
XShowing the menu: Slide ZV Æ.XHiding the menu: Slide ZV Æ.
or
XWait for approximately 8 seconds.192COMAND video DVDControl systems
221_AKB; 6; 20, en-USd2ugruen,Version: 2.11.8.12009-09-24T13:28:17+02:00 - Seite 192
Page 195 of 548
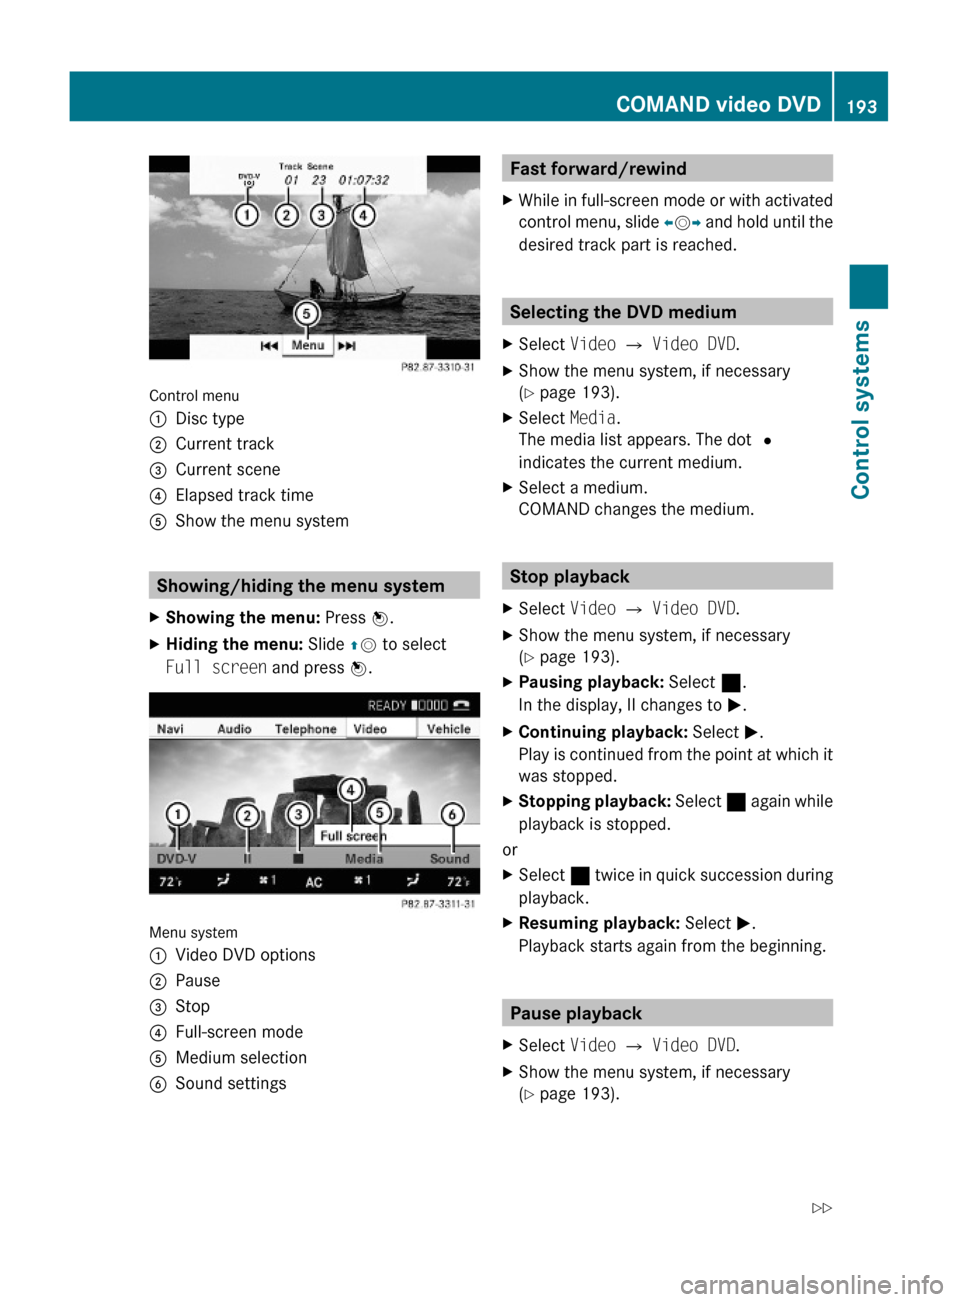
Control menu
:Disc type;Current track=Current scene?Elapsed track timeAShow the menu system
Showing/hiding the menu system
XShowing the menu: Press W.XHiding the menu: Slide ZV to select
Full screen and press W.
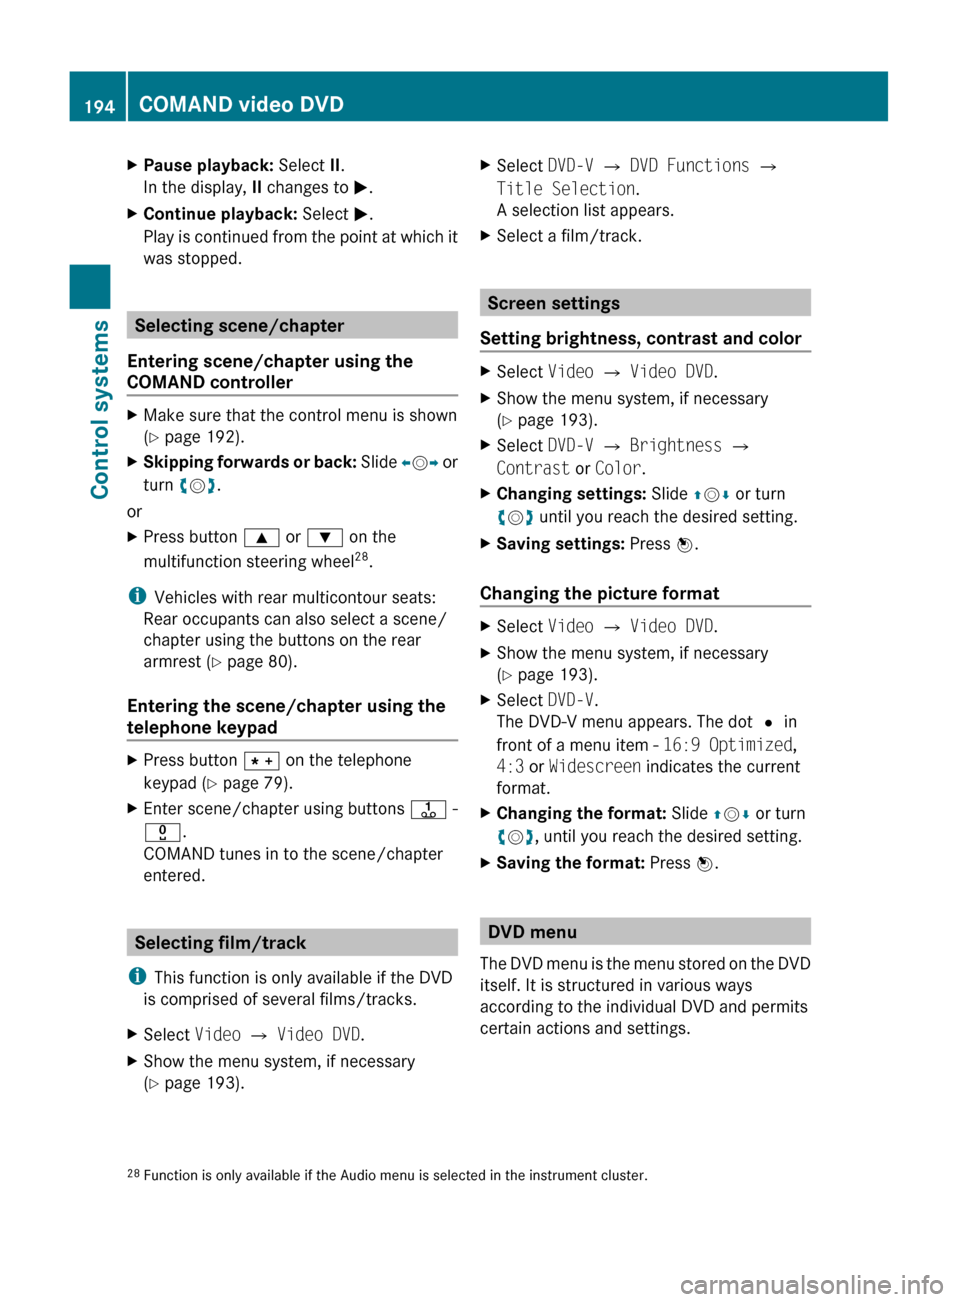
Menu system
:Video DVD options;Pause=Stop?Full-screen modeAMedium selectionBSound settingsFast forward/rewindXWhile in full-screen mode or with activated
control menu, slide XVY and hold until the
desired track part is reached.
Selecting the DVD medium
XSelect Video Q Video DVD.XShow the menu system, if necessary
(Y page 193).
XSelect Media.
The media list appears. The dot #
indicates the current medium.
XSelect a medium.
COMAND changes the medium.
Stop playback
XSelect Video Q Video DVD.XShow the menu system, if necessary
(Y page 193).
XPausing playback: Select ¯.
In the display, II changes to M.
XContinuing playback: Select M.
Play is continued from the point at which it
was stopped.
XStopping playback: Select ¯ again while
playback is stopped.
or
XSelect ¯ twice in quick succession during
playback.
XResuming playback: Select M.
Playback starts again from the beginning.
Pause playback
XSelect Video Q Video DVD.XShow the menu system, if necessary
(Y page 193).
COMAND video DVD193Control systems221_AKB; 6; 20, en-USd2ugruen,Version: 2.11.8.12009-09-24T13:28:17+02:00 - Seite 193Z
Page 196 of 548
XPause playback: Select II.
In the display, II changes to M.XContinue playback: Select M.
Play is continued from the point at which it
was stopped.
Selecting scene/chapter
Entering scene/chapter using the
COMAND controller
XMake sure that the control menu is shown
( Y page 192).XSkipping forwards or back: Slide XV Y or
turn cV d.
or
XPress button 9 or : on the
multifunction steering wheel 28
.
i Vehicles with rear multicontour seats:
Rear occupants can also select a scene/
chapter using the buttons on the rear
armrest ( Y page 80).
Entering the scene/chapter using the
telephone keypad
XPress button à on the telephone
keypad ( Y page 79).XEnter scene/chapter using buttons j -
x .
COMAND tunes in to the scene/chapter
entered.
Selecting film/track
i This function is only available if the DVD
is comprised of several films/tracks.
XSelect Video Q Video DVD .XShow the menu system, if necessary
( Y page 193).XSelect DVD-V Q DVD Functions Q
Title Selection .
A selection list appears.XSelect a film/track.
Screen settings
Setting brightness, contrast and color
XSelect Video Q Video DVD .XShow the menu system, if necessary
( Y page 193).XSelect DVD-V Q Brightness Q
Contrast or Color .XChanging settings: Slide ZV Æ or turn
c V d until you reach the desired setting.XSaving settings: Press W.
Changing the picture format
XSelect Video Q Video DVD .XShow the menu system, if necessary
( Y page 193).XSelect DVD-V.
The DVD-V menu appears. The dot # in
front of a menu item - 16:9 Optimized,
4:3 or Widescreen indicates the current
format.XChanging the format: Slide ZV Æ or turn
c V d, until you reach the desired setting.XSaving the format: Press W.
DVD menu
The DVD menu is the menu stored on the DVD
itself. It is structured in various ways
according to the individual DVD and permits
certain actions and settings.
28 Function is only available if the Audio menu is selected in the instrument cluster.194COMAND video DVDControl systems
221_AKB; 6; 20, en-USd2ugruen,Version: 2.11.8.12009-09-24T13:28:17+02:00 - Seite 194
Page 197 of 548
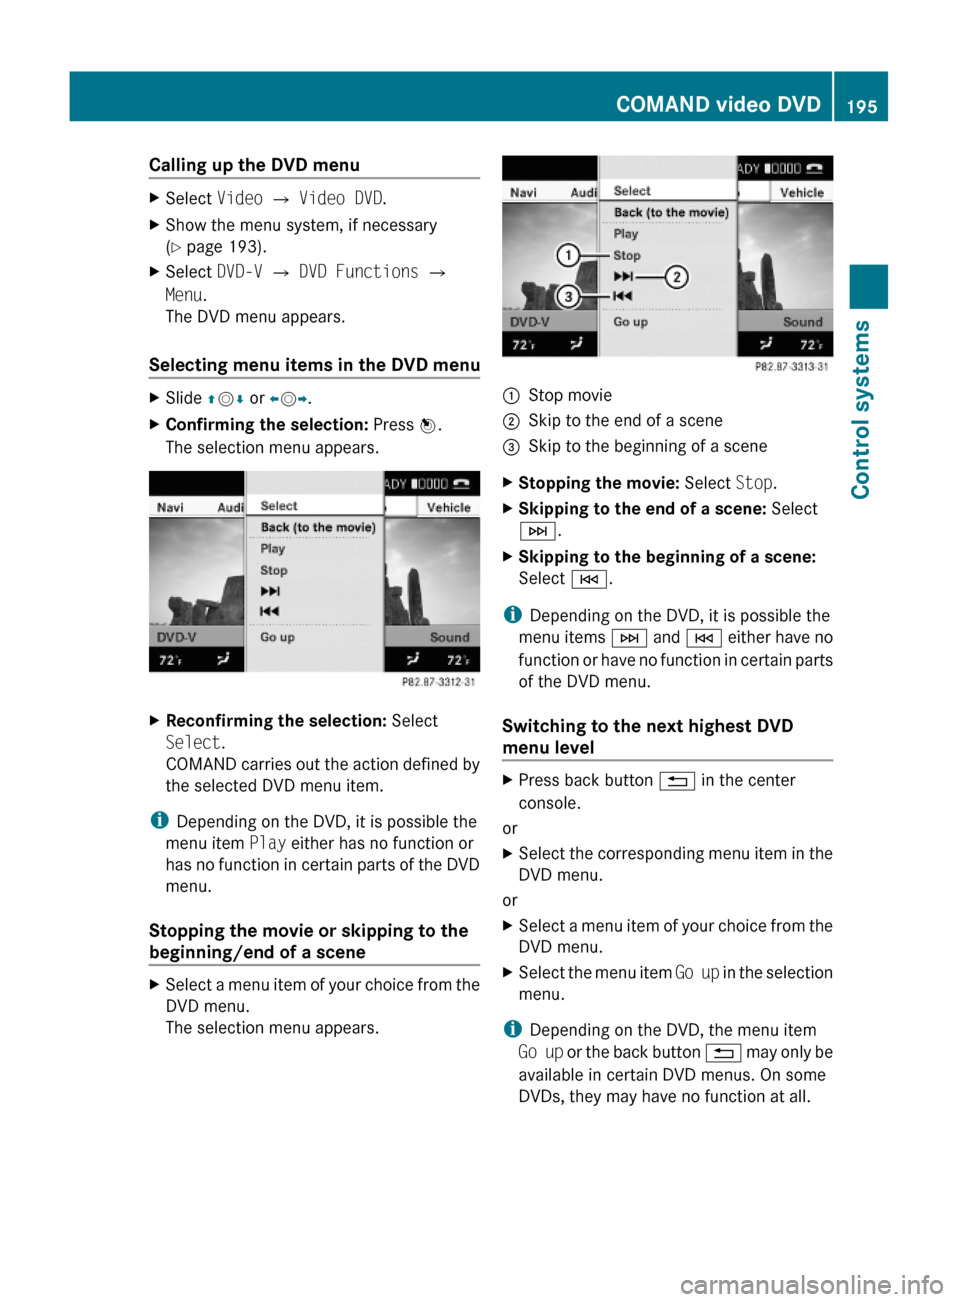
Calling up the DVD menuXSelect Video Q Video DVD.XShow the menu system, if necessary
(Y page 193).
XSelect DVD-V Q DVD Functions Q
Menu.
The DVD menu appears.
Selecting menu items in the DVD menu
XSlide ZVÆ or XVY.XConfirming the selection: Press W.
The selection menu appears.
XReconfirming the selection: Select
Select.
COMAND carries out the action defined by
the selected DVD menu item.
iDepending on the DVD, it is possible the
menu item Play either has no function or
has no function in certain parts of the DVD
menu.
Stopping the movie or skipping to the
beginning/end of a scene
XSelect a menu item of your choice from the
DVD menu.
The selection menu appears.
:Stop movie;Skip to the end of a scene=Skip to the beginning of a sceneXStopping the movie: Select Stop.XSkipping to the end of a scene: Select
F.
XSkipping to the beginning of a scene:
Select E.
iDepending on the DVD, it is possible the
menu items F and E either have no
function or have no function in certain parts
of the DVD menu.
Switching to the next highest DVD
menu level
XPress back button % in the center
console.
or
XSelect the corresponding menu item in the
DVD menu.
or
XSelect a menu item of your choice from the
DVD menu.
XSelect the menu item Go up in the selection
menu.
iDepending on the DVD, the menu item
Go up or the back button % may only be
available in certain DVD menus. On some
DVDs, they may have no function at all.
COMAND video DVD195Control systems221_AKB; 6; 20, en-USd2ugruen,Version: 2.11.8.12009-09-24T13:28:17+02:00 - Seite 195Z
Page 198 of 548
Back to the movieXPress back button % until you can see
the movie.
or
XSelect the corresponding menu item in the
DVD menu.
or
XSelect a menu item of your choice from the
DVD menu.XSelect the menu item Back (to the
movie) in the selection menu.
i
Depending on the DVD, the menu item
Back (to the movie) or the back button
% may be without function.
Setting the language
i This function is not available for all DVDs.
If it is available, you can set the language
for the DVD menu and the audio language.
The number of settings you can make is
determined by the content of the DVD. It
may also be possible to make the settings
in the DVD menu ( Y page 194).
XSelect Video Q Video DVD .XShow the menu system, if necessary
( Y page 193).XSelect DVD-V Q DVD Functions .XSelect Audio Language .
In both cases a selection list will appear.
The dot # in front of an entry indicates the
current language.XChanging the setting: Slide ZV Æ or turn
c V d, until you reach the desired setting.XSaving a setting: Press W.XExiting the menu: Slide XV Y.
Subtitles and camera angles
i This function is not available for all DVDs.
The number of settings you can make is
determined by the content of the DVD. It
may also be possible to make the settings
in the DVD menu ( Y page 194).XSelect Video Q Video DVD .XShow the menu system, if necessary
( Y page 193).XSelect DVD-V Q DVD Functions .XSelect Subtitles or Camera Angle .
In both cases a selection list will appear.
The dot # in front of an entry indicates the
current language.XChanging the setting: Slide ZV Æ or turn
c V d, until you reach the desired setting.XSaving a setting: Press W.XExiting the menu: Slide XV Y.
Interactive content
i DVDs may include interactive content
(e.g. a video game). In a video game you can
control the play by selecting and initiating
actions. The type and number of actions
depends on the DVD.
XSelecting an action: Slide ZV Æ or XV Y,
or turn cV d, until you reach the desired
setting.XInitiating an action: Press W.
A menu appears, the first entry Select is
highlighted.XPress W.
Music Register
GObserve Safety notes, see page 76.
You can save MP3 or WMA audio files in the
Music Register. The storage capacity is
approximately 7 gigabyte.
! Keep your original music files in a safe
place. A fault with the COMAND may cause
the music files stored in the Music Register
196Music RegisterControl systems
221_AKB; 6; 20, en-USd2ugruen,Version: 2.11.8.12009-09-24T13:28:17+02:00 - Seite 196
Page 199 of 548
to be lost. Mercedes-Benz USA, LLC is not
liable for any loss of data.
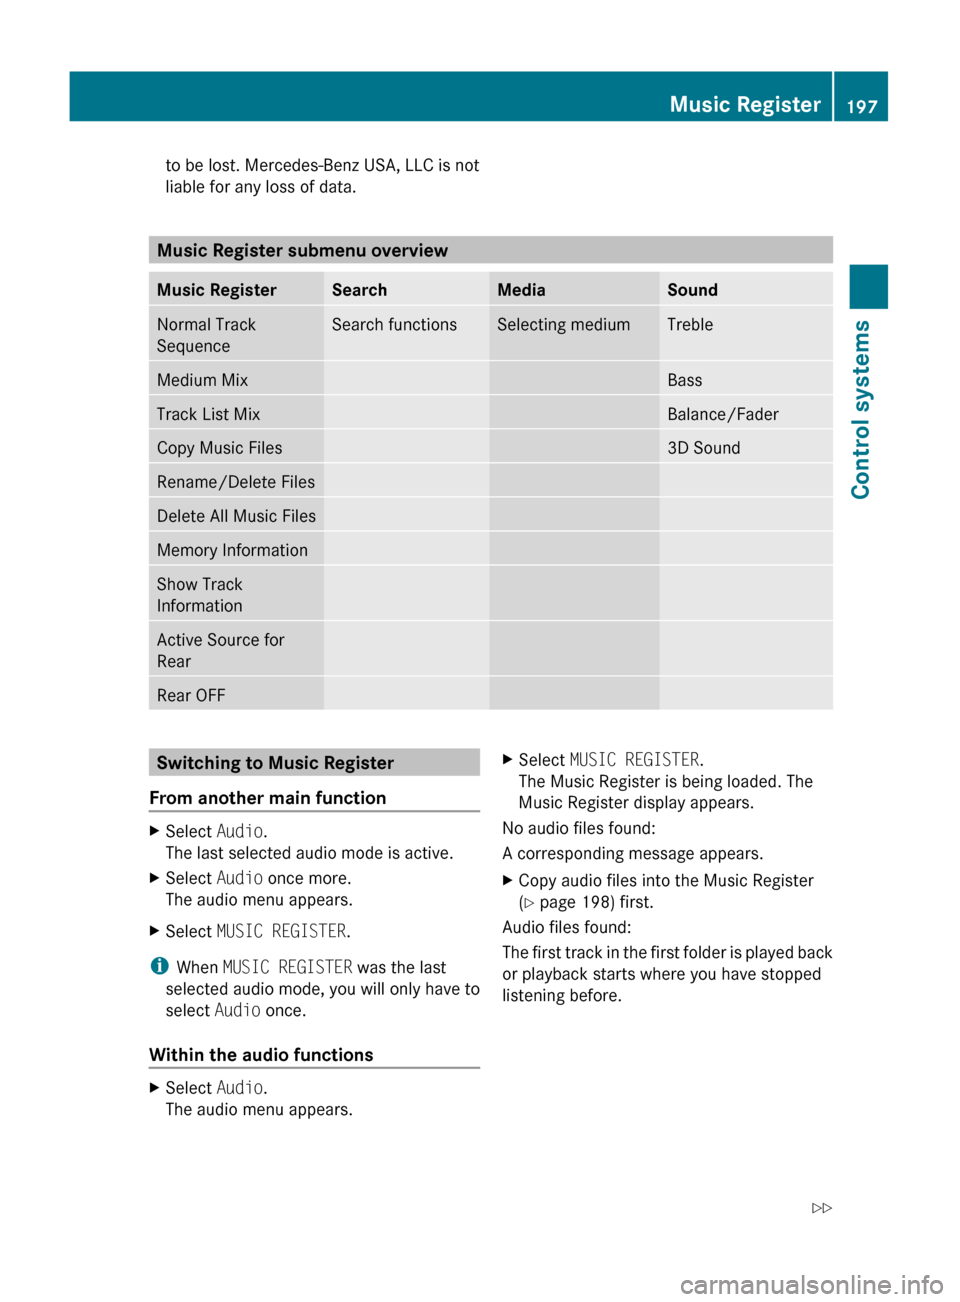
Music Register submenu overview
Music RegisterSearchMediaSoundNormal Track
SequenceSearch functionsSelecting mediumTrebleMedium MixBassTrack List MixBalance/FaderCopy Music Files3D SoundRename/Delete FilesDelete All Music FilesMemory InformationShow Track
InformationActive Source for
RearRear OFFSwitching to Music Register
From another main functionXSelect Audio.
The last selected audio mode is active.XSelect Audio once more.
The audio menu appears.XSelect MUSIC REGISTER .
i
When MUSIC REGISTER was the last
selected audio mode, you will only have to
select Audio once.
Within the audio functions
XSelect Audio.
The audio menu appears.XSelect MUSIC REGISTER .
The Music Register is being loaded. The
Music Register display appears.
No audio files found:
A corresponding message appears.
XCopy audio files into the Music Register
( Y page 198) first.
Audio files found:
The first track in the first folder is played back
or playback starts where you have stopped
listening before.
Music Register197Control systems221_AKB; 6; 20, en-USd2ugruen,Version: 2.11.8.12009-09-24T13:28:17+02:00 - Seite 197Z
Page 200 of 548
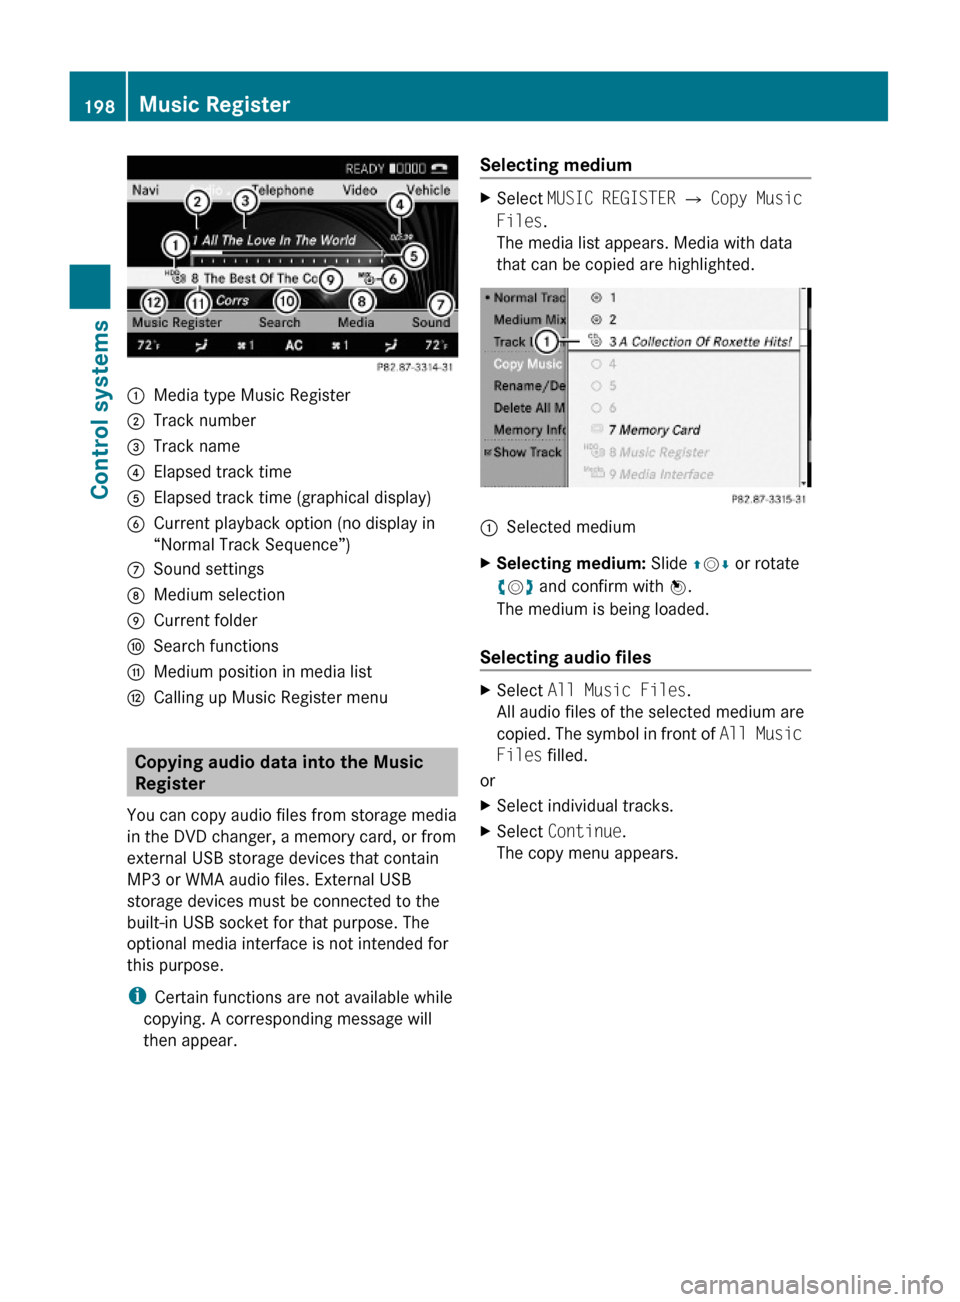
:Media type Music Register;Track number=Track name?Elapsed track timeAElapsed track time (graphical display)BCurrent playback option (no display in
“Normal Track Sequence”)
CSound settingsDMedium selectionECurrent folderFSearch functionsGMedium position in media listHCalling up Music Register menu
Copying audio data into the Music
Register
You can copy audio files from storage media
in the DVD changer, a memory card, or from
external USB storage devices that contain
MP3 or WMA audio files. External USB
storage devices must be connected to the
built-in USB socket for that purpose. The
optional media interface is not intended for
this purpose.
iCertain functions are not available while
copying. A corresponding message will
then appear.
Selecting mediumXSelect MUSIC REGISTER Q Copy Music
Files.
The media list appears. Media with data
that can be copied are highlighted.
:Selected mediumXSelecting medium: Slide ZVÆ or rotate
cVd and confirm with W.
The medium is being loaded.
Selecting audio files
XSelect All Music Files.
All audio files of the selected medium are
copied. The symbol in front of All Music
Files filled.
or
XSelect individual tracks.XSelect Continue.
The copy menu appears.
198Music RegisterControl systems
221_AKB; 6; 20, en-USd2ugruen,Version: 2.11.8.12009-09-24T13:28:17+02:00 - Seite 198