start stop button MERCEDES-BENZ S63AMG 2010 W221 Owner's Manual
[x] Cancel search | Manufacturer: MERCEDES-BENZ, Model Year: 2010, Model line: S63AMG, Model: MERCEDES-BENZ S63AMG 2010 W221Pages: 548, PDF Size: 12.48 MB
Page 33 of 548
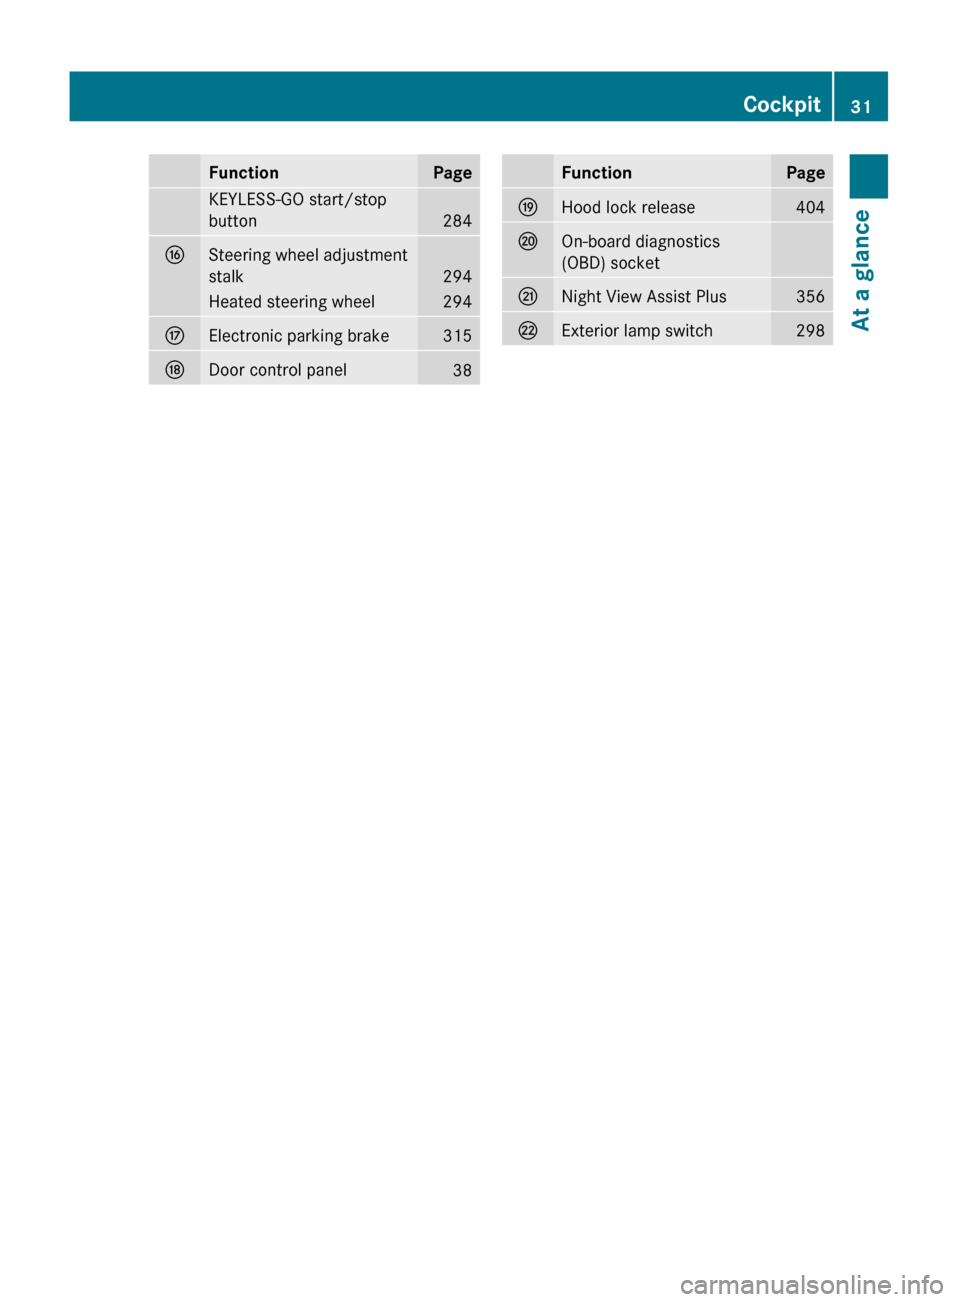
FunctionPageKEYLESS-GO start/stop
button
284
LSteering wheel adjustment
stalk
294
Heated steering wheel294MElectronic parking brake315NDoor control panel38FunctionPageOHood lock release404POn-board diagnostics
(OBD) socketQNight View Assist Plus356RExterior lamp switch298Cockpit31At a glance221_AKB; 6; 20, en-USd2ugruen,Version: 2.11.8.12009-09-24T13:28:17+02:00 - Seite 31Z
Page 51 of 548
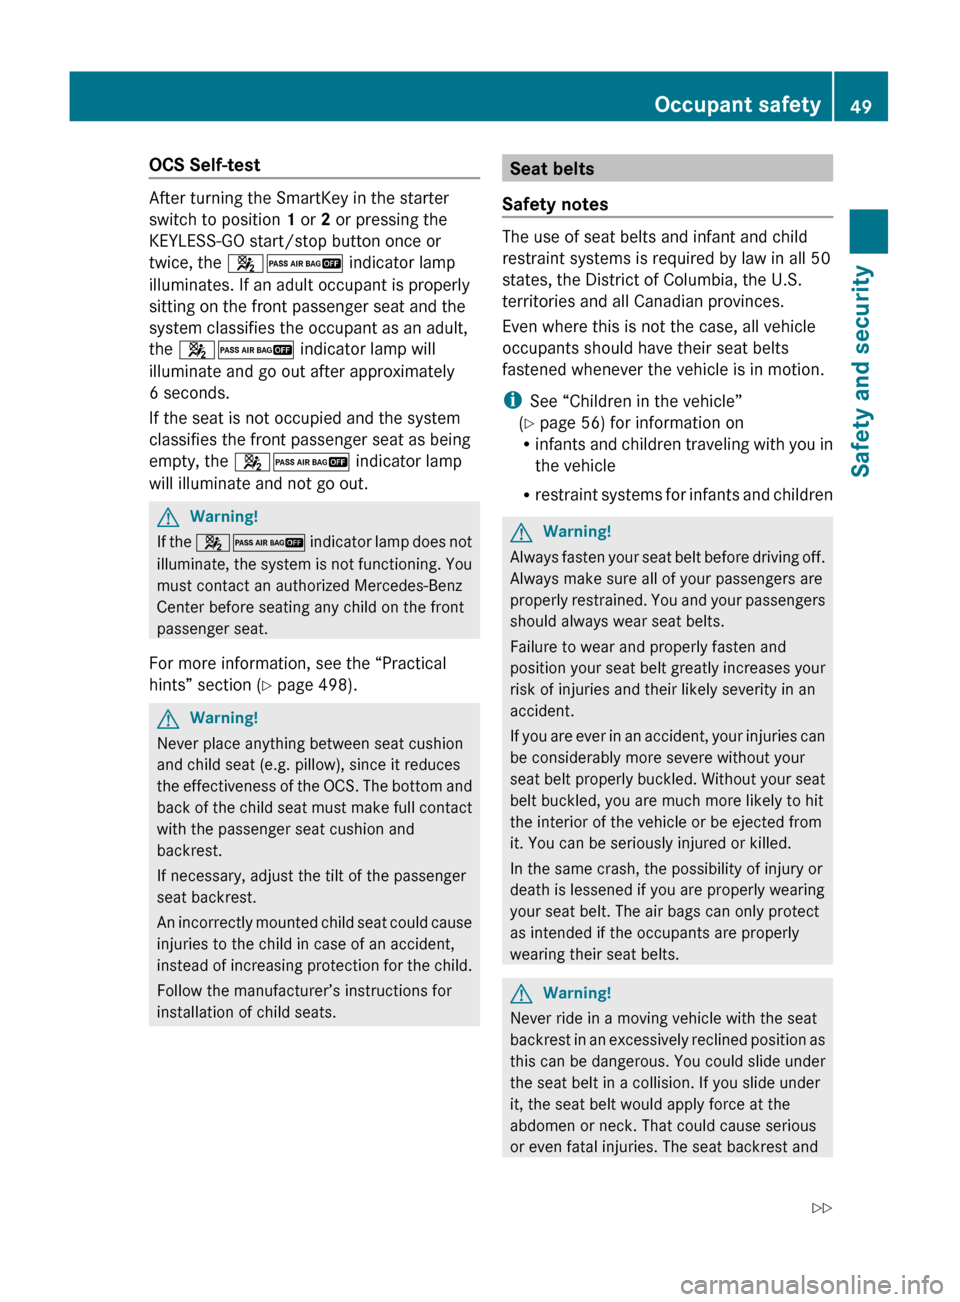
OCS Self-test
After turning the SmartKey in the starter
switch to position 1 or 2 or pressing the
KEYLESS-GO start/stop button once or
twice, the 42 indicator lamp
illuminates. If an adult occupant is properly
sitting on the front passenger seat and the
system classifies the occupant as an adult,
the 42 indicator lamp will
illuminate and go out after approximately
6 seconds.
If the seat is not occupied and the system
classifies the front passenger seat as being
empty, the 42 indicator lamp
will illuminate and not go out.
GWarning!
If the 42 indicator lamp does not
illuminate, the system is not functioning. You
must contact an authorized Mercedes-Benz
Center before seating any child on the front
passenger seat.
For more information, see the “Practical
hints” section ( Y page 498).
GWarning!
Never place anything between seat cushion
and child seat (e.g. pillow), since it reduces
the effectiveness of the OCS. The bottom and
back of the child seat must make full contact
with the passenger seat cushion and
backrest.
If necessary, adjust the tilt of the passenger
seat backrest.
An incorrectly mounted child seat could cause
injuries to the child in case of an accident,
instead of increasing protection for the child.
Follow the manufacturer’s instructions for
installation of child seats.
Seat belts
Safety notes
The use of seat belts and infant and child
restraint systems is required by law in all 50
states, the District of Columbia, the U.S.
territories and all Canadian provinces.
Even where this is not the case, all vehicle
occupants should have their seat belts
fastened whenever the vehicle is in motion.
i See “Children in the vehicle”
( Y page 56) for information on
R infants and children traveling with you in
the vehicle
R restraint systems for infants and children
GWarning!
Always fasten your seat belt before driving off.
Always make sure all of your passengers are
properly restrained. You and your passengers
should always wear seat belts.
Failure to wear and properly fasten and
position your seat belt greatly increases your
risk of injuries and their likely severity in an
accident.
If you are ever in an accident, your injuries can
be considerably more severe without your
seat belt properly buckled. Without your seat
belt buckled, you are much more likely to hit
the interior of the vehicle or be ejected from
it. You can be seriously injured or killed.
In the same crash, the possibility of injury or
death is lessened if you are properly wearing
your seat belt. The air bags can only protect
as intended if the occupants are properly
wearing their seat belts.
GWarning!
Never ride in a moving vehicle with the seat
backrest in an excessively reclined position as
this can be dangerous. You could slide under
the seat belt in a collision. If you slide under
it, the seat belt would apply force at the
abdomen or neck. That could cause serious
or even fatal injuries. The seat backrest and
Occupant safety49Safety and security221_AKB; 6; 20, en-USd2ugruen,Version: 2.11.8.12009-09-24T13:28:17+02:00 - Seite 49Z
Page 64 of 548
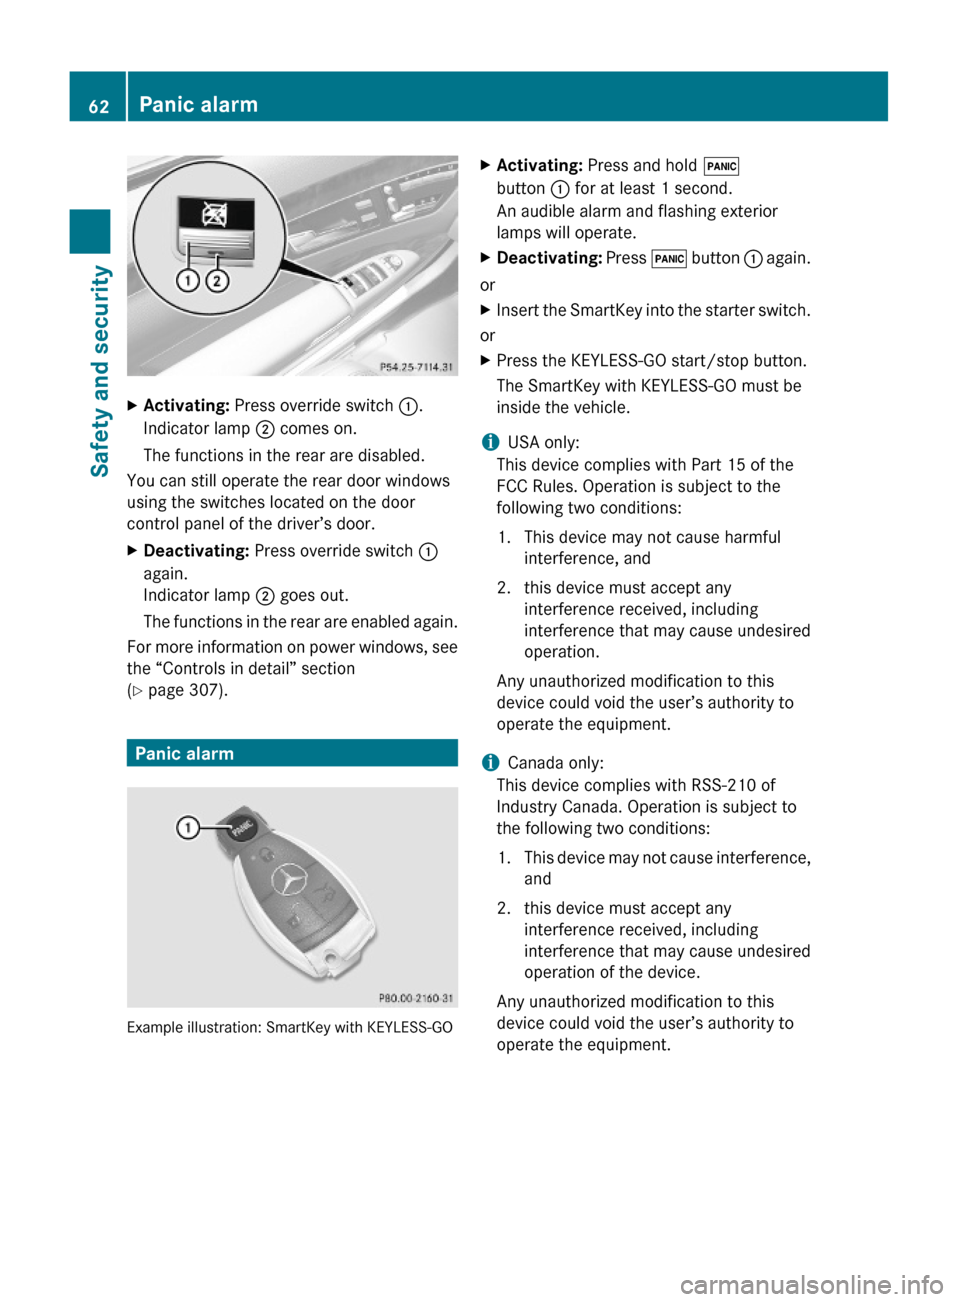
XActivating: Press override switch :.
Indicator lamp ; comes on.
The functions in the rear are disabled.
You can still operate the rear door windows
using the switches located on the door
control panel of the driver’s door.
XDeactivating: Press override switch :
again.
Indicator lamp ; goes out.
The functions in the rear are enabled again.
For more information on power windows, see
the “Controls in detail” section
(Y page 307).
Panic alarm
Example illustration: SmartKey with KEYLESS-GO
XActivating: Press and hold !
button : for at least 1 second.
An audible alarm and flashing exterior
lamps will operate.
XDeactivating: Press ! button : again.
or
XInsert the SmartKey into the starter switch.
or
XPress the KEYLESS-GO start/stop button.
The SmartKey with KEYLESS-GO must be
inside the vehicle.
iUSA only:
This device complies with Part 15 of the
FCC Rules. Operation is subject to the
following two conditions:
1. This device may not cause harmful
interference, and
2. this device must accept any
interference received, including
interference that may cause undesired
operation.
Any unauthorized modification to this
device could void the user’s authority to
operate the equipment.
iCanada only:
This device complies with RSS-210 of
Industry Canada. Operation is subject to
the following two conditions:
1.This device may not cause interference,
and
2. this device must accept any
interference received, including
interference that may cause undesired
operation of the device.
Any unauthorized modification to this
device could void the user’s authority to
operate the equipment.
62Panic alarmSafety and security
221_AKB; 6; 20, en-USd2ugruen,Version: 2.11.8.12009-09-24T13:28:17+02:00 - Seite 62
Page 69 of 548
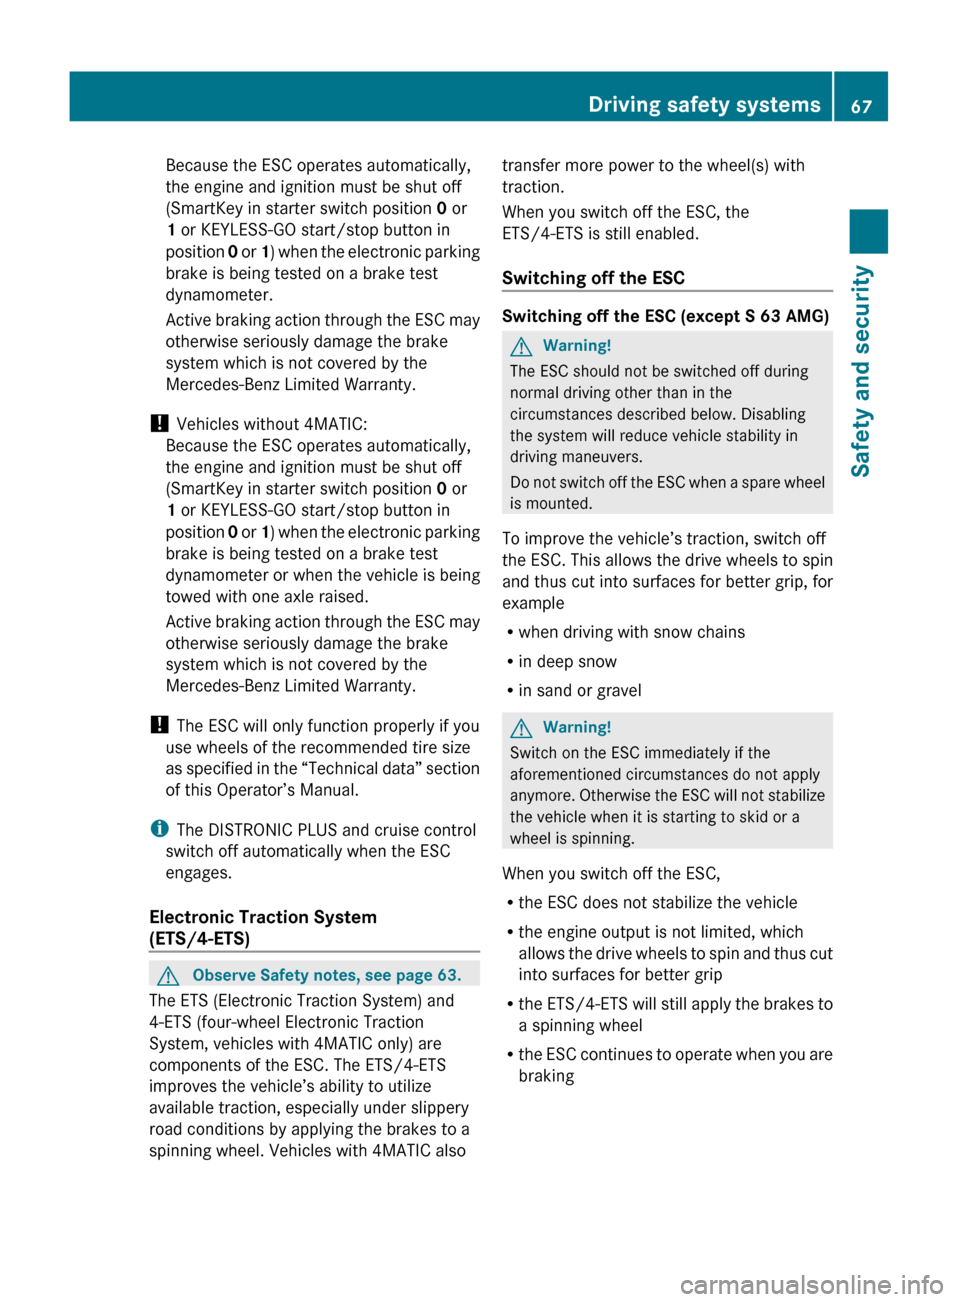
Because the ESC operates automatically,
the engine and ignition must be shut off
(SmartKey in starter switch position 0 or
1 or KEYLESS-GO start/stop button in
position 0 or 1) when the electronic parking
brake is being tested on a brake test
dynamometer.
Active braking action through the ESC may
otherwise seriously damage the brake
system which is not covered by the
Mercedes-Benz Limited Warranty.
! Vehicles without 4MATIC:
Because the ESC operates automatically,
the engine and ignition must be shut off
(SmartKey in starter switch position 0 or
1 or KEYLESS-GO start/stop button in
position 0 or 1) when the electronic parking
brake is being tested on a brake test
dynamometer or when the vehicle is being
towed with one axle raised.
Active braking action through the ESC may
otherwise seriously damage the brake
system which is not covered by the
Mercedes-Benz Limited Warranty.
! The ESC will only function properly if you
use wheels of the recommended tire size
as specified in the “Technical data” section
of this Operator’s Manual.
i The DISTRONIC PLUS and cruise control
switch off automatically when the ESC
engages.
Electronic Traction System
(ETS/4-ETS) GObserve Safety notes, see page 63.
The ETS (Electronic Traction System) and
4-ETS (four-wheel Electronic Traction
System, vehicles with 4MATIC only) are
components of the ESC. The ETS/4-ETS
improves the vehicle’s ability to utilize
available traction, especially under slippery
road conditions by applying the brakes to a
spinning wheel. Vehicles with 4MATIC also
transfer more power to the wheel(s) with
traction.
When you switch off the ESC, the
ETS/4-ETS is still enabled.
Switching off the ESC
Switching off the ESC (except S 63 AMG)
GWarning!
The ESC should not be switched off during
normal driving other than in the
circumstances described below. Disabling
the system will reduce vehicle stability in
driving maneuvers.
Do not switch off the ESC when a spare wheel
is mounted.
To improve the vehicle’s traction, switch off
the ESC. This allows the drive wheels to spin
and thus cut into surfaces for better grip, for
example
R when driving with snow chains
R in deep snow
R in sand or gravel
GWarning!
Switch on the ESC immediately if the
aforementioned circumstances do not apply
anymore. Otherwise the ESC will not stabilize
the vehicle when it is starting to skid or a
wheel is spinning.
When you switch off the ESC,
R the ESC does not stabilize the vehicle
R the engine output is not limited, which
allows the drive wheels to spin and thus cut
into surfaces for better grip
R the ETS/4-ETS will still apply the brakes to
a spinning wheel
R the ESC continues to operate when you are
braking
Driving safety systems67Safety and security221_AKB; 6; 20, en-USd2ugruen,Version: 2.11.8.12009-09-24T13:28:17+02:00 - Seite 67Z
Page 75 of 548
iUnless you open a door or the trunk within
approximately 40 seconds after unlocking
the vehicle:
R The vehicle will be locked again.
R The anti-theft alarm system will be
rearmed.
Canceling the alarm
To cancel the alarm, do one of the following:
XInsert the SmartKey into the starter switch.XPress button % or & on the
SmartKey.
In vehicles with KEYLESS-GO:
XGrasp an outside door handle.
The SmartKey must be within 3 ft (1 m) of
the vehicle.XPress the KEYLESS-GO start/stop button.
The SmartKey must be inside the vehicle.Anti-theft systems73Safety and security221_AKB; 6; 20, en-USd2ugruen,Version: 2.11.8.12009-09-24T13:28:17+02:00 - Seite 73Z
Page 130 of 548
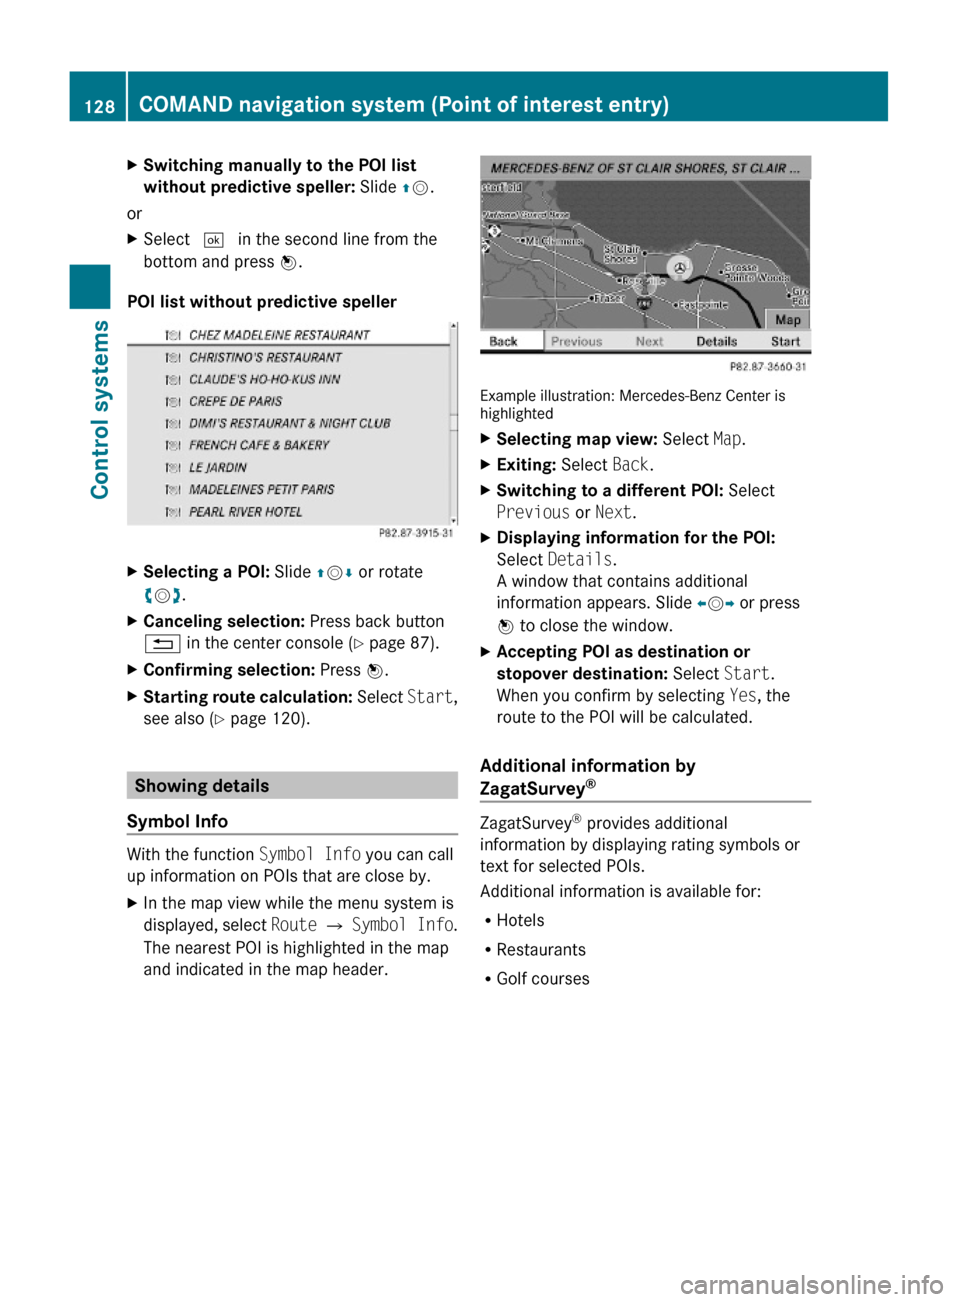
XSwitching manually to the POI list
without predictive speller: Slide ZV.
or
XSelect ¬ in the second line from the
bottom and press W.
POI list without predictive speller
XSelecting a POI: Slide ZVÆ or rotate
cVd.
XCanceling selection: Press back button
% in the center console (Y page 87).
XConfirming selection: Press W.XStarting route calculation: Select Start,
see also (Y page 120).
Showing details
Symbol Info
With the function Symbol Info you can call
up information on POIs that are close by.
XIn the map view while the menu system is
displayed, select Route Q Symbol Info.
The nearest POI is highlighted in the map
and indicated in the map header.
Example illustration: Mercedes-Benz Center ishighlighted
XSelecting map view: Select Map.XExiting: Select Back.XSwitching to a different POI: Select
Previous or Next.
XDisplaying information for the POI:
Select Details.
A window that contains additional
information appears. Slide omp or press
n to close the window.
XAccepting POI as destination or
stopover destination: Select Start.
When you confirm by selecting Yes, the
route to the POI will be calculated.
Additional information by
ZagatSurvey®
ZagatSurvey® provides additional
information by displaying rating symbols or
text for selected POIs.
Additional information is available for:
RHotels
RRestaurants
RGolf courses
128COMAND navigation system (Point of interest entry)Control systems
221_AKB; 6; 20, en-USd2ugruen,Version: 2.11.8.12009-09-24T13:28:17+02:00 - Seite 128
Page 183 of 548
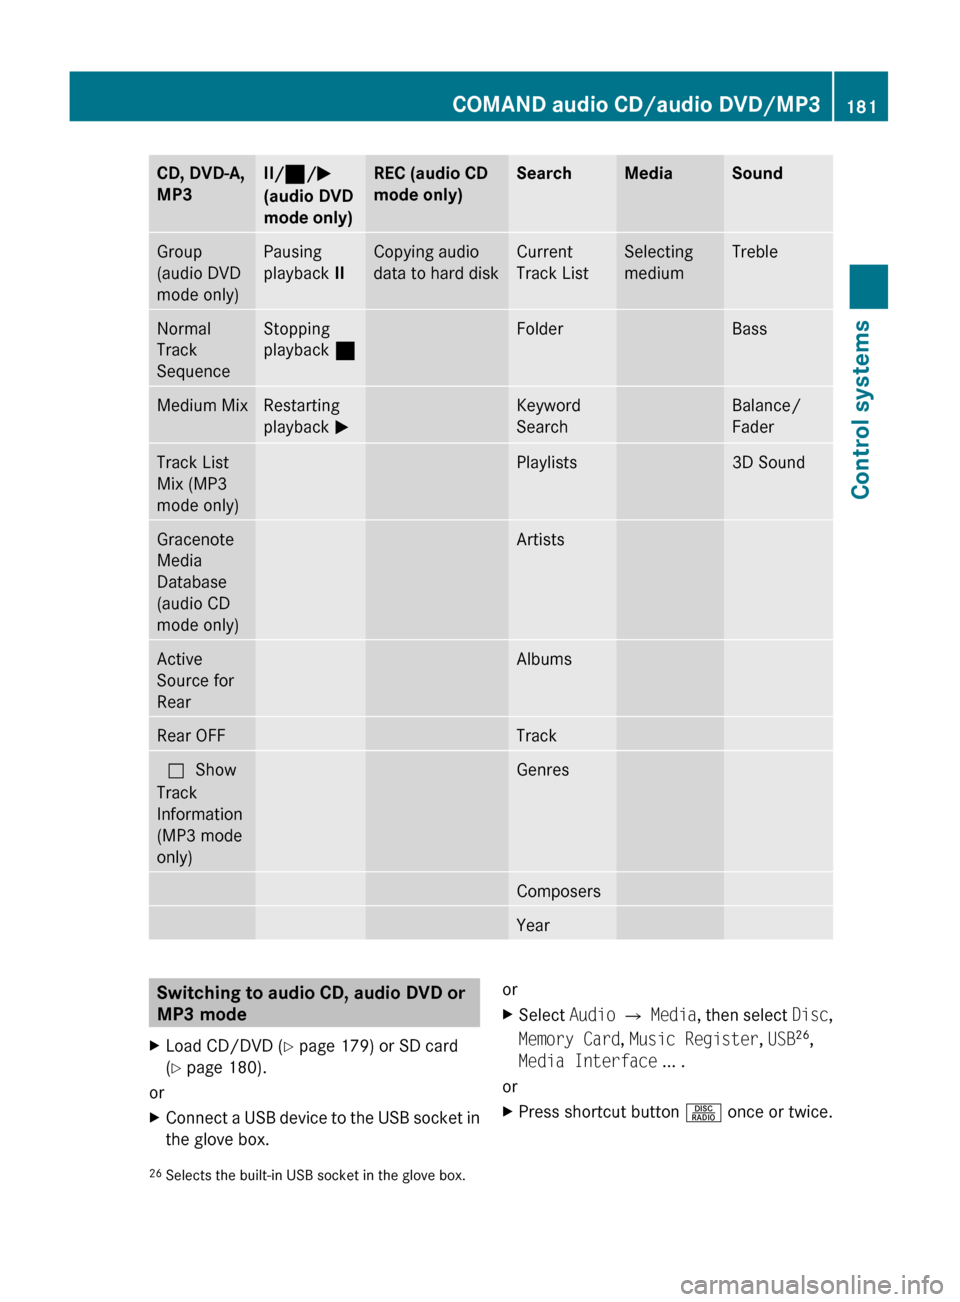
CD, DVD-A,
MP3II/ ¯ /M
(audio DVD
mode only)REC (audio CD
mode only)SearchMediaSoundGroup
(audio DVD
mode only)Pausing
playback IICopying audio
data to hard diskCurrent
Track ListSelecting
mediumTrebleNormal
Track
SequenceStopping
playback ¯FolderBassMedium MixRestarting
playback MKeyword
SearchBalance/
FaderTrack List
Mix (MP3
mode only)Playlists3D SoundGracenote
Media
Database
(audio CD
mode only)ArtistsActive
Source for
RearAlbumsRear OFFTrackª Show
Track
Information
(MP3 mode
only)GenresComposersYearSwitching to audio CD, audio DVD or
MP3 modeXLoad CD/DVD ( Y page 179) or SD card
( Y page 180).
or
XConnect a USB device to the USB socket in
the glove box.orXSelect Audio Q Media , then select Disc,
Memory Card , Music Register , USB 26
,
Media Interface ... .
or
XPress shortcut button R once or twice.26
Selects the built-in USB socket in the glove box.COMAND audio CD/audio DVD/MP3181Control systems221_AKB; 6; 20, en-USd2ugruen,Version: 2.11.8.12009-09-24T13:28:17+02:00 - Seite 181Z
Page 185 of 548
BElapsed track timeCElapsed track time and track number
(graphical display)DSound settingsEMedium selectionFTrack searchGArtist (ID3 tags)HMP3 functions
CD/DVD/MP3 functions
Stop function
i This function is only available in audio
DVD mode.
XStopping playback: Select Audio Q
Media Q DVD-A Q ± (twice).XRestarting playback: Select Audio Q
Media Q DVD-A Q M .
Playback restarts at the beginning of the
DVD.
Pause function
In audio CD, audio DVD and MP3 mode
XPausing playback: Press button 8 on
the multifunction steering wheel briefly.XContinuing playback: Press button 8
on the multifunction steering wheel briefly
once more.
In audio DVD mode only
XPausing playback: Select Audio Q
Media Q DVD-A Q « .
M appears instead of «.XContinuing playback: Select Audio Q
Audio Q DVD-A Q M .
« appears instead of M.Selecting CD/DVD/MP3 media XSelect Audio Q Media .
The media list appears. The dot # indicates
the currently selected medium.XSelect a medium.
or
XEnter a media number with the telephone
keypad using buttons ´ - Å
( Y page 79).
Selecting a track
Selecting by skipping tracks
XSkipping forward or backward: Slide
X V Y or rotate cV d.
or
XPress button 9 or : on the
multifunction steering wheel 27
.
i The skip forward function takes you to the
next track. The skip backward function
takes you to the beginning of the current
track, provided it has been played for
longer that 8 seconds. When the track has
been played for less than 8 seconds, you
will skip to the track before the current one.
When you switch on the option Random
Tracks , the track is chosen at random.
Selecting a track using the telephone
keypad
XPress button à on the telephone
keypad ( Y page 79).XEnter track number using buttons ´ -
Å .
Fast forward/rewind
XSelect the main area.XSlide XV Y and hold until the desired track
part is reached.27 Function is only available if the Audio menu is selected in the instrument cluster.COMAND audio CD/audio DVD/MP3183Control systems221_AKB; 6; 20, en-USd2ugruen,Version: 2.11.8.12009-09-24T13:28:17+02:00 - Seite 183Z
Page 210 of 548
Setting easy-entry/exit feature
iThe components and operating principles
of COMAND can be found on (Y page 76).
GWarning!
You must make sure no one can become
trapped or injured by the moving steering
wheel and driver’s seat when the easy-entry/
exit feature is activated.
To stop seat/steering wheel movement, do
one of the following:
RPress seat adjustment switch.
RMove steering wheel adjustment stalk.
RPress one of the memory position buttons
or the memory button M.
Do not leave children unattended in the
vehicle, or with access to an unlocked vehicle.
Children could open the driver’s door and
unintentionally activate the easy-entry/exit
feature, which could result in an accident
and/or serious personal injury.
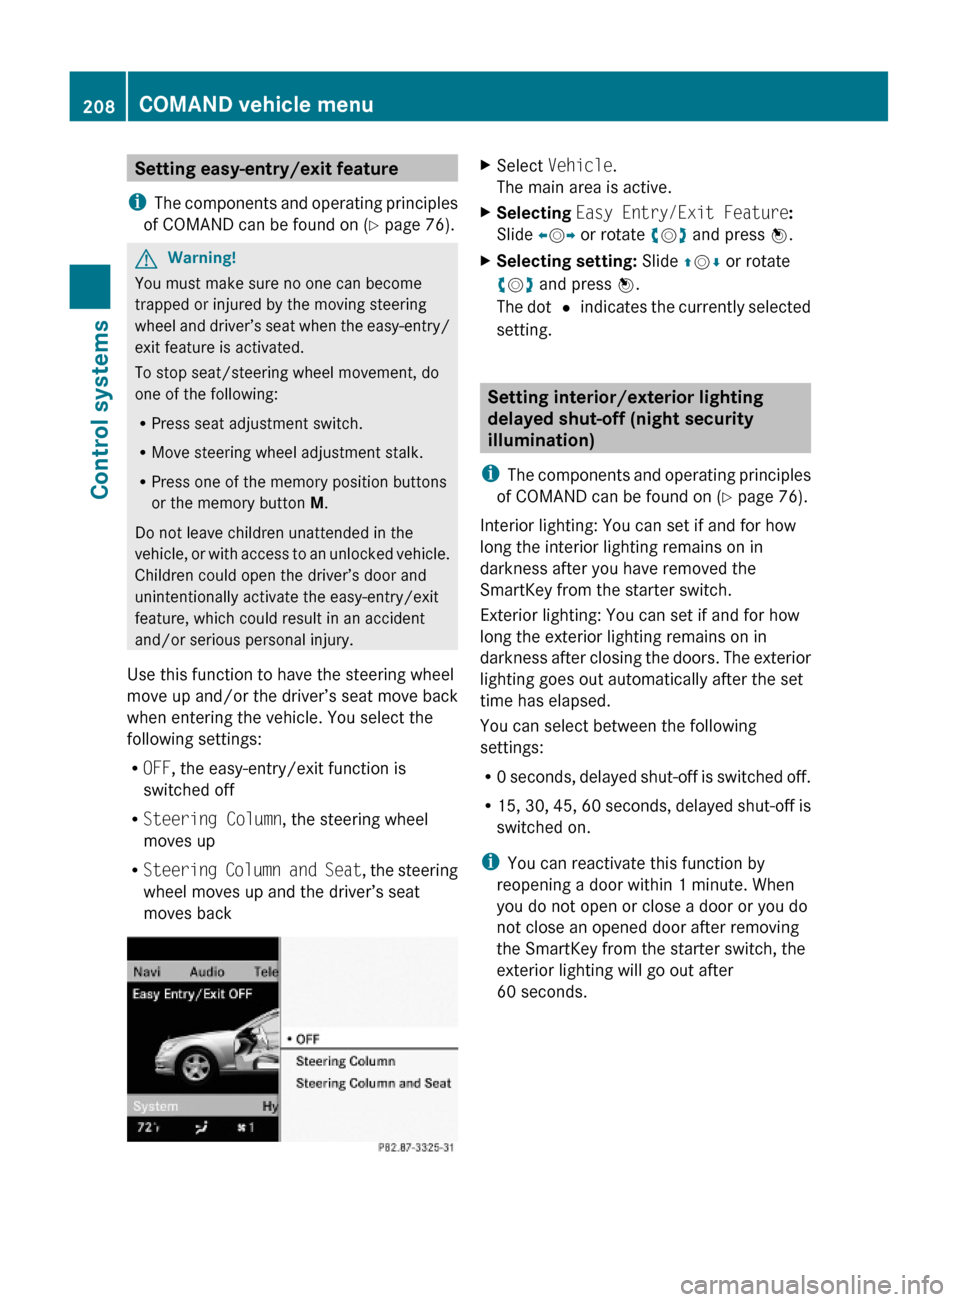
Use this function to have the steering wheel
move up and/or the driver’s seat move back
when entering the vehicle. You select the
following settings:
ROFF, the easy-entry/exit function is
switched off
RSteering Column, the steering wheel
moves up
RSteering Column and Seat, the steering
wheel moves up and the driver’s seat
moves back
XSelect Vehicle.
The main area is active.
XSelecting Easy Entry/Exit Feature:
Slide XVY or rotate cVd and press W.
XSelecting setting: Slide ZVÆ or rotate
cVd and press W.
The dot # indicates the currently selected
setting.
Setting interior/exterior lighting
delayed shut-off (night security
illumination)
iThe components and operating principles
of COMAND can be found on (Y page 76).
Interior lighting: You can set if and for how
long the interior lighting remains on in
darkness after you have removed the
SmartKey from the starter switch.
Exterior lighting: You can set if and for how
long the exterior lighting remains on in
darkness after closing the doors. The exterior
lighting goes out automatically after the set
time has elapsed.
You can select between the following
settings:
R0 seconds, delayed shut-off is switched off.
R15, 30, 45, 60 seconds, delayed shut-off is
switched on.
iYou can reactivate this function by
reopening a door within 1 minute. When
you do not open or close a door or you do
not close an opened door after removing
the SmartKey from the starter switch, the
exterior lighting will go out after
60 seconds.
208COMAND vehicle menuControl systems
221_AKB; 6; 20, en-USd2ugruen,Version: 2.11.8.12009-09-24T13:28:17+02:00 - Seite 208
Page 230 of 548
The engine oil temperature will be shown in
blue if the engine oil temperature has not yet
reached 176‡ (80†). During this time, avoid
driving at full engine speed.
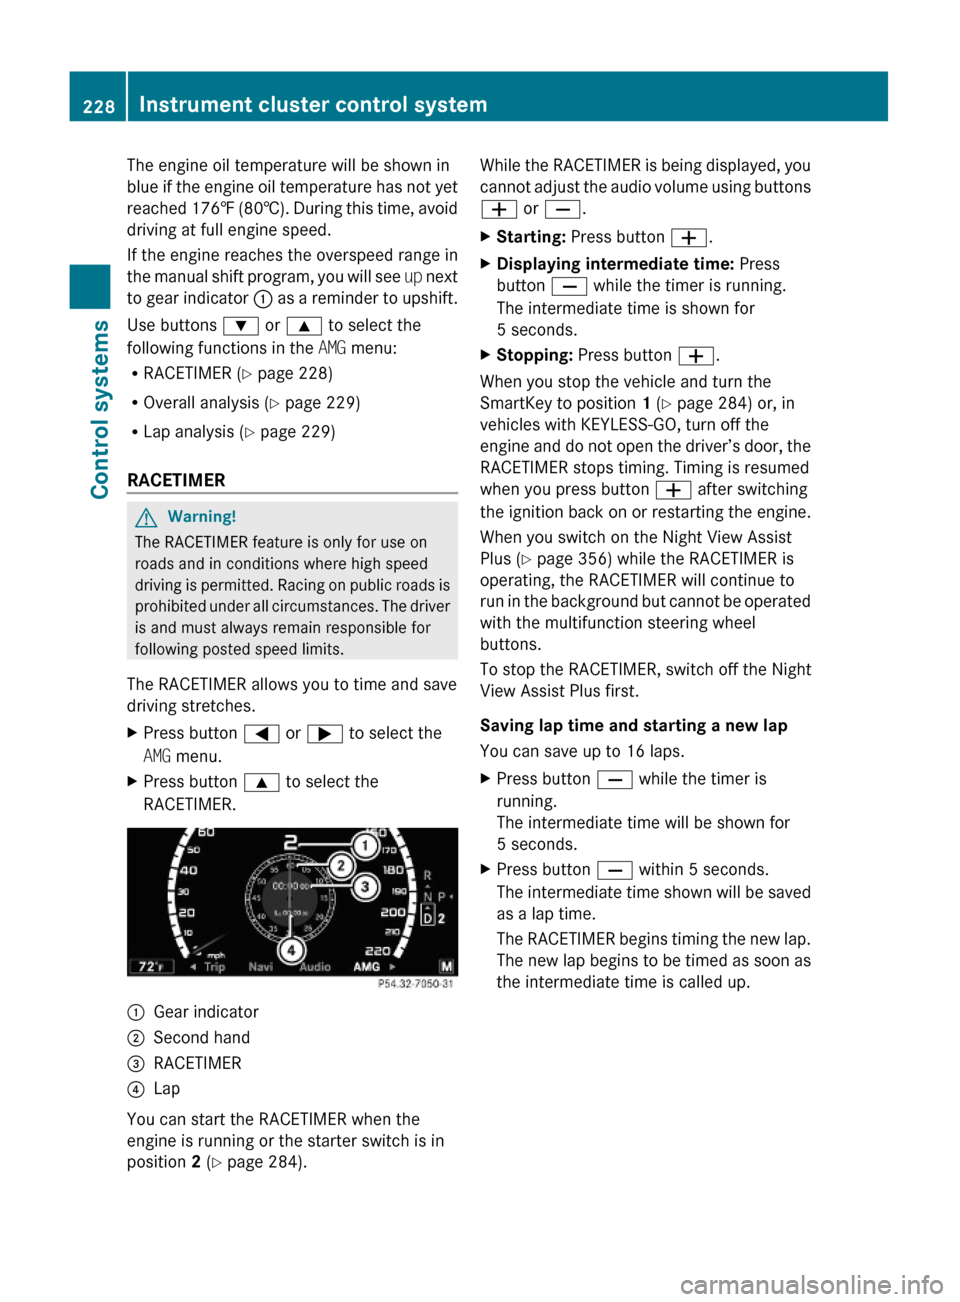
If the engine reaches the overspeed range in
the manual shift program, you will see up next
to gear indicator : as a reminder to upshift.
Use buttons : or 9 to select the
following functions in the AMG menu:
RRACETIMER (Y page 228)
ROverall analysis (Y page 229)
RLap analysis (Y page 229)
RACETIMER
GWarning!
The RACETIMER feature is only for use on
roads and in conditions where high speed
driving is permitted. Racing on public roads is
prohibited under all circumstances. The driver
is and must always remain responsible for
following posted speed limits.
The RACETIMER allows you to time and save
driving stretches.
XPress button = or ; to select the
AMG menu.
XPress button 9 to select the
RACETIMER.
:Gear indicator;Second hand=RACETIMER?Lap
You can start the RACETIMER when the
engine is running or the starter switch is in
position 2 (Y page 284).
While the RACETIMER is being displayed, you
cannot adjust the audio volume using buttons
W or X.
XStarting: Press button W.XDisplaying intermediate time: Press
button X while the timer is running.
The intermediate time is shown for
5 seconds.
XStopping: Press button W.
When you stop the vehicle and turn the
SmartKey to position 1 (Y page 284) or, in
vehicles with KEYLESS-GO, turn off the
engine and do not open the driver’s door, the
RACETIMER stops timing. Timing is resumed
when you press button W after switching
the ignition back on or restarting the engine.
When you switch on the Night View Assist
Plus (Y page 356) while the RACETIMER is
operating, the RACETIMER will continue to
run in the background but cannot be operated
with the multifunction steering wheel
buttons.
To stop the RACETIMER, switch off the Night
View Assist Plus first.
Saving lap time and starting a new lap
You can save up to 16 laps.
XPress button X while the timer is
running.
The intermediate time will be shown for
5 seconds.
XPress button X within 5 seconds.
The intermediate time shown will be saved
as a lap time.
The RACETIMER begins timing the new lap.
The new lap begins to be timed as soon as
the intermediate time is called up.
228Instrument cluster control systemControl systems
221_AKB; 6; 20, en-USd2ugruen,Version: 2.11.8.12009-09-24T13:28:17+02:00 - Seite 228