steering wheel adjustment MERCEDES-BENZ SL CLASS 2011 Owners Manual
[x] Cancel search | Manufacturer: MERCEDES-BENZ, Model Year: 2011, Model line: SL CLASS, Model: MERCEDES-BENZ SL CLASS 2011Pages: 316, PDF Size: 6.55 MB
Page 14 of 316

ESP®
.............................................. 228
Fog lamps .............................. 250, 252
Gas cap .......................................... 249
Gear selector lever ........................234
High-beam lamps ........................... 251
Hood .............................................. 241
License plate lamps .......................251
Light sensor ................................... 251
Low-beam lamps ............................ 251
Parking brake ................................ 239
Parking lamps ................................ 251
Passenger front air bag ..................229
Reserve fuel ................................... 249
Retractable hardtop .......................241
Reverse lamp ................................. 249
Roll bar .................................... 51, 240
Side marker lamps .........................250
SmartKey ....................................... 242
SmartKey with KEYLESS-GO ..........242
SRS ................................................ 240
Tail lamps ...................................... 252
Tele Aid .......................................... 240
Tire inflation pressure ............234, 253
Tire pressure monitor ....................234
Tires ...................................... 234, 253
Trunk ............................................. 241
Turn signals ................................... 253
Washer fluid ................................... 243
Multifunction steering wheel
Adjustment ...................................... 84
Buttons .......................................... 113
Cleaning ......................................... 220
Easy-entry/exit feature ...........85, 127
Gearshift control ............................ 108
Memory function .............................. 88
Overview .......................................... 27
N
Navigation menu ............................... 120
Navigation system see Separate operating instructions
Nets, parcel ....................................... 161
Night security illumination .............. 125
Normal occupant weight .................. 206
Number, vehicle identification
(VIN) ................................................... 295
O
Occupant Classification System see OCS (Occupant Classification
System)
Occupant distribution ....................... 206
Occupant safety
Air bags ........................................... 39
Children and air bags .......................39
Children in the vehicle .....................51
Fastening the seat belts ................... 48
Infant and child restraint systems .... 52
Introduction ..................................... 38
OCS (Occupant Classification
System) ........................................... 43
Passenger front air bag off
indicator lamp .......................... 43, 266
Roll bar ............................................ 51
Seat belts .................................. 40, 46
OCS (Occupant Classification
System) ................................................ 43
Self-test ........................................... 45
Odometer ........................................... 115
Oil, oil level see Engine oil
On-board computer
see Control system
One-touch gearshifting ..................... 108
Operating safety .................................. 21
Ornamental moldings, cleaning ....... 218
Overhead control panel ...................... 35
P
Paintwork, cleaning .......................... 216
Paintwork code ................................. 295
Panic alarm .......................................... 54
Panorama roof
Sunshade ....................................... 160
Parcel nets ......................................... 161
Parking ............................................... 101
Parktronic system ..........................144
Parking and standing lamp
Replacing bulbs ............................. 272
Parking brake .................................... 102
Messages in the multifunction
display ........................................... 239
12Index230_AKB; 6; 22, en-USd2ureepe,Version: 2.11.8.12009-07-28T18:49:58+02:00 - Seite 12
Page 17 of 316

Speed settings
Cruise control ................................ 131
Distronic ........................................ 137
Resume function ...................132, 138
SRS
Indicator lamp ............................ 31, 32
SRS (Supplemental Restraint System)
Indicator lamp ......................... 38, 257
Messages in the multifunction
display ........................................... 240
Standing water, driving through ...... 212
Starter switch positions
KEYLESS-GO .................................... 79
SmartKey ......................................... 78
Starting difficulties (engine) .............. 99
Starting the engine ............................. 98
Steering column see Multifunction steering wheel,
Adjustment
Steering wheel
see Multifunction steering wheel
Steering wheel gearshift control ..... 108
Stolen Vehicle Recovery Services ... 172
Storage compartments ..................... 161
Storing tires ....................................... 198
Sunshade ........................................... 160
Sun visors .......................................... 165
T
Tachometer ........................................ 113
Overspeed range ........................... 113
Tail lamps
Cleaning lenses ............................. 218
Messages in the multifunction
display ........................................... 252
Tar stains ........................................... 216
Technical data
Air conditioning refrigerant ............306
Brake fluid ..................................... 306
Capacities fuels, coolants,
lubricants etc. ................................ 303
Coolant .......................................... 307
Engine oil additives ........................306
Engine oils ..................................... 305
Fuel requirements .......................... 307
Gasoline additives .......................... 307
Identification labels .......................294
Premium unleaded gasoline ...........306
Rims and tires ................................ 299
Spare wheel ................................... 303
Vehicle specification SL 550 .........296
Vehicle specification SL 600 .........296
Vehicle specification SL 63 AMG ...297
Vehicle specification SL 65 AMG ...298
Washer and headlamp cleaning
system ................................... 305, 309
Technical data (dimensions)
see Vehicle specification
Technical data (electrical system)
see Vehicle specification
Technical data (engine)
see Vehicle specification
Technical data (weights)
see Vehicle specification
Tele Aid ............................................... 167
Emergency calls ............................. 168
Information button .........................170
Initiating an emergency call
manually ........................................ 168
Messages in the multifunction
display ........................................... 240
Remote door unlock ......................171
Roadside Assistance button ..........169
Search & Send ............................... 171
SOS button .................................... 168
Stolen Vehicle Recovery Services ..172
System self-test ............................. 167
Telephone ............................................. 27
Answering/ending a call ................129
Hands-free microphone ...................35
Menu ............................................. 129
Operation ....................................... 129
Phone book .................................... 130
Redialing ........................................ 130
Temperature
Coolant .......................................... 112
Interior temperature ......................151
Outside .......................................... 116
Tightening torque
Wheels ........................................... 282
TIN (Tire Identification Number) ...... 207
Tire and Loading Information
placard ............................................... 193
Tire and loading terminology ........... 205Index15230_AKB; 6; 22, en-USd2ureepe,Version: 2.11.8.12009-07-28T18:49:58+02:00 - Seite 15
Page 52 of 316
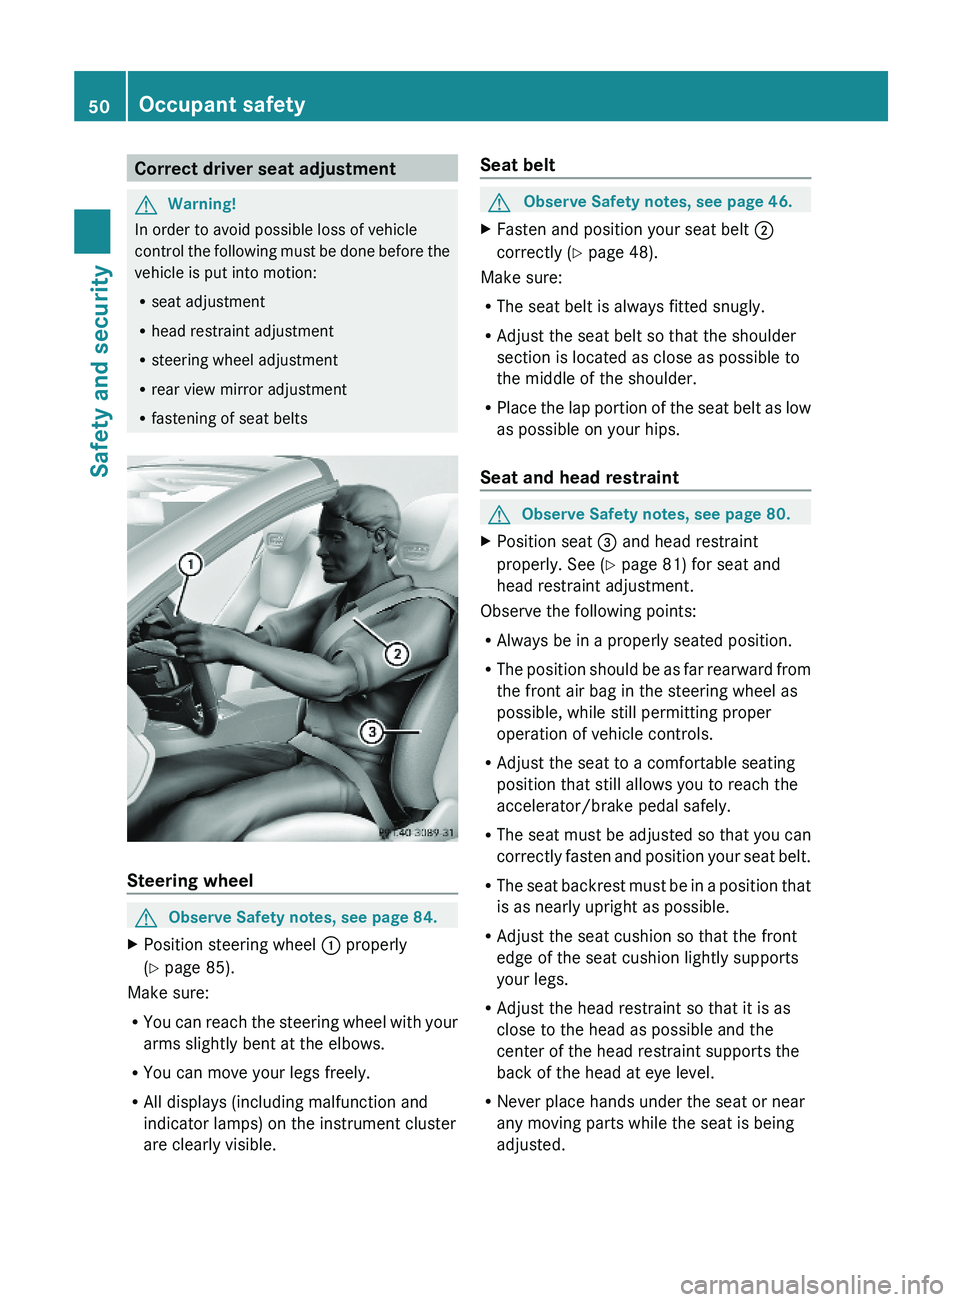
Correct driver seat adjustmentGWarning!
In order to avoid possible loss of vehicle
control the following must be done before the
vehicle is put into motion:
Rseat adjustment
Rhead restraint adjustment
Rsteering wheel adjustment
Rrear view mirror adjustment
Rfastening of seat belts
Steering wheel
GObserve Safety notes, see page 84.XPosition steering wheel \000F properly
(Y page 85).
Make sure:
RYou can reach the steering wheel with your
arms slightly bent at the elbows.
RYou can move your legs freely.
RAll displays (including malfunction and
indicator lamps) on the instrument cluster
are clearly visible.
Seat beltGObserve Safety notes, see page 46.XFasten and position your seat belt \000G
correctly (Y page 48).
Make sure:
RThe seat belt is always fitted snugly.
RAdjust the seat belt so that the shoulder
section is located as close as possible to
the middle of the shoulder.
RPlace the lap portion of the seat belt as low
as possible on your hips.
Seat and head restraint
GObserve Safety notes, see page 80.XPosition seat \000
Page 54 of 316
GWarning!
When leaving the vehicle, always remove the
SmartKey from the starter switch. Always
take the SmartKey with you and lock the
vehicle. Do not leave children unattended in
the vehicle, even if they are secured in a child
restraint system, or with access to an
unlocked vehicle. A child’s unsupervised
access to a vehicle could result in an accident
and/or serious personal injury. The children
could
R injure themselves on parts of the vehicle
R be seriously or fatally injured through
excessive exposure to extreme heat or cold
R injure themselves or cause an accident with
vehicle equipment that can be operated
even if the SmartKey is removed from the
starter switch or removed from the vehicle,
such as seat adjustment, steering wheel
adjustment, or the memory function
If children open a door, they could injure other
persons or get out of the vehicle and injure
themselves or be injured by following traffic.
Do not expose the child restraint system to
direct sunlight. The child restraint system’s
metal parts, for example, could become very
hot, and the child could be burned by these
parts.
GWarning!
Do not carry heavy or hard objects in the
passenger compartment unless they are
firmly secured in place.
Unsecured or improperly positioned cargo
increases a child’s risk of injury in the event
of
R strong braking maneuvers
R sudden changes of direction
R an accident
Infant and child restraint systemsGObserve Safety notes, see page 51.
We recommend all infants and children be
properly restrained at all times while the
vehicle is in motion.
The passenger lap/shoulder belt has a
special seat belt retractor for secure
fastening of child restraints.
To fasten a child restraint, follow the child
restraint manufacturer’s instructions for
mounting.
To activate the special seat belt retractor:
XPull the shoulder belt out completely and
let it retract.
During seat belt retraction, a ratcheting
sound can be heard to indicate that the
special seat belt retractor is activated.
The seat belt is now locked.XPush down on child restraint to take up any
slack.
To deactivate the special seat belt retractor:
XRelease the seat belt buckle and let the
seat belt retract completely.
The seat belt can then again be used in the
usual manner.GWarning!
Never release the seat belt buckle while the
vehicle is in motion, since the special seat belt
retractor will be deactivated.
The use of infant or child restraints is required
by law in all 50 states, the District of
Columbia, the U.S. territories and all
Canadian provinces.
Infants and small children should be seated
in an appropriate infant or child restraint
system. They must be properly secured by a
lap/shoulder belt in accordance with the
manufacturer’s instructions for the child
restraint. All infant or child restraint systems
must comply with U.S. Federal Motor Vehicle
Safety Standards 213 and 225 and Canadian
Motor Vehicle Safety Standards 213 and
210.2.
52Occupant safetySafety and security
230_AKB; 6; 22, en-USd2ureepe,Version: 2.11.8.12009-07-28T18:49:58+02:00 - Seite 52
Page 82 of 316
Seats
Safety notes
GWarning!
In order to avoid possible loss of vehicle
control the following must be done before the
vehicle is put into motion:
R seat adjustment
R head restraint adjustment
R steering wheel adjustment
R rear view mirror adjustment
R fastening of seat belts
GWarning!
Do not adjust the driver’s seat while driving.
Adjusting the seat while driving could cause
the driver to lose control of the vehicle.
Never ride in a moving vehicle with the seat
backrest in an excessively reclined position as
this can be dangerous. You could slide under
the seat belt in a collision. If you slide under
it, the seat belt would apply force at the
abdomen or neck. That could cause serious
or fatal injuries. The seat backrest and seat
belts provide the best restraint when the
wearer is in a position that is as upright as
possible and seat belts are properly
positioned on the body.
GWarning!
Your seat must be adjusted so that you can
correctly fasten your seat belt.
Observe the following points:
R Adjust the seat backrest until your arms are
slightly angled when holding the steering
wheel.
R Adjust the seat to a comfortable seating
position that still allows you to reach the
accelerator/brake pedal safely. The
position should be as far back as possible
with the driver still able to operate the
controls properly.
R Adjust the head restraint so that it is as
close to the head as possible. The center of
the head restraint must support the back of
the head at eye level.
R Never place hands under the seat or near
any moving parts while a seat is being
adjusted.
Failure to do so could result in an accident
and/or serious personal injury.GWarning!
The power seats can be operated at any time.
Therefore, do not leave children unattended
in the vehicle, or with access to an unlocked
vehicle. A child’s unsupervised access to a
vehicle could result in an accident and/or
serious personal injury.
GWarning!
Children 12 years old and under must be
seated and properly secured in an
appropriately sized infant restraint, toddler
restraint, or booster seat recommended for
the size and weight of the child. For additional
information, see section “Children in the
vehicle”.
A child’s risk of serious or fatal injuries is
significantly increased if the child restraints
are not properly secured in the vehicle and/
or the child is not properly secured in the child
restraint.
GWarning!
For your protection, drive only with properly
positioned head restraints.
Adjust the head restraint so that it is as close
to the head as possible and the center of the
head restraint supports the back of the head
at eye level. This will reduce the potential for
injury to the head and neck in the event of an
accident or similar situation.
Do not drive the vehicle without the seat head
restraints. Head restraints are intended to
help reduce injuries during an accident.
80SeatsControls in detail
230_AKB; 6; 22, en-USd2ureepe,Version: 2.11.8.12009-07-28T18:49:58+02:00 - Seite 80
Page 83 of 316
Seat adjustment
! When moving the seats, make sure there
are no items in the footwell or behind the
seats. Otherwise, you could damage the
seats and/or the items.
Power seats
iThe memory function (Y page 88) lets
you store the settings for the seat position
together with the settings for the steering
wheel and the exterior rear view mirrors.
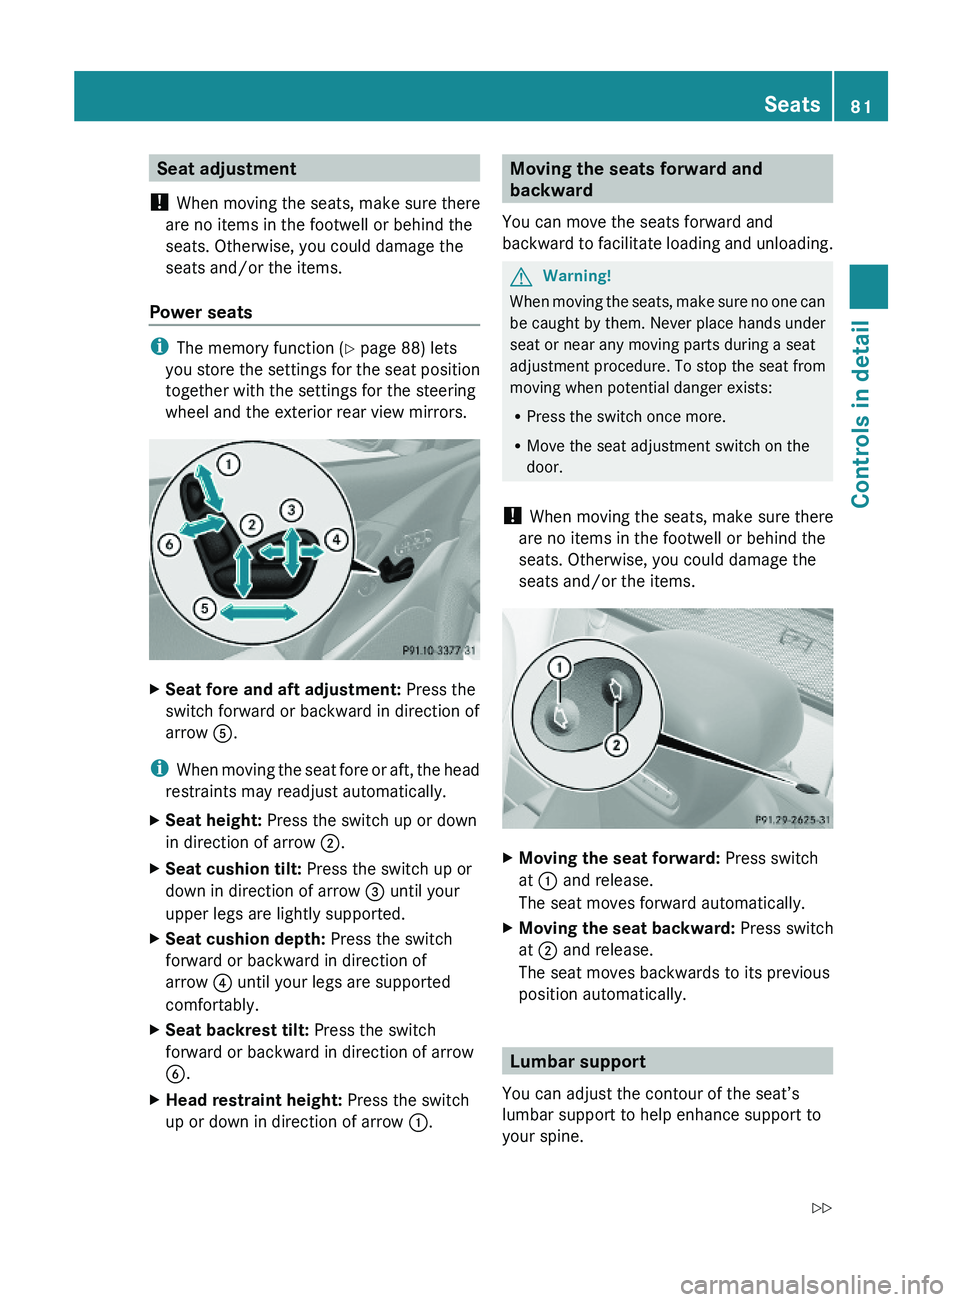
XSeat fore and aft adjustment: Press the
switch forward or backward in direction of
arrow \000
Page 86 of 316
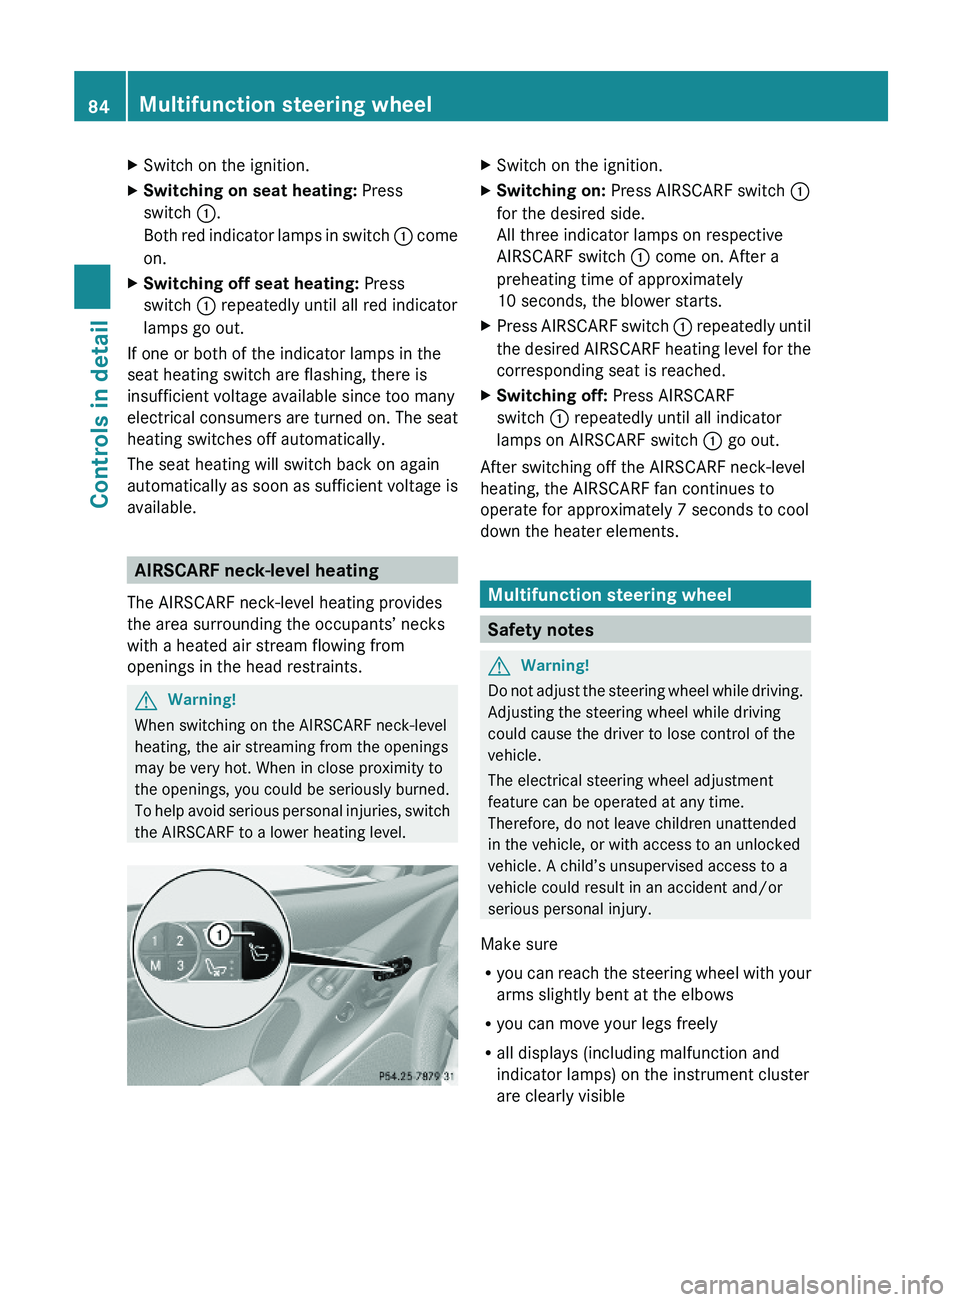
XSwitch on the ignition.XSwitching on seat heating: Press
switch \000F.
Both red indicator lamps in switch \000F come
on.
XSwitching off seat heating: Press
switch \000F repeatedly until all red indicator
lamps go out.
If one or both of the indicator lamps in the
seat heating switch are flashing, there is
insufficient voltage available since too many
electrical consumers are turned on. The seat
heating switches off automatically.
The seat heating will switch back on again
automatically as soon as sufficient voltage is
available.
AIRSCARF neck-level heating
The AIRSCARF neck-level heating provides
the area surrounding the occupants’ necks
with a heated air stream flowing from
openings in the head restraints.
GWarning!
When switching on the AIRSCARF neck-level
heating, the air streaming from the openings
may be very hot. When in close proximity to
the openings, you could be seriously burned.
To help avoid serious personal injuries, switch
the AIRSCARF to a lower heating level.
XSwitch on the ignition.XSwitching on: Press AIRSCARF switch \000F
for the desired side.
All three indicator lamps on respective
AIRSCARF switch \000F come on. After a
preheating time of approximately
10 seconds, the blower starts.
XPress AIRSCARF switch \000F repeatedly until
the desired AIRSCARF heating level for the
corresponding seat is reached.
XSwitching off: Press AIRSCARF
switch \000F repeatedly until all indicator
lamps on AIRSCARF switch \000F go out.
After switching off the AIRSCARF neck-level
heating, the AIRSCARF fan continues to
operate for approximately 7 seconds to cool
down the heater elements.
Multifunction steering wheel
Safety notes
GWarning!
Do not adjust the steering wheel while driving.
Adjusting the steering wheel while driving
could cause the driver to lose control of the
vehicle.
The electrical steering wheel adjustment
feature can be operated at any time.
Therefore, do not leave children unattended
in the vehicle, or with access to an unlocked
vehicle. A child’s unsupervised access to a
vehicle could result in an accident and/or
serious personal injury.
Make sure
Ryou can reach the steering wheel with your
arms slightly bent at the elbows
Ryou can move your legs freely
Rall displays (including malfunction and
indicator lamps) on the instrument cluster
are clearly visible
84Multifunction steering wheelControls in detail
230_AKB; 6; 22, en-USd2ureepe,Version: 2.11.8.12009-07-28T18:49:58+02:00 - Seite 84
Page 87 of 316
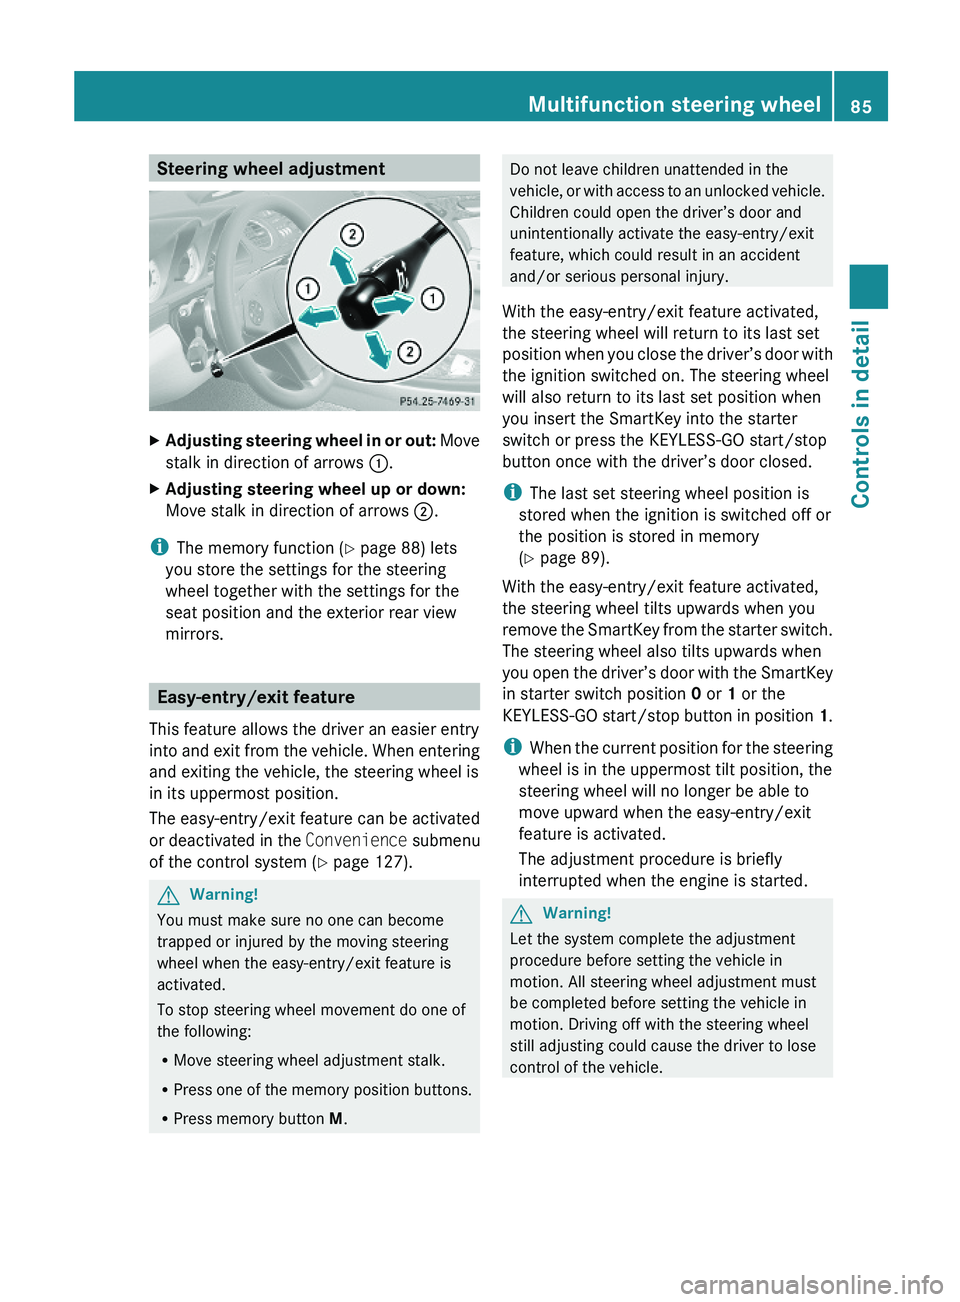
Steering wheel adjustmentXAdjusting steering wheel in or out: Move
stalk in direction of arrows \000F.
XAdjusting steering wheel up or down:
Move stalk in direction of arrows \000G.
iThe memory function (Y page 88) lets
you store the settings for the steering
wheel together with the settings for the
seat position and the exterior rear view
mirrors.
Easy-entry/exit feature
This feature allows the driver an easier entry
into and exit from the vehicle. When entering
and exiting the vehicle, the steering wheel is
in its uppermost position.
The easy-entry/exit feature can be activated
or deactivated in the Convenience submenu
of the control system (Y page 127).
GWarning!
You must make sure no one can become
trapped or injured by the moving steering
wheel when the easy-entry/exit feature is
activated.
To stop steering wheel movement do one of
the following:
RMove steering wheel adjustment stalk.
RPress one of the memory position buttons.
RPress memory button M.
Do not leave children unattended in the
vehicle, or with access to an unlocked vehicle.
Children could open the driver’s door and
unintentionally activate the easy-entry/exit
feature, which could result in an accident
and/or serious personal injury.
With the easy-entry/exit feature activated,
the steering wheel will return to its last set
position when you close the driver’s door with
the ignition switched on. The steering wheel
will also return to its last set position when
you insert the SmartKey into the starter
switch or press the KEYLESS-GO start/stop
button once with the driver’s door closed.
iThe last set steering wheel position is
stored when the ignition is switched off or
the position is stored in memory
(Y page 89).
With the easy-entry/exit feature activated,
the steering wheel tilts upwards when you
remove the SmartKey from the starter switch.
The steering wheel also tilts upwards when
you open the driver’s door with the SmartKey
in starter switch position 0 or 1 or the
KEYLESS-GO start/stop button in position 1.
iWhen the current position for the steering
wheel is in the uppermost tilt position, the
steering wheel will no longer be able to
move upward when the easy-entry/exit
feature is activated.
The adjustment procedure is briefly
interrupted when the engine is started.
GWarning!
Let the system complete the adjustment
procedure before setting the vehicle in
motion. All steering wheel adjustment must
be completed before setting the vehicle in
motion. Driving off with the steering wheel
still adjusting could cause the driver to lose
control of the vehicle.
Multifunction steering wheel85Controls in detail230_AKB; 6; 22, en-USd2ureepe,Version: 2.11.8.12009-07-28T18:49:58+02:00 - Seite 85Z
Page 129 of 316
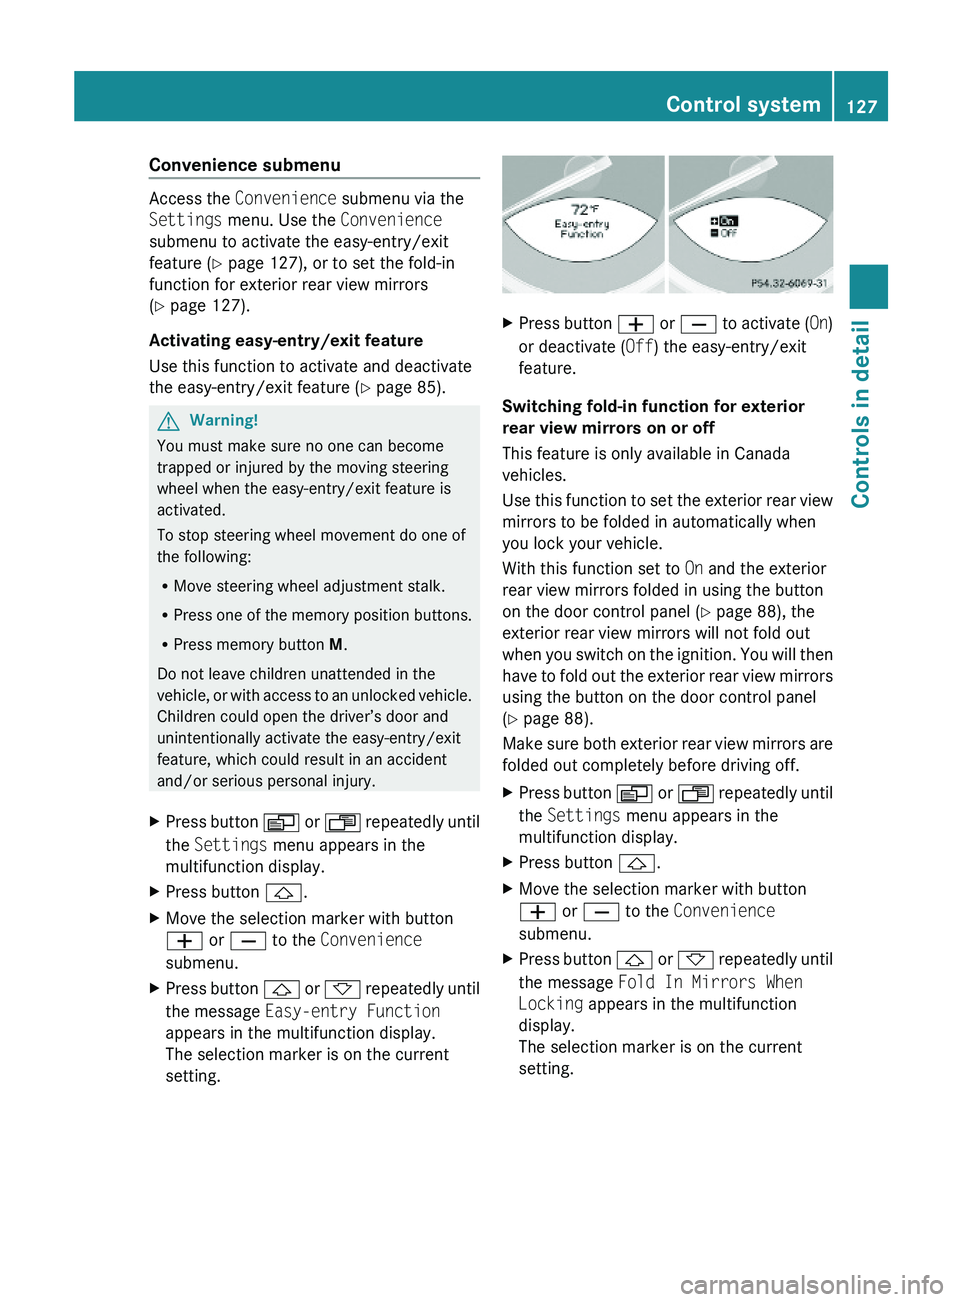
Convenience submenu
Access the Convenience submenu via the
Settings menu. Use the Convenience
submenu to activate the easy-entry/exit
feature (Y page 127), or to set the fold-in
function for exterior rear view mirrors
(Y page 127).
Activating easy-entry/exit feature
Use this function to activate and deactivate
the easy-entry/exit feature (Y page 85).
GWarning!
You must make sure no one can become
trapped or injured by the moving steering
wheel when the easy-entry/exit feature is
activated.
To stop steering wheel movement do one of
the following:
RMove steering wheel adjustment stalk.
RPress one of the memory position buttons.
RPress memory button M.
Do not leave children unattended in the
vehicle, or with access to an unlocked vehicle.
Children could open the driver’s door and
unintentionally activate the easy-entry/exit
feature, which could result in an accident
and/or serious personal injury.
XPress button \000Y or \000X repeatedly until
the Settings menu appears in the
multifunction display.
XPress button \000\).XMove the selection marker with button
\000Z or \000[ to the Convenience
submenu.
XPress button \000\) or \000- repeatedly until
the message Easy-entry Function
appears in the multifunction display.
The selection marker is on the current
setting.
XPress button \000Z or \000[ to activate (On)
or deactivate (Off) the easy-entry/exit
feature.
Switching fold-in function for exterior
rear view mirrors on or off
This feature is only available in Canada
vehicles.
Use this function to set the exterior rear view
mirrors to be folded in automatically when
you lock your vehicle.
With this function set to On and the exterior
rear view mirrors folded in using the button
on the door control panel (Y page 88), the
exterior rear view mirrors will not fold out
when you switch on the ignition. You will then
have to fold out the exterior rear view mirrors
using the button on the door control panel
(Y page 88).
Make sure both exterior rear view mirrors are
folded out completely before driving off.
XPress button \000Y or \000X repeatedly until
the Settings menu appears in the
multifunction display.
XPress button \000\).XMove the selection marker with button
\000Z or \000[ to the Convenience
submenu.
XPress button \000\) or \000- repeatedly until
the message Fold In Mirrors When
Locking appears in the multifunction
display.
The selection marker is on the current
setting.
Control system127Controls in detail230_AKB; 6; 22, en-USd2ureepe,Version: 2.11.8.12009-07-28T18:49:58+02:00 - Seite 127Z
Page 135 of 316
XBriefly pull the cruise control lever in
direction of arrow 0088.
If no speed is stored, the current speed is
set and stored.XRemove your foot from the accelerator
pedal.
The last stored speed is deleted from memory
when the engine is turned off.
Distronic
Safety notes
When activated, the Distronic adaptive cruise
control increases the driving convenience
afforded by the cruise control while traveling
on expressways and other major roadways.
R If the Distronic distance sensor detects a
slower moving vehicle directly ahead, your
vehicle speed will be reduced so that you
follow that vehicle at your preset following
distance.
R If there is no vehicle directly ahead of you,
the Distronic will function in the same way
as standard cruise control ( Y page 130).
GWarning!
The Distronic requires familiarity with its
operational characteristics. We strongly
recommend that you review the following
information carefully before operating the
system.
GWarning!
The Distronic is a convenience system. Its
speed adjustment reduction capability is
intended to make cruise control more
effective and usable when traffic speeds vary.
It is not however, intended to, nor does it,
replace the need for extreme care.
The responsibility for the vehicle’s speed,
distance to the preceding vehicle and, most
importantly, brake operation to ensure a safe
stopping distance, always remains with the
driver.
The Distronic cannot take street and traffic
conditions into account. Complex driving
situations are not always fully recognized by
the Distronic. This could result in wrong or
missing distance warnings.GWarning!
The Distronic adaptive cruise control is not a
substitute for active driving involvement. It
does not react to pedestrians or on stationary
objects, nor does it recognize or predict the
lane curvature or the movement of preceding
vehicles.
The Distronic can only apply 20% of the
maximum braking power of the vehicle.
It is the driver’s responsibility at all times to
be attentive to the road, weather and traffic
conditions. Additionally, the driver must
provide the steering, braking and other driving
inputs necessary to remain in control of the
vehicle.
High-frequency sources such as toll stations,
speed measuring systems etc. can cause the
Distronic system to malfunction.
GWarning!
The Distronic cannot take road and traffic
conditions into account. Only use the
Distronic if the road, weather and traffic
conditions make it advisable to travel at a
constant speed.
GWarning!
Use of the Distronic can be dangerous on
slippery roads. Rapid changes in tire traction
can result in wheel spin and loss of control.
The Distronic does not function in adverse
sight and distance conditions. Do not use the
Distronic during conditions of fog, heavy rain,
snow or sleet.
Driving systems133Controls in detail230_AKB; 6; 22, en-USd2ureepe,Version: 2.11.8.12009-07-28T18:49:58+02:00 - Seite 133Z