display MERCEDES-BENZ SL-Class 2013 R131 Owner's Manual
[x] Cancel search | Manufacturer: MERCEDES-BENZ, Model Year: 2013, Model line: SL-Class, Model: MERCEDES-BENZ SL-Class 2013 R131Pages: 590, PDF Size: 9.73 MB
Page 312 of 590
in the
Trip menu; see the separate vehicle
Operator's Manual. Driving conditions menu (Active Body
Control)
General notes On vehicles with Active Body Control (ABC),
you can display some driving systems and
additional information in the COMAND
display.
Calling up drive status regulator (ABC)
X
Press 000D.
X In the system menu, slide 00380012the
COMAND controller up until the display/
selection window is selected.
X Slide 003600120037 the COMAND controller
repeatedly until the drivin gconditions
menu (ABC) appears.
The corresponding displays appear in the
COMAND display.
Details on the displays:
R for all vehicles except AMG vehicles, see
the separate vehicle Operator's Manual
R for AMG vehicles, see the separate vehicle
Operator's Manual.
Exiting the display X
Slide 003600120037 the COMAND controller until
the desired display (clock or fuel
consumption) is shown. Seat functions
Overview The possible settings depend on the type of
seat and the vehicle model series. Using the
0011
button next to the COMAND controller
or the Seat menu item in the system menu,
you can call up the following seat adjustment
functions:
R For M-Class and GL-Class vehicles with
multicontour seats:
-seat cushion length
- backrest side bolsters
- lumbar
- massage
R For SL-Class vehicles with lumbar support
seats:
-lumbar
- balance
R For SL-Class vehicles with multicontour
seats:
-seat cushion side bolsters
- backrest side bolsters
- lumbar
- balance
R For SL-Class vehicles with dynamic
multicontour seats
-seat cushion side bolsters
- backrest side bolsters
- lumbar
- dynamics
- massage
- balance
i You can also store and recall the current
seat function settings using the memory
button and the corresponding memory
position switch; see the separate vehicle
Operator's Manual.
The massage function cannot be started or
stopped using the memory button. 310
Vehicle functionsCOMAND
Page 315 of 590
The values stand for:
R
0 -b
ackres tand sea tcushio nare heated
equally to the maximu mlevel
R 1 to
3 -t
he heat output to the seat
cushion is reduced in one-third
increments
R -1 to
-3 -t
he heat output to the backrest
is reduced in one-third increments
X Turn 003E0012003F or slide 003600120037the COMAND
controller and press 0039to confirm.
X To exit the menu: press the001Fback
button.
Massage function
This function is available on M-Class and GL-
Class vehicles with multicontour seats and on
SL-Class vehicles with dynamic multicontour
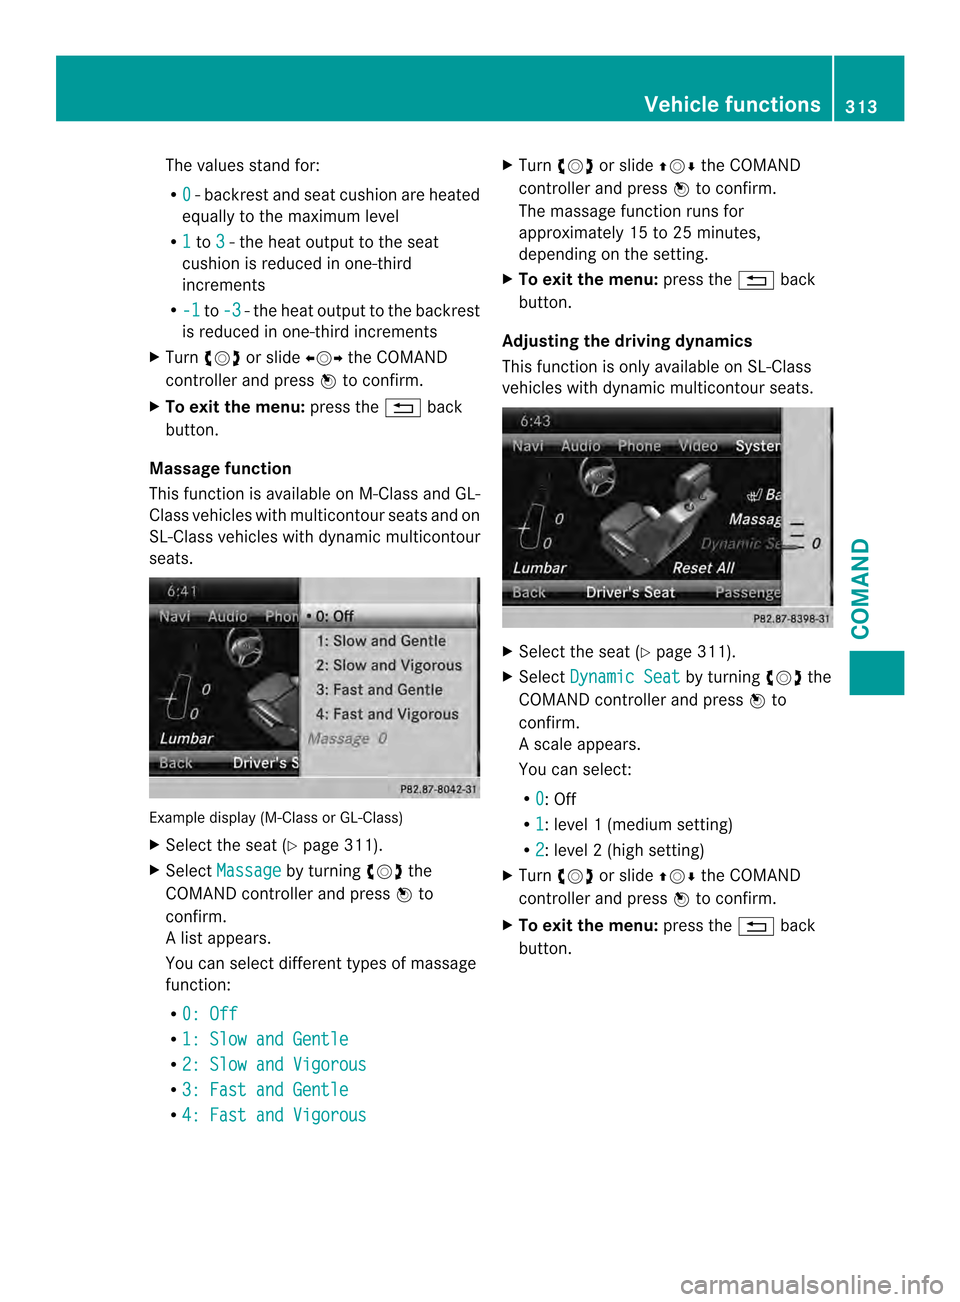
seats. Example display (M-Class or GL-Class)
X
Select the seat (Y page 311).
X Select Massage by turning
003E0012003Fthe
COMAND controller and press 0039to
confirm.
Al ist appears.
You can selec tdifferen ttypes of massage
function:
R 0: Off R
1: Slow and Gentle R
2: Slow and Vigorous R
3: Fast and Gentle R
4: Fast and Vigorous X
Turn 003E0012003F or slide 00380012000Athe COMAND
controller and press 0039to confirm.
The massage function runs for
approximately 15 to 25 minutes,
depending on the setting.
X To exit the menu: press the001Fback
button.
Adjusting the drivin gdynamics
This function is only available on SL-Class
vehicles with dynamic multicontour seats. X
Select the seat (Y page 311).
X Select Dynamic Seat by turning
003E0012003Fthe
COMAND controller and press 0039to
confirm.
As cale appears.
You can select:
R 0 : Off
R 1 :l
evel 1(mediu msetting)
R 2 :l
evel 2(high setting)
X Turn 003E0012003F or slide 00380012000Athe COMAND
controller and press 0039to confirm.
X To exit the menu: press the001Fback
button. Vehicle functions
313COMAND Z
Page 316 of 590
Resetting all adjustments
X
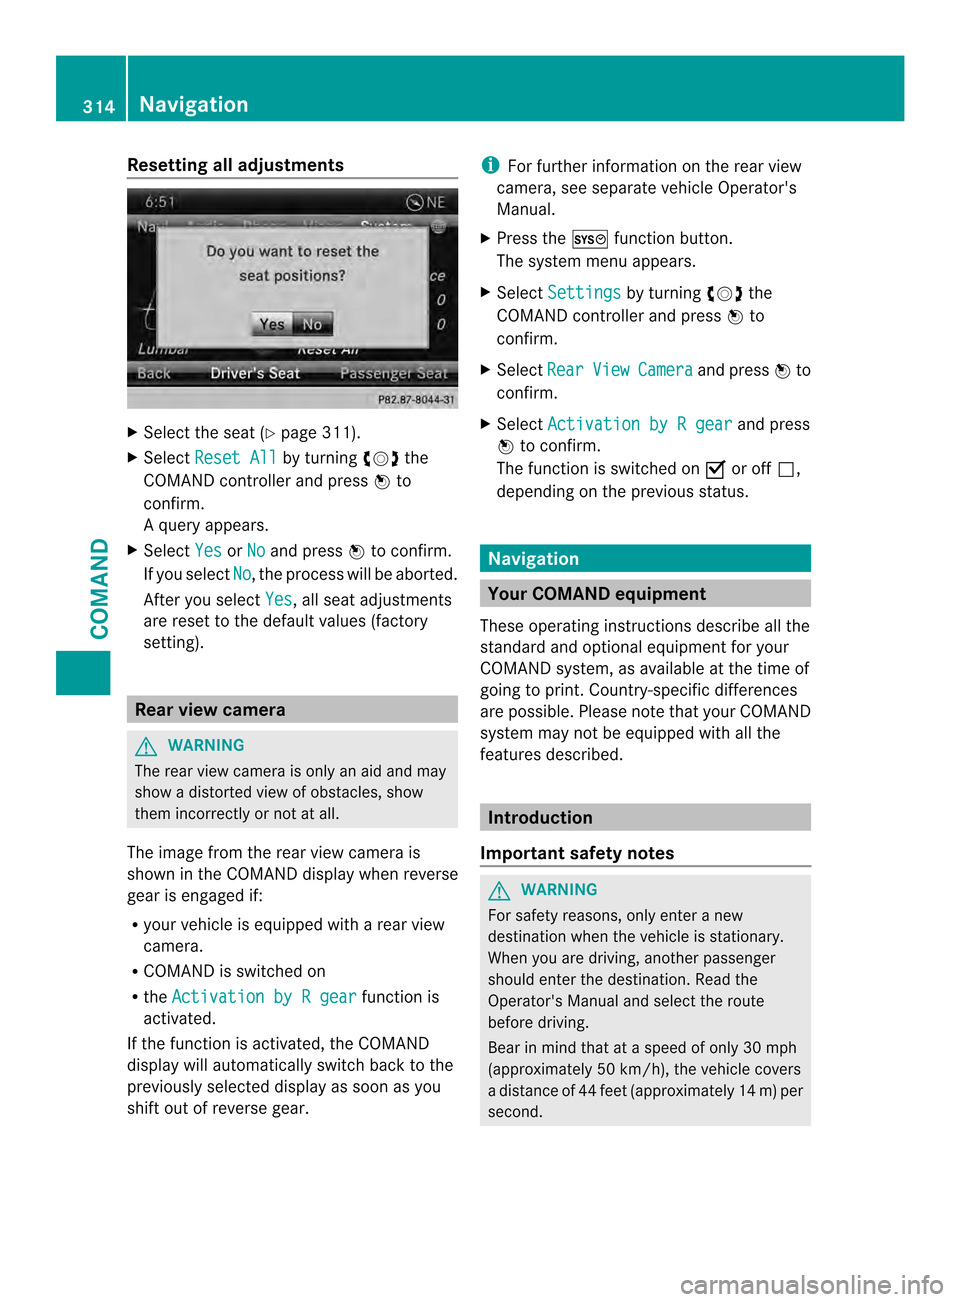
Select the sea t(Ypage 311).
X Select Reset All by turning
003E0012003Fthe
COMAND controller and press 0039to
confirm.
Aq uery appears.
X Select Yes or
No and press
0039to confirm.
If you select No , the process will be aborted.
Afte ryou select Yes , all seat adjustments
are reset to the default values (factory
setting). Rear view camera
G
WARNING
The rear view camera is only an aid and may
show a distorted view of obstacles, show
them incorrectly or not at all.
The image from the rear view camera is
shown in the COMAND display when reverse
gear is engaged if:
R your vehicle is equipped with a rear view
camera.
R COMAND is switched on
R the Activation by R gear function is
activated.
If the function is activated, the COMAND
display will automatically switch back to the
previously selected display as soon as you
shift out of reverse gear. i
For further information on the rear view
camera, see separate vehicle Operator's
Manual.
X Press the 000Dfunction button.
The system menu appears.
X Select Settings by turning
003E0012003Fthe
COMAND controller and press 0039to
confirm.
X Select Rear View Camera and press
0039to
confirm.
X Select Activation by R gear and press
0039 to confirm.
The function is switched on 0013or off 0003,
depending on the previous status. Navigation
Your COMAND equipment
These operating instructions describe all the
standard and optional equipment for your
COMAND system, as available at the time of
going to print. Country-specific differences
are possible. Please note that your COMAND
system may not be equipped with all the
features described. Introduction
Important safety notes G
WARNING
For safety reasons, only enter a new
destination when the vehicle is stationary.
When you are driving, another passenger
should enter the destination .Read the
Operator's Manual and select the route
before driving.
Bear in mind that at a speed of only 30 mph
(approximately 50 km/h), the vehicle covers
a distance of 44 feet (approximately 14 m) per
second. 314
NavigationCOMAND
Page 317 of 590
COMAND calculates the rout
eto the
destination without taking account of the
following, for example:
R traffic lights
R stop and give way signs
R merging lanes
R parking or stopping in a no parking/no
stopping zone
R other road and traffic rules and regulations
R narrow bridges G
WARNING
COMAND may give incorrect navigation
commands if the actual road/traffic situation
no longer corresponds to the data on the
digital map. Digital maps do not cover all
areas nor all routes in an area. For example,
a route may have been diverted or the
direction of a one-way street may have
changed.
For this reason, you must always observe road
and traffic rules and regulations during your
journey. Road and traffic rules and regulations
always have priority over the system's driving
recommendations. G
WARNING
Navigation announcements are intended to
direct you while driving without diverting your
attention from the road and driving.
Please always use this feature instead of
consulting the map display for directions.
Looking at the icons or map display can
distract you from traffic conditions and
driving, and increase the risk of an accident.
General notes Operational readiness of the navigation
system
The navigation system must determine the
position of the vehicle before first use or
whenever operational status is restored.
Therefore, you may have to drive for a while
before precise route guidance is possible. GPS reception
Correct functioning of the navigation system
depends, amongst other things, on GPS
reception
.Incertain situations, GPS
reception may be impaired, there may be
interference or there may be no reception at
all, e.g. in tunnels or parking garages.
i Using roof carriers may impair the correct
functioning of a roof antenna (phone,
satellite radio, GPS).
Entry restriction
On vehicles for certain countries, there is a
restriction on entering data.
The restriction is active from a vehicle speed
of above approximately 3 mph (5 km/h). As
soon as the speed falls below approximately
2 mph (3 km/h), the restriction becomes
inactive.
When the restriction is active, certain entries
cannot be made. This will be indicated by the
fact that certain menu items are grayed out
and cannot be selected.
The following entries are not possible, for
example:
R entering the destination city and street
R entering a destination via the map
R entering POIs in the vicinity of a city or via
a name search
R editing entries
R using the number keypad for direct entry
Other entries are possible, such as entering
points of interest in the vicinity of the
destination or curren tposition. Navigation
315COMAND Z
Page 318 of 590
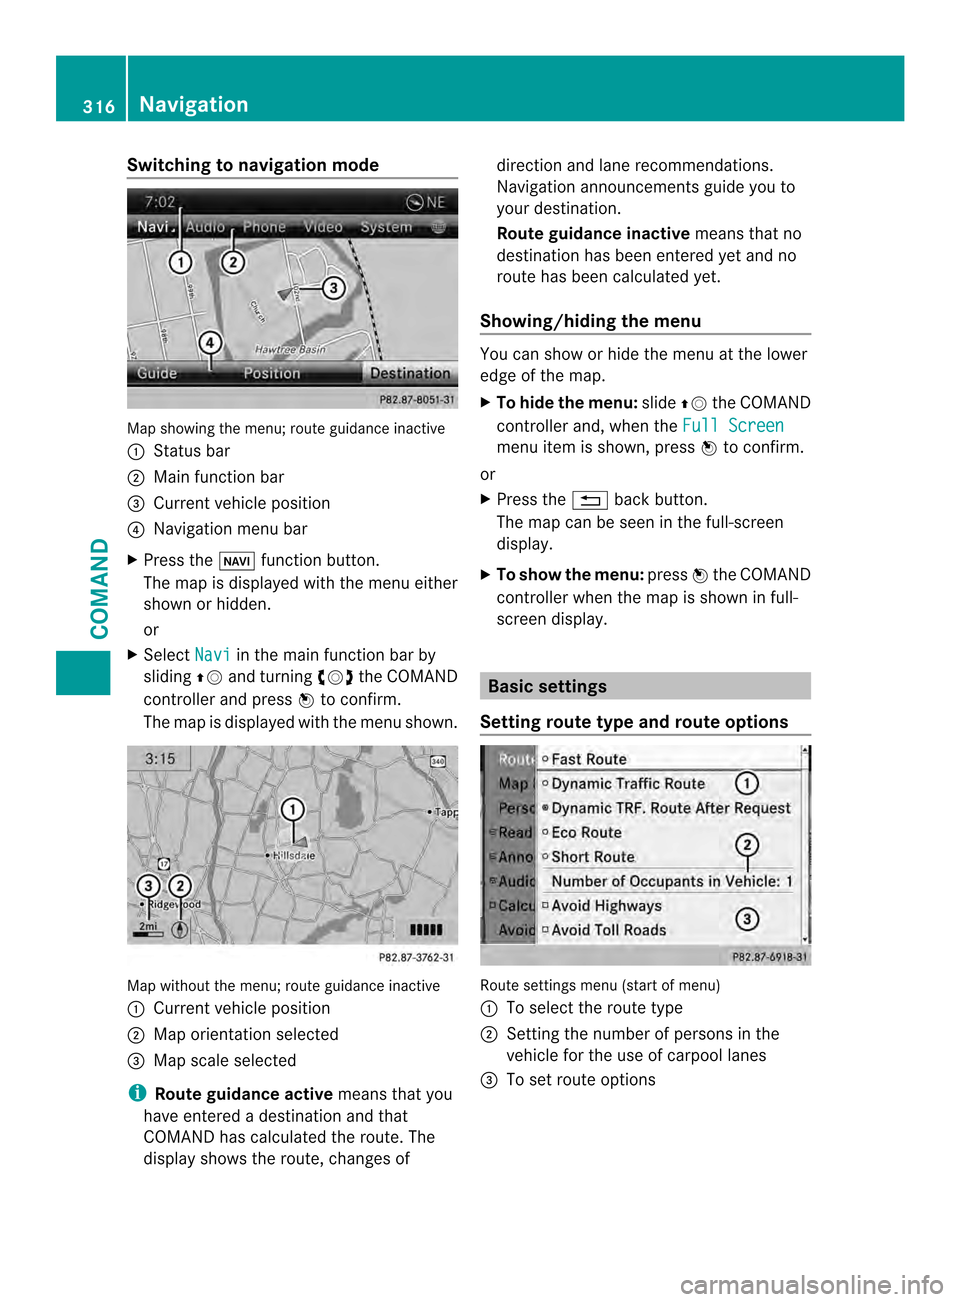
Switching to navigation mode
Map showing the menu; route guidance inactive
0002 Status bar
0003 Main function bar
0027 Current vehicle position
0026 Navigation menu bar
X Press the 0014function button.
The map is displayed with the menu either
shown or hidden.
or
X Select Navi in the main function bar by
sliding 00380012and turning 003E0012003Fthe COMAND
controller and press 0039to confirm.
The map is displayed with the menu shown. Map without the menu; route guidance inactive
0002
Current vehicle position
0003 Map orientation selected
0027 Map scale selected
i Route guidance active means that you
have entered a destination and that
COMAND has calculated the route. The
display shows the route, changes of direction and lane recommendations.
Navigation announcements guide you to
your destination.
Route guidance inactive
means that no
destination has been entered yet and no
route has been calculated yet.
Showing/hiding the menu You can show or hide the menu at the lower
edge of the map.
X
To hide the menu: slide00380012the COMAND
controller and, when the Full Screen menu item is shown, press
0039to confirm.
or
X Press the 001Fback button.
The map can be seen in the full-screen
display.
X To show the menu: press0039the COMAND
controller when the map is shown in full-
screen display. Basic settings
Setting route type and route options Route settings menu (start of menu)
0002
To select the route type
0003 Setting the number of persons in the
vehicle for the use of carpool lanes
0027 To set route options 316
NavigationCOMAND
Page 321 of 590
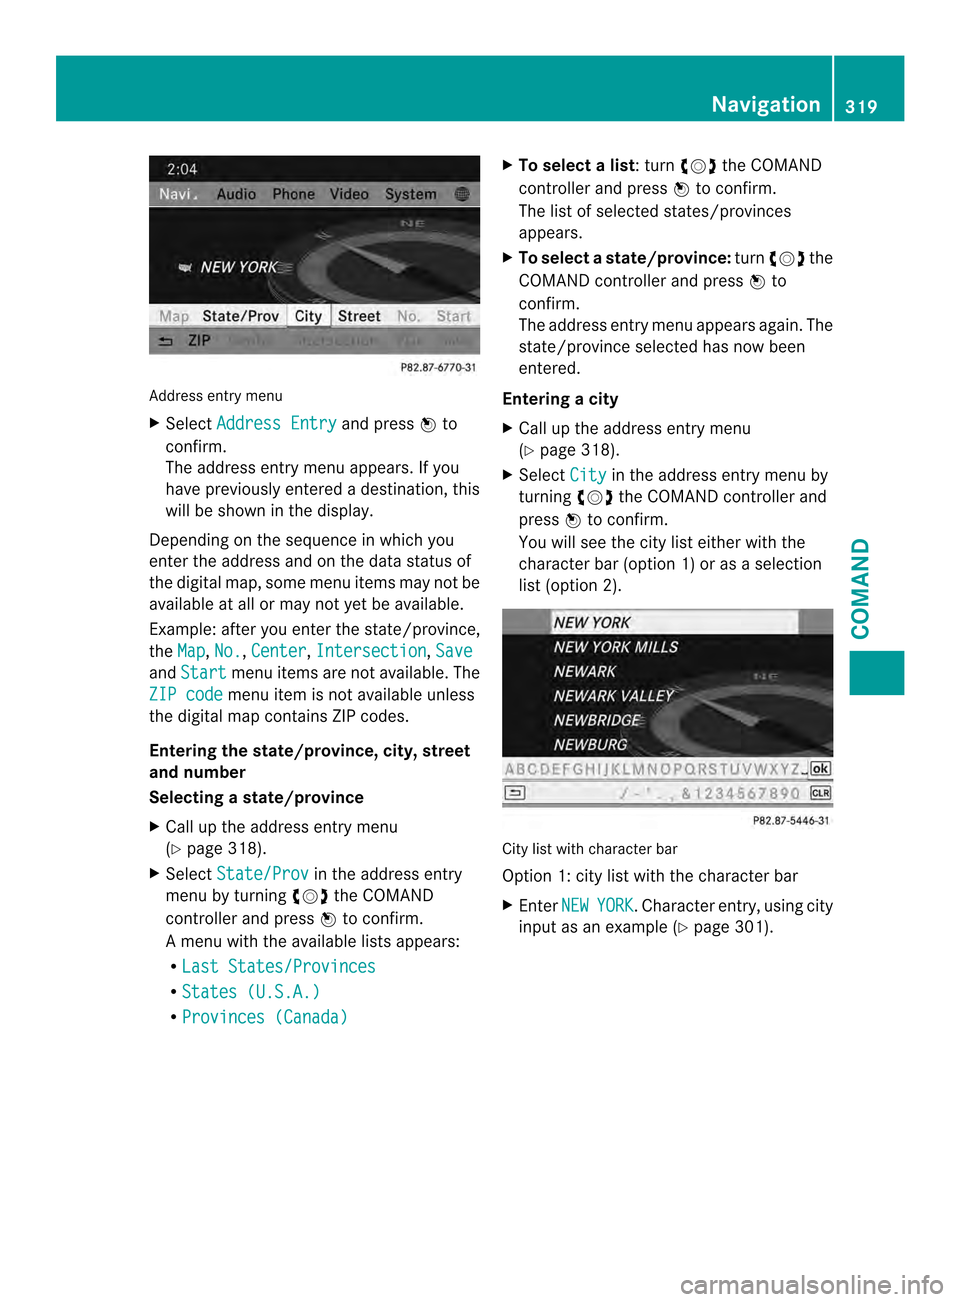
Address entry menu
X
Select Address Entry and press
0039to
confirm.
The address entry menu appears .Ifyou
have previously entered a destination, this
will be shown in the display.
Depending on the sequence in which you
enter the address and on the data status of
the digital map, some menu items may not be
available at all or may not yet be available.
Example: after you enter the state/province,
the Map ,
No. ,
Center ,
Intersection ,
Save and
Start menu items are not available. The
ZIP code menu item is not available unless
the digital map contains ZIP codes.
Entering the state/province, city, street
and number
Selecting astate/province
X Call up the address entry menu
(Y page 318).
X Select State/Prov in the address entry
menu by turning 003E0012003Fthe COMAND
controller and press 0039to confirm.
Am enu with the available lists appears:
R Last States/Provinces R
States (U.S.A.) R
Provinces (Canada) X
To select alist : turn 003E0012003Fthe COMAND
controller and press 0039to confirm.
The list of selected states/provinces
appears.
X To select astate/province: turn003E0012003F the
COMAND controller and press 0039to
confirm.
The address entry menu appears again. The
state/province selected has now been
entered.
Entering acity
X Call up the address entry menu
(Y page 318).
X Select City in the address entry menu by
turning 003E0012003Fthe COMAND controller and
press 0039to confirm.
You will see the city list eithe rwith the
character bar (option 1) or as a selection
list (option 2). City list with character bar
Option 1: city list with the character bar
X
Enter NEW YORK .C
haracter entry, using city
input as an example (Y page 301). Navigation
319COMAND Z
Page 325 of 590
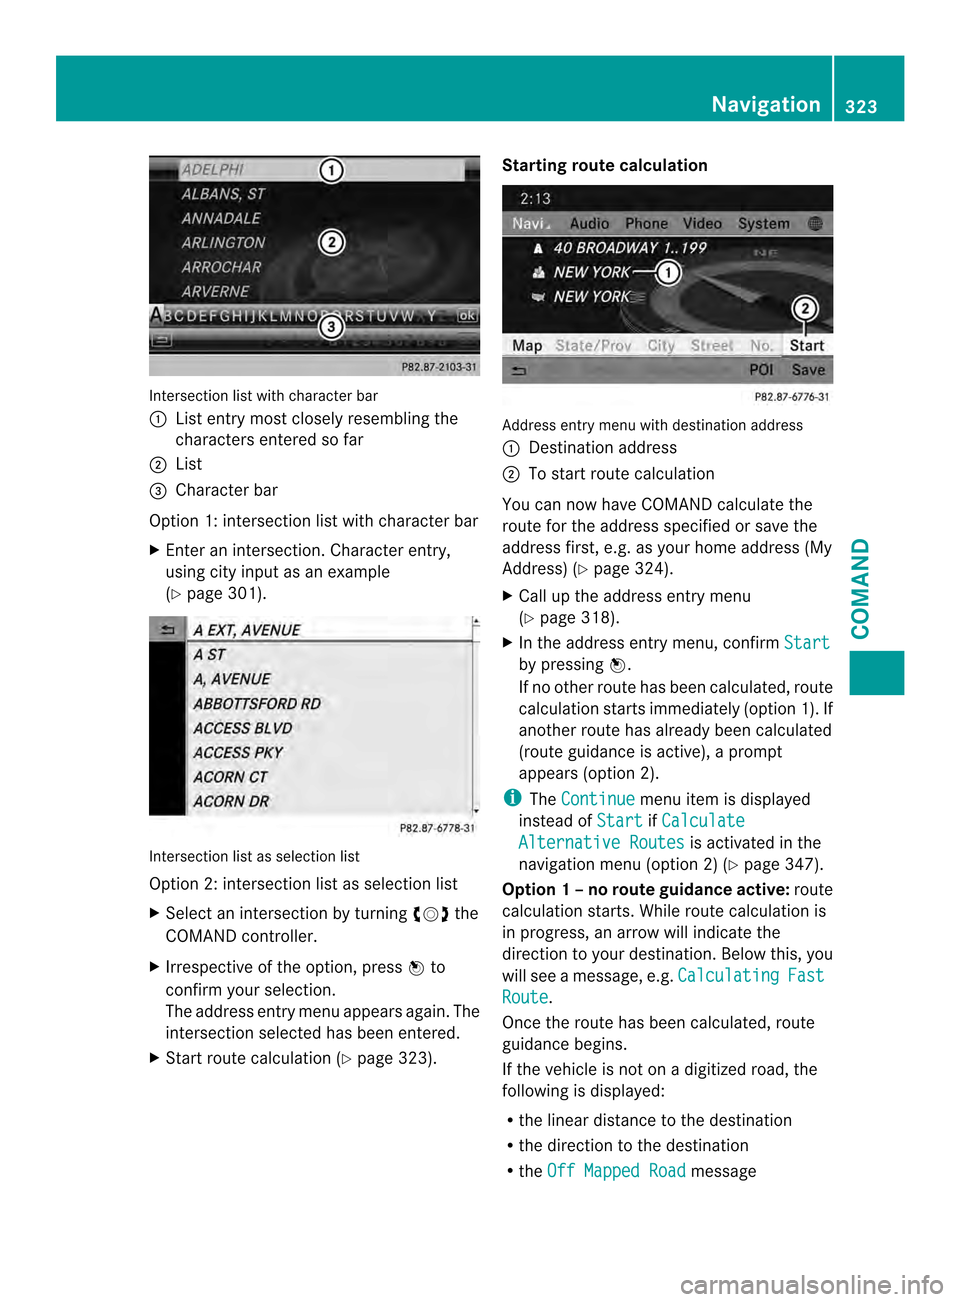
Intersection list with character bar
0002
List entry most closely resembling the
characters entered so far
0003 List
0027 Character bar
Option 1: intersection list with character bar
X Enter an intersection. Character entry,
using city input as an example
(Y page 301). Intersection list as selection list
Option 2: intersection list as selection list
X Select an intersection by turning 003E0012003Fthe
COMAND controller.
X Irrespective of the option, press 0039to
confirm yours election.
The address entry menu appears again. The
intersection selected has been entered.
X Start route calculation (Y page 323).Starting route calculation
Address entry menu with destination address
0002
Destination address
0003 To start route calculation
You can now have COMAND calculate the
route for the address specified or save the
address first, e.g. as your home address (My
Address) (Y page 324).
X Call up the address entry menu
(Y page 318).
X In the address entry menu, confirm Start by pressing
0039.
If no other route has been calculated, route
calculation starts immediately (option 1). If
another route has already been calculated
(route guidance is active), a prompt
appears (option 2).
i The Continue menu item is displayed
instead of Start if
Calculate Alternative Routes is activated in the
navigation menu (option 2) (Y page 347).
Option 1 –no route guidance active: route
calculatio nstarts. While route calculatio nis
in progress, an arrow will indicate the
direction to your destination. Below this, you
will see a message, e.g. Calculating Fast
Route .
Once the route has been calculated, route
guidance begins.
If the vehicle is not on a digitized road, the
following is displayed:
R the linear distance to the destination
R the direction to the destination
R the Off Mapped Road message Navigation
323COMAND Z
Page 328 of 590
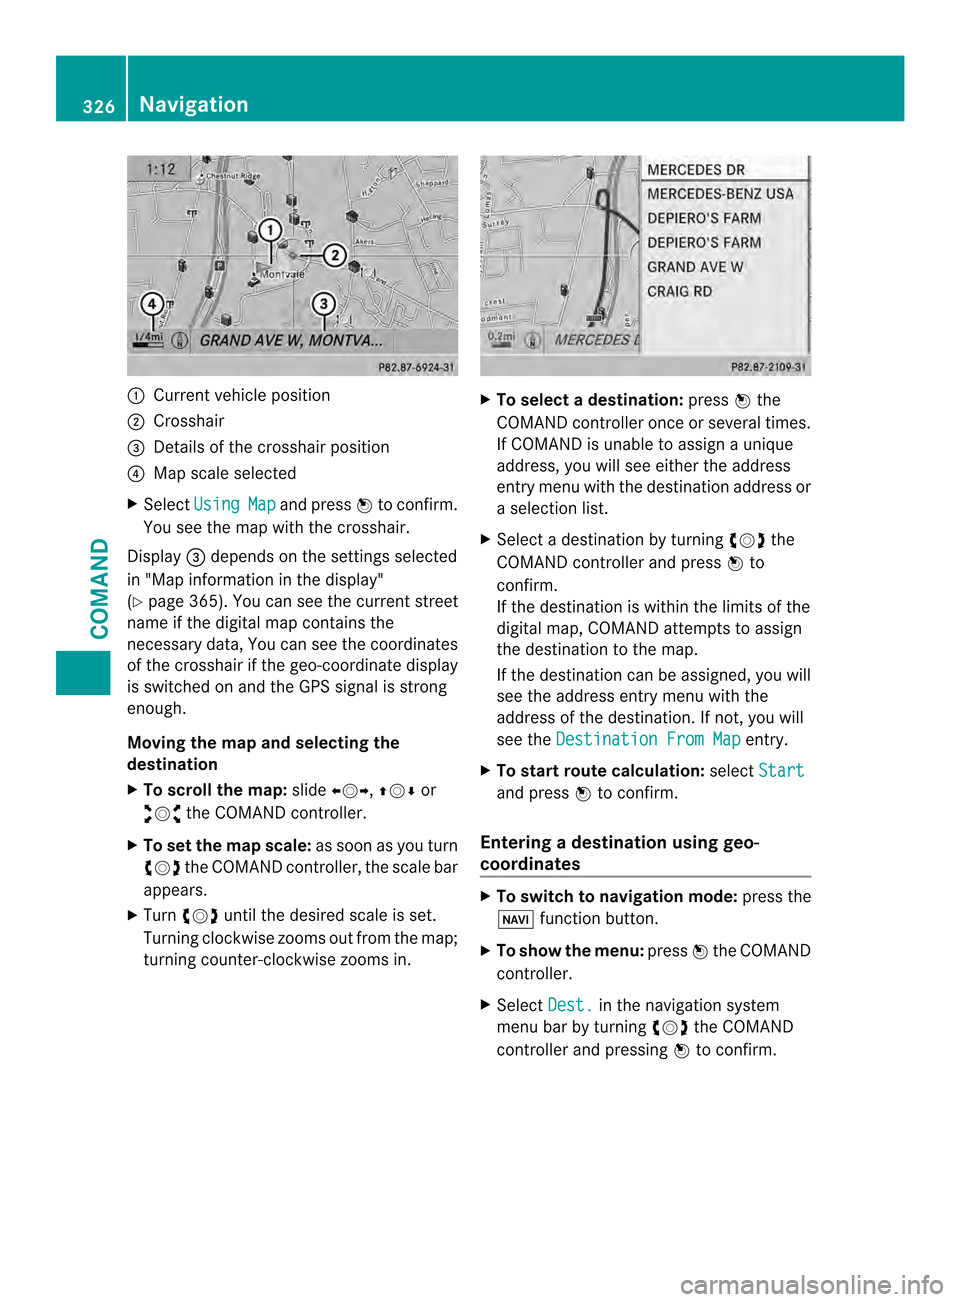
0002
Curren tvehicle position
0003 Crosshair
0027 Details of the crosshair position
0026 Map scale selected
X Select Using Map and press
0039to confirm.
You see the map with the crosshair.
Display 0027depends on the settings selected
in "Map information in the display"
(Y page 365). You can see the current street
name if the digital map contains the
necessary data, You can see the coordinates
of the crosshair if the geo-coordinate display
is switched on and the GPS signal is strong
enough.
Moving the map and selecting the
destination
X To scroll the map: slide003600120037, 00380012000Aor
00340012003D the COMAND controller.
X To set the map scale: as soon as you turn
003E0012003F the COMAND controller, the scale bar
appears.
X Turn 003E0012003F until the desired scale is set.
Turning clockwise zooms out from the map;
turning counter-clockwise zooms in. X
To select adestination: press0039the
COMAND controller once or several times.
If COMAND is unable to assign a unique
address, you will see either the address
entry menu with the destination address or
a selectio nlist.
X Selec tadestination by turning 003E0012003Fthe
COMAND controller and press 0039to
confirm.
If the destination is within the limits of the
digital map, COMAND attempts to assign
the destination to the map.
If the destination can be assigned, you will
see the address entry menu with the
address of the destination. If not, you will
see the Destination From Map entry.
X To start route calculation: selectStart and press
0039to confirm.
Entering adestination usin ggeo-
coordinates X
To switch to navigation mode: press the
0014 function button.
X To show the menu: press0039the COMAND
controller.
X Select Dest. in the navigation system
menu bar by turning 003E0012003Fthe COMAND
controller and pressing 0039to confirm. 326
NavigationCOMAND
Page 330 of 590
If COMAND finds destinations, a list
appears on the right-hand side of the
display.
The stopovers along the route are displayed
at the top of the list, sorted by increasing
distance from the vehicle's current position.
Below this, you will see the stopovers that
COMAND finds in the vicinity of the vehicle's
current position.
i For stopovers that are not located along
the calculated route, the lineard istance is
shown.
X Select an intermediate stop by turning
003E0012003F the COMAND controller and press
0039 to confirm.
The address entry menu appears, showing
the destination address.
X To start route calculation: selectStart and press
0039to confirm.
If COMAND does not fin dany destinations,
you will see a message to this effect.
X Confirm OK by pressing
0039.
X Select a different category.
Deleting astopover
If a stopove rhas already been entered, you
can delete it.
X To switch to navigation mode: press the
0014 function button.
X To show the menu: press0039the COMAND
controller.
X Select Dest. in the navigation system
menu bar by turning 003E0012003Fthe COMAND
controller and pressing 0039to confirm.
X Select Stopover and press
0039to confirm.
X Select Delete Stopover and press
0039to
confirm.
COMAND deletes the intermediate stop
and recalculates the route to the main
destination. Entering waypoints Introduction
You can map the route yourself by entering
up to two waypoints
.The sequence of the
waypoints can be changed at any time.
i An intermediate stop is always between
the current position of the vehicle and the
first waypoint.
Creating waypoints
X To switch to navigation mode: press the
0014 function button.
X To show the menu: press0039the COMAND
controller.
X Select Dest. in the navigation system
menu bar by turning 003E0012003Fthe COMAND
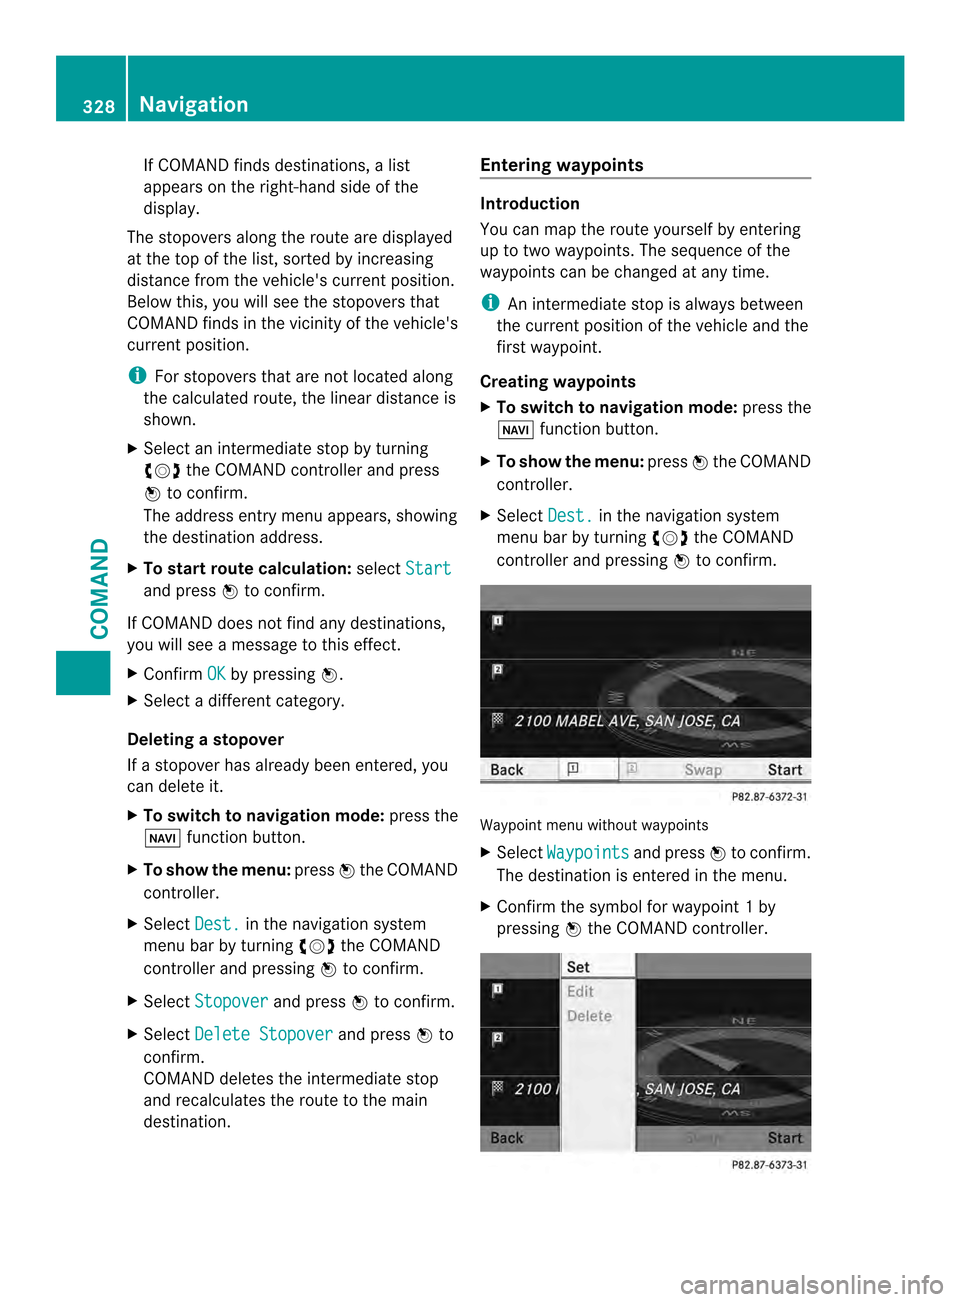
controller and pressing 0039to confirm. Waypoint menu without waypoints
X
Select Waypoints and press
0039to confirm.
The destination is entered in the menu.
X Confirm the symbol for waypoint 1by
pressing 0039the COMAND controller. 328
NavigationCOMAND
Page 331 of 590
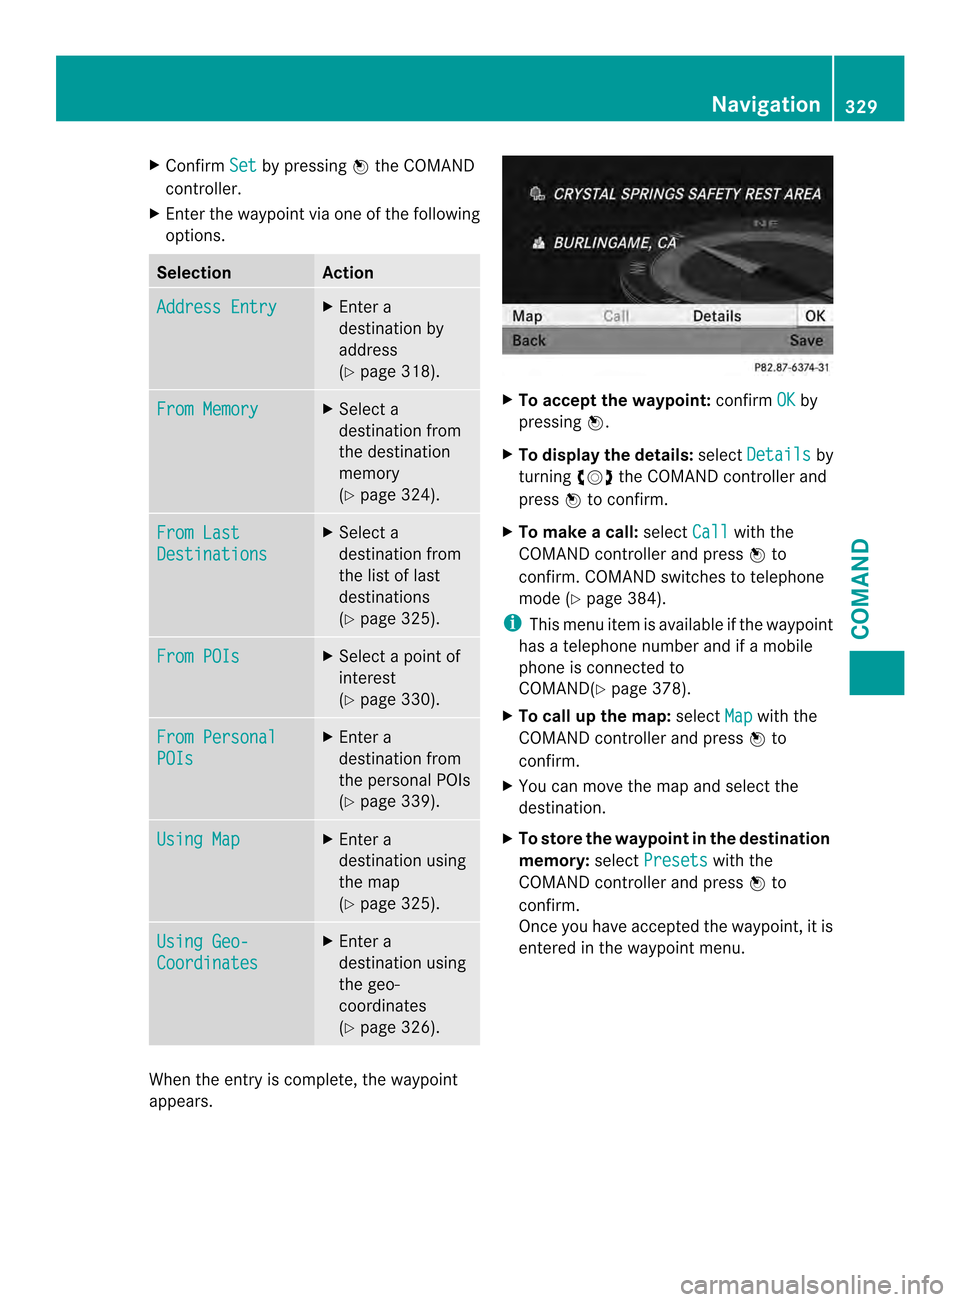
X
Confirm Set by pressing
0039the COMAND
controller.
X Ente rthe waypoint via one of the following
options. Selection Action
Address Entry X
Enter a
destination by
address
(Y page 318). From Memory X
Select a
destination from
the destination
memory
(Y page 324). From Last
Destinations X
Select a
destination from
the list of last
destinations
(Y page 325). From POIs X
Select a point of
interest
(Y page 330). From Personal
POIs X
Enter a
destination from
the personal POIs
(Y page 339). Using Map X
Enter a
destination using
the map
(Y page 325). Using Geo-
Coordinates X
Enter a
destination using
the geo-
coordinates
(Y page 326). When the entry is complete, the waypoint
appears. X
To accept the waypoint: confirmOK by
pressing 0039.
X To display the details: selectDetails by
turning 003E0012003Fthe COMAND controller and
press 0039to confirm.
X To make a call: selectCall with the
COMAND controller and press 0039to
confirm.C OMAND switches to telephone
mode (Y page 384).
i This menu item is available if the waypoint
has a telephone number and if a mobile
phone is connected to
COMAND(Y page 378).
X To call up the map: selectMap with the
COMAND controller and press 0039to
confirm.
X You can move the map and select the
destination.
X To store the waypoint in the destination
memory: selectPresets with the
COMAND controller and press 0039to
confirm.
Once you have accepted the waypoint, it is
entered in the waypoint menu. Navigation
329COMAND Z