stop start MERCEDES-BENZ SL-Class 2013 R131 User Guide
[x] Cancel search | Manufacturer: MERCEDES-BENZ, Model Year: 2013, Model line: SL-Class, Model: MERCEDES-BENZ SL-Class 2013 R131Pages: 590, PDF Size: 9.73 MB
Page 78 of 590

accelerate on slippery surfaces, for example
if the road surface is slippery on one side.
ET
Sr emains active when you deactivate
ESP ®
.
Important safety notes G
WARNING
If ESP ®
is malfunctioning, ESP ®
is unable to
stabilize the vehicle. Additionally, further
driving safety systems are deactivated. This
increases the risk of skidding and an accident.
Drive on carefully. Have ESP ®
checked at a
qualified specialist workshop.
! When testing the electric parking brake
on a braking dynamometer, switch off the
ignition .Application of the brakes by
ESP ®
may otherwise destroy the brake
system.
When towing the vehicle with the rear axle
raised, observe the notes on
ESP ®
(Y page 537).
ESP ®
is deactivated if the 0013warning lamp
in the instrument cluster lights up
continuously when the engin eis running.
If the 000B warning lamp and the 0013
warning lamp are lit continuously, ESP ®
is not
available due to a malfunction.
Observe the information on warning lamps
(Y page 273) and displaym essages which
may be shown in the instrument cluster
(Y page 241).
i Only use wheels with the recommended
tire sizes. Only then will ESP ®
function
properly.
Characteristics of ESP ®General information
ESP
®
is activated automatically when the
engine is started.
If ESP ®
intervenes, the 000BESP®
warning
lamp flashes in the instrument cluster. If ESP
®
intervenes:
X Do not deactivate ESP ®
under any
circumstances.
X Only depress the accelerator pedal as far
as necessary when pulling away.
X Adapt your driving style to suit the
prevailing road and weather conditions.
Vehicles with the ECO start/stop function
The ECO start/stop function switches the
engine off automatically if the vehicle stops
moving. The engine starts automatically when
the driver wants to pull away again. ESP ®
remains in its previously selected status.
Example: if ESP®
was deactivated before the
engine was switched off, ESP ®
remains
deactivated when the engine is switched on
again.
Deactivating/activating ESP ®
(except
AMG vehicles) Important safety notes
i Observe the "Important safety notes"
section (Y page 73).
You can select between the following states
of ESP ®
:
R ESP ®
is activated.
R ESP ®
is deactivated. G
WARNING
If you deactivate ESP ®
, ESP ®
no longer
stabilizes the vehicle. There is an increased
risk of skidding and an accident.
Only deactivate ESP ®
in the situations
described in the following.
It may be best to deactivate ESP ®
in the
following situations:
R when using snow chains
R in deep snow
R on sand or gravel
i Activate ESP ®
as soon as the situations
described above no longer apply. ESP ®
will 76
Driving safet
ysystemsSafety
Page 81 of 590

the brake syste
mchecked at a qualified
specialist workshop.
Observe information regarding indicator and
warning lamps (Y page 271) as well as
display messages (Y page 243).
EBD monitors and controls the brake
pressure on the rear wheels to improve
driving stability while braking. ADAPTIVE BRAKE
ADAPTIVE BRAKE enhances braking safety
and offers increased braking comfort. In
addition to the braking function, ADAPTIVE
BRAKE also has the HOLD function
(Y page 195) and hill start assist
(Y page 158). PRE-SAFE
®
Brake
i Observe the "Important safety notes"
section (Y page 73).
PRE-SAFE ®
Brake is only available in vehicles
with DISTRONIC PLUS.
If PRE-SAFE ®
Brake is to aid you, the radar
sensor system must:
R activated (Y page 235)
R operational
PRE-SAFE ®
Brake can help you to minimize
the risk of a collision with a vehicle ahead or
reduce the effects of such a collision. If PRE-
SAFE ®
Brake detects a risk of collision, you
will be warned visually and acoustically as
well as by automatic braking. PRE-SAFE ®
Brake cannot prevent a collision without your
intervention.
Starting at a speed of around
4 mph (7 km/h), this function warns you if
you very quickly approach a vehicle in front.
An intermittent warning tone will then sound
and the 000Ddistance warning lamp will light
up in the instrument cluster. X
Brake immediately in order to increase the
distance from the vehicle in front.
or
X Take evasive action provided it is safe to do
so.
From a speed of approximately
4 mph (7 km/h), if the driver and front
passenger have fastened their seat belts,
PRE-SAFE ®
Brake can brake the vehicle
automatically at speeds up to approximately
124 mph (200 km/h).
Due to the nature of the system, particularly
complicated driving conditionsm ay cause
unnecessary warnings or th eunnecessary
intervention of PRE-SAFE ®
Brake.
You can prevent the intervention of the PRE-
SAFE ®
Brake at any time by:
R depressing the accelerator peda lfurther
R activating kickdown
R releasing the brake pedal.
The braking action of PRE-SAFE ®
Brake is
ended automatically if:
R you maneuve rto avoid the obstacle.
R there is no longer any danger of a rear-end
collision.
R there is no longer an obstacle detected in
front of your vehicle.
With the help of the radar sensor system,
PRE-SAFE ®
Brake can detect obstacles that
are in front of your vehicle for an extended
period of time.
At speeds of up to approximately 40 mph
(70 km/h), BAS PLUS can also detect
stationary objects. Examples of stationary
objects are stopped or parked vehicles.
If you approach an obstacle and PRE-SAFE ®
Brake detects a risk of a collision, the system
will alert you both visually and acoustically. If
you do not brake or take evasive action, the
system will warn you by automatically braking
the vehicle gently. If there is an increased risk
of collision, preventative passenger
protection measures (PRE-SAFE ®
) are
activated (Y page 64). Driving safety systems
79Safety Z
Page 84 of 590
X
To sto pthe alarm using KEYLESS-GO:
grasp the outside door handle. The
SmartKey must be outside the vehicle.
The alarm is switched off.
or
X Press the Start/Stop button on the
dashboard. The SmartKey must be inside
the vehicle.
The alarm is switched off.
The alarm is not switched off, even if you
close the open door that has triggered it, for
example.
i If the alarm stays on for more than
30 seconds, the emergency call system
(USA only) or the TELE AID syste m(Canada
only) initiates a call to the Customer
Assistance Cente rautomatically. The Tele
Aid system will initiate the call provided
that:
R you have subscribed to the Tele Aid
service.
R the Tele Aid service has been activated
properly.
R the required mobile phone, power supply
and GPS are available. 82
Theft deterrent locking systemSafety
Page 88 of 590

X
To change the setting: press and hold
down the 000Eand000D buttons
simultaneously for approximately six
seconds until the battery check lamp
flashes twice (Y page 87).
i If the setting of the locking system is
changed withi nthe signal range of the
vehicle, pressing the 000Dor000E button:
R locks or
R unlocks the vehicle
The SmartKey now functions as follows:
X To unlock the driver's door: press the
000E button once.
X To unlock centrally: press the000E
button twice.
X To lock centrally: press the000Dbutton.
The KEYLESS-GO function is changed as
follows:
X To unlock the driver's door: touch the
inner surface of the door handle on the
driver's door.
X To unlock centrally: touch the inner
surface of the front-passenger door handle.
X To lock centrally: touch the outer sensor
surface on one of the door handles.
X To restore the factory settings: press
and hold down the 000Eand000D buttons
simultaneously for approximately six
seconds until the battery check lamp
flashes twice (Y page 87). Mechanical key
General notes If the vehicle can no longer be locked or
unlocked with the SmartKey, use the
mechanical key.
If you use the mechanical key to unlock and
open the driver's door or the trunk lid, the
anti-theft alarm system will be triggered
(Y page 81). There are several ways to turn off the alarm:
X
To turn the alarm off with the
SmartKey: press the000Eor000D button
on the SmartKey.
or
X Insert the SmartKey into the ignition lock.
or
X To deactivate the alarm with KEYLESS-
GO: press the Start/Stop button in the
ignition lock. The SmartKey must be in the
vehicle.
or
X Lock or unlock the vehicle using KEYLESS-
GO. The SmartKey must be outside the
vehicle.
If you unlock the vehicle using the mechanical
key, the fuel filler flap will not be unlocked
automatically.
X To unlock the fuel filler flap: insert the
SmartKey into the ignition lock.
Removing the mechanical key X
Push release catch 0002in the direction of
the arrow and at the same time, remove
mechanical key 0003from the SmartKey. 86
SmartKeyOpening and closing
Page 98 of 590
R
Press the KEYLESS-GO locking/closing
switch.
R Pull the trunk lid handle.
Even with the SmartKey removed from the
starter switch or the SmartKey with KEYLESS-
GO removed from the vehicle, the remote
trunk opening/closing switch can be
operated. Therefore, do not leave children
unattended in the vehicle, or with access to
an unlocked vehicle. Achild's unsupervised
access to a vehicle could result in an accident
and/or serious personal injury. 0002
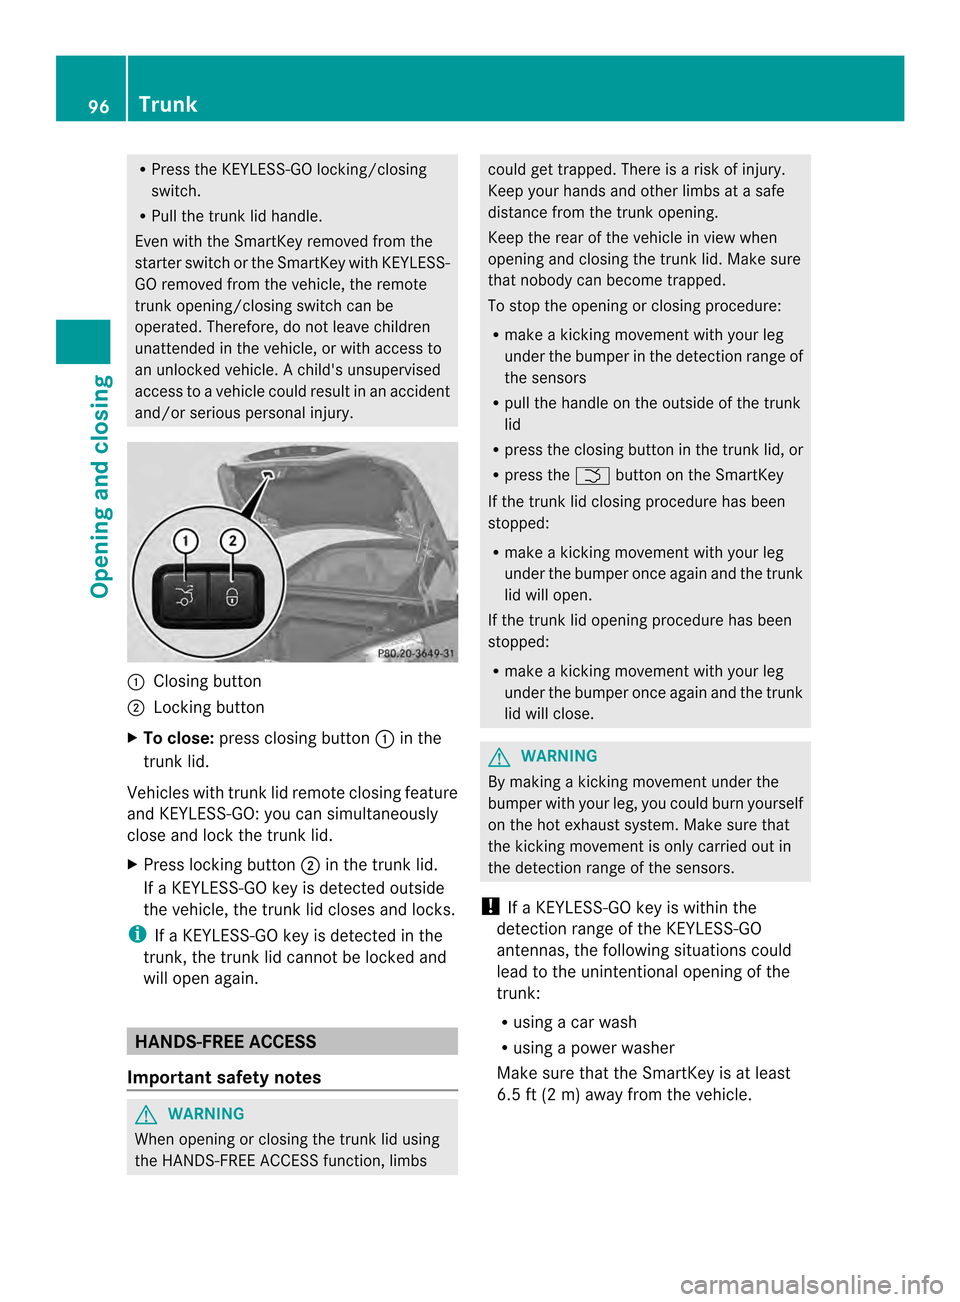
Closing button
0003 Locking button
X To close: press closing button 0002in the
trunk lid.
Vehicles with trunk lid remote closing feature
and KEYLESS-GO: you can simultaneously
close and lock the trunk lid.
X Press locking button 0003in the trunk lid.
If a KEYLESS-GO key is detected outside
the vehicle, the trunk lid closes and locks.
i If a KEYLESS-GO key is detected in the
trunk, the trunk lid cannot be locked and
will open again. HANDS-FREE ACCESS
Important safety notes G
WARNING
When opening or closing the trunk lid using
the HANDS-FREE ACCESS function, limbs could get trapped. There is a risk of injury.
Keep your hands and other limbs at a safe
distance from the trunk opening.
Keep the rear of the vehicle in view when
opening and closing the trunk lid. Make sure
that nobody can become trapped.
To stop the opening or closing procedure:
R make a kicking movement with your leg
under the bumper in the detection range of
the sensors
R pull the handle on the outside of the trunk
lid
R press the closing button in the trunk lid, or
R press the 0005button on the SmartKey
If the trunk lid closing procedure has been
stopped:
R make a kicking movement with your leg
under the bumper once again and the trunk
lid will open.
If the trunk lid opening procedure has been
stopped:
R make a kicking movement with your leg
under the bumper once again and the trunk
lid will close. G
WARNING
By making a kicking movement under the
bumper with your leg, you could burn yourself
on the hot exhaust system. Make sure that
the kicking movement is only carried out in
the detection range of the sensors.
! If a KEYLESS-GO key is within the
detection range of the KEYLESS-GO
antennas, the following situations could
lead to the unintentional opening of the
trunk:
R using a car wash
R using a power washer
Make sure that the SmartKey is at least
6.5 ft (2 m) away from the vehicle. 96
TrunkOpening and closing
Page 100 of 590

the door mounted switch
.Monitor the closing
procedure carefully to make sure no one is in
danger of being injured.
To interrupt the closing procedure, release
the door mounted remote trunk opening/
closing switch again.
Even with the SmartKey removed from the
starter switch or the SmartKey with KEYLESS-
GO removed from the vehicle, the remote
trunk opening/closing switch can be
operated. Therefore, do not leave children
unattended in the vehicle, or with access to
an unlocked vehicle. Achild's unsupervised
access to a vehicle could result in an accident
and/or serious personal injury. G
WARNING
Make sure the trunk lid is closed when the
engine is running and while driving. Among
other dangers, deadly carbon monoxide (CO)
gases may enter the vehicle interior resulting
in unconsciousness and death.
! The trunk lid swings upwards when
opened. Therefore, make sure that there is
sufficient clearance above the trunk lid.
i The opening dimensions of the trunk lid
can be found in the "Vehicle data" section
(Y page 585).
Opening and closing X
To open: pull remote operating switch for
trunk lid 0002until the trunk lid opens.
X To close: press remote operating switch
for trunk lid 0002until the trunk lid is closed.
You can open and close the trunk lid from the
driver's seat when the vehicle is stationary
and unlocked. Locking the trunk separately
You can lock the trunk separately.Ify ou then
unlock the vehicle centrally, the trunk
remains locked and cannot be opened.
X Close the trunk lid.
X Take the mechanical key out of the
SmartKey (Y page 86). 0007
Basic position
0008 Locking
X Insert the mechanical key into the trunk lid
lock as far as the stop.
X Turn the mechanical key clockwise from
position 0007to position 0008.
X Remove the mechanical key.
X Insert the mechanical key into the
SmartKey. Unlocking the trunk (mechanical key)
! The trunk lid swings upwards when
opened. Therefore, make sure that there is
sufficient clearance above the trunk lid. 98
TrunkOpening and closing
Page 123 of 590
EASY-ENTRY/EXIT feature
Important safety notes G
WARNING
Make sure that nobody can become trapped
when you activate the EASY-ENTRY/EXIT
feature.
If there is a risk of someone becoming
trapped, stop the adjustmen tprocedure. To
haltt he procedure:
R press the steering column adjustment
button.
R press one of the memory function position
buttons.
The steering column stops moving
immediately.
Do not keep the memory function position
button pressed as this will start the memory
function and set the steering wheel and seat
in motion.
Do not leave children unattended in the
vehicle. They could open the driver's door and
thereby unintentionally activate the EASY-
ENTRY/EXIT feature and become trapped. G
WARNING
Let the system complete the adjustment
procedure before setting the vehicle in
motion. All steering wheel adjustment must
be completed before setting the vehicle in
motion. Driving off with the steering wheel
still adjusting could cause the driver to lose
control of the vehicle.
The EASY-ENTRY/EXIT feature makes getting
in and out of your vehicle easier.
You can activate and deactivate the EASY-
ENTRY/EXIT feature in the on-board
computer (Y page 235). Position of the steering wheel when the
EASY-ENTRY/EXIT featurei
s active The steering wheel swings upwards when
you:
R
remove the SmartKey from the ignition lock
R open the driver's door and KEYLESS-GO is
in position 1
R open the driver's door and the SmartKey is
in position 0or 1in the ignition lock
i The steering wheel only moves upwards if
it has not already reached the upper end
stop.
Position of the steering wheel for
driving The steering wheel is moved to the last
selected position when:
R
the driver's door is closed.
R you insert the SmartKey into the ignition
lock.
or
R you press the Start/Stop button once on
vehicles with KEYLESS-GO.
When you close the driver's door with the
ignition switched on, the steering wheel is
also automatically moved to the previously
set position.
The last position of the steering wheel is
stored when you switch off the ignition or
when you store the setting with the memory
function (Y page 124).
Crash-responsive EASY-EXIT feature If the crash-responsive EASY-EXIT feature is
triggered in an accident, the steering column
will move upwards when the driver's door is
opened. This occurs irrespective of the
position of the SmartKey in the ignition lock.
This makes it easier to exit the vehicle and
rescue the occupants.
The crash-responsive EASY-EXIT feature is
only operational if the EASY-EXIT/ENTRY
feature is activated in the on-board computer. Steering wheel
121Seats, steering wheel and mirrors Z
Page 137 of 590
0009
0008 Intermittent wipe, high (rains ensor
set to high sensitivity)
000E 0014 Continuous wipe, slow
000F 000D Continuous wipe, fast
0025 0004 Single wipe/ 0005To wipe the
windshield using washer fluid
X Switch on the ignition.
X Turn the combination switch to the
corresponding position.
In the 0007or0008 position, the appropriate
wiping frequency is set automatically
according to the intensity of the rain. In
the 0008 position, the rain sensor is more
sensitive than in the 0007position, causing
the windshield wipers to wipe more
frequently.
If the wiper blades are worn, the windshield
will no longer be wiped properly. This could
prevent you from observing the traffic
conditions, thereby causing an accident.
Replace the wiper blades twice a year, ideally
in spring and fall.
i The vehicle is equipped with the MAGIC
VISION CONTROL wipe/wash system. The
washer fluid is fed through the wiper blades
and when wiping the screen with washer
fluid 0005, the water is emitted directly
from the blades. Replacing the wiper blades
Important safety notes G
WARNING
If the windshield wipers begin to move while
you are changing the wiper blades, you could
be trapped by the wiper arm. There is a risk
of injury.
Always switch off the windshield wipers and
ignition before changing the wiper blades.
! To avoid damaging the wiper blades,
make sure that you touch only the wiper
arm of the wiper. !
Never open the hood if a windshield wiper
arm has been folded away from the
windshield.
Never fold a windshield wiper arm without
a wiper blade back onto the windshield.
Hold the windshield wiper arm firmly when
you change the wiper blade. If you release
the windshield wiper arm without a wiper
blade and it falls onto the windshield, the
windshield may be damaged by the force of
the impact.
Mercedes-Benzr ecommends that you have
the wiper blades changed at aqualified
specialist workshop.
! Always position the windshield wiper
arms vertically before folding them away
from the windshield. By doing so, you will
avoid damage to the hood.
Changing the windshield wiper blades Moving the wiper arm to a vertical
position
On vehicles without KEYLESS-GO:
X
Turn the SmartKey to position 1or 2in the
ignition lock.
X Se tthe windshield wipers to
position 0014.
X When the wiper arms have reached a
vertical position, turn the SmartKey to
position 0and remove it from the ignition
lock.
X Fold the wiper arm away from the
windshield until it engages.
On vehicles with KEYLESS-GO:
X Switch off the engine.
X Remove your foot from the brake pedal.
X Set the windshield wipers to
position 0014.
X Press the Start/Stop button repeatedly
until the windshield wipers start. Windshield wipers
135Lights and windshield wipers Z
Page 138 of 590

X
When the wiper arms have reached a
vertical position, press the Start/Stop
button.
X Fold the wiper arm away from the
windshield until it engages.
Removing the wiper blades X
To bring the wiper blade into position
to be removed: hold the wiper arm firmly
with one hand. With the other hand, turn
the wiper blade in the direction of arrow
0027 beyond the point of resistance.
The wiper blade engages in the removal
position with an audible click.
X To remove a wiper blade: firmly press
release knob 0003and pull the wiper blade
upwards 0002.
Installing the wiper blades X
Push the new wiper blade in the direction
of arrow 0002onto the wiper arm until
tab 0003engages.
X Push the wiper blade out of the removal
position in the direction of arrow 0027beyond
the point of resistance.
The wiper blade disengages with an audible
click and is freely movable again.
X Make sure that wiper blade is seated
correctly.
X Fold the wiper arm back onto the
windshield. 136
Windshield wipersLights and windshield wipers
Page 139 of 590
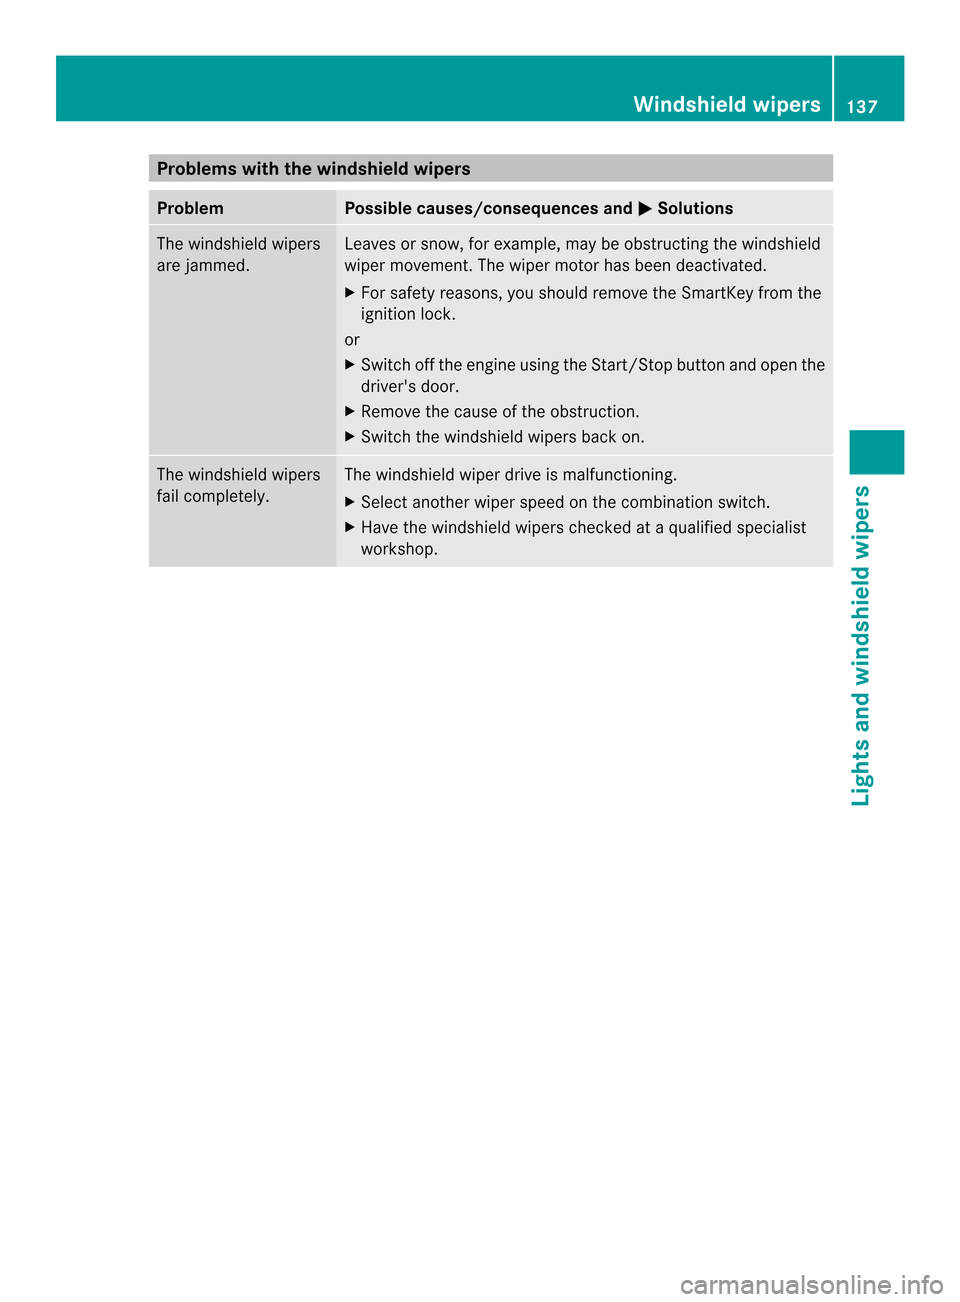
Problems with the windshield wipers
Problem Possible causes/consequences and
0003 Solutions
The windshield wipers
are jammed. Leaves or snow, for example, may be obstructing the windshield
wiper movement.T
he wiper motor has been deactivated.
X For safety reasons, you should remove the SmartKey from the
ignition lock.
or
X Switch off the engine using the Start/Stop button and open the
driver's door.
X Remove the cause of the obstruction.
X Switch the windshield wipers back on. The windshield wipers
fail completely. The windshield wiper drive is malfunctioning.
X
Select another wiper speed on the combination switch.
X Have the windshield wipers checked at a qualified specialist
workshop. Windshield wipers
137Lights and windshield wipers Z