manual radio set MERCEDES-BENZ SL-Class 2014 R131 Owner's Manual
[x] Cancel search | Manufacturer: MERCEDES-BENZ, Model Year: 2014, Model line: SL-Class, Model: MERCEDES-BENZ SL-Class 2014 R131Pages: 618, PDF Size: 7.88 MB
Page 16 of 618
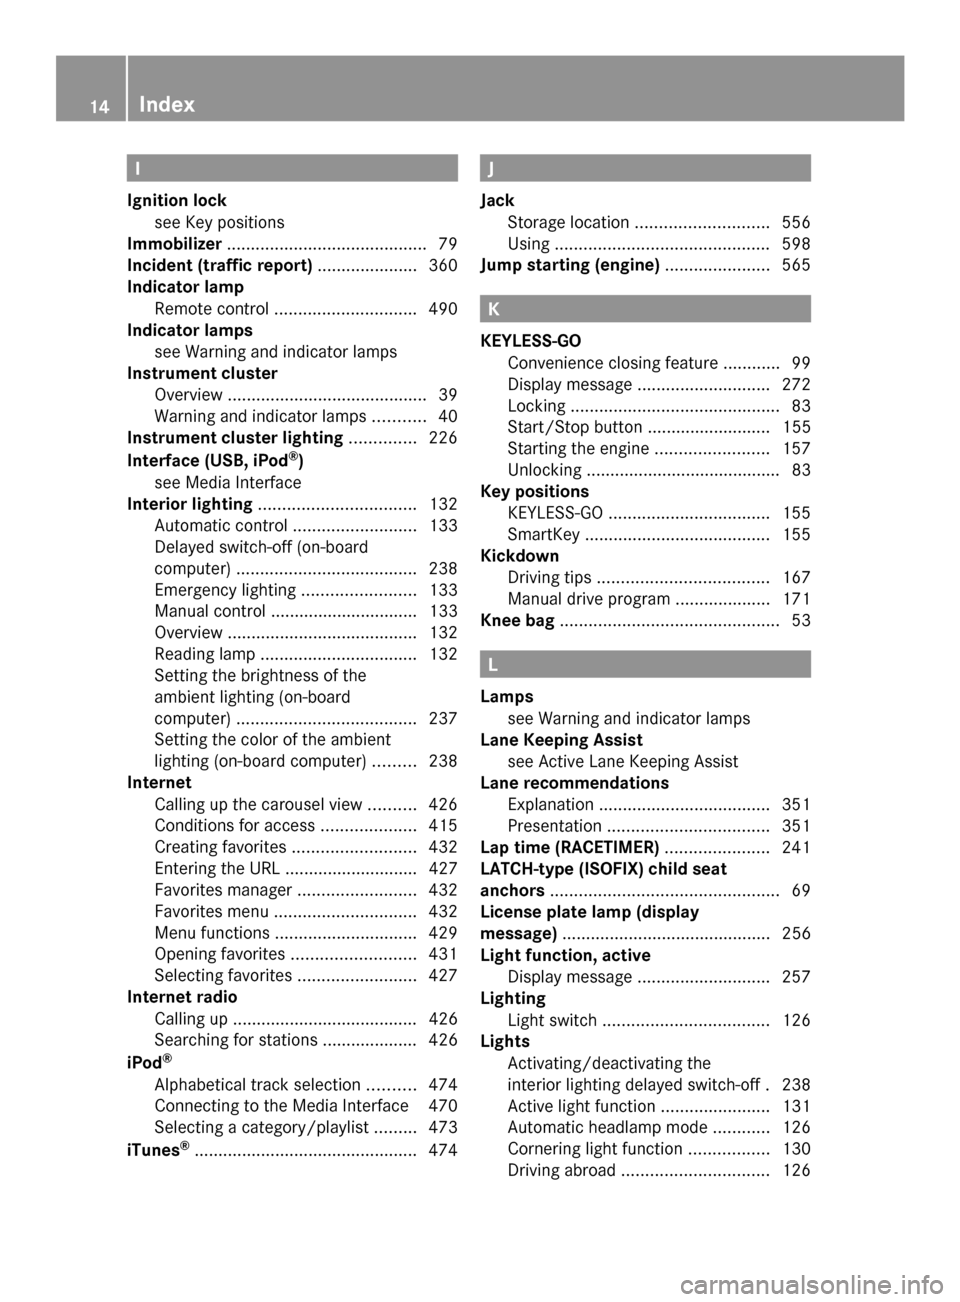
I
Ignition lock see Key positions
Immobilizer .......................................... 79
Incident (traffic report) .....................360
Indicator lamp Remote control .............................. 490
Indicator lamps
see Warning and indicator lamps
Instrument cluster
Overview .......................................... 39
Warning and indicator lamps ...........40
Instrument cluster lighting ..............226
Interface (USB, iPod ®
)
see Media Interface
Interior lighting ................................. 132
Automatic control ..........................133
Delayed switch-off (on-board
computer) ...................................... 238
Emergency lighting ........................133
Manual control ............................... 133
Overview ........................................ 132
Reading lamp ................................. 132
Setting the brightness of the
ambient lighting (on-board
computer) ...................................... 237
Setting the color of the ambient
lighting (on-board computer) .........238
Internet
Calling up the carousel view ..........426
Conditions for access ....................415
Creating favorites .......................... 432
Entering the URL ............................ 427
Favorites manager .........................432
Favorites menu .............................. 432
Menu functions .............................. 429
Opening favorites .......................... 431
Selecting favorites .........................427
Internet radio
Calling up ....................................... 426
Searching for stations .................... 426
iPod ®
Alphabetical track selection ..........474
Connecting to the Media Interface 470
Selecting a category/playlis t......... 473
iTunes ®
............................................... 474 J
Jack Storage location ............................ 556
Using ............................................. 598
Jump starting (engine) ......................565 K
KEYLESS-GO Convenience closing feature ............99
Display message ............................ 272
Locking ............................................ 83
Start/Stop button .......................... 155
Starting the engine ........................157
Unlocking ......................................... 83
Key positions
KEYLESS-GO .................................. 155
SmartKey ....................................... 155
Kickdown
Driving tips .................................... 167
Manual drive program ....................171
Knee bag .............................................. 53 L
Lamps see Warning and indicator lamps
Lane Keeping Assist
see Active Lane Keeping Assist
Lane recommendations
Explanation .................................... 351
Presentation .................................. 351
Lap time (RACETIMER) ......................241
LATCH-type (ISOFIX) child seat
anchors ................................................ 69
License plate lamp (display
message) ............................................ 256
Light function, active Display message ............................ 257
Lighting
Light switch ................................... 126
Lights
Activating/deactivating the
interior lighting delayed switch-off .238
Active light function .......................131
Automatic headlamp mode ............126
Cornering light function .................130
Driving abroad ............................... 12614
Index
Page 90 of 618
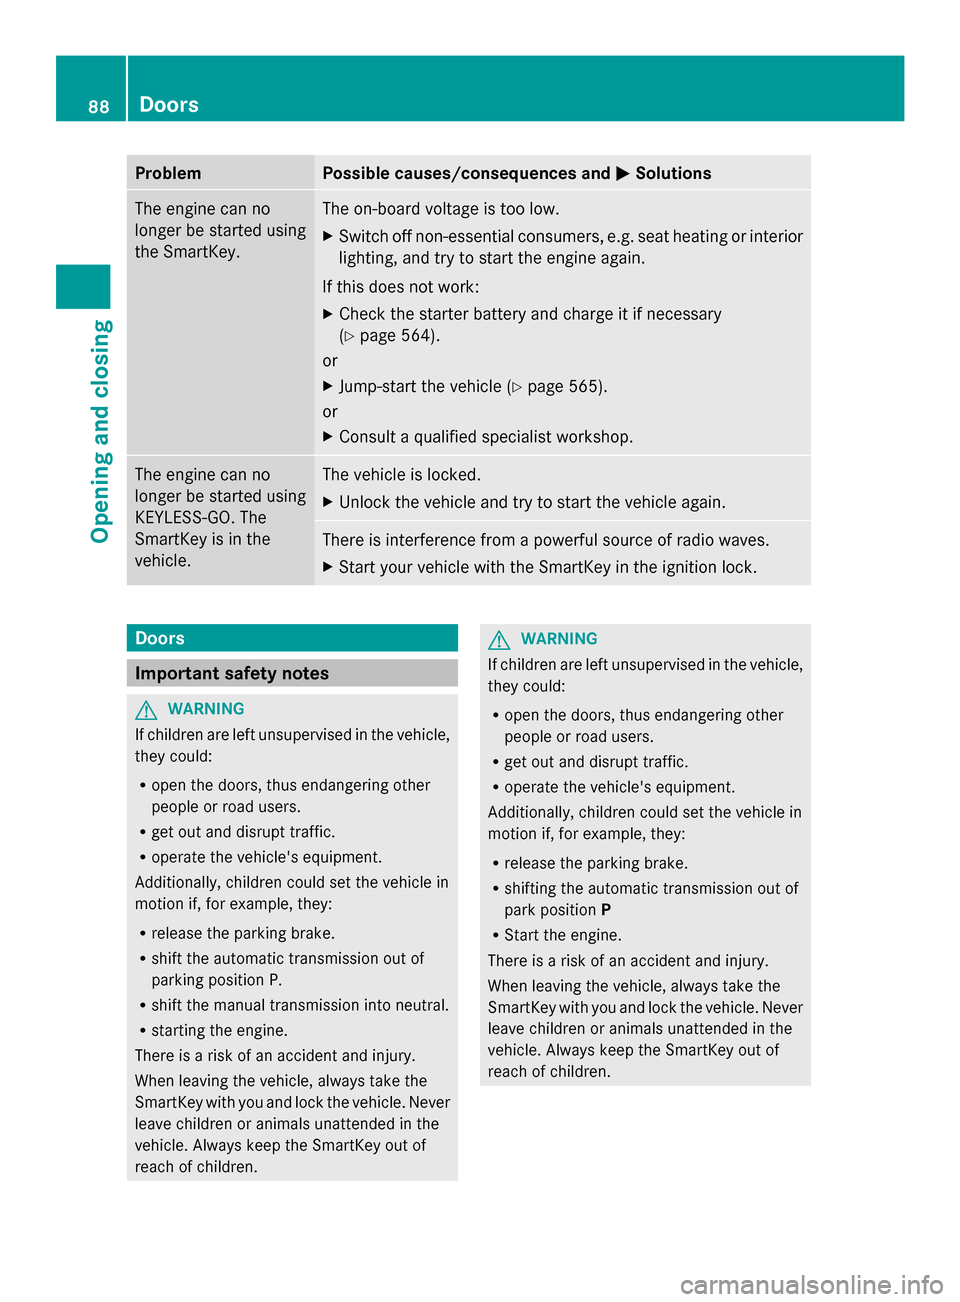
Problem Possible causes/consequences and
0050
0050Solutions The engine can no
longer be started using
the SmartKey. The on-board voltage is too low.
X
Switch off non-essential consumers, e.g. seat heating or interior
lighting, and try to start the engine again.
If this does not work:
X Check the starter battery and charge it if necessary
(Y page 564).
or
X Jump-start the vehicle (Y page 565).
or
X Consult a qualified specialist workshop. The engine can no
longer be started using
KEYLESS-GO. The
SmartKey is in the
vehicle. The vehicle is locked.
X
Unlock the vehicle and try to start the vehicle again. There is interference from a powerful source of radio waves.
X
Start your vehicle with the SmartKey in the ignition lock. Doors
Important safety notes
G
WARNING
If children are left unsupervised in the vehicle,
they could:
R open the doors, thus endangering other
people or road users.
R get out and disrupt traffic.
R operate the vehicle's equipment.
Additionally, children could set the vehicle in
motion if, for example, they:
R release the parking brake.
R shift the automatic transmission out of
parking position P.
R shift the manual transmission into neutral.
R starting the engine.
There is a risk of an accident and injury.
When leaving the vehicle, always take the
SmartKey with you and lock the vehicle. Never
leave children or animals unattended in the
vehicle. Always keep the SmartKey out of
reach of children. G
WARNING
If children are left unsupervised in the vehicle,
they could:
R open the doors, thus endangering other
people or road users.
R get out and disrupt traffic.
R operate the vehicle's equipment.
Additionally, children could set the vehicle in
motion if, for example, they:
R release the parking brake.
R shifting the automatic transmission out of
park position P
R Start the engine.
There is a risk of an accident and injury.
When leaving the vehicle, always take the
SmartKey with you and lock the vehicle. Never
leave children or animals unattended in the
vehicle. Always keep the SmartKey out of
reach of children. 88
DoorsOpening and closing
Page 289 of 618
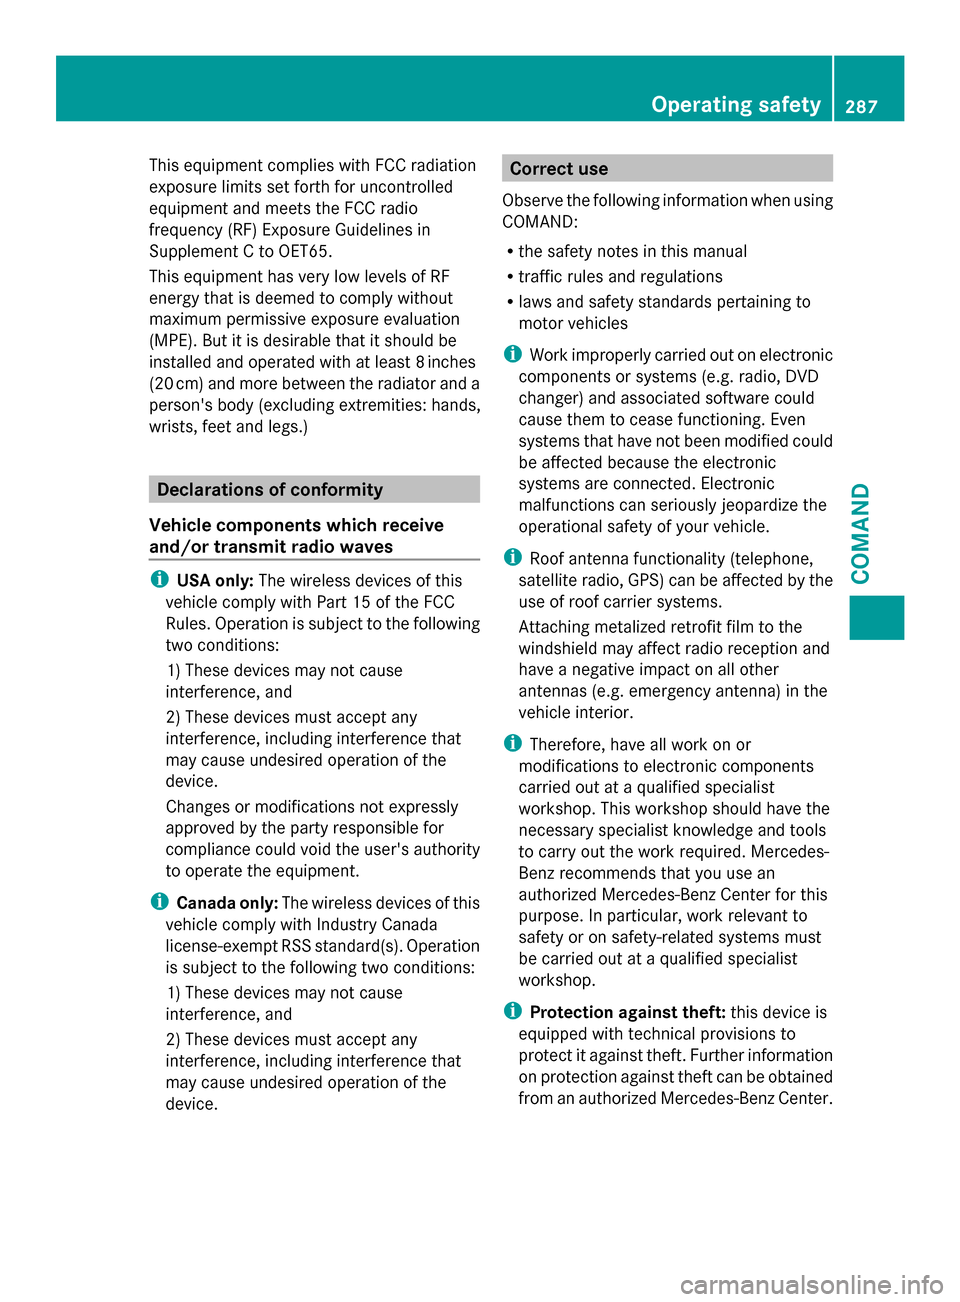
This equipment complies with FCC radiation
exposure limits set forth for uncontrolled
equipment and meets the FCC radio
frequency (RF) Exposure Guidelines in
Supplement C to OET65.
This equipment has very low levels of RF
energy that is deemed to comply without
maximum permissive exposure evaluation
(MPE). But it is desirable that it should be
installed and operated with at least 8inches
(20 cm) and more between the radiator and a
person's body (excluding extremities: hands,
wrists, feet and legs.) Declarations of conformity
Vehicle components which receive
and/or transmit radio waves i
USA only: The wireless devices of this
vehicle comply with Part 15 of the FCC
Rules. Operation is subject to the following
two conditions:
1) These devices may not cause
interference, and
2) These devices must accept any
interference, including interference that
may cause undesired operation of the
device.
Changes or modifications not expressly
approved by the party responsible for
compliance could void the user's authority
to operate the equipment.
i Canada only: The wireless devices of this
vehicle comply with Industry Canada
license-exempt RSS standard(s). Operation
is subject to the following two conditions:
1) These devices may not cause
interference, and
2) These devices must accept any
interference, including interference that
may cause undesired operation of the
device. Correct use
Observe the following information when using
COMAND:
R the safety notes in this manual
R traffic rules and regulations
R laws and safety standards pertaining to
motor vehicles
i Work improperly carried out on electronic
components or systems (e.g. radio, DVD
changer) and associated software could
cause them to cease functioning. Even
systems that have not been modified could
be affected because the electronic
systems are connected. Electronic
malfunctions can seriously jeopardize the
operational safety of your vehicle.
i Roof antenna functionality (telephone,
satellite radio, GPS) can be affected by the
use of roof carrier systems.
Attaching metalized retrofit film to the
windshield may affect radio reception and
have a negative impact on all other
antennas (e.g. emergency antenna) in the
vehicle interior.
i Therefore, have all work on or
modifications to electronic components
carried out at a qualified specialist
workshop. This workshop should have the
necessary specialist knowledge and tools
to carry out the work required. Mercedes-
Benz recommends that you use an
authorized Mercedes-Benz Center for this
purpose. In particular, work relevant to
safety or on safety-related systems must
be carried out at a qualified specialist
workshop.
i Protection against theft: this device is
equipped with technical provisions to
protect it against theft. Further information
on protection against theft can be obtained
from an authorized Mercedes-Benz Center. Operating safety
287COMAND Z
Page 294 of 618
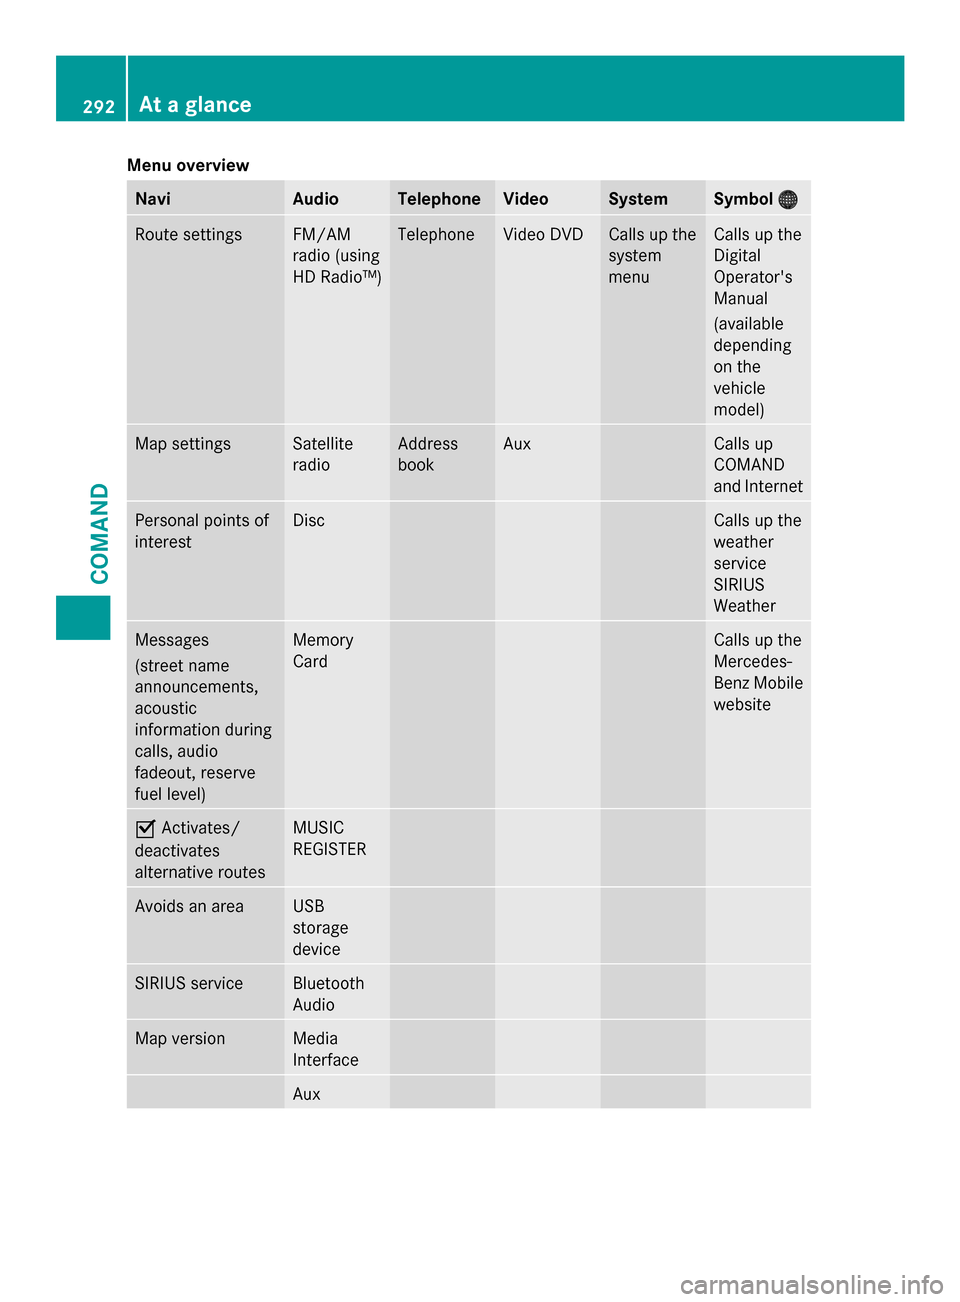
Menu overview
Navi Audio Telephone Video System Symbol
00A7
00A7 Route settings FM/AM
radio (using
HD Radio™) Telephone Video DVD Calls up the
system
menu Calls up the
Digital
Operator's
Manual
(available
depending
on the
vehicle
model)
Map settings Satellite
radio Address
book Aux Calls up
COMAND
and Internet
Personal points of
interest Disc Calls up the
weather
service
SIRIUS
Weather
Messages
(street name
announcements,
acoustic
information during
calls, audio
fadeout, reserve
fuel level) Memory
Card Calls up the
Mercedes-
Benz Mobile
website
0073
Activates/
deactivates
alternative routes MUSIC
REGISTER
Avoids an area USB
storage
device
SIRIUS service Bluetooth
Audio
Map version Media
Interface
Aux292
At a glanceCOMAND
Page 311 of 618

Switching on SPLITVIEW
X
Select System
System in the main function bar by
turning 00790052007Athe COMAND controller and
press 0098to confirm.
X Select 0044in the menu bar and confirm.
SPLITVIEW symbol 0043appears in the
display, and display 0044switches to Off
Off.
The front passenger sees the display of the
function last activated. If the switch-on
time was longer than 30 minutes
previously, the display from the driver's
side is shown.
Switching off SPLITVIEW
X Select 0044in the menu bar by turning
00790052007A the COMAND controller and press
0098 to confirm.
SPLITVIEW symbol 0043disappears from the
display. Display 0044switches to On On.
i If COMAND has already been switched
on, you can also use the remote control to
switch SPLITVIEW on and off. Make sure
that the SPLITVIEW symbol is set on the
remote control thumbwheel (Y page 487).
The SPLITVIEW display remains on for
approximately 30 minutes after the SmartKey
has been turned to position 0in the ignition
lock. After this time or after the SmartKey has
been removed, the settings on the front-
passenger side are saved for approximately
30 minutes longer. After this period,
reactivation on the front-passenger side
means that the settings from the driver's side
will be used. Transferring the driver's website X
To switch on SPLITVIEW: select System
System
from the main function bar by turning
00790052007A the COMAND controller and press
0098 to confirm.
X Select 0044in the menu bar and confirm.
SPLITVIEW symbol 0043appears in the
display, and display 0044switches to Off Off.
X Select 00A7in the main function bar with the
remote control.
A carousel view appears with the following
options:
R Operator's Manual Operator's Manual
R Enter URL
Enter URL
R Internet Favorites
Internet Favorites
R Mercedes-Benz Apps
Mercedes-Benz Apps
R Internet Radio
Internet Radio
R Mercedes Mobile Website
Mercedes Mobile Website
R Transfer Driver's Website
Transfer Driver's Website
X Select Transfer
Transfer Driver's
Driver'sWebsite
Websitewith
the remote control.
You see the last website called up by the
driver.
Transferring a destination to the driver Using SPLITVIEW you can select a destination
from the front-passenger side and transfer
this to the driver's side.
X
To switch on SPLITVIEW: select System System
from the main function bar by turning At a glance
309COMAND Z
Page 428 of 618

The data transfer rate of a station is displayed
while receiving data.
Calling up the Internet radio X
Select the 00A7icon in the main function bar
by sliding 00970052and turning 00790052007Athe
COMAND controller and press 0098to
confirm.
The carousel view appears.
X Bring the Internet Radio
Internet Radio panel to the
front by turning 00790052007Athe COMAND
controller and press 0098to confirm.
The Internet radio menu appears.
Searching for stations X
Select Search Search in the Internet radio menu.
A list with search criteria appears.
X Select criterion and press 0098to confirm.
i For example as a search criterion, you can
set an Internet radio station that is located
close to your navigation destination.
Connecting to a station X
Search for a station (Y page 426).
X Select 0065(play) in the Internet radio
menu and press 0098to confirm.
The call is placed.
If the data stream is interrupted, an automatic
attempt is made to re-establish the
connection. Manually re-establishing a connection
X
Select 0065(play) again in the Internet
radio menu and press 0098to confirm.
Ending data transfer:
X Select 00DB(stop) in the Internet radio
menu and press 0098to confirm.
or
X Change to another audio source, for
example Disc
Disc.
If you change to a main function that is not an
audio source, e.g. navigation, the data
connection remains on. You can continue
listening to the set station. Internet
Display restriction Internet pages cannot be shown while the
vehicle is in motion.
Calling up a website
Calling up the carousel view
X
Select the 00A7symbol in the main function
bar by turning 00790052007Athe COMAND
controller and press 0098to confirm.
The carousel view appears.
You can now enter a web address (option 1
(Y page 427)) or select it in the carousel view
(option 2 (Y page 427)).
To select in the carousel view, you must first
create favorites (Y page 432).426
Online and Internet functionsCOMAND
Page 440 of 618

X
Directly in the station presets: select
Presets
Presets by sliding 00520064and turning 00790052007A
the COMAND controller and press 0098to
confirm.
or
X When the display/selection window is
active, press 0098the COMAND controller.
The station preset memory appears. The
0036 dot indicates under which preset the
currently selected station is stored.
X Select a station by turning 00790052007Aand
pressing 0098to confirm or press a number
key, e.g. 0082.
Selecting stations by entering the
frequency manually
X Option 1: press the003Ebutton.
X Option 2: selectRadio
Radio in the radio display
by sliding 00520064and turning 00790052007Athe
COMAND controller and press 0098to
confirm.
X Select Enter Frequency Enter Frequency and press0098to
confirm.
Irrespective of the option chosen, an input
menu will appear.
X Enter a frequency using the number keys.
COMAND sets the frequency entered. Waveband Frequency
AM (MF) 530 - 1700 kHz
FM (VHF) 87.7 - 107.9 MHz
WB (Weather Band) Weather report
channels
i
You can only enter currently permitted
numbers.
i If you enter a frequency in the FM or AM
wavebands which is outside the frequency
range, COMAND sets the next lower
frequency. Storing a station Storing stations manually
There are ten presets available for the FM and
AM wavebands. Example: station memory
X Quick save: press and hold a number key,
e.g. 0082, until you hear a tone.
The station is stored.
X Directly in the station presets: press0098
the COMAND controller when the display/
selection window is active.
or
X Select Presets
Presets by sliding 00520064and turning
00790052007A the COMAND controller and press
0098 to confirm.
In both cases, the station presets appear.
The 0036dot indicates under which preset
the currently selected station is stored.
X Select a preset by turning 00790052007Athe
COMAND controller and press and hold
0098 until you hear a tone.
The station is stored under the preset.
Storing stations automatically
This function automatically stores stations
with adequate reception under the presets.
The search starts at the lowest frequency.
COMAND stores any stations found,
beginning with preset 1. When the highest
frequency is reached or 10 stations have
been found, the storing process ends. Any
stations stored manually under the presets 438
AudioCOMAND
Page 443 of 618

Registering SatRadio
Service information screen
0043
Provider's phone number (SIRIUS XM)
0044 SIRIUS XM ID of your satellite receiver
X Switch on SatRadio mode (Y page 441).
The satellite radio main menu appears,
showing the weather channel. You cannot
select any other stations.
X In the lower menu line, select Sat
Sat and press
0098 to confirm.
X Select Service Service and press 0098to confirm.
The service information screen appears.
Once the connection has been established:
X Follow the instructions of the service staff.
The activation process may take up to
ten minutes. If the activation is completed
successfully, the No Service
No Servicemessage
appears in the display, followed by the
satellite radio main menu.
i You can also have the satellite service
activated online. To do so, visit the SIRIUS
XM Radio website at
http://www.sirius.com (USA) or
http://www.siriuscanada.com
(Canada).
i If registration is not included when
purchasing the system, your credit card
details will be required to activate your
account.
If the satellite receiver is not installed or is
not installed correctly, the Device
Device
Unavailable Unavailable message will appear. Switching on satellite radio mode Notes
For example, to select a channel or scroll in
the lists, you can also use the
00590065
00630064 buttons on the multifunction
steering wheel, see the separate vehicle
Operator's Manual.
Important information on registering the
satellite radio (Y page 441).
Option 1
X Press the 002Afunction button.
The No Service No Service message appears after
switching on or if no signal is being
received. Once COMAND receives the
signal, the satellite radio display appears.
The station last selected is played.
i Repeatedly pressing this function button
switches through the wavebands in this
order: FM, AM, WB and subsequently
switches on the satellite radio. Pressing the
button again takes you back to FM radio
mode.
Option 2: Satellite radio main menu
0043
Satellite radio main display
0044 Channel name
0087 Preset
0085 Selected category/channel number
0083 Channel information (in brief)
0084 Sound settings
006B Category list Audio
441COMAND Z
Page 446 of 618

Storing channels
X
Press 0098the COMAND controller when the
display/selection window is active.
or
X Select Presets
Presets in the submenu bar by
turning 00790052007Athe COMAND controller and
press 0098to confirm.
In both cases, the channel presets appear.
The 0036dot in front of a preset entry
indicates that the currently selected
channel is stored under this preset.
X Select a preset by turning 00790052007Athe
COMAND controller and press and hold
0098 until you hear a tone.
or
X Press and hold a number button, e.g.
0084, until you hear a tone.
The channel is stored under the preset.
Storing channels automatically
This function automatically stores channels
with adequate reception in the preset
memory. Channels stored manually in the
preset memory will be overwritten.
X Option 1: press0098the COMAND controller
when the display/selection window is
active.
X Select Autostore
Autostore in the presets by turning
00790052007A the COMAND controller and press
0098 to confirm.
X Option 2: selectPresets Presets in the submenu
bar by sliding 00520064and turning 00790052007Athe
COMAND controller and press 0098to
confirm.
X Select Autostore
Autostore and press0098to confirm.
In both cases, COMAND searches for
channels that can be received. You will see
a message to this effect. The available
channels are automatically stored in the
preset positions.
X To cancel storing: selectCancel Cancel and
press 0098to confirm. Selecting a channel from the preset list
X To call up the preset list: select
Presets
Presets by turning 00790052007Athe COMAND
controller and press 0098to confirm.
The channel preset list appears.
X To set a channel: select a preset by
turning 00790052007Athe COMAND controller and
press 0098to confirm.
or
X Press a number key, such as 0084.
Displaying information X
Select Info Infoin the submenu bar by turning
00790052007A the COMAND controller and press
0098 to confirm.
Information on the currently received
program is displayed.
If available, you will see:
R the full channel name
R the artist of the track that is currently being
played
R the track that is currently being played
X To return to the radio display: confirm
Info
Info by pressing 0098.
X Slide 00970052the COMAND controller up. 444
AudioCOMAND
Page 587 of 618
headphones, two-way radios) that may be
being operated in or near the vehicle.
Checking the tire pressure
electronically X
Make sure that the SmartKey is in position
2 in the ignition lock (Y page 155).
X Press the 0059or0065 button on the
steering wheel to select the Service Service
menu.
X Press the 0063or0064 button to select
Tire Pressure
Tire Pressure.
X Press the 0076button.
The current tire pressure of each tire is
shown in the multifunction display.
If the vehicle has been parked for over
20 minutes, the Tire pressure will be
Tire pressure will be
displayed after driving a few displayed after driving a few
minutes minutes message appears.
After a teach-in process, the tire pressure
monitor automatically detects new wheels or
new sensors. As long as a clear allocation of
the tire pressure value to the individual
wheels is not possible, the Tire Pressure
Tire Pressure
Monitor Active Monitor Active display message is shown
instead of the tire pressure display. The tire
pressures are already being monitored.
Tire pressure monitor warning
messages If the tire pressure monitor detects a pressure
loss in one or more tires, a warning message
is shown in the multifunction display and the
yellow tire pressure monitor warning lamp
comes on.
R If the Please Correct Tire Pressure Please Correct Tire Pressure
message appears in the multifunction
display, the tire pressure in at least one tire
is too low and must be corrected at the next
opportunity.
R If the Check
Check Tires Tiresmessage appears in the
multifunction display, the tire pressure in one or more tires has dropped significantly
and the tires must be checked.
R If the Warning Tire Malfunction
Warning Tire Malfunction
appears in the multifunction display, the
tire pressure in one or more tires has
dropped suddenly and the tires must be
checked.
Observe the instructions and safety notes in
the display messages in the "Tires" section
(Y page 267).
i If the wheel positions on the vehicle are
rotated, the tire pressures may be
displayed for the wrong positions for a
short time. This is rectified after a few
minutes of driving, and the tire pressures
are displayed for the correct positions.
Restarting the tire pressure monitor When you restart the tire pressure monitor,
all existing warning messages are deleted and
the warning lamps go out. The monitor uses
the currently set tire pressures as the
reference values for monitoring. In most
cases, the tire pressure monitor will
automatically detect the new reference
values after you have changed the tire
pressure. However, you can also define
reference values manually as described here.
The tire pressure monitor then monitors the
new tire pressure values.
X
Set the tire pressure to the value
recommended for the corresponding
driving situation on the Tire and Loading
Information placard on the driver's side
B-pillar (Y page 579).
Additional tire pressure values for different
loads can also be found on the tire pressure
table on the inside of the fuel filler flap
(Y page 579).
X Make sure that the tire pressure is correct
on all four wheels.
X Make sure that the SmartKey is in position
2in the ignition lock. Tire pressure
585Wheels and tires Z