climate control MERCEDES-BENZ SL-Class 2015 R131 Owner's Guide
[x] Cancel search | Manufacturer: MERCEDES-BENZ, Model Year: 2015, Model line: SL-Class, Model: MERCEDES-BENZ SL-Class 2015 R131Pages: 610, PDF Size: 12.21 MB
Page 149 of 610
The residual heat function is only available on
vehicles for Canada.
It is possible to make use of the residual heat
of the engine to continue heating the station- ary vehicle for up to 30 minutes after the
engine has been switched off. The heating
time depends on the temperature that has
been set.
Activating/deactivating X
Turn the SmartKey to position 0in the igni-
tion lock or remove it (Y page 151).
X To activate: press the004Bbutton.
The indicator lamp in the 004Bbutton lights
up.
i The blower will run at a low speed regard-
less of the airflow setting.
i If you activate the residual heat function
at high temperatures, only the ventilation
will be activated. The blower runs at
medium speed.
X To deactivate: press the004Bbutton.
The indicator lamp in the 004Bbutton goes
out.
Residual heat is deactivated automatically: R after approximately 30 minutes
R when the ignition is switched on
R if the battery voltage drops Setting the air vents
Important safety notes
G
WARNING
Very hot or very cold air can flow from the air vents. This could result in burns or frostbite in the immediate vicinity of the air vents. There
is a risk of injury.
Make sure that all vehicle occupants always
maintain a sufficient distance to the air out-
lets. If necessary, redirect the airflow to
another area of the vehicle interior. G
WARNING
When AIRSCARF is switched on, very hot air
can flow from the vents in the head restraints. This could result in burns in the immediate
vicinity of the air vents. There is a risk of injury.
Reduce the heater output before it becomes
too hot.
In order to ensure the direct flow of fresh air
through the air vents into the vehicle interior, please observe the following notes:
R keep the air inlet grille on the hood and in
the engine compartment on the front-
passenger side free of blockages, such as
ice, snow or leaves.
R never cover the air vents or air intake grilles
in the vehicle interior.
i You can move the adjusters for the air
vents vertically or horizontally to set the
direction of the airflow.
i For optimal climate control in the vehicle,
open the air vents completely and set the
adjusters to the central position. Setting the center air vents
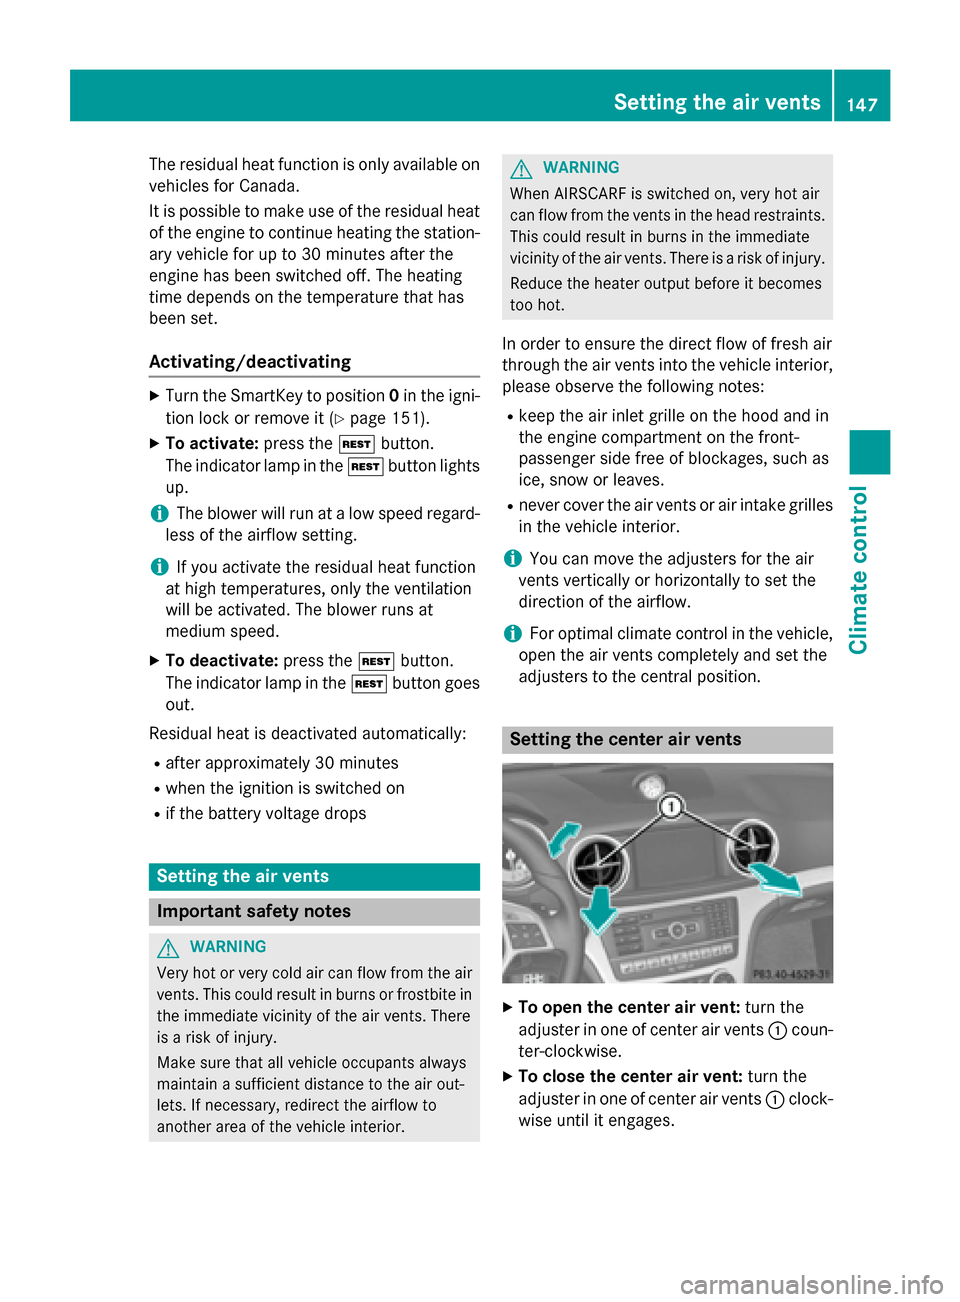
X
To open the center air vent: turn the
adjuster in one of center air vents 0043coun-
ter-clockwise.
X To close the center air vent: turn the
adjuster in one of center air vents 0043clock-
wise until it engages. Setting the air vents
147Climate control Z
Page 150 of 610
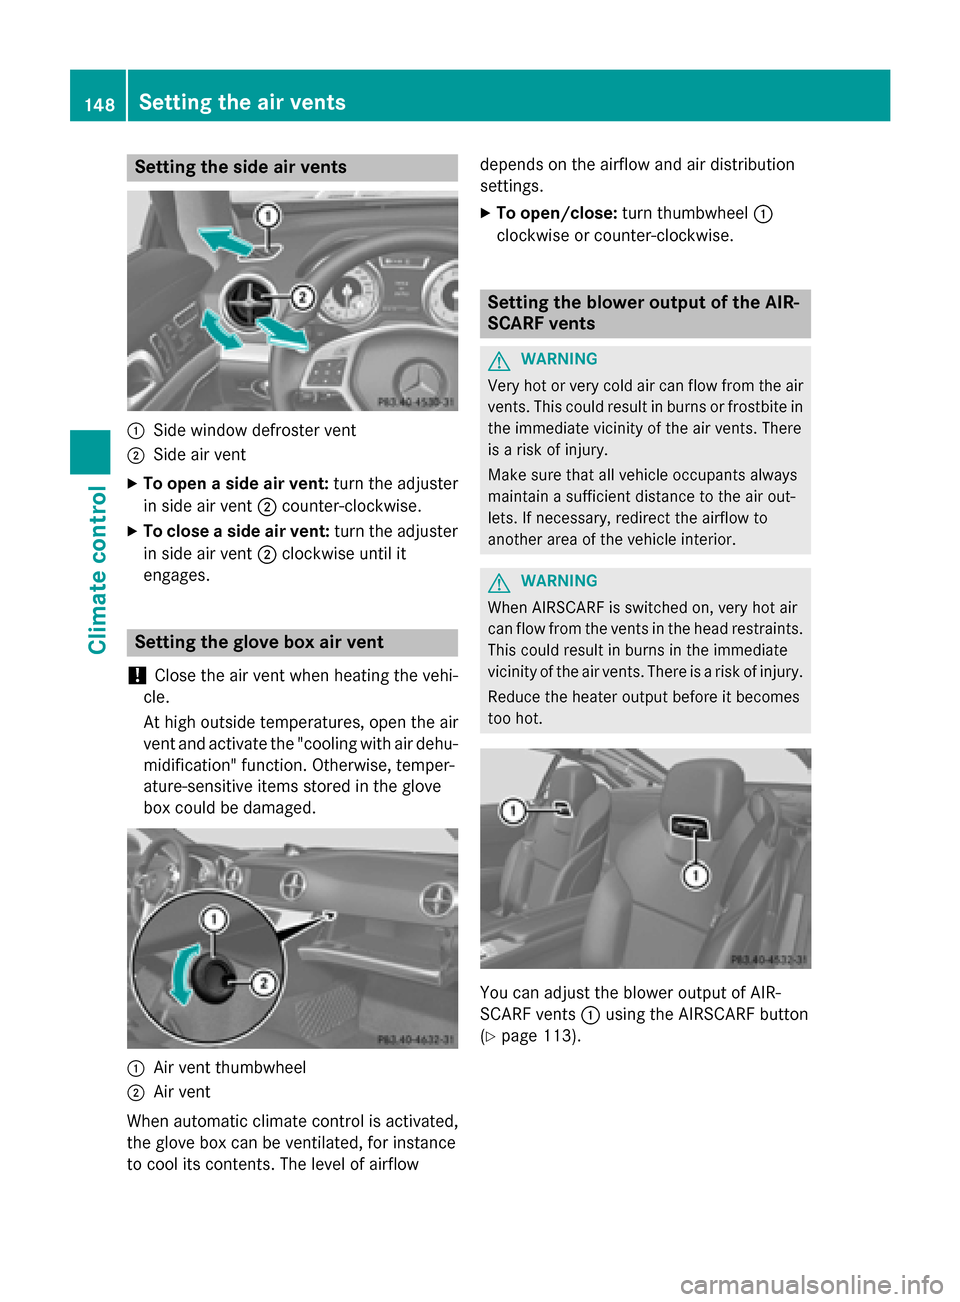
Setting the side air vents
0043
Side window defroster vent
0044 Side air vent
X To open a side air vent: turn the adjuster
in side air vent 0044counter-clockwise.
X To close a side air vent: turn the adjuster
in side air vent 0044clockwise until it
engages. Setting the glove box air vent
! Close the air vent when heating the vehi-
cle.
At high outside temperatures, open the air
vent and activate the "cooling with air dehu- midification" function. Otherwise, temper-
ature-sensitive items stored in the glove
box could be damaged. 0043
Air vent thumbwheel
0044 Air vent
When automatic climate control is activated,
the glove box can be ventilated, for instance
to cool its contents. The level of airflow depends on the airflow and air distribution
settings.
X To open/close: turn thumbwheel 0043
clockwise or counter-clockwise. Setting the blower output of the AIR-
SCARF vents
G
WARNING
Very hot or very cold air can flow from the air vents. This could result in burns or frostbite in the immediate vicinity of the air vents. There
is a risk of injury.
Make sure that all vehicle occupants always
maintain a sufficient distance to the air out-
lets. If necessary, redirect the airflow to
another area of the vehicle interior. G
WARNING
When AIRSCARF is switched on, very hot air
can flow from the vents in the head restraints. This could result in burns in the immediate
vicinity of the air vents. There is a risk of injury.
Reduce the heater output before it becomes
too hot. You can adjust the blower output of AIR-
SCARF vents
0043using the AIRSCARF button
(Y page 113). 148
Setting the air ventsClimate control
Page 314 of 610
ded before selling or transferring ownership
of your vehicle, for example.
Data on the internal hard drive, e.g. music
files in the MUSIC REGISTER, will be deleted. You can also delete music files from the
MUSIC REGISTER using the "Delete all music
files" function (Y page 457).
X Press the 0066function button.
X Select System
System by turning 00790052007Athe
COMAND controller and press 0098to con-
firm.
X Select Reset
Reset and press 0098to confirm.
A warning message appears asking
whether you wish to reset.
X Select Yes YesorNo
No and press 0098to confirm.
If you select Yes
Yes, a prompt will appear again
asking whether you really wish to reset to
the factory settings.
X Select Yes YesorNo
No and press 0098to confirm.
If you select Yes
Yes, a message will be shown.
COMAND is reset and restarted.
If you select No No, the process will be can-
celed. Vehicle functions
Your COMAND equipment
These operating instructions describe all the
standard and optional equipment for your
COMAND system, as available at the time of
going to print. Country-specific differences
are possible. Please note that your
COMAND system may not be equipped with
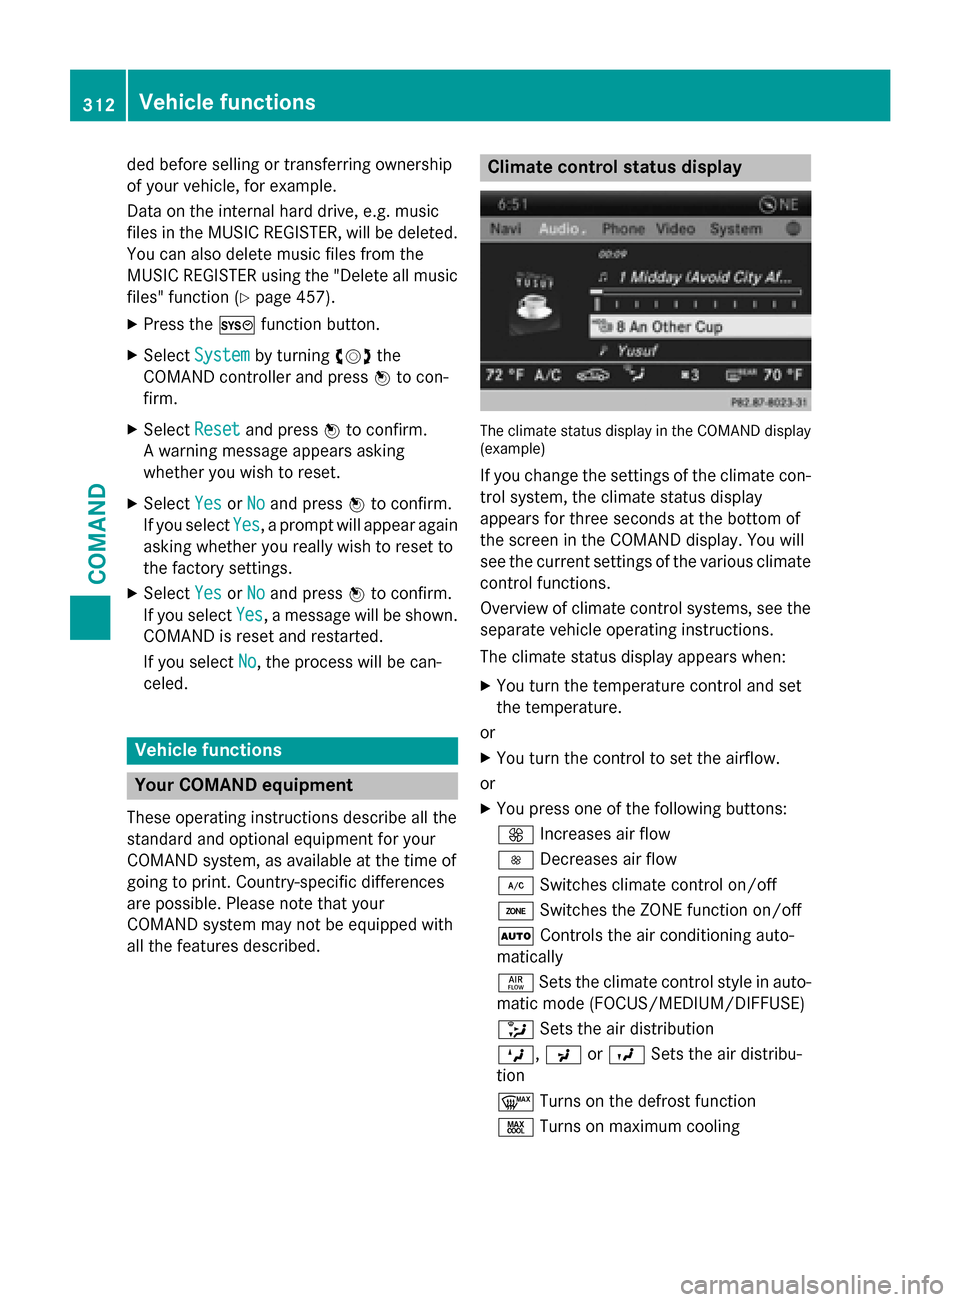
all the features described. Climate control status display
The climate status display in the COMAND display
(example)
If you change the settings of the climate con-
trol system, the climate status display
appears for three seconds at the bottom of
the screen in the COMAND display. You will
see the current settings of the various climate control functions.
Overview of climate control systems, see theseparate vehicle operating instructions.
The climate status display appears when:
X You turn the temperature control and set
the temperature.
or
X You turn the control to set the airflow.
or X You press one of the following buttons:
0097 Increases air flow
0095 Decreases air flow
005A Switches climate control on/off
00D6 Switches the ZONE function on/off
0058 Controls the air conditioning auto-
matically
00F0 Sets the climate control style in auto-
matic mode (FOCUS/MEDIUM/DIFFUSE)
008F Sets the air distribution
0099, 009Cor009B Sets the air distribu-
tion
0064 Turns on the defrost function
00C9 Turns on maximum cooling 312
Vehicle functionsCOMAND
Page 315 of 610
i
The way that the climate control status
display is called up depends on your vehi-
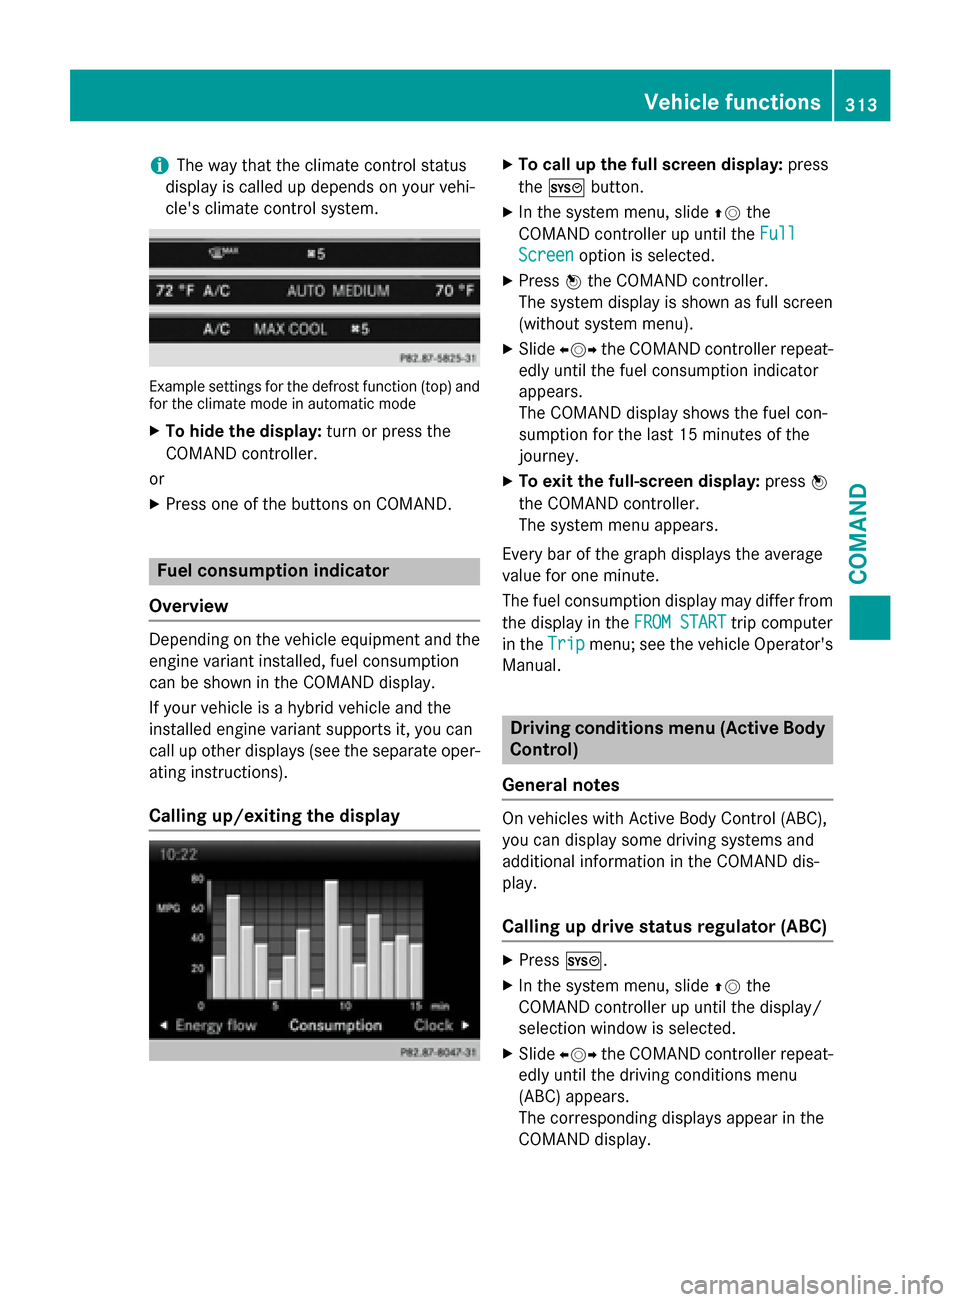
cle's climate control system. Example settings for the defrost function (top) and
for the climate mode in automatic mode
X To hide the display: turn or press the
COMAND controller.
or
X Press one of the buttons on COMAND. Fuel consumption indicator
Overview Depending on the vehicle equipment and the
engine variant installed, fuel consumption
can be shown in the COMAND display.
If your vehicle is a hybrid vehicle and the
installed engine variant supports it, you can
call up other displays (see the separate oper-
ating instructions).
Calling up/exiting the display X
To call up the full screen display: press
the 0066 button.
X In the system menu, slide 00970052the
COMAND controller up until the Full Full
Screen Screen option is selected.
X Press 0098the COMAND controller.
The system display is shown as full screen
(without system menu).
X Slide 009500520096 the COMAND controller repeat-
edly until the fuel consumption indicator
appears.
The COMAND display shows the fuel con-
sumption for the last 15 minutes of the
journey.
X To exit the full-screen display: press0098
the COMAND controller.
The system menu appears.
Every bar of the graph displays the average
value for one minute.
The fuel consumption display may differ from
the display in the FROM START FROM STARTtrip computer
in the Trip
Tripmenu; see the vehicle Operator's
Manual. Driving conditions menu (Active Body
Control)
General notes On vehicles with Active Body Control (ABC),
you can display some driving systems and
additional information in the COMAND dis-
play.
Calling up drive status regulator (ABC) X
Press 0066.
X In the system menu, slide 00970052the
COMAND controller up until the display/
selection window is selected.
X Slide 009500520096 the COMAND controller repeat-
edly until the driving conditions menu
(ABC) appears.
The corresponding displays appear in the
COMAND display. Vehicle functions
313COMAND Z
Page 542 of 610
should drive for a few minutes after clean-
ing. Braking heats the brake discs and the
brake pads/linings, thus drying them. The
vehicle can then be parked.
Regular care of your vehicle is a condition for
retaining the quality in the long term.
Use care products and cleaning agents rec-
ommended and approved by Mercedes-Benz. Washing the vehicle and cleaning the
paintwork
Automatic car wash G
WARNING
Braking efficiency is reduced after washing
the vehicle. There is a risk of an accident.
After the vehicle has been washed, brake
carefully while paying attention to the traffic
conditions until full braking power is restored.
! If DISTRONIC PLUS or the HOLD function
is activated, the vehicle brakes automati-
cally in certain situations. To prevent dam-
age to the vehicle, deactivate DISTRONIC
PLUS and the HOLD function in the follow-
ing or other similar situations:
R when towing the vehicle
R in the car wash
! It is preferable to use car washes with
adjustable high-pressure pre-cleaning that
corresponds to the specification for the
Cabriolet program. In car washes that use
high water pressures, there is a risk that a
small amount of water may leak into the
vehicle.
! Vehicles with HANDS-FREE ACCESS: if a
SmartKey with KEYLESS-GO is within the
detection range of the KEYLESS-GO
antenna, the following situations could lead
to the unintentional opening of the trunk
lid:
R using a car wash
R using a power washer Make sure that the SmartKey is at least
6.5 ft (2 m) away from the vehicle.
! Never clean your vehicle in a Touchless
Automatic Car Wash as these use special
cleaning agents. These cleaning agents can damage the paintwork or plastic parts.
! Make sure that the automatic transmis-
sion is in position Nwhen washing your
vehicle in a tow-through car wash. The vehi-
cle could be damaged if the transmission is
in another position.
! Make sure that:
R the side windows and the roof are com-
pletely closed
R the climate control blower is switched off
R the windshield wiper switch is at position
0
The vehicle could otherwise be damaged.
You can wash the vehicle in an automatic car
wash from the very start.
If the vehicle is very dirty, pre-wash it before
cleaning it in an automatic car wash.
After using an automatic car wash, wipe off
wax from the windshield and the wiper
blades. This will prevent smears and reduce
wiping noises caused by residue on the wind- shield.
Washing by hand In some countries, washing by hand is only
allowed at specially equipped washing bays.
Observe the legal requirements in all coun-
tries concerned.
X Do not use hot water and do not wash the
vehicle in direct sunlight.
X Use a soft sponge to clean.
X Use a mild cleaning agent, such as a car
shampoo approved by Mercedes-Benz.
X Thoroughly hose down the vehicle with a
gentle jet of water.
X Do not point the water jet directly towards
the air inlet. 540
CareMaintenance and care
Page 583 of 610
Permissible gross vehicle weight:
the
gross weight of the vehicle, all passengers
and the load must not exceed the permissible
gross vehicle weight.
Gross axle weight rating: the maximum per-
missible weight that can be carried by one
axle (front or rear axle).
To ensure that your vehicle does not exceed
the maximum permissible values (gross vehi-
cle weight and maximum gross axle weight
rating), have your loaded vehicle (including
driver, occupants and the load) weighed on a suitable vehicle weighbridge. All about wheels and tires
Uniform Tire Quality Grading Stand-
ards
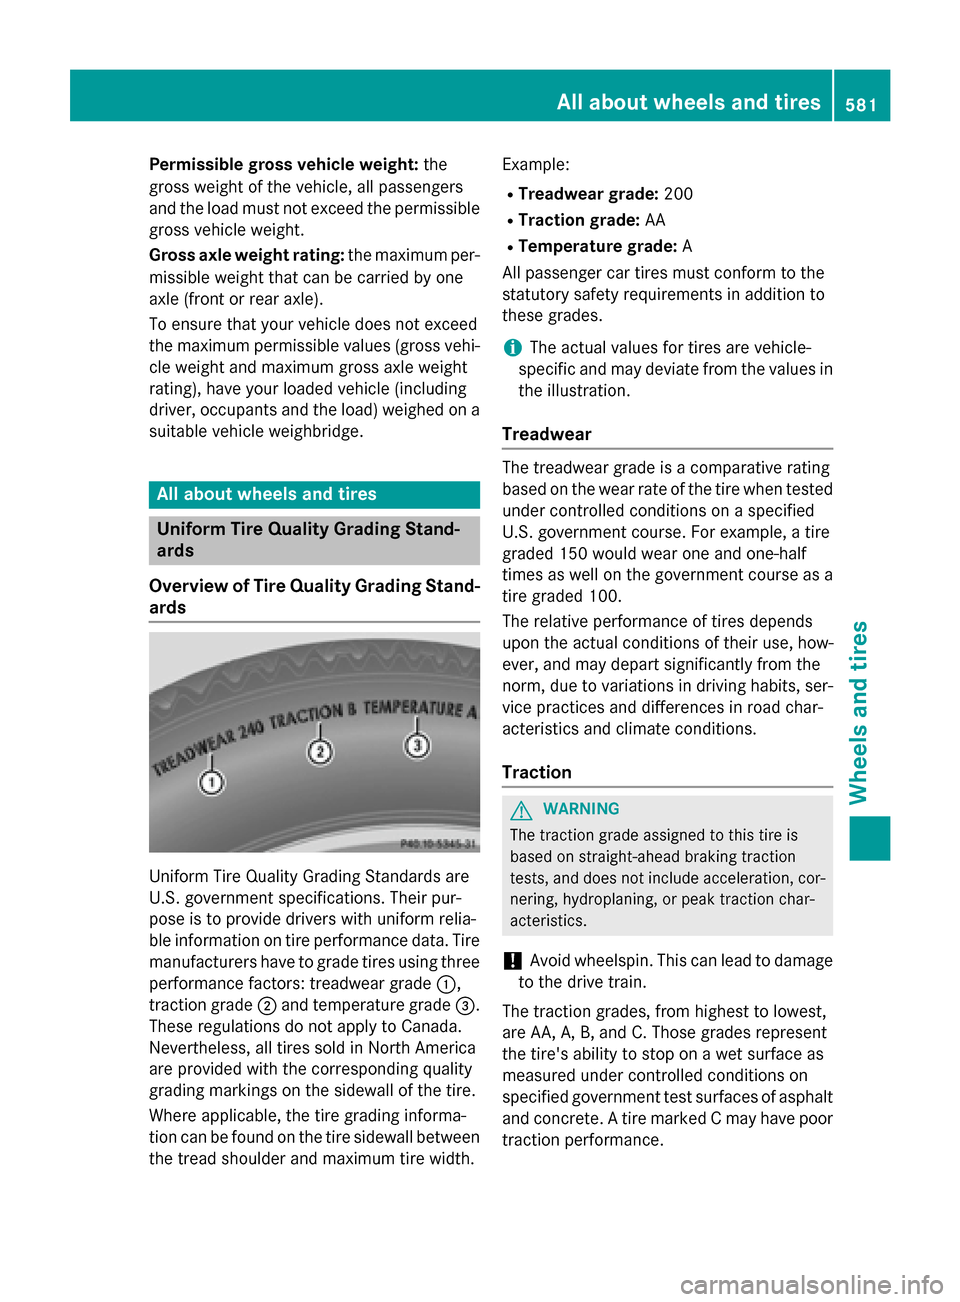
Overview of Tire Quality Grading Stand- ards Uniform Tire Quality Grading Standards are
U.S. government specifications. Their pur-
pose is to provide drivers with uniform relia-
ble information on tire performance data. Tire
manufacturers have to grade tires using three
performance factors: treadwear grade 0043,
traction grade 0044and temperature grade 0087.
These regulations do not apply to Canada.
Nevertheless, all tires sold in North America
are provided with the corresponding quality
grading markings on the sidewall of the tire.
Where applicable, the tire grading informa-
tion can be found on the tire sidewall between
the tread shoulder and maximum tire width. Example:
R Treadwear grade: 200
R Traction grade: AA
R Temperature grade: A
All passenger car tires must conform to the
statutory safety requirements in addition to
these grades.
i The actual values for tires are vehicle-
specific and may deviate from the values in
the illustration.
Treadwear The treadwear grade is a comparative rating
based on the wear rate of the tire when tested
under controlled conditions on a specified
U.S. government course. For example, a tire
graded 150 would wear one and one-half
times as well on the government course as a
tire graded 100.
The relative performance of tires depends
upon the actual conditions of their use, how-
ever, and may depart significantly from the
norm, due to variations in driving habits, ser-
vice practices and differences in road char-
acteristics and climate conditions.
Traction G
WARNING
The traction grade assigned to this tire is
based on straight-ahead braking traction
tests, and does not include acceleration, cor- nering, hydroplaning, or peak traction char-
acteristics.
! Avoid wheelspin. This can lead to damage
to the drive train.
The traction grades, from highest to lowest,
are AA, A, B, and C. Those grades represent
the tire's ability to stop on a wet surface as
measured under controlled conditions on
specified government test surfaces of asphalt
and concrete. A tire marked C may have poor
traction performance. All about wheels and tires
581Wheels and tires Z
Page 603 of 610
VIN
X
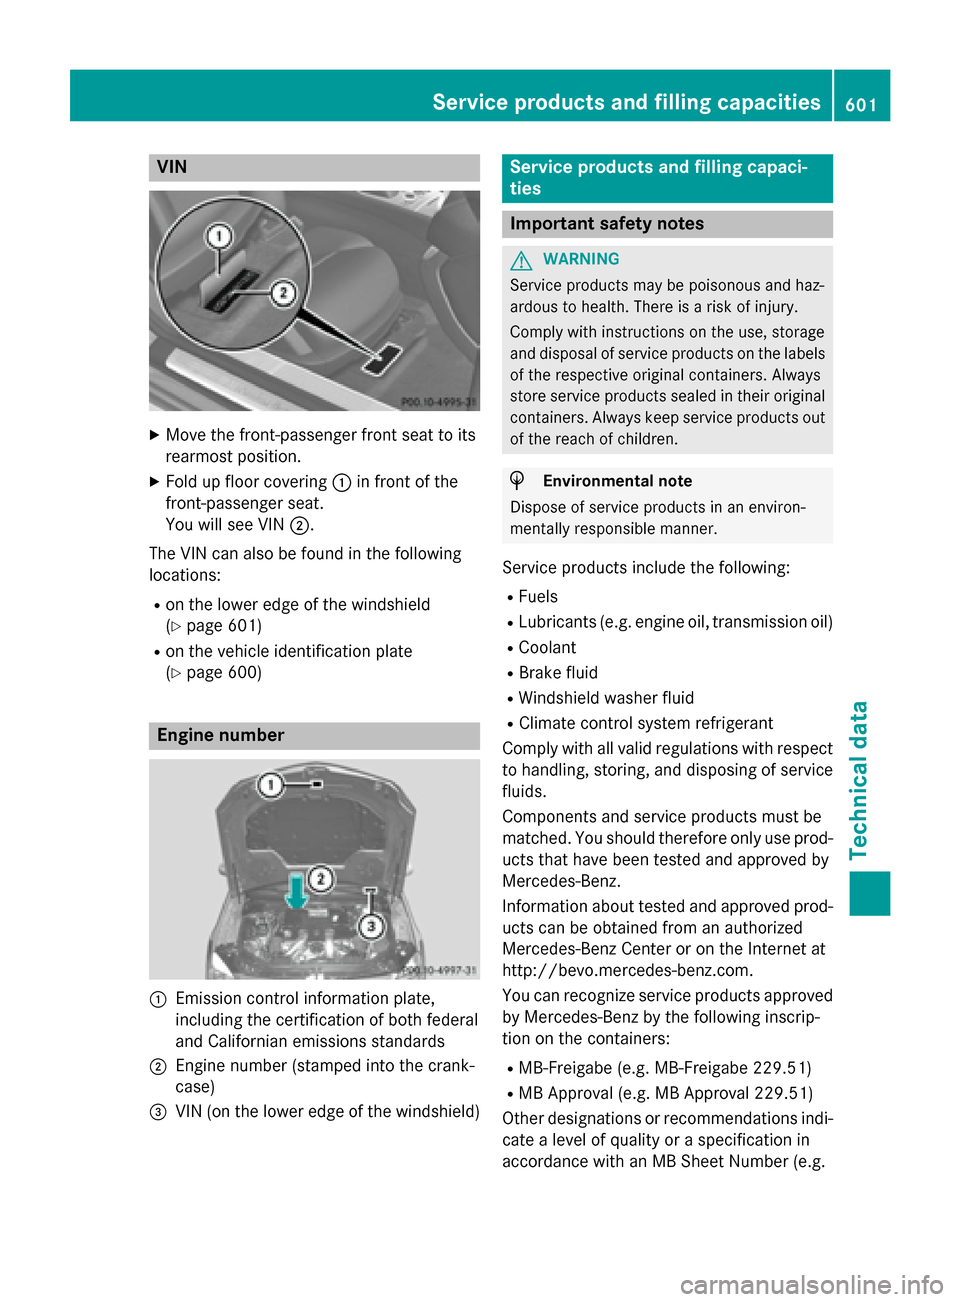
Move the front-passenger front seat to its
rearmost position.
X Fold up floor covering 0043in front of the
front-passenger seat.
You will see VIN 0044.
The VIN can also be found in the following
locations:
R on the lower edge of the windshield
(Y page 601)
R on the vehicle identification plate
(Y page 600) Engine number
0043
Emission control information plate,
including the certification of both federal
and Californian emissions standards
0044 Engine number (stamped into the crank-
case)
0087 VIN (on the lower edge of the windshield) Service products and filling capaci-
ties
Important safety notes
G
WARNING
Service products may be poisonous and haz-
ardous to health. There is a risk of injury.
Comply with instructions on the use, storage
and disposal of service products on the labels of the respective original containers. Always
store service products sealed in their original containers. Always keep service products out
of the reach of children. H
Environmental note
Dispose of service products in an environ-
mentally responsible manner.
Service products include the following:
R Fuels
R Lubricants (e.g. engine oil, transmission oil)
R Coolant
R Brake fluid
R Windshield washer fluid
R Climate control system refrigerant
Comply with all valid regulations with respect to handling, storing, and disposing of service
fluids.
Components and service products must be
matched. You should therefore only use prod- ucts that have been tested and approved by
Mercedes-Benz.
Information about tested and approved prod- ucts can be obtained from an authorized
Mercedes-Benz Center or on the Internet at
http://bevo.mercedes-benz.com.
You can recognize service products approved
by Mercedes-Benz by the following inscrip-
tion on the containers:
R MB-Freigabe (e.g. MB-Freigabe 229.51)
R MB Approval (e.g. MB Approval 229.51)
Other designations or recommendations indi- cate a level of quality or a specification in
accordance with an MB Sheet Number (e.g. Service products and filling capacities
601Technical data Z
Page 608 of 610
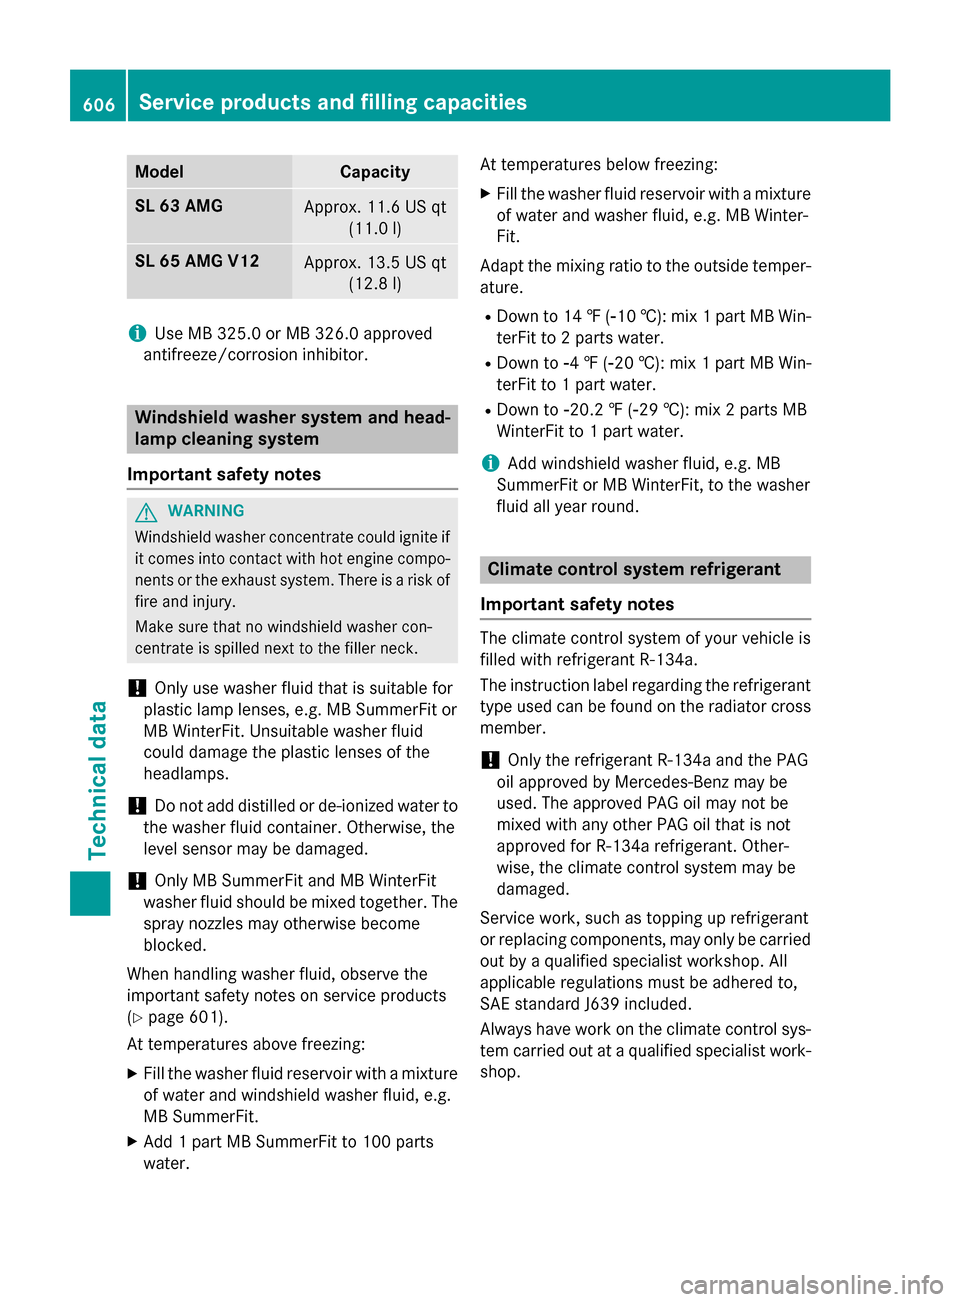
Model Capacity
SL 63 AMG
Approx. 11.6 US qt
(11.0l) SL 65 AMG V12
Approx. 13.5 US qt
(12.8l) i
Use MB 325.0 or MB 326.0 approved
antifreeze/corrosion inhibitor. Windshield washer system and head-
lamp cleaning system
Important safety notes G
WARNING
Windshield washer concentrate could ignite if it comes into contact with hot engine compo-
nents or the exhaust system. There is a risk of
fire and injury.
Make sure that no windshield washer con-
centrate is spilled next to the filler neck.
! Only use washer fluid that is suitable for
plastic lamp lenses, e.g. MB SummerFit or
MB WinterFit. Unsuitable washer fluid
could damage the plastic lenses of the
headlamps.
! Do not add distilled or de-ionized water to
the washer fluid container. Otherwise, the
level sensor may be damaged.
! Only MB SummerFit and MB WinterFit
washer fluid should be mixed together. The spray nozzles may otherwise become
blocked.
When handling washer fluid, observe the
important safety notes on service products
(Y page 601).
At temperatures above freezing:
X Fill the washer fluid reservoir with a mixture
of water and windshield washer fluid, e.g.
MB SummerFit.
X Add 1 part MB SummerFit to 100 parts
water. At temperatures below freezing:
X Fill the washer fluid reservoir with a mixture
of water and washer fluid, e.g. MB Winter-
Fit.
Adapt the mixing ratio to the outside temper-
ature.
R Down to 14 ‡ (00F810 †): mix 1 part MB Win-
terFit to 2 parts water.
R Down to 00F84‡( 00F820 †): mix 1 part MB Win-
terFit to 1 part water.
R Down to 00F820.2 ‡ (00F829 †): mix 2 parts MB
WinterFit to 1 part water.
i Add windshield washer fluid, e.g. MB
SummerFit or MB WinterFit, to the washer
fluid all year round. Climate control system refrigerant
Important safety notes The climate control system of your vehicle is
filled with refrigerant R‑134a.
The instruction label regarding the refrigerant
type used can be found on the radiator cross
member.
! Only the refrigerant R‑134a and the PAG
oil approved by Mercedes-Benz may be
used. The approved PAG oil may not be
mixed with any other PAG oil that is not
approved for R-134a refrigerant. Other-
wise, the climate control system may be
damaged.
Service work, such as topping up refrigerant
or replacing components, may only be carried out by a qualified specialist workshop. All
applicable regulations must be adhered to,
SAE standard J639 included.
Always have work on the climate control sys-
tem carried out at a qualified specialist work-
shop. 606
Service products and filling capacitiesTechnical data