oil pressure MERCEDES-BENZ SL-Class 2016 R231 Owner's Manual
[x] Cancel search | Manufacturer: MERCEDES-BENZ, Model Year: 2016, Model line: SL-Class, Model: MERCEDES-BENZ SL-Class 2016 R231Pages: 614, PDF Size: 15.67 MB
Page 27 of 614

Outside temperature ......................223
Setting (climate control) ................ 142
Transmission oil (on-board com-
puter, Mercedes-AMG vehicles) ..... 236
Text messages (SMS)
Calling the sender .......................... 402
Deleting ......................................... 402
Inbox .............................................. 401
Information and requirements ....... 400
Reading .......................................... 401
Reading aloud ................................ 401
Storing sender in address book ..... 402
Storing the sender as a new
address book entry ........................ 402
Time
Setting ...........................................3 09
Setting summer/standard time ..... 309
Setting the format ......................... 308
Setting the time ............................. 308
Setting the time manually .............. 308
Setting the time zone ..................... 309
Setting the time/date format ........ 308
Timing (RACETIMER) ......................... 237
Tire pressure
Calling up (on-board computer) ..... 575
Checking manually ........................ 575
Display message ............................ 264
Maximum ....................................... 574
Not reached (TIREFIT) .................... 554
Notes ............................................. 573
Reached (TIREFIT) .......................... 554
Recommended ............................... 571
Tire pressure monitor
Checking the tire pressure elec-
tronically ........................................ 577
Function/notes ............................. 575
General notes ................................ 575
Important safety notes .................. 575
Radio type approval for the tire
pressure monitor ........................... 578
Restarting ...................................... 577
Warning lamp ................................. 281
Warning message .......................... 577
TIREFIT kit .......................................... 552
Tire pressure not reached .............. 554
Tire pressure reached .................... 554
Tires
Aspect ratio (definition) ................. 587 Average weight of the vehicle
occupants (definition) .................... 586
Bar (definition) ............................... 586
Changing a wheel .......................... 588
Characteristics .............................. 586
Checking ........................................ 569
Cu
rb w
eight (definition) ................. 587
Definition of terms ......................... 586
Direction of rotation ...................... 589
Display message ............................ 264
Distribution of the vehicle occu-
pants (definition) ............................ 588
DOT (Department of Transporta-
tion) (definition) ............................. 586
DOT, Tire Identification Number
(TIN) ............................................... 585
GAWR (Gross Axle Weight Rating)
(definition) ..................................... 587
General notes ................................ 593
GVW (Gross Vehicle Weight) (def-
inition) ........................................... 587
GVWR (Gross Vehicle Weight Rat-
ing) (definition) .............................. 587
Important safety notes .................. 568
Increased vehicle weight due to
optional equipment (definition) ...... 587
Information on driving .................... 568
Kilopascal (kPa) (definition) ........... 587
Labeling (overview) ........................ 582
Load bearing index (definition) ...... 588
Load index ..................................... 585
Load index (definition) ................... 587
M+S tires ....................................... 570
Maximum load on a tire (defini-
tion) ............................................... 587
Maximum loaded vehicle weight
(definition) ..................................... 587
Maximum permissible tire pres-
sure (definition) ............................. 587
Maximum tire load ......................... 585
Maximum tire load (definition) ....... 587
MOExtended tires .......................... 570
Optional equipment weight (defi-
nition) ............................................ 588
Overview ........................................ 568
PSI (pounds per square inch) (def-
inition) ........................................... 587
Replacing ....................................... 588
Index25
Page 556 of 614

attained a pressure of at least 180 kPa
(1.8 bar/26 psi).
If a tire pressure of 180 kP a(1.8 bar/26 psi)
has been attained after five minutes:
(
Ypage 554).
If a tire pressure of 180 kPa (1.8 bar/26 psi)
has not been attained after five minutes:
(
Ypage 554).
iIf tire sealant leaks out, allow it to dry. It
can then be removed like a layer of film.
If your clothes are soiled with tire sealant,
have them cleaned with perchloroethylene
at a dry cleaner as soon as possible.
Tire pressure not reached
If a pressure of 180 kPa (1.8 bar/26 psi) has
not been attained after five minutes:
XSwitch off the tire inflation compressor.
XUnscrew the filler hose from the valve of
the faulty tire.
XVery slowly drive forwards or reverse
approximately 30 ft (10 m).
XPump up the tire again.
After a maximum of five minutes the tire
pressure must be at least 180 kPa (1.8 bar/ 26 psi).
GWARNING
If the required tire pressure is not reached
after the specified time, the tire is too badly
damaged. The tire sealant cannot repair the
tire in this instance. Damaged tires and a tire
pressure that is too low can significantly
impair the vehicle's braking and driving char-
acteristics. There is a risk of accident.
Do not continue driving. Contact a qualified
specialist workshop.
Tire pressure reached
GWARNING
A tire temporarily sealed with tire sealant
impairs the driving characteristics and is not
suitable for higher speeds. There is a risk of
accident.
You should therefore adapt your driving style
accordingly and drive carefully. Do not exceed the specified maximum speed with a tire that
has been repaired using tire sealant.
The maximum speed for a tire sealed with tire
sealant is 50 mph (80 km/h). The upper part of the TIREFIT sticker must be affixed to the
instrument cluster in the driver's field of
vision.
!Residue from the tire sealant may come
out of the filler hose after use. This could
cause stains.
Therefore, place the filler hose in the plastic bag which contained the TIREFIT kit.
HEnvironmental note
Have the used tire sealant bottle disposed of
professionally, e.g. at a qualified specialist
workshop.
If a tire pressure of 180 kPa (1.8 bar/26 psi)
has been achieved after a maximum period of ten minutes:
XSwitch off the tire inflation compressor.
XUnscrew the filler hose from the valve of
the faulty tire.
XStow the tire sealant bottle and the tire
inflation compressor.
XPull away immediately.
XStop after driving for approximately ten
minutes and check the tire pressure with
the tire inflation compressor.
The tire pressure must now be at least
130 kPa (1.3 bar/19 psi).
GWARNING
If the required tire pressure is not reached
after driving for a short period, the tire is too
badly damaged. The tire sealant cannot repair
the tire in this instance. Damaged tires and a
tire pressure that is too low can significantly
impair the vehicle's braking and driving char-
acteristics. There is a risk of accident.
554Flat tire
Breakdown assistance
Page 589 of 614

Increased vehicle weight due to optional
equipment
This is the combined weight of all standard
and optional equipment available for the vehi-
cle, regardless of whether it is actually instal-
led on the vehicle or not.
Rim
This is the part of the wheel on which the tire
is mounted.
GAWR (Gross Axle Weight Rating)
The GAWR is the maximum permissible axle
weight. The actual load on an axle must neverexceed the gross axle weight rating. The
gross axle weight rating can be found on the
vehicle identification plate on the B-pillar on
the driver's side.
Speed rating
The speed rating is part of the tire identifica-
tion. It specifies the speed range for which the
tire is approved.
GVW (Gross Vehicle Weight)
The gross vehicle weight includes the weight
of the vehicle including fuel, tools, the spare
wheel, accessories installed, occupants, lug-
gage and the drawbar noseweight, if applica-
ble. The gross vehicle weight must not exceedthe gross vehicle weight rating GVWR as
specified on the vehicle identification plate on
the B pillar on the driver's side.
GVWR (Gross Vehicle Weight Rating)
The GVWR is the maximum permissible gross
weight of a fully loaded vehicle (the weight of
the vehicle including all accessories, occu-
pants, fuel, luggage and the drawbar nose-
weight, if applicable). The gross vehicle
weight r
ating is specified on the vehicle iden-
tification plate on the B-pillar on the driver's
side.
Maximum loaded vehicle weight
The maximum weight is the sum of:
Rthe curb weight of the vehicle
Rthe weight of the accessories
Rthe load limit
Rthe weight of the factory installed optional
equipment
Kilopascal (kPa)
Metric unit for tire pressure. 6.9 kPa corre-
sponds to 1 psi. Another unit for tire pressure is bar. There are 100 kilopascals (kPa) to
1 bar.
Load index
In addition to the load-bearing index, the load
index may also be imprinted on the sidewall of
the tire. This specifies the load-bearing capa-
city more precisely.
Curb weight
The weight of a vehicle with standard equip-
ment including the maximum capacity of fuel,
oil and coolant. It also includes the air-condi-
tioning system and optional equipment if
these are installed in the vehicle, but does not
include passengers or luggage.
Maximum load rating
The maximum tire load is the maximum per-
missible weight in kilograms or lbs for which a
tire is approved.
Maximum permissible tire pressure
Maximum permissible tire pressure for one
tire.
Maximum load on one tire
Maximum load on one tire. This is calculated
by dividing the maximum axle load of one axle
by two.
PSI (pounds per square inch)
A st
andard unit of measure for tire pressure.
Aspect ratio
Relationship between tire height and tire
width in percent.
Tire pressure
This is pressure inside the tire applying an
outward force to each square inch of the tire's
surface. The tire pressure is specified in
All about wheels and tires587
Wheels and tires
Z
Page 591 of 614

Tire-mounting tools should not be used
near the valve. This could damage the elec-
tronic components.
Only have tires changed at a qualified spe-
cialist workshop.
Always pay attention to the instructions and
safety notes when changing a wheel
(
Ypage 589).
The wear patterns on the front and rear tires
differ, depending on the operating conditions.
Rotate the wheels before a clear wear pattern
has formed on the tires. Front tires typically
wear more on the shoulders and the rear tires
in the center.
On vehicles that have the same size front and
rear wheels, you can rotate the wheels
according to the intervals in the tire manu-
facturer's warranty book in your vehicle docu-
ments. If no warranty book is available, the
tires should be rotated every 3,000 to
6,000 miles (5,000 to 10,000 km). Depending on tire wear, this may be required earlier. Do
not change the direction of wheel rotation.
Clean the contact surfaces of the wheel and
the brake disc thoroughly every time a wheel
is rotated. Check the tire pressure and, if nec-
essary, restart the tire pressure loss warning
system.
Direction of rotation
Tires with a specified direction of rotation
have additional benefits, e.g. if there is a risk
of hydroplaning. These advantages can only
be gained if the tires are installed correspond-
ing to the direction of rotation.
An arrow on the sidewall of the tire indicates
its correct direction of rotation.
Storing wheels
Store wheels that are not being used in a cool,
dry and preferably dark place. Protect the
tires from oil, grease, gasoline and diesel.
Mounting a wheel
Preparing the vehicle
XStop the vehicle on solid, non-slippery and
level ground.
XUnload the vehicle. The jack can only be
used when the vehicle is unladen.
XApply the electric parking brake manually.
XBring the front wheels into the straight-
ahead position.
XShift the transmission to position P.
XSwitch off the engine.
XVehicles without KEYLESS-GO:remove
the SmartKey from the ignition lock.
XVehicles with KEYLESS-GO: open the
driver's door.
The on-board electronics now have status
0. This is the same as the SmartKey having
been removed.
XVehicles with KEYLESS-GO: remove the
Start/Stop button from the ignition lock
(
Ypage 152).
XIf included in the vehicle equipment,
remove the tire-change tool kit from the
vehicle.
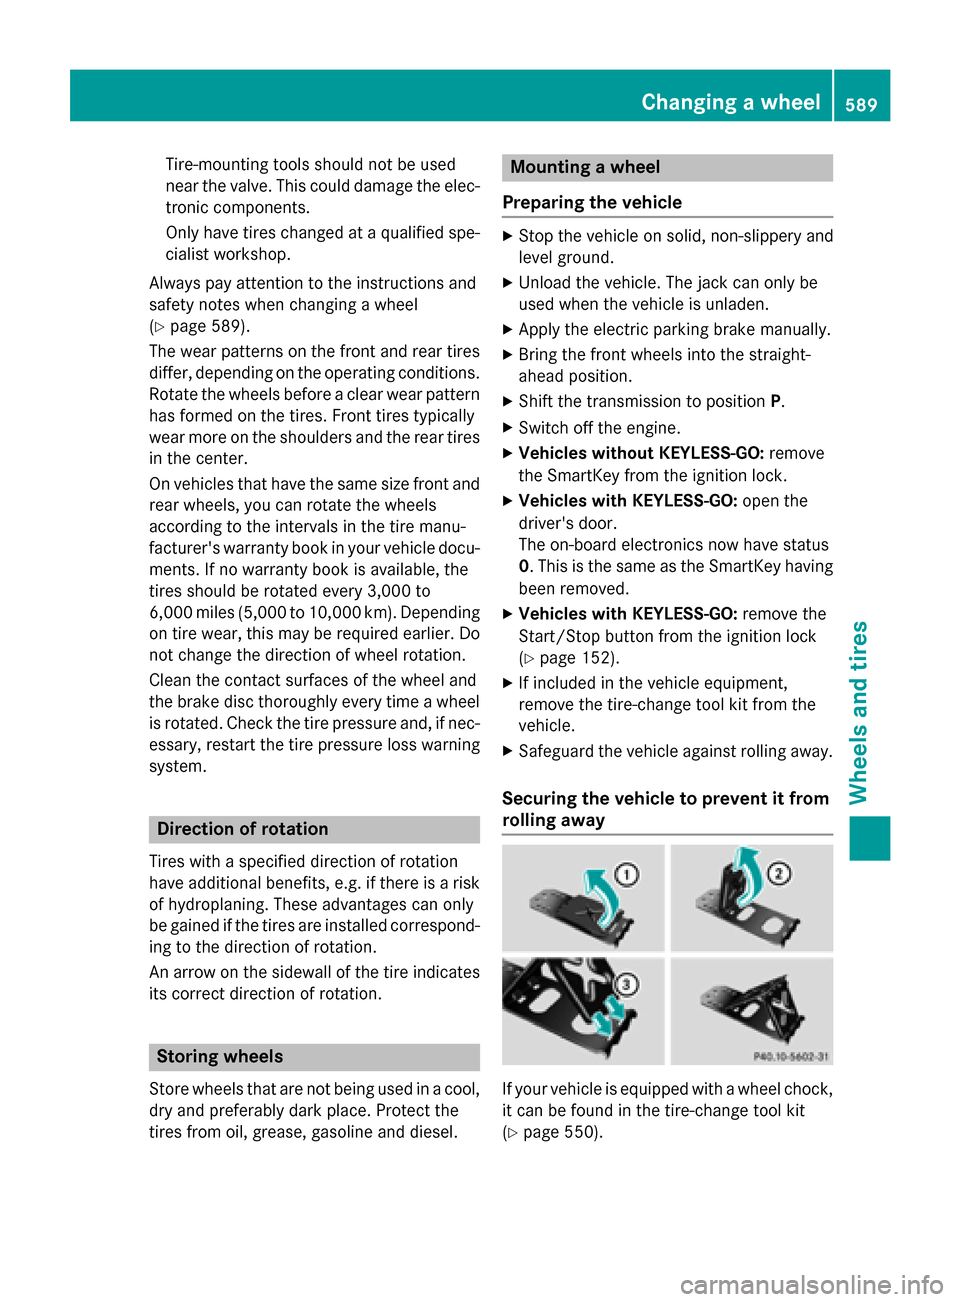
XSafeguard the vehicle against rolling away.
Securing the vehicle to prevent it from
rolling away
If your vehicle is equipped with a wheel chock,
it can be found in the tire-change tool kit
(
Ypage 550).
Changing a wheel589
Wheels and tires
Z