brake MERCEDES-BENZ SL CLASS 2018 Workshop Manual
[x] Cancel search | Manufacturer: MERCEDES-BENZ, Model Year: 2018, Model line: SL CLASS, Model: MERCEDES-BENZ SL CLASS 2018Pages: 298, PDF Size: 4.54 MB
Page 256 of 298

G WARNING
During the charging process ,ab attery produces hydrogen gas. If as hort circui to ccurs or sparks
are created ,t he hydrogen gas can ignite. There is ar isk of an explosion.R
Make sure that the positive terminal of ac onnected battery does not come into contact with
vehicl ep arts.R
Never place metal objects or tools on ab attery.R
It is important that you observe the described order of the battery terminal sw hen connecting
and disconnecting ab attery.R
When jump-starting, make sure that the battery pole sw ith identical polarity are connected.R
It is particularl yi mportant to observe the described order when connecting and disconnecting
the jumper cables. R
Never connect or disconnect the battery terminal sw hile the engine is running.
G WARNING
Ad ischarged battery can freeze at temperatures below freezing point. When jump-starting the
vehicl eorc harging the battery ,g ase sc an escap ef rom the battery .T here is ar isk of an explosion.
Allow the frozen battery to thaw out before charging it or jump-starting.
! Avoid repeated and lengthy starting attempts. Otherwise, the catalytic converter coul db e
damaged by the non-combusted fuel.
If the indicator/warning lamp sdon ot light up at low temperatures, it is very likel yt hat the dis-
charge db attery has frozen. In this case, you may neither charge the battery nor jump-start the
vehicle. The service life of at hawed-out battery may be shorter. The starting characteristics can be
impaired ,p articularl yatl ow temperatures. Have the thawed-out battery checked at aq ualified
specialist workshop.
Do not start the vehicl eu sing ar api dc harging device. If you rv ehicle's battery is discharged, the
engine can be jump-started from another vehicl eorf rom as econd battery using jumper cables.
Observe the following points: R
The battery is not accessible in all vehicles. If the other vehicle's battery is not accessible ,j ump-
start the vehicl eu sing as econd battery or aj ump-starting device.R
You may only jump-start the vehicl ew hen the engine and exhaust system are cold.R
Do not start the engine if the battery is frozen. Let the battery thaw first. R
Only jump-start from batterie sw ith a12Vv oltag er ating.R
Only use jumper cables which have as ufficient cross-section and insulated terminal clamps.R
If the battery is full yd ischarged, leave the battery that is being used to jump-start connected for
af ew minutes before attempting to start. This charge st he battery slightly.R
Make sure that the two vehicles do not touch.
Make sure that: R
The jumper cables are not damaged. R
Bare parts of the terminal clamp do not come into contact with other metal parts while the jumper
cables are connected to the ba ttery.R
The jumper cables cannot come into contact with parts which can move when the engine is
running, such as the V-belt pulley or the fan. X
Secure the vehicl ebya pplying the electric parking brake.X
Shift the transmission to position ] .254
Jump-starting
Breakdown assistance
Page 259 of 298

The bracket sf or the screw-in towing eye are
located in the bumpers. They are at the front and
at the rear, behind the covers. X
Remove the towing eye from the vehicle tool
kit ( Y
page 245).X
Press the mark on cover C inwards in the
direction of the arrow. X
Take cover C off the opening.X
Screw in the towing eye clockwise as far as it
will go and tighten it.
Removing the towing eye X
Unscrew and remove the towing eye. X
Attach cover C to the bumper and press until
it engages. X
Place the towing eye in the vehicle tool kit.
Towing av ehicle with both axles on
the ground
G WARNING
You can no longer steer the vehicle if the
steerin gw heel lock has been engaged. There
is ar isk of an accident.
Always switch off the ignition when towing the
vehicle with at ow cable or at ow bar.
The automatic transmission shifts to position
] automatically when you open the driver's or
front-passenger door or when you remove the
SmartKey from the ignition lock. In order to ensure that the automatic transmis-
sion stays in position \\ when towing away the
vehicle, you must observe the following points: X
Switch on the hazard warning lamps
( Y
page 97). X
Turn the SmartKey to position H in the igni-
tion lock.
On vehicles with KEYLESS-GO, use the Smart-
Key instead of the Start/Stop button
( Y
page 116). X
Depress and hold the brake pedal. X
Shift the transmission to position \\ .X
Release the brake pedal. X
Release the electric parking brake. X
Leave the SmartKey in position H in the igni-
tion lock.
In order to signal ac hange of direction when
towing the vehicle with the hazard warning
lamps switched on, use the combination switch
as usual. In this case, only the indicator lamps
for the direction of travel flash. When you reset
the combination switch, the hazard warning
flashers start flashing again.
It is important that you observe the safety
instructions when towing away your vehicle
( Y
page 256).
Towing the vehicle with the rear axle
raised
! The ignition must be switched off if you are
towing the vehicle with the rear axle raised.
Intervention by ESP ®
could otherwise dam-
age the brake system.
! Vehicles with automatic transmission must
not be towed with the rear axle raised. The
vehicle/trailer combination may otherwise
swerve or even roll over.Towing and tow-starting 257
Breakdown assistance Z
Page 282 of 298

Weight of optional extras The combined weight of those optiona le xtras
that weigh more than the replaced standard
parts and more than 2.3 kg (5 lbs) .T hese
optiona le xtras, such as high-performance
brakes ,l eve lc ontrol, ar oof rack or ah igh-per-
formance battery ,a re not included in the curb
weight and the weight of the accessories.
TIN (Tire Identification Number) This is au nique identifier which can be use db y
at ire manufacturer to identify tires, for example
for ap roduct recall, and thus identify the pur-
chasers. The TIN is made up of the manufactur-
er's identity code, tire size, tire type code and
the manufacturing date.
Load bearin gi ndexThe loa db earing index (also loa di ndex) is ac ode
that contains the maximu ml oa db earing capa-
city of at ire.
Traction Tractio nist he result of friction between the tires
and the road surface.
Treadwear indicators Narrow bars (tread wea rb ars )t hat are distrib-
uted over the tire tread. If the tire tread is level
with the bars ,t he wea rl imi to f
Page 283 of 298

An arrow on the sidewall of the tire indicates its
correct direction of rotation.
Storin gw heelsStore wheels tha ta re not being used in ac ool,
dry and preferably dark place .P rotect the tires
from oil, grease, gasoline and diesel.
Mounting aw heel
Preparin gt he vehicleX
Stop the vehicl eons olid ,n on-slippery and
level ground. X
Apply the electri cp ar king brake manually.X
Bring the front wheels into the straight-ahead
position. X
Shift the transmission to position ] .X
Switch off the engine. X
Vehicles withou tK EYLESS -GO: remove the
SmartKe yf rom the ignition lock.X
Vehicles with KEYLESS-GO: open the driv-
er' sd oo r.
The vehicl ee le ctronics now have status 0 .
Thi sist he same as the SmartKe yh av ing been
removed. X
Vehicles with KEYLESS-GO: remove the
Start/Stop button from the ignition lock
( Y
page 116). X
If included in the vehicl ee quipment ,r emove
the tire-change tool kit from the vehicle. X
Safeguar dt he vehicl ea gain st rolling away.
i Due to difference sinv ehicl ee quipment ,n ot
al lv ehicles ar ee quippe dw it hat ire-change
tool kit. For informatio nonw hi ch tool sa re
required to perfor maw heel change on your
vehicle, consult an authorize dM ercedes-
Benz Center.
Necessary tire-changing tool sc an include, for
example: R
Jack R
Wheel chock R
Lu gw rench Securin gt he vehicle to preven titf rom
rolling away
If your vehicl eise quippe dw it haw heel chock, it
can be found in the tire-change tool kit
( Y
page 245).
The folding whee lc hoc ki sana ddit ional safety
measure to prevent the vehicl ef rom rolling
away ,f or exampl ew he nc hanging aw heel .X
Fol db ot hp la te su pwar ds C .X
Fol do ut lowe rp la te D .X
Guid et he lugs on the lowe rp la te full yi nto the
openings in base plate
Page 284 of 298
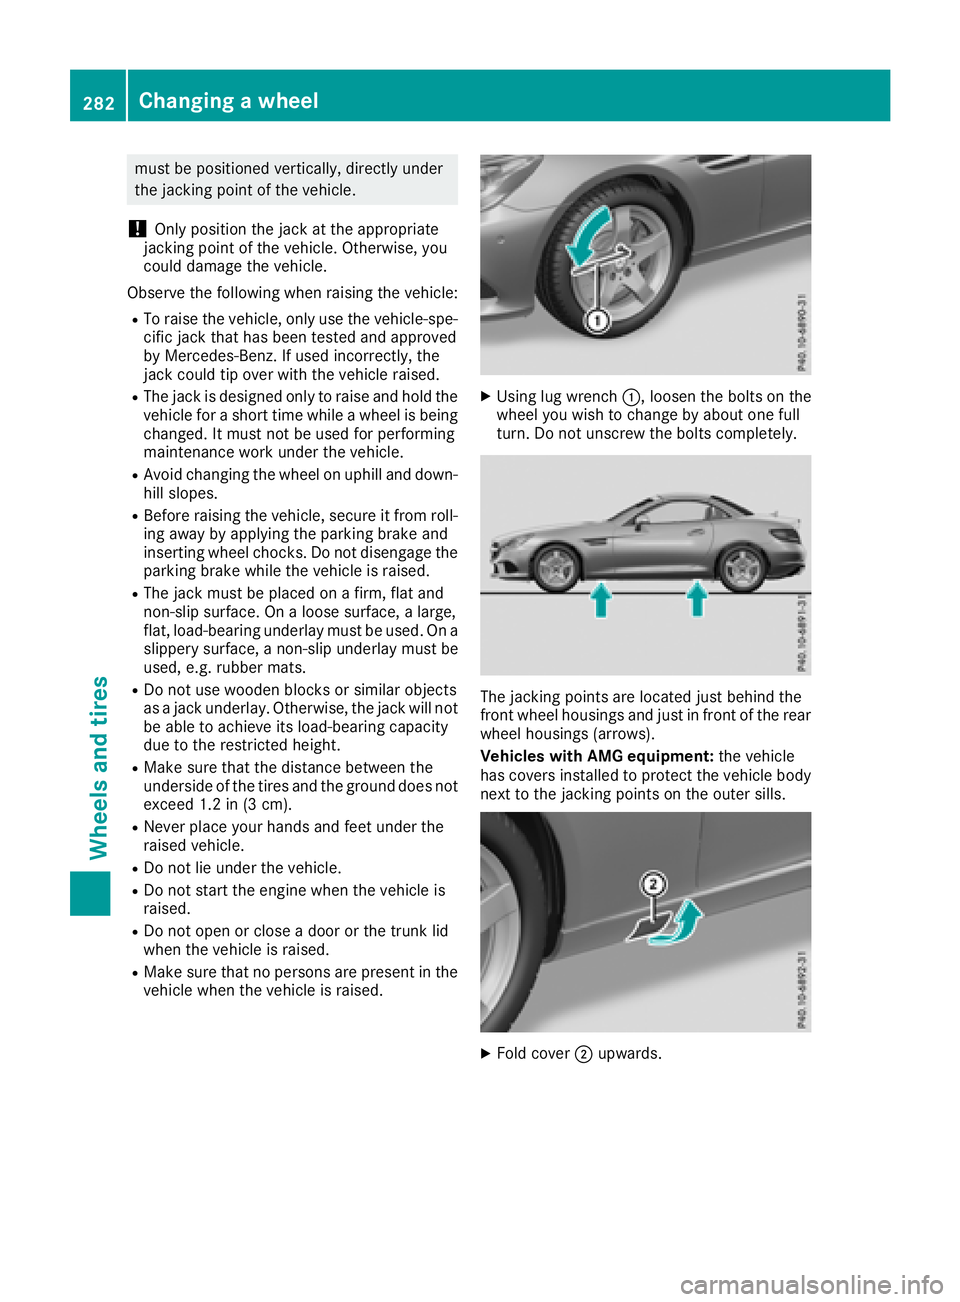
must be positioned vertically, directly under
the jacking point of the vehicle.
! Only position the jack at the appropriate
jacking point of the vehicle. Otherwise, you
could damage the vehicle.
Observe the following when raising the vehicle: R
To rais et he vehicle, only use the vehicle-spe-
cific jack that has been tested and approved
by Mercedes-Benz. If used incorrectly, the
jack could tip over with the vehicl er aised.R
The jack is designed only to rais ea nd hold the
vehicl ef or as hort time while aw hee lisb eing
changed. It must not be used for performing
maintenance work under the vehicle. R
Avoid changing the whee lonu phill and down-
hill slopes. R
Before raising the vehicle, secure it from roll-
ing awa ybya pplying the parking brake and
inserting whee lc hocks. Do not disengage the
parking brake whil et he vehicl eisr aised.R
The jack must be placed on af irm, flat and
non-slip surface. On al oose surface, al arge,
flat, load-bearing underlay must be used .Ona
slippery surface, an on-slip underlay must be
used ,e .g. rubber mats.R
Do not use wooden blocks or similar objects
as aj ack underlay .O therwise, the jack wil ln ot
be abl etoa chieve its load-bearing capacity
due to the restricted height. R
Make sure that the distance betwee nt he
underside of the tires and the ground does not
exceed 1.2 in (3 cm). R
Never place you rh ands and feet under the
raised vehicle. R
Do not lie under the vehicle. R
Do not start the engine when the vehicl ei s
raised. R
Do not open or close ad oor or the trunk lid
when the vehicl eisr aised.R
Make sure that no persons are present in the
vehicl ew hen the vehicl eisr aised. X
Using lug wrench C ,l oose nt he bolts on the
whee ly ou wish to change by abou to ne full
turn. Do not unscrew the bolts completely.
The jacking points are located just behind the
front whee lh ousings and just in front of the rear
whee lh ousings (arrows).
Vehicles with AMG equipment: the vehicle
has covers installed to protect the vehicl eb ody
next to the jacking points on the outer sills.
X
Fold cover D upwards.282
Changing aw heel
Wheel sa nd tires
Page 295 of 298

Model MB-Freigabe or
MB-Approval
All models
229.5
i MB approval is indicated on the oil contain-
ers.
Fillin gc apacitiesThe following values refer to an oil change
including the oil filter.
Model Capacity
SLC 300
6.7 US qt (6.3 l)
Mercedes-AMG
SLC 43 6.9 US qt (6.5 l)
Ad ditives
! Do not us ea ny additive sint he engine oil.
Thi sc ould damag et he engine.
Brake fluid
G WARNING
The brake fluid constantly absorb sm oisture
from the air. Thi sl owers the boiling point of
the brake fluid .Ift he boiling point of the brake
fluid is too low, vapor pockets may form in the
brake system when the brakes are applied
hard. Thi sw ould impai rb raking efficiency.
There is ar is kofana ccident.
Yo us houl dh av et he brake fluid renewe da t
the specified intervals.
Whe nh an dling brake fluid ,o bserve the impor-
tant safety notes on service products
( Y
page 290).
The brake fluid change interval sc an be found in
the Maintenance Booklet.
Only us eb rake fluid approved by Mercedes-
Benz in accordance with MB-Freigab eorM B-
Approva l3 31.0.
Information abou ta pp roved brake fluid can be
obtaine data ny qualified specialist worksho po r
on the Interne ta t
http://bevo.mercedes-benz.co m. i Have the brake fluid regularly replaced at a
qualified specialist workshop and the replace-
ment confirmed in the Maintenance Booklet.
Coolant
Importan ts afety notes
G WARNING
If antifreeze comes into contact with hot com-
ponents in the engine compartment, it may
ignite. There is ar isk of fire and injury.
Let the engine cool dow nb efore yo ua dd anti-
freeze .M ake sur et hat antifreeze is not spilled
next to the filler neck. Thoroughly clea nt he
antifreeze from components before starting
the engine.
! Only ad dc oolant that has bee np remixed
with the desire da ntifreeze protection. You
coul do therwise damag et he engine.
Furthe ri nformatio nonc oolants can be found
in the Mercedes-Benz Specifications for Ser-
vice Products, MB BeVo 310.1, e.g. on the
Internet at
http://bevo.mercedes-benz.com .Orc on-
tact aq ualifie ds pecialist workshop.
! Always use as uitabl ec oolant mixture, even
in countries where hig ht emperatures prevail.
Otherwise ,t he engine cooling system is not
sufficiently protected from corrosion and
overheating.
i Have the coolant regularly replaced at a
qualified specialist workshop and the replace-
ment confirmed in the Maintenance Booklet.
Comply with the important safety precautions
for service products whe nh andling coolant
( Y
page 290).
The coolant is am ixture of water and anti-
freeze/corrosion inhibitor. It is responsible for
the following: R
anti-corrosion protection R
antifreeze protection R
raising the boiling point
If the coolant has antifreeze protection dow nt o
-35 ‡( -3 7† ), the boiling point of the coolant
during operation is approximatel y2 66 ‡
(130 †).Service products and filling capacities 293
Technical data Z