tow MERCEDES-BENZ SL CLASS 2020 Workshop Manual
[x] Cancel search | Manufacturer: MERCEDES-BENZ, Model Year: 2020, Model line: SL CLASS, Model: MERCEDES-BENZ SL CLASS 2020Pages: 334, PDF Size: 17.43 MB
Page 266 of 334
The
required distance between remotecon-
trol 0083and theintegr atedgarage door
opener depends onthe garage doordrive
system. Severalattemptsmight beneces-
sary. Youshould testevery position forat
least 25seconds beforetryinganother posi-
tion.
Synchronizing therolling code
Pay atten tiontothe "Importan tsafety notes"
(Y page 263).
If the garage doorsystem usesarolling code,
you willalso have tosynchron izethe garage
door system withtheintegr atedgarage door
opener inthe rear-view mirror.Todo this you
will need touse theprogramming buttonon
the door drive controlpanel. Theprogramming
button maybelocated indifferent places
depending onthe manufact urer.Itis usuall y
located onthe door drive unitonthe garage
ceiling.
Familiarize yourselfwiththegarage doordrive
operating instructions ,e.g. under "Program-
ming additional remotecontrols", before carry-
ing out thefollowing steps.
Your vehicle mustbewithin reachofthe
garage doororgate opener drive.Makesure
that neither yourvehicle norany persons/
object sare present withinthesweep ofthe
door orgate.
X Turn theSmart Keytoposition 0048inthe igni-
tion lock (Ypage 126).
X Get outofthe vehicle.
X Press theprogramming buttononthe door
drive unit.
Usually ,you now have 30seconds toinitiate
the next step.
X Get into thevehicle.
X Press previously programed button0044,0087
or 0085 onthe integr atedgarage dooropener
repeatedly untilthedoor closes.
The rolling codesynchron izationisthen
complete.
Notes onprogr ammingthe remot econ-
tr ol
Canadian radiofrequency lawsrequire a
"break" (orinter ruption) ofthe trans mission
signals afterbroadcasting forafew seconds.
Therefore, thesesignals maynotlast long
enough forthe integr atedgarage dooropener.
The signal isnot recogn izedduring program-
ming. Comparable withCanadian law,some U.S.
garage dooropeners alsofeature a
"break".
Proceed asfollows:
R ifyou liveinCanada.
R ifyou have difficulties programming the
garage dooropener (regardless ofwhere
you live) when following theprogramming
steps.
X Press andhold oneofbutton s0044 to0085 on
the integr atedgarage dooropener.
Aft erashort time,indicator lamp0043lights
up yellow.
X Release thebutton .
Indicat orlamp 0043flashes yellow.
X Press button 0084ofgarage doorremote con-
trol 0083for two seconds, thenrelease itfor
two seconds.
X Press button 0084again fortwo seconds.
X Repeat thissequence onbutton 0084of
remote control0083 until indicator lamp0043
lights upgreen.
When indicator lamp0043lights upgreen:
programming isfinished.
When indicator lamp0043flashes green:pro-
gramming wassuccessful. Thenext step is
to synchron izethe rolling code.
X Release button0084ofremote control0083 of
the garage doordrive.
When indicator lamp0043lights upred:
repeat theprogramming processforthe cor-
responding buttononthe rear-view mirror.
When doingso,vary thedistance between
remote control0083 and therear-view mirror.
The required distance between remotecon-
trol 0083and theintegr atedgarage door
opener depends onthe garage doordrive
system. Severalattemptsmight beneces-
sary. Youshould testevery position forat
least 25seconds beforetryinganother posi-
tion.
Problems whenprogramming
If you areexperienc ingproblems programming
the integr atedgarage dooropener onthe rear-
view mirror, takenoteof the following instruc-
tions:
R Check thetrans mitterfrequency usedby
garage doordrive remote control0083 and
whether itis supported. Thetrans mitterfre-
quency canusuall ybe found onthe back of
remote control0083 for the garage doordrive. 264
Featur
esStowage andfeatu res
Page 267 of 334
The
integr atedgarage dooropener iscom-
patible withdevices thathave units which
operate inthe frequency rangeof280 to
433 MHz.
R Replace thebatteries ingarage doorremote
cont rol0083. This increases thelikelihood that
garage doorremote control0083 will trans mit
a stron gand precise signaltothe integr ated
garage dooropener.
R When programming, holdremote control0083
at varying distances andangles frombut-
ton s0044 to0085 which youareprogramming.
Try various anglesatadistance between
2and 8inches (5to20cm) oratthe same
angle butatvarying distances .
R Ifafurther remote control0083 isavailabl efor
the same garage doordrive, repeat the
same programming stepswiththisremote
cont rol0083. Before performin gthese steps,
make surethatnew batteries havebeen
installed ingarage doordrive remote control
0083.
R Note thatsome remote controlsonly trans -
mit foralimited amount oftime (theindica-
tor lamp onthe remote controlgoes out).
Press button 0084onremote control0083 again
before transmission ends.
R Align theanten nacable ofthe garage door
opener unit.Thiscanimprove signalrecep-
tion/ transmission.
Opening/clo singthegara gedoor Aft
erithas been programmed, theintegr ated
garage dooropener performs thefunct ionof
the garage doorsystem remote control.Please
also read theoperating instructions forthe
garage doorsystem.
X Turn theSmart Keytoposition 0048inthe igni-
tion lock (Ypage 126).
X Press either button 0044,0087or0085 which you
have programmed tooperate thegarage
door.
Garage doorsystem withafixed code: indi-
cator lamp0043lights upgreen.
Garage doorsystem witharolling code:indi-
cator lamp0043flashes green.
The trans mitterwill trans mitasignal aslong
as the button ispressed. Thetrans mission
is halted afteramaximum often seconds
and indicator lamp0043lights upyellow.
X Press button 0044,0087or0085 again ifneces-
sary. Clearing
thememor y Make
surethatyouclear thememory ofthe
integr atedgarage dooropener beforeselling
the vehicle.
X Turn theSmart Keytoposition 0048inthe igni-
tion lock (Ypage 126).
X Press andhold button s0044 and 0085.
The indicator lampinitially lightsupyellow
and then green.
X Release buttons0044 and 0085.
The memory ofthe integr atedgarage door
opener inthe rear-view mirroriscleared. Compass
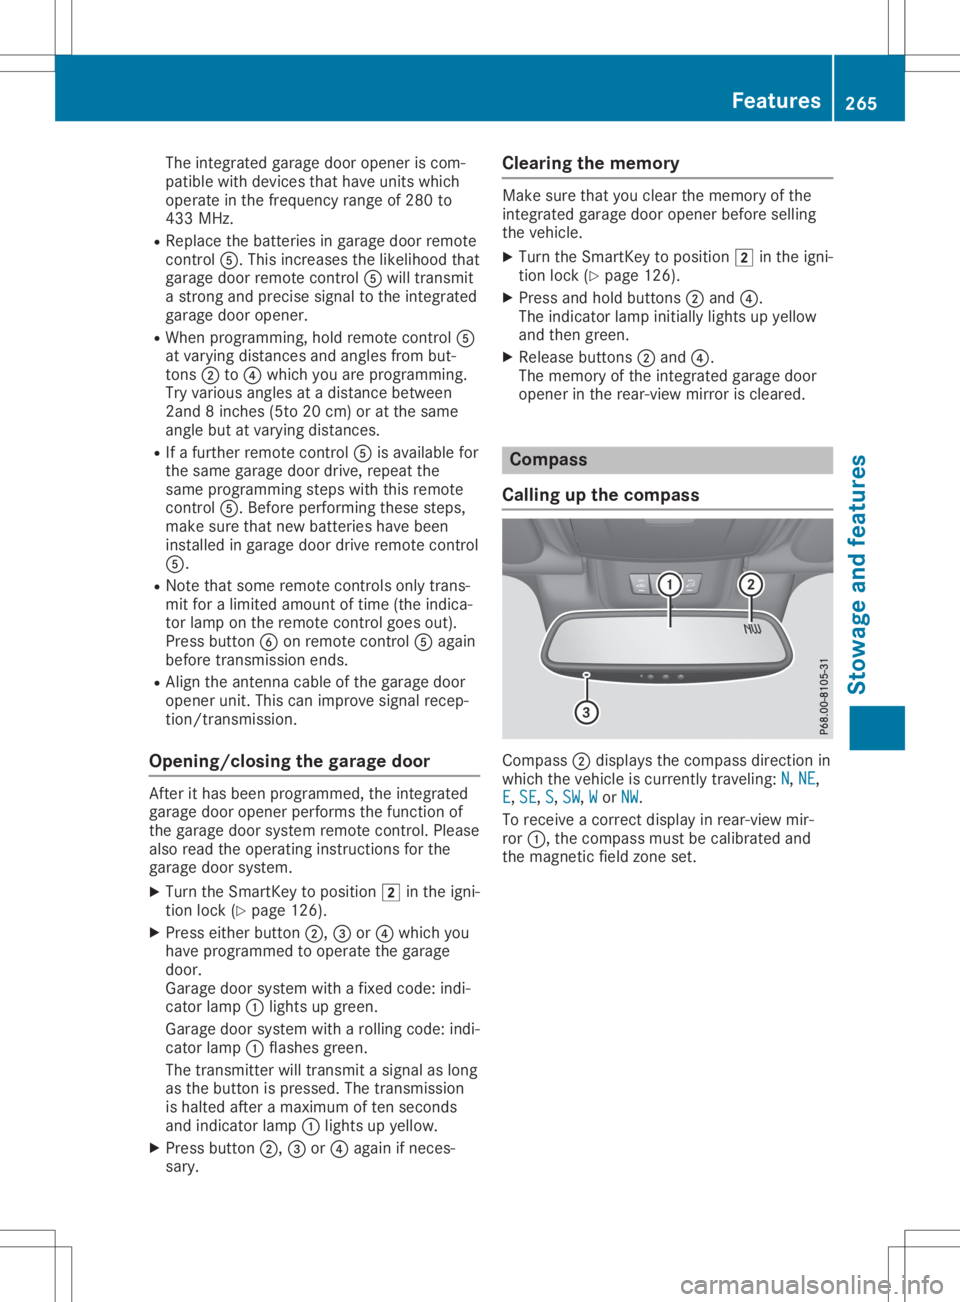
Calling upthe compass Compass
0044display sthe compass directionin
which thevehicle iscurrent lytraveling: N N,
NE NE,
E E,
SE SE,
S S,
SW SW,
W W
or NW NW.
To receive acorrec tdisplay inrear-view mir-
ror 0043, thecompass mustbecalibrated and
the magnetic fieldzone set. Featur
es
265Stowage andfeatu res Z
Page 268 of 334
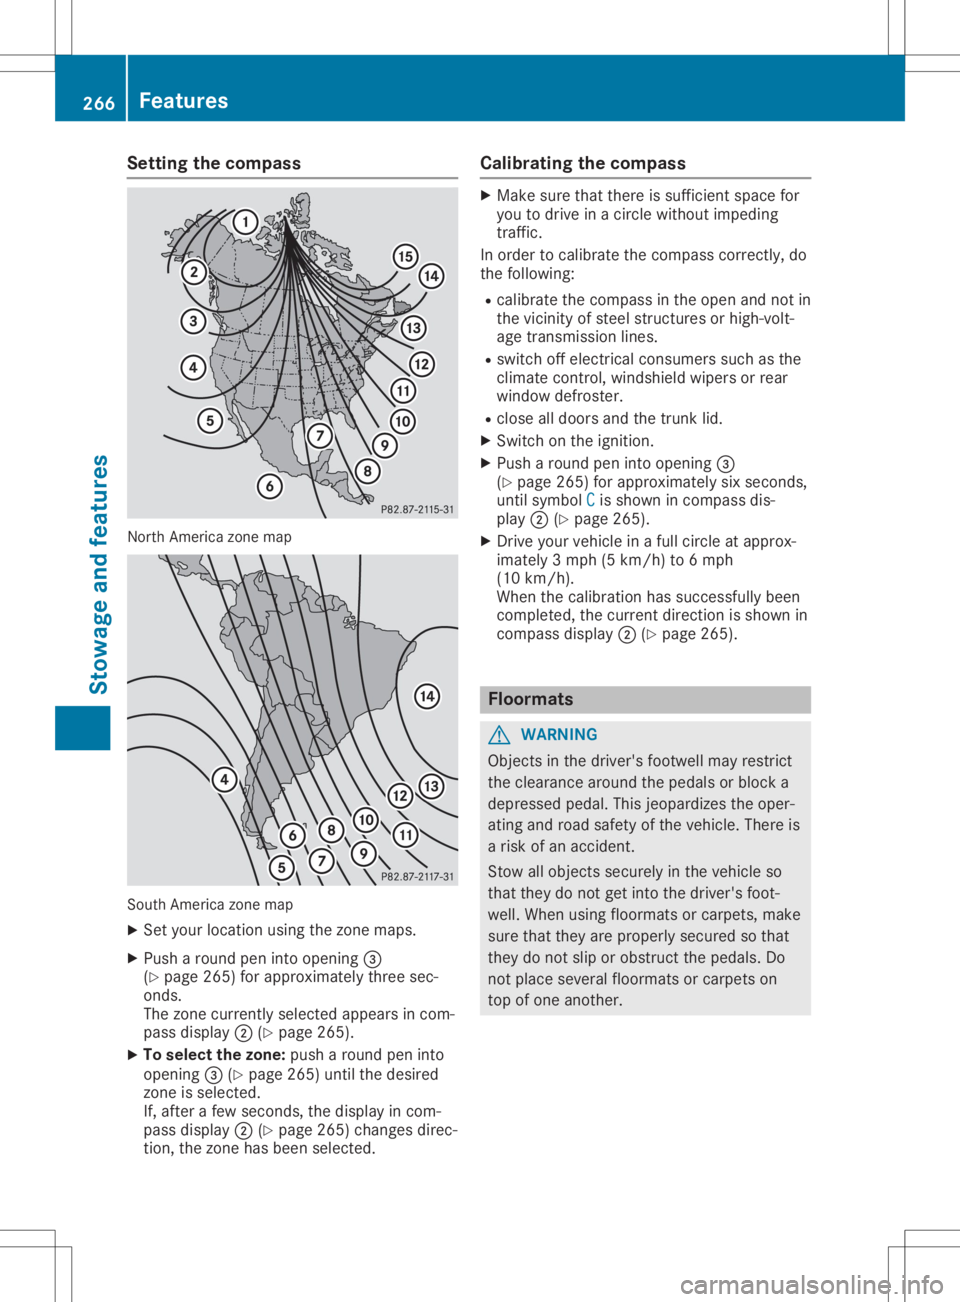
Setting
thecompass North
America zonemap South
America zonemap
X Set your location usingthezone maps.
X Push around peninto opening 0087
(Y page 265)forapproximately threesec-
onds.
The zone current lyselected appearsincom-
pass display 0044(Ypage 265).
X To selec tthe zone: pusharound peninto
opening 0087(Ypage 265)untilthedesired
zone isselected.
If, after afew seconds, thedisplay incom-
pass display 0044(Ypage 265)changes direc-
tion, thezone hasbeen selected. Calibrating
thecompass X
Make surethatthere issufficient spacefor
you todrive inacircle without impeding
traffic.
In order tocalibrate thecompass correctly,do
the following:
R calibrate thecompass inthe open andnotin
the vicinity ofsteel struct uresorhigh-volt-
age transm issionlines.
R switch offelectrical consumers suchasthe
climate control,windshield wipersorrear
window defroster.
R close alldoors andthetrunk lid.
X Switch onthe ignition.
X Push around peninto opening 0087
(Y page 265)forapproximately sixseconds,
until symbol C C
is shown incompass dis-
play 0044(Ypage 265).
X Drive yourvehicle inafull circle atapprox-
imately 3mph (5km/h) to6mph
(10 km/h).
When thecalibration hassuccessfully been
completed, thecurrent direction isshown in
compass display0044(Ypage 265). Floo
rmats G
WARNING
Object sin the driver's footwell mayrestrict
the clearance aroundthepedals orblock a
depressed pedal.Thisjeopardizes theoper-
ating androad safety ofthe vehicle. Thereis
a risk ofan accident.
Stow allobject ssecurely inthe vehicle so
that they donot getinto thedriver's foot-
well. When usingfloormats orcarpets, make
sure thatthey areproperly securedsothat
they donot slip orobstruct thepedals. Do
not place several floormats orcarpets on
top ofone another. 266
FeaturesStowage
andfeatu res
Page 269 of 334
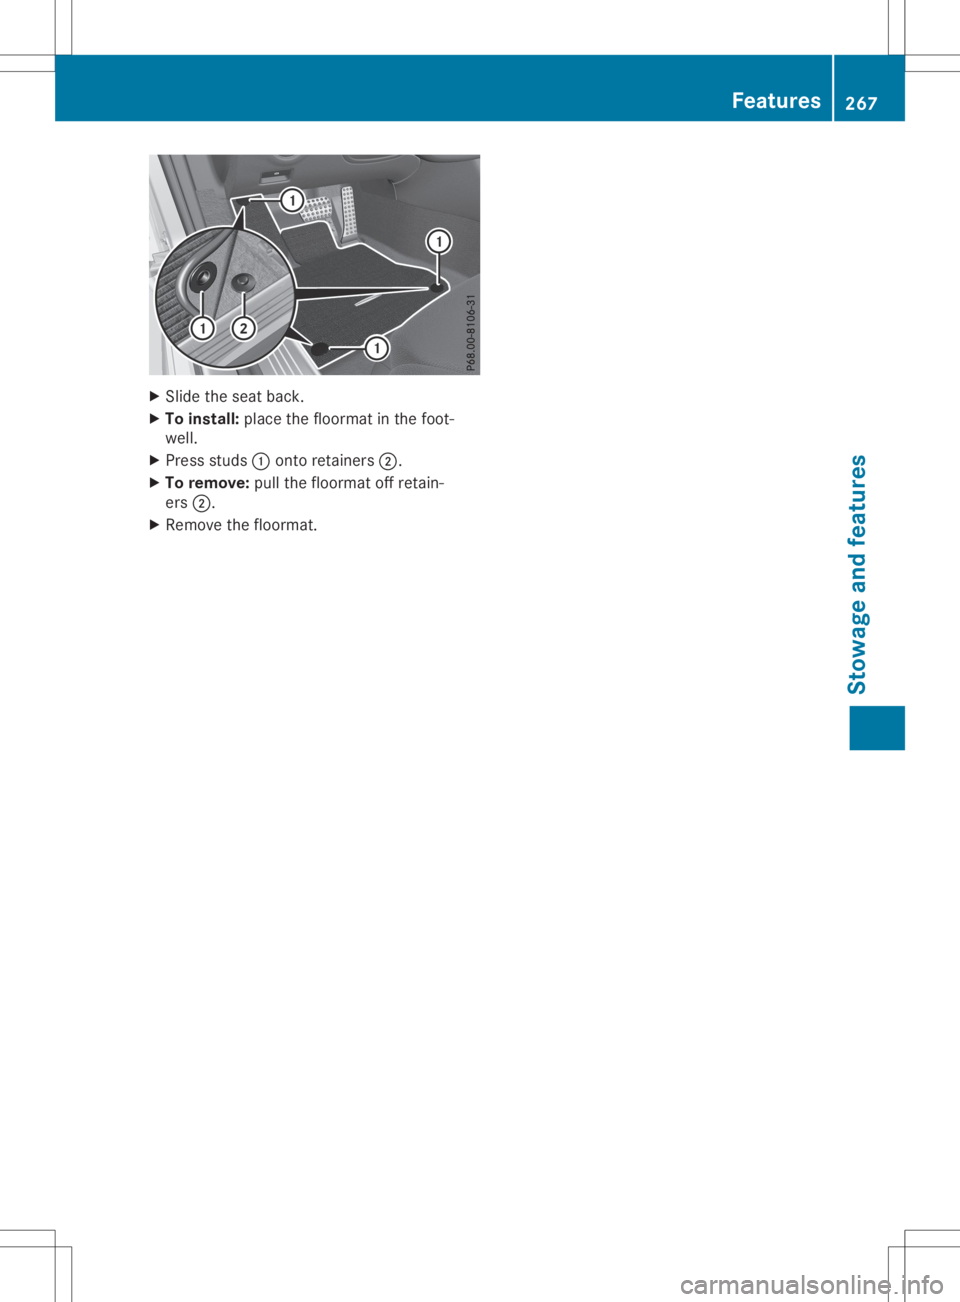
X
Sli de the seatba ck.
X To instal l:place thefloorma tin the foot-
we ll.
X Pre ssstud s0043 onto retainers0044.
X To remo ve:pullthe floorma toff reta in-
ers 0044.
X Re move thefloorma t. Fe
atures
267Stow ageand features Z
Page 276 of 334
R
solvents
R cleaning agentscontaining solvents
Do not scrub.
Do not touch thesurfaces andfilms with
hard objects, e.g.rings orice scrapers. Oth-
erwise, youmay scratch ordamage thesur-
faces andfilms.
! Do
not park yourvehicle foralong period
of time directly aftercleaning, particularly
after cleaning thewheel rimwith wheel
cleaner. Wheelcleaner canlead tothe
increased corrosionofthe brake discsand
pads. Therefore, driveforafew minutes
after cleaning. Byheating upthe brakes, the
brake discsandpads dry.Thevehicle can
then beparked foralong period oftime.
Regu larcare ofyour vehicle isacondition for
retaining thequal ityinthe long term.
Use care products andcleaning agentsrecom-
mended andapproved byMercedes-Benz . Washing
thevehicl eand cleani ng
the paintwork
Automatic carwash G
WARNING
Braking efficiency isreduced afterwashing
the vehicle. Thereisarisk ofan accident.
Aft erthe vehicle hasbeen washed, brake
carefully whilepayingattent iontothe traffic
conditions untilfullbraking poweris
restored.
! When
DISTRONIC PLUSorthe HOLD func-
tion isactivated, thevehicle brakesauto-
matically incertain situations.
To avoid damage tothe vehicle, deactivate
DISTRONIC PLUSandtheHOLD function in
the followi ngorsimilar situations:
R when towing thevehicle
R in the carwash
! It
is preferable touse carwashes with
adjustable high-pressure pre-cleaningthat
corresponds tothe specification forthe
Cabri oletprogram. Incar washes thatuse
high water pressures, thereisarisk that a
small amount ofwater mayleakintothe
vehicle. !
Vehicles
withHAND S-FREE ACCESS: ifa
key with KEYLES S-GOiswithin thedetec-
tion range ofthe KEYLES S-GOantenn as,the
trunk lidcould openunintent ionallyinthe
followi ngsituations, forexample:
R when usinganautomatic carwash
R when usingapower washer
Make surethatthekey isat least 6.5ft
(2 m) awa yfrom thevehicle.
! Never
cleanyourvehicle inaTouchless
Automatic CarWash asthese usespecial
cleaning agents.Thesecleaning agentscan
damage thepaintwork orplastic parts.
If you have yourvehicle cleaned inahigh-
pressure automatic carwash, small
amounts ofwater mayenter thevehicle.
! Make
surethattheautomatic transmission
is in position Nwhen washing yourvehicle
in atow-through carwash. Thevehicle could
be damaged ifthe transmission isin another
position.
! Make
surethat:
R the side windows androof arecompletely
closed
R the climate controlblower isswitched off
R the windshiel dwiper switch isin position
0
The vehicle mayotherwise bedamaged .
You canclean thevehicle atan automatic car
wash fromthevery start.
Preferably cleanthevehicle atautomatic car
washes thatusetextilewashing elements
without brushes. Thisprevents finescratches
from forming onthe paintwork andfilm.
If the vehicle isvery dirty, pre-wash itbefore
cleaning itin an automatic carwash.
Aft erusing anautomatic carwash, wipeoff
wax from thewindshiel dand thewiper blades.
This willprevent smearsandreduce wiping
noises caused byresidue onthe windshiel d.
i Vehicles
withdecorative film:select a
wash program withouthotwax atthe auto-
matic carwash.
Washing byhand In
some countries, washingbyhand isonly
allow edatspeciall yequip pedwashing bays. 274
CareMaintenance
andcare
Page 277 of 334
Observe
thelegal requirements ineach coun-
try.
X Do not use hotwater anddonot wash the
vehicle indirect sunlight.
X Use asoft sponge toclean.
X Use amild cleaning agent,suchasacar
shampoo approved byMercedes-Benz .
X Thoroughly hosedown thevehicle witha
gentle jetofwater.
X Do not point thewater jetdirectly towards
the airinlet orthe edges ofdecorative foils.
X Use plenty ofwater andrinse outthe
sponge frequently.
X Rinse thevehicle withclean water anddry
thoroughly withachamois.
X Do not letthe cleaning agentdryonthe
paintwork orthe decorative foils.
Careful lyremove alldeposits ofroad saltas
soon aspossible whendriving inwinter.
Powe rwashers G
WARNING
The water jetfrom acircular jetnozz le(dirt
blasters) cancause invisible exteriordam-
age tothe tires orchassis component s.
Components damagedinthis way may fail
unexpectedly. Thereisarisk ofan accident.
Do not use power washers withcircular jet
nozz lestoclean thevehicle. Havedamaged
tires orchassis component sreplaced imme-
diately .
! Vehicles
withdecorative film:parts ofyour
vehicle arecovered withdecorative film.
Maintain adistance ofat least 27.5in
(70 cm) between thefilm-covered partsof
the vehicle andthenozz leof the power
washer.
Information aboutthe correct distance is
avail able from theequip ment manufacturer.
Move thepower washer nozzlearound when
cleaning yourvehicle.
The water temperature ofthe power washer
must notexceed 140‡(60 †).
! Alway
smaintain adistance ofat least
12 in(30 cm) between thevehicle andthe
power washer nozzle.Information aboutthe
correct distance isavail able from theequip -
ment manufacturer. Move
thepower washer nozzlearound when
cleaning yourvehicle.
Do not aim directly atany ofthe followi ng:
R Tires
R Door gaps, roofgaps, joints, etc.
R Electrical component s
R Battery
R Plug-type couplings
R Light bulbs
R Seals
R Trim elements
R Ventilation slots
Damaged sealsorelectrical component s
can lead toleaks orfailu res.
! Vehicles
withHAND S-FREE ACCESS: ifa
key with KEYLES S-GOiswithin thedetec-
tion range ofthe KEYLES S-GOantenn as,the
trunk lidcould openunintent ionallyinthe
followi ngsituations, forexample:
R when usinganautomatic carwash
R when usingapower washer
Make surethatthekey isat least 6.5ft
(2 m) awa yfrom thevehicle.
Cleani ngthe paintwork !
Do
not affix:
R stickers
R films
R magnetic platesorsimila ritems
to painted surfaces. Youcould otherwise
damage thepaintwork.
Scratc hes,corrosive deposits,areasaffected
by corrosion anddamage causedbyinade-
quate carecannot alwaysbe completely
repaired. Insuch cases, visitaqual ified spe-
cialist workshop.
X Remove dirtimmediately ,where possible ,
while avoidi ngrubbing toohard.
X Soak insect remains withinsect remover
and rinse offthe treated areasafterwards.
X Soak birddroppings withwater andrinse off
the treated areasafterwards.
X Remove treeresin, oils,fuels andgreases by
rubbing gentlywithacloth soaked inpetro-
leum ether orlighter fluid
X Remove coolantandbrake fluidwithamoist
cloth andclear water. Care
275Maintenance andcare Z
Page 281 of 334
Where
willIfind...? Warning
triangle
Removi ngthe warni ngtriangle Warni
ngtriangl e0043 isloca tedinabracket on
the insid eof the trunk lid.
X Open thetrunk lid.
X Press catches 0044inthe direction ofthe
bracket andopen thebracket inthe direc-
tion ofthe arrow .
X Pul lthe retai ning clipofwa rning triangl e0043
in the center ofthe bracket, outward.
X Remo vewarning triangl e0043 from the
bracket.
Setting upthe warni ngtriangle X
Fold feet0087dow nand outtothe side .
X Pul lside reflectors 0044upw ards toform atri-
angl eand lock them atthe top using upp er
press -stud 0043. Fi
rst-aid kit First-ai
dkit 0043 isloca tedinthe stowa gewel l
under thetrunk floor.
X Lift the trunk floorupwards (Ypag e255) .
X Remo vefirst-ai dkit 0043.
Che ckthe expira tiondate onthe first-ai dkit at
lea stonce ayea r.Rep lace thecontents ifnec-
essa ry,and replace missi ngitems. Refle
ctive safety jacket
Removi ng/replac ingrefle ctive safety
jackets The
refle ctive safetyjackets areloca tedinthe
safe tyjacket compartments inthe stowa ge
compa rtments ofthe front doors .There are
als osafe tyjacket compartments inthe stow-
age compa rtments ofthe rear doors ,in whi ch
refle ctive safetyjackets canbestowed .
X To remove :pul lout safe tyjacket bag0043
with therefle ctive safetyjacket bythe loop .
X Open safetyjacket bag0043and pullout the
refle ctive safetyjacket. Where
willIfind...?
279Breakdown assistance
Page 282 of 334
X
To sto w:foldthe reflecti vesafety jacke t,
rol lit up and stow itin safety jacke tba g0043 .
X Sli de safety jacke tba g0043 along thelowe r
ed ge ofthe arm restinto thesafety jacke t
comp artment.Meanwhile, ensu retha tthe
lo op hangs outwe llwi thi nrea ch.
i Re
move anew reflecti vesafety jacke t
from itspackag ingmateri albe fore slid ing it
into thesafety jacke tcomp artment.The
pa ckag ingmateri alma yothe rwisecau seit
to slip ou tor ma kerem oving itdiffi cul t.
Obs ervethe lega lreq uirem ents ineach cou n-
try .
Note son the reflective safetyjack et 0043
Maximu mnum berof wa she s
0044 Maximu mwa sh temp erature
0087 Donot blea ch
0085 Donot iron
0083 Donot usealaund rydry er
0084 Donot dry-cle an
006B Thisis acla ss2ves t
R The reflecti vesafety jacke tsmee tthe
req uirem ents define dby the lega lsta nda rd
onl yif:
- the corr ectsize isus ed and
- the reflecti vesafety jacke tis corr ectly
fas tened
R Befo reuse, ensu retha tthe reflecti vesafety
jacke tis cle an and intact.The specialpro p-
erti esma yothe rwisebe comp romised.
R The reflecti vesafety jacke tssho uld be
stor edinthei rori ginal packag inginadry
pl ace away from sources ofhea tand light.
R The maximu mnum berof wa she sspe cified
is not theonlyfac tor influencing thelife
spa nof the reflecti vesafety jacke ts.The ir
li fe spa nalso depends onuse, car e,stor age,
etc. R
The reflecti vesafety jacke tssho uld be dis-
po sed ofand replaced with new ones :
- afte r15 washe s,and /or
- ifthe reflecti vestri pshave become
scra tched ,and /or
- ifthe backing materi aland /or reflecti ve
stri pshave become soiled and canno tbe
cle ane doff, and/or
- the reflecti vesafety jacke t'sfluore scenc e
ha sfad ed,e.g .du eto the effectsofsun-
li ght
R Disp oseofthe reflecti vesafety jacke tin an
envi ronme ntallyres ponsi ble ma nner. Todo
so, conta ctyour local waste dispo salcom-
pa ny. Vehi
cle too lkit
Gen eral notes The
towingeyeis locate din the trunk ina
bra cket below the trunk lid lock.
If yo ur veh icleis eq uipp ed with aTIR EFIT kit,it
is locate din the stow agespa ceund erthe
trunk floor.
Vehi cles with aTIRE FITkit The
TIREFIT kitislocate din the stow agewe ll
und erthe trunk floor (Y page 255 ). 0043
Tow ingeye
0044 Tire sea lant fillerbo ttle
0087 Fuseallo cati oncha rt
0085 Tire infl ation comp ressor
0083 Stow agetray openi ng
X To rem ove towingeye0043 raise the openi ng
on stow agetray 0083.
X Use theTIREFIT kit(Ypage 282 ). 28
0 Whe
rewillIfin d...?Breakdo wnassis tan ce
Page 283 of 334
Tire
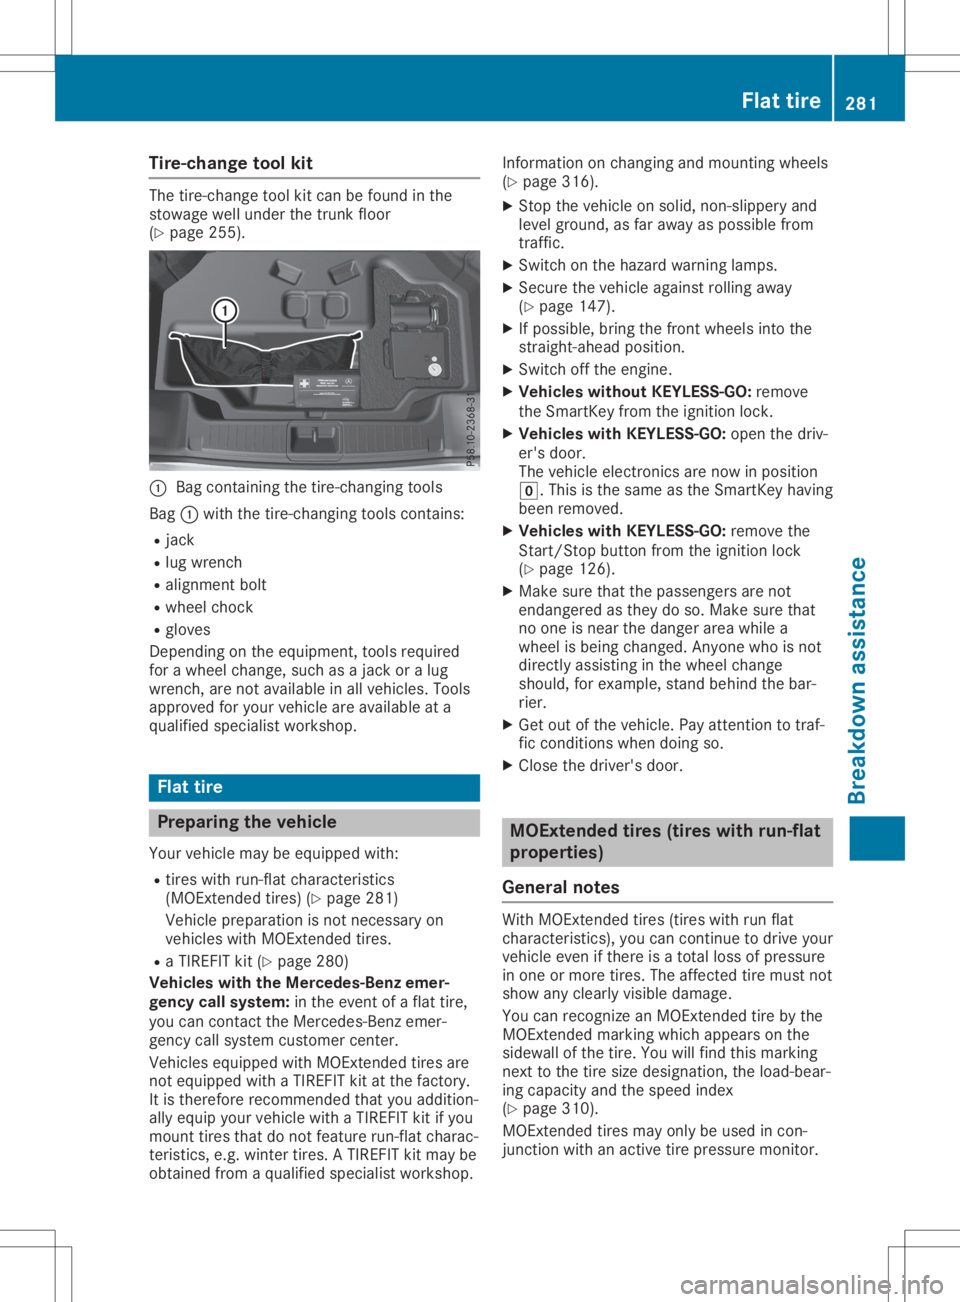
-chan getoo lkit The
tire-cha nge tool kitcan befou ndinthe
stow agewe llund erthe trunk floor
(Y page 255 ). 0043
Bag conta ining the tire-cha nging tool s
Bag 0043with the tire-cha nging tool sconta ins:
R jack
R lug wr ench
R alig nment bolt
R wh eelcho ck
R glove s
Dep endingonthe equipme nt,tool sreq uired
for awh eelcha nge ,su ch asajack oralug
wr ench ,ar enot availabl e in allveh icles. Tools
ap pro ved foryour veh iclear eav ailabl e at a
qu alifi ed speci alistwo rksh op. Fl
at tire Pre
parin gthe vehic le
Yo ur veh iclema ybe equipp ed with:
R tire swi th run-fl atcha racteri stics
(M OExte ndedtire s)(Y page 281 )
Veh iclepre paratio nis not nece ssaryon
veh icles with MOExte ndedtire s.
R aTIR EFIT kit(Ypage 280 )
Veh icle swi th the Merce des -Benzeme r-
ge ncyca llsys tem: inthe eventofafla ttire ,
yo ucan conta ctthe Merced es-Benz emer-
ge ncy callsy stem custome rcente r.
Veh icles equipp ed with MOExte ndedtire sar e
not equipp ed with aTIR EFIT kitatthe factory .
It is the refore reco mme ndedtha tyo uad ditio n-
al ly eq uip yo ur veh iclewi th aTIR EFIT kitifyo u
mou nttire stha tdo not featureru n-fl atcha rac-
teri stics, e.g.wi nter tires.ATIR EFIT kitmaybe
ob tained fromaqu alifi ed speci alistwo rksh op. Info
rma tionon cha nging and mou nting wheels
(Y page 316 ).
X Stop thevehicleon solid,non-s lipp ery and
le vel ground ,as faraw ay aspossi ble fro m
tra ffic.
X Swi tch onthe hazar dwa rning lamps .
X Secu rethe vehicleag ainst rolling away
(Y page 147 ).
X Ifpo ssi ble, bri ng the frontwh eelsinto the
stra ight-a head positio n.
X Swi tch offthe engine.
X Veh icle swi tho utKEYLES S-GO :rem ove
the Sma rtKeyfro mthe igniti onlock.
X Veh icle swi th KEYLES S-GO :op en the driv-
er' sdo or.
The vehicleelectro nicsarenow inpo sitio n
005A. Thisis the same asthe Sma rtKeyha vin g
be en rem oved.
X Veh icle swi th KEYLES S-GO :rem ove the
Star t/Stop button fromthe igniti onlock
(Y page 126 ).
X Ma kesure tha tthe passe nge rsarenot
end angeredas the ydo so. Makesure tha t
no one isnea rthe dange rar ea while a
wh eelis be ing change d.Anyo newhois not
di rectl yas sisti ng inthe wheelcha nge
sho uld, for exa mpl e,sta nd behind the bar-
rie r.
X Ge tou tof the vehicle. Pa yatte ntionto tra f-
fic cond itions when doing so.
X Close thedriver 'sdo or. MOE
xtende dtire s(ti res with run-f lat
prope rties)
Ge neral notes Wi
th MOExte ndedtire s(ti res with runfla t
cha racteri stics) ,yo ucan conti nuetodrive your
veh icleeve nif the reisatota llo ss ofpre ssu re
in one ormor etire s.The affecte dtire mustnot
sho wany clearly vis ible da ma ge.
Yo ucan reco gnizean MOExte ndedtire bythe
MOExte ndedma rkin gwh ich appe arson the
si de wa llof the tire.Yo uwi llfind thisma rkin g
next tothe tire size designa tion,the load -be ar-
ing capacityand thespee dind ex
(Y page 310 ).
MOExte ndedtire sma yonl ybe used incon-
juncti onwith an acti vetire pressu remoni tor. Fl
at tire
281Break downass istanc e
Page 285 of 334
There
isarisk ofan accident .
Do not drive thevehicle. Contact aqualified
specialist workshop. G
WARNIN
G
The tiresealant isharmful andcauses irrita-
tion. Itmust notcome intocontactwith your
skin, eyesorclothin gor be swallowe d.Do
not inhale TIREFIT fumes.Keeptiresealant
away fromchildren. Thereisarisk ofinjury.
If you come intocontactwith thetire seal-
ant, observe thefollowing:
R Rinse offthe tire sealant fromyourskin
immediately withwater.
R Ifthe tire sealant comesintocontactwith
your eyes, immediately rinsethem thor-
oughly withclean water.
R Iftire sealant isswallowe d,immediately
rinse yourmouth outthoroughly anddrink
plenty ofwater. Donot induce vomitin g,
and seek medical attentionimmediately.
R Immediately changeoutofclothin gwhich
has come intocontactwith tiresealant.
R Ifan allergic reaction occurs,seekmedi-
cal atten tionimmediately.
! Do
not operate thetire inflation compres-
sor forlonger thaneight minutes atatime
without abreak. Itmay otherwise overheat.
The tireinflation compressor canbeoper-
ated again onceithas cooled down.
Comply withthemanufact urer’ssafety instruc-
tions onthe stick eron the tire inflation com-
pressor. Using
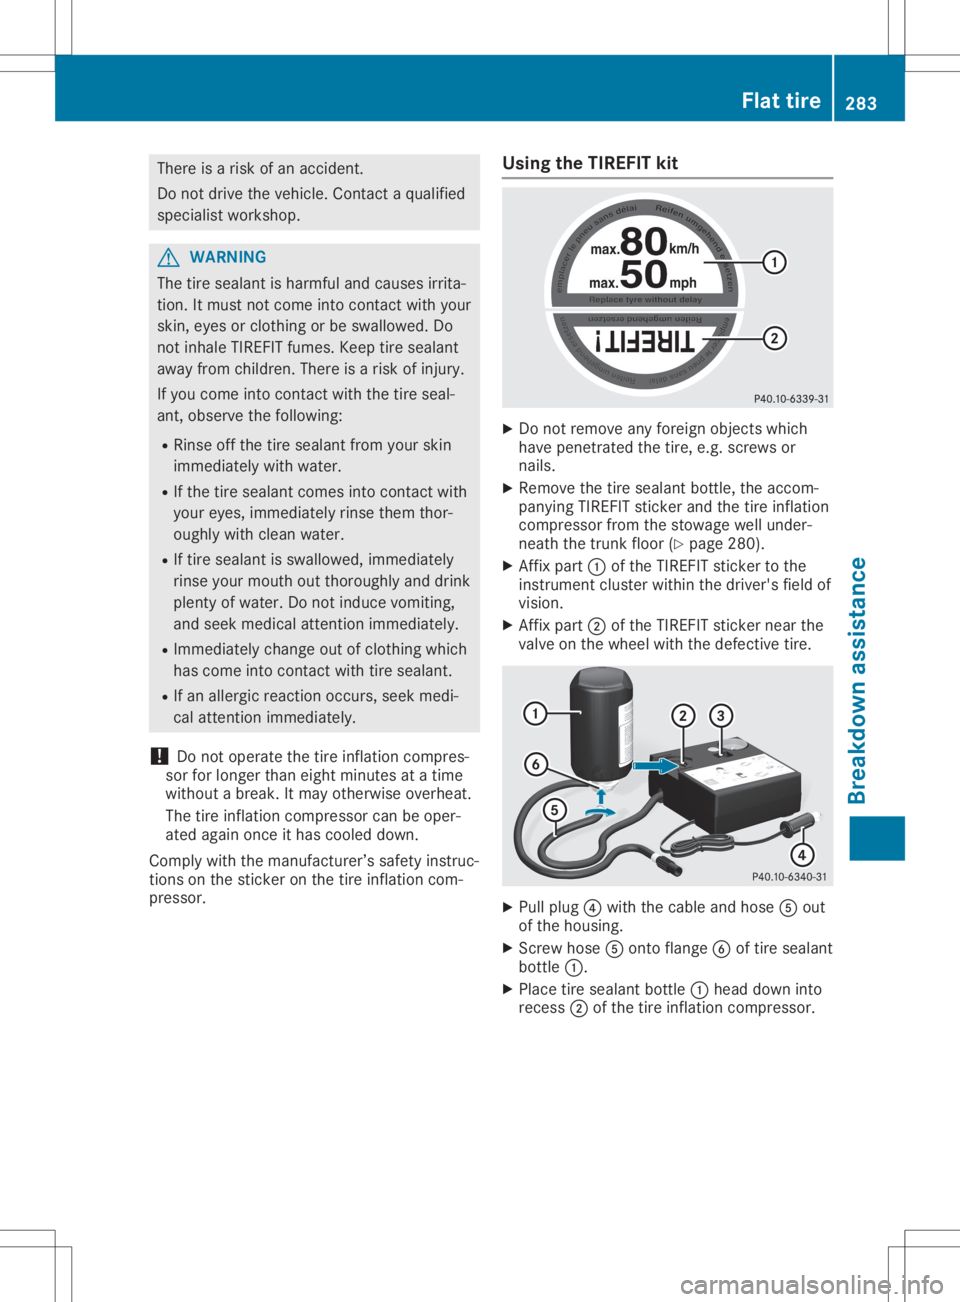
theTIREFIT kit X
Do not remove anyforeign objectswhich
have penetr atedthetire, e.g.screws or
nails.
X Remove thetire sealant bottle,theaccom-
panying TIREFITstickerand thetire inflation
compressor fromthestowage wellunder-
neath thetrunk floor(Ypage 280).
X Aff ixpart 0043ofthe TIREFIT stickerto the
instr ument cluster withinthedriver's fieldof
vision.
X Aff ixpart 0044ofthe TIREFIT stickernear the
valve onthe wheel withthedefect ivetire. X
Pull plug 0085with thecable andhose 0083out
of the housing.
X Scr ew hose 0083ontoflange 0084oftire sealant
bottle 0043.
X Place tiresealant bottle0043head down into
recess 0044ofthe tire inflation compressor . Flat
tire
283Breakdown assistance Z