MERCEDES-BENZ SL-CLASS ROADSTER 2014 Owners Manual
Manufacturer: MERCEDES-BENZ, Model Year: 2014, Model line: SL-CLASS ROADSTER, Model: MERCEDES-BENZ SL-CLASS ROADSTER 2014Pages: 284, PDF Size: 45.52 MB
Page 101 of 284
Useful information
............................100
Correct driver's seat position ..........100
Seats .................................................. 100
Steering wheel .................................. 102
Mirrors ............................................... 102
Memory function .............................. 103 99Seats, steering wheel and mirrors
Page 102 of 284
Useful information
i This Operator's Manual describes all
models and all standard and optional
equipment of your vehicle available at the
time of publication of the Operator's
Manual. Country-specific differences are
possible. Please note that your vehicle may
not be equipped with all features
described. This also applies to safety-
related systems and functions.
i Read the information on qualified
specialist workshops: (Y page 30).Correct driver's seat position
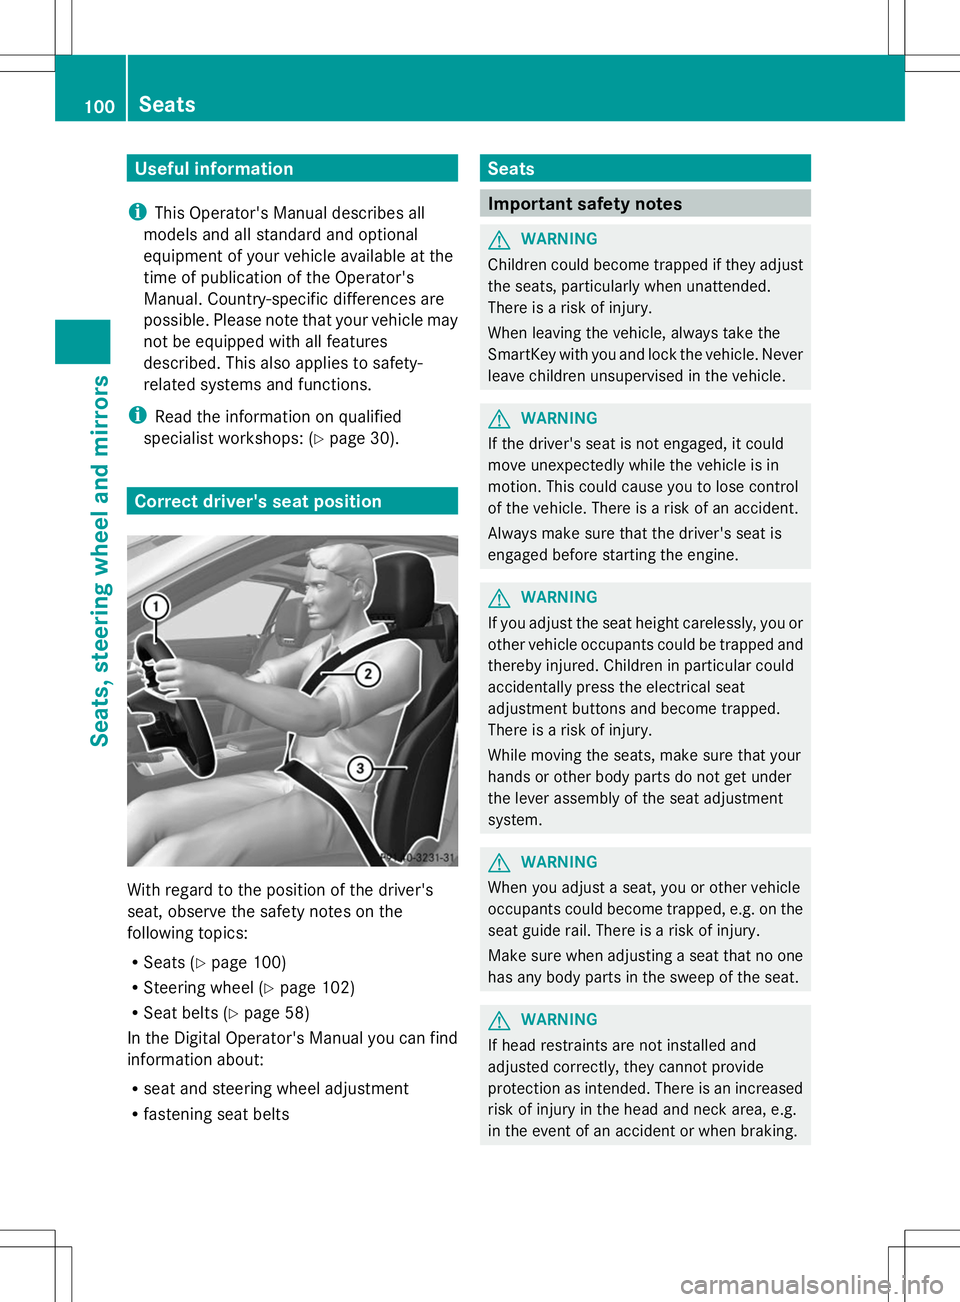
With regard to the position of the driver's
seat, observe the safety notes on the
following topics:
R Seats (Y page 100)
R Steering wheel (Y page 102)
R Seat belts (Y page 58)
In the Digital Operator's Manual you can find
information about:
R seat and steering wheel adjustment
R fastening seat belts Seats
Important safety notes
G
WARNING
Children could become trapped if they adjust
the seats, particularly when unattended.
There is a risk of injury.
When leaving the vehicle, always take the
SmartKey with you and lock the vehicle. Never
leave children unsupervised in the vehicle. G
WARNING
If the driver's seat is not engaged, it could
move unexpectedly while the vehicle is in
motion. This could cause you to lose control
of the vehicle. There is a risk of an accident.
Always make sure that the driver's seat is
engaged before starting the engine. G
WARNING
If you adjust the seat height carelessly, you or
other vehicle occupants could be trapped and
thereby injured. Children in particular could
accidentally press the electrical seat
adjustment buttons and become trapped.
There is a risk of injury.
While moving the seats, make sure that your
hands or other body parts do not get under
the lever assembly of the seat adjustment
system. G
WARNING
When you adjust a seat, you or other vehicle
occupants could become trapped, e.g. on the
seat guide rail. There is a risk of injury.
Make sure when adjusting a seat that no one
has any body parts in the sweep of the seat. G
WARNING
If head restraints are not installed and
adjusted correctly, they cannot provide
protection as intended. There is an increased
risk of injury in the head and neck area, e.g.
in the event of an accident or when braking. 100
SeatsSeats, steering wheel and mirrors
Page 103 of 284
Always drive with the head restraints
installed. Before driving off, make sure for
every vehicle occupant that the center of the
head restraint supports the back of the head
at about eye level. G
WARNING
You could lose control of your vehicle if you
do the following while driving:
R adjust the driver's seat, steering wheel or
mirrors
R fasten the seat belt
There is a risk of an accident.
Adjust the driver's seat, steering wheel or
mirrors and fasten your seat belt before
starting the engine. G
WARNING
When you adjust a seat, you or other vehicle
occupants could become trapped, e.g. on the
seat guide rail. There is a risk of injury.
Make sure when adjusting a seat that no one
has any body parts in the sweep of the seat. G
WARNING
If head restraints are not installed and
adjusted correctly, they cannot provide
protection as intended. There is an increased
risk of injury in the head and neck area, e.g.
in the event of an accident or when braking.
Always drive with the head restraints
installed. Before driving off, make sure for
every vehicle occupant that the center of the
head restraint supports the back of the head
at about eye level.
! To avoid damage to the seats and the seat
heating, observe the following information:
R keep liquids from spilling on the seats. If
liquid is spilled on the seats, dry them as
soon as possible.
R if the seat covers are damp or wet, do not
switch on the seat heating. The seat
heating should also not be used to dry
the seats. R
clean the seat covers as recommended;
see the "Interior care" section.
R do not transport heavy loads on the
seats. Do not place sharp objects on the
seat cushions, e.g. knives, nails or tools.
The seats should only be occupied by
passengers, if possible.
R when the seat heating is in operation, do
not cover the seats with insulating
materials, e.g. blankets, coats, bags,
seat covers, child seats or booster seats.
! Make sure that there are no objects in the
footwell or behind the seats when resetting
the seats. There is a risk that the seats
and/or the objects could be damaged.
i The head restraints cannot be removed.
For more information, contact a qualified
specialist workshop. Information in the Digital Operator's
Manual
In the Digital Operator's Manual you will find
information on the following topics:
R Adjusting the seats
R Adjusting the head restraints
R Adjusting the multicontour seat
R Adjusting the 4-way lumbar support
R Switching the seat ventilation on/off
R AIRSCARF Switching the seat heating on/off
Activating/deactivating G
WARNING
Repeatedly switching on the seat heating can
cause the seat cushion and backrest pads to
become very hot. The health of persons with
limited temperature sensitivity or a limited
ability to react to excessively high
temperatures may be affected or they may
even suffer burn-like injuries. There is a risk
of injury. Seats
101Seats, steering wheel and mirrors
Z
Page 104 of 284
Therefore, do not switch the seat heating on
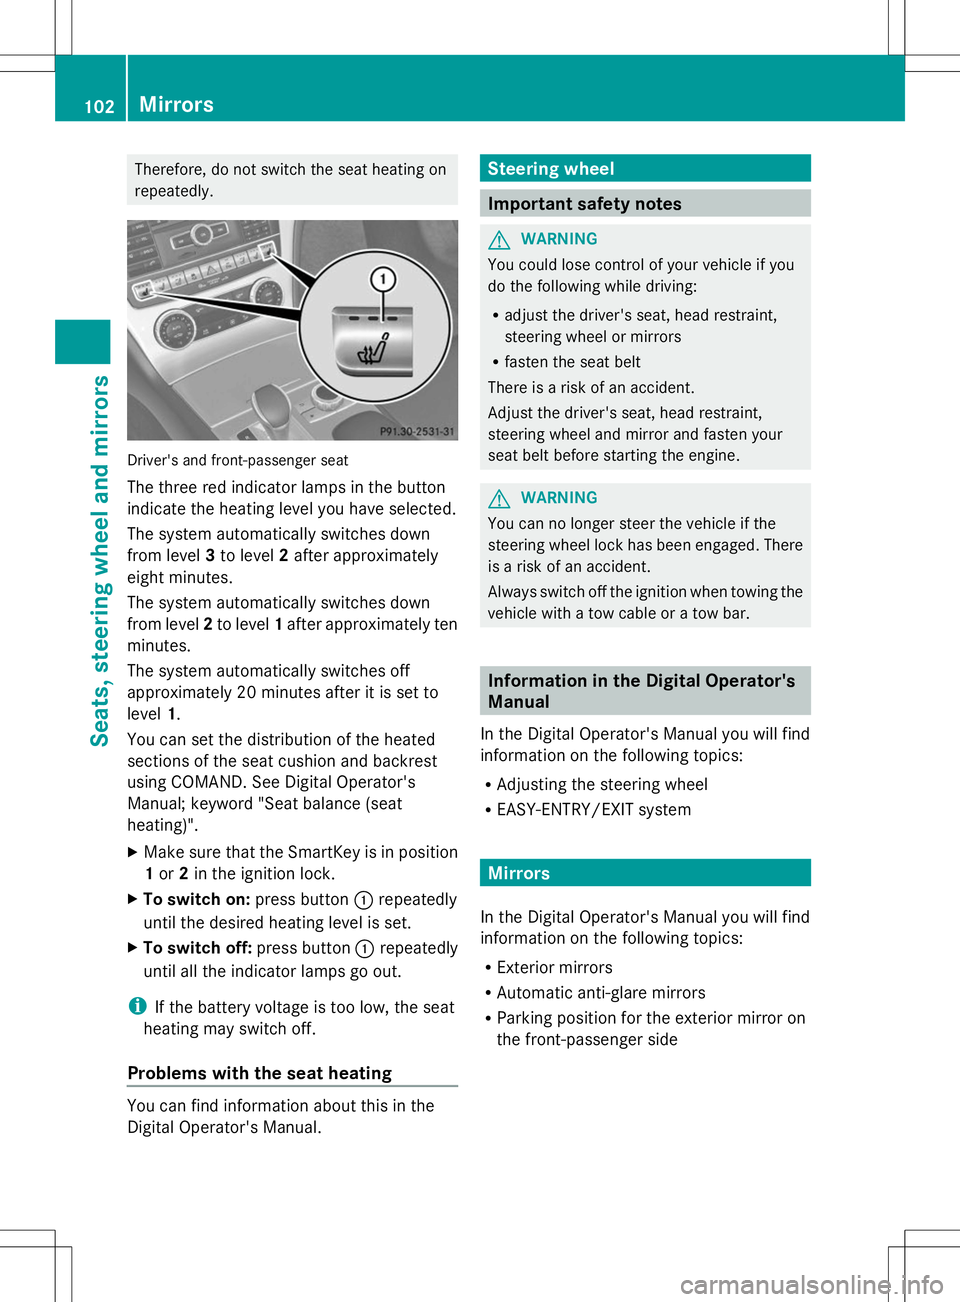
repeatedly. Driver's and front-passenger seat
The three red indicator lamps in the button
indicate the heating level you have selected.
The system automatically switches down
from level 3to level 2after approximately
eight minutes.
The system automatically switches down
from level 2to level 1after approximately ten
minutes.
The system automatically switches off
approximately 20 minutes after it is set to
level 1.
You can set the distribution of the heated
sections of the seat cushion and backrest
using COMAND. See Digital Operator's
Manual; keyword "Seat balance (seat
heating)".
X Make sure that the SmartKey is in position
1or 2in the ignition lock.
X To switch on: press button:repeatedly
until the desired heating level is set.
X To switch off: press button:repeatedly
until all the indicator lamps go out.
i If the battery voltage is too low, the seat
heating may switch off.
Problems with the seat heating You can find information about this in the
Digital Operator's Manual. Steering wheel
Important safety notes
G
WARNING
You could lose control of your vehicle if you
do the following while driving:
R adjust the driver's seat, head restraint,
steering wheel or mirrors
R fasten the seat belt
There is a risk of an accident.
Adjust the driver's seat, head restraint,
steering wheel and mirror and fasten your
seat belt before starting the engine. G
WARNING
You can no longer steer the vehicle if the
steering wheel lock has been engaged. There
is a risk of an accident.
Always switch off the ignition when towing the
vehicle with a tow cable or a tow bar. Information in the Digital Operator's
Manual
In the Digital Operator's Manual you will find
information on the following topics:
R Adjusting the steering wheel
R EASY-ENTRY/EXIT system Mirrors
In the Digital Operator's Manual you will find
information on the following topics:
R Exterior mirrors
R Automatic anti-glare mirrors
R Parking position for the exterior mirror on
the front-passenger side 102
MirrorsSeats, steering wheel and mirrors
Page 105 of 284

Memory function
In the Digital Operator's Manual you will find
information on the following topics:
R Storing settings
R Calling up a stored setting Memory function
103Seats, steering wheel and mirrors Z
Page 106 of 284

104
Page 107 of 284
Useful information
............................106
Exterior lighting ................................ 106
Interior lighting ................................. 110
Replacing bulbs ................................. 110
Windshield wipers ............................111 105Lights and windshield wipers
Page 108 of 284
Useful information
i This Operator's Manual describes all
models and all standard and optional
equipment of your vehicle available at the
time of publication of the Operator's
Manual. Country-specific differences are
possible. Please note that your vehicle may
not be equipped with all features
described. This also applies to safety-
related systems and functions.
i Read the information on qualified
specialist workshops: (Y page 30).Exterior lighting
General notes
For reasons of safety, Mercedes-Benz
recommends that you drive with the lights
switched on even during the daytime. In some
countries, operation of the headlamps varies
due to legal requirements and self-imposed
obligations. Driving abroad
Symmetrical low-beam headlamps Switch the headlamps to symmetrical low
beam in countries in which traffic drives on
the opposite side of the road from the country
where the vehicle is registered. This prevents
glare to oncoming traffic. When using
symmetrical lights, the edge of the road is not
lit as widely and as far ahead as normal.
Have the headlamps converted at a qualified
specialist workshop as close to the border as
possible before driving in these countries.
Asymmetrical low beam Have the headlamps converted back to
asymmetrical low-beam headlamps at a
qualified specialist workshop as soon as
possible after crossing the border again. Information in the Digital Operator's
Manual
In the Digital Operator's Manual you will find
information on the following topics:
R Hazard warning lamps
R Headlamps fogged up on the inside Setting the exterior lighting
Setting options Exterior lighting can be set using:
R
the light switch
R the combination switch (Y page 108)
R the on-board computer (Y page 161)
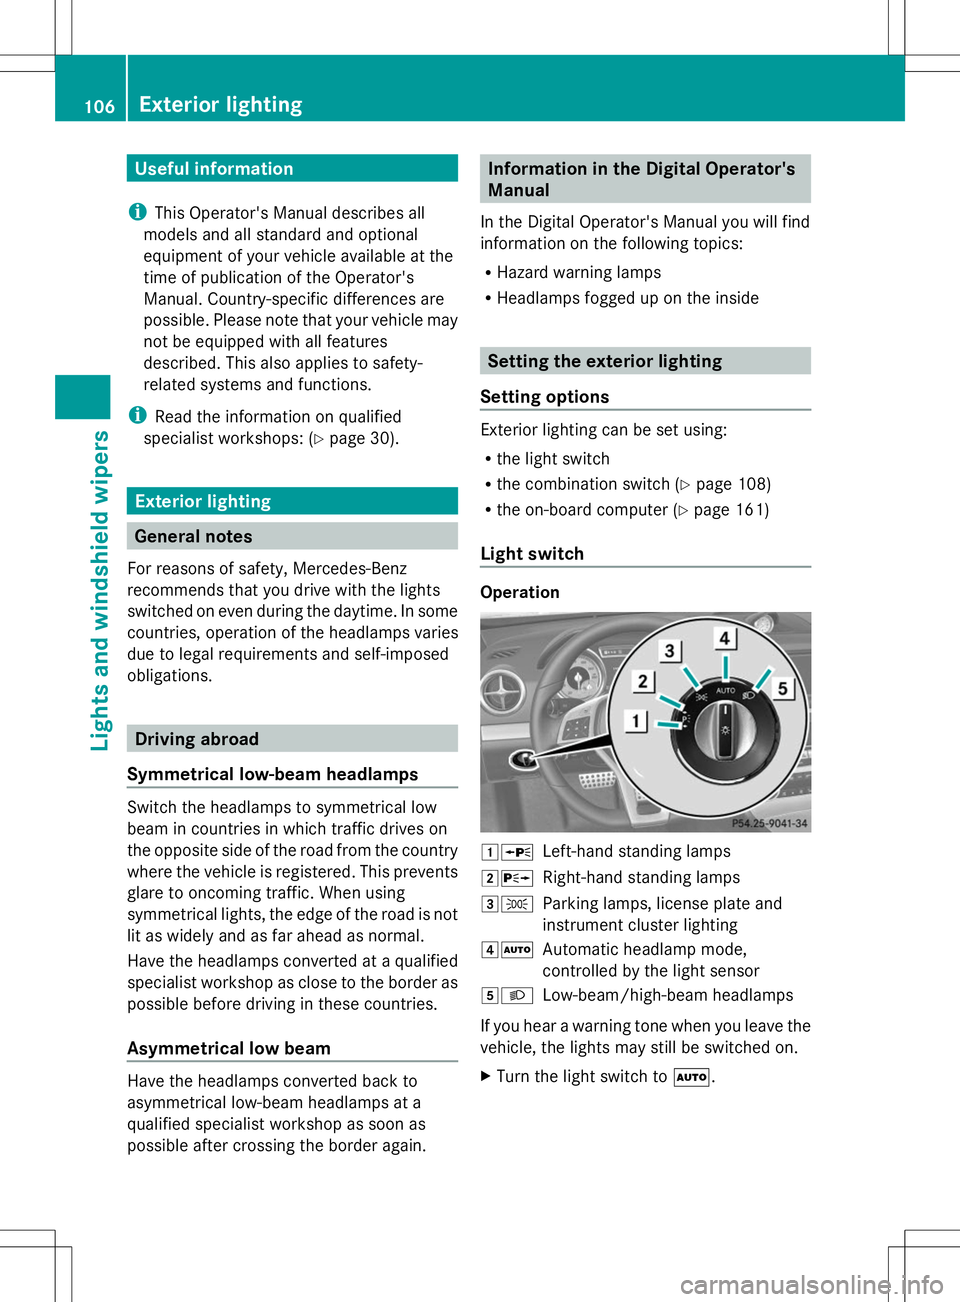
Light switch Operation
1W
Left-hand standing lamps
2X Right-hand standing lamps
3T Parking lamps, license plate and
instrument cluster lighting
4Ã Automatic headlamp mode,
controlled by the light sensor
5L Low-beam/high-beam headlamps
If you hear a warning tone when you leave the
vehicle, the lights may still be switched on.
X Turn the light switch to Ã.106
Exterior lightingLights and windshield wipers
Page 109 of 284
The exterior lighting (except the parking/
standing lamps) switches off automatically if
you:
R remove the SmartKey from the ignition lock
R open the driver's door with the SmartKey
in position 0.
Automatic headlamp mode G
WARNING
When the light switch is set to Ã, the low-
beam headlamps may not be switched on
automatically if there is fog, snow or other
causes of poor visibility due to the weather
conditions such as spray. There is a risk of an
accident.
In such situations, turn the light switch to
L.
The automatic headlamp feature is only an
aid. The driver is responsible for the vehicle's
lighting at all times.
à is the favored light switch setting. The
light setting is automatically selected
according to the brightness of the ambient
light (exception: poor visibility due to weather
conditions such as fog, snow or spray):
R SmartKey in position 1in the ignition lock:
the parking lamps are switched on or off
automatically depending on the brightness
of the ambient light.
R With the engine running: if you have
activated the daytime running lamps
function via the on-board computer, the
daytime running lamps or the low-beam
headlamps and parking lamps are switched
on or off automatically depending on the
brightness of the ambient light.
X To switch on automatic headlamp
mode: turn the light switch to Ã.
Only for Canada:
The daytime running lamps improve the
visibility of your vehicle during the day. The
daytime running lamps function is required by
law in Canada. It cannot therefore be
deactivated. When the engine is running and the vehicle is
stationary: if you move the selector lever from
a drive position to
P, the daytime running
lamps/low-beam headlamps go out after
three minutes.
When the engine is running, the vehicle is
stationary and in bright ambient light: if you
turn the light switch to T, the daytime
running lamps and parking lamps switch on.
If the engine is running and you turn the light
switch to L, the manual settings take
precedence over the daytime running lamps.
USA only:
The daytime running lamps improve the
visibility of your vehicle during the day. To do
this, the daytime running lamps function must
be switched on using the on-board computer
(Y page 161).
If the engine is running and you turn the light
switch to TorL, the manual settings
take precedence over the daytime running
lamps.
Low-beam headlamps G
WARNING
When the light switch is set to Ã, the low-
beam headlamps may not be switched on
automatically if there is fog, snow or other
causes of poor visibility due to the weather
conditions such as spray. There is a risk of an
accident.
In such situations, turn the light switch to
L.
Even if the light sensor does not detect that
it is dark, the parking lamps and low-beam
headlamps switch on when the ignition is
switched on and the light switch is set to the
L position. This is a particularly useful
function in the event of rain and fog.
X To switch on the low-beam headlamps:
turn the SmartKey in the ignition lock to
position 2or start the engine.
X Turn the light switch to L.
The green Lindicator lamp in the
instrument cluster lights up. Exterior lighting
107Lights and windshield wipers Z
Page 110 of 284
Parking lamps
!
If the battery has been excessively
discharged, the parking lamps or standing
lamps are automatically switched off to
enable the next engine start. Always park
your vehicle safely and sufficiently lit
according to legal standards. Avoid the
continuous use of the Tparking lamps
for several hours. If possible, switch on the
X right or the Wleft standing lamp.
X To switch on: turn the light switch to
T.
The green Tindicator lamp in the
instrument cluster lights up.
Standing lamps
Switching on the standing lamps ensures the
corresponding side of the vehicle is
illuminated.
X To switch on the standing lamps: the
SmartKey is not in the ignition lock or it is
in position 0.
X Turn the light switch to W(left-hand side
of the vehicle) or X(right-hand side of
the vehicle).
Information in the Digital Operator's
Manual In the Digital Operator's Manual you will find
information on the following topics:
R Automatic headlamp mode
R Low-beam headlamps
R Parking lamps
R Standing lamps Combination switch
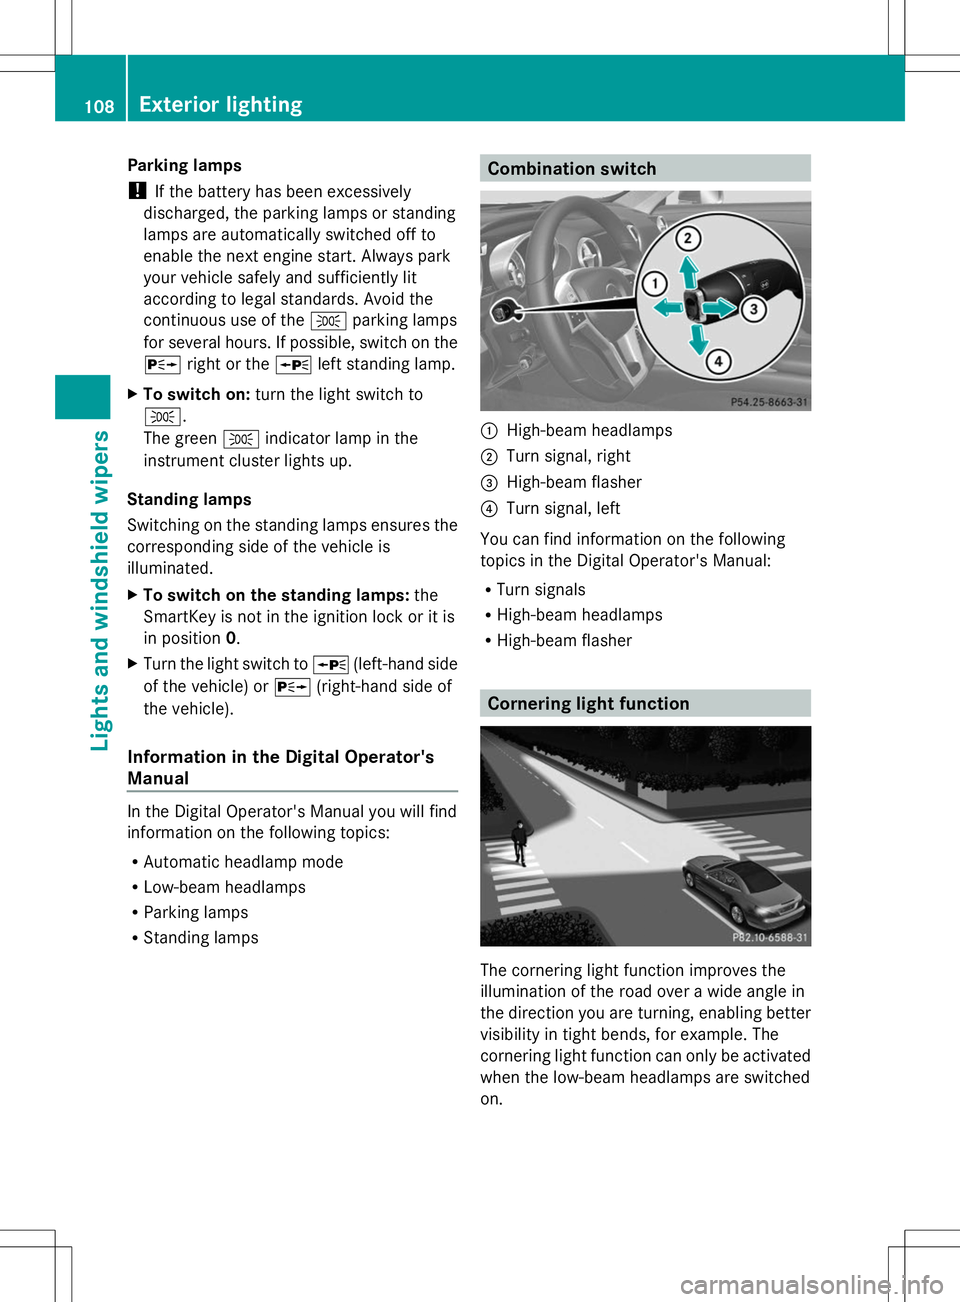
:
High-beam headlamps
; Turn signal, right
= High-beam flasher
? Turn signal, left
You can find information on the following
topics in the Digital Operator's Manual:
R Turn signals
R High-beam headlamps
R High-beam flasher Cornering light function
The cornering light function improves the
illumination of the road over a wide angle in
the direction you are turning, enabling better
visibility in tight bends, for example. The
cornering light function can only be activated
when the low-beam headlamps are switched
on. 108
Exterior lightingLights and windshield wipers