MERCEDES-BENZ SL-CLASS ROADSTER 2014 Owners Manual
Manufacturer: MERCEDES-BENZ, Model Year: 2014, Model line: SL-CLASS ROADSTER, Model: MERCEDES-BENZ SL-CLASS ROADSTER 2014Pages: 284, PDF Size: 45.52 MB
Page 111 of 284
Active:
R
if you are driving at speeds below
25mph (40 km/h) and switch on the turn
signal or turn the steering wheel.
R if you are driving at speeds between
25mph (40 km/h) and45mph (70 km/h)
and turn the steering wheel
Not active: if you are driving at speeds above
25 mph (40 km/h) or switch off the turn
signals or turn the steering wheel to the
straight-ahead position.
The cornering light function may remain lit for
a short time, but is automatically switched off
after no more than three minutes. Active light function
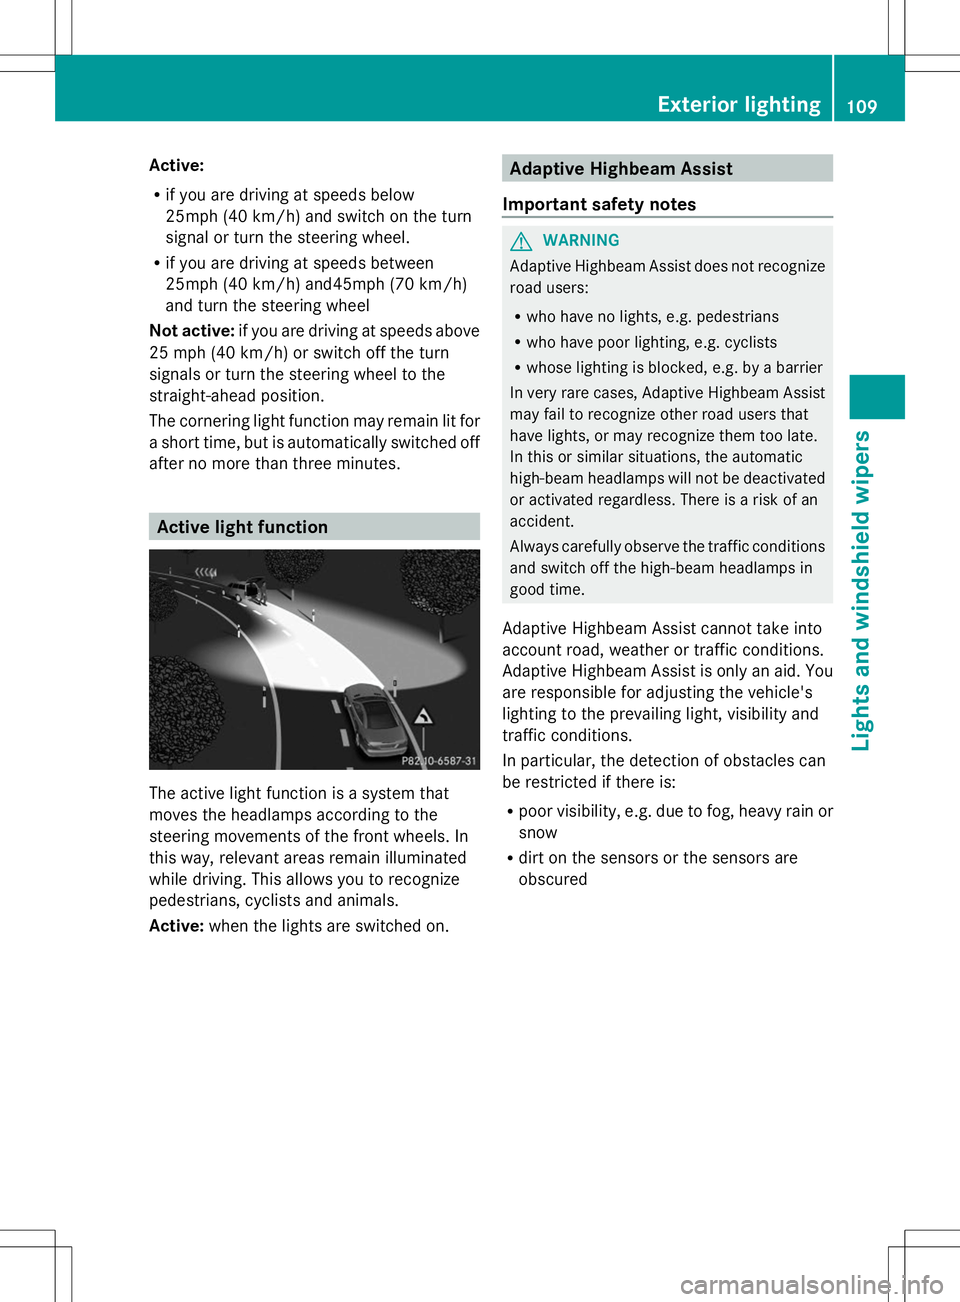
The active light function is a system that
moves the headlamps according to the
steering movements of the front wheels. In
this way, relevant areas remain illuminated
while driving. This allows you to recognize
pedestrians, cyclists and animals.
Active: when the lights are switched on. Adaptive Highbeam Assist
Important safety notes G
WARNING
Adaptive Highbeam Assist does not recognize
road users:
R who have no lights, e.g. pedestrians
R who have poor lighting, e.g. cyclists
R whose lighting is blocked, e.g. by a barrier
In very rare cases, Adaptive Highbeam Assist
may fail to recognize other road users that
have lights, or may recognize them too late.
In this or similar situations, the automatic
high-beam headlamps will not be deactivated
or activated regardless. There is a risk of an
accident.
Always carefully observe the traffic conditions
and switch off the high-beam headlamps in
good time.
Adaptive Highbeam Assist cannot take into
account road, weather or traffic conditions.
Adaptive Highbeam Assist is only an aid. You
are responsible for adjusting the vehicle's
lighting to the prevailing light, visibility and
traffic conditions.
In particular, the detection of obstacles can
be restricted if there is:
R poor visibility, e.g. due to fog, heavy rain or
snow
R dirt on the sensors or the sensors are
obscured Exterior lighting
109Lights and windshield wipers Z
Page 112 of 284
General notes
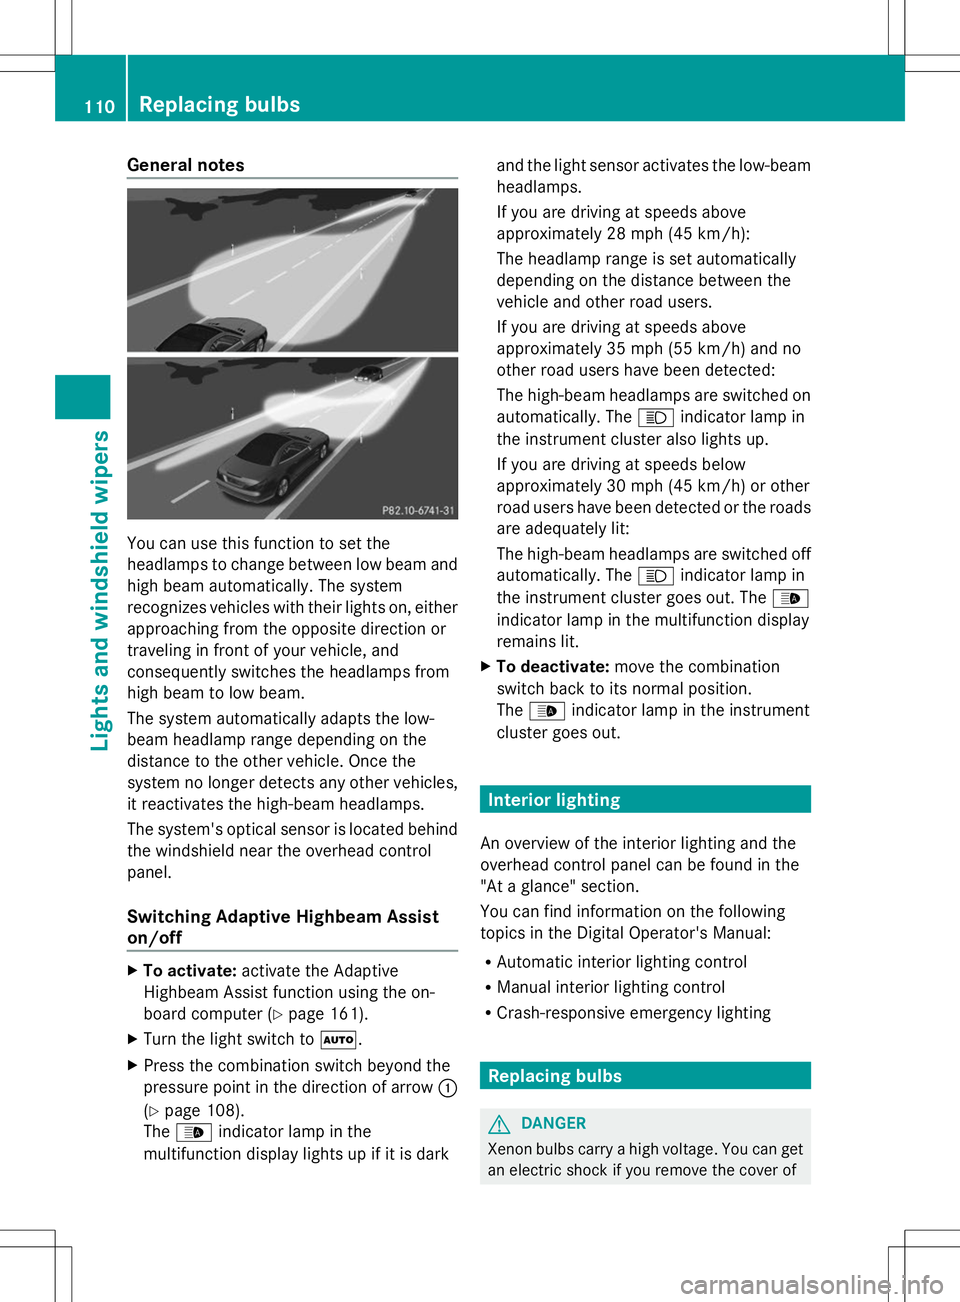
You can use this function to set the
headlamps to change between low beam and
high beam automatically. The system
recognizes vehicles with their lights on, either
approaching from the opposite direction or
traveling in front of your vehicle, and
consequently switches the headlamps from
high beam to low beam.
The system automatically adapts the low-
beam headlamp range depending on the
distance to the other vehicle. Once the
system no longer detects any other vehicles,
it reactivates the high-beam headlamps.
The system's optical sensor is located behind
the windshield near the overhead control
panel.
Switching Adaptive Highbeam Assist
on/off X
To activate: activate the Adaptive
Highbeam Assist function using the on-
board computer (Y page 161).
X Turn the light switch to Ã.
X Press the combination switch beyond the
pressure point in the direction of arrow :
(Y page 108).
The _ indicator lamp in the
multifunction display lights up if it is dark and the light sensor activates the low-beam
headlamps.
If you are driving at speeds above
approximately 28 mph (45 km/h):
The headlamp range is set automatically
depending on the distance between the
vehicle and other road users.
If you are driving at speeds above
approximately 35 mph (55 km/h) and no
other road users have been detected:
The high-beam headlamps are switched on
automatically. The
Kindicator lamp in
the instrument cluster also lights up.
If you are driving at speeds below
approximately 30 mph (45 km/h) or other
road users have been detected or the roads
are adequately lit:
The high-beam headlamps are switched off
automatically. The Kindicator lamp in
the instrument cluster goes out. The _
indicator lamp in the multifunction display
remains lit.
X To deactivate: move the combination
switch back to its normal position.
The _ indicator lamp in the instrument
cluster goes out. Interior lighting
An overview of the interior lighting and the
overhead control panel can be found in the
"At a glance" section.
You can find information on the following
topics in the Digital Operator's Manual:
R Automatic interior lighting control
R Manual interior lighting control
R Crash-responsive emergency lighting Replacing bulbs
G
DANGER
Xenon bulbs carry a high voltage. You can get
an electric shock if you remove the cover of 110
Replacing bulbsLights and windshield wipers
Page 113 of 284
the Xenon bulb and touch the electrical
contacts. There is a risk of fatal injury.
Never touch the parts or the electrical
contacts of the Xenon bulb. Always have work
on the Xenon bulbs carried out at a qualified
specialist workshop.
The front and rear lamps of your vehicle are
equipped with either Xenon or LED bulbs. Do
not replace the bulbs yourself. Contact a
qualified specialist workshop which has the
necessary specialist knowledge and tools to
carry out the work required.
Bulbs and lamps are an important aspect of
vehicle safety. You must therefore make sure
that these function correctly at all times.
Have the headlamp setting checked regularly. Windshield wipers
Switching the windshield wipers on/
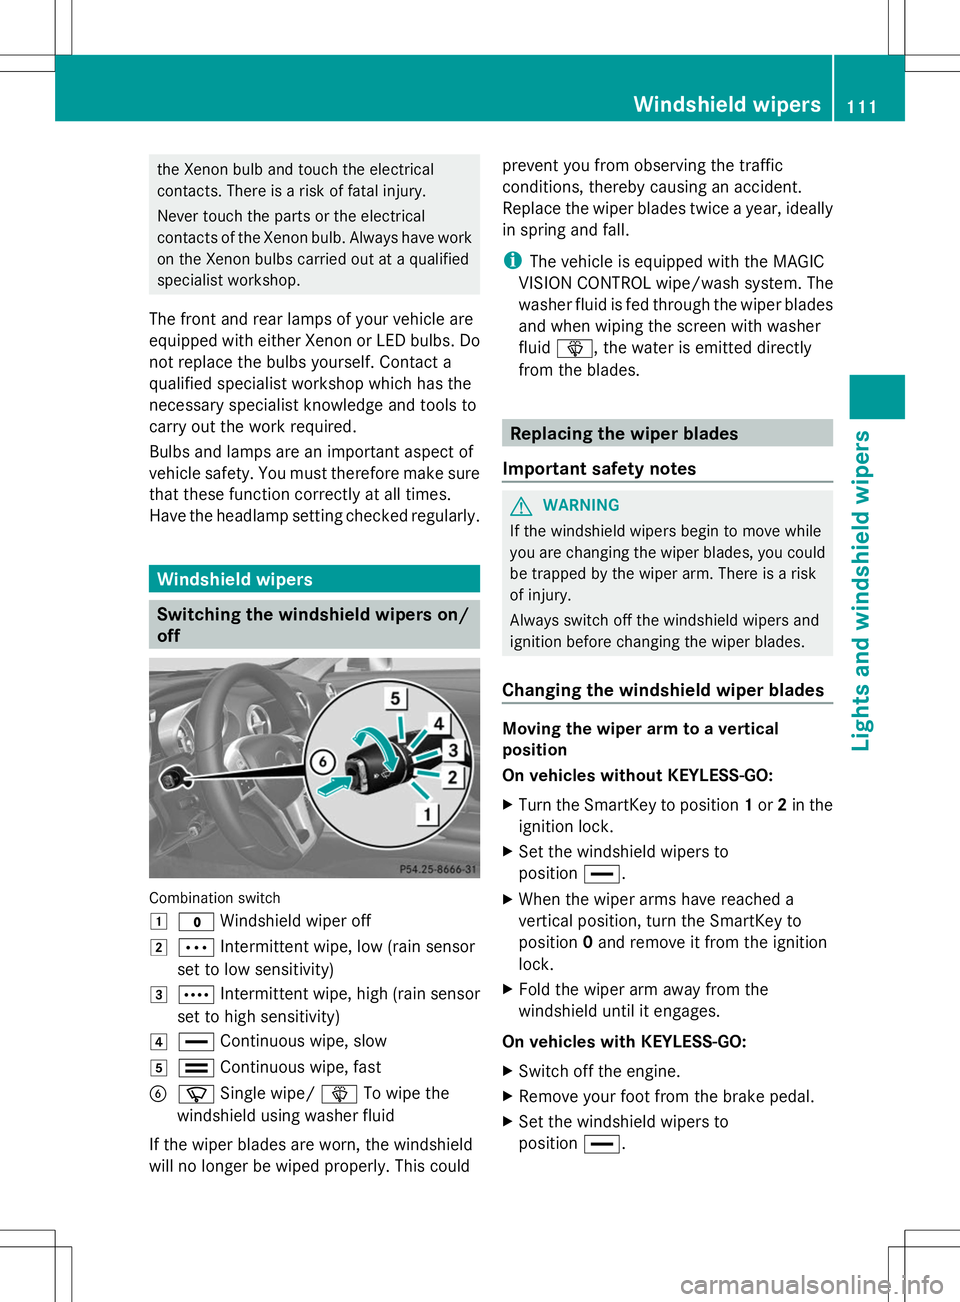
off Combination switch
1
$ Windshield wiper off
2 Ä Intermittent wipe, low (rain sensor
set to low sensitivity)
3 Å Intermittent wipe, high (rain sensor
set to high sensitivity)
4 ° Continuous wipe, slow
5 ¯ Continuous wipe, fast
B í Single wipe/ îTo wipe the
windshield using washer fluid
If the wiper blades are worn, the windshield
will no longer be wiped properly. This could prevent you from observing the traffic
conditions, thereby causing an accident.
Replace the wiper blades twice a year, ideally
in spring and fall.
i
The vehicle is equipped with the MAGIC
VISION CONTROL wipe/wash system. The
washer fluid is fed through the wiper blades
and when wiping the screen with washer
fluid î, the water is emitted directly
from the blades. Replacing the wiper blades
Important safety notes G
WARNING
If the windshield wipers begin to move while
you are changing the wiper blades, you could
be trapped by the wiper arm. There is a risk
of injury.
Always switch off the windshield wipers and
ignition before changing the wiper blades.
Changing the windshield wiper blades Moving the wiper arm to a vertical
position
On vehicles without KEYLESS-GO:
X
Turn the SmartKey to position 1or 2in the
ignition lock.
X Set the windshield wipers to
position °.
X When the wiper arms have reached a
vertical position, turn the SmartKey to
position 0and remove it from the ignition
lock.
X Fold the wiper arm away from the
windshield until it engages.
On vehicles with KEYLESS-GO:
X Switch off the engine.
X Remove your foot from the brake pedal.
X Set the windshield wipers to
position °. Windshield
wipers
111Lights and windshield wipers Z
Page 114 of 284
X
Press the Start/Stop button repeatedly
until the windshield wipers start.
X When the wiper arms have reached a
vertical position, press the Start/Stop
button.
X Fold the wiper arm away from the
windshield until it engages.
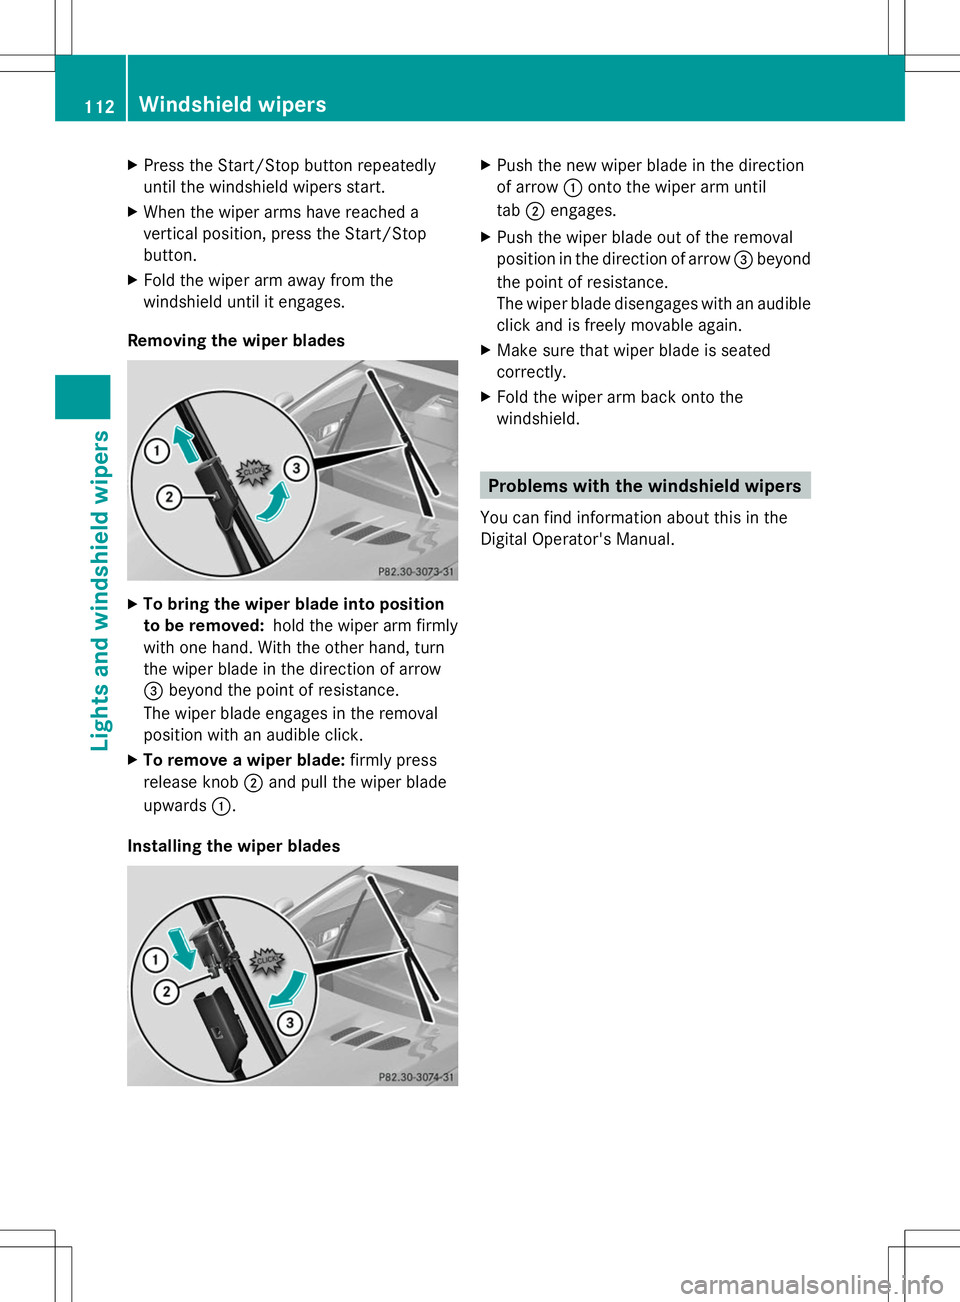
Removing the wiper blades X
To bring the wiper blade into position
to be removed: hold the wiper arm firmly
with one hand. With the other hand, turn
the wiper blade in the direction of arrow
= beyond the point of resistance.
The wiper blade engages in the removal
position with an audible click.
X To remove a wiper blade: firmly press
release knob ;and pull the wiper blade
upwards :.
Installing the wiper blades X
Push the new wiper blade in the direction
of arrow :onto the wiper arm until
tab ;engages.
X Push the wiper blade out of the removal
position in the direction of arrow =beyond
the point of resistance.
The wiper blade disengages with an audible
click and is freely movable again.
X Make sure that wiper blade is seated
correctly.
X Fold the wiper arm back onto the
windshield. Problems with the windshield wipers
You can find information about this in the
Digital Operator's Manual. 112
Windshield wipersLights and windshield wipers
Page 115 of 284

Useful information
............................114
Overview of climate control sys-
tems ................................................... 114
Operating the climate control sys-
tems ................................................... 116 113Climate control
Page 116 of 284

Useful information
i This Operator's Manual describes all
models and all standard and optional
equipment of your vehicle available at the
time of publication of the Operator's
Manual. Country-specific differences are
possible. Please note that your vehicle may
not be equipped with all features
described. This also applies to safety-
related systems and functions.
i Read the information on qualified
specialist workshops: (Y page 30).Overview of climate control systems
Important safety notes
Observe the settings recommended on the
following pages. The windows could
otherwise fog up.
To prevent the windows from fogging up:
R switch off climate control only briefly
R switch on air-recirculation mode only
briefly
R switch on the cooling with air
dehumidification function
R switch on the defrost windshield function
briefly, if required
Climate control regulates the temperature
and the humidity in the vehicle interior and
filters undesirable substances out of the air.
Climate control can only be operated when
the engine is running. Optimum operation is
only achieved with the side windows and roof
closed.
The residual heat function can only be
activated or deactivated if the ignition is
switched off. See the Digital Operator's
Manual, keyword "Residual heat".
i When the weather is warm, ventilate the
vehicle for a brief period. This will speed up
the cooling process and the desired vehicle
interior temperature will be reached more
quickly. i
It is possible that the dehumidification
function of the climate control system may
be activated automatically an hour after the
SmartKey has been removed. The vehicle
is then ventilated for 30 minutes to dry the
air-conditioning system. 114
Overview of climate control systemsClimate control
Page 117 of 284
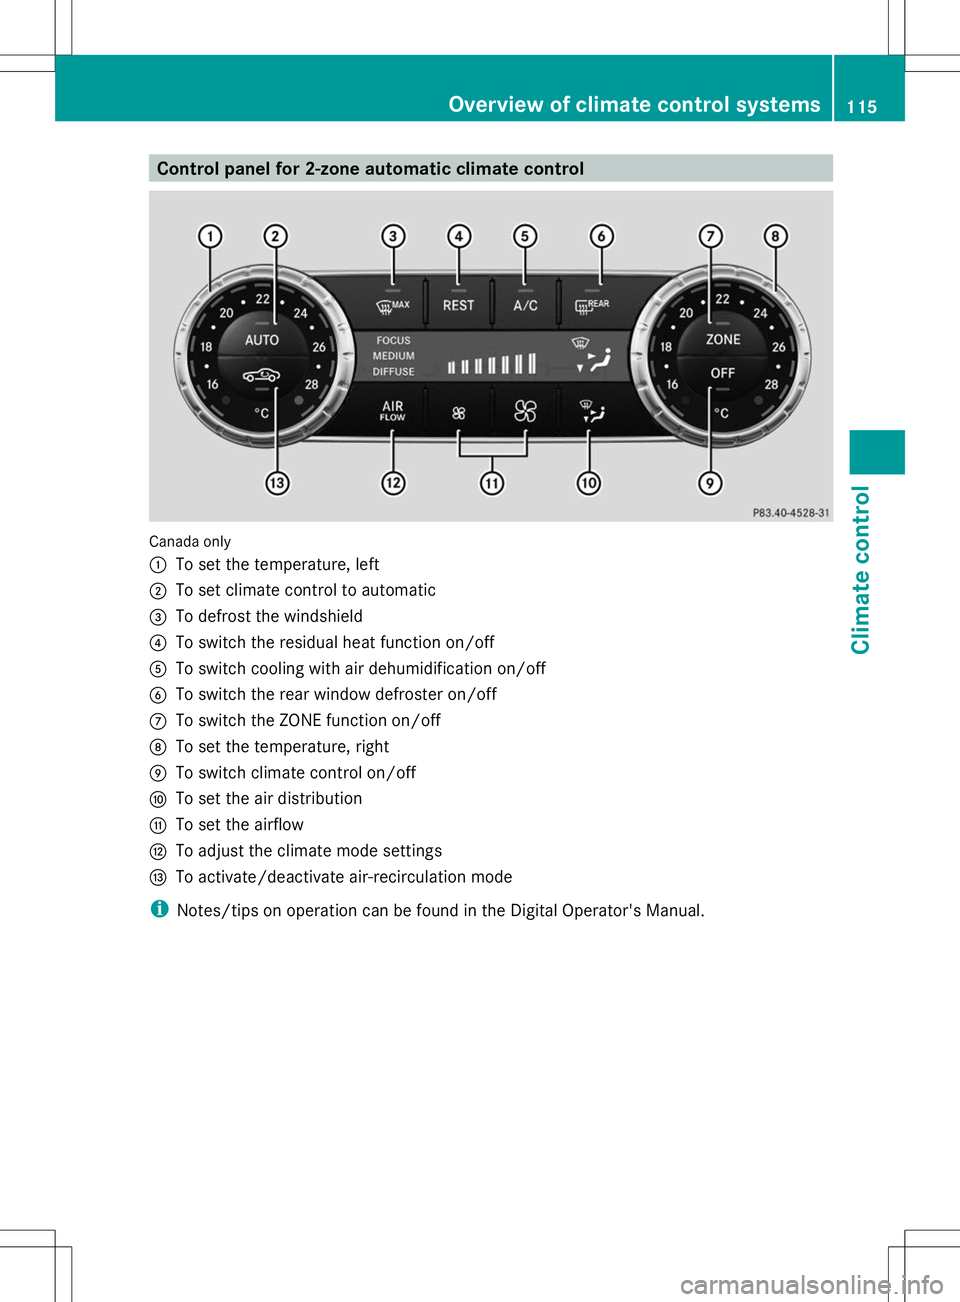
Control panel for 2-zone automatic climate control
Canada only
:
To set the temperature, left
; To set climate control to automatic
= To defrost the windshield
? To switch the residual heat function on/off
A To switch cooling with air dehumidification on/off
B To switch the rear window defroster on/off
C To switch the ZONE function on/off
D To set the temperature, right
E To switch climate control on/off
F To set the air distribution
G To set the airflow
H To adjust the climate mode settings
I To activate/deactivate air-recirculation mode
i Notes/tips on operation can be found in the Digital Operator's Manual. Overview of climate control systems
115Climate control
Page 118 of 284
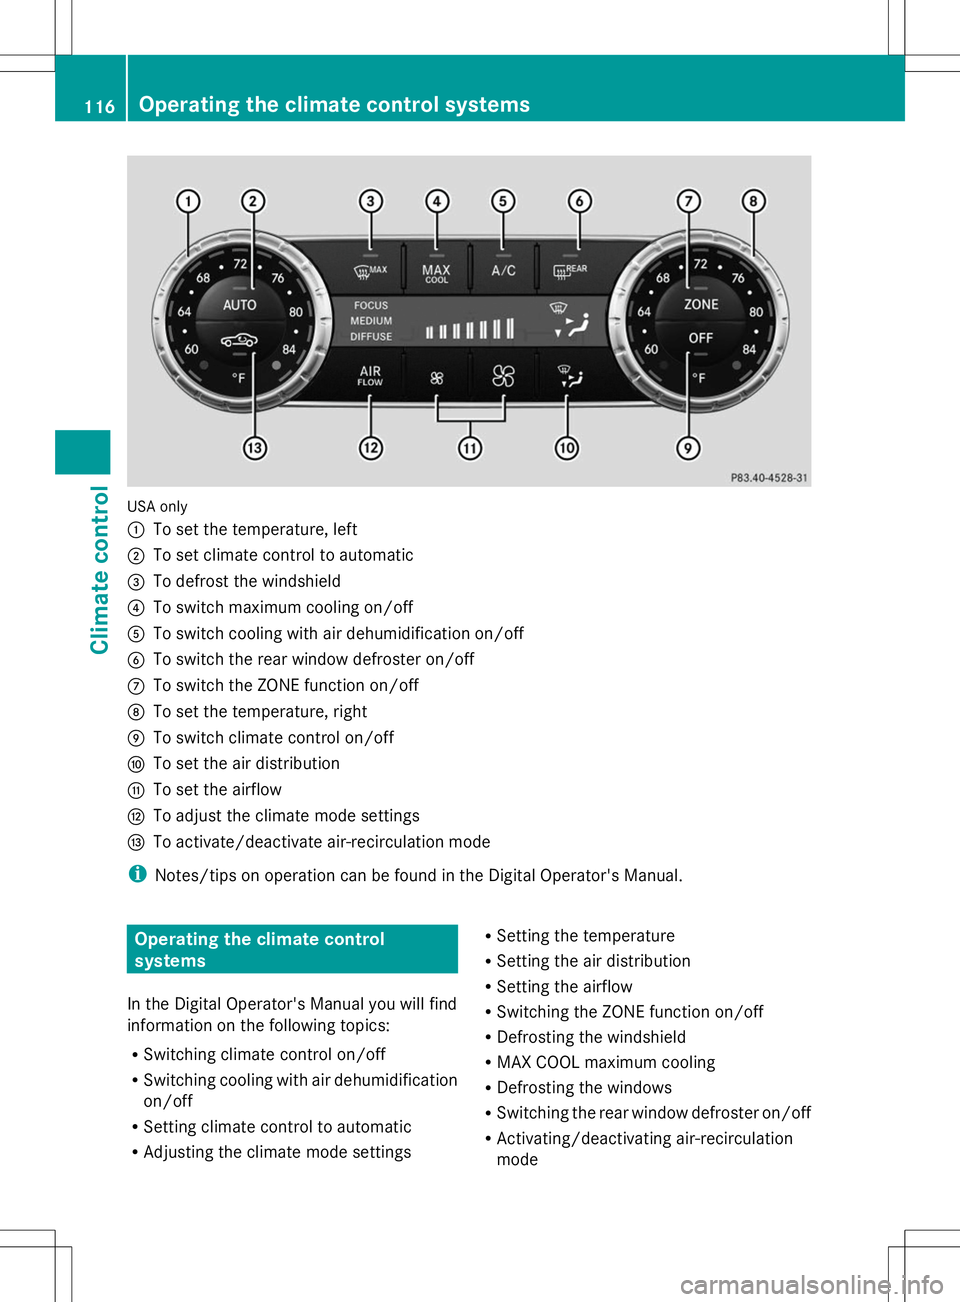
USA only
:
To set the temperature, left
; To set climate control to automatic
= To defrost the windshield
? To switch maximum cooling on/off
A To switch cooling with air dehumidification on/off
B To switch the rear window defroster on/off
C To switch the ZONE function on/off
D To set the temperature, right
E To switch climate control on/off
F To set the air distribution
G To set the airflow
H To adjust the climate mode settings
I To activate/deactivate air-recirculation mode
i Notes/tips on operation can be found in the Digital Operator's Manual. Operating the climate control
systems
In the Digital Operator's Manual you will find
information on the following topics:
R Switching climate control on/off
R Switching cooling with air dehumidification
on/off
R Setting climate control to automatic
R Adjusting the climate mode settings R
Setting the temperature
R Setting the air distribution
R Setting the airflow
R Switching the ZONE function on/off
R Defrosting the windshield
R MAX COOL maximum cooling
R Defrosting the windows
R Switching the rear window defroster on/off
R Activating/deactivating air-recirculation
mode 116
Operating the climate control systemsClimate control
Page 119 of 284

R
Switching the residual heat function on/off
R Setting the air vents Operating the climate control systems
117Climate control
Page 120 of 284

118