keyless MERCEDES-BENZ SL-CLASS ROADSTER 2016 User Guide
[x] Cancel search | Manufacturer: MERCEDES-BENZ, Model Year: 2016, Model line: SL-CLASS ROADSTER, Model: MERCEDES-BENZ SL-CLASS ROADSTER 2016Pages: 614, PDF Size: 15.67 MB
Page 91 of 614
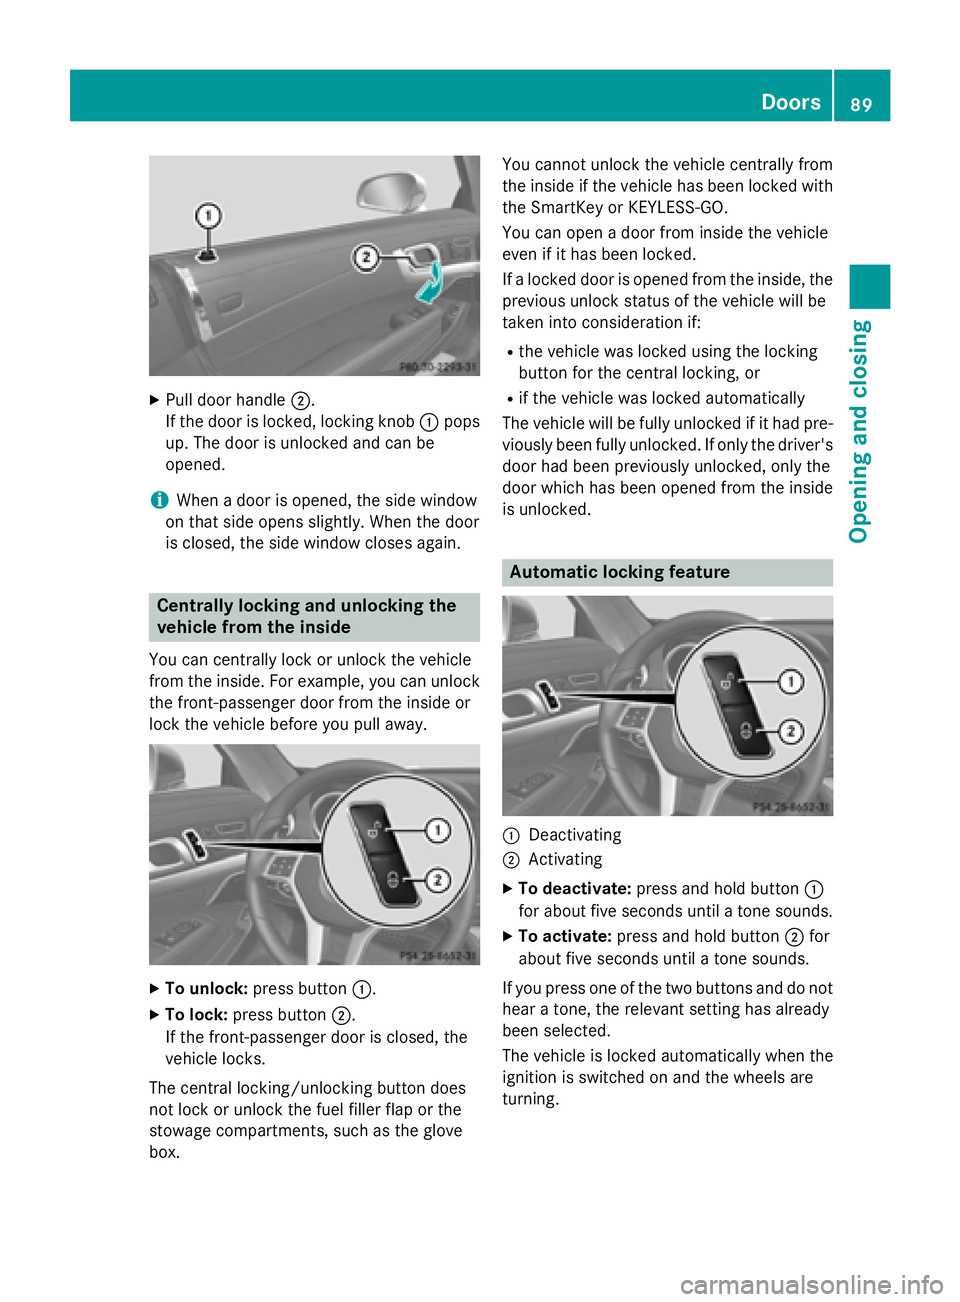
XPull door handle;.
If the door is locked, locking knob :pops
up. The door is unlocked and can be
opened.
iWhen a door is opened, the side window
on that side opens slightly. When the door
is closed, the side window closes again.
Centrally locking and unlocking the
vehicle from the inside
You can centrally lock or unlock the vehicle
from the inside. For example, you can unlock
the front-passenger door from the inside or
lock the vehicle before you pull away.
XTo unlock: press button :.
XTo lock:press button ;.
If the front-passenger door is closed, the
vehicle locks.
The central locking/unlocking button does
not lock or unlock the fuel filler flap or the
stowage compartments, such as the glove
box. You cannot unlock the vehicle centrally from
the inside if the vehicle has been locked with
the SmartKey or KEYLESS-GO.
You can open a door from inside the vehicle
even if it has been locked.
If a locked door is opened from the inside, the
previous unlock status of the vehicle will be
taken into consideration if:
Rthe vehicle was locked using the locking
button for the central locking, or
Rif the vehicle was locked automatically
The vehicle will be fully unlocked if it had pre-
viously been fully unlocked. If only the driver's
door had been previously unlocked, only the
door which has been opened from the inside
is unlocked.
Automatic locking feature
:Deactivating
;Activating
XTo deactivate: press and hold button :
for about five seconds until a tone sounds.
XTo activate: press and hold button ;for
about five seconds until a tone sounds.
If you press one of the two buttons and do not
hear a tone, the relevant setting has already
been selected.
The vehicle is locked automatically when the
ignition is switched on and the wheels are
turning.
Doors89
Opening and closing
Z
Page 93 of 614
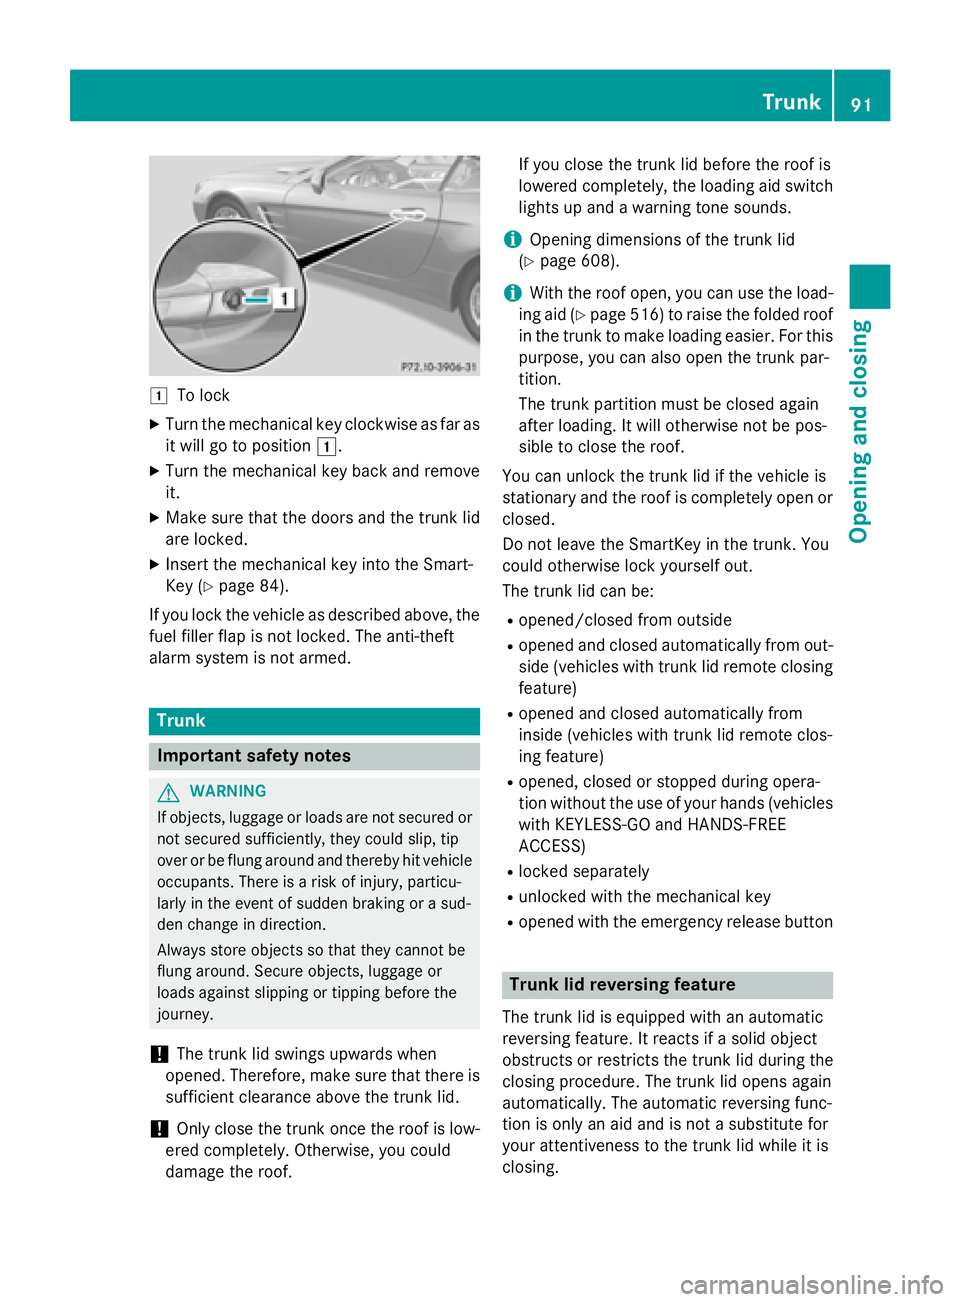
1To lock
XTurn the mechanical key clockwise as far as
it will go to position1.
XTurn the mechanical key back and remove
it.
XMake sure that the doors and the trunk lid
are locked.
XInsert the mechanical key into the Smart-
Key (
Ypage 84).
If you lock the vehicle as described above, the
fuel filler flap is not locked. The anti-theft
alarm system is not armed.
Trunk
Important safety notes
GWARNING
If objects, luggage or loads are not secured or
not secured sufficiently, they could slip, tip
over or be flung around and thereby hit vehicle
occupants. There is a risk of injury, particu-
larly in the event of sudden braking or a sud-
den change in direction.
Always store objects so that they cannot be
flung around. Secure objects, luggage or
loads against slipping or tipping before the
journey.
!The trunk lid swings upwards when
opened. Therefore, make sure that there is
sufficient clearance above the trunk lid.
!Only close the trunk once the roof is low-
ered completely. Otherwise, you could
damage the roof. If you close the trunk lid before the roof is
lowered completely, the loading aid switch
lights up and a warning tone sounds.
iOpening dimensions of the trunk lid
(
Ypage 608).
iWith the roof open, you can use the load-
ing aid (
Ypage 516) to raise the folded roof
in the trunk to make loading easier. For this
purpose, you can also open the trunk par-
tition.
The trunk partition must be closed again
after loading. It will otherwise not be pos-
sible to close the roof.
You can unlock the trunk lid if the vehicle is
stationary and the roof is completely open or
closed.
Do not leave the SmartKey in the trunk. You
could otherwise lock yourself out.
The trunk lid can be:
Ropened/closed from outside
Ropened and closed automatically from out-
side (vehicles with trunk lid remote closing
feature)
Ropened and closed automatically from
inside (vehicles with trunk lid remote clos-
ing feature)
Ropened, closed or stopped during opera-
tion without the use of your hands (vehicles with KEYLESS-GO and HANDS-FREE
ACCESS)
Rlocked separately
Runlocked with the mechanical key
Ropened with the emergency release button
Trunk lid reversing feature
The trunk lid is equipped with an automatic
reversing feature. It reacts if a solid object
obstructs or restricts the trunk lid during the
closing procedure. The trunk lid opens again
automatically. The automatic reversing func-
tion is only an aid and is not a substitute for
your attentiveness to the trunk lid while it is
closing.
Trunk91
Opening and closing
Z
Page 94 of 614
GWARNING
The reversing feature does not react:
Rto soft, light and thin objects, e.g. small fin-
gers
Rover the last 1/3 in (8 mm) of the closing
movement
This means that the reversing feature cannot
prevent someone being trapped in these sit-
uations. There is a risk of injury.
Make sure that no body parts are in close
proximity during the closing procedure.
If somebody becomes trapped:
Rpress the Fbutton on the SmartKey, or
Rpull or press the remote operating switch
on the driver's door or
Rpress the closing or locking button on the
trunk lid, or
Rpull on the trunk lid handle
Opening/closing from outside
Opening
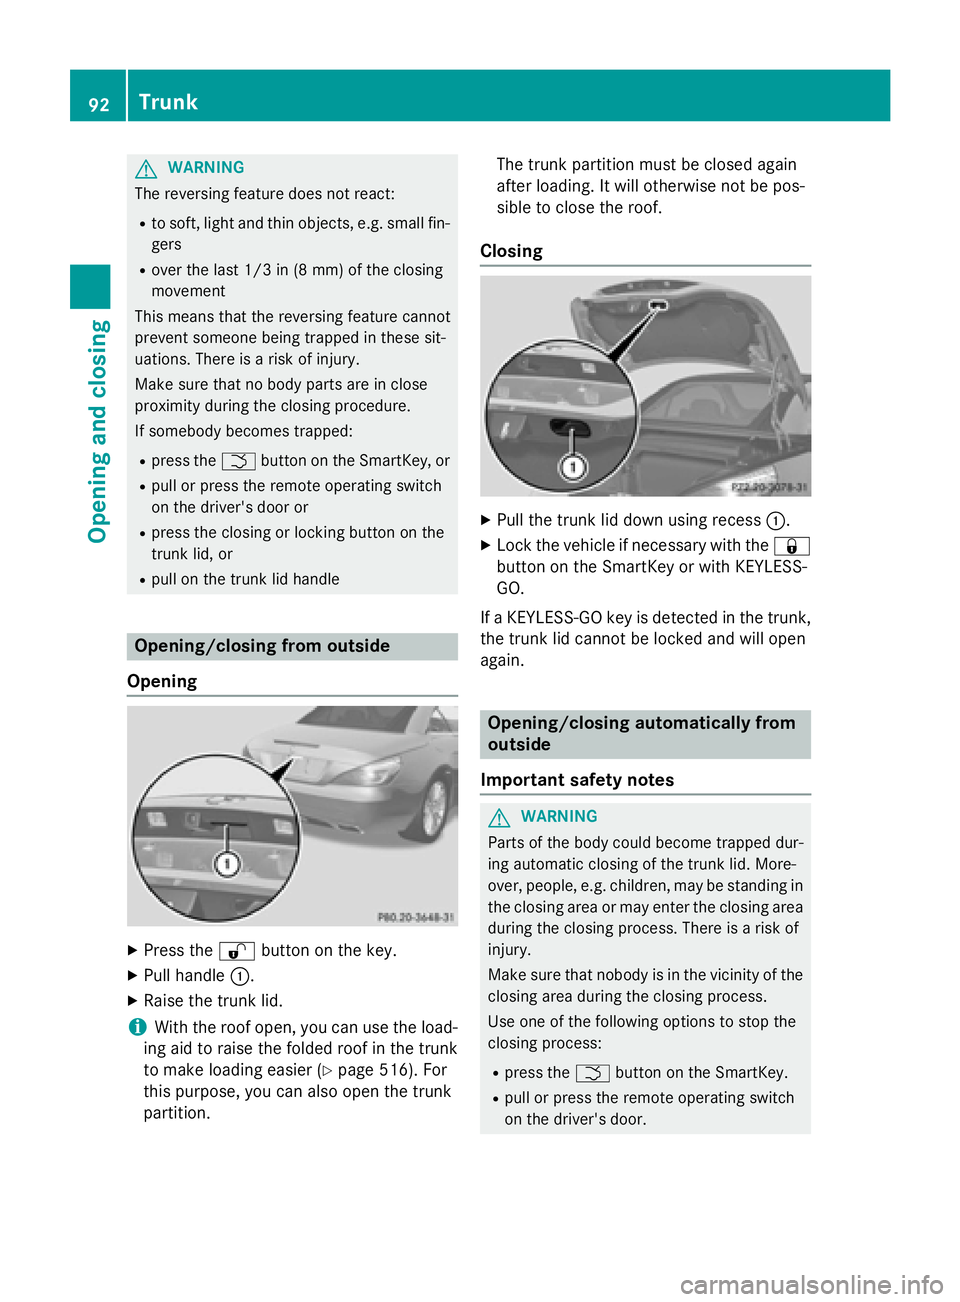
XPress the %button on the key.
XPull handle :.
XRaise the trunk lid.
iWith the roof open, you can use the load-
ing aid to raise the folded roof in the trunk
to make loading easier (
Ypage 516). For
this purpose, you can also open the trunk
partition. The trunk partition must be closed again
after loading. It will otherwise not be pos-
sible to close the roof.
Closing
XPull the trunk lid down using recess
:.
XLock the vehicle if necessary with the &
button on the SmartKey or with KEYLESS-
GO.
If a KEYLESS-GO key is detected in the trunk,
the trunk lid cannot be locked and will open
again.
Opening/closing automatically from
outside
Important safety notes
GWARNING
Parts of the body could become trapped dur-
ing automatic closing of the trunk lid. More-
over, people, e.g. children, may be standing in the closing area or may enter the closing area
during the closing process. There is a risk of
injury.
Make sure that nobody is in the vicinity of the
closing area during the closing process.
Use one of the following options to stop the
closing process:
Rpress the Fbutton on the SmartKey.
Rpull or press the remote operating switch
on the driver's door.
92Trunk
Opening and closing
Page 95 of 614
Rpress the closing or locking button on the
trunk lid.
Rpull the trunk lid handle
!The trunk lid swings upwards when
opened. Therefore, make sure that there is
sufficient clearance above the trunk lid.
iOpening dimensions of the trunk lid
(
Ypage 608).
Opening
You can open the trunk lid automatically
using the handle in the trunk lid.
XIf the trunk lid is unlocked, pull the trunk lid
handle and let it go again immediately.
Vehicles with the trunk lid remote closing fea-
ture: the trunk lid can be also be opened
automatically using the SmartKey.
XPress and hold the Fbutton on the key
until the trunk lid opens.
Closing
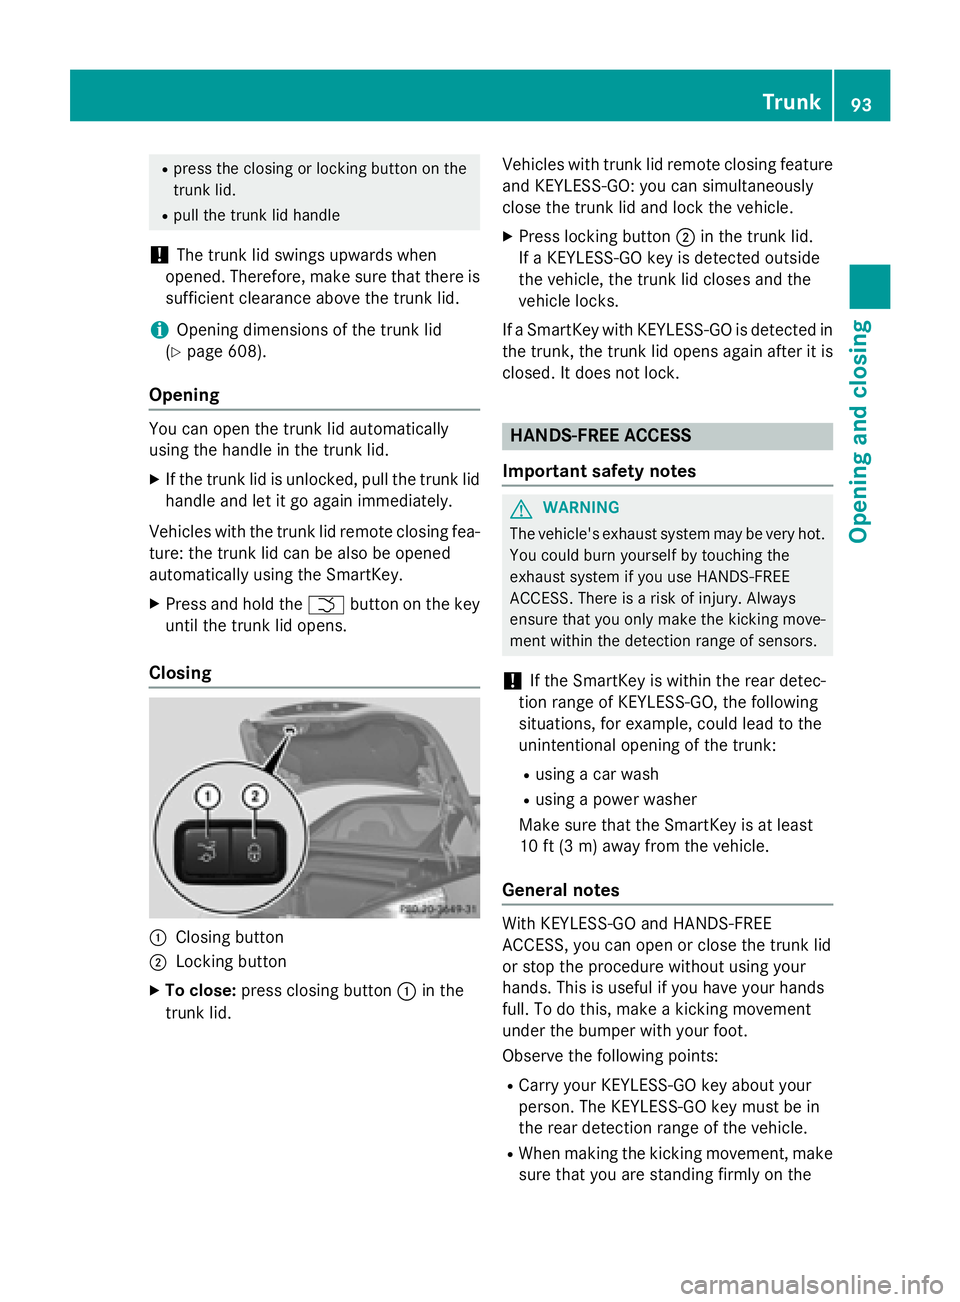
:Closing button
;Locking button
XTo close: press closing button :in the
trunk lid. Vehicles with trunk lid remote closing feature
and KEYLESS-GO: you can simultaneously
close the trunk lid and lock the vehicle.
XPress locking button ;in the trunk lid.
If a KEYLESS-GO key is detected outside
the vehicle, the trunk lid closes and the
vehicle locks.
If a SmartKey with KEYLESS-GO is detected in
the trunk, the trunk lid opens again after it is
closed. It does not lock.
HANDS-FREE ACCESS
Important safety notes
GWARNING
The vehicle's exhaust system may be very hot. You could burn yourself by touching the
exhaust system if you use HANDS-FREE
ACCESS. There is a risk of injury. Always
ensure that you only make the kicking move-
ment within the detection range of sensors.
!If the SmartKey is within the rear detec-
tion range of KEYLESS-GO, the following
situations, for example, could lead to the
unintentional opening of the trunk:
Rusing a car wash
Rusing a power washer
Make sure that the SmartKey is at least
10 ft (3 m) away from the vehicle.
General notes
With KEYLESS-GO and HANDS-FREE
ACCESS, you can open or close the trunk lid
or stop the procedure without using your
hands. This is useful if you have your hands
full. To do this, make a kicking movement
under the bumper with your foot.
Observe the following points:
RCarry your KEYLESS-GO key about your
person. The KEYLESS-GO key must be in
the rear detection range of the vehicle.
RWhen making the kicking movement, make
sure that you are standing firmly on the
Trunk93
Opening and closing
Z
Page 96 of 614
ground and that there is sufficient clear-
ance to the rear of the vehicle. You could
otherwise lose your balance e.g. on ice.
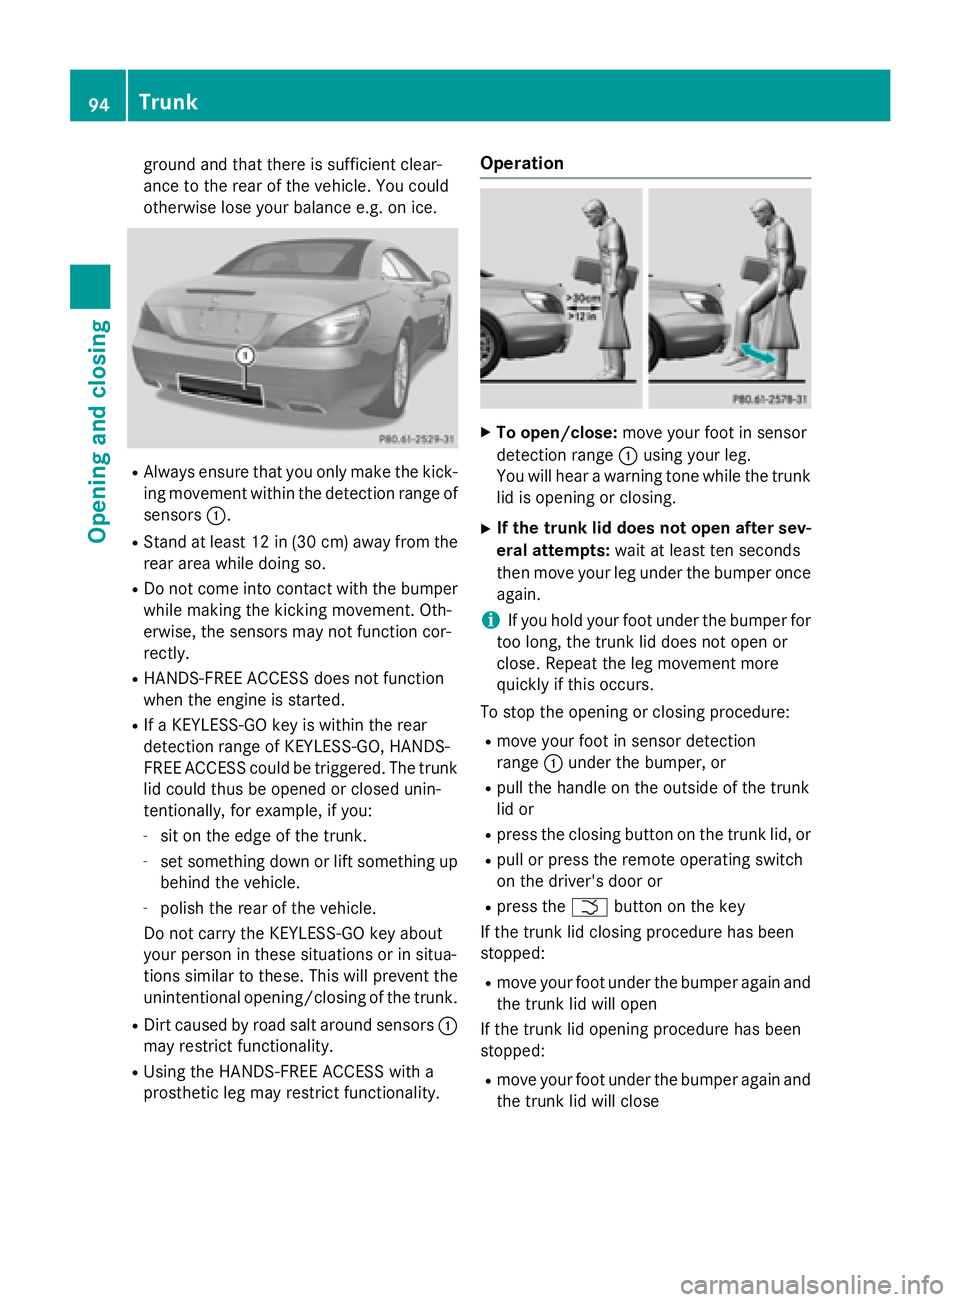
RAlways ensure that you only make the kick-ing movement within the detection range of
sensors :.
RStand at least 12 in (30 cm) away from the
rear area while doing so.
RDo not come into contact with the bumper
while making the kicking movement. Oth-
erwise, the sensors may not function cor-
rectly.
RHANDS-FREE ACCESS does not function
when the engine is started.
RIf a KEYLESS-GO key is within the rear
detection range of KEYLESS-GO, HANDS-
FREE ACCESS could be triggered. The trunk
lid could thus be opened or closed unin-
tentionally, for example, if you:
-sit on the edge of the trunk.
-set something down or lift something up
behind the vehicle.
-polish the rear of the vehicle.
Do not carry the KEYLESS-GO key about
your person in these situations or in situa-
tions similar to these. This will prevent the
unintentional opening/closing of the trunk.
RDirt caused by road salt around sensors :
may restrict functionality.
RUsing the HANDS-FREE ACCESS with a
prosthetic leg may restrict functionality.
Operation
XTo open/close: move your foot in sensor
detection range :using your leg.
You will hear a warning tone while the trunk
lid is opening or closing.
XIf the trunk lid does not open after sev-
eral attempts: wait at least ten seconds
then move your leg under the bumper once
again.
iIf you hold your foot under the bumper for
too long, the trunk lid does not open or
close. Repeat the leg movement more
quickly if this occurs.
To stop the opening or closing procedure:
Rmove your foot in sensor detection
range :under the bumper, or
Rpull the handle on the outside of the trunk
lid or
Rpress the closing button on the trunk lid, or
Rpull or press the remote operating switch
on the driver's door or
Rpress the Fbutton on the key
If the trunk lid closing procedure has been
stopped:
Rmove your foot under the bumper again and
the trunk lid will open
If the trunk lid opening procedure has been
stopped:
Rmove your foot under the bumper again and
the trunk lid will close
94Trunk
Opening and closing
Page 98 of 614
XInsert the mechanical key into the trunk lid
lock as far as it will go.
XTurn the mechanical key clockwise from
position1to position 2.
XRemove the mechanical key.
XInsert mechanical key into the SmartKey
(
Ypage 84).
Unlocking the trunk (mechanical key)
!
The trunk lid swings upwards when
opened. Therefore, make sure that there is
sufficient clearance above the trunk lid.
If the trunk cannot be unlocked with the
SmartKey or KEYLESS-GO, use the mechani-
cal key.
If you use the mechanical key to unlock and
open the trunk lid, the anti-theft alarm system will be triggered (
Ypage 80).
XTake the mechanical key out of the Smart-
Key (
Ypage 84).
XInsert the mechanical key into the trunk lid
lock as far as it will go.
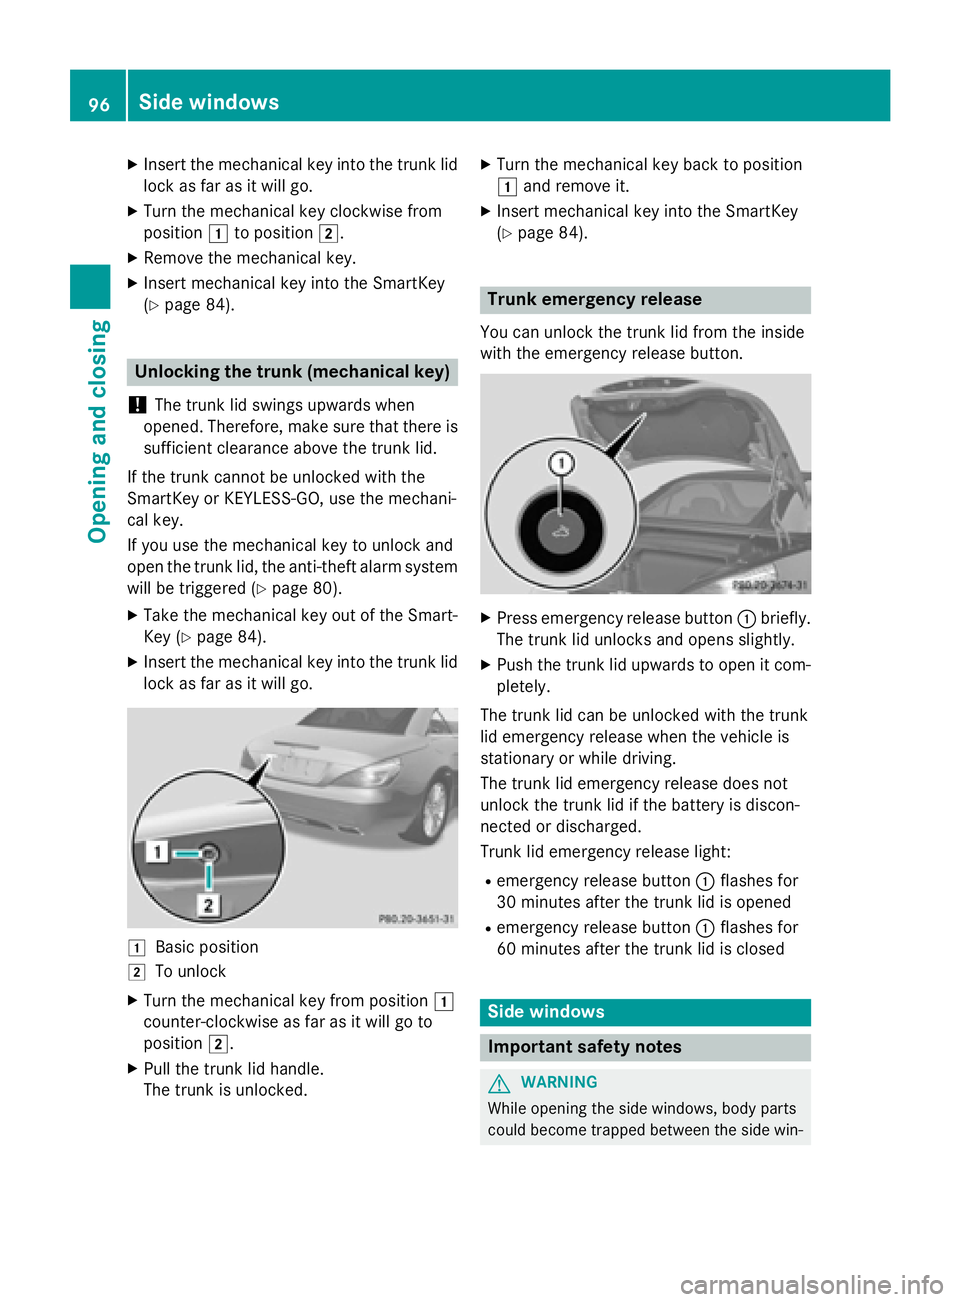
1Basic position
2To unlock
XTurn the mechanical key from position 1
counter-clockwise as far as it will go to
position 2.
XPull the trunk lid handle.
The trunk is unlocked.
XTurn the mechanical key back to position
1and remove it.
XInsert mechanical key into the SmartKey
(
Ypage 84).
Trunk emergency release
You can unlock the trunk lid from the inside
with the emergency release button.
XPress emergency release button :briefly.
The trunk lid unlocks and opens slightly.
XPush the trunk lid upwards to open it com-
pletely.
The trunk lid can be unlocked with the trunk
lid emergency release when the vehicle is
stationary or while driving.
The trunk lid emergency release does not
unlock the trunk lid if the battery is discon-
nected or discharged.
Trunk lid emergency release light:
Remergency release button :flashes for
30 minutes after the trunk lid is opened
Remergency release button :flashes for
60 minutes after the trunk lid is closed
Side windows
Important safety notes
GWARNING
While opening the side windows, body parts
could become trapped between the side win-
96Side windows
Opening and closing
Page 101 of 614
You can use the SmartKey to open or close all
side windows simultaneously.
XClose the roof (Ypage 101).
XOpen the trunk partition (Ypage 102).
XVehicles without KEYLESS-GO:point the
tip of the SmartKey at the door handle on
the driver's door.
XVehicles with KEYLESS-GO: the Smart-
Key must be within 6 ft (2 m) of the vehicle.
XTo open all side windows: press the%
button on the key until the side windows
are fully opened.
XTo interrupt the opening procedure:
release the %button.
XTo close all side windows: press the&
button on the key until the side windows
are fully closed.
XTo interrupt the closing procedure:
release the &button.
Convenience closing with KEYLESS-GO
GWARNING
When using the convenience closing feature,
parts of the body could be trapped in the clos-
ing area when a side window is being closed.
There is a risk of injury.
Observe the complete closing procedure
when the convenience closing feature is oper-
ating. Make sure that no body parts are in
close proximity during the closing procedure.
If someone is trapped:
XRelease the recessed sensor surface on the
door handle immediately.
XPull the door handle immediately and hold
it until the side windows open again.
With KEYLESS-GO you can close all side win-
dows simultaneously. The KEYLESS-GO key
must be outside the vehicle. All the doors
must be closed.
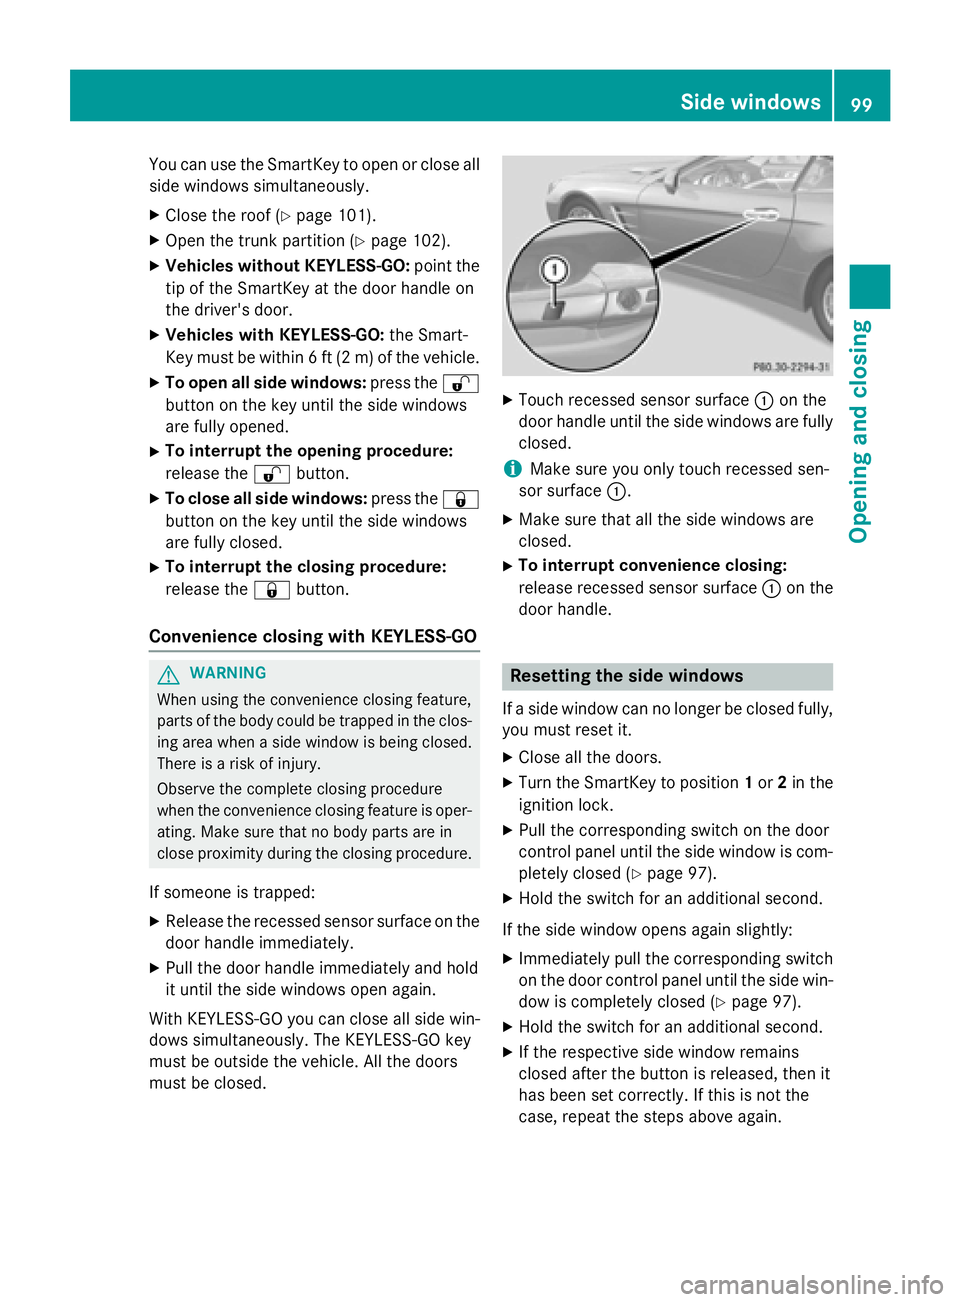
XTouch recessed sensor surface :on the
door handle until the side windows are fully
closed.
iMake sure you only touch recessed sen-
sor surface :.
XMake sure that all the side windows are
closed.
XTo interrupt convenience closing:
release recessed sensor surface :on the
door handle.
Resetting the side windows
If a side window can no longer be closed fully,
you must reset it.
XClose all the doors.
XTurn the SmartKey to position 1or 2in the
ignition lock.
XPull the corresponding switch on the door
control panel until the side window is com- pletely closed (
Ypage 97).
XHold the switch for an additional second.
If the side window opens again slightly:
XImmediately pull the corresponding switch
on the door control panel until the side win-
dow is completely closed (
Ypage 97).
XHold the switch for an additional second.
XIf the respective side window remains
closed after the button is released, then it
has been set correctly. If this is not the
case, repeat the steps above again.
Side windows99
Opening and closing
Z
Page 104 of 614
Opening and closing using the Smart-
Key
Important safety notes
GWARNING
When opening or closing the roof, body parts
could be trapped by, for example, the roof
mechanism, trunk lid or side windows. There
is a risk of injury.
When raising or lowering the roof, make sure
that no body parts are in the vicinity of moving
components. If someone becomes trapped,
release the button.
Opening and closing
XClose the trunk partition (Ypage 102).
XClose the trunk lid (Ypage 91).
XVehicles without KEYLESS-GO: point the
tip of the SmartKey at the door handle on
the driver's door.
XVehicles with KEYLESS-GO: the Smart-
Key must be within 6 ft (2 m) of the vehicle.
XTo open: press and hold the %button
on the key until the roof is fully opened.
The roof and the rear side windows open.
The front side windows close.
XTo interrupt the opening procedure:
release the %button.
XTo open the front side windows: press
the % button on the key again.
XTo close: press and hold the &button
on the key until the roof is fully closed.
The roof and the side windows close.
XTo interrupt the closing procedure:
release the &button.
When the roof is closed and the trunk parti-
tion is open, the roof cannot be opened using the SmartKey functions. Instead, all of the
side windows open or close simultaneously
(
Ypage 98).
Locking the roof again
Important safety notes
GWARNING
If you do not fully open/close the soft top, the
soft-top hydraulics depressurize after a short
time. This causes the soft top to lower unex-
pectedly and may cause you or others to be
trapped. There is a risk of injury.
Always open or close the soft top completely.
The roof is not locked if:
Rthe K symbol and the Vario-Roofin
Operationmessage appear in the multi-
function display
Rthe K symbol and the Open/Close
Vario-Roof Completelymessage
appear and you hear a warning tone.
Ryou hear a warning tone for up to 10 sec-
onds when pulling away or while driving.
Locking
You can lock the roof again if it is not locked
fully.
XPull over and stop the vehicle safely as soon
as possible, paying attention to road and
traffic conditions.
XMake sure that the SmartKey is in position
2 in the ignition lock.
XPress the roof switch (Ypage 101).
Trunk partition
General notes
!To avoid damaging the roof or luggage
when folding back the roof, you should:
Ronly load the trunk to below the trunk
partition
Rnot place any objects on or in front of the
trunk partition
102Roof
Opening and closing
Page 117 of 614
iFurther related subjects:
REASY-ENTRY/EXIT feature
(
Ypage 115)
RStoring settings (Ypage 119)
EASY-ENTRY/EXIT feature
Important safety notes
GWARNING
If you drive off while the EASY-ENTRY/EXIT
feature is making adjustments, you could lose
control of the vehicle. There is a risk of an
accident.
Always wait until the adjustment process is
complete before driving off.
GWARNING
When the EASY-ENTRY/EXIT feature adjusts
the steering wheel, you and other vehicle
occupants – particularly children – could
become trapped. There is a risk of injury.
While the EASY-ENTRY/EXIT feature is mak-
ing adjustments, make sure that no one has
any body parts in the sweep of the steering
wheel.
If somebody becomes trapped:
Rpress one of the memory function position
buttons, or
Rmove the switch for steering wheel adjust-
ment in the opposite direction to that in
which the steering wheel is moving.
The adjustment process is stopped.
GWARNING
When the EASY-ENTRY/EXIT feature adjusts
the steering wheel and the driver's seat, you
and other vehicle occupants – particularly
children – could become trapped. There is a
risk of injury.
While the EASY-ENTRY/EXIT feature is mak-
ing adjustments, make sure that no one has
any body parts in the sweep of the seat and
the steering wheel.
If somebody becomes trapped:
Rpress one of the memory function position
buttons, or
Rpress one of the memory function memory
buttons, or
Rmove the switch for steering wheel adjust-
ment in the opposite direction to that in
which the steering wheel is moving
The adjustment process is stopped.
GWARNING
If you use openings in the bodywork or
detachable parts as steps, you could:
Rslip and/or fall
Rdamage the vehicle and cause yourself to
fall.
There is a risk of injury.
Always use secure climbing aids, e.g. a suita-
ble ladder.
The EASY-ENTRY/EXIT feature makes getting
in and out of your vehicle easier.
You can activate and deactivate the EASY-
ENTRY/EXIT feature in the on-board com-
puter (
Ypage 235).
Position of the steering wheel when the
EASY-ENTRY/EXIT feature is active
The steering wheel swings upwards when
you:
Rremove the SmartKey from the ignition lock
Ropen the driver's door with KEYLESS-GO in position 1
Ropen the driver's door and the SmartKey is
in position 0or 1in the ignition lock
iThe steering wheel only moves upwards if
it has not already reached the upper end
stop.
Steering wheel115
Seats, steering wheel and mirrors
Z
Page 118 of 614
Position of the steering wheel for driv-
ing
The steering wheel is moved to the last selec-
ted position when:
Rthe driver's door is closed
Ryou insert the SmartKey into the ignition
lock
or
Ryou press the Start/Stop button once on
vehicles with KEYLESS-GO
When you close the driver's door with the
ignition switched on, the steering wheel is
also automatically moved to the previously
set position.
The last position of the steering wheel is
stored when you switch off the ignition or
when you store the setting with the memory
function (
Ypage 119).
Crash-responsive EASY-EXIT feature
If the crash-responsive EASY-EXIT feature is
triggered in an accident, the steering column
will move upwards when the driver's door is
opened. This occurs irrespective of the posi-
tion of the SmartKey in the ignition lock. This
makes it easier to exit the vehicle and rescue the occupants.
The crash-responsive EASY-EXIT feature is
only operational if the EASY-EXIT/ENTRY fea-
ture is activated in the on-board computer
(
Ypage 235).
Mirrors
Exterior mirrors
Adjusting the exterior mirrors
GWARNING
You could lose control of your vehicle if you do the following while driving:
Radjust the driver's seat, head restraint,
steering wheel or mirrors
Rfasten the seat belt
There is a risk of an accident.
Adjust the driver's seat, head restraint, steer-ing wheel and mirror and fasten your seat belt
before starting the engine.
GWARNING
The exterior mirror on the front-passenger
side reduces the size of the image. Visible
objects are actually closer than they appear.
This means that you could misjudge the dis-
tance from road users traveling behind, e.g.
when changing lane. There is a risk of an acci-
dent.
For this reason, always make sure of the
actual distance from the road users traveling
behind by glancing over your shoulder.
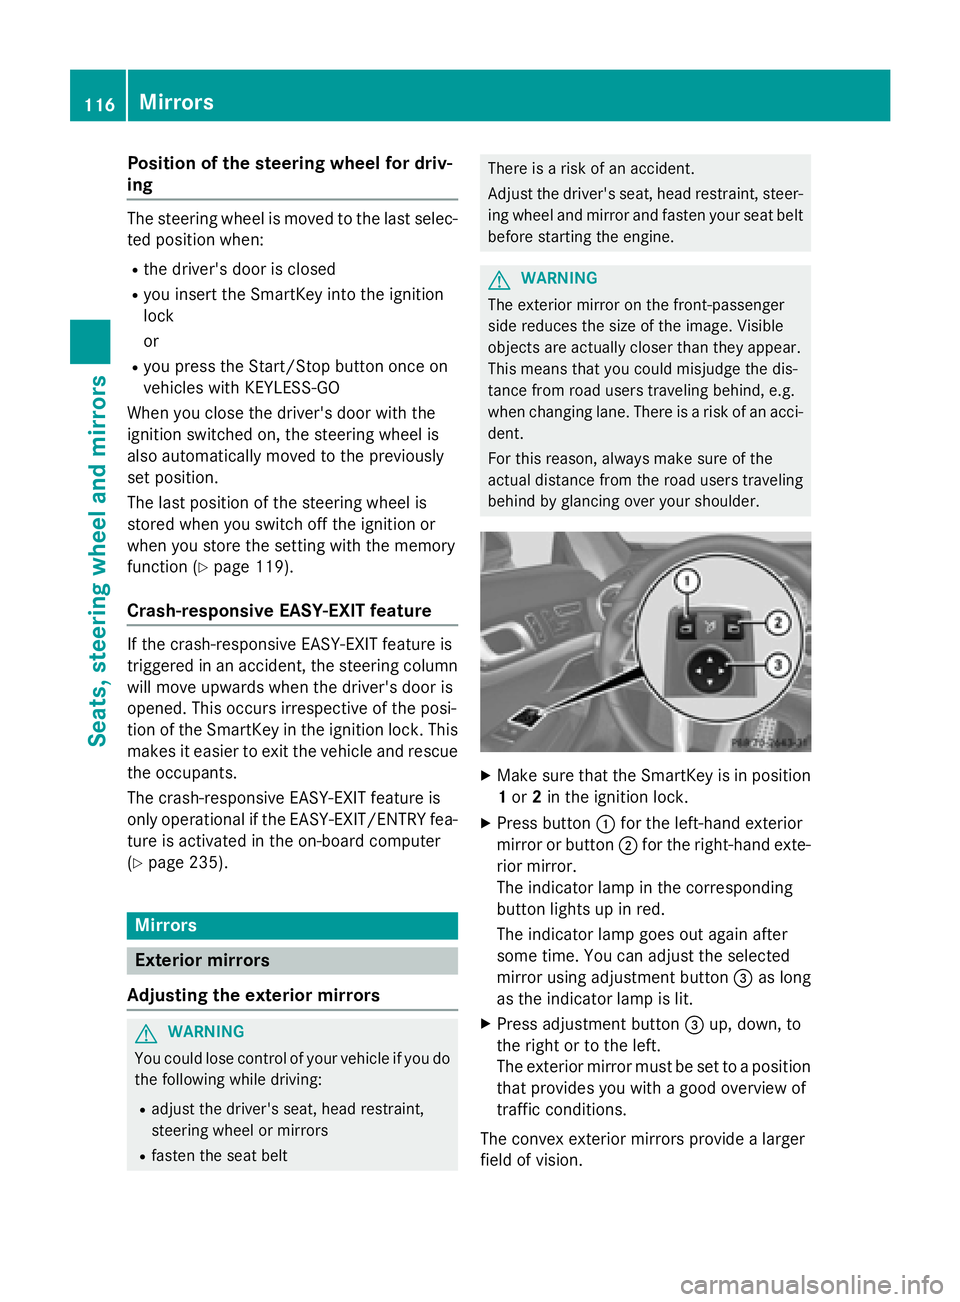
XMake sure that the SmartKey is in position 1 or 2in the ignition lock.
XPress button :for the left-hand exterior
mirror or button ;for the right-hand exte-
rior mirror.
The indicator lamp in the corresponding
button lights up in red.
The indicator lamp goes out again after
some time. You can adjust the selected
mirror using adjustment button =as long
as the indicator lamp is lit.
XPress adjustment button =up, down, to
the right or to the left.
The exterior mirror must be set to a position
that provides you with a good overview of
traffic conditions.
The convex exterior mirrors provide a larger
field of vision.
116Mirrors
Seats, steering wheel and mirrors