MERCEDES-BENZ SL ROADSTER 2008 Owners Manual
Manufacturer: MERCEDES-BENZ, Model Year: 2008, Model line: SL ROADSTER, Model: MERCEDES-BENZ SL ROADSTER 2008Pages: 317, PDF Size: 5.35 MB
Page 261 of 317
Changing th
ebatteries 258
X
Remove th eemergenc ykey elemen tfrom
th ek ey ( Ypage 255).
X Inser tthe emergenc ykey elemen tint ot he
loc koft heglov ecom partmen tand tur nit
to position $.
You can open th eglovec om partment. Lowering th
eloading aid manually
If it is no longer possible to lower th estowed
roo fint heboot usin gthe loadin gaid, and you
therefor ecanno tclose th eboot ,proceed as
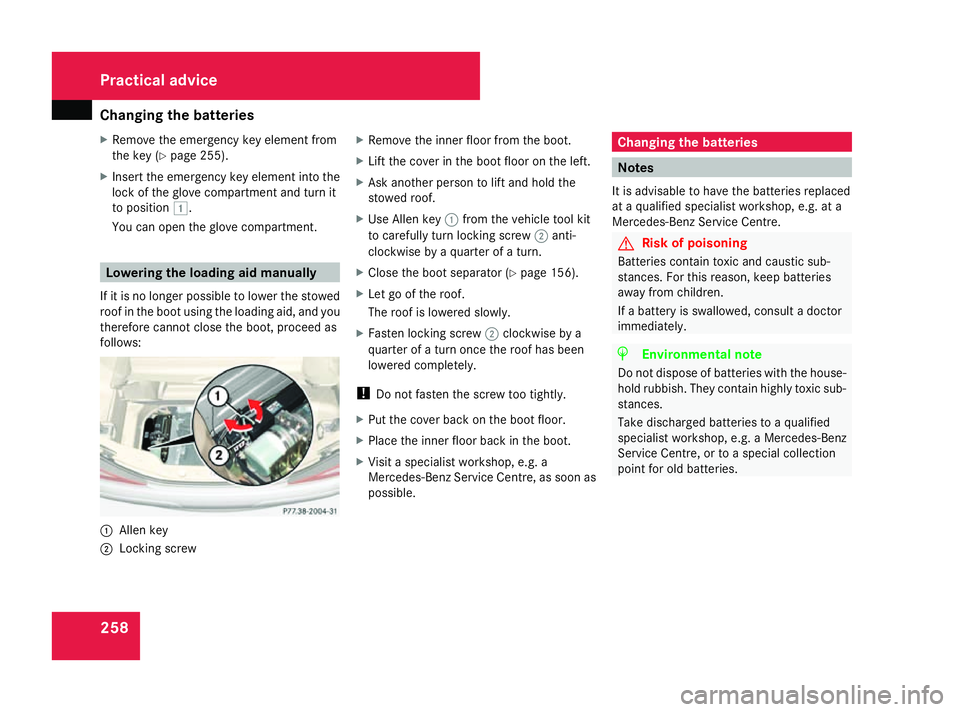
follows: 1
Alle nkey
2 Lockin gscrew X
Remov ethe inner floo rfromt heboot.
X Lif tthe cover in th eboot floo rontheleft.
X Ask another person to lift and hold the
stowed roof.
X Use Alle nkey1 from th evehicle tool kit
to carefully tur nlocking screw 2anti-
clockwis ebyaquarter of aturn.
X Close th eboot separator (Y page 156).
X Let go of th eroof.
The roof is lowered slowly.
X Fasten locking screw 2clockwis ebya
quarter of aturno ncet he roof has been
lowered completely.
! Do not fasten th escrew to otightly.
X Put th ecover back on th eboot floor.
X Place th einner floo rback in th eboot.
X Visit aspecialist workshop, e.g .a
Mercedes-Ben zServic eCentre, as soon as
possible. Changing th
ebatteries Notes
It is advisabl etohave th ebatteries replaced
at aq ualified specialist workshop, e.g .ata
Mercedes-Ben zServic eCentre. G
Risk of poisoning
Batteries contain toxic and caustic sub-
stances. For this reason, kee pbatteries
away from children.
If ab attery is swallowed, consult adoctor
immediately. H
Environmental note
Do not dispos eofbatteries with th ehouse-
hold rubbish .They contain highly toxic sub-
stances.
Take discharge dbatteries to aqualified
specialist workshop, e.g .aMercedes-Benz
Servic eCentre, or to aspecial collection
poin tfor old batteries. Practical advice
230_AKB; 5; 4, en-GB
bjanott
,V ersion: 2.9.6
2008-04-08T15:09:54+02:00
-Seite 258 Dateiname: 6515_3089_02_buchblock.pdf; preflight
Page 262 of 317
Changing th
ebulbs 259Key or KEYLESS GO key*
Checking th ebatteries X
Press the jork button.
The batteries are in order if th ebattery
charge indicator lamp lights up briefly.
Changing th ebatteries You require two CR 2025
3Vcellb atteries.
X Remove th eemergenc ykey elemen tfrom
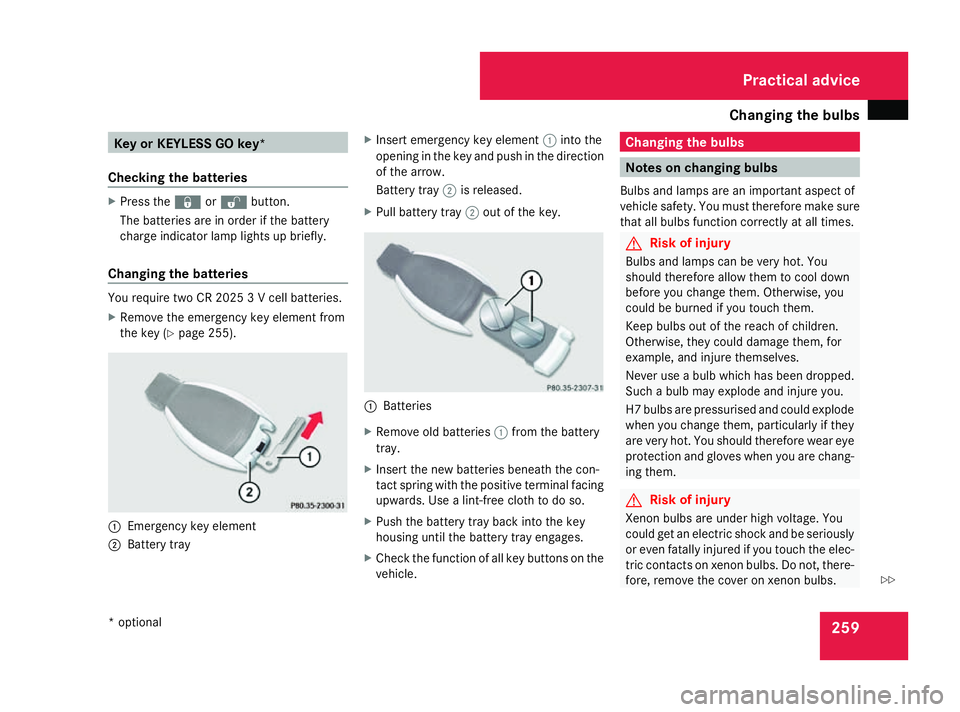
th ek ey ( Ypage 255). 1
Emergency ke yelement
2 Battery tray X
Inser temergenc ykey element 1intot he
opening in th ekeyand push in th edirection
of th earrow.
Battery tray 2is released.
X Pull battery tray 2out of th ekey. 1
Batteries
X Remove old batteries 1from th ebattery
tray.
X Inser tthe newb atteries beneat hthe con-
tac tspring wit hthe positive termina lfacing
upwards. Use alint-free cloth to do so.
X Push th ebattery tray bac kintot he key
housing until th ebattery tray engages.
X Chec kthe function of all ke ybuttons on the
vehicle. Changing th
ebulbs Notes on changing bulbs
Bulb sand lamps are an important aspec tof
vehicl esafety. You must therefor emakes ure
that all bulbs function correctl yatall times. G
Ris
kofi njury
Bulb sand lamps can be ver yhot.Y ou
should therefor eallow them to cool down
before you chang ethem. Otherwise, you
could be burned if you touch them.
Kee pbulbs out of th ereac hofc hildren.
Otherwise, they could damag ethem, for
example, and injure themselves.
Never use abulb whic hhas been dropped.
Suc hab ulb may explode and injure you.
H7 bulbs are pressurised and could explode
when you chang ethem, particularly if they
are ver yhot.Y ou should therefor ewear eye
protection and gloves when you are chang-
ing them. G
Ris
kofi njury
Xenon bulbs are under high voltage. You
could get an electric shock and be seriously
or eve nfatally injured if you touch th eelec-
tric contact sonxenonbulbs.Don ot,the re-
fore, remove th ecover on xeno nbulbs. Practical advice
*o ptional
230_AKB; 5; 4, en-GB
bjanott
,V ersion: 2.9.6
2008-04-08T15:09:54+02:00
-Seite 259 ZDateiname: 6515_3089_02_buchblock.pdf; preflight
Page 263 of 317
Changing th
ebulbs 260 Do no
tchang ex enon bulbs yourself ,but
have them replace dataqualified specialist
workshop whic hhas th eneces saryspecial-
ist knowledge and tools to carry out the
wor krequired.
Mercedes-Benz recommends that you use
aM ercedes-Benz Service Centr efor this
purpose .Inparticular, wor krelevan tto
safet yoro nsafety-related systems must be
carried out at aqualified specialist work-
shop.
! Do no tchang et he LEDs yourself .You
could otherwise damag ethe LEDs or parts
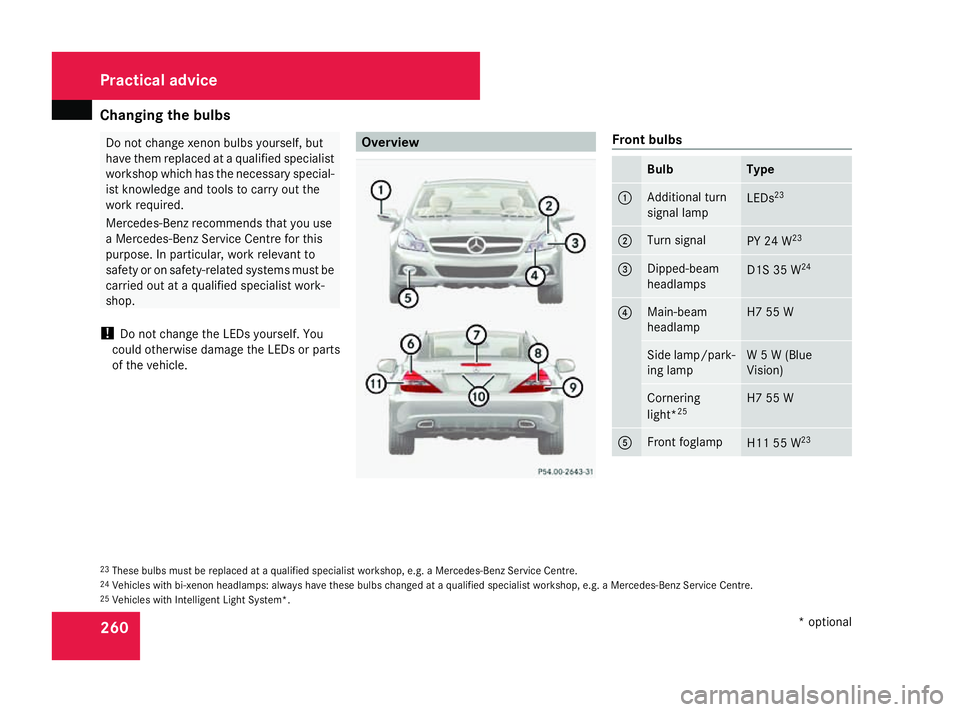
of th evehicle. Overview Front bulbs
Bulb Type
1 Additional turn
signal lamp LEDs
23 2 Turn signal
PY 24 W
23 3 Dipped-beam
headlamps
D1S35W
24 4 Main-beam
headlamp H7 55 W
Side lamp/park-
ing lamp W5W(
Blue
Vision) Cornering
light*
25 H7 55 W
5 Front foglamp
H11 55 W
23 23
These bulbs must be replaced at aqualifie dspecialist workshop, e.g .aMercedes-Ben zServic eCentre.
24 Vehicles with bi-xenon headlamps: always have these bulbs changed at aqualifie dspecialist workshop, e.g .aMercedes-Ben zServic eCentre.
25 Vehicles with Intelligen tLight System*. Practical advice
*optional
230_AKB; 5; 4, en-GB
bjanott ,V ersion: 2.9.6
2008-04-08T15:09:54+02:00
-Seite 260 Dateiname: 6515_3089_02_buchblock.pdf; preflight
Page 264 of 317
Changing th
ebulbs 261
Rea
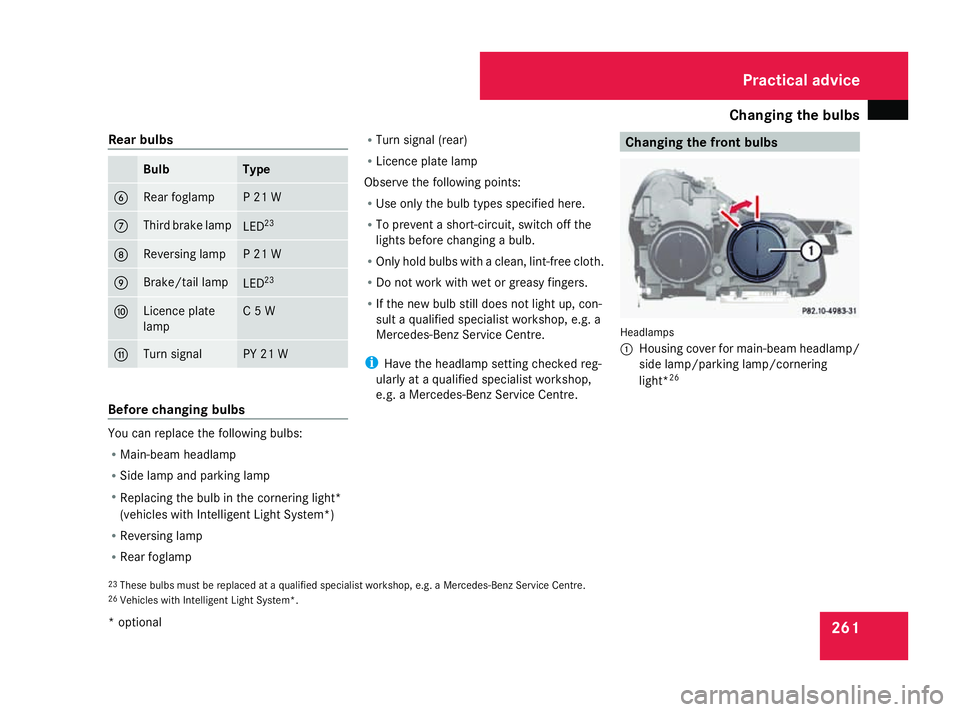
rbulbs Bulb Type
6 Rear foglamp P21W
7 Thir
dbrak elamp LED
23 8 Reversing lamp P21W
9 Brake/tail lamp
LED
23 a Licence plate
lamp C5W
b Turn signal PY 21 W
Before changing bulbs
You can replace th
efollowin gbulbs:
R Main-beam headlamp
R Sid elamp and parking lamp
R Replacing th ebulb in th ecorner ingl ight*
(vehicles wit hIntel ligent Light System*)
R Reversing lamp
R Rear foglamp R
Turn signal (rear)
R Licence plat elamp
Observ ethe followin gpoints:
R Use only th ebulb types specifie dhere.
R To preven tashort-circuit ,switch off the
lights before changing abulb.
R Only hold bulbs wit haclean, lint-free cloth.
R Do no tworkw ithw et or greasy fingers.
R If th enew bulb still does no tligh tup, con-
sult aqualified specialist workshop, e.g. a
Mercedes-Benz Service Centre.
i Hav ethe headlamp setting checke dreg-
ularly at aqualified specialist workshop,
e.g. aMercedes-Benz Service Centre. Changing th
efront bulbs Headlamps
1
Housin gcover for main-beam headlamp/
side lamp/parking lamp/cornering
light* 26
23 These bulbs mus tbereplace dataq ualified specialist workshop ,e.g.aM ercedes-Ben zServic eCentre.
26 Vehicles wit hIntel ligent Light System*. Practical advice
*o ptional
230_AKB; 5; 4, en-GB
bjanott
,V ersion: 2.9.6
2008-04-08T15:09:54+02:00
-Seite 261 ZDateiname: 6515_3089_02_buchblock.pdf; preflight
Page 265 of 317
Changing th
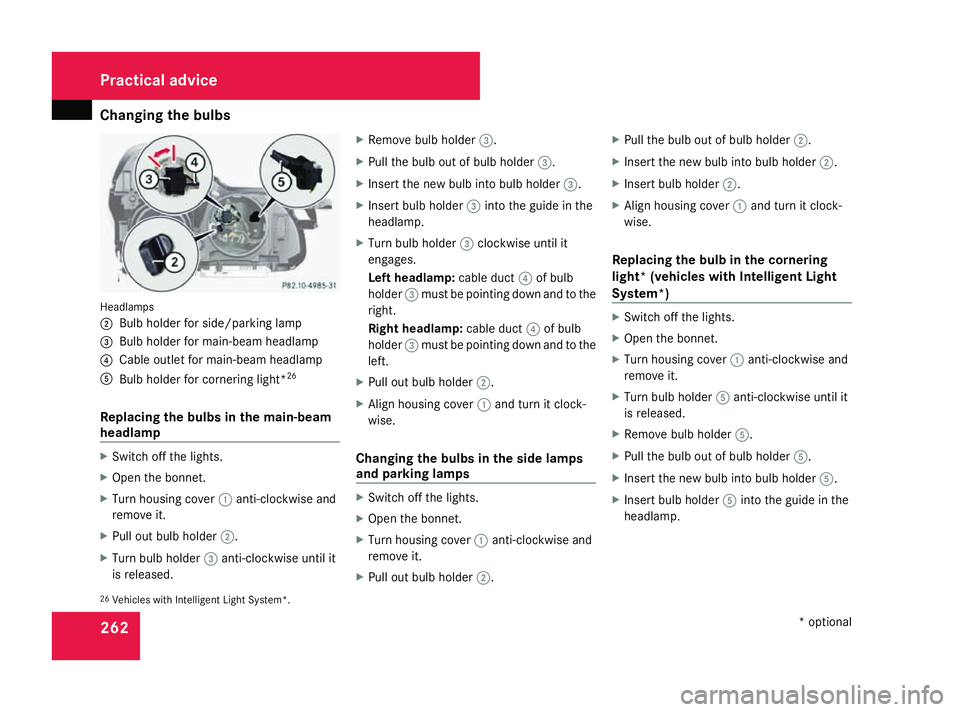
ebulbs 262Headlamps
2
Bulb holder for side/parking lamp
3 Bulb holder for main-beam headlamp
4 Cable outle tfor main-beam headlamp
5 Bulb holder for cornering light* 26
Replacing th ebulbs in th emain-beam
headlamp X
Switch off th elights.
X Open th ebonnet.
X Turn housin gcover 1anti-clockwise and
remove it.
X Pull out bulb holder 2.
X Turn bulb holder 3anti-clockwise until it
is released. X
Remov ebulb holder 3.
X Pull th ebulb out of bulb holder 3.
X Insert th enew bulb int obulb holder 3.
X Insert bulb holder 3intot he guide in the
headlamp.
X Turn bulb holder 3clockwis euntil it
engages.
Left headlamp: cable duct4of bulb
holder 3must be pointin gdown and to the
right.
Righ theadlamp: cable duct 4of bulb
holder 3must be pointin gdown and to the
left.
X Pull out bulb holder 2.
X Alig nhousin gcover 1and tur nitclock-
wise.
Changing th ebulbs in th eside lamps
and parking lamps X
Switch off th elights.
X Open th ebonnet.
X Turn housin gcover 1anti-clockwise and
remove it.
X Pull out bulb holder 2. X
Pull th ebulb out of bulb holder 2.
X Insert th enew bulb int obulb holder 2.
X Insert bulb holder 2.
X Alig nhousin gcover 1and tur nitclock-
wise.
Replacing th ebulb in th ecornering
light *(vehicles with Intelligent Light
System*) X
Switch off th elights.
X Open th ebonnet.
X Turn housin gcover 1anti-clockwise and
remove it.
X Turn bulb holder 5anti-clockwise until it
is released.
X Remov ebulb holder 5.
X Pull th ebulb out of bulb holder 5.
X Insert th enew bulb int obulb holder 5.
X Insert bulb holder 5intot he guide in the
headlamp.
26 Vehicles with Intelligen tLigh tSystem*. Practical advice
*optional
230_AKB; 5; 4, en-GB
bjanott
,V ersion: 2.9.6
2008-04-08T15:09:54+02:00
-Seite 262 Dateiname: 6515_3089_02_buchblock.pdf; preflight
Page 266 of 317
Changing th
ebulbs 263
X
Turn bulb holder 5clockwise until it
engages.
The handle of bulb holder 5must be hor-
izontal.
X Align housing cover 1and tur nitclock-
wise. Changing th
erearb ulbs
Opening and closin gthe sidetrimp an-
els You must open th
ecorre sponding side trim
panel in th eboot to chang ethe bulbs.
Left-hand sid etrimp anel Left-han
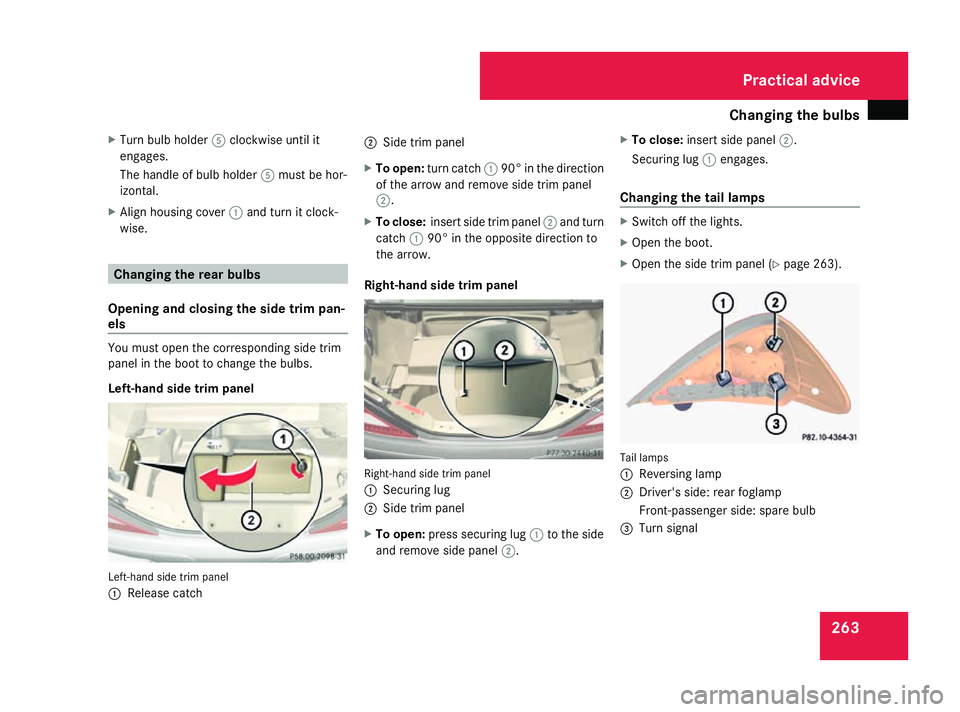
dside trim panel
1 Releas ecatch 2
Sidetrimp anel
X To open: turnc atch 190°int he direction
of the arrow and remove side trim panel
2.
X To close: insert side trim panel 2and turn
catch 190° in the opposite direction to
the arrow.
Right-han dsidet rim panel Right-hand side trim panel
1
Securing lug
2 Sidetrim panel
X To open: press securing lug 1to the side
and remove side panel 2.X
To close: insert side panel 2.
Securing lug 1engages.
Changin gthe tail lamps X
Switch off the lights.
X Ope nthe boot.
X Ope nthe side trim panel (Y page 263). Tail lamps
1
Reversing lamp
2 Driver' sside: rearfoglamp
Front-passenger side :spare bulb
3 Turn signal Practical advice
230_AKB; 5; 4, en-GB
bjanott,
Version: 2.9.6 2008-04-08T15:09:54+02:00-Seite 263 ZDateiname: 6515_3089_02_buchblock.pdf; preflight
Page 267 of 317
Replacing the wiper blades
264
X
Turn the corresponding bulb holde ranti-
clockwise and remove it.
X Pull the corresponding bulb ou tofthe bulb
holder.
X Insert the appropriate new bulb into the
bulb holder.
X Insert the corresponding bulb holde rand
turn it clockwise.
X Close the side trim panel (Y page 263).
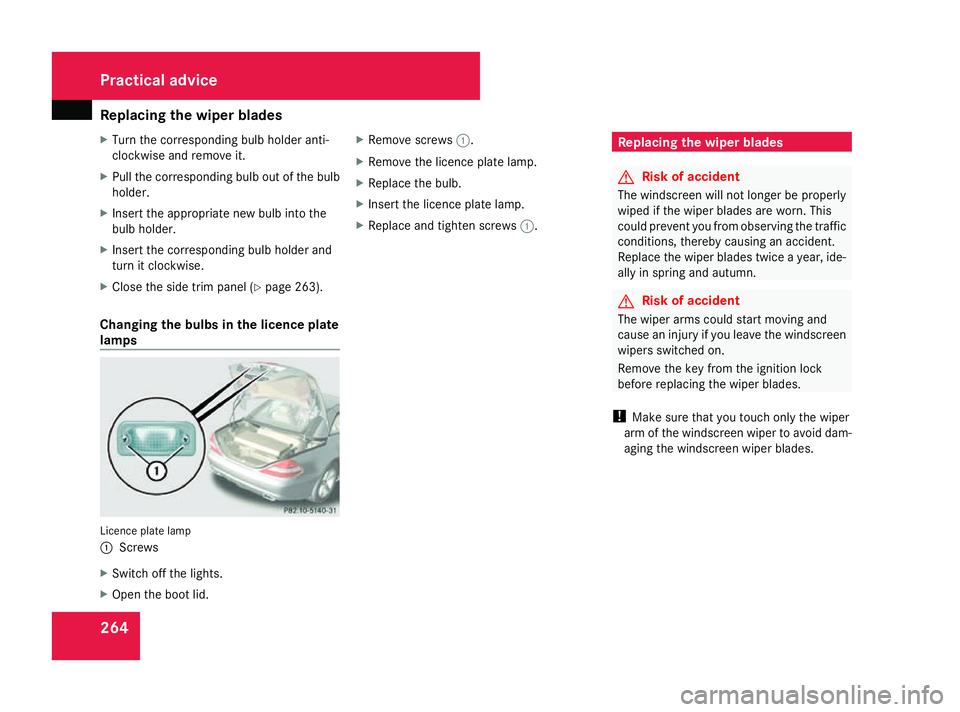
Changin gthe bulbs in the licenc eplate
lamps Licence plate lamp
1
Screws
X Switch off the lights.
X Ope nthe boo tlid. X
Remove screws 1.
X Remove the licence plate lamp.
X Replace the bulb.
X Insert the licence plate lamp.
X Replace and tighten screws 1. Replacing the wiper blades
G
Ris
kofa ccident
The windscree nwilln ot longer be properly
wipe difthe wipe rblade sare worn. This
could prevent yo ufrom observing the traffic
conditions, thereb ycausing an accident.
Replace the wipe rblade stwice ayear, ide-
ally in spring and autumn. G
Ris
kofa ccident
The wipe rarm sc ould start moving and
cause an injury if yo ulea ve the windscreen
wipers switched on.
Remove the key from the ignition lock
before replacing the wipe rblade s.
! Make sure tha tyou touch onl ythe wiper
arm of the windscree nwiper to avoid dam-
aging the windscree nwiper blades. Practical advice
230_AKB; 5; 4, en-GB
bjanott,
Version: 2.9.6 2008-04-08T15:09:54+02:00-Seite 264 Dateiname: 6515_3089_02_buchblock.pdf; preflight
Page 268 of 317
Replacing the wiper blades
265Removing
Movin gthe wiper blades to avertical
position Vehicles withou
tKEYLESS GO*
X Make sure tha tthe key is in position 1or
2 in the ignition lock.
X Set the windscree nwiper stop osition II
(Y page 93) on the combinatio nswitch.
X Whe nthe wipe rarm sh aver eached aver-
tica lposition, turn the key to position 0and
remove it from the ignition lock.
X Fol dthe wipe rarm away from the wind-
screen unti litengages.
X Set the wipe rblade at right angle stothe
wipe rarm.
Vehicles with KEYLES SGO*
X Switch off the engine.
X Take your foo toff the brake pedal.
X Set the windscree nwiper stop osition II
(Y page 93) on the combinatio nswitch.
X Press the KEYLESS GO button repeatedly
unti lthe windscree nwiper sstart. X
Whe nthe wipe rarm sh aver eached aver-
tica lposition, press the KEYLESS GO but-
ton again.
X Fol dthe wipe rarm away from the wind-
screen unti litengages.
X Set the wipe rblade at right angle stothe
wipe rarm.
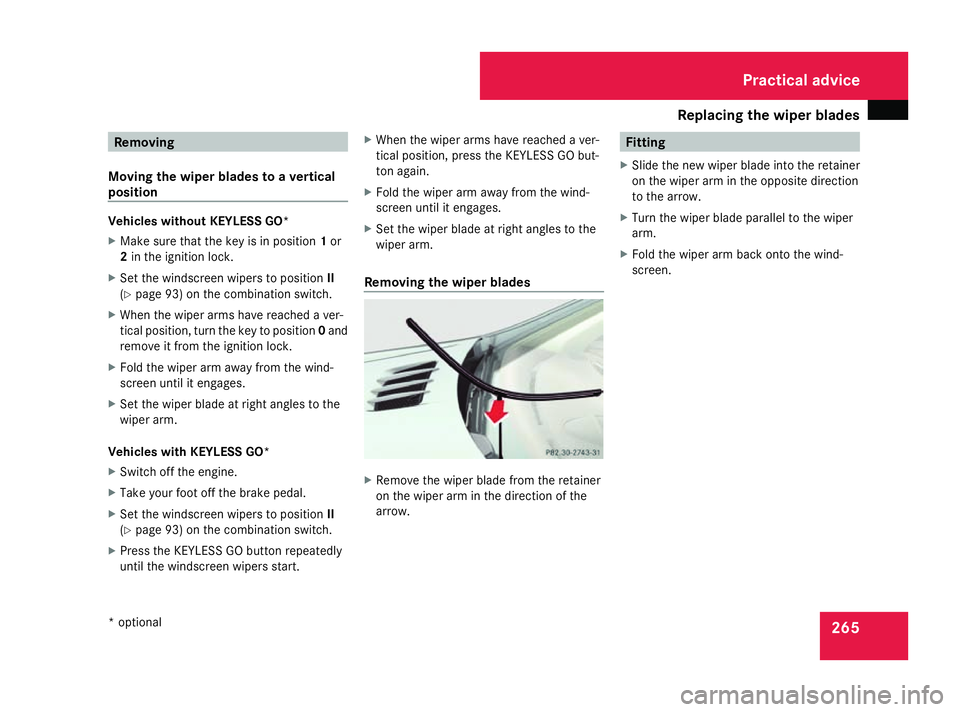
Removing the wiper blades X
Remove the wipe rblade from the retainer
on the wipe rarm in the direction of the
arrow. Fitting
X Slide the new wipe rblade into the retainer
on the wipe rarm in the opposite direction
to the arrow.
X Turn the wipe rblade paralle ltothe wiper
arm.
X Fol dthe wipe rarm back onto the wind-
screen. Practical advice
*o ptional
230_AKB; 5; 4, en-GB
bjanott,
Version: 2.9.6 2008-04-08T15:09:54+02:00-Seite 265 ZDateiname: 6515_3089_02_buchblock.pdf; preflight
Page 269 of 317
Flat tyre
266 Flat tyre
Flat tyre
Your vehicl emay be equipped with:
R aT IREFI Tkit (Ypage 201)
R as par ew heel* (Y page 201)
R theM OExtended run-flat sys-
tem* (Y page 275) Preparing th
evehicle
i Vehicl epreparation is no tneces saryon
vehicles wit hMOE tyres*.
X Stop your vehicl easfar away from traffic
as possibl eonsolid, non-slippery, level
ground.
X Switc hont hehazard warnin glamps.
X Firmly depress th eparkin gbrake.
X Mov ethe selector lever to P.
X Allo ccupant smustg et out of th evehicle.
Mak esuret hatthe ya re no tend angered as
they do so.
X Mak esuret hatnoo neis near th edanger
area whils tawheelisb eingchanged. Any-
on ew ho is no tdirectl yassistin ginthe whee
lcha ng es hould, fo rexample, stand
behin dthe barrier.
X Switc hoffthee ngine.
X Remove th ekeyfrom th eignition lock.
X Get out of th evehicle.
X Clos ethe driver's door.
X Plac ethe warnin gtriangle ( Ypage 200) at
as uitable distance. Observ elegal require-
ments. Usin
gthe TIREFIT kit
You can use th eTIREFI Tkitto seal small
punctures ,particularl ytho se in th etyret read.
You can use TIREFI Tinoutdoo rtem peratures
down to -2 0°C. G
Risk of accident
In th efollowing situations, your safet yisat
particular ris kand tyr esealant is unable to
provid ebreakdown assistance:
R if there are cut sorpunctures in th etyre
greate rtha n4mm
R if th ewhee lrim is damaged
R if you hav edriven at ver ylow tyr epres-
sures or on aflat tyre Do no
tdrive any further. Consult aqualified
specialist workshop whic hhas th eneces-
sar yspecialist knowledge and tools to carry
out th eworkr equired.
Mercedes-Ben zrecommends that you use
aM ercedes-Ben zServi ce Centr efor this
purpose .Inparticular, wor krelevan tto
safet yoro nsafety-related systems mus tbe
carrie dout at aqualified specialist work-
shop.
X Do no tremove any foreign objects which
hav epenetrated th etyre, e.g. screw sor
nails.
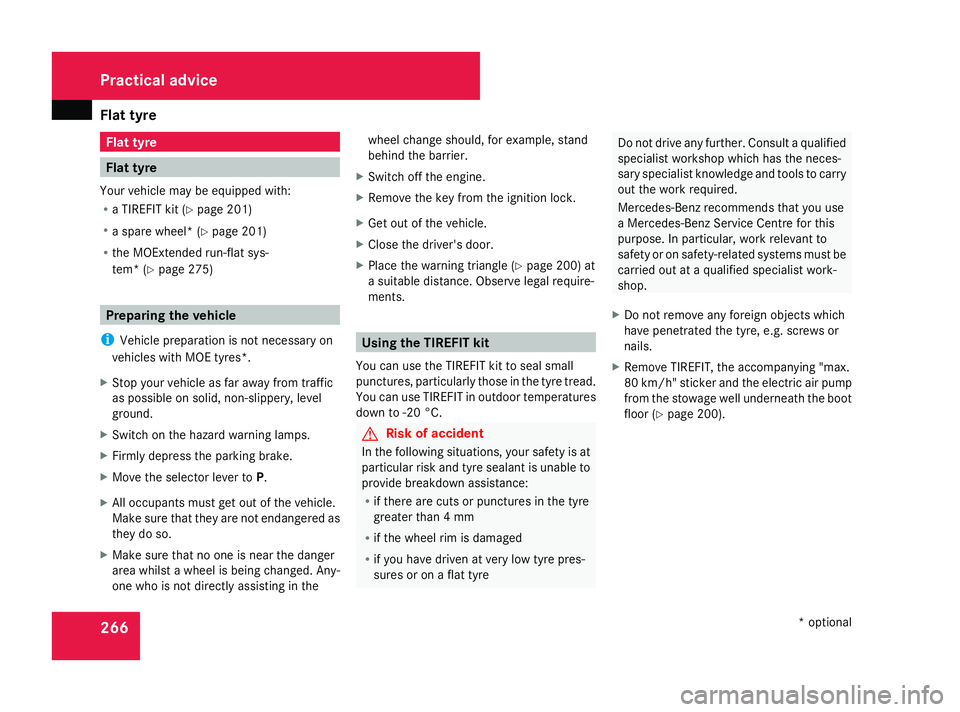
X Remove TIREFIT, th eaccompanying "max.
80 km/h "sticke rand the electric ai rpump
fro mt he stowage well underneath the boot
floo r(Ypage 200). Practical advice
*optional
230_AKB; 5; 4, en-GB
bjanott,
Version: 2.9.6 2008-04-08T15:09:54+02:00-Seite 266 Dateiname: 6515_3089_02_buchblock.pdf; preflight
Page 270 of 317
Flat tyre
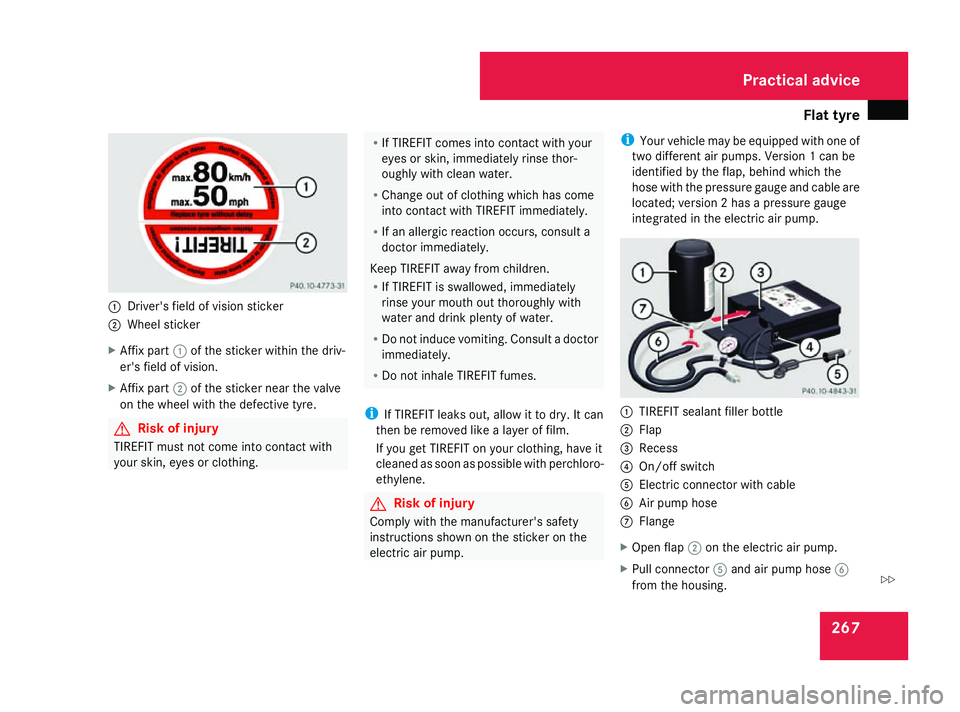
2671
Driver's field of vision sticker
2 Wheel sticker
X Affix part 1of th esticker within th edriv-
er' sfield of vision.
X Affix part 2of th esticker near th evalve
on th ewheel with th edefective tyre. G
Risk of injury
TIREFI Tmust not com eintoc ontac twith
your skin, eyes or clothing. R
If TIREFI Tcomes int ocontac twith your
eyes or skin, immediately rinse thor-
oughly with clean water.
R Chang eout of clothing whic hhas come
int oc ontac twith TIREFI Timmediately.
R If an allergic reactio noccurs, consult a
docto rimmediately.
Keep TIREFI Taway from children.
R If TIREFI Tisswallowed ,immediately
rinse your mout hout thoroughly with
water and drin kplenty of water.
R Do not induce vomiting. Consult adoctor
immediately.
R Do not inhale TIREFI Tfumes.
i If TIREFI Tleak sout, allow it to dry. It can
then be removed lik ealayer of film.
If you get TIREFI Tonyour clothing ,have it
cleaned as soon as possible with perchloro-
ethylene. G
Risk of injury
Comply with th emanufacturer' ssafety
instruction sshown on th esticker on the
electric air pump. i
Your vehicle may be equipped with one of
two differen tair pumps. Version 1can be
identified by th eflap, behin dwhichthe
hose with th epressure gauge and cable are
located ;version 2hasap ressure gauge
integrated in th eelectric air pump. 1
TIREFI Tsealan tfille rbottle
2 Flap
3 Recess
4 On/of fswitch
5 Electric connecto rwith cable
6 Air pump hose
7 Flange
X Open flap 2on th eelectric air pump.
X Pull connector 5and air pump hose 6
from th ehousing. Practical advice
230_AKB
;5;4,en-GB
bjanott, Version:2.9.6
2008-04-08T15:09:54+02:00
-Seite 267 ZDateiname: 6515_3089_02_buchblock.pdf; preflight