tow MERCEDES-BENZ SL ROADSTER 2008 Owner's Guide
[x] Cancel search | Manufacturer: MERCEDES-BENZ, Model Year: 2008, Model line: SL ROADSTER, Model: MERCEDES-BENZ SL ROADSTER 2008Pages: 317, PDF Size: 5.35 MB
Page 129 of 317
Driving sys
tems 1261
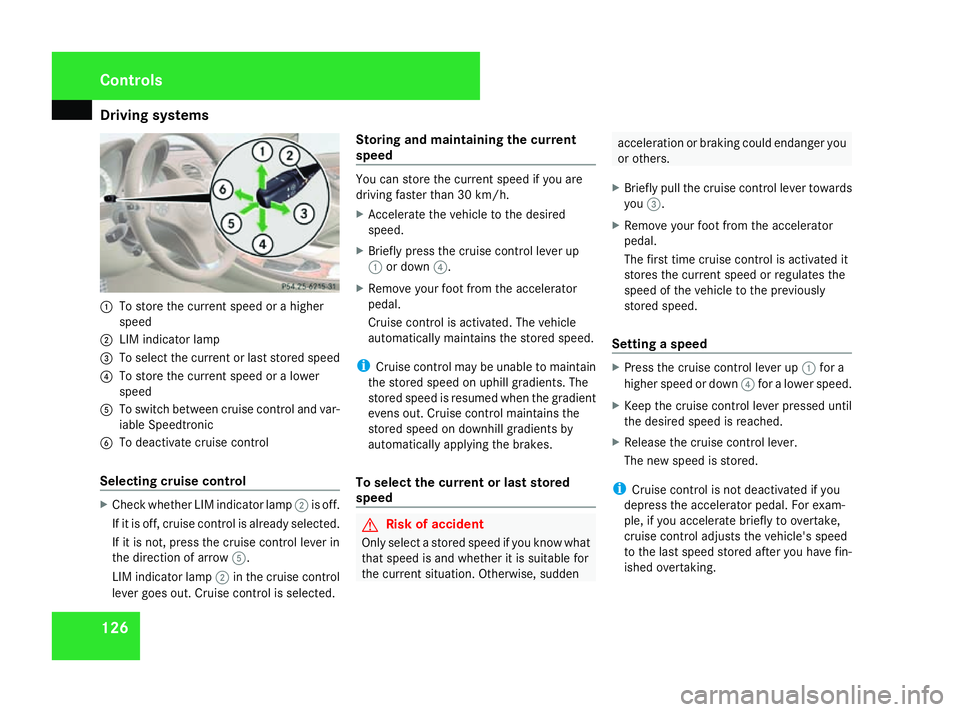
To store the current spee dorahigher
speed
2 LIM indicator lamp
3 To select the current or last store dspeed
4 To store the current spee doralower
speed
5 To switc hbetween cruisecontro land var-
iabl eSpeedtronic
6 To deactivat ecruis econtrol
Sele ctingc ruise control X
Check whether LIM indicator lamp 2is off.
If it is off, cruis econtro lisalready selected.
If it is not, pres sthe cruis econtro llever in
the direction of arrow 5.
LIM indicator lamp 2in the cruis econtrol
leve rgoeso ut.C ruis econtro lisselected. Storin
gand maintainin gthe current
speed Yo
uc an store the current spee difyou are
drivin gfastert ha n30k m/h.
X Accelerate the vehicle to the desired
speed.
X Briefly pres sthe cruis econtrol leve rup
1or down 4.
X Remove your footfromt he accelerator
pedal.
Cruise control is activated. Th evehicle
automaticall ymaintains the store dspeed.
i Cruise control ma ybeunable to maintain
the store dspeed on uphill gradients .The
store dspeed is resume dwhent he gradient
evens out. Cruise control maintains the
store dspeed on downhill gradients by
automaticall yapplyin gthe brakes.
To select the current or last stored
speed G
Ris
kofa ccident
Onl yselec tastore dspeed if youknow what
tha tspeed is andwhether it is suitabl efor
the current situation. Otherwise ,sudden acceleration or braking could endange
ryou
or others.
X Briefly pull the cruis econtrol leve rtowards
you 3.
X Remove your footfromt he accelerator
pedal.
Th ef irst tim ecruis econtrol is activate dit
store sthe current spee dorregulate sthe
spee doft he vehicle to the previously
store dspeed.
Settin gaspeed X
Pres sthe cruis econtrol leve rup1for a
higher spee dordown4for alower speed.
X Keep the cruis econtrol leve rpressed until
the desire dspeed is reached.
X Release the cruis econtrol lever.
Th en ew spee disstored.
i Cruise control is not deactivate difyou
depres sthe accelerato rpedal .For exam-
ple, if yo uaccelerate briefl ytoovertake,
cruis econtrol adjusts the vehicle's speed
to the last spee dstore dafter you have fin-
ishe dovertaking. Cont
rols
230_AKB; 5; 4, en-GB
bjanott
,V ersion: 2.9.6
2008-04-08T15:09:54+02:00
-Seite 126 Dateiname: 6515_3089_02_buchblock.pdf; preflight
Page 133 of 317
Driving sys
tems 130
Making adjustments in 10 km/
hincre-
ments X
Briefl ypress the cruis econtrol lever up
1 for ahighe rspeed or down 4for a
lowe rspeed.
Th elasts peed stored is increase dor
reduced.
Making fine adjustments in 1km/h
increments X
Fo rah ighe rs peed: brieflypullt he cruise
control lever towards you 3.
or
X Kee pthe cruis econtrol lever pulled
towards you 3unti lthe desired spee dis
reached.
Storin gthe curren tspeed or callin gup
the las tstored speed G
Ris
kofa ccident
Onl yselect astored spee difyouknow what
tha tspeed is and whether it is suitabl efor
the current situation. Otherwise, sudden
acceleratio norbraking could endanger you
or others. X
Briefl ypullt he cruis econtrol lever towards
you 3.
X Remov eyourfoo tfromt he accelerator
pedal.
Distroni cisa ctivate dand accepts the cur-
ren tspeed if it is activate dfor the first time,
or adjusts the vehicle' sspeed to the last
spee dstored.
Settin gthe specified minimu mdistance
fo rD istronic Yo
uc an setthe specified minimum distance
for Distroni cbyvaryi ng the tim espan
between one and two seconds. This tim espan
determine sthe distance tha tDistroni cshould
maintain fro mthe vehicl einfront, depending
on the roa dspeed .You canr eadt hisd istance
in the multi-functio ndisplay ( Ypage 132). Exampl
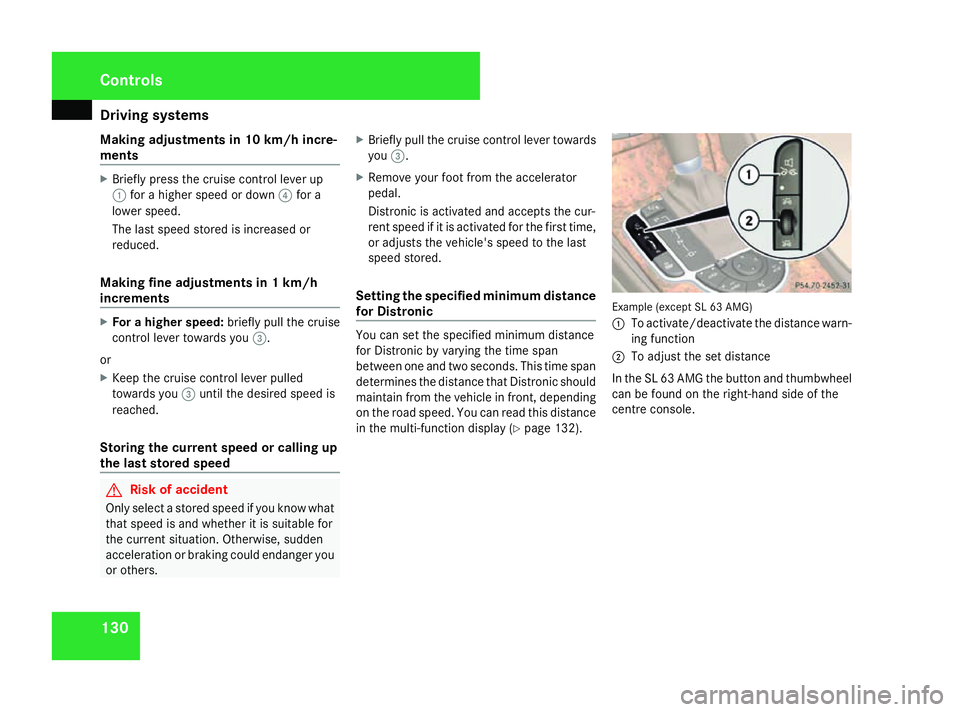
e(excep tSL63A MG)
1 To activate/deactivate the distance warn-
ing function
2 To adjus tthe se tdistance
In the SL 63 AMG the button and thumbwheel
ca nb efound on the right-hand side of the
centr econsole. Controls
230_AKB; 5; 4, en-GB
bjanott,
Version: 2.9.6 2008-04-08T15:09:54+02:00-Seite 130 Dateiname: 6515_3089_02_buchblock.pdf; preflight
Page 134 of 317
Driving sys
tems 131
Adjusting the se
tdistance
X To increase: turnthumbwheel 2towards
the ¯ symbol.
Distroni cthe nm aintains agreate rdistance
between your vehicl eand the vehicl ein
front.
X To decrease: turnthumbwheel 2towards
the ® symbol.
Distroni cthe nm aintains ashorter distance
between your vehicl eand the vehicl ein
front.
i Make sure tha tyou maintain the mini-
mu md istance to the vehicl einfront
required by law. Adjust the distance to the
vehicl einfront if necessary.
Distance warning function Even if Distroni
cisd eact ivated, thi sfun ction
warns yo uatspeedsabove 30 km/h if:
R the distance to the vehicl einfront is too
short for the spee dyou ared riving at for
several seconds. The EDTR warning
lamp in the speedomete rlight supinr ed.
R yo ua reapproaching avehicl einfront at too
great aspeed .You the nhearani ntermit-
tent warning tone ,and the EDTR warn- ing lamp in the speedomete
rlight supin
red.
Yo um usta pply the brakes yourself in order
to maintain the correc tdistance to the vehicle
and to avoi dacollision. G
Ris
kofa ccident
Be especiall yobser vant of traffi ccondi-
tions when the EDTR warning lamp in
the speedomete rlight suporani ntermit-
tent warning tone sounds.
Brake or take evasive actio nasnecessary.
i Distroni cdoesn ot always clearly recog-
nis ec omplex roa dand traffi cconditions.
Yo um aythe nreceive afalse distance warn-
ing tone or none at all.
X To activate/deactivate: press button1.
When the functio nisa ctivated, the indica-
tor lamp in button 1lights up and aloud-
speaker symbo lappears in the display.
When the functio nisd eact ivated, the indi-
cator lamp in button 1goes ou tand the
loudspeaker symbo ldisappear sfromt he
multi-functio ndisplay. Distroni
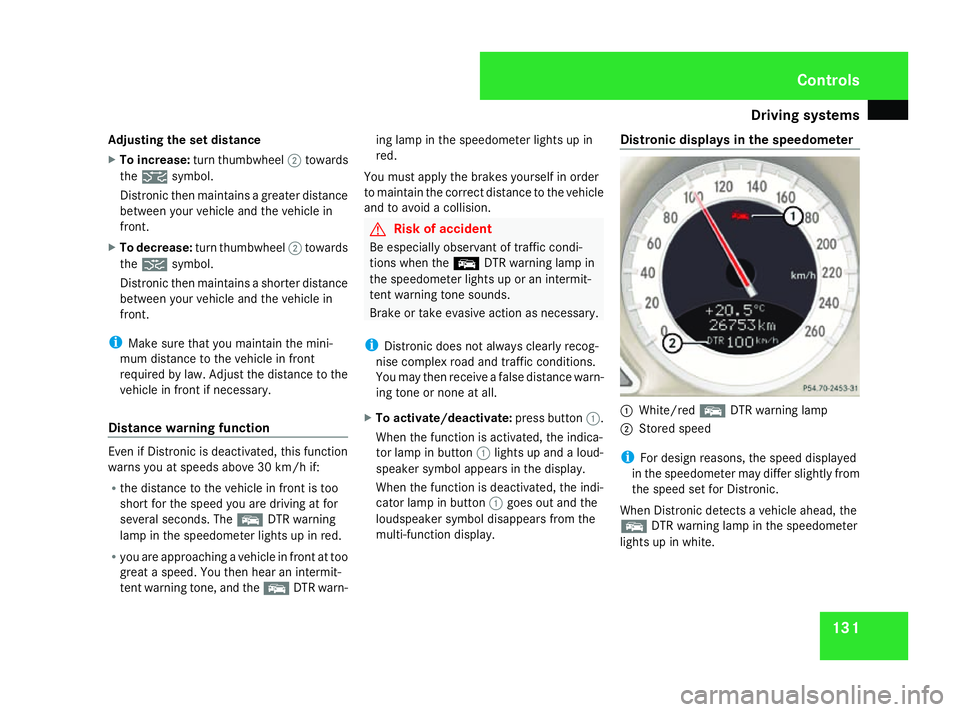
cdisplays in the speedometer 1
White/red EDTR warning lamp
2 Stored speed
i For design reasons, the spee ddisplayed
in the speedomete rmaydiffe rsligh tlyf rom
the spee dsetfor Distronic.
When Distroni cdetects avehicl eahead ,the
E DTR warning lamp in the speedometer
lights up in white. Controls
230_AKB; 5; 4, en-GB
bjanott,
Version: 2.9.6 2008-04-08T15:09:54+02:00-Seite 131 ZDateiname: 6515_3089_02_buchblock.pdf; preflight
Page 138 of 317
Driving sys
tems 135
cruis
econtrol or Distronic* is selected
R LIM indicator lamp lit:
Variable Speedtroni ciss elect ed
Yo uc an uset he cruis econtrol lever to limit
the spee dtoany spee dabove 30 km/h while
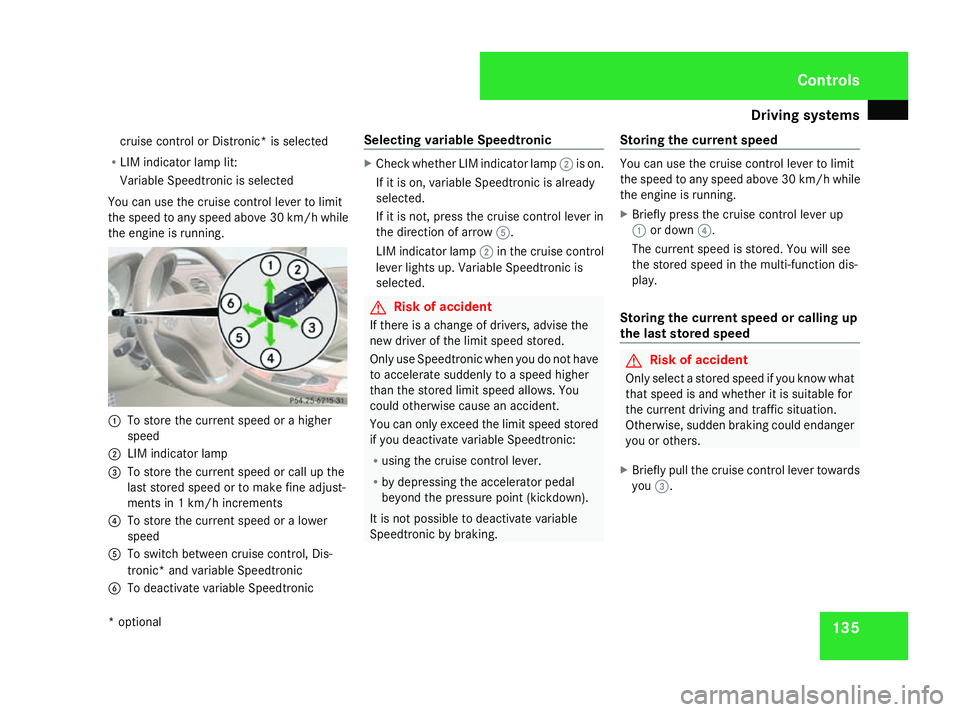
the engine is running. 1
To store the current spee dorahigher
speed
2 LIM indicator lamp
3 To store the current spee dorcallupt he
last store dspeed or to make fine adjust-
ments in 1km/ hincrements
4 To stor ethe curren tspeed or alower
speed
5 To switch between cruise control, Dis-
tronic* and variable Speedtronic
6 To deactivate variable Speedtronic Selecting variable Speedtronic X
Check whether LIM indicator lamp 2is on.
If it is on, variable Speedtronic is already
selected.
If it is not ,press the cruise contro llever in
the direction of arrow 5.
LIM indicator lamp 2in the cruise control
lever lights up. Variable Speedtronic is
selected. G
Risk of accident
If ther eisac hange of drivers ,advise the
new driver of the limit speed stored.
Only use Speedtronic when you do not have
to accelerat esuddenly to aspeed higher
than the stored limit speed allows. You
could otherwise cause an accident.
You can only exceed the limit speed stored
if you deactivate variable Speedtronic:
R using the cruise contro llever.
R by depressin gthe accelerator pedal
beyond the pressure point (kickdown).
It is not possible to deactivate variable
Speedtronic by braking. Storing the current speed You can use the cruise contro
llever to limit
the speed to any speed above 30 km/hw hile
the engine is running.
X Briefly press the cruise control lever up
1 or down 4.
The current speed is stored. You wills ee
the stored speed in the multi-function dis-
play.
Storing the current speed or calling up
the last stored speed G
Risk of accident
Only select astored speed if you know what
that speed is and whether it is suitable for
the current driving and traffic situation.
Otherwise ,sudden braking could endanger
you or others.
X Briefly pullt he cruise control lever towards
you 3. Controls
*o ptional
230_AKB; 5; 4, en-GB
bjanott,
Version: 2.9.6 2008-04-08T15:09:54+02:00-Seite 135 ZDateiname: 6515_3089_02_buchblock.pdf; preflight
Page 139 of 317
Driving sys
tems 136
Making adjustments in 10 km/
hincre-
ments X
Briefl ypress the cruis econtrol lever up
1 for ahighe rspeed or down 4for a
lowe rspeed.
or
X Kee pthe cruis econtrol lever presse duntil
the desired spee disset.P ress the cruise
control lever ,up1forahighe rspeed or
down 4for alower speed.
Making fine adjustments in 1km/h
increments X
Fo rah ighe rs peed: brieflypullt he cruise
control lever towards you 3.
or
X Kee pthe cruis econtrol lever pulled
towards you 3unti lthe desired spee dis
set.
Deactivating variabl eSpeedtronic There ar
eseveral ways to deactivate variable
Speedtronic:
X Briefl ypress the cruis econtrol lever for-
wards 6.
or X
Briefl ypress the cruis econtrol lever in the
directio nofarrow 5.
LIM indicator lamp 2in the cruis econtrol
lever goes out. Variable Speedtroni cis
deactivated.
Cruise control or Distronic* is selected.
Variable Speedtroni cisd eact ivate dautomat-
icall ywheny ou depress the accelerator pedal
beyond the pressure point (kickdown) ,but
onl yify ourc urrent spee ddoesn ot diffe rby
mor ethan20k m/h fro mthe stored speed.
Yo uw illh ea raw arning tone if thi sisthe case. G
Ris
kofa ccident
It is not possibl etodeactivate variable
Speedtroni cbybraking.
i Thelas ts peed stored is cleared when you
switch off the engine.
Permanent Speedtronic i
Permanent Speedtroni ciso nlya vailable
in certai ncountries.
Yo uc an uset he on-board computer to limit
the spee dpermanentl ytoavaluebetween
160 km/h (e.g. for driving with winter tyres)
and the maximum speed. Shortl
ybefor et he stored spee disreache dit
appear sinthe multi-functio ndisplay.
Yo uc annot exceed the stored limi tspeed,
eve nify oudepress the accelerator pedal
beyond the pressure point (kickdown).
Settin gpermanent Speedtronic
X Press the èor· button to select the
Settings menu(Ypage 116).
X Press the jbutton to call up the selec-
tio nofs ubmenus.
X Press the æorç button to select the
Vehicle submenu.
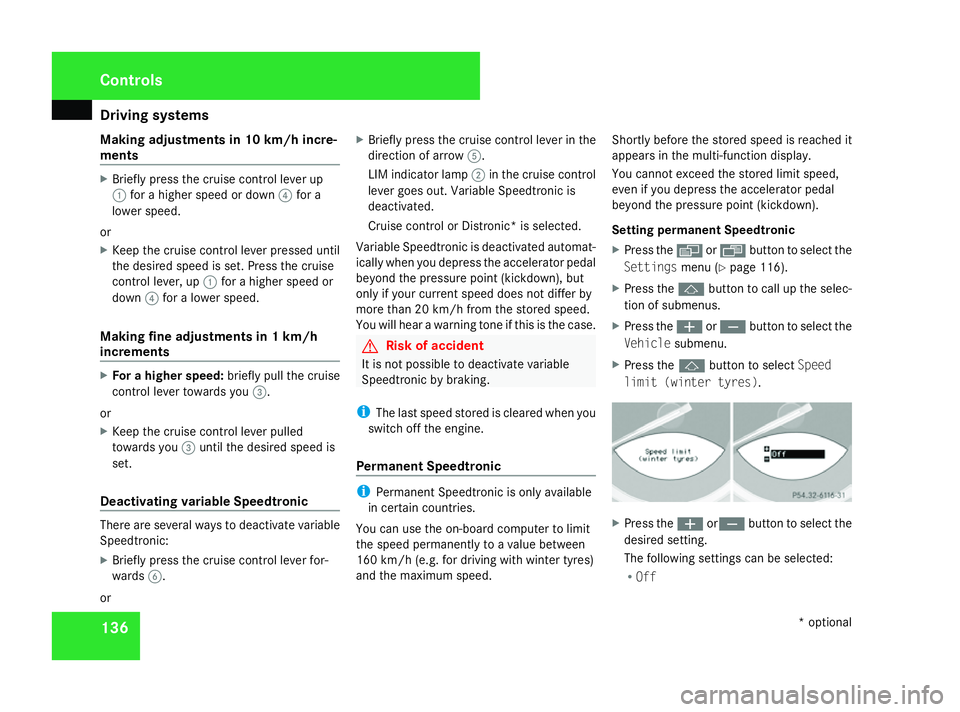
X Press the jbutton to select Speed
limit (winte rtyres) . X
Press the æorç button to select the
desired setting.
Th ef ollowing setting scan be selected:
R Off Controls
*optional
230_AKB; 5; 4, en-GB
bjanott,
Version: 2.9.6 2008-04-08T15:09:54+02:00-Seite 136 Dateiname: 6515_3089_02_buchblock.pdf; preflight
Page 140 of 317
Driving sys
tems 137
Permanent Speedtroni
cisd eact ivated.
R Al imit spee dbetween 240 km/h and
160 km/h in increments of 10 km/h
X To select adifferen tdisplay ,press the
j, èorÿ button. SBC Hold
SBC ®
Hol dassis ts the driver in the following
situations:
R when pulling away ,especially on steep
slopes
R when manoeuvring on steep slopes
R when waiting in traffic
Th ev ehicl eisk epts tationar ywithout the
driver having to depress the brake pedal.
Th eb raking effect is cancelle dand SBC Hold
deactivate dwheny ou depress the accelera-
tor peda ltopulla way.
Activation conditions Yo
uc an activate SBC Hol dif:
R the vehicl eisstationary
R the engine is running
R the driver's door is closed R
the parking brake is not applied
R the bonnet is closed
R the selector lever is in position D,Ror N
Activating SBC Hold X
Make sure tha tthe activation conditions
ar em et.
X Depres sthe brake.
X Depres sthe brake agai nquickl yu ntil
SBC H appear sinthe multi-functio ndis-
play.
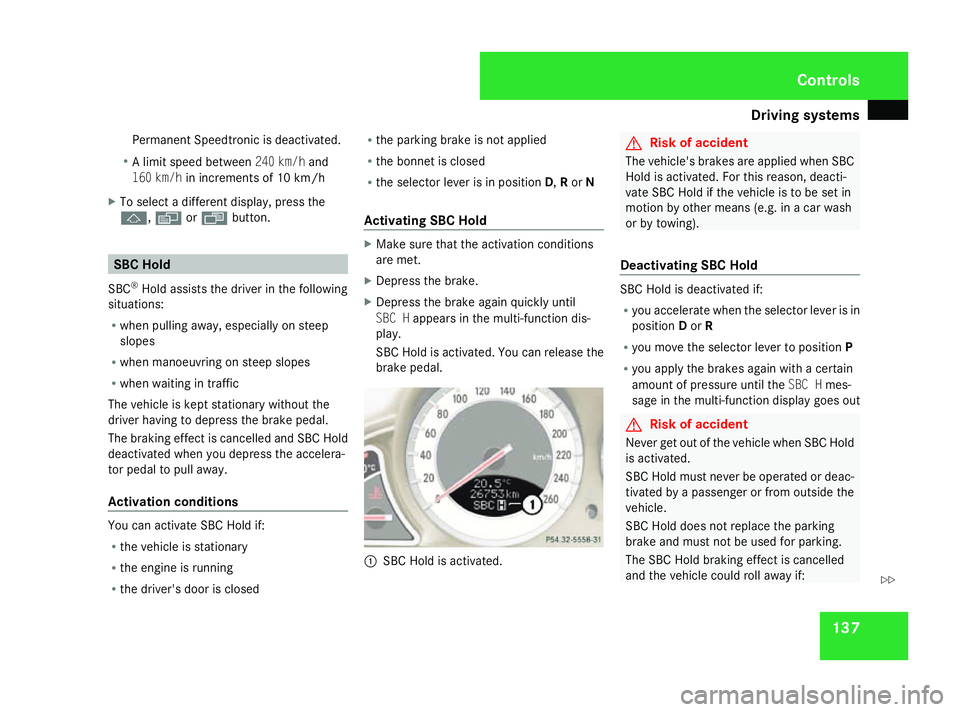
SBC Hol disactivated. Yo ucan release the
brake pedal. 1
SBC Hol disactivated. G
Ris
kofa ccident
Th ev ehicle' sbrakes ar eapplied when SBC
Hol disa ctivated. For thi sreason, deacti-
vate SBC Hol difthe vehicl eistobes etin
motion by other means (e.g. in acarwash
or by towing).
Deactivating SBC Hold SBC Hol
disdeactivate dif:
R yo ua ccelerate when the selector lever is in
position Dor R
R yo um ovet he selector lever to position P
R yo ua pply the brakes agai nwithac ertain
amount of pressure unti lthe SBC H mes-
sage in the multi-functio ndisplay goes out G
Ris
kofa ccident
Never ge toutof the vehicl ewhenS BC Hold
is activated.
SBC Hol dmustn eve rbeo perated or deac-
tivate dbyapassenge rorfromo utside the
vehicle.
SBC Hol ddoesn ot replace the parking
brake and must not be used for parking.
Th eS BC Hol dbraking effect is cancelled
and the vehicl ecould rol lawa yif: Controls
230_AKB; 5; 4, en-GB
bjanott,
Version: 2.9.6 2008-04-08T15:09:54+02:00-Seite 137 ZDateiname: 6515_3089_02_buchblock.pdf; preflight
Page 146 of 317
Driving sys
tems 143
Front sensors Centre Approximatel
y100 cm Corners Approximatel
y60cm Rea
rsenso rs Centre Approximatel
y120 cm Corners Approximatel
y80cm !
Payp articula rattentio ntoobjects above
or belo wthe sensors when parking, such
as flower pots or trailer towbars. Parktronic
does not detect such objects when the yare
in the immediate vicinity of the vehicle. You
could damage the vehicl eorthe objects.
Ultrasonic sources such as an automatic
ca rw ash, alorry's compressed-air brakes
or ap neumati cdrill could caus eParktronic
to malfunction.
Minimum distance Centre Approximatel
y20cm Corners Approximatel
y15cm If there is an obstacle withi
nthisr ange,all
warning displays ligh tupa nd atone sounds.
If the distance fall sbelow the minimum clear-
ance, it ma ynolongerbes hown.
Warnin gdisplays Th
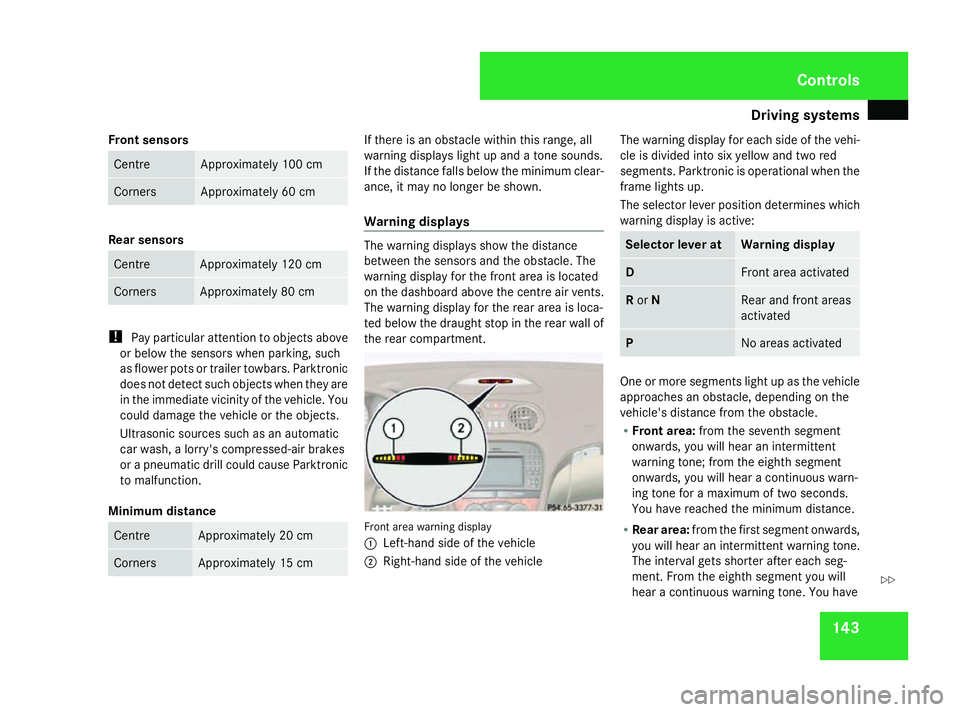
ew arning displays sho wthe distance
between the sensors and the obstacle .The
warning displa yfor the front area is located
on the dashboard above the centr eairvents.
Th ew arning displa yfor the rea rareaisl oca-
ted belo wthe draught sto pinthe rea rwallof
the rea rcompartment. Front area warning display
1
Left-hand side of the vehicle
2 Right-hand side of the vehicle Th
ew arning displa yfor each side of the vehi-
cle is divide dinto si xyello wand two red
segments. Parktronic is operational when the
frame lights up.
Th es elect or lever positio ndetermine swhich
warning displa yisactive: Selecto
rlever at Warnin
gdisplay D Front area activated
R
or N Rear and front areas
activated
P No area
sactivated One or mor
esegments ligh tupast he vehicle
approache sanobstacle ,depen ding on the
vehicle' sdistance fro mthe obstacle.
R Front area: fromt he seventh segment
onwards ,you will hear an intermittent
warning tone ;fro mt he eighth segment
onwards ,you will hear acontinuous warn-
ing tone for amaximum of two seconds.
Yo uh aver eache dthe minimum distance.
R Rea rarea: fromt he first segment onwards,
yo uw illh earani ntermittent warning tone.
Th einterva lgetss horter after each seg-
ment. Fro mthe eighth segment yo uwill
hear acontinuous warning tone .You have Controls
230_AKB; 5; 4, en-GB
bjanott,
Version: 2.9.6 2008-04-08T15:09:54+02:00-Seite 143 ZDateiname: 6515_3089_02_buchblock.pdf; preflight
Page 162 of 317
Loading and stowing
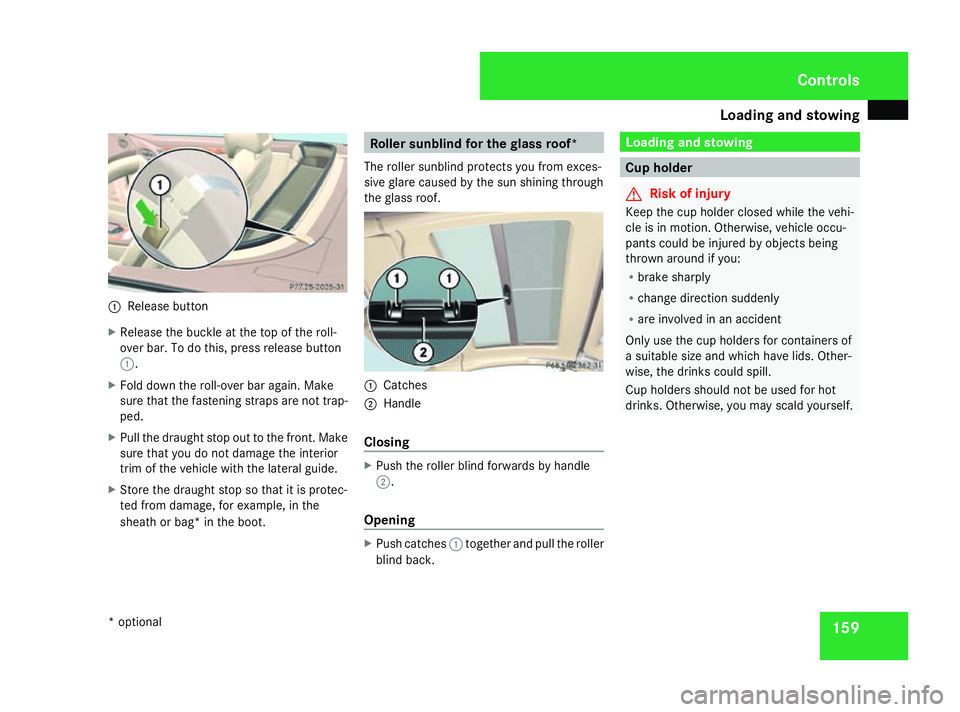
1591
Release button
X Release the buckle at the top of the roll-
over bar. To do this, press release button
1.
X Fold down the roll-over bar again. Make
sure that the fastenin gstraps are not trap-
ped.
X Pull the draught stop out to the front .Make
sure that you do not damage the interior
trim of the vehicle with the lateral guide.
X Store the draught stop so that it is protec-
ted fro mdamage, for example, in the
sheat horb ag* in the boot. Roller sunblind for th
eglass roof*
The roller sunblin dprotect syou fro mexces-
sive glare caused by the sun shining through
the glass roof. 1
Catches
2 Handle
Closing X
Push the roller blind forwards by handle
2.
Opening X
Push catches 1together and pull the roller
blind back. Loading and stowing
Cup holder
G
Risk of injury
Keep the cup holder closed while the vehi-
cle is in motion. Otherwise, vehicle occu-
pant scould be injured by object sbeing
thrown around if you:
R brak esharply
R change direction suddenly
R are involved in an accident
Only use the cup holder sfor containers of
as uitable siz eand which have lids. Other-
wise, the drinks could spill.
Cup holder sshould not be used for hot
drinks. Otherwise, you may scald yourself. Controls
*o ptional
230_AKB; 5; 4, en-GB
bjanott
,V ersion: 2.9.6
2008-04-08T15:09:54+02:00
-Seite 159 ZDateiname: 6515_3089_02_buchblock.pdf; preflight
Page 163 of 317
Loading and stowing
1601
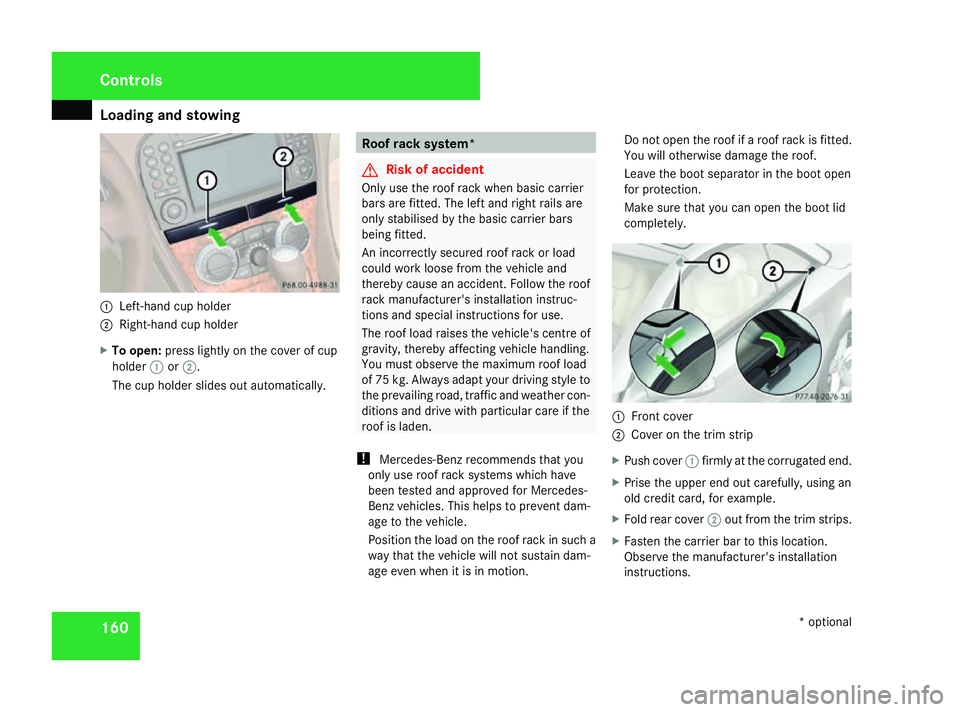
Left-han dcup holder
2 Right-hand cup holder
X To open: press lightly on the cover of cup
holder 1or2.
The cup holder slides out automatically. Roof rack system*
G
Risk of accident
Only use the roof rack when basic carrier
bars are fitted. The left and right rails are
only stabilised by the basic carrier bars
being fitted.
An incorrectly secured roof rack or load
could work loose fro mthe vehicle and
thereby cause an accident .Follow the roof
rack manufacturer' sinstallation instruc-
tion sand special instructions for use.
The roof load raises the vehicle's centr eof
gravity, thereby affectin gvehicle handling.
You must observe the maximum roof load
of 75 kg. Always adapt your driving style to
the prevailing road, traffic and weather con-
ditions and drive with particular care if the
roof is laden.
! Mercedes-Ben zrecommends that you
only use roof rack systems which have
been tested and approved for Mercedes-
Ben zvehicles. This helps to prevent dam-
age to the vehicle.
Position the load on the roof rack in such a
way that the vehicle will not sustain dam-
age even when it is in motion. Do not open the roof if
aroof rack is fitted.
You will otherwise damage the roof.
Leave the boot separator in the boot open
for protection.
Make sure that you can open the boot lid
completely. 1
Front cover
2 Cover on the trim strip
X Push cover 1firmly at the corrugated end.
X Prise the upper end out carefully, using an
old credit card, for example.
X Fold rear cover 2out fro mthe trim strips.
X Fasten the carrier bar to thi slocation.
Observe the manufacturer' sinstallation
instructions. Controls
*optional
230_AKB; 5; 4, en-GB
bjanott ,V ersion: 2.9.6
2008-04-08T15:09:54+02:00
-Seite 160 Dateiname: 6515_3089_02_buchblock.pdf; preflight
Page 164 of 317
Loading and stowing
161G
Ris
kofi njury
Only use th eroofrac kw hen th eroofis
closed. The roo frac kort heload could
endanger th eoccupant softhevehicle
when th eroofiso pen. Luggage net in th
efront-passenger
footwell G
Ris
kofi njury
Only plac elightweigh titems in th eluggage
net. Do no tuse it to transpor theavy, bulky,
sharp-edged or fragile objects. In th eevent
of an accident, th eluggage ne twill not
secure th etransporte dgoods. Stowage well under th
eboot floor
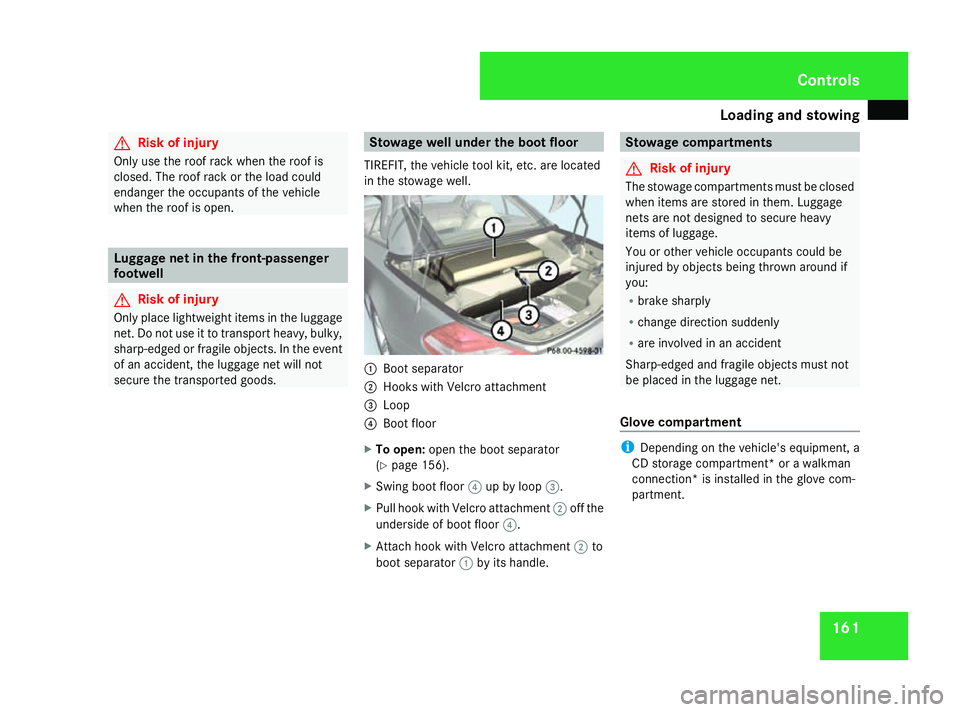
TIREFIT, th evehicle tool kit ,etc.a re located
in th estowage well. 1
Boot separator
2 Hook swith Velcro attachment
3 Loop
4 Boot floor
X To open: open the boot separator
(Y page 156).
X Swin gboot floor 4up by loop 3.
X Pull hook with Velcro attachment 2off the
underside of boot floor 4.
X Attac hhook with Velcro attachment 2to
boot separator 1by its handle. Stowage compartments
G
Risk of injury
The stowage compartments must be closed
when item sare stored in them. Luggage
net sare not designed to secur eheavy
item sofl uggage.
You or other vehicle occupant scould be
injured by object sbeing thrown around if
you:
R brak esharply
R change direction suddenly
R are involved in an accident
Sharp-edged and fragile object smust not
be placed in the luggage net.
Glove compartment i
Depending on the vehicle's equipment, a
CD storage compartment* or awalkman
connection *isinstalled in the glove com-
partment. Controls
230_AKB; 5; 4, en-GB
bjanott
,V ersion: 2.9.6
2008-04-08T15:09:54+02:00
-Seite 161 ZDateiname: 6515_3089_02_buchblock.pdf; preflight