lumbar support MERCEDES-BENZ SL ROADSTER 2008 Owners Manual
[x] Cancel search | Manufacturer: MERCEDES-BENZ, Model Year: 2008, Model line: SL ROADSTER, Model: MERCEDES-BENZ SL ROADSTER 2008Pages: 317, PDF Size: 5.35 MB
Page 12 of 317

9
LIM indicator lamp
Cruise control ................ 125
Distronic .................... 128
Variabl eSpeedtronic ........... 134
Load compartment load, maximum 299
Loading aid (boot) ............... 164
Lowering manually .............258
Locator lighting
Switching on/off (on-board com-
puter) ....................... 119
Locking
Automatic ..................... 68
Emergency locking .............256
From the insid e(central locking
button) ....................... 68
Luggage compartment
Powe rclosing feature ........... 67
Luggage compartmen t(rear) ...... 163
Luggage cover see Boot separator
Luggage net .................... 161
Lumbar support .................. 75M
Main-beam headlamps Display message .............. 222
Maintenance
Battery ...................... 276Malfunction memory
see Message memory menu
Manual gearshift program ....102, 104
Maximum speed Technical data ................ 291
Memory card ................... 114
Operation (on-board computer) ...114
see separate operating instructions
Memory function ................. 82
Menu (on-board computer) ........109
AMG ........................ 111
Audi o....................... 113
Distronic .................... 132
DVD ........................ 115
Message memory .............. 115
Navigation ................... 115
Resetting to factory settings .....116
Settings ..................... 116
Standard displa y.............. 110
Submenu overview .............116
Telephone ................... 123
Trip computer ................ 122
TV .......................... 114
Message
see Display message
see Indicator and warning lamp
see Message memory menu
Mirror
Sun viso r.................... 165Mobile phone
................... 166
Bracket ..................... 167
Display message ..........209, 227
Installatio n................... 287
Own numbe rsending ........... 168
Run-on time .................. 168
Telephone menu (on-board com-
puter) ....................... 123
Modifying the programming
Key .......................... 64
KEYLESS GO key ............... 66
MOExtended run-flat system* .183, 275
MP3 ........................... 114
Operation (on-board computer) ...114
see separate operating instructions
Multi-contour seat ................ 76
Multi-function display ........105, 108
Multi-functio nsteering wheel .....107
Overview ..................... 30 N
Navigation ..................... 115
Navigation menu (on-board com-
puter) ....................... 115
see separate operating instructions
Notes on driving
SBC TM
brake system ............ 58 Index
230_AKB; 5; 4, en-GB
bjanott,
Version: 2.9.6 2008-04-08T15:09:54+02:00-Seite 9 Dateiname: 6515_3089_02_buchblock.pdf; preflight
Page 78 of 317

Seats
75
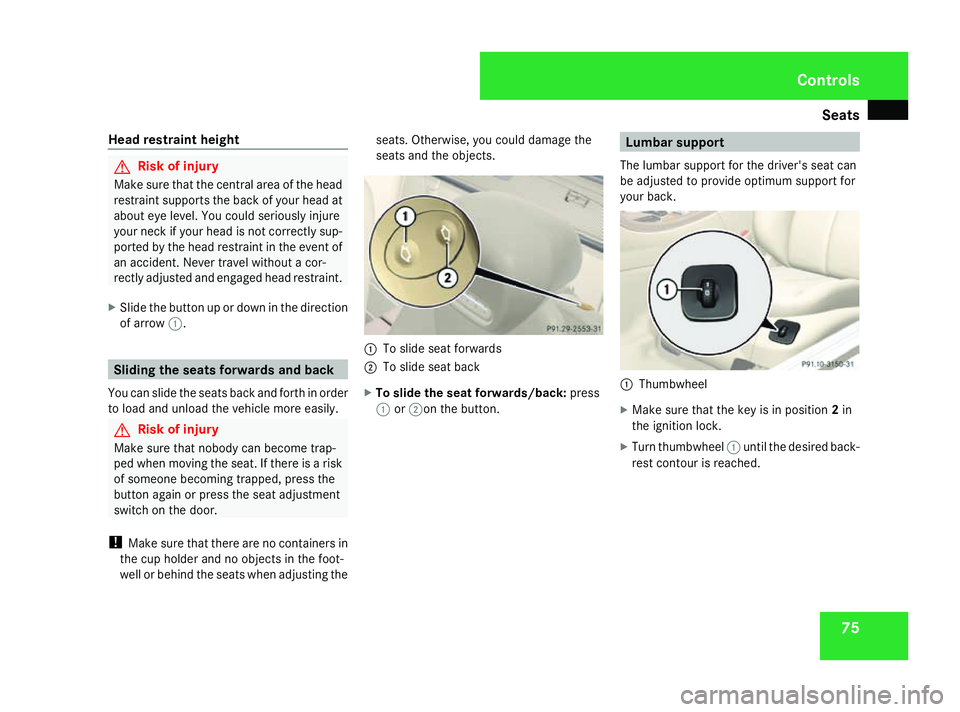
Head restraint height G
Risk of injury
Make sure that the central area of the head
restraint supports the back of your head at
about eye level. You could seriously injure
your neck if your head is not correctly sup-
ported by the head restraint in the event of
an accident. Never travel without acor-
rectly adjusted and engaged head restraint.
X Slide the button up or down in the direction
of arrow 1. Sliding the seats forwardsa
nd back
You can slide the seats back and forth in order
to load and unload the vehicle more easily. G
Risk of injury
Make sure that nobody can become trap-
ped when moving the seat. If there is arisk
of someone becoming trapped, press the
button again or press the seat adjustment
switch on the door.
! Make sure that there are no containers in
the cup holder and no objectsint he foot-
well or behind the seats when adjusting the seats. Otherwise, you could damage the
seats and the objects.
1
To slide seat forwards
2 To slide seat back
X To slide the seat forwards/back: press
1 or2on the button. Lumbar support
The lumbar support for the driver's seat can
be adjusted to provide optimum support for
your back. 1
Thumbwheel
X Make sure that the key is in position 2in
the ignition lock.
X Turn thumbwheel 1until the desired back-
rest contour is reached. Controls
230_AKB; 5; 4, en-GB
bjanott
,V ersion: 2.9.6
2008-04-08T15:09:54+02:00
-Seite 75 ZDateiname: 6515_3089_02_buchblock.pdf; preflight
Page 79 of 317

Seats
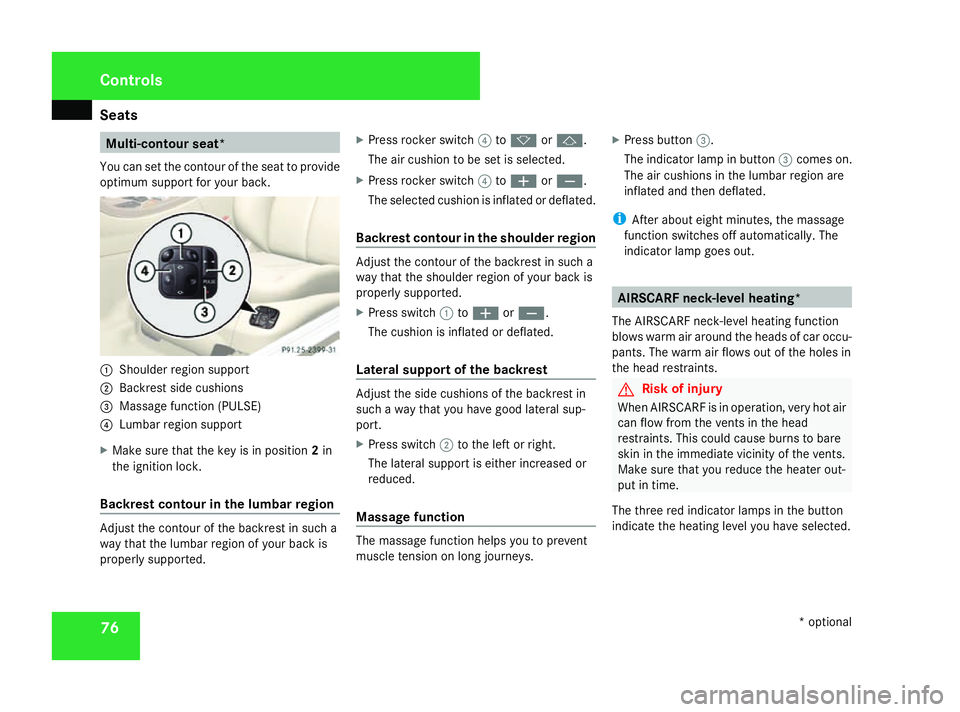
76 Multi-contour seat*
You can set the contour of the seat to provide
optimum support for your back. 1
Shoulder region support
2 Backrest side cushions
3 Massage function (PULSE)
4 Lumbarr egion support
X Make sure that the key is in position 2in
the ignition lock.
Backrest contour in the lumbar region Adjust the contour of the backrest in such a
way that the lumbar region of yourb
ack is
properly supported. X
Press rocker switch 4tok orj.
The air cushion to be set is selected.
X Press rocker switch 4toæ orç.
The selected cushion is inflated or deflated.
Backrest contour in the shoulder region Adjust the contour of the backrest in such a
way that the shoulder region of yourb
ack is
properly supported.
X Press switch 1toæ orç.
The cushion is inflated or deflated.
Lateral support of the backrest Adjust the side cushions of the backrest in
such
away that you have good lateral sup-
port.
X Press switch 2to the left or right.
The lateral support is either increased or
reduced.
Massage function The massage function helps you to prevent
muscle tension on long journeys.X
Press button 3.
The indicator lamp in button 3comes on.
The air cushions in the lumbar region are
inflated and then deflated.
i After aboute ight minutes, the massage
function switches off automatically.T he
indicator lamp goes out. AIRSCARF neck-level heating*
The AIRSCARF neck-level heating function
blowsw arm air around the headsofc ar occu-
pants. The warm air flows out of the holes in
the head restraints. G
Risk of injury
When AIRSCARF is in operation, very hot air
can flow from the vents in the head
restraints. This could cause burns to bare
skin in the immediate vicinity of the vents.
Make sure that you reduce the heater out-
put in time.
The three red indicator lamps in the button
indicate the heating level you have selected. Controls
*optional
230_AKB; 5; 4, en-GB
bjanott,
Version: 2.9.6 2008-04-08T15:09:54+02:00-Seite 76 Dateiname: 6515_3089_02_buchblock.pdf; preflight