spare wheel MERCEDES-BENZ SL ROADSTER 2008 Owners Manual
[x] Cancel search | Manufacturer: MERCEDES-BENZ, Model Year: 2008, Model line: SL ROADSTER, Model: MERCEDES-BENZ SL ROADSTER 2008Pages: 317, PDF Size: 5.35 MB
Page 8 of 317
5
Children
In th evehicle .................. 47
Restrai ntsystems .............. 47
Chil dseat
Automatic recognition ...........49
Automatic recognition (malfunc-
tion) ........................ 232
Recommendations ..............51
Suitable positions .............. 50
Ciga rettel ighter ................ 166
Cockpit Overview ..................... 22
Collapsible emergency spare wheel
Stowage ..................... 274
Collapsibl ewheel
Pumping up .................. 273
Technical data ................ 297
COMAND ....................... 109
On-board computer ............109
see separate Operating Instructions
Constant headlamp mode
Setting (on-board computer) .....118
Consumptio nstatistic s(on -board
computer) ...................... 122
Coolant ........................ 180
Checking the leve l.............180
Display message ......214, 219, 220
Mixture ratio ................. 304
Temperature gauge ............106
Warning lamp ................. 236Cornerin
glight
Display message .............. 220
Cruis econtrol .................. 125
Display message ..........212, 213
Cup holder ..................... 159 D
Dashboard see Cockpit
see Instrument cluster
Daytime drivin glights
see Constant headlamp mode
Delaye dswitch-off
Exterior lighting (on-board com-
puter) ....................... 119
Interior lighting (on-board com-
puter) ....................... 120
Digital speedometer .............111
Setting the unit (on-board com-
puter) ....................... 118
Dipped beam
Display message .............. 220
Dipped-beam headlamps
Symmetrical .................. 193
Display message ................ 202
Service indicator .............. 193
Symbo lmessages ............. 213
Text messages ................ 203
Up (AMG menu) ............... 111Distanc
erecorder
see Total distance recorder
see Trip meter
Distanc ewarning function ........131
Distanc ewarning lamp .......131, 233
Distronic ....................... 127
Cleaning the sensors ...........198
Cove r....................... 198
Display message ......206, 207, 213
Distance warning function .......131
Driving tips ................... 133
Warning lamp ................. 233
Door
Automatic locking .............. 68
Display message .............. 214
Emergency locking .............256
Emergency unlocking ...........255
Opening (from the inside) ........67
Door control panel
Overview ..................... 34
Draught stop ................... 158
Drinks holder see Cuph older
Driver's airbag ................... 44
Driver's door Unlocking (K EYLESS GO) ......... 67
Driver's seat position .............86
Drivin gabroad .................. 193
Driving safety system .............53
ABS ......................... 53 Index
230_AKB; 5; 4, en-GB
bjanott,
Version: 2.9.6 2008-04-08T15:09:54+02:00-Seite 5 Dateiname: 6515_3089_02_buchblock.pdf; preflight
Page 15 of 317
12
Shift ranges
Automatic transmission .........100
Display in the speedometer .......99
Side window
Fault ........................ 250
Opening/closing ............... 93
Resetting .................... .95
Side windows
Cleaning ..................... 196
Sno wchains .................... 189
Socket ......................... 166
Soft top see Roof
Spare wheel
Fitting ....................... 270
Storage location ............... 200
Technical data ................ 297
Speed
Technical data ................ 291
Spee dlimiter
Speedtronic .................. 134
Speedometer
Digita lspeedometer (on-board
computer) ................... 111
Setting the unit (on-board com-
puter) ....................... 117
Speedtronic .................... 134
Display message ..........212, 213
Permanent ................... 136
Variabl e..................... 134SRS (Supplemental Restrain
tSys-
tem) ............................ 41
Warning lamp .................. 41
Station
see Radio
Status line (on-board computer) ...108
Selecting the displa y...........118
Steering
Display message .............. 220
Steering wheel
Adjusting ..................... 79
Buttons (on-board computer) .....107
Storing settings ................ 82
Steering wheel gearshift paddles ..102
Stowage compartment ...........161
Armrest (under) ............... 162
Door ........................ 163
Glove compartment ............161
Locking/unlocking .............162
Rea r........................ 163
Stowage compartments
Overview ..................... 36
Stowage space
Cup holde r.................. .159
Display message .............. 224
Stowage well
Boot floo r(un derneath) ......... 161
Submen u(on-board computer) ....116
Convenience ................. 117
Instrument cluster .............117Lighting
..................... 117
Vehicle ...................... 117
Sun visor ....................... 165
Supplemental Restrain tSystem
see SRS
Supplemental Restrain tSyste m(SRS)
Display message .............. 212
Warning lamp ................. 235
Surround lighting
see Locator lighting
Suspensio ntuning ............... 141
SETUP (on-board computer) .....111
Switchin goff the alarm
ATA .......................... 60 T
Tail lamps Changing .................... 263
Display message .............. 224
Tank capacity ................... 300
Tank contents Calling up the range (on-board
computer) ................... 123
Technical data
Acceleration .................. 291
Engine ...................... 290
Speed ....................... 291
Tyres ................... 293, 295
Vehicle dimensions ............298 Index
230_AKB; 5; 4, en-GB
bjanott,
Version: 2.9.6 2008-04-08T15:09:54+02:00-Seite 12 Dateiname: 6515_3089_02_buchblock.pdf; preflight
Page 24 of 317
Exterior view
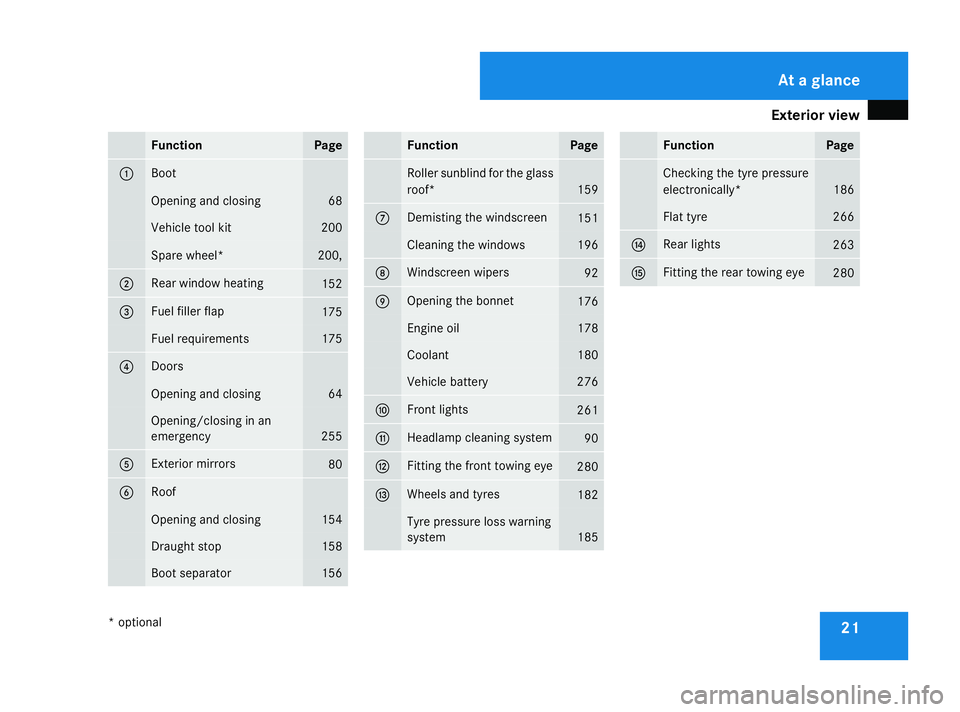
21Function Page
1 Boot
Opening and closing 68
Vehicl
etoolkit 200
Spare wheel* 200,
2 Rear window heating
152
3 Fuel fille
rflap 175
Fuel requirements 175
4 Doors
Opening and closing 64
Opening/closing in an
emergency
255
5 Exterio
rmirrors 80
6 Roof
Opening and closing 154
Draught stop 158
Boot separator 156 Function Page
Roller sunblin
dfor th eglass
roof* 159
7 Demisting th
ewindscreen 151
Cleaning th
ewindows 196
8 Windscree
nwipers 92
9 Opening th
ebonnet 176
Engin
eoil 178
Coolant 180
Vehicl
ebattery 276
a Fron
tlights 261
b Headlamp cleanin
gsystem 90
c Fitting th
efront towin geye 280
d Wheels and tyres
182
Tyre pressur
eloss warning
system 185 Function Page
Checkin
gthe tyrep ressure
electronically* 186
Flat tyre 266
e Rear lights
263
f Fitting th
erear towin geye 280At
ag lance
*o ptional
230_AKB
;5;4,en-GB
bjanott ,V ersion: 2.9.6
2008-04-08T15:09:54+02:00
-Seite 21 Dateiname: 6515_3089_02_buchblock.pdf; preflight
Page 192 of 317
Winte
rdriving 189Winte
rdriving Points to remember
Have you rvehicle winterproofed at aqualified
specialist workshop, e.g. at aMercedes-Benz
Service Centre, at the onset of winter.
! Take care not to damage the sealing strip
and the moulding on the sid eofthe rear
window whe nscraping ice off the rear win-
dow. Winte
rtyres
Use winter tyres at temperatures below
+7 °C and on snow or ice-covere droads. Only
then can the effect of the ABS and ESP ®
driv-
ing systems be ensure dinwinter too.
Use winter tyres of the same make and tread
on allw heels to maintain safe handling char-
acteristics. G
Risk of accident
Winter tyres with atread depth of less than
4mmm ust be replaced immediately .They
are no longe rsuitabl efor winter use ,can
no longe rprovide sufficient grip .This could
cause you to lose control of you rvehicle
and cause an accident. Always observe the maximu
mpermitted
spee dspecified for the winter tyres you have
fitted. If you fit winter tyres which have a
lower maximu mpermitted spee dthan that of
the vehicle, affi xanappropriate warning sign
in the driver's fiel dofvision. This can be
obtained at aqualified specialist workshop,
e.g. from aMercedes-Benz Service Centre.
Under these circumstances, you should also
restrict the maximu mspee doft he vehicle
using permanent Speedtronic 20
to the maxi-
mum permissible spee dfor the winter tyres
(Y pag e136).
Once you have fitted the winter tyres:
X Check the tyre pressures (Y page184).
X Restart the tyre pressure moni-
tor* (Y page186). G
Risk of accident
If you fit the spare wheel* whe ndriving with
winter tyres, bea rinmind that driving sta-
bility wil lbeimpaired owing to unstable
cornering characteristics caused by the dif-
ferent tyres. You should therefore adapt
you rdriving styl eand drive carefully.
Have the spare wheel* replaced at the
nearest qualified specialist workshop which has the necessary specialist knowl-
edge and tools to carry out the work
required
.Mercedes-Benz recommends
that you use aMercedes-Benz Service
Centre for this purpose. In particular, work
relevant to safety or on safety-related sys-
tems must be carrie dout at aqualified
specialist workshop. Sno
wchains
For safety reasons, Mercedes-Benz recom-
mends that you only use snow chains which
have bee nspecially approved for you rvehicle
by Mercedes-Benz, or are of acorresponding
standard of quality.
! Information about the use of snow chain-
compatibl eAMG winter tyres is applicable
for AMG tyres. Use of snow chains is only
permissible with these tyres.
If you intend to fit snow chains, please bear
the following points in mind:
20 Only available for certai ncountries. Operation
*o ptional
230_AKB; 5; 4, en-GB
bjanott,
Version: 2.9.6 2008-04-08T15:09:54+02:00-Seite 189 ZDateiname: 6515_3089_02_buchblock.pdf; preflight
Page 203 of 317
Where will
Ifind...? 200 Where will
Ifind...? Warning triangle
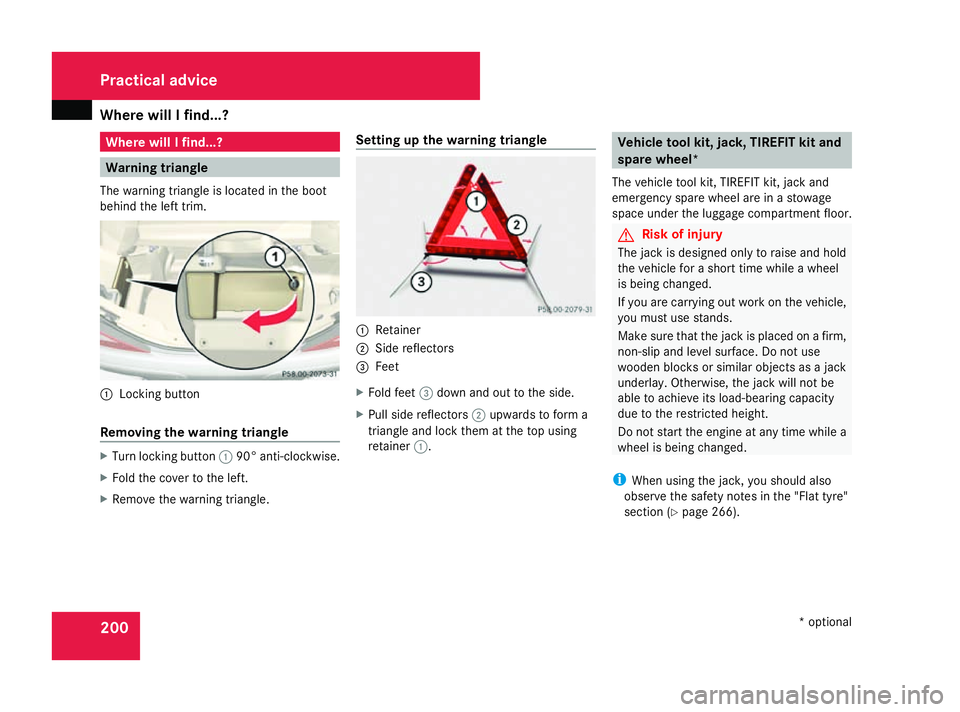
The warning triangl eislocated in the boot
behind the left trim. 1
Locking button
Removin gthe warning triangle X
Turn locking button 190° anti-clockwise.
X Fold the cover to the left.
X Remove the warning triangle. Setting up the warning triangle 1
Retainer
2 Side reflectors
3 Feet
X Fold feet 3dow nand ou ttothe side.
X Pull sid ereflectors 2upwards to form a
triangle and lock them at the top using
retainer 1. Vehicl
etoolkit, jack, TIREFI Tkit and
spare wheel*
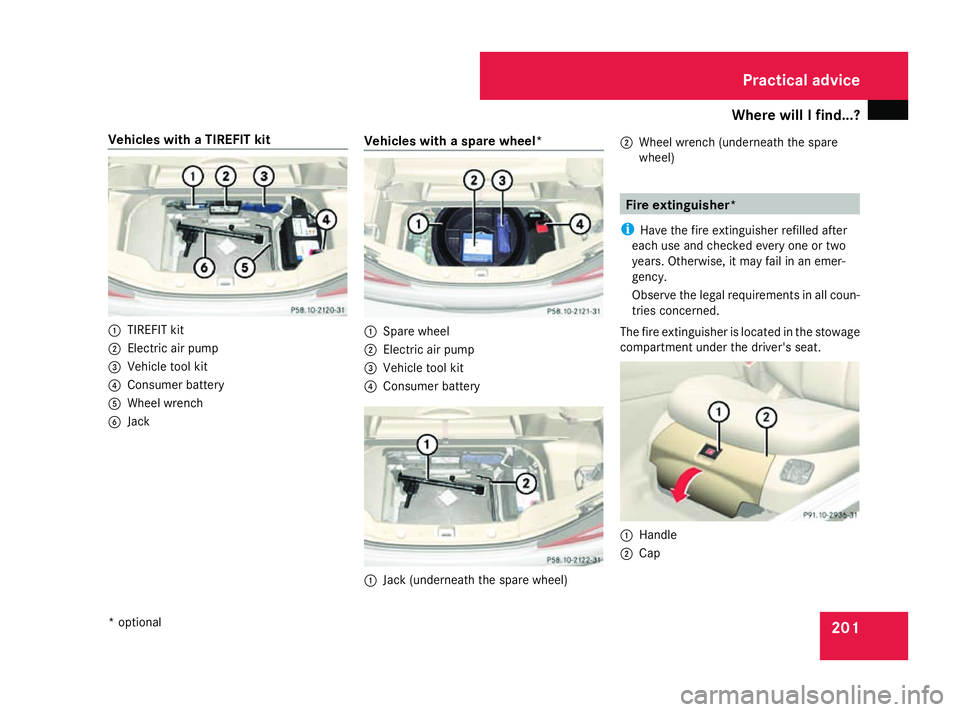
The vehicle tool kit, TIREFIT kit, jack and
emergency spare wheel are in astowage
space under the luggage compartment floor. G
Risk of injury
The jack is designe donly to raise and hold
the vehicle for ashort time whileaw heel
is being changed.
If yo uare carrying ou tworkont he vehicle,
yo um ustu se stands.
Make sure that the jack is place donafirm,
non-sli pand level surface .Donot use
woode nblocks or similar objects as ajack
underlay .Otherwise, the jack will not be
able to achiev eits load-bearing capacity
du etot he restricted height.
Do not start the engine at any time whilea
wheel is being changed.
i Whe nusing the jack, yo ushoul dalso
observe the safety notes in the "Flat tyre"
section (Y page 266). Practical advice
*optional
230_AKB; 5; 4, en-GB
bjanott,
Version: 2.9.6 2008-04-08T15:09:54+02:00-Seite 200 Dateiname: 6515_3089_02_buchblock.pdf; preflight
Page 204 of 317
Where will
Ifind...? 201
Vehicles with
aTIREFIT kit 1
TIREFIT kit
2 Electric airp ump
3 Vehicle tool kit
4 Consumer battery
5 Whee lwrench
6 Jack Vehicles with
aspare wheel* 1
Spare wheel
2 Electric airp ump
3 Vehicle tool kit
4 Consumer battery 1
Jack (underneath the spare wheel) 2
Whee lwrench (underneath the spare
wheel) Fire extinguisher*
i Have the fire extinguisher refilled after
each use and checked every one or two
years. Otherwise, it may fai linanemer-
gency.
Observe the legal requirements in allc oun-
tries concerned.
The fire extinguisher is located in the stowage
compartment unde rthe driver's seat. 1
Handle
2 Cap Practical advice
*o ptional
230_AKB; 5; 4, en-GB
bjanott,
Version: 2.9.6 2008-04-08T15:09:54+02:00-Seite 201 ZDateiname: 6515_3089_02_buchblock.pdf; preflight
Page 273 of 317
Flat tyre
270 Changin
gawheel and fitting th espare
wheel* G
Risk of accident
The whee ldimensions and tyr esizeoft he
emergenc yspar ew heel* may differ from
those of th estandard wheels.
Your vehicle's handlin gcharacteristics will
chang ewhen drivin gwithac ollapsible
emergenc yspar ew heel* .Adapt your style
of drivin gaccordingly.
The collapsible emergenc yspar ew heel*
may only be used fo rashort time. Do not
exceed th emaximum speed of 80 km/h
and do no tdeactivat eESP®
.
Never drive th evehicl ewithm oret hano ne
collapsible emergenc yspar ew heel* fitted. G
Risk of accident
Hav ethe collapsible emergenc yspare
wheel* replaced as soo naspossibleata
qualified specialist workshop whic hhas the
necessar yspecialist knowledge and tools
to carry out th eworkr equired. Mercedes-
Benz recommends that you use a
Mercedes-Ben zServi ce Centr efor this pur-
pose. In particular, wor krelevan ttosafety or on safety-related systems mus
tbecar-
rie do ut at aqualified specialist workshop.
Preparing th evehicle X
Prepare th evehicl easd escribed
(Y page 266).
X Plac ethe wheels in th estraight-ahead posi-
tion.
X Tak ethe following from th estowage well
beneat hthe boo tfloor:
R thec ollapsible emergenc yspar ew heel*
R thev ehicl etoolkit
R thew hee lchock
R thej ack
R thea ir pump
.
X Secur ethe vehicl etopreven titfromr olling
away.
On level ground: placechock sors imilar
items under th efront and rear of th ewheel
that is diagonally opposit ethe whee lyou
wish to change. X
On downhil lgradie nts:placechock sor
similar items under bot hwheels of the
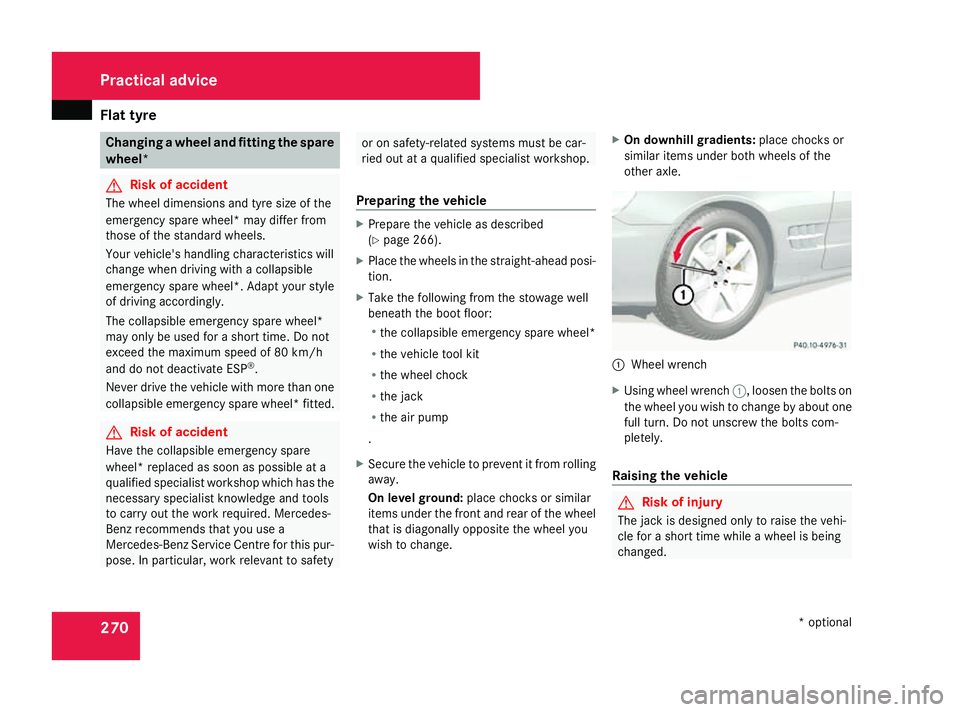
other axle. 1
Wheel wrench
X Using whee lwrench 1,loosen th eboltson
th ew hee lyou wish to chang ebyabout one
full turn. Do no tunscrew th eboltsc om-
pletely.
Raisin gthe vehicle G
Risk of injury
The jac kisdesigned only to rais ethe vehi-
cle fo rashort time while awhee lisb eing
changed. Practical advice
*optional
230_AKB; 5; 4, en-GB
bjanott
,V ersion: 2.9.6
2008-04-08T15:09:54+02:00
-Seite 270 Dateiname: 6515_3089_02_buchblock.pdf; preflight
Page 275 of 317
Flat tyre
272
X
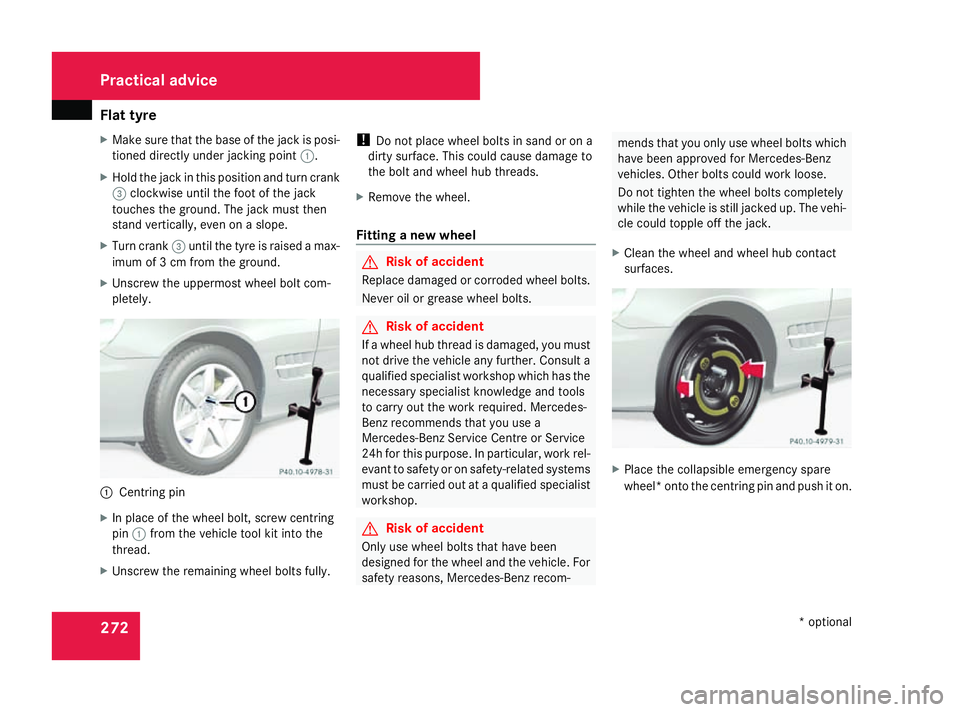
Mak esuret hatthe base of th ejackisp osi-
tioned directl yunder jacking point 1.
X Hold th ejac kint hisp osition and tur ncrank
3 clockwise until th efootoft hejack
touches th eground .The jac kmustthen
stand vertically, eve nonaslope.
X Tur ncrank 3 until th etyreisr aised amax-
imum of 3cmfromt heground.
X Unscrew th euppermos twhee lbolt com-
pletely. 1
Centrin gpin
X In place of th ewheel bolt ,screw centring
pin 1from th evehicle tool kit int othe
thread.
X Unscrew th eremainin gwheel bolt sfully. !
Do not place wheel bolt sinsandorona
dirt ysurface. This could cause damage to
th eb olt and wheel hub threads.
X Remov ethe wheel.
Fitting anew wheel G
Risk of accident
Replace damaged or corrode dwheel bolts.
Never oil or greas ewheel bolts. G
Risk of accident
If aw heel hub thread is damaged ,you must
not driv ethe vehicle any further. Consult a
qualifie dspecialist workshop whic hhas the
necessar yspecialist knowledge and tools
to carry out th ework required. Mercedes-
Ben zrecommend sthaty ou use a
Mercedes-Ben zServic eCentre or Service
24 hfor this purpose. In particular ,work rel-
evan ttosafety or on safety-related systems
must be carried out at aqualifie dspecialist
workshop. G
Risk of accident
Only use wheel bolt sthath ave been
designed for th ewheel and th evehicle. For
safety reasons ,Mercedes-Ben zrecom- mends that you onl
yuse wheel bolt swhich
have been approved for Mercedes-Benz
vehicles .Other bolt scould work loose.
Do not tighten th ewheel bolt scompletely
while th evehicle is still jacked up. The vehi-
cle could topple off th ejack.
X Clean th ewheel and wheel hub contact
surfaces. X
Place th ecollapsible emergency spare
wheel* ont othe centring pin and push it on. Practical advice
*optional
230_AKB
;5;4,en-GB
bjanott, Version:2.9.6
2008-04-08T15:09:54+02:00
-Seite 272 Dateiname: 6515_3089_02_buchblock.pdf; preflight
Page 276 of 317
Flat tyre
273X
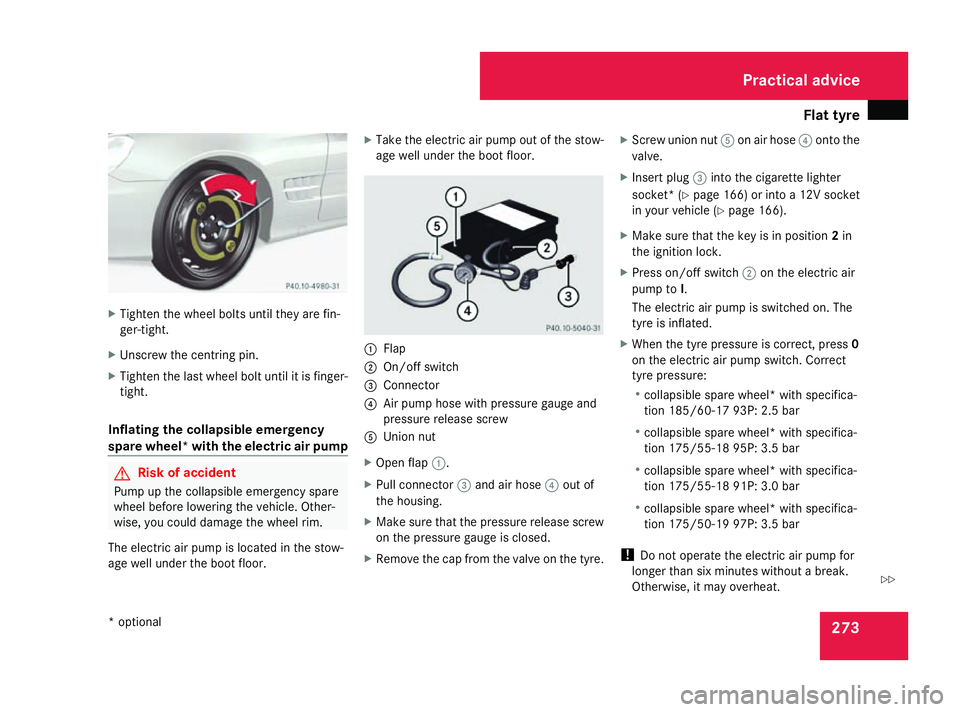
Tighten th ewheel bolt suntil they are fin-
ger-tight.
X Unscrew th ecentring pin.
X Tighten th elast wheel bolt until it is finger-
tight.
Inflatin gthe collapsible emergency
spare wheel* with th eelectric air pump G
Risk of accident
Pump up th ecollapsible emergency spare
wheel before lowering th evehicle. Other-
wise, you could damage th ewheel rim.
The electric air pump is located in th estow-
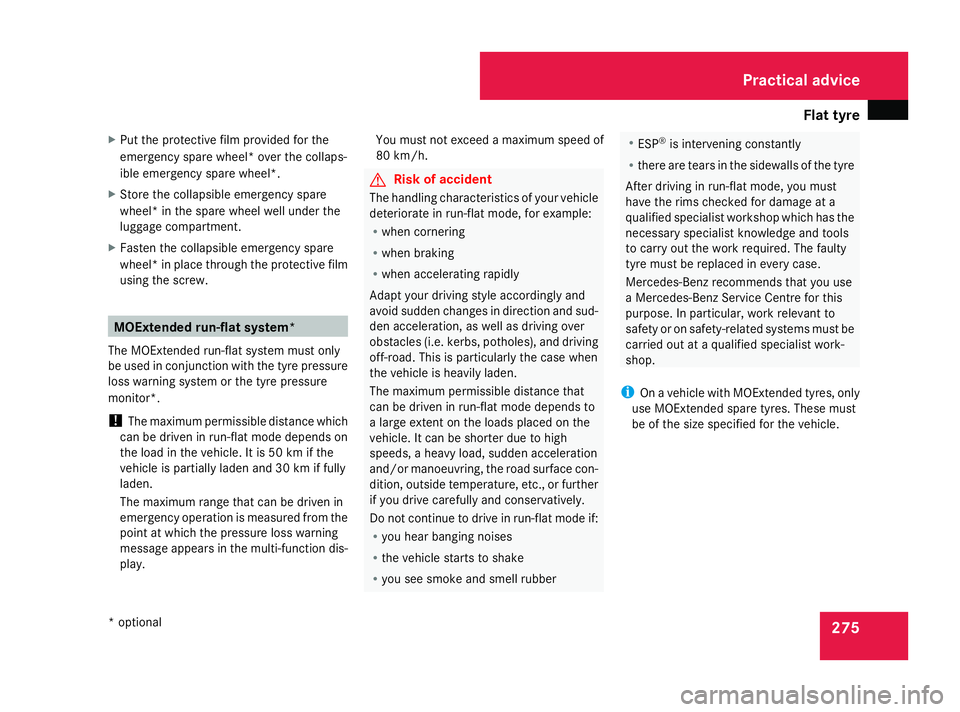
age well under th eboot floor. X
Take th eelectric air pump out of th estow-
age well under th eboot floor. 1
Flap
2 On/of fswitch
3 Connector
4 Air pump hose with pressure gauge and
pressure release screw
5 Union nut
X Open flap 1.
X Pull connector 3and air hose 4out of
th eh ousing.
X Make sure that th epressure release screw
on th epressure gauge is closed.
X Remov ethe cap from th evalv eont hetyre. X
Screw unio nnut5 on air hose 4ont othe
valve.
X Inser tplug 3intot he cigarette lighter
socket *(Ypage 166) or int oa12Vsocket
in your vehicle (Y page 166).
X Make sure that th ekey is in position 2in
th ei gnition lock.
X Pres son/off switch 2on th eelectric air
pump to I.
The electric air pump is switche don. The
tyr eisi nflated.
X When th etyrep ressure is correct, press 0
on th eelectric air pump switch. Correct
tyr ep ressure:
R collapsible spare wheel* with specifica-
tio n1 85/60-17 93P: 2.5bar
R collapsible spare wheel* with specifica-
tio n1 75/55-18 95P: 3.5bar
R collapsible spare wheel* with specifica-
tio n1 75/55-18 91P: 3.0bar
R collapsible spare wheel* with specifica-
tio n1 75/50-19 97P: 3.5bar
! Do not operate th eelectric air pump for
longer than six minutes without abreak.
Otherwise, it may overheat. Practical advice
*o ptional
230_AKB
;5;4,en-GB
bjanott, Version:2.9.6
2008-04-08T15:09:54+02:00
-Seite 273 ZDateiname: 6515_3089_02_buchblock.pdf; preflight
Page 278 of 317
Flat tyre
275
X
Put th eprotective film provided fo rthe
emergenc yspar ew heel* ove rthe collaps-
ible emergenc yspar ew heel*.
X Store th ecollapsible emergenc yspare
wheel* in th espar ew hee lwell under the
luggage compartment.
X Faste nthe collapsible emergenc yspare
wheel* in plac ethrough th eprotective film
usin gthe screw. MOExtended run-fla
tsystem*
The MOExtended run-flat system mus tonly
be used in conjunction wit hthe tyrep ressure
los sw arnin gsystem or th etyrep ressure
monitor*.
! The maximum permissibl edistanc ewhich
can be driven in run-flat mod edepend son
th el oad in th evehicle. It is 50 km if the
vehicl eispartially laden and 30 km if fully
laden.
The maximum range that can be driven in
emergenc yoperation is measured from the
poin tatw hichthe pressur elossw arning
message appears in th emulti-function dis-
play. You mus
tnotexceed amaximum speed of
80 km/h. G
Risk of accident
The handlin gcharacteristics of your vehicle
deteriorate in run-flat mode, fo rexample:
R when cornering
R when braking
R when accelerating rapidly
Adapt your drivin gstyle accordingly and
avoid sudden changes in direction and sud-
den acceleration ,aswell as drivin gover
obstacles (i.e. kerbs ,potholes), and driving
off-road. This is particularl ythe cas ew hen
th ev ehicl eish eavily laden.
The maximum permissibl edistanc ethat
can be driven in run-flat mod edepend sto
al arg eexten tont heloads placed on the
vehicle. It can be shorter due to high
speeds ,aheavyload, sudden acceleration
and/o rmanoeuvring, th eroads urfac econ-
dition ,outside temperature, etc. ,orfurther
if you drive carefully and conservatively.
Do no tcontinu etodrive in run-flat mod eif:
R you hear bangin gnoises
R thev ehicl estartstos hake
R you see smok eand smell rubber R
ESP ®
is intervenin gconstantly
R there are tears in th esidewalls of th etyre
Afte rdrivin ginr un-flat mode, you must
hav ethe rim schecked ford amage at a
qualified specialist workshop whic hhas the
necessar yspecialist knowledge and tools
to carry out th eworkr equired. The faulty
tyr em ustber eplaced in every case.
Mercedes-Ben zrecommends that you use
aM ercedes-Ben zServi ce Centr efor this
purpose .Inparticular, wor krelevan tto
safet yoro nsafety-related systems mus tbe
carrie dout at aqualified specialist work-
shop.
i Onavehicl ewithM OExtended tyres, only
use MOExtended spar etyres. These must
be of th esizes pecified fo rthe vehicle. Practical advice
*o ptional
230_AKB; 5; 4, en-GB
bjanott
,V ersion: 2.9.6
2008-04-08T15:09:54+02:00
-Seite 275 ZDateiname: 6515_3089_02_buchblock.pdf; preflight