buttons MERCEDES-BENZ SL ROADSTER 2012 Owners Manual
[x] Cancel search | Manufacturer: MERCEDES-BENZ, Model Year: 2012, Model line: SL ROADSTER, Model: MERCEDES-BENZ SL ROADSTER 2012Pages: 637, PDF Size: 20.68 MB
Page 10 of 637
Bonnet
Active bonnet (pedestrian protec-tion) ............................................... 562
Closing ........................................... 563
Display message ............................ 270
Important safety notes .................. 562
Opening ......................................... 563
Boot
Emergency release .......................... 99
Important safety notes .................... 94
Locking separately ........................... 98
Opening/closing (automatically
from inside) ...................................... 98
Opening/closing (automatically
from outside) ................................... 95
Opening/closing (from the out-
side, HANDS-FREE ACCESS) ............ 96
Opening/closing (manually from
outside) ............................................ 95
Overview .......................................... 94
Power closing .................................. 93
Boot lid
Display message ............................ 270
Opening dimensions ...................... 629
Opening/closing .............................. 94
Boot load (maximum) ........................ 629
Boot separator
Display message ............................ 271
Fitting ............................................ 106
General notes ................................ 105
Opening/closing ............................ 106
Removing ....................................... 106
Bottle holders .................................... 549
Brake Assist
see BAS (Brake Assist System)
Brake fluid
Display message ............................ 253
Notes ............................................. 627
Brake lamps
Adaptive ........................................... 73
Display message ............................ 256
Brakes
ABS .................................................. 71
BAS .................................................. 71
BAS PLUS ........................................ 72
Brake fluid (notes) ......................... 627
Display message ............................ 248
Driving tips .................................... 179 High-performance brake system .... 180
Important safety notes .................. 179
Parking brake ................................ 176
Warning lamp ................................. 275
Breakdown
see Flat tyre
see Towing away
Buttons on the COMAND control-
ler ........................................................ 296 C
Call ...................................................... 397
Accepting/ending/rejecting .......... 396
Connecting .................................... 397
see Telephone
Call list
Display details ............................... 406
Call lists
Deleting ......................................... 407
Opening and selecting an entry ..... 405
Saving an entry in the address
book .............................................. 406
Calling up a fault
see Display messages
Capacities (technical data) ............... 622
Car
see Vehicle
Car key
see Key
Car wash (care) ................................. 568
Care
Automatic car wash ....................... 568
Carpets .......................................... 574
Display ........................................... 572
Exhaust pipe .................................. 572
Exterior lighting ............................. 571
Gear or selector lever .................... 573
High-pressure cleaner .................... 569
Interior ........................................... 572
Matt paintwork .............................. 570
Night View Assist Plus ................... 572
Notes ............................................. 568
Paint .............................................. 570
Plastic trim .................................... 573
Reversing camera .......................... 572
Roof lining ...................................... 574
Seat belt ........................................ 574 Index
7
Page 28 of 637
SRS (Supplemental Restraint Sys-
tem)
Display message ............................2 55
Introduction ..................................... 51
Warning lamp ................................. 280
Warning lamp (function) ................... 51
Start/stop function
see ECO start/stop function
Starting (engine) ................................ 157
Station list ......................................... 464
Station pre-sets ................................. 465
Station search ................................... 465
STEER CONTROL .................................. 78
Steering (display message) .............. 271
Steering wheel
Adjusting (electrically) ................... 118
Button overview ............................... 43
Buttons (on-board computer) ......... 229
Cleaning ......................................... 573
Gearshift paddle s........................... 169
Important safety notes .................. 118
Storing settings (memory func-
tion) ............................................... 123
Steering wheel gearshift paddles .... 169
Stop function
Audio DVD ..................................... 474
Video DVD ..................................... 513
Stopwatch (RACETIMER) ................... 245
Storing channels
TV .................................................. 505
Storing stations
Radi o............................................. 466
Stowage areas ................................... 544
Stowage compartments
Armrest (under) ............................. 545
Centre console .............................. 545
Centre console (rear) ..................... 546
Cup holde r..................................... 548
Glove compartment ....................... 544
Important safety information ......... 544
Rear ............................................... 546
Spectacles compartment ............... 545
Stowage net ....................................... 546
Stowage space
Display message ............................ 271
Stowage net ................................... 546
Umbrella holde r............................. 545 Stowage well beneath the boot
floor
.................................................... 548
Street View ........................................ 335
Summer tyres .................................... 598
Sun visor ............................................ 549
Supplemental Restraint System
see SRS (Supplemental Restraint
System)
Surround lighting (on-board com-
puter) .................................................. 241
Surround sound ................................. 300
Surround sound (harman/
kardon® surround sound system)
Notes ............................................. 300
Switching on/of f........................... 301
Suspension tuning
Active Body Control (AMG vehi-
cles) ............................................... 203
Active Body Control (except AMG
vehicles) ........................................ 200
SETUP (on-board computer) .......... 244
Switching between summer and
standard time .................................... 311
Switching wavelength (radio) .......... 464
System settings
Bluetooth® .................................... 313
Date ............................................... 311
Language ....................................... 313
LINGUATRONIC (voice control) ...... 312
Text reader speed .......................... 312
Time ............................................... 311
Time zone ...................................... 311 T
Tail lamps Display message ............................ 256
see Lights
Tank
see Fuel tank
Technical data
Capacities ...................................... 622
Emergency spare wheel ................. 617
Information .................................... 620
Tyres/wheels ................................. 610
Vehicle data ................................... 629
Telephone .................................. 397, 399
Accepting a cal l............................. 236 Index
25
Page 50 of 637
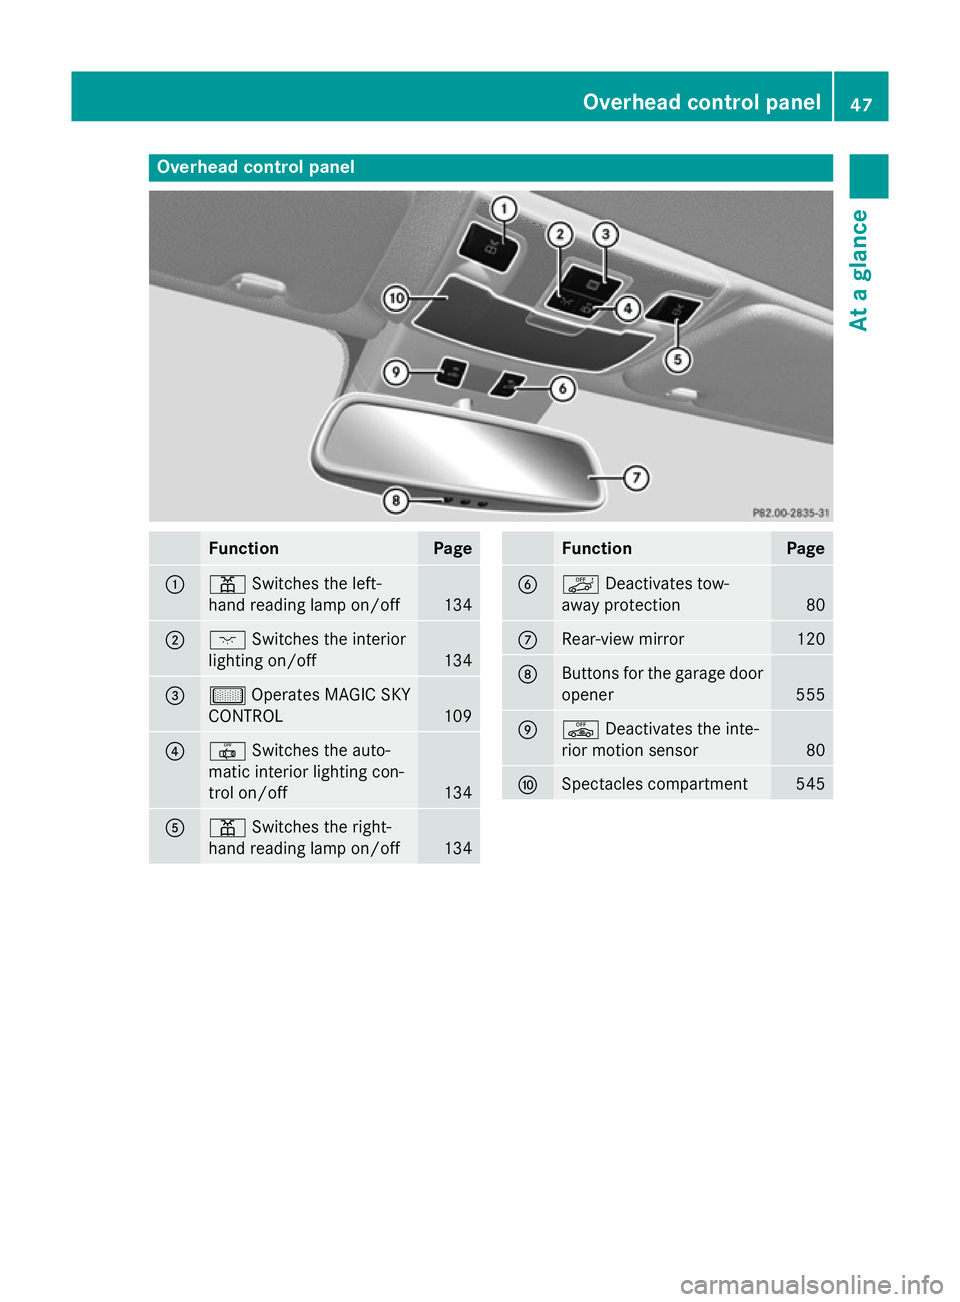
Overhead control panel
Function Page
:
p
Switches the left-
hand reading lamp on/off 134
;
c
Switches the interior
lighting on/off 134
=
µ
Operates MAGIC SKY
CONTROL 109
?
|
Switches the auto-
matic interior lighting con-
trol on/off 134
A
p
Switches the right-
hand reading lamp on/off 134 Function Page
B
ë
Deactivates tow-
away protection 80
C
Rear-view mirror 120
D
Buttons for the garage door
opener 555
E
ê
Deactivates the inte-
rior motion sensor 80
F
Spectacles compartment 545Overhead control panel
47At a glance
Page 89 of 637

X
To unlock the vehicle: touch the inner
surface of the door handle.
X To lock the vehicle: touch sensor sur-
face :.
X Convenience closing feature: touch
recessed sensor surface ;for an exten-
ded period.
Further information on the convenience
closing feature (Y page 101).
X To unlock the boot lid: pull the boot lid
handle.
The vehicle only unlocks the boot lid. Changing the settings of the locking
system
You can change the settings of the locking
system. This means only the driver's door, the
lockable stowage compartments in the vehi-
cle interior and the fuel filler flap are unlocked when the vehicle is unlocked. This is useful if
you frequently travel on your own.
X To change the setting: press and hold
down the %and& buttons simulta-
neously for approximately six seconds until the battery check lamp flashes twice
(Y page 87).
i If the setting of the locking system is
changed within the signal range of the vehi- cle, pressing the &or% button:
R locks or
R unlocks the vehicle The key now functions as follows:
X To unlock the driver's door: press the
% button once.
X To unlock centrally: press the%but-
ton twice.
X To lock centrally: press the&button.
The KEYLESS-GO function is changed as fol-
lows:
X To unlock the driver's door: touch the
inner surface of the door handle on the
driver's door.
X To unlock centrally: touch the inner sur-
face of the front-passenger door handle.
X To lock centrally: touch the outer sensor
surface on one of the door handles.
X To restore the factory settings: press
and hold down the %and& buttons
simultaneously for approximately six sec-
onds until the battery check lamp flashes
twice (Y page 87). Emergency key element
General notes If the vehicle can no longer be locked or
unlocked with the key, use the emergency
key element.
If you use the emergency key element to
unlock and open the driver's door or the boot
lid, the anti-theft alarm system will be trig-
gered (Y page 79).
There are several ways to deactivate the
alarm:
X To deactivate the alarm with the key:
press the %or& button on the key.
or
X Insert the key into the ignition lock.
or
X To deactivate the alarm with KEYLESS-
GO: press the Start/Stop button in the igni-
tion lock. The key must be in the vehicle. 86
KeyOpening and closing
Page 91 of 637
i
If the key battery is checked within the
signal reception range of the vehicle, press- ing the &or% button:
R locks or
R unlocks the vehicle
i You can obtain a battery from any quali-
fied specialist workshop.
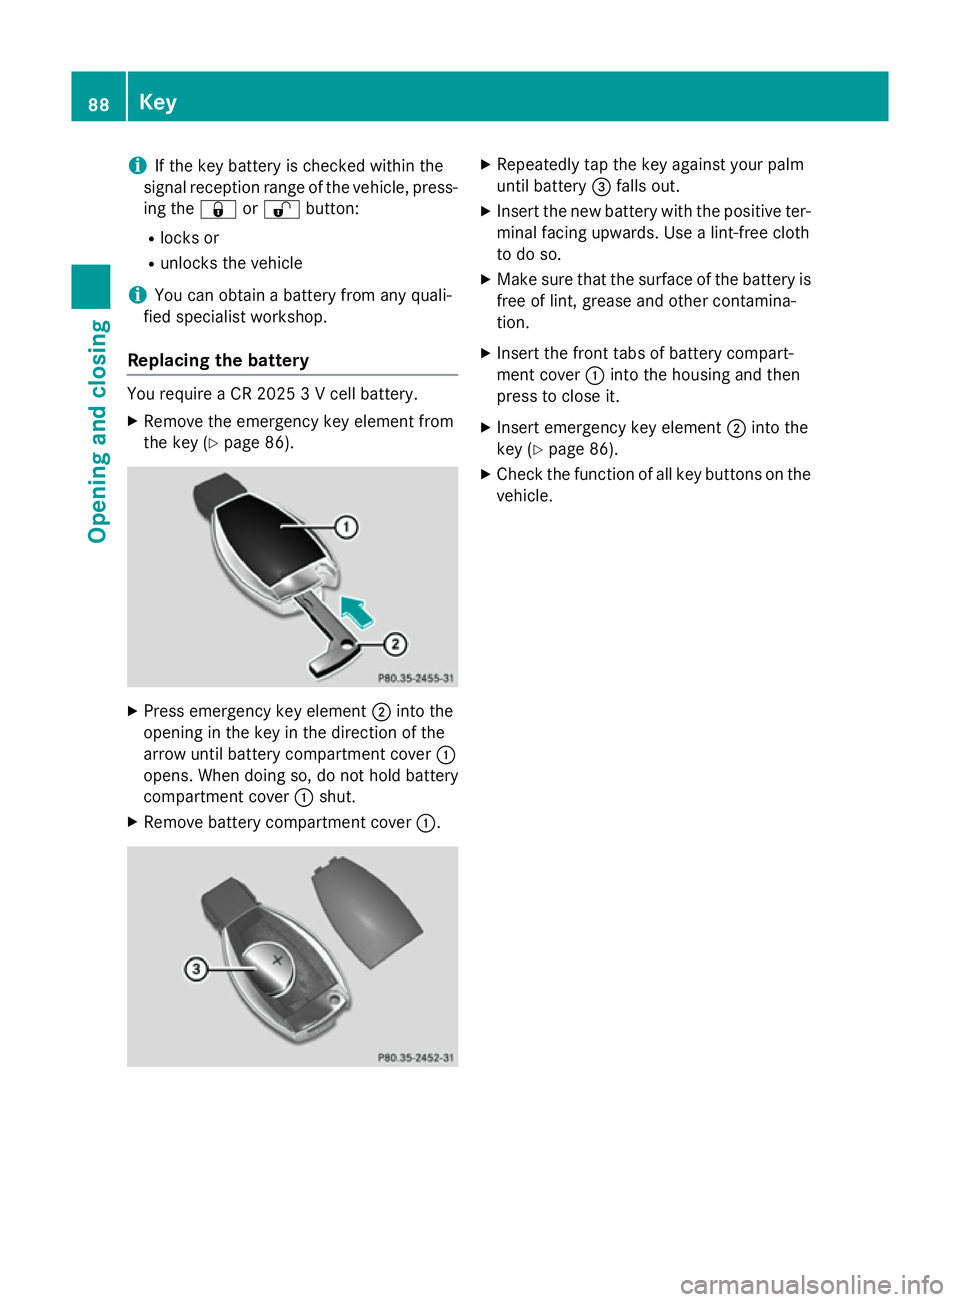
Replacing the battery You require a CR 2025 3 V cell battery.
X Remove the emergency key element from
the key (Y page 86). X
Press emergency key element ;into the
opening in the key in the direction of the
arrow until battery compartment cover :
opens. When doing so, do not hold battery
compartment cover :shut.
X Remove battery compartment cover :. X
Repeatedly tap the key against your palm
until battery =falls out.
X Insert the new battery with the positive ter-
minal facing upwards. Use a lint-free cloth
to do so.
X Make sure that the surface of the battery is
free of lint, grease and other contamina-
tion.
X Insert the front tabs of battery compart-
ment cover :into the housing and then
press to close it.
X Insert emergency key element ;into the
key (Y page 86).
X Check the function of all key buttons on the
vehicle. 88
KeyOpening and closing
Page 95 of 637
X
Pull door handle ;.
If the door is locked, locking knob :pops
up. The door is unlocked and can be
opened.
i When a door is opened, the side window
on that side opens slightly. When the door
is closed, the side window is raised again. Centrally locking and unlocking the
vehicle from the inside
You can centrally lock or unlock the vehicle
from the inside. For example, you can unlock the front-passenger door from the inside or
lock the vehicle before you pull away. X
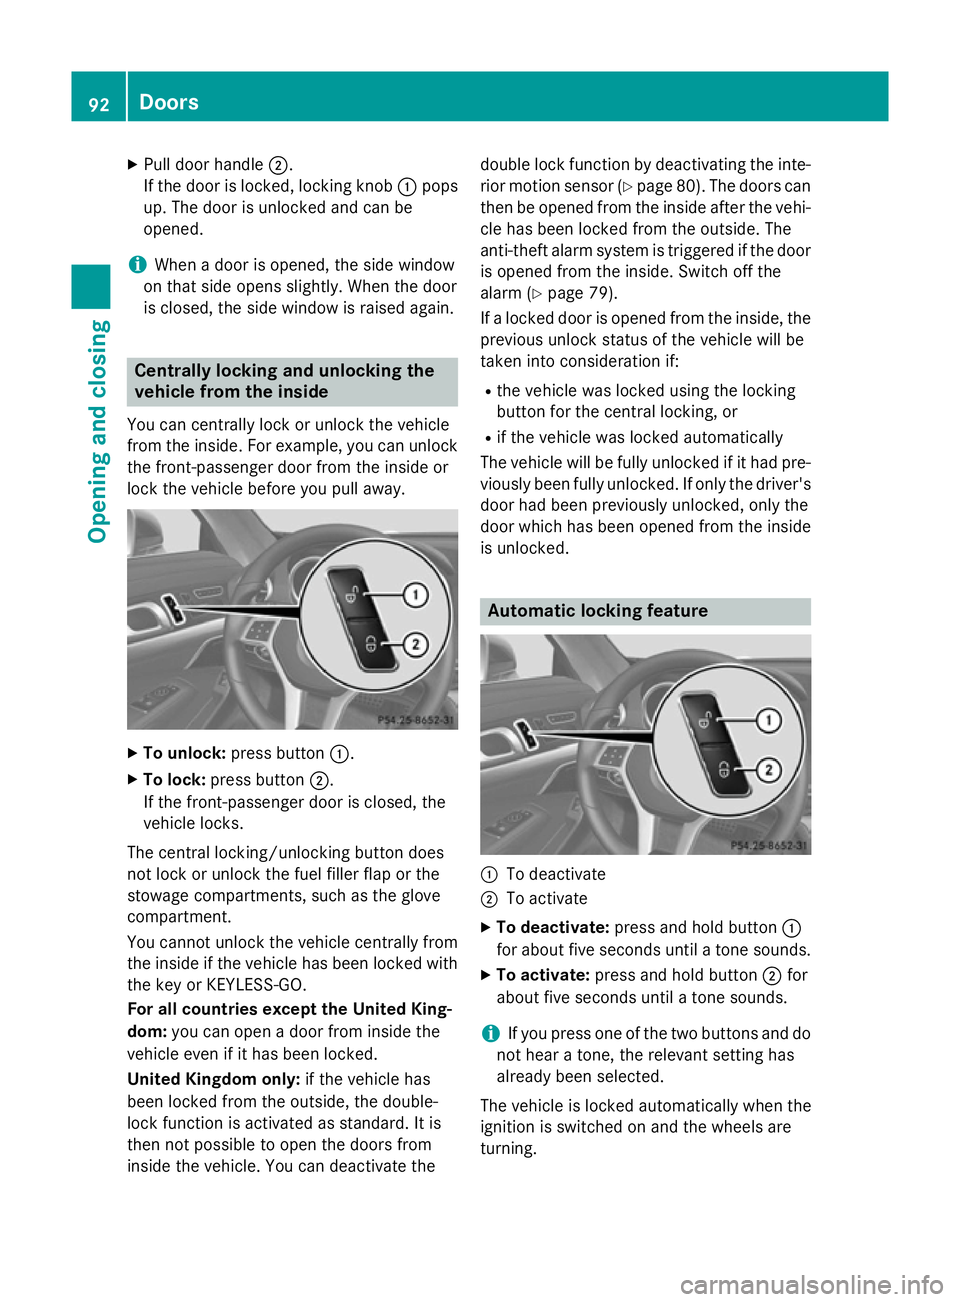
To unlock: press button :.
X To lock: press button ;.
If the front-passenger door is closed, the
vehicle locks.
The central locking/unlocking button does
not lock or unlock the fuel filler flap or the
stowage compartments, such as the glove
compartment.
You cannot unlock the vehicle centrally from
the inside if the vehicle has been locked with the key or KEYLESS-GO.
For all countries except the United King-
dom: you can open a door from inside the
vehicle even if it has been locked.
United Kingdom only: if the vehicle has
been locked from the outside, the double-
lock function is activated as standard. It is
then not possible to open the doors from
inside the vehicle. You can deactivate the double lock function by deactivating the inte-
rior motion sensor (Y page 80). The doors can
then be opened from the inside after the vehi- cle has been locked from the outside. The
anti-theft alarm system is triggered if the door
is opened from the inside. Switch off the
alarm (Y page 79).
If a locked door is opened from the inside, the previous unlock status of the vehicle will be
taken into consideration if:
R the vehicle was locked using the locking
button for the central locking, or
R if the vehicle was locked automatically
The vehicle will be fully unlocked if it had pre- viously been fully unlocked. If only the driver's
door had been previously unlocked, only the
door which has been opened from the inside
is unlocked. Automatic locking feature
:
To deactivate
; To activate
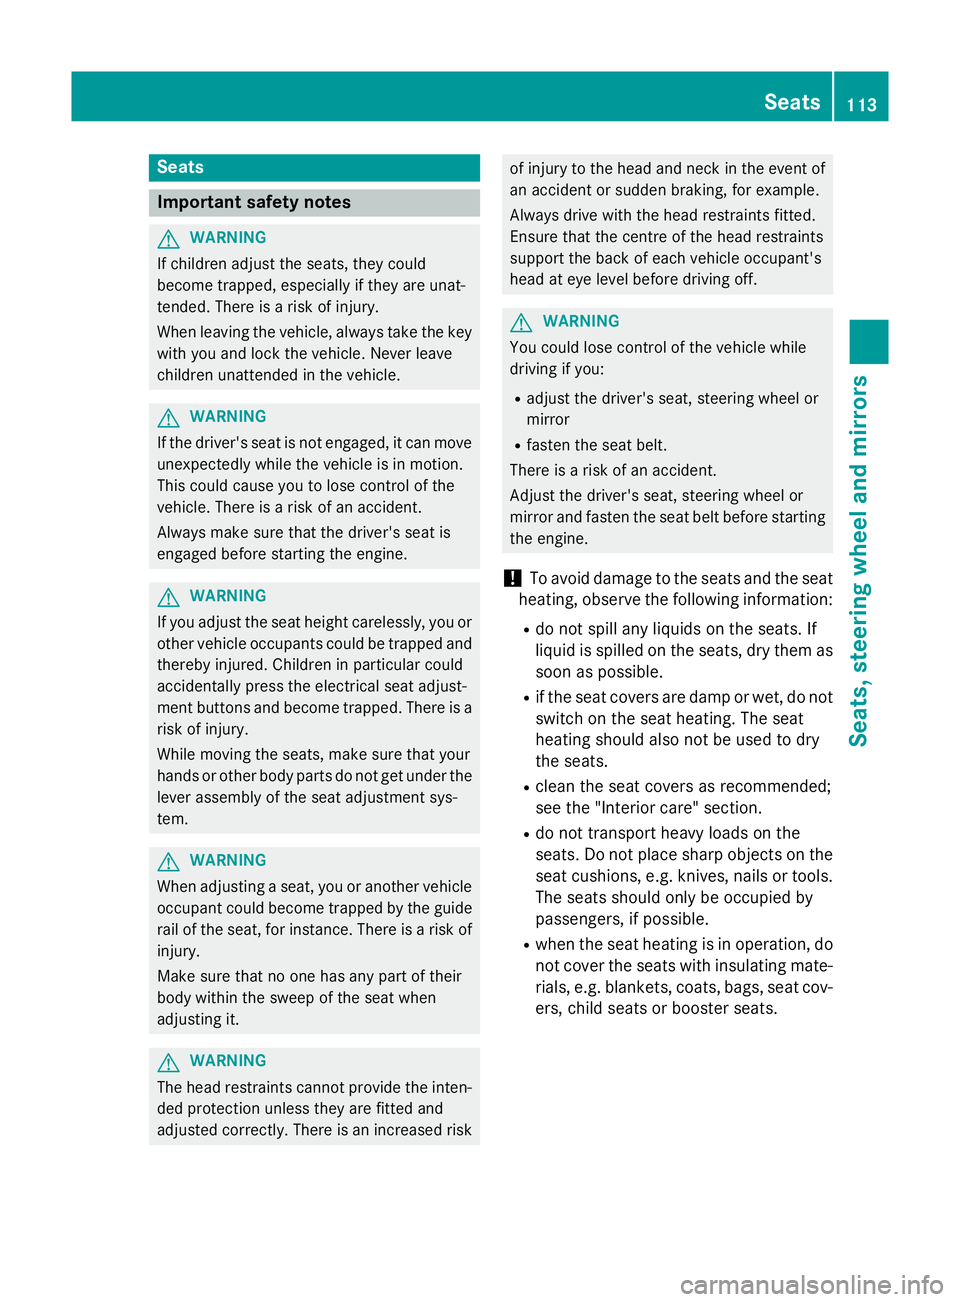
X To deactivate: press and hold button :
for about five seconds until a tone sounds.
X To activate: press and hold button ;for
about five seconds until a tone sounds.
i If you press one of the two buttons and do
not hear a tone, the relevant setting has
already been selected.
The vehicle is locked automatically when the
ignition is switched on and the wheels are
turning. 92
DoorsOpening and closing
Page 116 of 637
Seats
Important safety notes
G
WARNING
If children adjust the seats, they could
become trapped, especially if they are unat-
tended. There is a risk of injury.
When leaving the vehicle, always take the key with you and lock the vehicle. Never leave
children unattended in the vehicle. G
WARNING
If the driver's seat is not engaged, it can move unexpectedly while the vehicle is in motion.
This could cause you to lose control of the
vehicle. There is a risk of an accident.
Always make sure that the driver's seat is
engaged before starting the engine. G
WARNING
If you adjust the seat height carelessly, you or other vehicle occupants could be trapped andthereby injured. Children in particular could
accidentally press the electrical seat adjust-
ment buttons and become trapped. There is a
risk of injury.
While moving the seats, make sure that your
hands or other body parts do not get under the
lever assembly of the seat adjustment sys-
tem. G
WARNING
When adjusting a seat, you or another vehicle occupant could become trapped by the guiderail of the seat, for instance. There is a risk of
injury.
Make sure that no one has any part of their
body within the sweep of the seat when
adjusting it. G
WARNING
The head restraints cannot provide the inten-
ded protection unless they are fitted and
adjusted correctly. There is an increased risk of injury to the head and neck in the event of
an accident or sudden braking, for example.
Always drive with the head restraints fitted.
Ensure that the centre of the head restraints
support the back of each vehicle occupant's
head at eye level before driving off. G
WARNING
You could lose control of the vehicle while
driving if you:
R adjust the driver's seat, steering wheel or
mirror
R fasten the seat belt.
There is a risk of an accident.
Adjust the driver's seat, steering wheel or
mirror and fasten the seat belt before starting
the engine.
! To avoid damage to the seats and the seat
heating, observe the following information:
R do not spill any liquids on the seats. If
liquid is spilled on the seats, dry them as
soon as possible.
R if the seat covers are damp or wet, do not
switch on the seat heating. The seat
heating should also not be used to dry
the seats.
R clean the seat covers as recommended;
see the "Interior care" section.
R do not transport heavy loads on the
seats. Do not place sharp objects on the
seat cushions, e.g. knives, nails or tools. The seats should only be occupied by
passengers, if possible.
R when the seat heating is in operation, do
not cover the seats with insulating mate- rials, e.g. blankets, coats, bags, seat cov-
ers, child seats or booster seats. Seats
113Seats, steering wheel and mirrors Z
Page 120 of 637
X
Make sure that the key is in position 1or 2
in the ignition lock.
X To switch on: press button:repeatedly
until the desired heating level is set.
X To switch off: press button:repeatedly
until all the indicator lamps go out.
i If the battery voltage is too low, the seat
heating may switch off.
Problems with the seat heating The seat heating has switched off prema-
turely or cannot be switched on. The vehicle's
electrical system voltage is too low because
too many electrical consumers are switched
on.
X Switch off electrical consumers that you do
not need, such as the rear window heating or interior lighting.
X Once the battery is sufficiently charged,
switch the seat heating on again. Switching the seat ventilation on/off
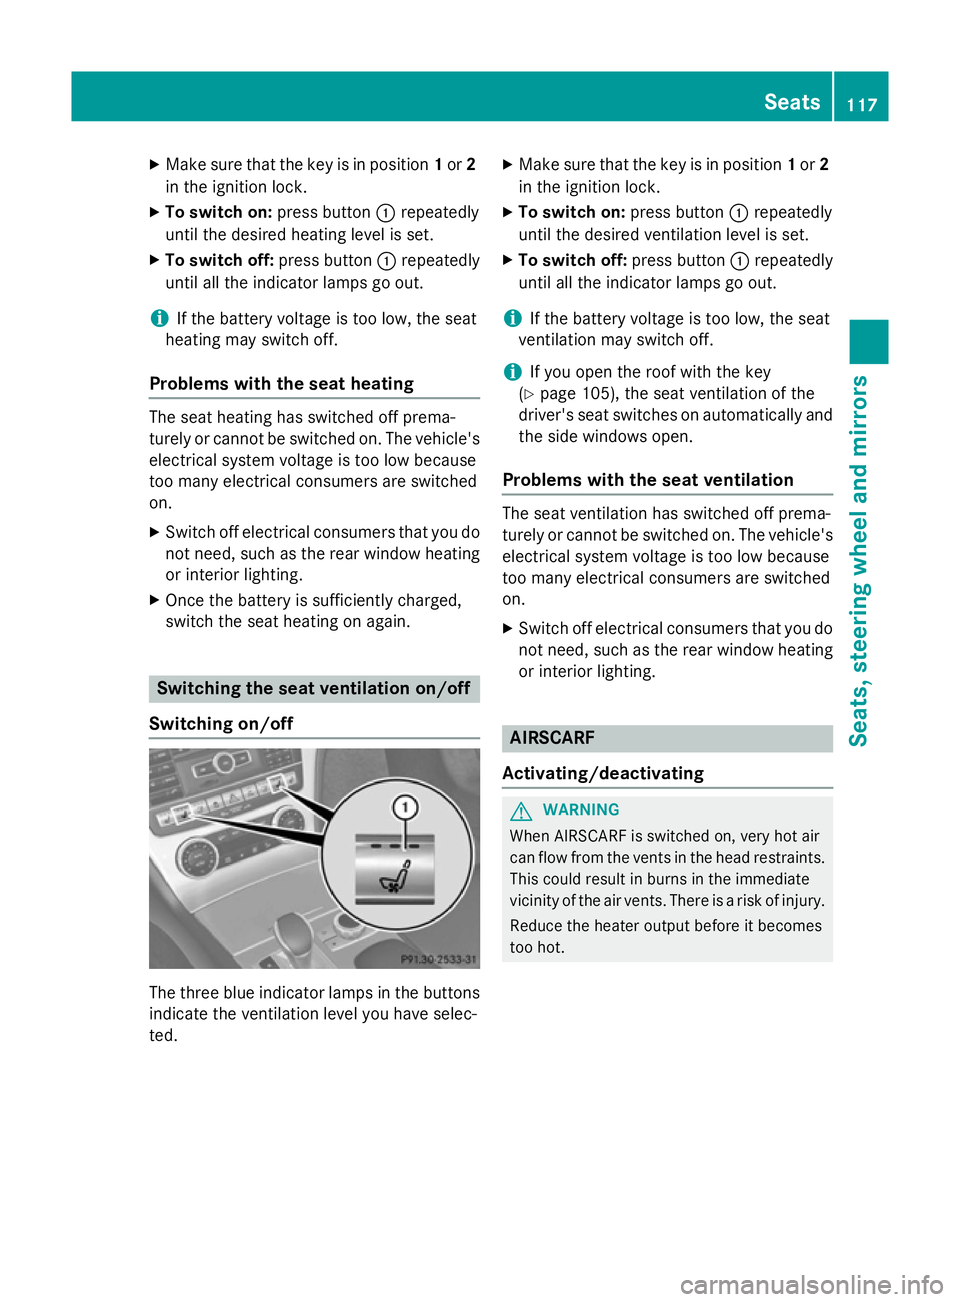
Switching on/off The three blue indicator lamps in the buttons
indicate the ventilation level you have selec-
ted. X
Make sure that the key is in position 1or 2
in the ignition lock.
X To switch on: press button:repeatedly
until the desired ventilation level is set.
X To switch off: press button:repeatedly
until all the indicator lamps go out.
i If the battery voltage is too low, the seat
ventilation may switch off.
i If you open the roof with the key
(Y page 105), the seat ventilation of the
driver's seat switches on automatically and
the side windows open.
Problems with the seat ventilation The seat ventilation has switched off prema-
turely or cannot be switched on. The vehicle's
electrical system voltage is too low because
too many electrical consumers are switched
on.
X Switch off electrical consumers that you do
not need, such as the rear window heating
or interior lighting. AIRSCARF
Activating/deactivating G
WARNING
When AIRSCARF is switched on, very hot air
can flow from the vents in the head restraints. This could result in burns in the immediate
vicinity of the air vents. There is a risk of injury.
Reduce the heater output before it becomes
too hot. Seats
117Seats, steering wheel and mirrors Z
Page 122 of 637
G
WARNING
When the EASY-ENTRY/EXIT feature adjusts
the steering wheel, you and other vehicle
occupants – particularly children – could
become trapped. There is a risk of injury.
While the EASY-ENTRY/EXIT feature is mak-
ing adjustments, make sure that no one has
any body parts in the sweep of the steering
wheel.
If someone is trapped:
R press one of the memory function position
buttons, or
R move the switch for steering wheel adjust-
ment in the opposite direction to that in
which the steering wheel is moving.
The adjustment process is stopped. G
WARNING
When the EASY-ENTRY/EXIT feature adjusts
the steering wheel and the driver's seat, you
and other vehicle occupants – particularly
children – could become trapped. There is a
risk of injury.
While the EASY-ENTRY/EXIT feature is mak-
ing adjustments, make sure that no one has
any body parts in the sweep of the seat and
the steering wheel.
If someone is trapped:
R press one of the memory function position
buttons, or
R press one of the memory function memory
buttons, or
R move the switch for steering wheel adjust-
ment in the opposite direction to that in
which the steering wheel is moving.
The adjustment process is stopped. G
WARNING
If you use openings in the bodywork or
detachable parts as steps, you could:
R slip and/or fall
R damage the vehicle and cause yourself to
fall.
There is a danger of injury. Always use secure climbing aids, e.g. a suita-
ble ladder.
The EASY-ENTRY/EXIT feature makes getting in and out of your vehicle easier.
You can activate and deactivate the EASY-
ENTRY/EXIT feature in the on-board com-
puter (Y page 243).
Position of the steering wheel when the EASY-ENTRY/EXIT feature is active The steering wheel tilts upwards if you:
R remove the key from the ignition lock
R open the driver's door and KEYLESS-GO is
in position 1
R open the driver's door and the key is in
position 0or 1in the ignition lock
i The steering wheel only moves upwards if
it has not already reached the upper end
stop.
Position of the steering wheel for driv-
ing The steering wheel is moved to the previously
set position if:
R the driver's door is closed and
R you insert the key into the ignition lock
or
R you press the Start/Stop button once on
vehicles with KEYLESS-GO
If you close the driver's door with the key
inserted in the ignition lock, the steering
wheel is automatically moved to the previ-
ously set position.
The last position of the steering wheel is
stored when you switch off the ignition or
when you store the setting with the memory
function (Y page 123).
Crash-responsive EASY-EXIT feature If the crash-responsive EASY-EXIT feature is
triggered in an accident, the steering column
will move upwards when the driver's door is steering wheel
119Seats, steering wheel and mirrors Z
Page 144 of 637
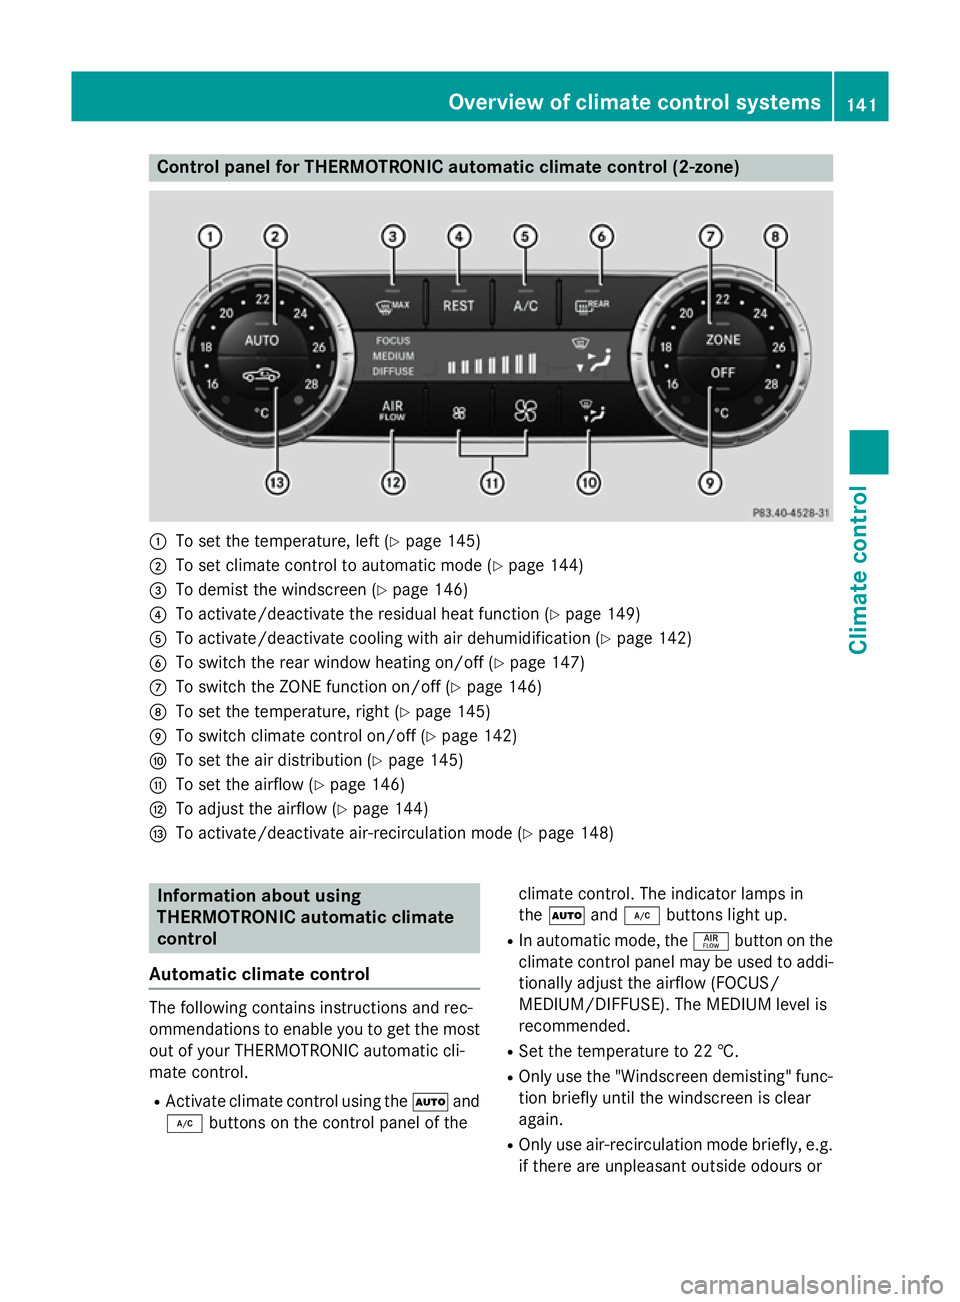
Control panel for THERMOTRONIC automatic climate control (2-zone)
:
To set the temperature, left (Y page 145)
; To set climate control to automatic mode (Y page 144)
= To demist the windscreen (Y page 146)
? To activate/deactivate the residual heat function (Y page 149)
A To activate/deactivate cooling with air dehumidification (Y page 142)
B To switch the rear window heating on/off (Y page 147)
C To switch the ZONE function on/off (Y page 146)
D To set the temperature, right (Y page 145)
E To switch climate control on/off (Y page 142)
F To set the air distribution (Y page 145)
G To set the airflow (Y page 146)
H To adjust the airflow (Y page 144)
I To activate/deactivate air-recirculation mode (Y page 148)Information about using
THERMOTRONIC automatic climate
control
Automatic climate control The following contains instructions and rec-
ommendations to enable you to get the most
out of your THERMOTRONIC automatic cli-
mate control.
R Activate climate control using the Ãand
¿ buttons on the control panel of the climate control. The indicator lamps in
the
à and¿ buttons light up.
R In automatic mode, the ñbutton on the
climate control panel may be used to addi- tionally adjust the airflow (FOCUS/
MEDIUM/DIFFUSE). The MEDIUM level is
recommended.
R Set the temperature to 22 †.
R Only use the "Windscreen demisting" func-
tion briefly until the windscreen is clear
again.
R Only use air-recirculation mode briefly, e.g.
if there are unpleasant outside odours or Overview of climate control systems
141Climate control